
Hello to Amasty blog readers!
Last time we talked about Magento 2 UI components. Actually, there is one more new capability of Magento 2, sections, on which we will focus today. They are meant to sync data between the client and web server to keep it always up-to-date. To illustrate how sections work and how to use them in Magento 2, let’s consider the example of a Magento 2 standard module - Magento_Checkout.
Need some custom features for your Magento?
Leave your request and our manager will get back to you to discuss how we can help you.
Sections and CustomerData in Magento 2
Magento 2 local storage
As Magento 2 heavily relies on localStorage, they added a new entity called CustomerData to ensure a smooth work of the attribute.
You can read more about it here.
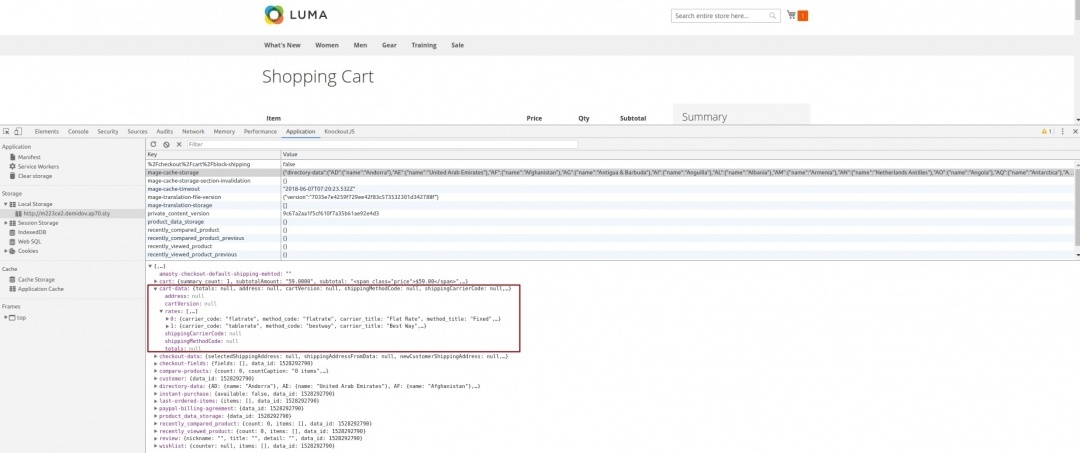
CustomerData works with the data stored on the client side. Magento 2 sections are merged parts of customer data. They allow keeping this data up-to-date via a sync with the web server. Every section is a key in magento-cache-storage, while magento-cache-storage is the key in localStorage as it is shown in the picture:

Initializing and defining sections in Magento 2
As we said above, the Magento_Customer module is used to define and initialize sections. Now, we will show this mechanism in detail.
Customer section load Magento 2
All Magento 2 sections are initialized with AJAX requests (customer/section/load) to the controller (Magento\Customer\Controller\Section). As a result, the data in magento-cache-storage is refreshed.
All sections are defined in di.xml. This is an example of a defined Magento 2 section:
vendor/magento/module-checkout/etc/frontend/di.xml
This definition creates new sections Cart and Directory-data in magento-cache-storage:

The sections Cart and Directory-data are initialized on the server side via the classes Magento\Checkout\CustomerData\Cart and Magento\Checkout\CustomerData\DirectoryData. Each of these classes contains a definition of the method getSectionData, which initializes the value of the section.
Initializing sections on the client side
There are also other ways to initialize sections. For example, on the client side, they can be initialized with the help of customer-data adapters. To create a Magento 2 customer section on the client side, you also have to add a definition to the di.xml.
vendor/magento/module-checkout/etc/frontend/di.xml
As you see, this definition also creates new keys checkout-data and cart-data in magento-cache-storage. The difference from the previous method lies in the initialization ways.
The argument name clientSideSections shows Magento that initialization should go on the client side. This means that initialization requires cache keys related to the section initialization data instead of PHP classes.
In our example, we use the keys checkout-data and cart-data. At the same time, data requested by the keys is created by the customer-data adapters. Technically, these adapters are js-modules that define, first, the methods for working with customer-data and, second, the names of the cacheKey that are used to call for these data.
An example of defining a section in Magento 2
Let’s consider a section definition using the example of the cart-data section in the Magento_Checkout module. As we mentioned above, it is defined in di.xml. This definition uses the cart-data key to create a section in magento-cache-storage. Its name is defined with the attribute name of the <item> tag.
To initialize cart-data, define the <item> tag value and specify the cacheKey that refers to data in magento-cache-storage.
vendor/magento/module-checkout/etc/frontend/di.xml
The data itself is created by the js-module Magento_Checkout/js/model/cart/cache via the key cart-data. As a customer-data adapter, this module contains methods for working with customer-data and defines the ?acheKey value as cart-data. As a result of the initializing cart-data, we get the following:
The PUT and POST requests allow changing the values of customer-data. We can define requests that will change particular sections using the etc/sections.xml file. This is how an update can look like:
vendor/magento/module-checkout/etc/frontend/sections.xml
The value of the <section name> tag shows how a request will affect the Cart section. After a request (checkout/cart/estimateUpdatePost) reaches the controller (Magento\Checkout\Controller\Cart\EstimateUpdatePost), the Cart section will get a new value. If we set the action as “*”, all PUT and POST requests will change the section. If the <section> tag is missing, all sections in customer-data will change.
Magento 2 sections in custom modules
We reviewed how sections work in the Magento 2 default functionality. We use in our custom modules standard Magento 2 sections.
For example, the Free Gift module uses a standard cart section. This is how it is introduced in the configuration file of the extension: Amasty/Promo/etc/frontend/sections.xml.
This file section.xml describes the controller that updates the cart section.
Conclusion
Today, we reviewed sections in Magento 2, learned to define and initialize them as well as considered an example of using sections in a Magento 2 module. Hope this article gave you an idea of how to use sections in your Magento 2 projects.
If you still have questions or comments, feel free to share them in the comment feed below.