Creating a Magento 2 extension

Table of Content

create-module
Posted in: Magento 2 Guides

Yay, Magento 2 is officially out!

Great news indeed. My name is Alex, and I’m a Magento specialist at Amasty. For the last few months I’ve been busy building Magento 2 extensions, and today I wanted to share an instruction on building a simple custom module in Magento 2.

What we’re going to build

To demonstrate how to create a Magento 2 extension, we are going to create a new HelloWorld module, which is going to have some basic functionality, covering as many as many development aspects as possible in this case.

This Magento 2 extension is going to have a model with undefined data, which will be stored in the database. And we’ll display the values on the product page.

What’s more, we are going to create several settings to change the extension’s behavior. Nothing complicated, so let’s start!

Create configuration

The first step is to install Magento 2 and create a catalog to store the extension files. In Magento 2 files are not distributed through the folders and have a modular structure.

The files of the newly created extension will be in this catalog:

app\code\Amasty\HelloWorld/

Here Amasty is the name of the company that built the extension, HelloWorld is the name of the Magento 2 extension we are creating at the moment.

Now it’s time to actually code the extension. Catalogs purposes have slightly changed in comparison with the first versions of Magento.

Extension configuration is located in etc folder, as before.

Let’s create app\code\Amasty\ HelloWorld \etc catalog in Magento 2 and add a module.xml file inside it. This is the file where we are going to set our extension name and its version.

The file looks like this:

Now let’s check if Magento 2 sees the extension.

Run the following console command:

php bin/magento setup:upgrade

But there’s no result. To fix it, let’s create registration.php file in the root folder of the extension and put the following code inside:

This is done to tell Magento 2 that it should run the extension from the current directory.

Now go and clear Magento cache, and you’ll see that our extension is working now:

How to create Magento 2 extension: enable module

Create settings

Now let’s create some settings for the new extension. To do that, add adminhtml catalog to etc catalog. It will contain configuration files for backend.

The first file we need here is routes.xml for frontName and id setting, which is used to define queries for the extension. It is done by the following piece of code:

Now let’s configure the extension settings. As in the previous version, they’re located in the system.xml file, but the xml markup is slightly different in Magento 2.

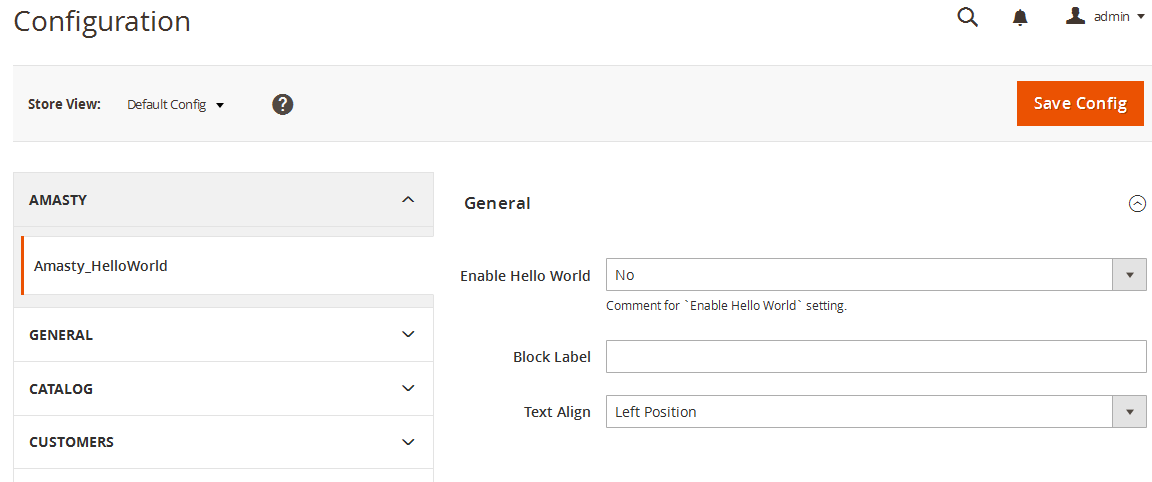
I’m creating the three most popular settings as an example: a text setting, yes/no setting and a setting with custom values.

Have a look at the config file contents and what it actually means:

Add a new section to the settings block using <tab>. Set the unique ID and the name of the settings section inside. It is done because we have a very high possibility of using several apps from the same vendor on a single site.

Add the new <section id="amasty_helloworld"> , again, with the unique ID, and set the necessary parameters, such as type, translation fields, order, label, the block for which the section is added, and so on. And then add the settings just inside the section. They will be divided into groups (one group in our case). The groups are defined by <group>, and the fields are set by <field>. We have already created three settings and pointed out types, labels, visibility, translation, comments and the data model.

In our case the third setting implies custom data, so we pointed out a separate data model for it. To do that, you need to create Amasty\HelloWorld\Model\Source\ Align model, where we will set the needed choice variants. The extension should be defined from \Magento\Framework\Option\ArrayInterface interface, and you need to redefine toOptionArray() and toArray() methods as well.

Let’s check the result. Open your Magento 2 backend, go to Stores - Configuration. Boom, we can see the settings!

Create Magento 2 extension: create module settings

Now, as we created the settings, we should set default values for the options. To do that, create a config.xml in the etc catalog and put the default values in accordance with system.xml in there.

→ If you need help to configure the Amasty module according to your needs, check out our Configuration Service. You will be provided professional Magento web configuration service for any available extension. After the configuration of the module, testing is carried out for its correct operation.

Frontend output

Block

Now let’s try to show something on the frontend, i.e. to create a block and a template for it, and then to show this block on the product page.

Create a class of \Amasty\HelloWorld\Block\Catalog\Product\HelloWorld block, which should inherit from Magento class \Magento\Framework\View\Element\Template

We are going to use the parent constructor. Here’s how it will look like for this block:

Template

Let’s create a simple template and put it in the following catalog:

Amasty\HelloWorld\view\frontend\templates\product\hello.phtml

You can see that in Magento 2 we have the view catalog, where we’re going to store the information, which was scattered in several theme catalogs, such as templates, layouts, scripts, styles, before.

Put this simple text inside:

<?=__('Hello World');?>

As we see from the example, now you can perform translation in Magento using __() without a separate class. And the translation for this line will be pulled from Amasty\HelloWorld\i18n\en_US.csv

We have created the template, now let’s show it on the product page.

Layout

Time to create the layout! Now we are creating not a unique layout for all the pages, but a separate file for each page. As we will show the block on the product page, let’s create a layout with the following name:
Amasty\HelloWorld\view\frontend\layout\catalog_product_view.xml
Put this code inside:

As an example, we added the new block into product.info.main block in the layout code and added the styles file to use when showing on frontend. The styles file has the following address:

Amasty\HelloWorld\view\frontend\web\css\hello.css

Refresh the product page:

Create Magento 2 extension: see block on product page

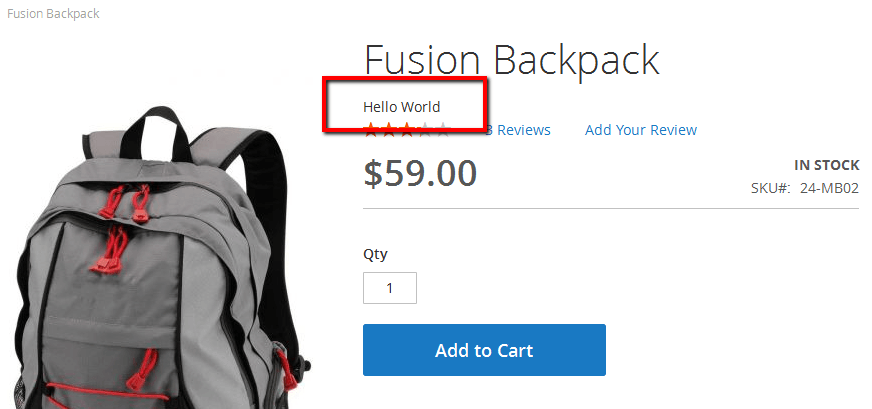
Voila, the block is there!

Now let’s change the look of the block – and add the helper initialization to it.

The extension constructor looks like this:

The helper from the created block is used as $this->_helper variable.

Helper

Create the helper in the following catalog:

Amasty\HelloWorld\Helper\Data.php

Add \Magento\Framework\App\Config\ScopeConfigInterface interface object initialization to the helper, it works to receive the data from configuration.

Now the file looks like this:

In this piece of code you can see that three functions for getting extension configuration from settings section were created.

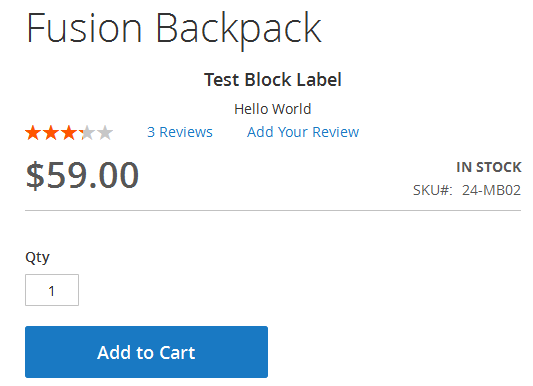
Let’s use these functions in the block and change the template:

Now the block is displayed taking the settings into account:

Create Magento 2 extension: block is displayed accroding to settings

Model creation

Create installation script

As in the 1.x versions of Magento, you need to create the installation file to use your own table. We are going to describe creating of a simple table with several fields. The file should be created here: Amasty\HelloWorld\Setup\InstallSchema.php

And this is its contents:

You can see that we are creating an 'amasty_helloworld' table with one field of integer type and two fields of text type.

Model creation

As in the previous Magento version, we need to create three classes to work with the model: the model itself, the resource model and the collection.

Let’s create a Amasty\HelloWorld\Model\HelloWorld.php file and use the following initialization:

[php]
/**
* Copyright © 2015 Amasty. All rights reserved.
*/

namespace Amasty\HelloWorld\Model\ResourceModel;

class HelloWorld extends \Magento\Framework\Model\ResourceModel\Db\AbstractDb
{
/**
* Model Initialization
*
* @return void
*/
protected function _construct()
{
$this->_init('amasty_helloworld', 'id');
}
}

[/php]

We just set the Magento helper constructor for the model here. In fact, there is no great difference from the first Magento versions on this step. The resource model and the collection are stored in the following catalogs:

Amasty\HelloWorld\Model\ResourceModel\HelloWorld.php

Amasty\HelloWorld\Model\ResourceModel\HelloWorld\Collection.php

These files’ listings are of no particular interest. Create a simple function in the block we’re working with:

[php]
public function getCollection()
{
$model = $this->_objectManager->create('Amasty\HelloWorld\Model\HelloWorld');
$collection = $model->getCollection();

return $collection;
}

[/php]

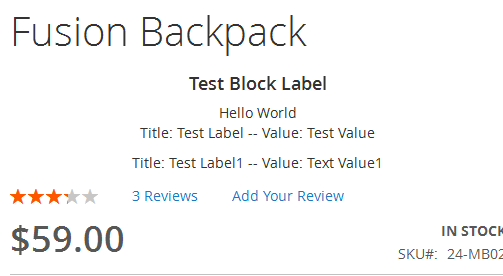
and display it inside the template:

[php]
<?php foreach($this->getCollection() as $item):?>

<label><?= __("Title: ") . $item->getLabel()?></label> -- <label><?= __("Value: ") . $item->getValue();?></label>

<?php endforeach;?>

[/php]

Now update the product page: it works!

Create Magento 2 extension: final result

Should you have any questions about this process of Magento 2 extension creation, please ask them in comments. Good luck to you!

October 24, 2016
December 21, 2016
October 18, 2016
Comments
Nestor González
November 26, 2015
This is GOLD, thank you very much Alex!
Reply
Ksenia Dobreva
November 26, 2015
Glad it was helpful for you, Nestor! Thanks for reading.
Amit Bera
November 29, 2015
It is really help full. Thanks Amit Bera
Reply
Ksenia Dobreva
November 30, 2015
Thanks for reading!
Shopagentur
November 30, 2015
extension für the shop, that what I've searched for. It works! Nice !
Reply
santosh
January 4, 2016
hi ksenia Dobreva, Thanks for the precious information. can you just help me out in the scenario where a user want to add data from admin panel and it just stores in db and then will fetched and render in frontend,right now i have to put text value and label manually in database.... Thanks in advance, wishing you a happy new year.
Eres
April 1, 2016
Come on man, there is no git link in there? Why the hell you waist other people time? I got lost too because you haven't wrote this tutorial for beginners. and what is this??? "To do that, add adminhtml catalog to etc catalog. " what the hell is this, who knows what is adminhtml and catalog and where are these located.
Ksenia Dobreva
March 11, 2016
Hey Vikram, thanks for your question. Have a look: <img src="https://amasty.com/blog/wp-content/uploads/2016/03/2016-03-05_1139.png" alt="" /> Hope that helps!
Larry Reliford
December 3, 2015
Good article, with simple training and perfect. Magento is the most important tool to use in e-commerce market.
Reply
Ksenia Dobreva
November 30, 2015
Thanks for reading!
Kamrul
December 4, 2015
Thank you Alexey for sharing your knowledge about magento 2 extension. I have learned a lot from this post. Really helpful post for me.
Reply
Ksenia Dobreva
December 3, 2015
Thanks for reading and commenting, Larry!
aidalab
December 10, 2015
great work!!!!! I admire your efforts keep it up.
Reply
Ksenia Dobreva
December 7, 2015
Thanks for reading!
Carlos
December 22, 2015
I think that will be great, if you add of " <?php " at the begin registration.php file . I also appreciate if you could put all paths for each file. I new in Magento world, so i'm familiar with. First part works for me, then I get lost. Thanks for your time and patience.
Reply
Ksenia Dobreva
December 10, 2015
Thanks for reading!
santosh
January 4, 2016
@alexey first of all thanks to the beautiful article but i just wanted to know, what if i just wanted to set label and value of text through user, right now i have to enter it manual in my database, can you please guide me over this. Thanks in advance.
Reply
Ksenia Dobreva
December 23, 2015
Hey Carlos, thanks for reading and for your suggestions! As for the file paths, you can easily download the extension from git (see the link in the end of the article) and see them for all the files you need. Good luck with your studies!
santosh
January 4, 2016
i am eagerly waiting for the new post..... :)
Reply
Jine
February 10, 2016
Hello, thanks for this tutorial. I have a problem with the css file. I can see the file linked in the viewsource and onlclick I also see the css code. But the styles are not being applied to the block on the product page. On inspection with firebug, I don't see the style file or the class styles either. What am I missing here? Thanks for your time.
Reply
Ksenia Dobreva
April 4, 2016
Hi Eres, thanks for your notes! We will take these terms into consideration for our next articles. Cheers!
Lachezar
February 11, 2016
Great tutorial! I didn't understand one thin - how did the "Hello World" message (I should say template, to be more precise) is printed to that exact part of the page - on the specific product's page under the Product Name element. Thank you for the great tutorial, of if you are a Bulgarian by any chance - Благодаря! :) :) It was very, very helpful.
Reply
Ksenia Dobreva
June 15, 2016
Hey Mitch, you can easily download the example extension at the end of the article (subscription form) and investigate the structure of the extension in every way! As for your question, the M1 config.xml included various extension configuration settings and also their default values. In M2, it has only default values for options from system.xml. Hope that helps! If you have any other questions, we will be happy to help.
Lachezar
February 15, 2016
Yep, I think i got it, thank you for what you are doing! :) Have a good one today
Reply
Volodymyr
February 17, 2016
After "bin/magento setup:upgrade" all pages are blank (front, admin). Command "setup:di:compile" not resolve problem
Reply
Ksenia Dobreva
January 4, 2016
Hi there and thanks for your question. We didn't implement a separate page scenario with adding the values to the database. But thanks for your suggestion - we will definitely have this idea in mind when writing the next post about Magento 2 development. Meanwhile, you can go to Magento 2 module creator https://amasty.com/magento-2-module-creator.html and see the example implementation of what you'd like to see. Hope that helps!
Ksenia Dobreva
February 25, 2016
Hey Volodymyr, sorry for the late answer, glad that you've figured it out!
Reply
Vikram
March 4, 2016
Followed the above blog. But my helper function is called only by using `$this->helper('NamespaceModulenameHelperData')->getModuleStatus()` and not as shown in code above `$this->getModuleStatus()`. Why I can not call my helper method directly using `$this` ?
Reply
Ksenia Dobreva
February 10, 2016
Hello and thanks for the question! Could you please double-check these points? 1. Please make sure your added your css file to the right xml file 2. Clear Magento cache Let me know if that helps.
Kenneth Onah
March 14, 2016
Thanks Alexey. You just saved me tons of hours of reading through the official documentation.
Reply
Ksenia Dobreva
February 12, 2016
Hey Lachezar, we're happy that the post was useful for you! To show the block, we went to catalog_product_view.xml and defined it as [php]<block name="amasty_helloworld.helloworld" class="AmastyHelloWorldBlockCatalogProductHelloWorld" before="-" template="product/hello.phtml" />[/php] Hope that helps! Ha-ha, I'm not a Bulgarian =) It's my husband's second name, and, as far as I know, he has some Bulgarian roots =) Thanks again!
Ajay Kumar Singh
March 21, 2016
thanks...before i was very confuse regarding magento 2. but now feeling good.. Great tutorial! thanku so much Ksenia Dobreva
Reply
Center
March 25, 2016
Thanks for this how-to ! I am not actually a developer but it's good to have some more insights of the file and folder structures for future Amasty M2 modules we surely need on our new website I do not see the Amasty admin settings after completing step "Create settings" with the files routes.xml and system.xml I also added AmastyHelloWorldModelSource.Align.php from the zip file
Reply
Volodymyr
February 17, 2016
Problem solved by "sudo chmod 777 -R magento_2.0/"
Center
March 25, 2016
doh need to clear cache in default mode
Reply
Dzmitry
March 31, 2016
Thanks for an article
Reply
Eres
April 1, 2016
I found it. Pardon me. You can delete my comment. :)
Reply
Eres
April 1, 2016
The actual source of confusion is the term "Catalog" in this tutorial. You are using the term "Catalog" instead of "Folder". There would have been no problem if you will say " add adminhtml FOLDER to etc FOLDER" instead of " add adminhtml catalog to etc catalog". May be the magento guys use this term for folder?
Reply
Ksenia Dobreva
March 14, 2016
Very happy the article was useful for you!
Ksenia Dobreva
April 4, 2016
I'm glad it finally worked =)
Reply
Ksenia Dobreva
April 4, 2016
Thanks for reading!
Reply
Ksenia Dobreva
April 4, 2016
Glad it worked for you in the end =)
Reply
Mihai
April 27, 2016
Hello, Excellent tutorial and the source files are golden. I'm having a bit of a problem. The database table is not being created. In the log files it says that it doesn't exist and I also verified it in phpMyAdmin. It worked once, the table got created then I disabled and deleted the module and the table, from the database and after that I ran into this problem. Could you maybe give me an idea as to what's going on ? Thanks!
Reply
Mihai
May 3, 2016
Thank you for getting back to me. You are right. I added some scripts after setup:upgrade. All works fine now. Thanks again!
Reply
Jose Reyes
May 10, 2016
getCollection is too broad. I have being trying to create a function to do a custom data pull but not sure what file I should put it in and then how to call it from my observer class. Could you point me in the right direction?
Reply
Ksenia Dobreva
April 28, 2016
Hey there, thanks for reading! Happy it was useful for you. As for your question, well, it's hard to see from here why the database table isn't created. We can suppose that you didn't run setup:upgrade, or you run it and added the scripts afterwards, and they weren't executed.
Ksenia Dobreva
May 11, 2016
Hey Jose, thanks for your comment. In the class collection you can add the new method with conditions for the selection and get the necessary custom data. In the observer you can get this collection via object manager. Hope that helps!
Reply
Ezequiel
June 1, 2016
Great article! Got a doubt for overriding a extension module, let say i've created a new one, but now i'm creating a new theme and want to override only the css of the module. app > design > bla bla bla done it just like Magento 2 in the official documentation but can't get to call the css. Can you guide me through maybe?
Reply
Ksenia Dobreva
June 2, 2016
Hey Ezequiel, thanks for reading and asking! Unfortunately, we can't really help you here and be 100% confident with the answer, because we are more about extensions than themes. Maybe you should ask a question here: http://magento.stackexchange.com/ Good luck!
Reply
Ezequiel
June 6, 2016
Thanks for your feedback! Maybe this question you can answer, where to put the images for the css of the extension?
Reply
Ezequiel
June 7, 2016
Thanks!!
Reply
sunny
June 8, 2016
its a nice tutorial, really thankfull to u.
Reply
Ksenia Dobreva
June 7, 2016
This path to an example image from an extension will guide you: app/code/Amasty/Cart/view/frontend/web/images/down.png
Ksenia Dobreva
June 8, 2016
Thanks for reading!
Reply
Nhu
June 14, 2016
Hi all, I run "php bin/magento setup:di:compile" command, it take me 4h, i dont know what wrong wit me, how about you.
Reply
mk
June 14, 2016
You don't mention the location of system.xml and I can't find it, beginners can't complete the third step :(
Reply
mitch
June 14, 2016
Where??? There is no link to the Git??? Why not just post a link and take 2 more seconds type where to put a file like config.xml and what is "create a config.xml in the etc catalog and put the default values in accordance with system.xml in there"? What does that mean? Please take an extra few seconds to explain things, it's extremely frustrating... not everyone is coming from Magento 1. Just update the blog please to add this info for people who will visit tomorrow, and the day after and the year after... think ahead a little please.
Reply
Ksenia Dobreva
June 14, 2016
Hey there and thanks for the question. Are you seeing any errors? Are you using the latest Magento version? Are you sure your server suits the Magento 2 requirements?
Nhu
June 15, 2016
I am running Magento 2 with the latest version and i am running on local machine, it run nomally but waste many time when compile, how long did it take for you? Thanks, Ksensia Dobreva.
Reply
Ksenia Dobreva
June 15, 2016
Hey Nhu, it's really hard to say from here without no additional information. At our side, the process takes about 5 minutes. It may be a good idea to check the server logs.
Reply
Nhu
June 16, 2016
Thanks Ksenia Dobreva.
Reply
Ksenia Dobreva
June 15, 2016
Hey there, you can easily download the example extension at the end of the article (subscription form) and investigate the structure of the extension in every way. Also, the example path for the file is appcodeAmastyCustomerAttributesetcadminhtmlsystem.xml Hope that helps.
Ksenia Dobreva
July 5, 2016
Hey Dieter, thanks for reading! Glad that it was useful for you. Go to app/code/Amasty/HelloWorld/view/frontend/layout/catalog_product_view.xml and enter the different location by replacing <referenceContainer <referenceContainer name="product.info.main"> with your own needed variant. Hope that helps!
Reply
Dieter Walckiers
July 5, 2016
Hello Ksenia, thanks for your reply. I thought so too, but I tried replacing the name of the referenceContainer element in there with "sidebar.additional" (refreshed and flushed caches), but nothing shows up in the sidebar... I'm still finding my way around magento 2.
Reply
Ksenia Dobreva
July 5, 2016
Dieter, did you place an output like <?php echo $this->getChild('your_block')?> in your template?
Reply
priyansh agrawal
August 22, 2016
i have run "php bin/magento setup:di:compile" but it takes a long time to respond it stuck first at somewhere:- "repositories code generation...1/7 [===>---------] 14% 2sec 42.0 MB" and this is my apache server error.log file . i am running on windows using xampp...plz help . [Mon Aug 22 17:09:58.647023 2016] [ssl:warn] [pid 5268:tid 392] AH01909: www.example.com:443:0 server certificate does NOT include an ID which matches the server name [Mon Aug 22 17:09:58.770228 2016] [core:warn] [pid 5268:tid 392] AH00098: pid file D:/xampp/apache/logs/httpd.pid overwritten -- Unclean shutdown of previous Apache run? [Mon Aug 22 17:09:58.970254 2016] [ssl:warn] [pid 5268:tid 392] AH01909: www.example.com:443:0 server certificate does NOT include an ID which matches the server name [Mon Aug 22 17:09:59.503739 2016] [mpm_winnt:notice] [pid 5268:tid 392] AH00455: Apache/2.4.18 (Win32) OpenSSL/1.0.2e PHP/7.0.8 configured -- resuming normal operations [Mon Aug 22 17:09:59.503739 2016] [mpm_winnt:notice] [pid 5268:tid 392] AH00456: Apache Lounge VC14 Server built: Dec 9 2015 10:17:39 [Mon Aug 22 17:09:59.503739 2016] [core:notice] [pid 5268:tid 392] AH00094: Command line: 'd:\xampp\apache\bin\httpd.exe -d D:/xampp/apache' [Mon Aug 22 17:09:59.507716 2016] [mpm_winnt:notice] [pid 5268:tid 392] AH00418: Parent: Created child process 4140 [Mon Aug 22 17:10:00.390955 2016] [ssl:warn] [pid 4140:tid 288] AH01909: www.example.com:443:0 server certificate does NOT include an ID which matches the server name [Mon Aug 22 17:10:00.565223 2016] [ssl:warn] [pid 4140:tid 288] AH01909: www.example.com:443:0 server certificate does NOT include an ID which matches the server name [Mon Aug 22 17:10:00.613228 2016] [mpm_winnt:notice] [pid 4140:tid 288] AH00354: Child: Starting 150 worker threads.
Reply
Ksenia Dobreva
August 24, 2016
Hey Priyansh, thanks for your question. Does it stop for ever or does it still end but just works slowly?
Reply
priyansh agrawal
August 24, 2016
just works slowly...it took around 1.5 hrs to complete
Reply
priyansh agrawal
August 24, 2016
also i want to ask u one thing that why ur extension show "hello world" only when we clicked any product on frontend page? what should we do to make it visible on homepage of luma(frontend) which files we have to edit and what we have to write in them to see this change?/
Reply
priyansh agrawal
August 24, 2016
can u give link/links of such sources which have tutorials for building these kind of basic plugins or have plugins to free download ..i need this only for practicing purpose
Reply
Ksenia Dobreva
September 5, 2016
It's because we're using this layout: AmastyHelloWorldviewfrontendlayoutcatalog_product_view.xml If you replace catalog_product_view with a certain page, then the block will be displayed there.
sushil
September 27, 2016
Hello Ksenia I am using your sample extension magento2 i.e https://amasty.com/blog/how-to-create-a-magento-2-extension/ I get the code and its successfully working... But I need some modification in that...I want to show this on cart page in frontend rather than product detail page....Is that possible? What changes i need to do that for showing on cart page in frontend? Please reply me ASAP. Thanks
Reply
Manoj
October 19, 2016
Guys can you guide me on magento2 extension contribution steps.
Reply
Ksenia Dobreva
October 21, 2016
Hey Manoj, could you please explain what you mean by "magento2 extension contribution steps"?
Reply
Kaushal
November 12, 2016
Hi Ksenia, Thanks from the bottom of the heart :) That you explained in detail this extension - It's development steps & the usage of each step.....what one developer actually wants :) God Bless You :)
Reply
Ksenia Dobreva
November 14, 2016
Kaushal, thanks for the kind words! We're happy that it was useful for you. Goal accomplished =)
Reply
Marcio Shimoda
December 11, 2016
Hello! Nice article. Could you tell me where the values of the amasty_helloworld table are registered and how the values in this module are stored?
Reply
Ksenia Dobreva
December 12, 2016
Thanks for reading! Unfortunately, Alexey didn't create a controller for adding the values into the table, that's why there's no answer for your question in this article. But we will cover it in the upcoming blog posts!
Reply
Marcio Shimoda
December 12, 2016
OK, I will try to create a controller for it. Thank you!
Reply
Randy
December 29, 2016
Someone already mentioned it, but you guys didn't look like you fixed it. There is no <?php declaration at the top of registration.php. If you have an article on creating an extension, you're most likely dealing with individuals who don't have much experience in building Magento2 extensions, and may just be copy-pasting.
Reply
Kevin
January 5, 2017
hello, can you explain what is Amasty_HelloWorld::amasty_helloworld means in system.xml? I stucked while creating system.xml
Reply
Ksenia Dobreva
January 5, 2017
Hey Randy, indeed, thanks for pointing out! However, we highly encourage our readers not to copy-paste anything from the web and to try to understand the code before using it, which is more helpful for Magento education. Cheers!
Ksenia Dobreva
January 5, 2017
Hey Kevin, thanks for the question. Amasty_HelloWorld::amasty_helloworld is the resource name, which is used to grant permissions with the help of acl. This code will be used in acl.xml to restrict the visibility of this setting for some admin users. Hope that helps!
Kevin
January 6, 2017
thanks, I understand now. Anyway, how to use model with some conditions based on user input? can you get where id = some number or title = some title? how to do that?
Reply
Ksenia Dobreva
January 6, 2017
Kevin, could you please explain what you mean here? I'm not sure I'm getting your question right. Thanks!
Reply
Jin
January 10, 2017
Hi Ksenia, Good tutorial! Took me awhile to figure out the logic, but I finally understand. I have some questions though, hope you can help me clearify. What happens when I disable the module in the admin backend? I can see that the function _toHtml() in HelloWorld.php calls the getEnable() from the helper, but it is _toHtml is never called. And what does it do? Does it disabled the whole module except for the backend settings?
Reply
Ksenia Dobreva
January 11, 2017
Thanks for reading! Glad it was useful for you. As for your question: This way in the admin backend the extension is not disabled, but the module output is disabled. It means that all the features such as observers, plugins, rewrites, and cron continue to work. For the extension blocks, the toHtml() function gives an empty value. To disable the extension, it's better to use a special console command: http://devdocs.magento.com/guides/v2.0/install-gde/install/cli/install-cli-subcommands-enable.html Hope that helps!
Reply
Alexxx
January 12, 2017
Hi, thanks for the tutorial, very helpful for a beginner. Could I suggest to add also the exact version of Magento that was used on the dev time? And I followed the tutorial & downloaded fiels and for me I don't get to see the texts on the product view. The only difference in source code is that I used overall the "urn:" location instead of the "../../../", but I think the problem should not be this small detail. In addition I refreshed the caches and performed a setup:di:compile. What do you think the problem is? Thanks ;)
Reply
Alexxx
January 12, 2017
One more thing, if I look on the product page at the html source I can see the css file, but nothing related about the block.
Reply
Alexxx
January 13, 2017
Ok, prety strange behavior. When I renamed the module from amasty to mytest and peformed 'setup:upgrade' and alle the cache refreshed I could see the changes on the product page. Has anyone any idea why? (before with the amasty name I also delete the caches, setup:upgrade and also setup:di:compile done, did I missed something?)
Reply
Ksenia Dobreva
January 13, 2017
Thanks for the question! We're pretty sure you missed something else, because in this extension nothing really depends on its name.
Reply
Dyan
March 10, 2017
Could I get your contact such as facebook to ask some questions about this post by sending you a screenshot ? Thank you very much.
Reply
Dyan
March 10, 2017
and I can not dowmload the code. How could I get the code in this blog?
Reply
William South
March 11, 2017
I am getting this error, even when I just add the downloaded files, any ideas. Fatal error: Uncaught TypeError: Argument 2 passed to AmastyHelloWorldHelperData::__construct() must implement interface MagentoFrameworkAppConfigScopeConfigInterface, none given, called in /Users/admin/mage2_vagrant/magento2ce/lib/internal/Magento/Framework/ObjectManager/Factory/AbstractFactory.php on line 97 and defined in /Users/admin/mage2_vagrant/magento2ce/app/code/Amasty/HelloWorld/Helper/Data.php on line 20
Reply
Ksenia Dobreva
March 27, 2017
You can post your questions here. Please find a subscription form at the end of the article. After subscribing, you will get the files via email.
Ksenia Dobreva
March 27, 2017
Hi William, sorry for the late reply. The thing is, we created this code for the older Magento 2 versions. It is possible that in the new versions the order of parameters is different. I have scheduled an update for the article to make it more relevant. Thanks in advance!
Ksenia Dobreva
March 27, 2017
Hi Asad, please find a subscription form at the end of the article. After subscribing, you will get the files via email.
Asad
March 13, 2017
Please Can You Explain the each file Path...or give the Git Link...ThankYou
Reply
Rizki Pratama
May 4, 2017
Hi Alex. This tutorial is great for me that just start learning how to create an extension for Magento 2. However, when I reached to a point where I need to create a Helper, I got a problem. I'm sure I've followed the instruction properly, but the helper methods are not showing any value to the template. Either $this->getBlockLabel() or $this->getTextAlign() outputs nothing. I read elsewhere that interface object ScopeConfigInterface is already defined inside AbstractHelper so that we don't need to define it again inside Helper. I tried that too but it's just the same. Am I missing something here? Thank you for your time.
Reply
Rizki Pratama
May 4, 2017
Never mind, I just find out your comment that we need to create the methods inside Block file and use $this->_helper to read the value. Cheers!
Reply
Rizki Pratama
May 5, 2017
Hi, apparently I'm getting stuck when implementing ways to retrieve the collection. I'm getting HTTP Error 500, the page just shows the block part, and the collection is not retrieved. My getCollection method in the Block file is: public function getCollection() { $model = $this->_objectManager->create('SofttamaHelloWorldModelHel‌​loWorld'); $collection = $model->getCollection(); return $collection; } and the code I used on my template is: getCollection() as $item) { ?> <b>getLabel(); ?></b>: getValue(); ?> Thanks.
Reply
Rizki Pratama
May 5, 2017
The code is trimmed, so I type some spaces in purpose here: getCollection() as $item) { ?> <b>getLabel(); ?></b>: getValue(); ?>
Reply
Rizki Pratama
May 5, 2017
I'm posting the complete code for Block, Model, ResourceModel, and Collection here https://gist.github.com/softtama/a20e1d7410f7a05213bb3f4b3e17d5e5 Thanks.
Himani
June 13, 2017
HI ksenia Dobreva, I have one issue while I installed this module in my app/code folder. Every Product detail page is showing 404 page not found error. Please help me in this.
Reply
Ksenia Dobreva
June 14, 2017
Hi there, I'm sorry, but it's hard to tell what's wrong from here. Please do send an email to [email protected] so the support team could help you out. Cheers!
Reply
Griehle
November 28, 2017
I am not understanding the new way of doing the noNameSpace urn: stuff. It isn't part of this tutorial I know. Do you know of resources to figure it out according to best practices? The relative path stuff is kind of frowned upon now days.
Reply
Alina Bragina
January 22, 2018
Hi Tejinder, thanks for reading and commenting! Sorry, but it looks like it could be rather complicated to answer your question in a single comment. We'll try to see if we can cover this question in the future articles. Cheers!
Reply
claretyoung
January 30, 2018
Hi, am new to Mageto 2, I dont know to navigate the page to display the products I I enter this URL http://localhost/magento2/amasty_helloworld/catalog/product/helloWorld but am get 404 not found. please help me.
Reply
claretyoung
January 30, 2018
I don't know how to navigate the page to display the products.
Reply
amam
March 10, 2018
i have done exactyly what it says, but the hello world does not appearing in my fusion-backpack.html
Reply
Alina Bragina
April 13, 2018
Hi there! Thanks for reading and commenting. Please, check all the created configurations and the module's settings or go to the bottom of the article and subscribe to get the code of the whole extension to review the result.
Chirag
April 10, 2019
This is good article and very helpful for me thank you so much
Reply
Alina Bragina
May 17, 2019
Hey Chirag, thanks for sharing your impression!
christoper stalin
May 15, 2019
This blog is very great content delivery. Thanks for pot this blog.
Reply
Alina Bragina
May 17, 2019
Hi Christoper, thanks for reading us and sharing your opinion!
Guest
September 4, 2019
0.5
Reply
Guest
September 4, 2019
5
Reply
Guest
October 29, 2019
3.5
Reply
Stella George
December 22, 2020
Great Article!
Reply
Polina Kratovich
December 23, 2020
Hi Stella, thanks for your feedback! We are glad to share our experience and be helpful.
KEith
June 7, 2021
Hi, Where do we subscribe ?
Reply
Vladimir Derachits
June 15, 2021
Hi there, we are so sorry, but this option is no longer available.
stella george
October 6, 2021
Very Informative blog on How to Create A Magento 2 Extension! Thanks for sharing!
Reply
Leave your comment

Your email address will not be published

This blog was created with Amasty Blog Pro

This blog was created with Amasty Blog Pro

© 2009-2024 Amasty. All Rights Reserved.