
Hello to Amasty blog readers!
Today I'm sharing a tutorial for users of Amasty Product Parts Finder extension. Product Parts Finder is a very powerful tool that lets people find spare parts and components by certain parameters.
In the user guide, we described options of adding the Product Parts Finder block on certain pages via the admin panel. But often this method is not enough for merchants, so I described ways of adding Product Parts Finder block on various pages of your Magento store.
Note: before performing the following actions, please make sure that you're doing this on a test or dev store. Also, please make sure you have enough technical knowledge to follow the instructions. If they are not quite clear to you, please address a developer.
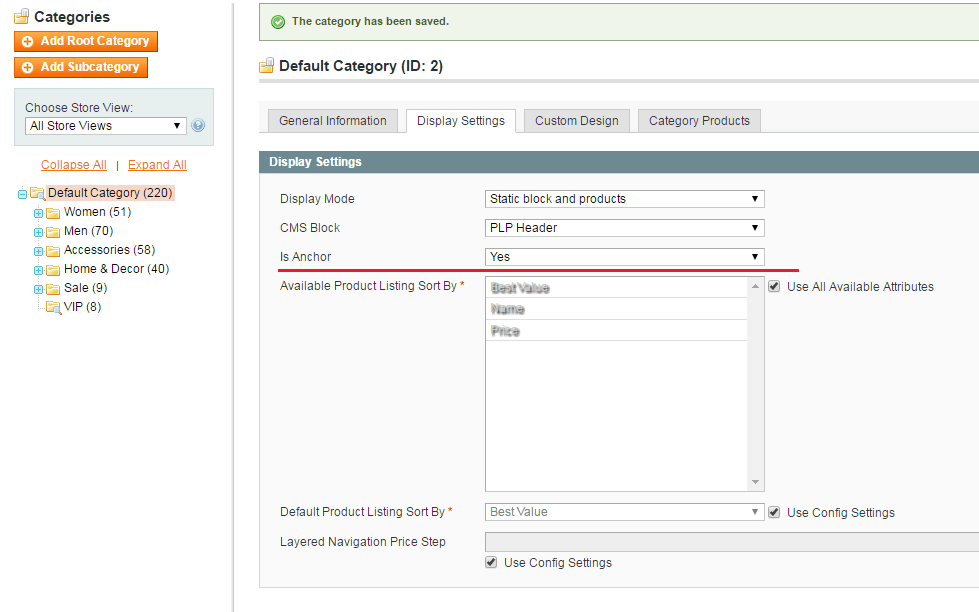
If you want to put the finder block onto a special amfinder page, which will search among all the site products, make sure you set the root category as an anchored one:
1) The most effective method of adding the finder block to the pages is adding via inserting blocks into the xml file. To do that, we are going to modify /app/design/frontend/base/default/layout/amfinder.xml file.
For instance, we want a finder block with id = 1 to be available on the amfinder page. For this result, please uncomment this code part:

[php]
<block type ="amfinder/form" name="amfinder89">
<action method="setId"><id>1</id></action>
<action method="apply" />
</block>
[/php]
If you still can't see the finder block, change the block type from type="catalog/category_view" to type="core/text_list".

Here we've done that, the finder block is visible and working now.

2) If you want to set a vertical, horizontal or responsive design for a particular finder block, use the following parameter:
[php]

<action method="setTemplate"><template>amfinder/responsive.phtml</template></action>

[/php]

3) For installing the finder block on all the store categories, uncomment the following lines:
[php]

<catalog_category_default>
<reference name="content">
<block type ="amfinder/form" name="amfinder89" before="category.products">
<action method="setId"><id>1</id></action>
<action method="apply" />
</block>
</reference>
</catalog_category_default>

<catalog_category_layered>
<reference name="content">
<block type ="amfinder/form" name="amfinder89" before="category.products">
<action method="setId"><id>1</id></action>
<action method="apply" />
</block>
</reference>
</catalog_category_layered>

[/php]
4) To add the finder block onto a certain category page, you need to know this category ID (say, it's 19 for a quick example).

Use the following code to perform this task:
[php]

<CATEGORY_19>
<reference name="content">
<block type ="amfinder/form" name="amfinder89" before="category.products">
<action method="setId"><id>1</id></action>
<action method="apply" />
</block>
</reference>
</CATEGORY_19>
[/php]
5) Sometimes merchants ask us how to add the finder block to all the site pages, and it should redirect to the amfinder page.
It can be done, too! Go to the finder settings and make sure that Custom Destination URL = amfinder/

Then, add the finder block to the header section of all the site's pages:
[php]
<default>
<reference name="header">
<block type ="amfinder/form" name="amfinder89" as="finder1">
<action method="setId"><id>1</id></action>
<action method="setTemplate"><template>amfinder/responsive.phtml</template></action>
<action method="apply" />
</block>
</reference>
</default>

[/php]
After that, you need to call the declared block, and we are going to do that in the theme file. For example, if you have the RWD Magento theme installed, it is the following file:
\app\design\frontend\rwd\default\template\page\html\header.phtml
Call the finder block with this code line:
[php]<?php echo $this->getChildHtml('finder1') ?>[/php]
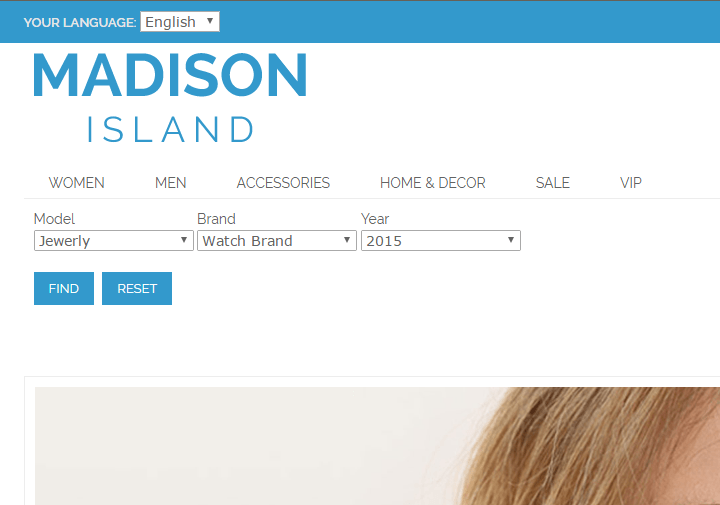
And here's the result:
I hope these short instructions will help you in using Product Parts Finder extensions to its full. If you still have any questions on adding the finder blocks to your site, please welcome to ask me in the comments or drop a line at [email protected].