
Today we are going to touch on Varnish cache, its syntax - client and backend sides, web server and Magento 2 configuration, and more.
Does that sound like something you are interested in?
Put things behind for 15 minutes to read the post till the end.
What is Varnish? How does it work with Magento 2?
When running an online store on Magento 2, you need to know the platform supports Varnish versions starting from 3.0.5 and later or any Varnish 4.x version. Say, you’ve chosen an appropriate version and launched Varnish for your Magento 2 store. So, how do the client requests work with Varnish and server? A simple scheme below gives a visual explanation of the process:

Now, let’s dig deeper into the process and talk it in details.
As you see, users’ HTTP requests are passed over the Internet result into numerous requests for CSS, HTML, JavaScript, and images. All together they are called assets. From the scheme above, we see that Varnish Proxy goes next and passes all these requests to the web server.
While going back from the web server the cacheable assets are stored in Varnish. Any future users’ requests for those assets are fulfilled by Varnish (meaning, the requests no longer reach the web server). In doing so, Varnish returns the cached content extremely quickly without keeping your visitors waiting for long. As a result, you get a faster response time and a reduced number of requests passing directly to Magento. Thus, Varnish allows for reducing the response time and network bandwidth consumption for similar requests in future.
But what about the assets updates? Do users get the out-of-date content?
It’s not entirely true. Assets cached by Varnish either expire automatically upon a preconfigured period or are replaced by newer versions of the same assets. You can also clear the cache manually via the Magento Admin Panel→System→Cache Management or using this Magento command → cache:clean.
Draw attention to Magento recommendations:
“We strongly recommend you use Varnish (or Redis) in production. The built-in full-page caching (to either the file system or database) is much slower than Varnish, and Varnish is designed to accelerate HTTP traffic.”
What makes Varnish a win-win HTTP processor?
Have you heard of Varnish Configuration Language (VCL) and its main purpose?
VCL is the main Varnish configuration mechanism. It is a domain-specific language (DSL) utilized for writing hooks. The hooks are called at critical points of a request handling.
It is this element that makes Varnish more configurable and adjustable in comparison with other HTTP accelerators. Having being loaded, a VCL script is translated to C and then compiled to a shared object by the system compiler. After that, it’s directly loaded into the accelerator, which can be reconfigured without a restart.
Every request goes through Varnish, which allows you to influence which way the request is handled. All you need is to alter the VCL code.
For example, you can:
- direct certain requests to particular backends;
- alter the requests and responses;
- make Varnish apply different actions relying on the request/response properties.
That’s exactly why Varnish is a win-win HTTP processor not just for caching.
Varnish translates VCL into a binary code, which is executed on requests arrival, thus, making the VCL impact on the performance insignificant. All the VCL files are arranged into subroutines, which are executed at different times. Thus, one subroutine is executed when we receive a request, another one - when files are fetched from the backend server:

We’ll cover how subroutines work right in the next part.
So, go on reading!
Varnish: VCL Syntax
Note: VCL doesn’t contain any loops or jump statements. For a complete documentation of the VCL syntax, please, follow the link.
Built-in subroutines
VCL doesn’t allow you to start with an empty file, it lets you interfere with certain aspects of the execution flow of Varnish. The flow, in turn, is defined in a finite state machine. This aspects or hooks (as we said before) present specific stages of the flow where the behavior of Varnish in the stages is expressed through different built-in subroutines.
To enable a needed behavior, you need to:
- define a subroutine in your VCL file,
- extend the behavior in this subroutine,
- and issue the file reload.
In order to determine how processing will continue in the request processing state machine, you need to use keywords. As for the behavior of return() keywords, it’s similar to other subroutines. Therefore, the differences are documented only where necessary.

Client side
vcl_recv
It’s called (a) at the beginning of a request, (b) after a complete request is received, (c) parsed or (d) after a restart. The purpose of the subroutine is to decide if to serve the request or not; modify the request and choose how to process it further.
By calling return() on one of these keywords: error code [reason], pass, pipe, lookup, you may terminate the subroutine.
vcl_pipe
The subroutine is called upon the entire pipe mode. In so doing, the request is passed on to the backend. After, the further data from the client or backend is passed on unchanged til one of the ends completes the connection. In this pipe mode, no other VCL subroutine will be called after vcl_pipe.
By calling return() on one of these keywords: error code [reason], pipe, you may terminate the subroutine.
vcl_pass
The subroutine is called upon entering the pass mode. In this, the request is sent to the backend, and the backend response is further passed to the client without entering into the cache.
By calling return() on one of these keywords: error code [reason], pass, you may terminate the subroutine.
vcl_hash
The subroutine is called after vcl_recv for creating a hash value of the request. It’s utilized as a key in order to look for the object in Varnish.
By calling return() on one of this keyword: hash, you may terminate the subroutine.
vcl_purge
The subroutine is called when the purge is completed and all the variants are dismissed.
By calling return() on one of this keyword: fail, restart, synth(status code, reason), you may terminate the subroutine.
vcl_hit
The subroutine is called if a cache search is crowned with success. In this, the hit object can be out-of-date.
By calling return() on one of this keyword: fail, restart, synth(status code, reason), pass, miss, deliver, you may terminate the subroutine.
vcl_miss
The subroutine is called in case the needed document wasn’t found during a cache search or if vcl_hit returned fetch. The purpose of the subroutine is to choose if to try to get the required document from the backend or not.
By calling return() on one of this keyword: fail, restart, synth(status code, reason), pass, miss, fetch, you may terminate the subroutine.
vcl_deliver
The subroutine is called prior to any object (exception: vcl_synth) is brought to the client.
By calling return() on one of this keyword: fail, restart, synth(status code, reason), deliver, you may terminate the subroutine.
vcl_synth
The subroutine is called for delivering a synthetic object. In this, the synthetic object is generated in VCL, but not taken from the backend. In contrast to the vcl_backend_error defined object, the vcl_synth defined object never enters the cache.
By calling return() on one of this keyword: fail, restart, deliver, you may terminate the subroutine.
Backend side
vcl_backend_fetch
The subroutine is called prior to sending the backend request. In this, you normally alter the request before it gets to the backend.
By calling return() on one of this keyword: fail, fetch, you may terminate the subroutine.
vcl_backend_response
The subroutine is called when the response headers are successfully retrieved from the backend.
By calling return() on one of this keyword: fail, deliver, retry, pass, you may terminate the subroutine.
vcl_backend_error
The subroutine may be called in two cases, the first one is if we fail the backend fetch, the second one is when max_retries is exceeded.
By calling return() on one of this keyword: fail, deliver, retry, you may terminate the subroutine.
This illustration shows how these subroutines are interrelated and work together:

Request & respond to VCL objects
There are several important objects that you should be aware of in VCL. The objects can be manipulated by using VCL.
req
This is a request object. When Varnish receives the request the req object is created and populated. The larger part of work you fulfill in vcl_recv is done on/with the req object.
bereq
This is a backend request object. Varnish creates it before passing to the backend and it’s based on the req object.
beresp
This is a backend response object. It carries with it the headers of the object coming from the backend. In case you want to change the response coming from the server, alter this object in vcl_backend_response.
resp
This is an HTTP response before it’s delivered to the client. Normally it’s modified in vcl_deliver.
obj
The object is stored in the cache and intended for reading only.
You can find the file with all the settings via the address: nano /etc/varnish/default.vcl or see a default.vcl file here.
For more information, click the link.
How to install Varnish and configure web server?
The theory is one thing, but practice “on the field” is quite another. That’s exactly why below we are going to explain how to install Varnish and make all the web server configurations.
Varnish installation
To get Varnish to communicate with your web server, alter the settings in the virtual host file of your website. After that, it’s time to install Varnish on the system. You can do it using this apt command:
#sudo apt install varnish -y
Then you’ll need to start Varnish and launch it at system boot using these systemctl commands:
#systemctl start varnish
#systemctl enable varnish
Varnish is preset to use port 6081 for public accesses and port 6082 for the admin web interface by default. To check the default conditions use this netstat command:
#netstat -plntu
Then start it and check Varnish HTTP cache:

As we see from the example above, Varnish HTTP Accelerator was installed successfully.
Web server configurations
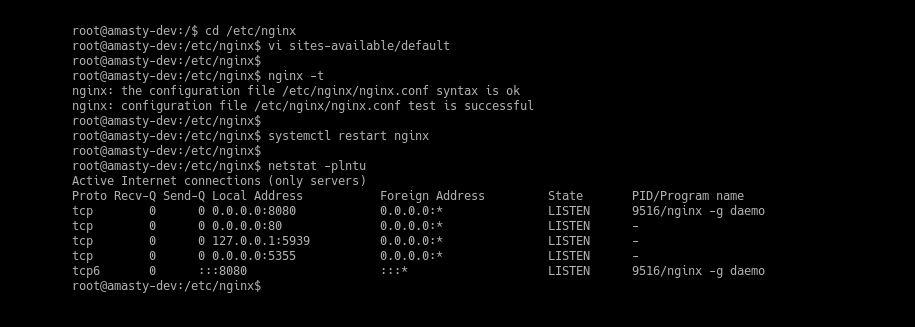
Note: In case you run Nginx, miss this step. If you are running Apache, open ports.conf to change the 80 in Listen 80 to another port.
Apache:
#cd /etc/apache2/sites-available/
#vim example.com.conf
<VirtualHost *:8080>
Nginx:
#cd /etc/nginx/sites-available/
#vim example.com
listen 8080;
listen [::]:8080;
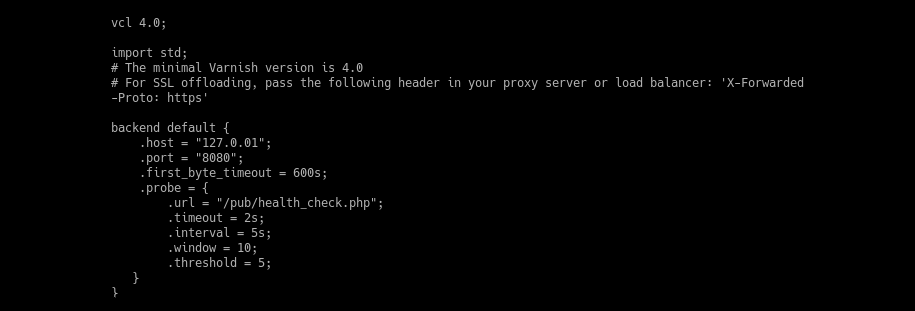
Check your /etc/varnish/user.vcl file and make sure the backend default is set to use port 8080:
Reload the configuration for your web server (Apache or Nginx respectively): #sudo systemctl reload apache2 #sudo systemctl restart nginx After that test your web server once again using netstat command: #netstat -plntu and check if it’s working with the non-default HTTP port 8080:
Varnish as a proxy web server
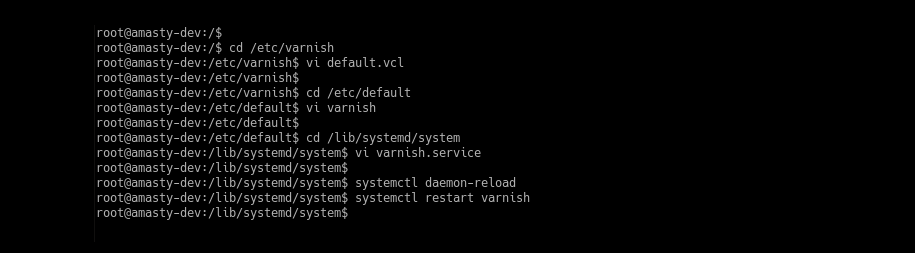
If you want set Varnish up to work as a proxy server, make sure Varnish runs on the HTTP port 8080, as we just explained it above. Once it’s done, we need to define the backend server and alter Varnish to run under HTTP port 80. (1) First, navigate to the Varnish configuration directory to edit the default.vcl file: #cd /etc/varnish #vim default.vcl Find the backend line to make the settings as shown below:
Save the changes and leave the file.
(2) Secondly, we are to configure Varnish to work under HTTP port 80. For this, go to the /etc/default directory and modify varnish configuration file:
#cd /etc/default/
#vim varnish
Change the default port 6081 to HTTP port 80 in the DAEMON_OPTS="-a :80 \ line:
Save the changes and exit.
(3) Go to the systemd directory to edit the varnish.service file:
#cd /lib/systemd/system
#vim varnish.service
Then change the varnish port 6081 to HTTP port 80:
ExecStart=/usr/sbin/varnishd -j unix,user=vcache -F -a :80 -T localhost:6082 -f /etc/varnish/default.vcl -S /etc/varnish/secret -s malloc,256m
Save the changes and skip the directory.
Now you need to reload the systemd configuration and restart Varnish. Use the commands:
#systemctl daemon-reload
#systemctl restart varnish
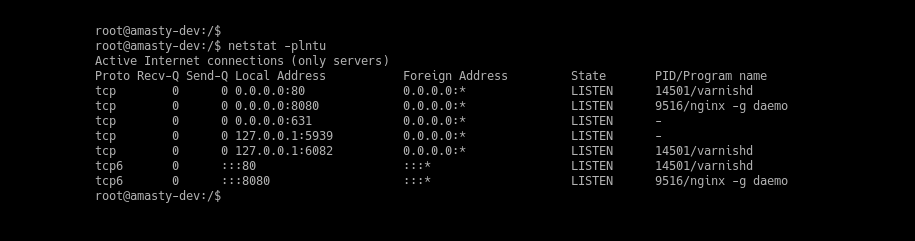
When everything is done, check Varnish:
#netstat -plntu
Then make sure Varnish is running on HTTP port 80 as shown below. For this, test Varnish configuration:
Magento 2 configurations
To set up your Magento to use Varnish, log in to the Admin Panel, then navigate to
Stores → Configuration → Advanced → System → Full Page Cache:
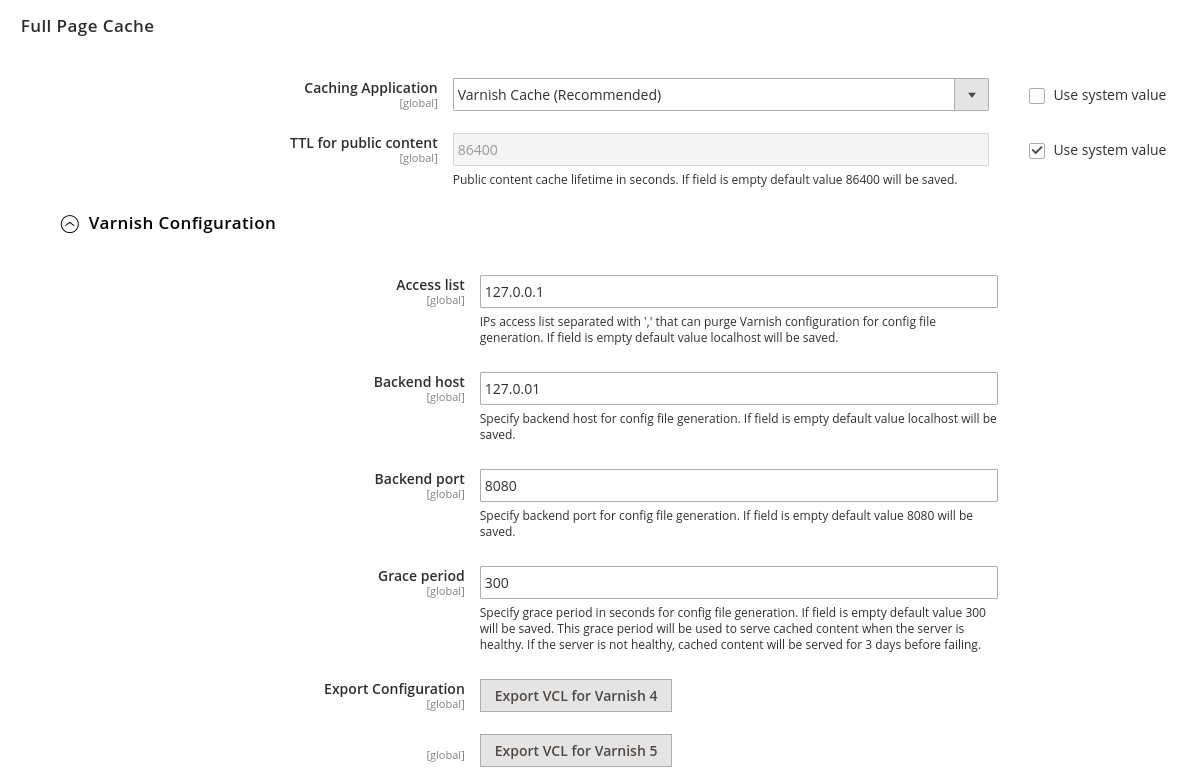
From the Caching Application list, choose Varnish Cache. Enter a value in the TTL for public content field, expand the Varnish Configuration setting and enter the next information:
Access list
Enter the fully qualified hostname, IP address, or Classless Inter-Domain Routing (CIDR) notation IP address range for which to invalidate content.
Backend host
Enter the fully qualified hostname or IP address and listen to the port of the Varnish backend or origin server. In our case, it is 127.0.0.1
Backend port
Fill in the listen to the port number. In our case it is 8080.
In Magento, you can also get pre-configured vcl file, export it and use it as default.
Once it’s done, save the changes.
Test Varnish
You can test your Varnish in several ways. Choose which one suits you the most and just do it.
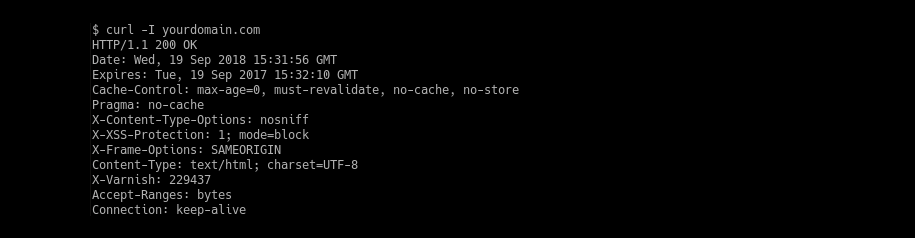
#1. Test Varnish using cURL
You may test Varnish using the curl command, so you’ll see HTTP headers from the server:
#curl -I yourdomain.com
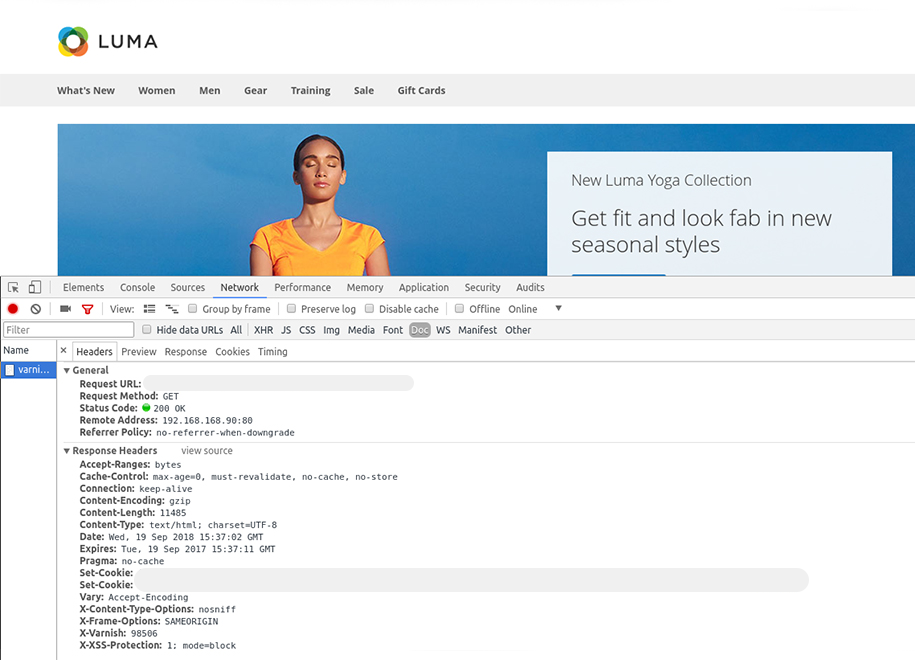
#2. Test Varnish using Web Browsers
To test Varnish in your browser, open the web browser to type your server URL or address:
#3. Test Varnish Log
Varnish provides some commands for managing and viewing logs. To get Varnish access log, we’ll use varnishncsa:

Thus, having tested Varnish work, we can say that its installation and configuration as a reverse proxy for Nginx web server was completed.
Click this to find useful Varnish command line tools that can help you see detailed log records, stats and more.
Wrap-Up
These are:
- speed & performance;
- bandwidth saving;
- scalability, your site will match any customers’ demand, there are no more overloadings;
- Varnish continues serving cached content to visitors even if your site is failed;
- using VCL you can create customized solutions, rules, modules;
- and, as a result of Varnish implementation, you achieve an improved end-user experience.
We hope the post was of use for you.
Do you still have questions?
Feel free to pose any in the comments below.