
Any Magento 2 website well-populated with high-quality content and a whole bunch of products variety has to perform fast on the frontend. Why can’t we just say ‘should’ rather than ‘has to’?
It’s better to see once than to hear one hundred times:

Thus, can we say your frontend speed performance influences conversions? Sure, we can.
What are the top reasons your website can break?
- Unminified JS and CSS files 68% (see the solution here)
- Slow HTML load speed 43%
- Uncompressed JS and CSS files 43%
- Uncached JS and CSS files 26%
To see a complete list of problems, use thesource.
What’s this got to do with indexing?
Indexing directly affects your storefront performance. Without indexers, we would force our store to work on the fly. So, read on to learn what indexing is in Magento 2, why you need it, how to create a new indexer, and manage the process correctly.
What is Indexing in Magento 2?
Put simply, indexing is the way Magento 2 converts refreshable data (products, categories, prices, etc.) to enhance the storefront performance. When you refresh the converted data, it needs an update or Magento 2 to be reindexed programmatically or manually.
More specifically, read the definition from Magento DevDocs: "Magento has a very sophisticated architecture that stores lots of merchant data (including catalog data, prices, users, stores, and so on) in many database tables. To optimize storefront performance, Magento accumulates data into special tables using indexers." Source
What does it look like in practice? Let’s take an example from our Magento 2 Product Labels extension.
Say, you’ve created a product label and specified 4 conditions to determine cases when the label should be applied. Consequently, without indexers, while loading a product page, Magento 2 would have to check each label to verify it matches the conditions you preset. Definitely, this would take too much time, which could increase your abandoned cart rate and would decrease conversions in the foreseeable future.
In the case with indexing, information about what labels should be displayed on this or that product page is already saved in tables, taking into account all the conditions.
By and large, if Magento 2 worked without these special tables with indexers, the performance would be slowed down and, as a result, you would lose a significant part of conversions, which is bad. Now let’s dig deeper into the technical part.
What is Magento Reindexing
Sometimes changes to your catalog, price rules, or product attributes may require a Magento 2 reindex to be performed. Without proper reindexing, your store may show outdated or inaccurate information, which can affect the shopping experience and overall site performance.
Magento 2 automatically triggers reindexing when necessary, but in certain situations, you may need to intervene manually. This is especially true when you see the "Magento 2 index management reindex required" notification in the admin panel. This could happen after updating product data, changing prices, or modifying attributes that affect search functionality, such as inventory or product status.
If Magento 2 fails to automatically reindex, or if you prefer to control the process yourself, you can perform a Magento 2 manual reindex through the command line. Here’s how:
- Access your server’s SSH.
- Navigate to the root directory of your Magento installation. Use the following command to check the status of your indexes: php bin/magento indexer:status
- To reindex all required indexes, run: php bin/magento indexer:reindex. This command will process all indexes and bring them up to date.
Alternatively, you can reindex specific indexes if needed: php bin/magento indexer:reindex [indexer_name]
Magento 2 Indexing Terminology
When laying it all out, indexing terminology comprises three main terms. They are:
- Dictionary;
- Index;
- and Indexer.
What is a dictionary?
This is all the original data entered into your system. In order to simplify the maintenance, these dictionaries are normalized, which means they are restructured to cut data redundancy and ensure better data integrity.
What is an index?
This is the representation of the original data for improved reading/searching. They can include aggregation results, as well as different calculations. By using a special algorithm, the index content can be restored from a dictionary.
What is an indexer?
The indexer implies an object that creates an index.
When you understand why you need indexers and know the indexing terminology, it’s time for little coding. So, the next part we have dedicated to the creation of a Magento 2 custom indexer.
Why You Need Magento 2 Custom Indexers?
Getting back to the Magento 2 Product Labels extension, when developing the module, we came to the conclusion that we need to create a custom indexer for it.
What made us think so?
Just imagine multiple labels created on numerous conditions for a wide range of products.
Can Magento 2 make the analytical work (upon what label on what product pages to display) on the fly?
Yes, it can.
Will your storefront perform well at that?
We tested, and it won’t.
That’s why we decided to create a special indexer and added a setting to the backend named ‘Use Indexes for Better Performance’, which allows you to enable the process of indexation:

How to Create a Magento 2 Custom Indexer?
For you to devise a custom indexer, complete the next steps.
Step 1: Create a configuration file
Create a config file app/code/Amasty/Example/etc/indexer.xml first:
<?xml version="1.0"?>
<config xmlns:xsi="http://www.w3.org/2001/XMLSchema-instance" xsi:noNamespaceSchemaLocation=
"urn:magento:framework:Indexer/etc/indexer.xsd">
<indexer id="amasty_example" view_id="amasty_example" class=
"Amasty\Example\Model\Indexer\ExampleIndexer" shared_index="amasty_example">
<title translate="true">Amasty Example</title>
<description translate="true">Amasty Example</description>
<dependencies>
<indexer id="cataloginventory_stock"/>
</dependencies>
</indexer>
</config>
The id attribute is used to identify this indexer. You can call it when you want to check the status, mode or reindex this indexer by the command line.
The view_id is the id of the view element, which will be defined in the mview configuration file.
The class attribute is the name to the class, which processes the indexer method.
The shared_index attribute is used for combining several indexers into groups. While reindexing one of the group indexers, the others will be labeled as valid.
Magento 2 indexing has some child elements like the title, which is applied to show the name of the indexer in the grid of indexers; description, which is applied to define the description of the indexer in the grid of indexers.
The dependencies element is used to mark the dependencies between various indexers. While calling reindexRow, reindexList, and invalidate methods of the cataloginventory_stock indexer after the reindex of the cataloginventory_stock indexer, the indexers that are marked as dependent on the indexer will be initiated. In our case, it will be the amasty_example indexer. The option is available in Magento 2.2.0. Starting from Magento 2.2.6, a required condition of the dependent indexer for reindexRow, reindexList methods of the indexer will be the work mode - Update On Save.
Step 2: Create an MView configuration file
Create an app/code/Amasty/Example/etc/mview.xml config file, which will be responsible for the indexation by Cron.
<?xml version="1.0"?>
<config xmlns:xsi="http://www.w3.org/2001/XMLSchema-instance" xsi:noNamespaceSchemaLocation=
"urn:magento:framework:Mview/etc/mview.xsd">
<view id="amasty_example" class="Amasty\Example\Model\Indexer\ExampleIndexer" group="indexer">
<subscriptions>
<table name="catalog_product_entity" entity_column="entity_id"/>
</subscriptions>
</view>
</config>
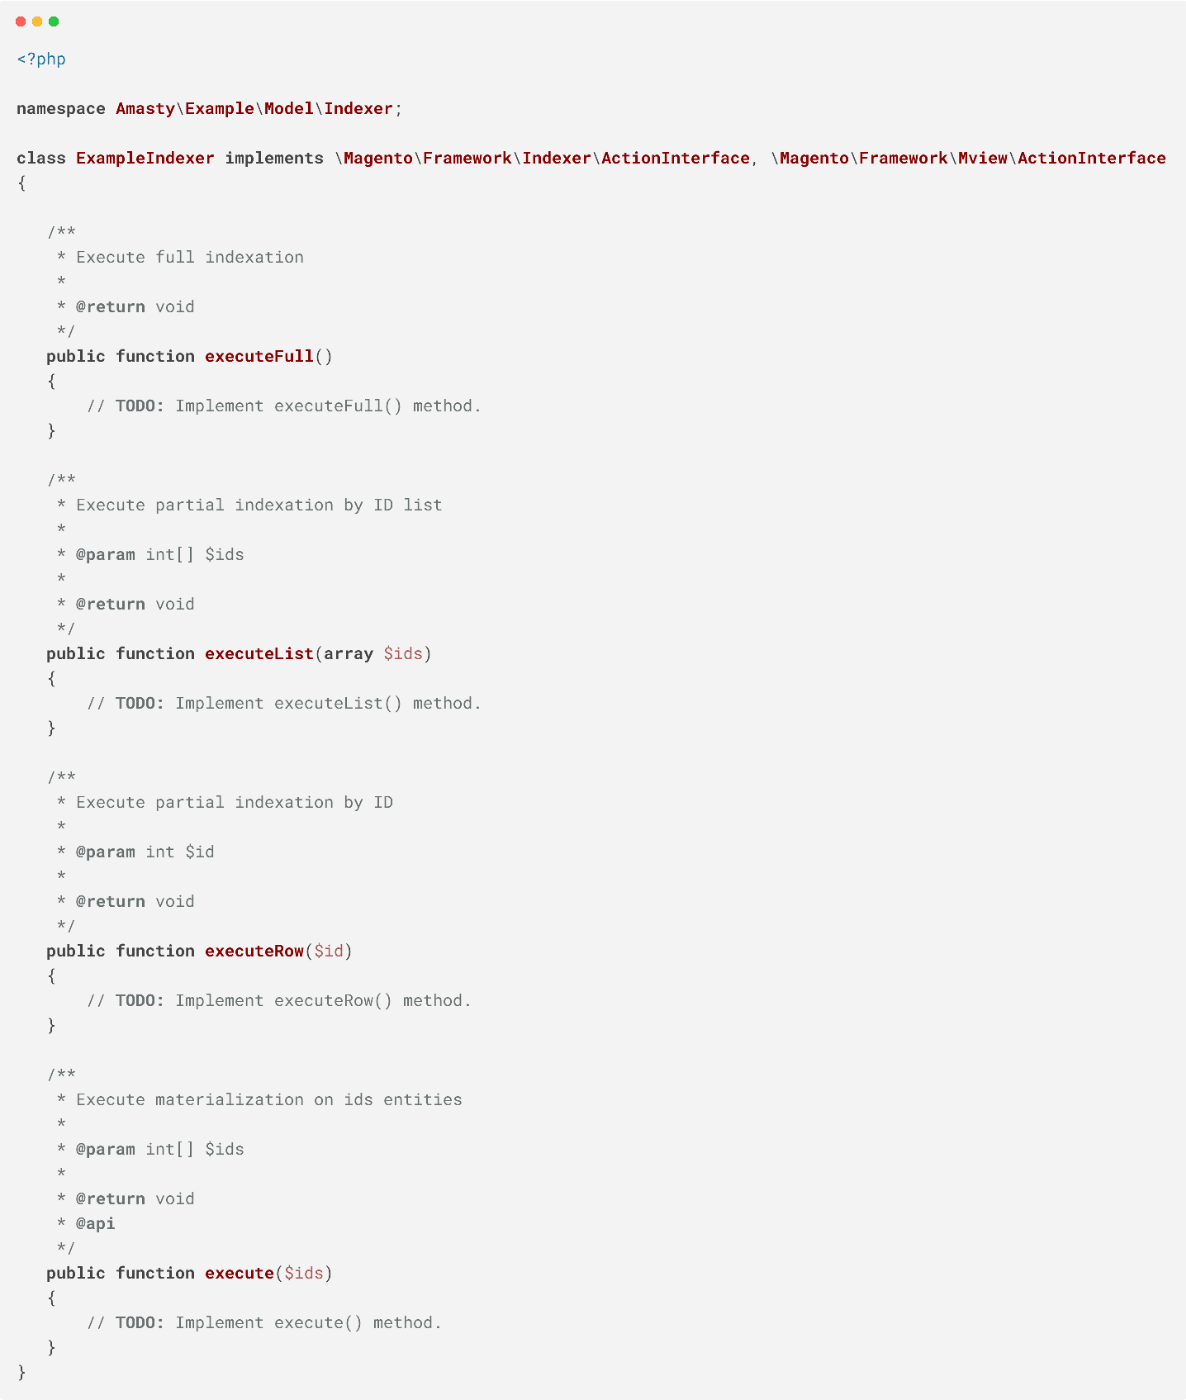
Also, you need to identify the class specified in the config files of Amasty\Example\Model\Indexer\ExampleIndexer, it will contain the logic of our instance indexation.
The class should implement the interfaces: \Magento\Framework\Indexer\ActionInterface, \Magento\Framework\Mview\ActionInterface.
Where the \Magento\Framework\Indexer\ActionInterface interface contains the main indexation methods and the \Magento\Framework\Mview\ActionInterface interface contains the methods that are applied for the Update By Schedule mode of indexation.
See the code below as an example of indexing methods and why you need them:
Step 3: Clear cache
After all the files mentioned above are created, clear the Magento 2 cache. Then go to System > Index Management to see a new indexer in the Index Management grid.
Update On Save vs. Update By Schedule
Update On Save mode
In the indexing mode, Update On Save has the sense to initiate the reindex for a definite instance after it’s been changed. In our case (with product labels) we depend on products. This means that while one concrete Magento 2 product is changed we need to reindex our instance for this product programmatically. To programmatically reindex the instance in Magento 2, you need to do the following:
- Create an app/code/Amasty/Example/etc/adminhtml/events.xml file:
<?xml version="1.0"?>

<config xmlns:xsi="http://www.w3.org/2001/XMLSchema-instance" xsi:noNamespaceSchemaLocation=
"urn:magento:framework:Event/etc/events.xsd">
<event name="catalog_product_save_after">
<observer name="reindex_event" instance=
"Amasty\Example\Model\Observer\Backend\CatalogProductSaveAfterObserver" />
</event>
</config>
- Create an app/code/Amasty/Example/Model/Observer/Backend/CatalogProductSaveAfterObserver.php file:
<?php

namespace Amasty\Example\Model\Observer\Backend;

use Magento\Framework\Event\Observer;
use Magento\Framework\Indexer\IndexerRegistry;
use Magento\Framework\Event\ObserverInterface;

class CatalogProductSaveAfterObserver implements ObserverInterface
{
/**
* @var IndexerRegistry
*/
private $indexerRegistry;

public function __construct(IndexerRegistry $indexerRegistry)
{
$this->indexerRegistry = $indexerRegistry;
}

public function execute(Observer $observer)
{
$product = $observer->getEvent()->getProduct();

if ($product) {
$this->indexerRegistry->get('amasty_example')->reindexRow($product->getId());
}
}
}
By doing so, we have added an observer for a product save action.
After a product is changed, the indexer will be called, and the ID of the updated product will be transferred.
Update By Schedule mode
If you change the Update On Save mode for the Update By Schedule one, the app/code/Amasty/Example/etc/mview.xml config file will be read, and MySQL triggers will be created. This means that while deleting, adding, and updating rows in the defined subscriptions tables, the entity_id column will be added and amasty_example_cl will be written into the table (it’s created automatically for the work in the Update By Schedule mode):

Also, there is a version_id (AUTO_INCREMENT) field in the amasty_example_cl table. The field is compared to the version_id field from mview_state for a current indexer.
As a result, in our execute($ids) processor will get only those instances that have been changed after the previous launch (amasty_example_cl.version_id > mview_state.version_id).
How to Set Up a Cron Job for Magento 2 Index Management?
The main Cron jobs for working with indexers are defined in the vendor/magento/module-indexer/etc/crontab.xml file.
When launching a Cron job by indexer_reindex_all_invalid (every minute), executeFull will be started for invalid indexers (they are marked in the Indexers grid with REINDEX REQUIRED status). It is intended for a full reindex, that is, in this case, for all the invalid indexers, the table with the saved information will be rewritten.
When starting a Cron job by indexer_update_all_views (every minute), all the indexers that work in the Update On Schedule mode will be launched.
While launching it by indexer_clean_all_changelogs (every hour), the _cl tables (in our example it’s amasty_example_cl) indexers will be purged of entries with version_id below the latest version in the mview_state table.
Note: Check out how to reindex Magento 2 indexers manually without cron.
All the presented Cron jobs belong to the index group. The work of the Cron job group can be set up here, Stores -> Advanced -> System:

How to Manage Magento 2 Custom Indexers Through the Command Line?
To see a complete list of indexer commands in Magento 2, click the link.
Note: While executing the bin/magento indexer:reindex amasty_example command, you may face the error:
‘Amasty Example index is locked by another reindex process. Skipping.’
You can solve it in two ways:
- Either you have to wait for the end of the reindex process, which is now being executed,
- Or the reindex process has been interrupted for any reason, and the status meaning hasn’t been changed in the table, as the process wasn’t finished:
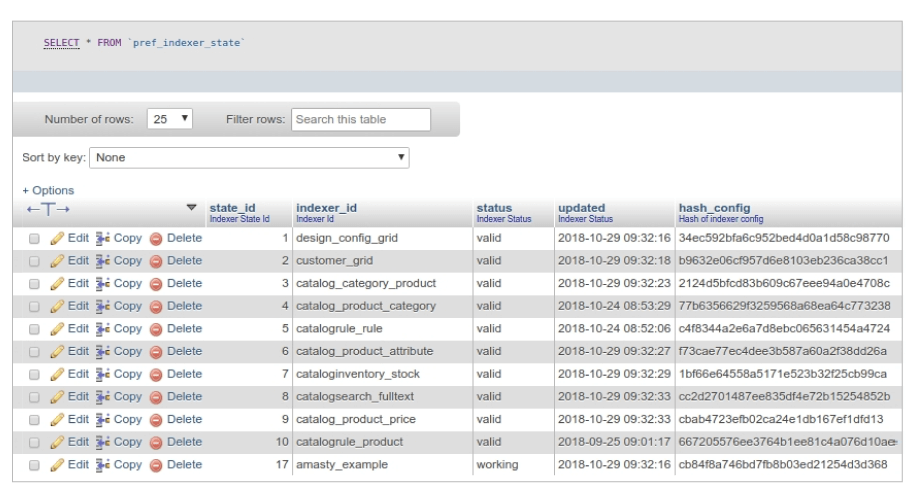
If this occurs, you can reset indexer in your Magento 2 via the bin/magento indexer:reset amasty_example command. It will change the working status to invalid, and while launching the next reindex, it will work.
Wrap-up
That’s all for today.
If you have questions or suggestions, feel free to pose them in the comments below.
And stay tuned for new technical posts!
Frequently asked questions
Index management in Magento helps improve performance by organizing data like products, prices, and categories into index tables for faster access. Admins can manage indexers via the backend or CLI to ensure the data shown is up-to-date.
Magento 2 indexing transforms data (like price rules or product relations) into index tables for quicker frontend access. It supports scheduled or manual index modes, keeping storefront data consistent with backend changes without affecting live performance.
In Magento 2 index management, reindex is required when data changes (like product prices or categories) to update the index tables. Without Magento 2 reindexing, frontend data might be outdated. Regular reindexing ensures accurate and fast retrieval of store information for users.
To create a custom indexer, define it in indexer.xml, create an indexer class implementing \Magento\Framework\Indexer\ActionInterface, and register it via di.xml. This helps index custom data for performance, keeping it aligned with Magento’s indexing flow.


