
Search engine optimization or SEO in Magento is one of the key factors for the success of your e-commerce business. While off-page Magento SEO, including citations and links pointing to your site, is crucial, you should never overlook magento SEO on-page optimization. It is within your full control and can bring immense impact when implemented properly.
Dive into our Magento 2 SEO tips and best practices, and see for yourself the impact it can have on your Magento SEO strategy.
Key Magento SEO Features
SEO Magento has multiple features that we'll overview in this article.
Meta tags for products
One of the main aspects of Magento SEO is Meta tags. The importance of Magento meta-information cannot be overestimated. Your site needs them to rank high and look attractive in SERPs. Product pages are most important for Magento e-commerce SEO, so I’ve decided to start with them.
There is one new SEO Magento 2 feature that you will like: Fields Auto-Generation. It helps to set templates for product metadata. They are applied on a global level.
The setting can be found under Stores > Configuration > Catalog > Product Fields Auto-Generation:
This is a great tool that will save you lots of time for Magento on-page SEO, especially if you have many products. However, there are some drawbacks I must point out:
- As auto-generated fields are set up globally, you can’t change them for products found in particular categories, say, for men's and women's clothes.
- Currently only 3 placeholders are supported: {{name}}, {{description}} and {{sku}}. This doesn’t provide much pliability.
- Adjustments you can make in these global settings are not retrospective, i.e. they won’t be applied to the existing products. It’s not convenient if you’ve found a misspelling or just want to change something quickly.
- The {{description}} placeholder may not be the best choice for Meta Description Mask if the product descriptions are long which is probably true for most stores (and it’s OK as they are the main content on such URLs). So if you use {{description}}, you will probably get something like this:

To sum it up, while a new Product Fields Auto-Generation feature is a great perspective, it is quite basic and limited right now.
Alternatively, you can edit a Magento 2 meta title and a Magento 2 meta description right from the product page settings: Catalog> Product > Edit > Search Engine Optimization:
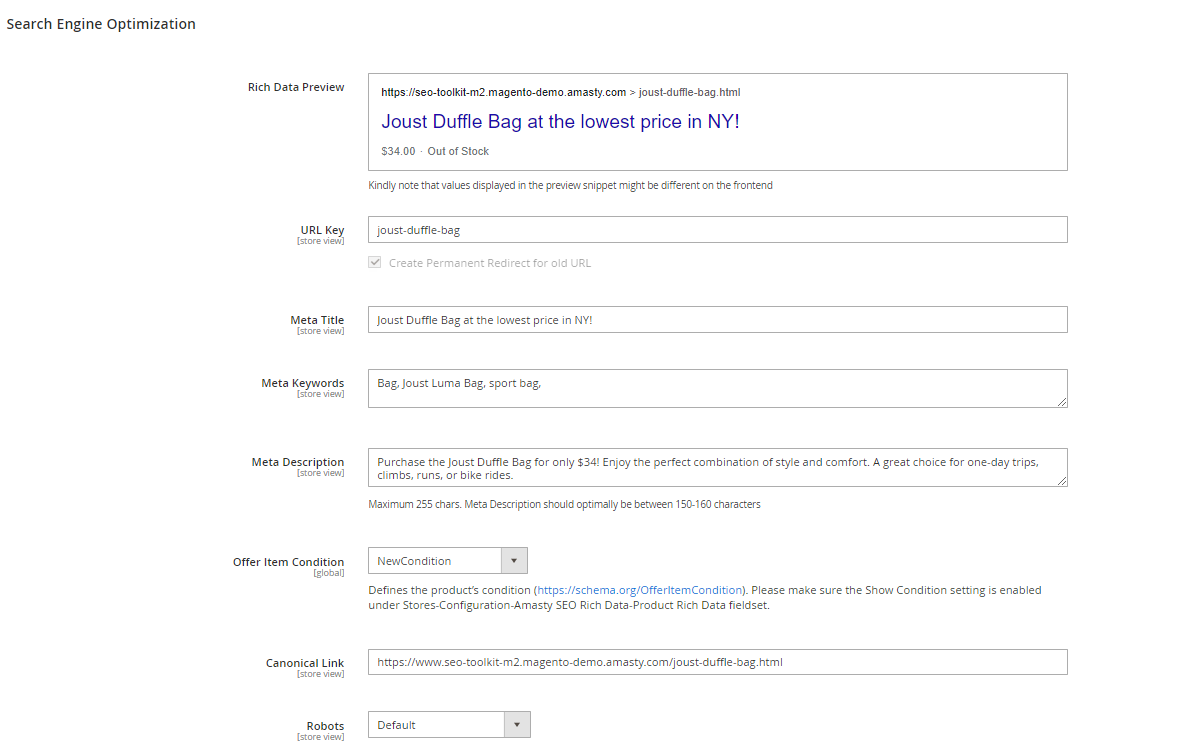
These settings will overwrite the data set globally via Product Fields Auto-Generation. This way, you can customize product titles and meta descriptions, but it will be extremely time-consuming if you have many products as you will have to make changes on a one-by-one basis.
To overcome these limitations and extend the default possibilities, we developed the Meta Tags Templates extension. With its help, you can not only create templates for meta titles, meta descriptions, and keywords but also set up H1, descriptions, and image alt for categories, subcategories, and products.
SEO-friendly URLs for products
A product URL in Magento 2 is created per the SKU number you’ve specified. But you can change or edit the URL if you need it. This feature is located in Product > Basic Settings > Search Engine Optimization.
To use SEO-friendly URLs in Magento 2, you need to enable URL rewrites in store settings.
- Go to Stores > Configuration > General and click on the Web tab
- Open the Search Engine Optimization section
- Set the Use Web Server Rewrites field to Yes
- Save the changes and clear the cache
But if you want to generate product URLs automatically, you can use the Unique Product URL extension. Once you have set up this extension, it will work automatically without any attention required.
- Read more: Why URL Structure Matters in SEO
Meta tags and SEO-friendly URLs for categories
For category meta description Magento lets you edit a store view level in Stores > Configuration > General > Design > HTML Head. This can be overwritten on a category level at Products > Categories > Search Engine Optimization:

Here you can also choose a URL for the category according to your needs.
Another way, how you can make URLs more SEO-friendly is by enabling URL rewrites. This tool optimizes URLs by deleting unnecessary words like index.php. that have a low impact on performance or site rank.
Read more: How to Enable Web Server Rewrites
Meta tags for Home page
Magento 2 will continue the tradition of Magento 1 and set the default main page title to – guess what? – Home Page, right. So one of the first things you should do when you switch to Magento 2 is to customize this important tag.
- To edit Magento 2 page title, go to Content > Pages
- Open Home Page in the edit mode
- And add a custom title in the Page Title field
- Save the changes.

In Magento meta keywords and titles can also be changed on the Search Engine Optimization tab.
Prefixes and suffixes for title tags
If you need to add your company name or anything else either at the end or the beginning of your title tags across all site pages, you can do it in Stores > Configuration > General > Design > HTML Head:

Images optimization
Image optimization plays a vital role in site speed. The latter affects your site rankings: the faster your site is the more ranking ability it has. Using high-quality images from Depositphotos can enhance your site's visual appeal and optimize performance, contributing positively to your SEO strategy. Unfortunately, Magento 2 doesn’t have out-of-box tools for image compression.
In Magento 2 you can add alt attributes for product images in Product > Edit > Images And Videos > Image > Alt Text.
And please change the alt text for your logo image from “Magento Commerce” to something related to your brand in Stores > Configuration > General > Design > HTML Head > Header:
![]()
Read more: How to Optimize Images for SEO
Unique Content for SEO with Magento
I have already pointed out many duplicate content issues that can be found on most e-commerce sites. The good news is that Magento 2 has some out-of-the-box tools to solve many of these SEO problems.
Canonical Tags
A canonical tag, also known as a canonical URL, is a URL that you mark as a preferred search engine. Thus, Google bots know which pages they need to crawl first.
If you don’t use canonical tags, Google can take any page from your site and show it in search, even the one you don't want to show. What's more, it will crawl both pages, which means that Google's bots will spend limited resources on pages you don't need, and won't reach the ones you want to show up as soon as possible.
To enable canonical tags for categories in Stores > Configuration > Catalog > Search Engine Optimization:

This setting guarantees that canonicals are also applied to sorted and filtered pages, i.e. the ones with product_list_mode=list, product_list_order=name, etc. This minimizes the chances of thin content occurrences on your site.
However, there are a few things to remember:
- Instead of canonicalization, pages with sorted or filtered results can be no-indexed either by setting up exclusions in Google Console or by adding meta robots META NAME="ROBOTS" CONTENT="NOINDEX, FOLLOW" to such URLs. But the latter is quite problematic since there is no default option for this in Magento 2, I’ll write about it in detail below. Mind that either canonicals or no-index tags should be used, not both entities simultaneously.
- If you want to utilize pages with applied filters and/or sorting options for SEO by creating landing pages, you can achieve this only with a special extension like Improved Layered Navigation for Magento 2.
- If you choose to set “Yes” for Canonical Link Meta Tag for Categories, canonical tags will be applied to paginated results too.
Category path in product URLs
If you navigate to Stores > Configuration > Catalog > Search Engine Optimization, you’ll find an option to choose whether to enable or disable showing category paths in product URLs (see the image above, 3). These category indicators are good for indexing and clearly show the logic of store navigation. There are a few scenarios for using this setting in combination with canonical tags:
- You can choose not to add a category path to a product URL. In this case, there won’t be any threats of potential duplicates.
- If you add category paths to product page addresses and don’t enable canonicals, you might face duplicate content issues.
- If both category paths and product canonicals are enabled, each product page will have a canonical pointing to itself without any category indication. Concurrently, each product URL will have a category path in its address and be accessible from all the categories you’ve added it to.
Control of Site Indexing in Magento 2 SEO
Robots.txt
One of the greatest improvements of SEO with Magento is the ability to edit your robots.txt file right from the Magento 2 admin panel.
- To generate robots.txt in Magento 2, go to Content > Design> Configuration
- Find the line Global, click the Edit link, and open the Search Engine Robots tab
- Edit custom instruction of robots.txt file
- Save Configuration

This is quite handy, isn’t it?
Your robots.txt file can be accessed at yoursite.com/robots.txt which is the right place for it.
Though a default configuration of robots.txt is ok, you would probably want these directories disallowed as well: /catalog/product_compare/, /catalogsearch/, /wishlist/. See the list of custom instructions for robots.txt.
Meta robots
As you can see in the image above, default meta robots in Magento 2 are set to INDEX, FOLLOW which is correct if you want your site to be indexed by Google.
However, you can’t customize it on a specific page. For example, if you create a duplicate product to set up an experiment in Google Analytics, you will have to find a way to restrict search engines' access to this page. You could add such URLs to the robots.txt file but this doesn’t always work as expected.
XML Sitemap
Magento 2 provides many useful settings when it comes to generating an XML sitemap, you can find them in Stores > Configuration > Catalog > XML Sitemap:

The most important changes are the following:
- All the images can be added to the sitemap automatically
- There is an option to submit the URL of your XML sitemap to robots.txt
- You can set the number of pages per file as well as the maximum file size
And now here is some bad news:
- There is no opportunity to choose which product types should be added to the XML sitemap: grouped, simple, configurable, etc. You may want to add only one type, for example, if you have configurable products that consist of two or more, say, software versions. Each version is a simple product and will be automatically included in the sitemap, while you need to include the configurable version only
- An option to add images to the XML sitemap is certainly great, but what about other file types? If you want to include PDFs, Microsoft Word files, etc., you will have to add them manually
- You can’t exclude or include particular pages if there is a need for that
HTML Sitemap
Unfortunately, no HTML sitemap is available in Magento 2 out of the box, so you’ll need customization or an extension to create one.
Additional changes in SEO Magento 2
Suffix for Product and Category URLs
This new e-commerce Magento SEO feature helps to set up a suffix for your store pages: Stores > Configuration > Catalog > Catalog > Search Engine Optimization:

In theory, you can use different suffixes for products and categories. But you will hardly benefit from that as users expect to see an identical URL structure within one site.
Moreover, using different suffixes may lead to numerous 404 pages: changes you make in these fields are retrospective but no redirects are created automatically.
So, if you used to have a product at yourstore.com/category/product.html and changed the product page's suffix to .ht, your former page will return a 404 error, so be careful with such significant changes.
Magento Schema and Rich Snippets in Magento 2
This is a great innovation of Magento 2 SEO and I’m sure merchants will be happy with it. All product pages have microdata added to them by default.
There are no settings available: they are not necessary as almost all important tags are included:

You may ask why I wrote “almost” above. Well, there is a reason for that: while Magento 2 default microdata will help to get rich snippets in Google SERPs, it is still rather basic.
For example, it’s missing “Availability”, provided by Magento 2 schema markup. You can compare the results from a page which uses the Google Rich Snippets extension:
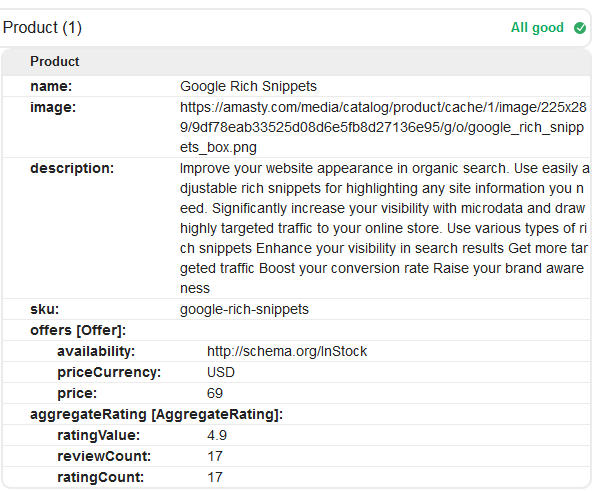
As you can see, much more info is provided to Google in this case thanks to the use of Magento schema among other things.
Additionally, only product snippets are available in a default Magento 2 configuration; if you want to add breadcrumbs, organization or search box markup, you will have to do it yourself or with the help of Magento SEO extensions.
Google Analytics and Magento 2
Magento 2 offers a handy tool for adding a Google Analytics tracking code to your store: Stores > Configuration > Sales > Google API > Google Analytics:
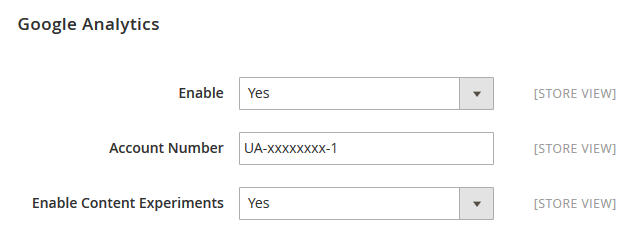
All you need to do is to enable Google Analytics and add your Tracking ID which can be found under Admin > Tracking Info in your GA Account. While Google Analytics offers a user-friendly interface, having a google certification in digital analytics can provide a deeper understanding of the platform and its capabilities.
Read more: How to add Google Analytics to Magento 2
Another great point is the ability to enable content experiments. If you do that, you will be able to add a Google Analytics Experiment code to a product page section: Product > Advanced Settings > Product View Optimization:
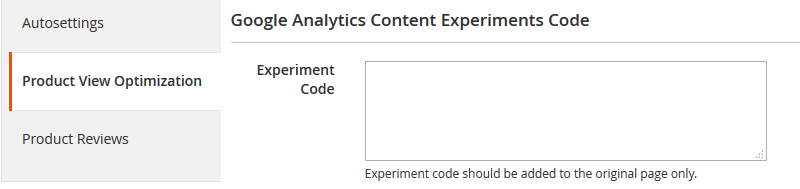
However, you will still need to create a duplicate product page and add a no-index tag to it. Generally, other aspects of setting up split tests in Magento didn’t change.
Google AdWords and Magento 2
Magento 2 developers decided to do their best and made Google AdWords implementation much easier for merchants. By navigating to Stores > Configuration > Sales > Google API > Google AdWords, you will see all the needed settings:
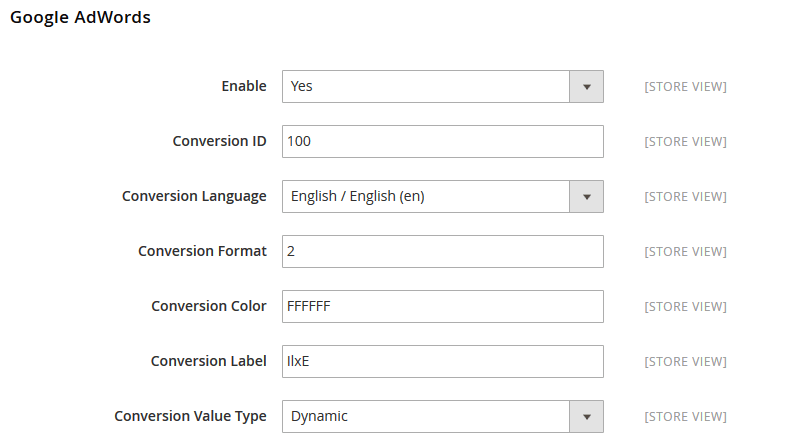
Conversion ID, Format, Color, etc. can be found in your Google AdWords account.
Navigation optimization
It may not be obvious, but you can improve on page SEO by changing the settings of the Improved Layered Navigation extension. Too long URLs, filtering results crawling, similar content, all these problems can be managed by the right settings combinations.
- block everything from indexing;
- add brand pages to indexing;
- make filtered results more appealing.
Read more: Improved Layered Navigation: Best Settings for Magento SEO
Advanced Magento 2 SEO Settings with Magento SEM Extensions
Utilizing specialized Magento 2 SEO extensions can significantly reduce your efforts and make your search optimization more efficient. Below, we highlighted key advanced settings available through Amasty's SEO Toolkit Pro and other Amasrt extensions:
SEO Toolkit Pro by Amasty
Amasty’s SEO Toolkit provides powerful tools to optimize your Magento store's search engine optimization:
- Auto-generate Meta Tags for any site page – Save time and reduce errors by creating SEO templates that automatically apply to new products, categories, or other pages. This ensures unique and relevant metadata for each page, helping attract the right audience and improving search visibility.
- Stand out in search using Rich Snippets – Enhance your search results with Google Rich Snippets by including details such as price, stock status, ratings, reviews, and breadcrumbs. This makes your store more noticeable and appealing to potential customers.
- Automate URL Rewrites generation – Quickly apply SEO-friendly URL rewrites to new products and categories with a single click. This feature simplifies URL management and speeds up product updates, making your links SEO-ready faster.
See how else you can optimize your store with SEO Toolkit Pro by visiting the extension page.
More Magento 2 SEO Extensions
Beyond the SEO Toolkit Pro, we recommend these additional extensions for advanced SEO capabilities:
- Google Page Speed Optimizer Pro – Improves the site speed and overall performance without additional costs on custom development. Our clients achieved a 15% speed increase with this extension – and all without any coding!
- Blog Pro – Make your Magento blog SEO-friendly to get top positions in Google search results and drive organic traffic to your blog pages. By the way, our own Amasty blog is powered by this extension.
- Advanced Product Reviews – Get more user-generated reviews and improve your search rankings. Positive feedback from customers increases the time new visitors spend on your page and enhances your site's overall SEO, leading to improved SERP positions.
- Google Indexing API – Traditional site indexing can take weeks, keeping your clients' new content out of search results and away from potential customers. Thus extension quickly informs Google of new, updated, or deleted pages – so your content appears in search much faster.
Explore Amasty’s full catalog to discover all available SEO extensions and their features.
Magento 2 Speed Optimization
Speed optimization is critical for both SEO and user experience, as faster load times directly influence search engine rankings and conversion rates. Here are three tips to help you speed up your Magento 2 store:
- Keep your Magento updated – Staying current with Magento updates is one of the quickest ways to improve the speed and performance of your website. Each update includes security patches and other features that ensure Magento runs efficiently and help avoid slow loading times caused by outdated systems.
- Delete unused data – Your Magento store can accumulate unnecessary data, such as details on products you no longer sell, slowing down your site. Regularly cleaning up this unused data keeps your pages loading efficiently.
- Optimize your images – Image size significantly impacts website speed, and large images can degrade performance. Use tools like Magento 2 PageSpeed Insights to identify heavy images, and convert them to optimized formats like JPEG 2000, JPEG XR, or WebP to improve load times.
While this article covers only the three most essential tips, be sure to explore our Magento 2 speed optimization guide, which includes 19 proven techniques to improve your store's performance.
Magento 2 SEO Tips
Setting up Magento E-commerce SEO for Website can be challenging. You can see that a lot of things have been done to improve SEO in Magento and provide more sufficient Magento SEO help to businesses. While these new settings are useful for e-commerce Magento SEO, most of them are too basic and offer minimum to no flexibility when it comes to real stores and products. Basically, it breaks into 3 types of actions.
- First, you can make sure your URLs are properly optimized with relevant keywords. For example, instead of a generic product URL like "www.example.com/product1," use something like this properly optimized URL example "www.example.com/blue-widgets-product1."
- Next, take advantage of Magento's built-in search engine by enabling Elasticsearch and optimizing search terms for your products.
- Finally, be sure to follow Magento and SEO best practices such as using Magento meta keywords, adding descriptive meta titles and descriptions, and using alt tags for images.
After you properly set up SEO in Magento and follow our Magento SEO tips, you can improve your website's visibility and search engine ranking. If you still have any questions, please do ask them in the comments and Amasty's Magento SEO consultants will share their insights.
Frequently asked questions
Here's a Magento SEO checklist:
- Conduct targeted keyword research.
- Create enticing meta tags.
- Generate and submit an XML sitemap for improved indexing.
- Utilize clean, descriptive URLs.
- Ensure a responsive design for mobile optimization.
- Optimize site speed.
- Implement structured data for rich snippets.
- Enhance navigation and user engagement for a positive user experience.
- Build quality backlinks for authority.
Magento SEO best practices for 2024 include optimizing for Core Web Vitals, prioritizing mobile responsiveness, leveraging structured data, focusing on user experience, and regularly updating content. Additionally, prioritize site speed, secure connections (HTTPS), and strategic use of keywords in meta tags and content.v
Small businesses searching for a proficient Magento developer or SEO specialist can seek recommendations on platforms like Magento forums, LinkedIn, or Upwork. Evaluate portfolios, check client reviews, and prioritize effective communication. Choose Magento SEO services from Adobe-certified providers.
Choosing between Shopify and Magento for SEO depends on your needs. Shopify, with built-in SEO features, suits small to medium-sized businesses. Magento, ideal for large enterprises, offers robust customization. Both thrive with the right optimization strategy


