The success of the business directly depends on the e-commerce website and how customers can use it. Merchants have to face multiple challenges, starting with choosing the software and ending with specific store settings.
In this comprehensive Magento tutorial for beginners, we'll cover essential aspects of getting started with Magento 2. We’ll find out how Magento works and how to use key Magento features.
What Is Magento?
Magento is one of the most widespread open-source platforms that merchants can use to sell their products and services online. From a technical point of view, it is based on the Zend Framework of the PHP language. From the business side, it has all the needed options for B2C and B2B commerce: Community/Enterprise versions and Cloud.
Read More: Magento Today: The State of the Platform
Why Use Magento?
The main reason for being a top-rated platform (apart from being open-source software, of course) is that Magento's architecture, interface, and performance are extremely flexible and can be easily adjusted according to particular needs.
The most significant advantages of Magento are:
A wide choice of Magento extensions
Flexible configuration
Stability even with 100,000+ products
Built-in SEO features
Mobile-friendly structure
Read More: Magento vs. Shopify vs. WooCommerce
Now, let’s proceed to the Magento tutorial step by step.
Magento User Guide: Installation
Before installing Magento, you need to check the requirements necessary for the successful operation of any Magento website. Make sure to see those for the version you want to install.
You can install the platform by following these steps:
Configure your server environment.
Get the Magento software.
Install the software using either the Web Setup Wizard or the command line.
Check the result.
Read More: Complete Guide to Magento Installation
Introduction to Magento: Store Setup
Once the installation is complete, you can proceed to store configuration. As a merchant, you should carefully follow each step of the Magento 2 store setup tutorial to build a highly profitable webstore.
See the complete M2 Admin Panel tutorial to learn how to navigate your backend properly.
Step 1. Create Your Websites/Store Views
Naturally, the main goal of any merchant is to make their brand popular in as many countries as possible. Magento features allow you to create multiple websites and store views for customers worldwide. Refer to the Multiple Stores Setup guide for detailed instructions on configuring store views.
Need multilingual support? See our Language Switcher guide and consider redirecting shoppers to the appropriate store view via GeoIP redirect.
Step 2. Supply Your Store with Inventory
Once all stores and views are ready, it's time to connect your online platform with real inventory. Manage stock and learn more about configuration.
Magento allows seamless integration with multiple warehouses and stock sources. For advanced inventory options, check the Advanced MSI extension.
Read More: MSI Multi-Source Inventory Management Guide
Step 3. Choose and Install Magento Theme
A theme defines how your store looks and performs. Choose a lightweight, responsive theme that offers an excellent shopping experience on all devices and supports customizations.
Hyvä is a popular choice among merchants due to its speed, simplicity, and developer-friendly architecture. It’s optimized for performance and SEO, making it ideal for Magento 2 stores aiming for fast loading times and better conversion rates.
After purchasing your theme, install it via Composer or manually, then activate it in Content > Design > Configuration.
Read More: Why Hyva is the Best Magento Theme
Step 4. Set Permissions for Your Team
You likely have a team responsible for managing your store. Since different employees handle different tasks, assign permissions carefully to ensure security and reduce the chance of errors.
Go to System > Permissions > All Users to add backend users, and adjust roles in User Roles.
If you’re managing a large team, we recommend using the Advanced Permissions and Admin Actions Log extensions.
Step 5. Improve the Security Level
Run a security scan to test your store’s protection level. To maintain real-time store stability, you need protection from spam and bots. You can do this easily by installing the Google Invisible reCAPTCHA extension.
If you sell in the EU, make sure your store complies with GDPR requirements.
Read More: How to Upgrade Magento to the Latest Version
Content Management
Now it's time to fill your site with products and helpful content.
Step 1. Create and Adjust Categories
Navigate to Catalog > Categories to view existing categories or add new root and subcategories. Want more flexibility? Learn how to change the category sort order.
Step 2. Upload Products
To start adding products, go to Catalog > Products. Magento allows various product types, each with unique settings.
If you’re aiming to create a catalog with a wide range of over 1,000 items, consider streamlining product management with Mass Actions and configuring an Extended Product Grid.
Read More: How to Add Simple and Configurable Products Programmatically
Step 3. Add Helpful Content
Your store shouldn’t just showcase products – you also need rich informational content to support your customers and boost search engine optimization capabilities. Well-structured content builds trust, improves user experience, and contributes to higher rankings in search results.
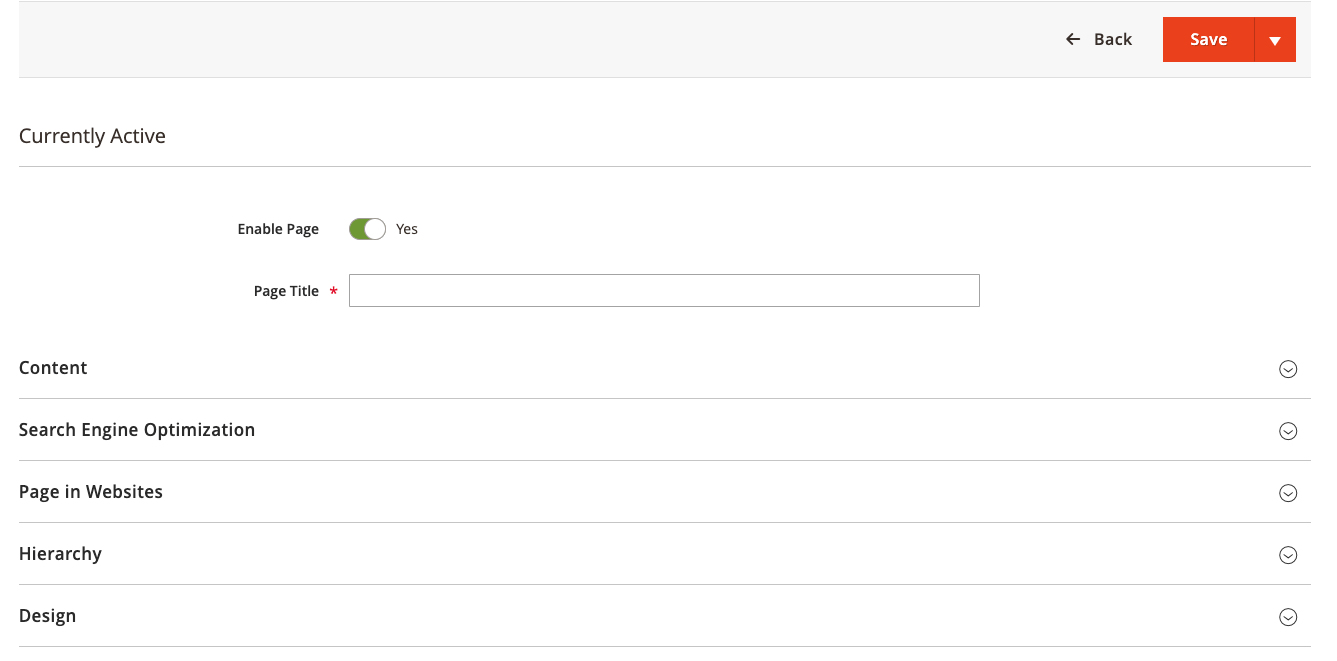
Start by going to Content > Elements > Pages to create essential CMS pages like About Us, Shipping & Returns, or Privacy Policy. Customize the content, SEO, and design settings.
Watch our CMS pages video tutorial for more tips:
What else should you consider doing?
Add Contact Forms for Better Communication – Enable customers to reach you easily by adding a contact form. Magento’s built-in form options or advanced extensions can help you collect inquiries, feedback, or support requests.
Launch a Blog for Valuable Content – A blog helps you share updates, tips, guides, and news. Use a blog extension to create a dedicated space for regular content updates that attract traffic and encourage repeat visits.
Integrate a Detailed FAQ Section – Answer common customer questions to reduce support requests and improve conversion. A searchable FAQ page can streamline decision-making and boost customer confidence.
Step 4. Configure Search Options
Many visitors rely on search to find exactly what they need. If your store’s search experience is poor, you risk losing potential customers. To ensure shoppers quickly find what they’re looking for, focus on optimizing your store’s search and navigation:
Enable Advanced Search – Install and configure Advanced Search or Elasticsearch to deliver fast, accurate, and relevant search results, even for large product catalogs.
Fine-Tune Search Settings – Adjust advanced search configurations to improve result quality, handle synonyms, and support misspelled queries.
Enhance Filtering Options – Provide intuitive layered navigation and smart filters to help users narrow down products by attributes like price, size, brand, or color.
Refine Your Navigation Menu – Design a clean, well-organized menu structure that guides users to top categories and key pages effortlessly.
See this video tutorial on how to create a Magento menu without developers’ help.
Magento: How to Use It for Sales
Once your store is ready to sell, ensure your products generate revenue and ship successfully. This section of the Magento 2 basics tutorial helps avoid missed opportunities due to technical issues.
Step 1. Configure Payments
Improper payment configuration can lead to abandoned carts, failed transactions, and lost trust. To explore Magento’s built-in options, navigate to Stores > Configuration > Sales > Payment Methods.
To further optimize your checkout experience:
Apply flexible payment restrictions based on country, order total, or customer group.
Aside from debit and credit cards, offer offline payment options like bank transfer or cash on delivery.
Consider adding popular payment gateways like PayPal, Stripe, or Klarna for a smoother customer experience.
Step 2. Create a Shipping Strategy
Once payments are secured, focus on delivering your products efficiently. Go to Stores > Configuration > Sales > Shipping Methods and review this checklist to ensure proper setup.
Magento’s default methods may not cover the needs of complex shipping operations. To optimize for cost and performance:
Set up custom shipping table rates based on destination, weight, or order value
Define advanced shipping rules for specific products, carriers, or promotions
Apply delivery restrictions for unsupported locations or hazardous items
Read More: Magento Shipping Guide
Step 3. Adjust Taxes
Tax regulations differ by country, state, and even product type. To stay compliant, head to Stores > Taxes and configure settings according to your region’s requirements. For smooth setup:
Define tax zones and rates
Create tax rules based on customer class or product class
Enable VAT ID validation if you sell to B2B customers in the EU
Refer to the Magento Tax Configuration Guide for detailed, step-by-step instructions.
Magento E-commerce Tutorial: Marketing
Now that your store is up and running, it's time to focus on promoting your products. This part of the Magento 2 open source tutorial highlights built-in marketing tools.
Step 1. Define a Smart Pricing Strategy
Pricing directly affects conversion rates and profitability. Magento’s shopping cart price rules allow you to create dynamic discounts and promotions. If your pricing is on the higher side, use tactics to boost average order value (AOV).
5 proven strategies to boost sales:
Create eye-catching promotions
Offer free gifts with purchases to increase perceived value
Boost seasonal revenue with gift cards
Use promo banners to highlight offers
Build customer loyalty with reward points
Watch: Magento 2 Promo Extension Tutorial for setup guidance
Step 2. Create Your Email Strategy
Email remains one of the most powerful tools for retaining and converting customers. Navigate to Marketing > Communications to access Magento’s email and newsletter tools. Email marketing essentials:
Segment your audience for personalized emails
Automate abandoned cart reminders to recover lost sales
Set up event-triggered emails (e.g., post-purchase follow-ups)
Tools like Follow Up Email or extensions for advanced features in email workflows can further enhance your strategy.
Read More: How to Set Up Segmented Follow-Up Emails
Step 3. Build Customer Trust
Trust is a key driver of conversions. Enable and encourage product reviews directly in Magento. To make reviews more useful:
Use an advanced reviews extension with images, pros/cons, and filters
Highlight verified buyer badges
Reply to reviews to show active engagement
- Recommend related or popular products other users bought
Search Engine Optimization in Magento
To grow your business, you need to rank high in search results. Magento includes several SEO-friendly features.
Step 1. Set Up SEO
Start with the essentials. Use our Ultimate Magento 2 SEO Guide for step-by-step configuration, no coding needed.
Key areas to focus on:
Add Google Tag Manager for analytics and marketing tracking
Create clean, SEO-friendly URLs
Configure an XML sitemap to help search engines index your site
Optimize your robots.txt file to control crawler access
Step 2. Monitor Your SEO Progress
SEO is a continuous process. For real growth, track what's working.
Connect Google Analytics for real-time traffic and behavior data
Use per-page SEO audits and metadata optimization tools
Consider advanced SEO extensions for deeper analysis and control
Read More: How to Connect Magento 2 and Google Analytics 4
Revenue
Managing revenue effectively is vital to growing a profitable online business. Magento provides several tools for tracking sales and improving financial performance.
Step 1. Analyze Store Performance
Visit Admin Panel > Dashboard to access key sales metrics and performance charts. Need deeper insights? Install the Advanced Reports extension to build a data-driven strategy.
Pro tips to increase visibility and conversions:
Connect your admin panel to popular marketplaces (Amazon, eBay, etc.) via Product Feeds
Display up-sells and cross-sells to raise AOV
Use product labels to draw attention to key offers
Step 2. Manage Sales Documents
All order-related documents are found under the Sales tab, including:
Invoices
Shipments
Credit memos
Transactions
Billing agreements
Make operations smoother by learning:
How to customize invoices
Tools to speed up order management
How to collect and use multiple order attributes
Step 3. Minimize Revenue Losses and Returns
For e-commerce, business losses are unavoidable. But you can adjust your selling strategy to minimize them.
Proven tactics:
Recover abandoned carts with automation
Streamline your returns process with an RMA tool
Use analytics to identify and address high-return products
Takeaways
To sum up, Magento offers powerful functionality that is relatively easy to configure. In this Magento 2 step-by-step learning path, we’ve covered the essentials.
For more in-depth Magento 2 training, check out our comprehensive Magento guides to build a successful online store.
Still missing something? Contact our Magento development experts to discuss your needs.