- Knowledge Base
- Most Asked Magento-Related Questions
- How to add custom registration fields to Magento 2?
How to add custom registration fields to Magento 2?
How to add fields to the registration form in Magento 2?
Step 1. To add new fields to the registration form in Magento 2 go to Stores > Configuration > Customer Attributes and specify the shown options.
Step 2. Go to Customers > Customer Attributes > Manage Attributes. Set new attributes or customize the already created ones. Click Add New Attribute to add an attribute.
Step 3. Fill in the proposed lines.
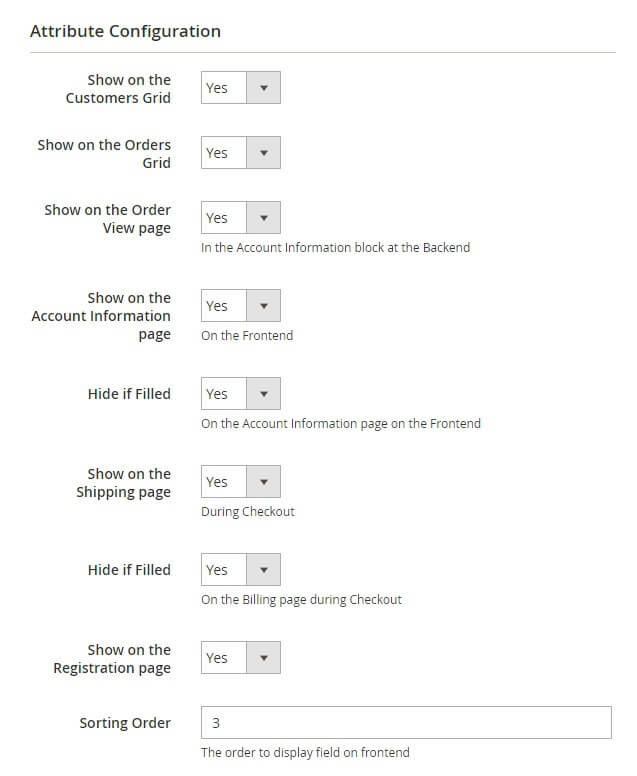
Step 4. Choose yes or no on the Attribute Configuration options and define a Sorting Order.
How to add a customer group to the registration form in Magento 2?
Allow customers to change their group option lets customers choose and change their customer group. In Step 1 change the customer attributes of the Customer Group Selector input type to Yes to add a customer group to the registration form in Magento 2:
Such an element as custom registration fields is a tool for learning your audience. But it's important to remember that not everyone likes to sit and enter a lot of information at the registration stage. It can be time-consuming. Therefore, you need to make this process user-friendly.
Adding new custom fields to the registration form in Magento 2 is a technically complex process that requires knowledge of the code. With the Custom Registration Fields extension, you can create new fields without writing a line of code. It provides an opportunity to create a personalized registration stage by using relations between fields and collect all the necessary user information.
To add a custom attribute in the customer registration form in Magento 2, follow these steps:
Step 1. In Magento 2 to add a custom attribute you need to go to Stores > Configuration > Customer Attributes.
Here you will see 2 options available:
- Set Display Customer Attributes on the 'selected customer' option to Yes to make the attributes visible from the backend when selecting a customer during the order creation.
- Allow customers to change their group option lets customers choose and change their customer group. To make the option work, create a customer attribute of the Customer Group Selector input type:
Step 2. Now you need to set up the attribute.
Follow this way to do it: Customers > Customer Attributes > Manage Attributes. On this grid, you can set new attributes and customize the already created ones. Then click Add New Attribute to add an attribute:
Step 3. On the attribute configuration step, you will need to fill in several lines.
First of all, you are to fill in such Attribute Properties as:
- Default Label/ Attribute Code, which specifies an attribute label and a code.
- The Store View section provides you an opportunity to select the store view for which the attribute will be accessible.
- And Catalog Input Type for Store Owner field consists of several options, which you choose depending on your specific needs. The following fields will depend on the selection here.
Let it be Text Field, for example.
Then you will see the Default Value line, which defines the preselected by a default value if necessary, and the Values Required line, which consists of yes and no options. If you choose yes, then customers won’t be able to leave this attribute field blank while getting registered.
And the last line in the Attribute Properties section is Input Validation. It specifies the type of input validation.
Step 4. On this step, you have to choose yes or no on the Attribute Configuration options and define a Sorting Order(the order to display a field on the frontend). You can see these options on the screenshot:
This extension synergizes perfectly with the Custom Checkout Fields extension. Working together, these extensions will improve your store's user experience and help you gather the information you need to grow your business.
Try the Elasticsearch Extension
Enhance your Magento 2 store's search capabilities with Amasty's Elasticsearch Extension. This powerful tool improves search accuracy and speed, helping your customers find products more easily. Experience seamless integration and increased conversion rates by upgrading your store's search functionality today!


Login and Registration Form