- Knowledge Base
- Most Asked Magento-Related Questions
- How to install Cloud CLI in Magento 2?
How to install Cloud CLI in Magento 2?
Magento Cloud Command Line Interface is a project and environment management tool for Magento Cloud that implements many of the features of the Project web interface. This is done using various Magento 2 CLI commands.
So how to install the Magento Cloud CLI?
Step 1. Navigate to the directory on your local workstation where you plan to clone cloud projects and in which the Magento File System Owner has write access.
Step 2. Install the magento-cloud CLI:
curl -sS https://accounts.magento.cloud/cli/installer | php
Step 3. Use the following command to add magento-cloud CLI to the bash profile:
export PATH=$PATH:$HOME/.magento-cloud/bin
Step 4. Restart the modernized bash profile:
. ~/.bash_profile
Step 5. Call magento-cloud via CLI command and create your Magento 2 Cloud account login and password when needed to launch the CLI:
magento-cloud
Welcome to Magento Cloud!
Please log in using your Magento Cloud account.
Your email address or username:
Step 6. Check that the magento-cloud command is in your path. The following piece of code lists common Magento CLI commands:
magento-cloud list
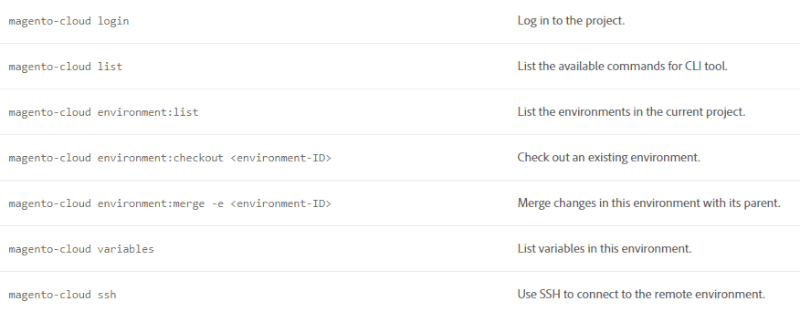
These commands are for managing ?loud Integration environments. The most frequently used commands are shown in the following table:
In order to make the process of managing your store from the Admin panel even more efficient and prevent lags in your store, you can use the Reindex from Admin extension. It will help ease and automate the re-indexing process and save your customers from suffering from store lags. With this extension, you can do all this yourself without the help of developers. It is convenient to manage re-indexing with the use of this extension since everything will be located in a convenient grid, in which you can also check the live status of reindexing, which will help you to be aware of all errors and fix them as quickly as possible.


Login and Registration Form