How to Setup Magento 2 Website Switcher?
Setting up a Magento 2 website switcher can enhance the shopping experience for your international customers, as it enables them to switch easily between multiple store views, languages, or currencies, based on your configuration.
What is a Website Switcher in Magento 2?
A website switcher is an extension that allows online merchants to provide their customers with options to change the storefront as per their preferred language, currency, or region. It enhances user experience through localized and personalized shopping experiences.
Why Use a Website Switcher?
- Multi-regional handling: Helps manage different regions with automatic redirect of customers to the region-specific store based on their IP address.
- Enhanced user experience: Customers can view the store in their preferred language and currency.
- SEO benefits: Allows search engines to know your site caters to different regions and languages.
Steps to Set Up Magento 2 Website Switcher
To set up multiple websites, stores, and store views in Magento 2, follow the steps outlined below:
Create Websites
- Log in to the Magento Admin Panel with an authorized account
- Click Stores > Settings > All Stores
- On the Stores page, click “Create Website”
- Fill in the following required fields and click “Save Web Site”:
- Name - Enter website name
- Code - Enter a unique code to identify the website
- Sort Order - Set website sort order
Create Stores
- In the Magento Admin panel, click Stores > Settings > All Stores
- Click “Create Store”
- Fill the required fields and click “Save Store”:
- Website: Choose the associated website
- Name: Enter the store name
- Code: Enter a unique store code
- Root Category: Select a root category (create a unique one if desired)
Create Store View
- In the Magento Admin Panel, go to Stores > Settings > All Stores
- Click “Create Store View”
- Fill in the required fields and click “Save Store View”:
- Store: Choose the associated store
- Name: Enter the store view name
- Code: Enter a unique store view code
- Sort Order: Set the store view sort order
Change the Website Base URL
- Go to Stores > Settings > Configuration in the Magento Admin Panel
- Click General > Web
- Select the desired website from the Store View list
- Expand the Base URLs section and uncheck “Use Default”
- Enter the URL in the Base URL and Base Link URL fields.
- Repeat steps 4 and 5 for the Base URLs (Secure) section.
- Click “Save Config”
Change the Default Store View Base URL
- Go to Stores > Settings > Configuration in the Magento Admin Panel
- Click General > Web
- Select “Default Config” from the Store View list
- Expand the Base URLs section and uncheck “Use system value”
- Enter the Base URL in the Base URL and Base Link URL fields
- Repeat steps 4 and 5 for the Base URLs (Secure) section
- Click “Save Config”
Add the Store Code to the Base URL
- Go to Stores > Settings > Configuration in the Magento 2 Admin sidebar
- Expand General > Web in the left panel
- Select “Default Config” from the Store View dropdown
- Expand the URL Options section
- Uncheck “Use System Value” for the “Add Store Code to Urls” field
- Set “Add Store Code” to “YES”
- Click “Save Config”
Flush Magento 2 Cache
- Go to System > Cache Management in the Admin sidebar
- On the Cache Management page, click “Flush Magento Cache”
Steps to Set Up Magento 2 Website Switcher with Amasty Store Switcher Extension
Extension Installation
First, install the extension here to begin customizing your application and tailoring its functionality to better suit your needs.
Database Installation
Then you’ll need to install a GeoIP database to make sure that the module works correctly and detects the visitor's location.
To install the GeoIP database, go to Stores → Configuration → Amasty Extensions → GeoIP Data.

Hit the Download and Import button to make the extension download or update SQL dump file and import it into your database automatically.
Note: In Download and Import mode, disregard the error notification in the Import section when CSV files are absent. These files aren't necessary, and the import will still proceed.
To import files from your own source, use the Import option. Path to the files should look like this (the part 'var/amasty' should be replaced with your folders’ names):
var/amasty/geoip/GeoLite2-City-Blocks-IPv4.csv
var/amasty/geoip/GeoLite2-City-Locations-en.csv
In the Import section, the Import button is grayed out by default. It will be available right after you upload the CSV files. The red error notification will switch to green success notification when the import is completed.
IP Database Update Settings
The database included in the extension was last updated on October 24, 2023. To keep the IP database current, you can update it using one of two methods.
Please note that regardless of the updating method chosen, you need to import the IP database first.

Refresh IP Database –select the appropriate method for refreshing the IP database:
- Manually – to manually upload the updated database files;
- Update via Amasty Service – to update the database automatically and regularly via Amasty Service, which is complimentary for you until August 2024.
Extension Configuration
To configure the Store Switcher extension, go to Stores → Configuration → Amasty Extensions → GeoIP Redirect.
First, expand the General section.

Enable GeoIP Redirect– enable or disable the Store Switcher module.
Then, proceed to the Restriction section.

Apply Logic To – select the general logic of redirecting rules:
- All URLs
- Specified URLs
- All Except Specified URLs
- Redirect From Home Page Only
Excepted URLs – choose the Specified URLs or All Except Specified URLs options above to define the excepted URLs here.
User Agents to Ignore – ignore redirection rules for specified search engines.
Restriction by IP – restrict redirection for certain IP addresses.

First Visit Redirect Only – activate to enable redirection only for the first visit.
Note: Beware that if you set this option to No, customers wouldn’t be able to switch store view and currency at their desire.
Redirect Between Websites – enable to redirect visitors between several websites.
Country to Store Redirect Configuration
Expand the Country to Store View Redirect section.
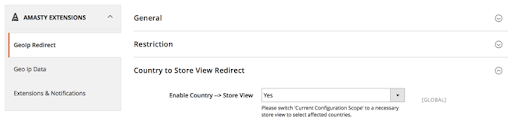
Enable Country –> Store View – enable to redirect visitors from certain countries to particular store views.

Switch the Store View dropdown menu to the required store version and define the list of countries that will be affected.
Now, visitors from the selected countries will see the defined store view version.
Countries and Currencies Mapping
Open the Country to Currency Switch section.

Enable Country –> Currency – set this option to Yes to automatically switch currency according to the user's location.
Country to Currency Mapping – define country-currency relation by selecting countries and the appropriate currencies. Hit the Add button to create a new relation.
Country to URL Redirect
Then, proceed to the Country to URL Redirect section.

Enable Country –> URL – enable to redirect visitors from certain locations to any other URL.
Country to URL Mapping – select locations and specify the URL that would be used to redirect visitors to. Use the Add button to create a new country – URL relation.
Note: If you enable the Use Website checkboxes for the mapping options, the same set of rules would be applied to the Main Website and the selected Store View.
Loading
© 2009-2025 Amasty. All Rights Reserved.
Login and Registration Form