- Knowledge Base
- Most Asked Magento-Related Questions
- How to add a CMS block to any Magento 2 page?
How to add a CMS block to any Magento 2 page?
Magento 2 is known as a highly-customizable platform. And rich CMS blocks’ settings are direct evidence. Let’s see how to create a CMS block in Magento 2 without any programming skills.
Step 1. Log in to the admin panel and navigate to Content > Elements > Blocks to start creating Magento 2 CMS block programmatically.
Step 2. Click Add New Block and set Enable Block field to continue the process of creating CMS block in Magento 2.
Step 3. Enter a Block Title and create a unique Identifier. The identifier should include only lowercase characters with underscores.
Step 4. Choose the needed Store View and fill in the content by using WYSIWYG editor or HTML code. If you want to call newsletter Magento 2 in static block, enter the following code in the content field:
Step 5. When ready, click Save & Close.
Helpful tip: Newsletters can help you convert your one-time buyers into regular ones. For this, you can use our Thank-you Page extension. Place a valuable offer before the newsletter block on the Magento 2 Success page and get more loyal customers that will return to your store for the next purchase.
Step 6. Next, we need to create a widget to place this block to the needed page. For this, go to Content > Elements > Widgets and click Add Widget.
Step 7. From the Type dropdown, choose CMS Static Block, pick the needed Design Theme, and click Continue.
Step 8. Fill in the Widget Title field, choose the needed Store Views, and enter the Sort Order of this widget.
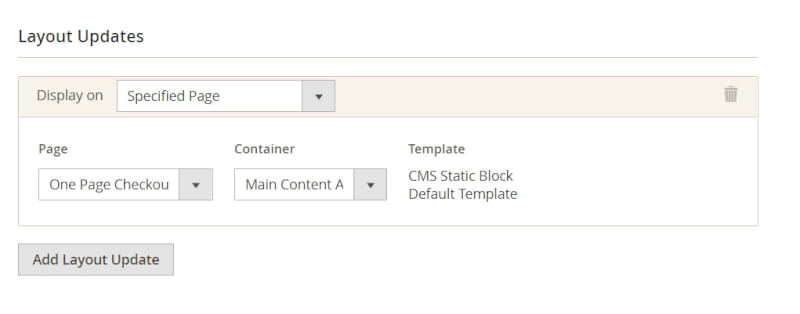
Step 9. Then, click Add Layout Update, and specify where you want to show this block. For example, you can add a CMS block to Magento 2 checkout. For this, in the Display on, set Specified Page, and choose the needed checkout page. Then define where on the page this block should be displayed in the Container field.
Note: Learn more about positions details in the official documentation.
Step 10. Finally, go to the Widget Options tab and select the block that you want to display.
Step 11. Save the changes to finish the Magento 2 creating block programmatically process.
See also: Learn how to use widgets to inform customers about new products in your store.
And that’s it, after refreshing the cache, you will see the newsletter signup block in your Magento 2.
According to the statistics, you may find helpful the following question about newsletter subscription.
Try the Elasticsearch Extension
Enhance your Magento 2 store's search capabilities with Amasty's Elasticsearch Extension. This powerful tool improves search accuracy and speed, helping your customers find products more easily. Experience seamless integration and increased conversion rates by upgrading your store's search functionality today!


Login and Registration Form