- Knowledge Base
- Most Asked Magento-Related Questions
- How to enable Inline Translation in Magento 1/2?
How to enable Inline Translation in Magento 1/2?
In case you’ve already installed your language packs and created different store views for different languages, it’s about time to think over the inline translation.
Have you opted for language packages? Then you may be seeking for a personal approach to your multilanguage audience. Try our Magento 2 GeoIP extension to help you with this.
What is inline translation in Magento?
The Translate Inline option does well when you need magento translations for your website but translation packs are not fully translated. As translation function is not applicable for static blocks and CMS pages, you can achieve it via the inline translation. To translate text on your store frontend you need to make the next configurations:
Magento 1 & Magento 2 inline translation configuration [Admin Panel]
Relying on the version of the platform in use decide on the steps.
Step 1: Magento 1
- Navigate to the Admin Panel> System> Configuration:
-
Find the Developer tab under Advanced settings and preset it:
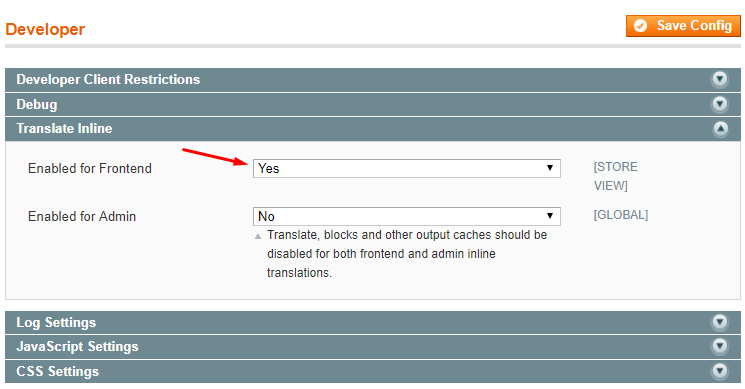
- Open the Translate Inline options:
- Set the ‘Enable for Frontend’ option to ‘Yes’ and click the ‘Save Config’ button:
Step 1: Magento 2
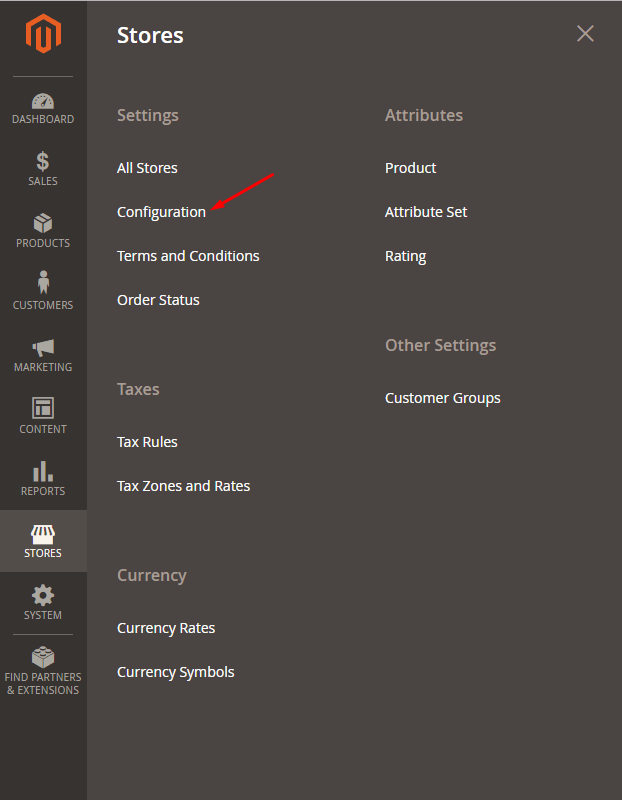
- Navigate to the Admin Panel> Stores> Configuration:
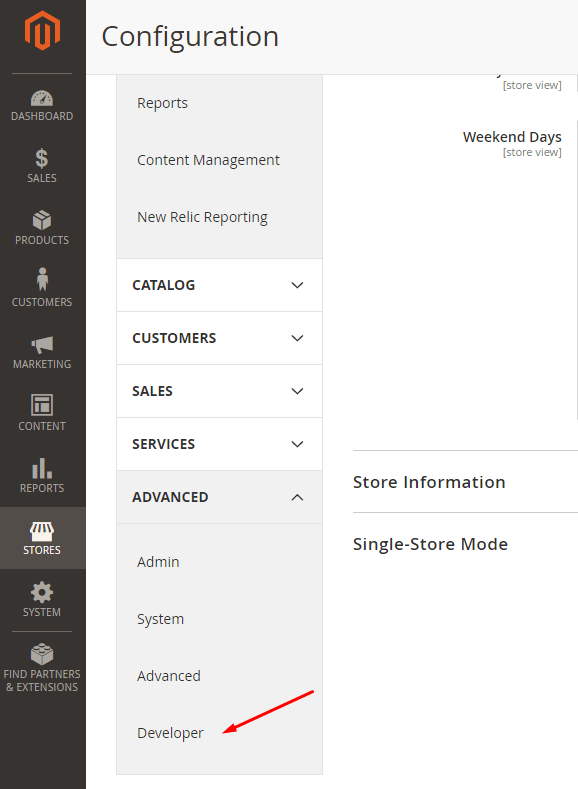
- Find the Developer tab under Advanced settings and preset it:
- Open the Translate Inline options:
- Set the ‘Enable for Frontend’ option to ‘Yes’ and click the ‘Save Config’ button:
Step 2: Store frontend (Magento 1&2)
- Once the Translate Inline is enabled and you see the message, clear the cache:
- Then navigate to your store frontend and refresh the page. Thus, different sections of text on your website are placed into red frames:
- Let’s assume you want to change the ‘Cart’ section to ‘My Cart’. Mouseover the red frame and click the icon with a book:
- Change the ‘Cart’ for ‘My Cart’ in the ‘Custom’ field of the pop-up window and click the ‘Submit’ button to save the settings:
- Refresh the page to make sure all set:
- Once you’ve finished with the settings, don’t forget to disable the Translate Inline option and press the ‘Save Config’ button.
How to configure Magento 2 inline translation programmatically?
To adjust your store with multiple languages programmatically, you need to find the Magento 2 translation file, which is located in the i18n folder.
We’ll take an example of the Magento Luma theme. In this case, the Magento 2 translation CSV file is located in: <Magento_Luma_theme_dir>/i18n/en_US.csv.
In this file, you’ll find Magento 2 translation table where (a) the left column contains the default values (keys), and (b) the right column contains the values, which should be used instead when Luma is applied:
| "Add to Wish List", | "Wish List" |
| "Add to Compare", | "Compare" |
| "Your Checkout Progress", | "Checkout Progress" |
| "Card Verification Number", | "CVV" |
Thus, if fr_FR.csv dictionary is added to the Luma theme, it will look as follows:
| "Add to Wish List", | <translation> |
| "Add to Compare", | <translation> |
| "Your Checkout Progress", | <translation> |
| "Card Verification Number", | <translation> |
To make the changes:
- Create a new translation file, e.g: <Magento_Luma_theme_dir>/i18n/de_DE.csv;
- Find a string (strings) that needs to be changed in the right column;
- Replace the string (strings) with the needed equivalent, e.g.: "Add to Wish List" to "Wunschliste";
- Save the changed file on your server. In case you edit it locally, upload it to your website;
- Once it’s done, flush Magento 2 cache.
Note that you can also generate a dictionary for the theme by using the i18n tool.
Magento Inline Translation is not working
If your Magento translate via CSV is not working, here are some widespread mistakes:
- enable the Translate Inline option for the current store view only and for the remaining stores you need to disable it;
- open your store frontend via Firefox (or install a new ‘fresh’ browser) and use the hard refresh option;
- navigate to your cache management and disable everything odd.


Login and Registration Form