Sidebar
magento_2:landing_pages
Table of Contents
For more details, see the way the Landing Pages for Magento 2 extension works.
Guide for Landing Pages for Magento 2
Let customers explore your store goods via multiple landing pages. Boost sales with custom selection of products for each page. Improve your site search engine ranking building SEO-optimized unique content.
- Create as many landing pages as you need
- Add unique URLs and metadata to your landing pages
- Use flexible conditions for adding products to each page
- Display custom CMS blocks at any place of the page
- Add landing pages to the sitemap for better visibility
- Compatible with Improved Layered Navigation
- Compatible with ChatGPT AI Content Generator Pro
- Hyvä-ready storefront and Hyvä Checkout ready
- WCAG compliance (for Hyvä Theme)
The extension is compatible with Hyvä Theme. You can find the ‘amasty/module-xlanding-hyva' package for installing in composer suggest. The compatibility is available as a part of an active product subscription or support subscription.
The Enterprise and Cloud editions of the extension are compatible with Live Search.
Landing Pages Grid
To create or edit Landing Pages, go to Admin Panel→ Content→ Landing Pages section→ Pages.
Select quick actions for any landing page on the grid. It allows to edit, delete, duplicate or view a page.

With the extension, you can also select multiple landing pages and apply the following Mass Actions to them:
- Delete
- Disable
- Enable
- Change Meta Robots

General landing page info
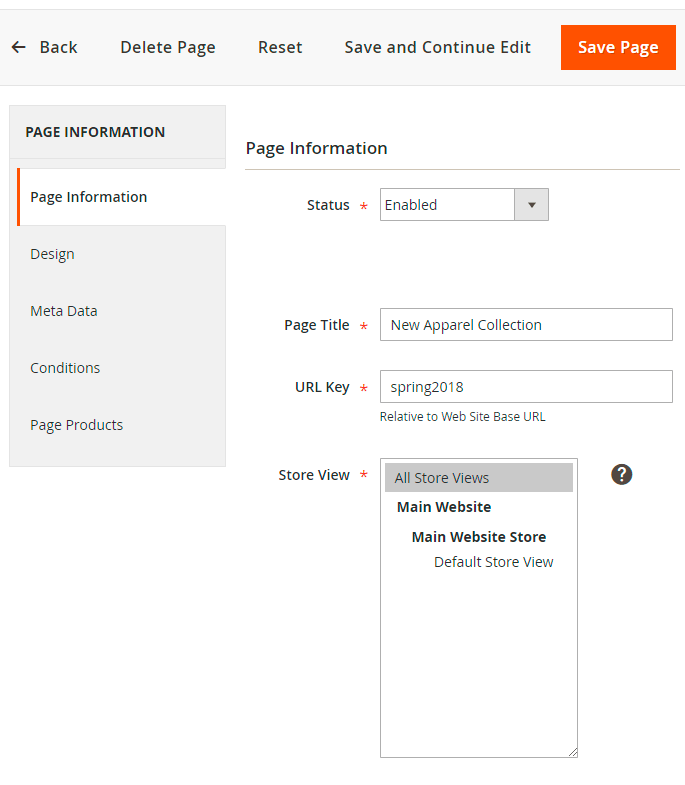
At the Page Information tab, you can choose at which store views to display the landing page, specify its name and URL key.
If URL key is equal to sport-backpacks,
URL of the landing page will be:
yoursite.com/sport-backpacks
The URL will be canonical. If URLs on
your site have suffixes, the landing page
address will include suffix too.
E.g. yoursite.com/sport-backpacks.html
Landing page layout and static blocks
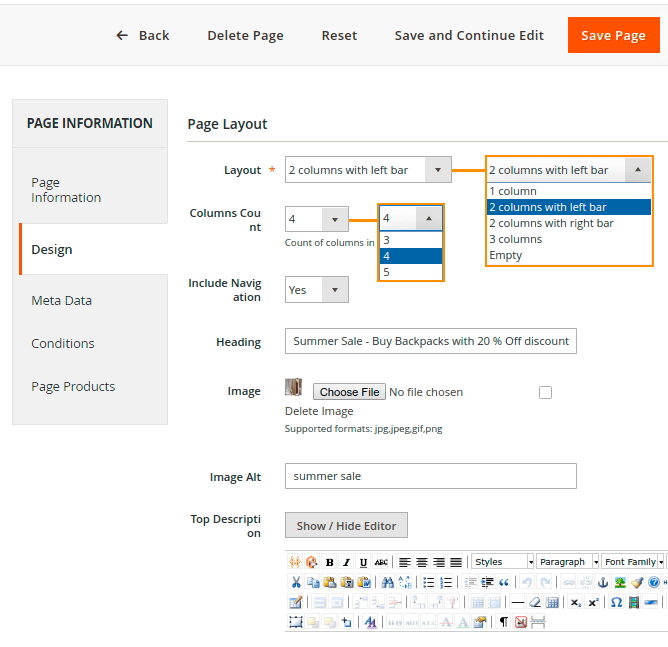
At the Design tab, you can choose Layout for the landing page:
- 1 column
- 2 columns with left bar
- 2 columns with right bar
- 3 columns
- Page Full Width
- Category Full Width
- Product Full Width
Please note, that currently within the Hyva Theme compatibility, layout adaptation is implemented according to the options: 2 columns with left bar, 2 columns with right bar, and 3 columns. Other options display as 2 columns with a left bar.
Include Navigation - you can choose whether to display the navigation block and where.
Columns count - You can select in how many columns the products will be displayed on landing pages.
You can specify Heading, Image and custom description for each landing page.
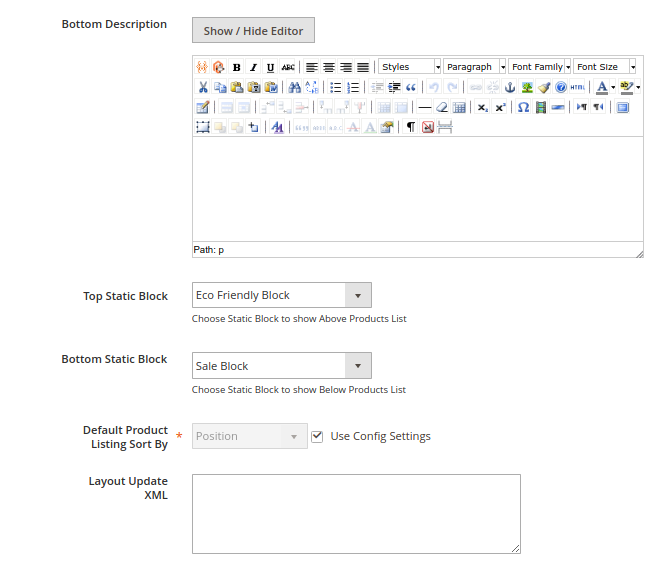
Static Block - You can display a static block above (Top) and under (Bottom) the list of products.
Default Product Listing Sort by - If you want to use the Configuration Settings, put a check mark in the checkbox. If not, select the desired default sorting (Position, Product Name, Price) from dropdown.
Layout Update XML - Customize layout template.
Meta Data
At the Meta Data tab, you can specify meta tags for the landing page.
If you have multiple store views, it is possible to specify meta title, description, and keywords for each of them, for a single landing page.
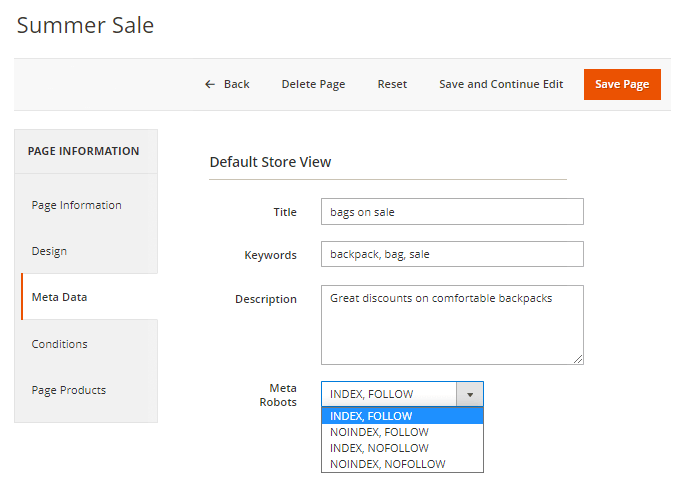
Specify Meta Robots so the search engine bots could better understand your preferences for indexing.
Conditions
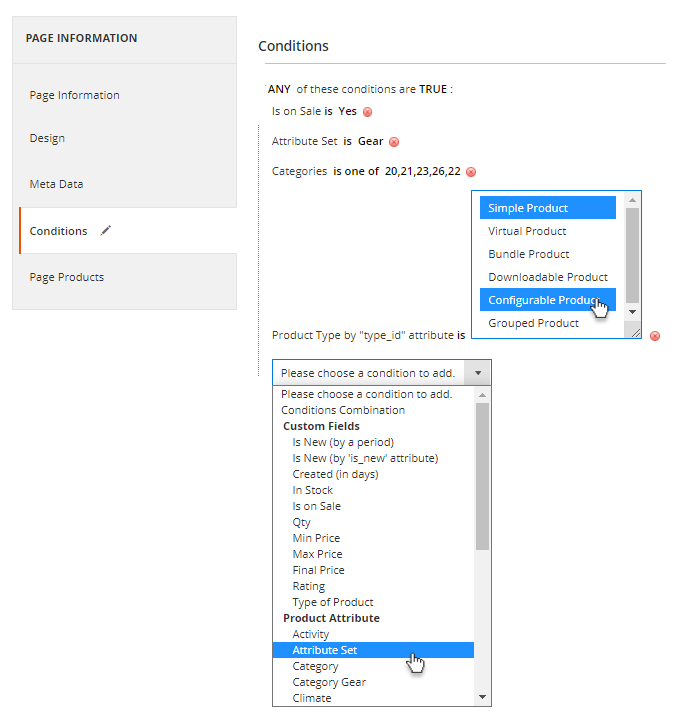
Combine product conditions according to your needs. The conditions should be met for all products that are displayed on the landing page.
With Custom Fields, you can specify attribute conditions to narrow down the product list. You can combine an unlimited number of attributes.
Page Products
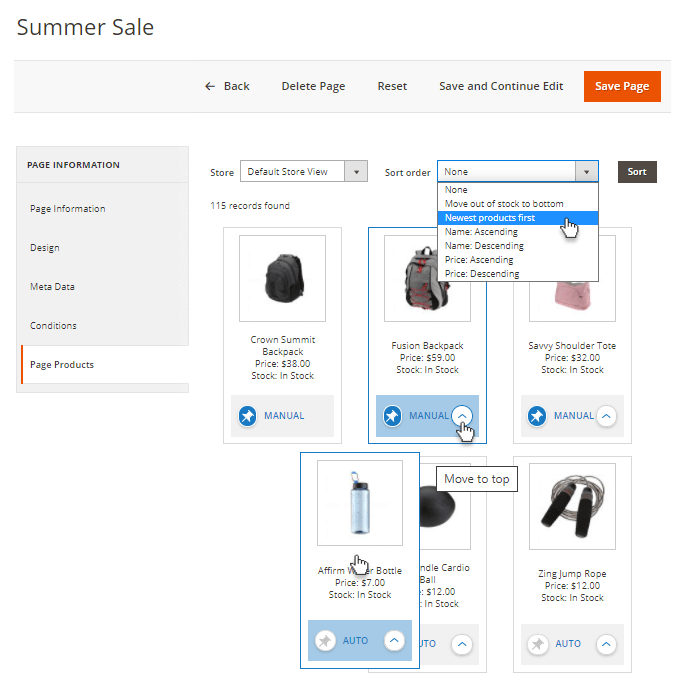
Preview the products that will be displayed on the landing page.
You can sort them manually if needed. Choose the product you want to move and enable the Manual Sorting mode for it. Then, simply drag the product to the desired place.
You can also use the Move to top link to instantly move a product to the top of the list.
Import
To import a landing page as a .CSV file, go to Stores → Configuration → Amasty Extensions section → Landing Pages
Select a target store to which the landing page will be imported.
Upload a .CSV file with a landing page. Remember to click on the 'Save Config' button, when you are done.

Search Landing Pages
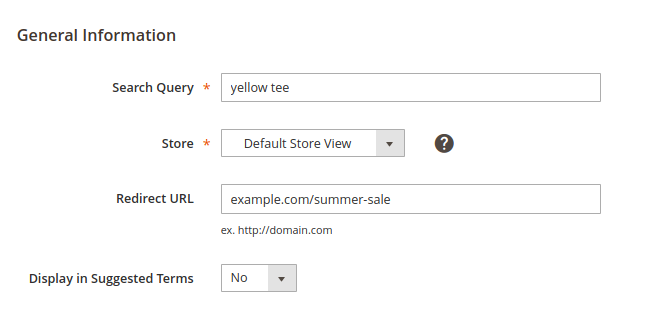
To display Landing Pages instead of the search results page, go to Admin Panel → Marketing → SEO & Search → Search Terms → Press 'Add New Search Term' .
- Input expected Search Query;
- Specify the Store;
- Redirect URL - input the URL of the landing page.
Landing Page Link Widget
With the extension, you can add landing page links to any website page using widgets.
To do this, go to the needed page, scroll to Content section and add Widget. In the Type field choose Amasty Landing Page Link.

Anchor Custom Text - Set a custom text for your link. If empty, the Page Title will be used.
Anchor Custom Title - Set a custom title for your link. You can also leave this field empty if preferred.
You can also select a template for your link block and choose the landing page you want to link to.
The Magento 2 Landing Pages extension is compatible with Amasty Improved Layered Navigation and Amasty Elastic Search extensions.
The Magento 2 Landing Pages extension is compatible with Amasty ChatGPT AI Content Generator Pro, enabling content generation for Landing Pages (Note: the compatibility is available as part of an active product subscription or Support Subscription)
Usage example
How to use dynamic categories
The extension provides you with the ability to use dynamic categories based on landing pages.
Let’s check how to set up the feature.
Step 1. Create a new landing page. Go to Admin Panel→ Content→ Landing Pages section→ Pages and click the Add New Page button.
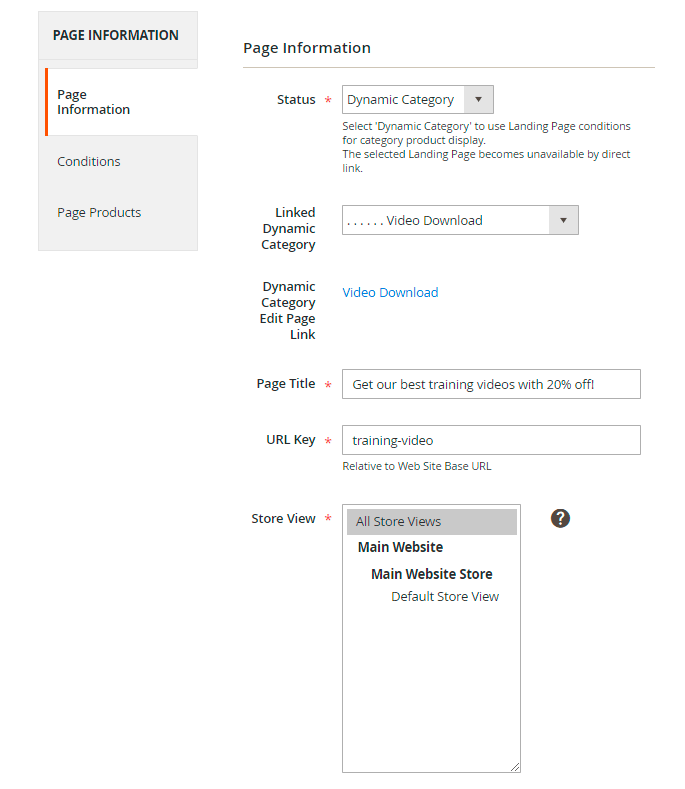
Step 2. Fill in the necessary information on the Page Information tab.
Set the Status field to Dynamic Category and choose the dynamic category in the Linked Dynamic Category field (you can choose any of the existing categories or create a new one). If you need to edit the category you've chosen as a dynamic, click the Dynamic Category Edit Page Link to get right to the dynamic category page.
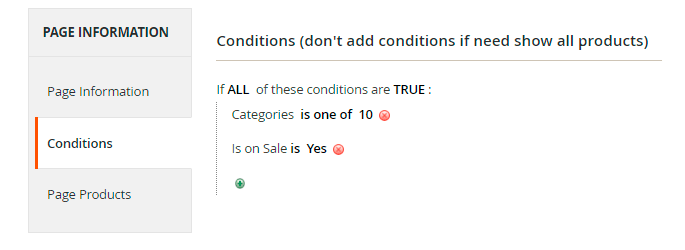
Step 3. Specify conditions to be applied on the Conditions tab. Remember, that the products displayed on the landing page will be refreshed automatically in accordance with the conditions you’ve set up.
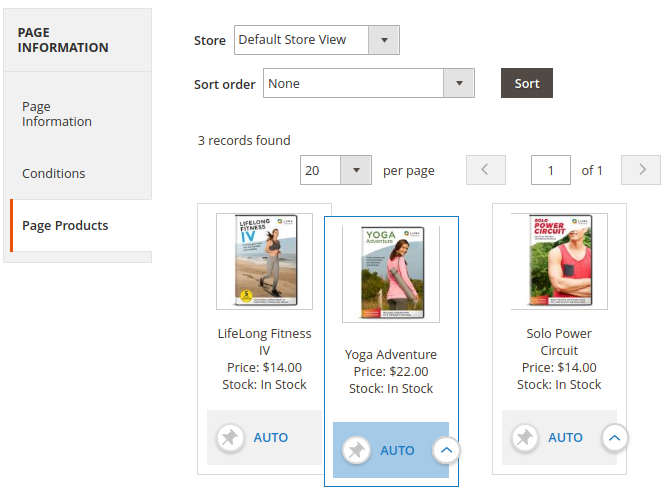
Step 4. Preview the products that will be displayed to customers on the page (according to the conditions we've set, these will be the products on sale from the category Video Download). Sort the products if needed.
How it will be displayed on the frontend:
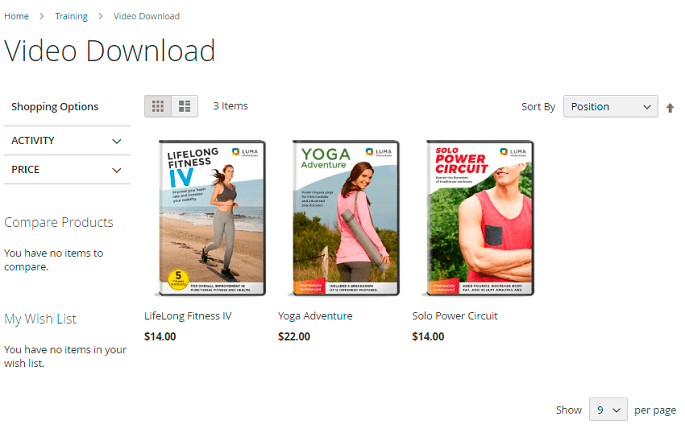
When a customer clicks to a dynamic category, he automatically gets to a landing page (note, that the module creates redirect from the landing page’s link to the product category’s link).
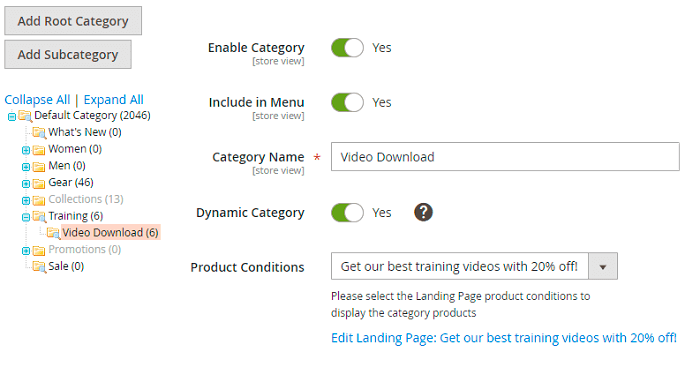
You can also switch on a dynamic category right from the category itself. To do this, go to Catalog → Categories and choose the category you want to make dynamic. Set the Dynamic Category to Yes and choose the landing page to display these products on in the Product Conditions field.
Compatibility with ChatGPT AI Content Generator Pro
The extension is compatible with the Pro version of Amasty ChatGPT AI Content Generator (the compatibility is available as a part of an active product subscription or support subscription). This means that if you have both extensions installed, you can automatically generate Landing Pages content using AI Content Generator.
This functionality is available if you have both extensions installed: Landing Pages for Magento 2 and ChatGPT AI Content Generator Pro for Magento 2.
With the ChatGPT AI Content Generator Pro for Magento 2 you can automatically generate the following types of content for Landing Pages:
Page Information tab:
- Page Title - is generated based on previous title.

Design tab:
- Heading - is generated based on Page Title or current heading if it is present.
- Image Alt - based on current image if it is present.
- Top Description - based on Heading, Page Title, Bottom Description and current Top description if it is present.
- Bottom Description - based on Heading, Page Title, Top Description and current Bottom description if it is present.

Check the demo and this user guide to learn more.
Read this article to learn more about Amasty AI Service. Discover the supported models, how using your own OpenAI API key differs from using our service, and how we manage usage limits.
PWA for Landing Pages (Add-On)
By using this PWA add-on you'll provide your site visitors with a seamless cross-device and cross-browser experience of exploring landing pages you create with the original extension.
Lead shoppers to the special promo pages you've made for them to highlight some new offers and products and significantly improve your conversion rate.
Please note that the PWA add-on will work correctly only if a PWA theme and the original Landing Pages extension for Magento 2 are installed to your store. Learn more on how to install PWA Studio here.
In order to correctly install a PWA add-on, please install the corresponding GraphQL system package first. For the correct name of it, please check the composer.json file of the main module. For example, the GraphQL system package name of the PWA add-on for the Blog Pro extension would be the following: amasty/blog-graphql
Find below some examples of how the Magento 2 Landing Pages will work with the both PWA theme and PWA add-on installed:

This very PWA add-on does not support the following features of the original extension:
- feature option of not including navigation into your landing page ('Include Navigation = 'No'), which means that the default filtration by Venia will be available anyway;
- embedding dynamic content into the Content field, which means that inserted widgets won't be working correctly on the front end.
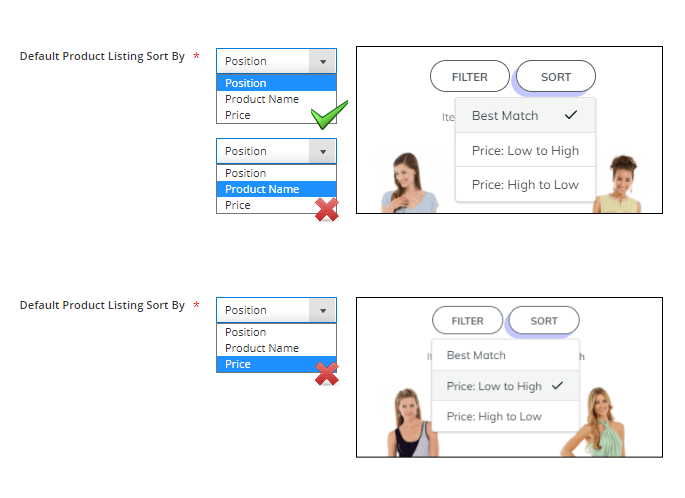
Product sorting on Venia and on Luma
As the Venia and Luma filtration options are different by default now, please use the hints below to configure the product order on the front end keeping in mind these peculiarities.
This is how the sorting options on Venia and Luma are different:
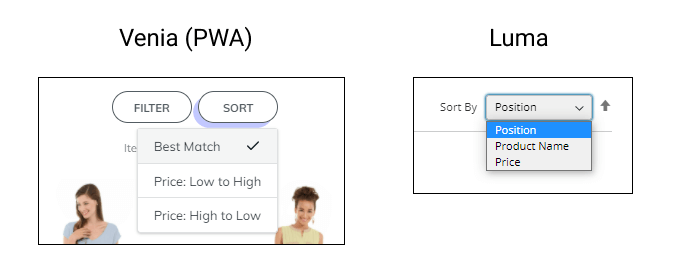
Click on the illustration below to see how Venia and Luma filtration options match if you're configuring the setting 'Default Product Listing Sort By'.
Please note that the sorting order you've configured on the 'Page Products' tab using the drag-n-drop merchandiser will be displayed correctly only if you've picked up the 'Position' option from the dropdown for the 'Default Product Listing Sort By' setting. So we strongly recommend using this option for the best work of the extension with the Venia theme installed.
Find out more about Magento PWA integration here.
Additional packages (provided in composer suggestions)
To make additional functionality available, please install the suggested packages you may need.
Available as a part of an active product subscription or support subscription:
amasty/module-ai-xlanding-content-generator- Install this package to ensure compatibility with Amasty ChatGPT AI Content Generator Pro and enable content generation for Landing Pages.
amasty/module-xlanding-live-search- Install this package to ensure compatibility with Live Search (for Enterprise and Cloud Editions).
In Landing Pages FAQ you can find answers to the most popular questions about the extension functionality.
Find out how to install the Landing Pages extension for Magento 2 via Composer.
magento_2/landing_pages.txt · Last modified: 2025/08/13 08:54 by asemenova

