
Sidebar
magento_2:advanced_product_reviews
Table of Contents
For more details see how the Advanced Product Reviews extension works.
Guide for Advanced Product Reviews for Magento 2
Employ the Advanced Product Reviews extension to encourage purchasing decisions. The improved reviews' page extends the capability and provides a friendly environment for both customers and admin.
- Reviews Summary Section
- Admin Reply Option
- Verified badge
- 'I recommend this product' checkbox / badge
- 'Was this review helpful' thumbs
- Images Upload Settings
- Invisible Captcha
- WCAG compliance (for Luma Theme)
- GraphQL compatible
Magento 2 Advanced Product Reviews extension is compatible with GraphQL.
The extension is compatible with Hyvä themes. You can find the 'amasty/module-advanced-review-hyva' package for installing in composer suggest (Note: the compatibility is available as a part of an active product subscription or support subscription)
General Settings
To get the access to the Advanced Product Reviews for Magento 2 settings, go to Stores → Configuration → Amasty extensions → Advanced Product Reviews and expand the General Settings section.

Who Can Submit Review - Specify which customers can submit a review (the functionality is available as a part of an active product subscription or support subscription). You can choose one of the following options.
- All - is the default option, that enables review submission for every customer group, including both registered and guest customers. Selecting this option enables the Show 'Email' Field for Guests setting, allowing you to collect email addresses from guest customers for future contact.
- Registered Customers - allows for review submission only for registered customers.
- Registered Customers Who Bought the Product - restricts review submission to registered customers who have purchased the product. Selecting this option activates the Order Status setting, allowing you to define the order statuses that permit a customer to submit a review:

Please note that the statuses set in this configuration do not affect the statuses configured for the Review Reminder. To avoid confusion, we recommend choosing the same statuses in these settings.
Enable Helpful Control - Enable to allow people to display if they found the review helpful or unhelpful.
Enable `I recommend this product` - Enable to display a checkbox in a review form. When customers check the box, a marker I recommend this product is displayed next to their name on the reviews page.
Enable Pros and Cons - Set to Yes to add to the customer reviews form separate Advantages and Disadvantages fields. On the frontend - on the reviews page - the pros and cons are displayed as green plus and red minus.
Allow Admin to Comment on Review - Enable to allow admin reply as a store representative.
Show Admin's Comment in Customer Account Only - Set to Yes to make admin's comments display only in the customer account under the 'My Product Reviews' tab.
Allow Guests to Submit Review - Disable to allow only logged-in users to write a review.
We improved the compatibility of the Advanced Product Reviews extension with our Social Login extension. Now the not logged-in customer’s process of writing a review is more optimized. In case the login popup is enabled and guests are not allowed to leave reviews, the Write a Review button is anyway displayed for guest visitors but it calls forth the social login popup. After the successful login, the customer is directed right to the review form.
Show 'Email' field for guests - Enable to add an email field to the customer reviews form for the guest visitors.
Optionally, you can enable a GDPR Consent and specify the Consent Text to be displayed.
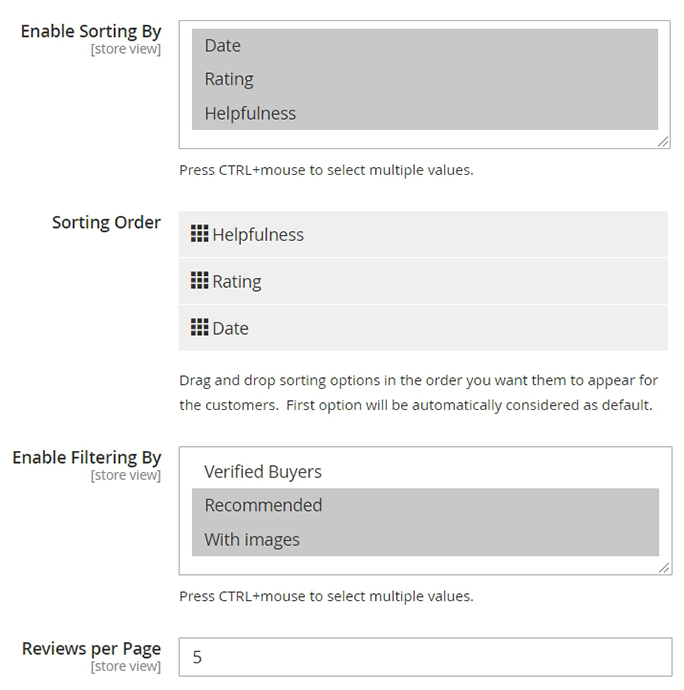
Enable Sorting By - Let your customers sort reviews by Newest, Top Rated and Most Helpful.
Sorting Order - Configure the order of the sorting options display via drag-and-drop. The first option will be automatically considered as a default one.
Enable Filtering By - This option allows customers to filter reviews by Recommended, Verified Buyers and With images.
Reviews per Page - Adjust the number of reviews to display at the page.
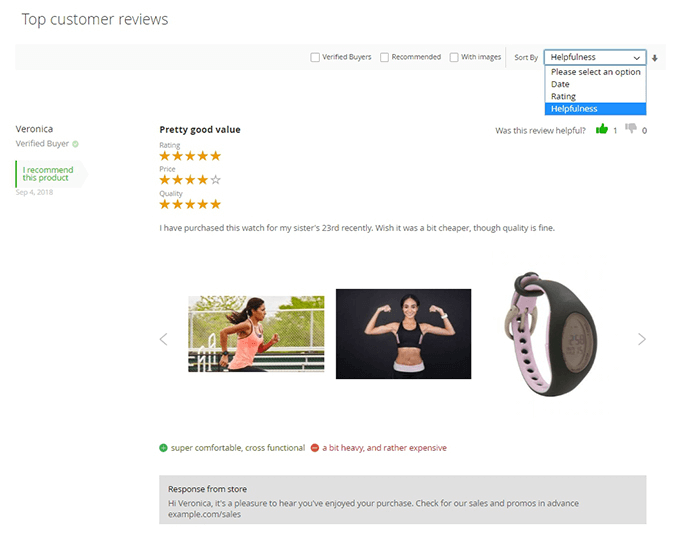
Front-end sample
Images
To get the access to the Advanced Product Reviews for Magento 2 settings, go to Stores → Configuration → Amasty extensions → Advanced Product Reviews and expand the Images section.
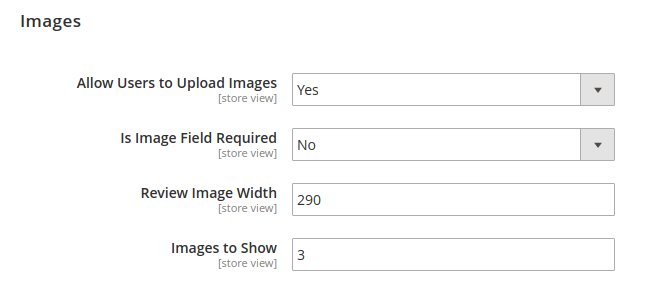
Allow Users to Upload Images - Enable to add a field for the images' upload in the review form
Is Image Field Required - Set to Yes to make an image upload obligatory for the reviewers.
Review Image Width - Specify in what size the uploaded images will be displayed.
Images to Show - Set the number of images to display in a review. If customers upload more images than specified, a slider will be implemented. Set to 0 disable slider on both mobile and desktop. There is also a lightbox option set by default.
Frontend sample 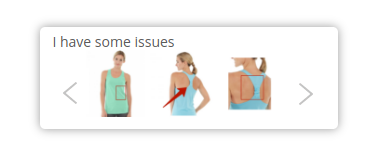
Review Commenting
In this tab, you can allow or forbid customers commenting on already approved reviews.
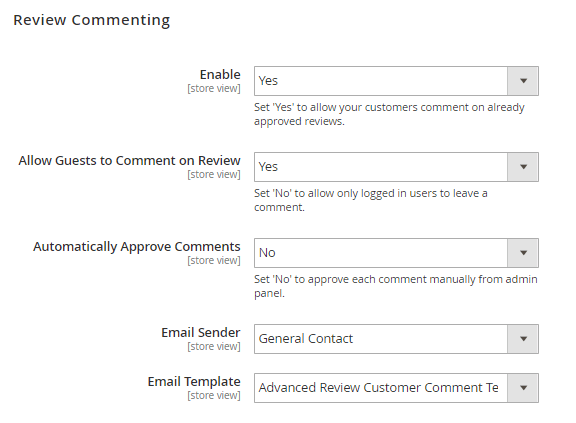
Enable - Set Yes to allow your customers commenting product reviews.
Allow Guests to Comment on Review - If No, only logged-in users will be able to leave a comment.
Automatically Approve Comments - Set No to approve each comment manually from the admin panel.
Email Sender — select the email sender for notifications;
Email Template — choose the email template to use for notifications.
To view, edit, approve or reject comments, go to Marketing → Review Comments.
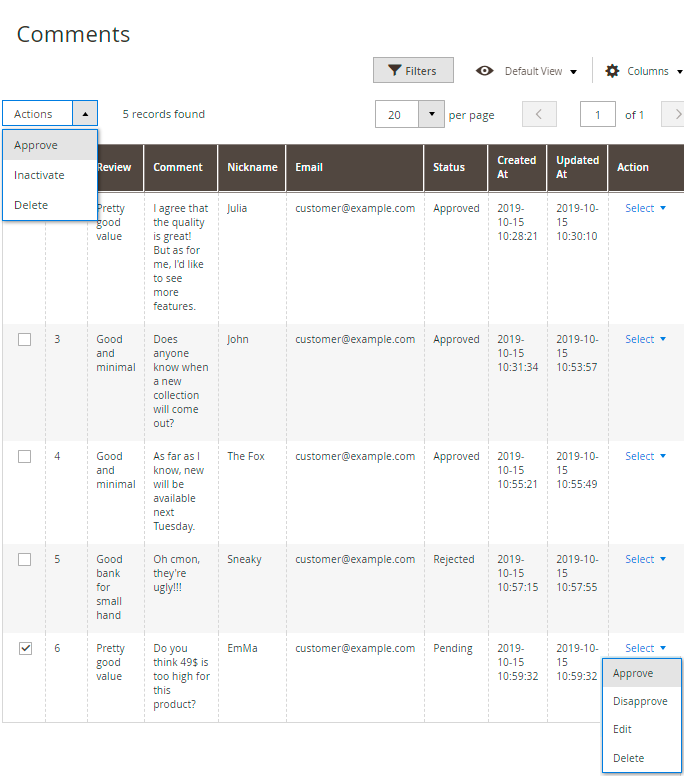
To manage each comment, click Select in the Action column and choose the action you want to perform.
With the extension, it is also possible to process comments in bulk. Tick the necessary comments and Approve, Inactivate or Delete them using Actions dropdown menu.
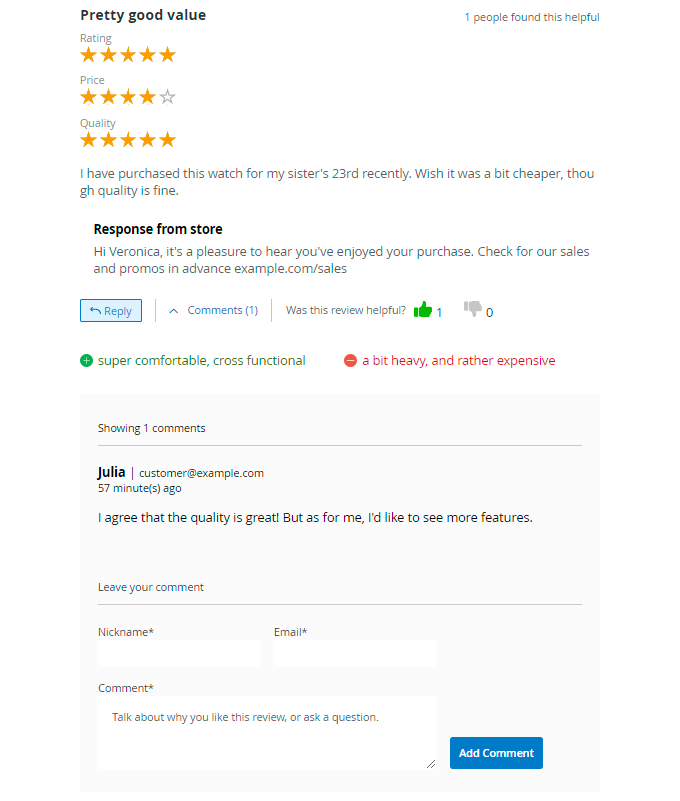
On the frontend, customers can view all comments and leave them using a Reply button.
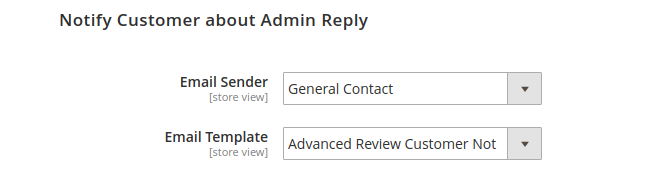
Notify Customer about Admin Reply
To get the access to the Advanced Product Reviews for Magento 2 settings, go to Stores → Configuration → Amasty extensions → Advanced Product Reviews and expand the Notify Customer about Admin Reply section.
Email Sender — select the email sender for notifications;
Email Template — choose the email template to use for notifications.
Review Reminder
To get the access to the Advanced Product Reviews for Magento 2 settings, go to Stores → Configuration → Amasty extensions → Advanced Product Reviews and expand the Review Reminder section.
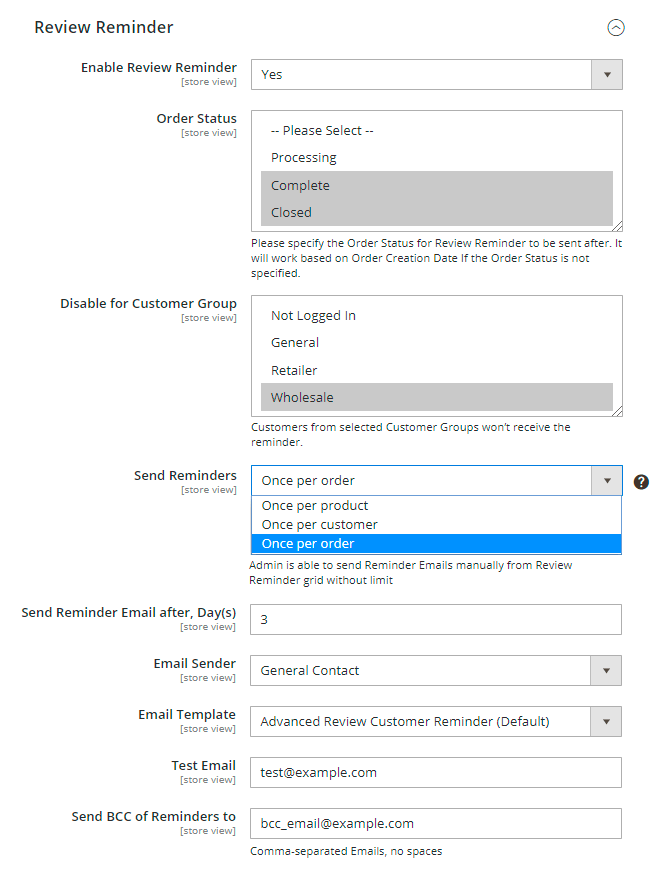
Enable Review Reminder — enable or disable the review reminder.
Order Status - choose the Order Status for Review Reminder to be sent after. It will work based on Order Creation Date If the Order Status is not specified. You may choose multiple statuses if needed.
Disable for Customer Group - Specify the customer groups for which the reminders won't be sent.
Send Reminders - the option allows admin to limit the review reminders' email quantity. Once per product - if a customer has bought the same product several times, he will get only one review request Once per customer - each customer will receive a review request only once: after the first purchase. Once per order - customers will receive review reminders after each purchase. Admin is able to send Reminder Emails manually from the Review Reminder grid without limit.
Send Review Reminder Email after Day(s) — specify the time period in days to send reminder emails.
Email Sender — select the email sender for reminders.
Email Template — choose the email template to use for reminders.
Test Email — specify the email address to which a test email will be sent.
Send BCC of Reminders to — specify the email address to which a BCC email will be sent.
To ensure that everything works correctly, you may send a test review reminder. To do this, please
- In the Test Email field, specify the email, where you want to send the test reminder
- Create an order
- Go to Marketing → Review Reminder
- Choose the order, you have just created, and choose Send Test Email in the Actions field.
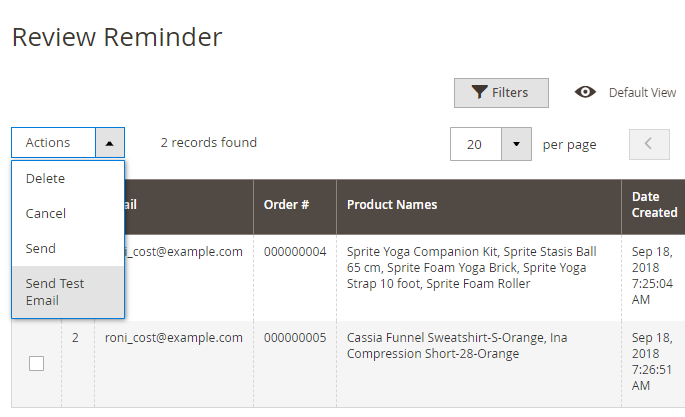
The review reminder will be sent to the Test Email, that you have specified in the extension settings previously.
Admin Notifications
To get the access to the Advanced Product Reviews for Magento 2 settings, go to Stores → Configuration → Amasty extensions → Advanced Product Reviews and expand the Admin Notifications section.

Send Email Reports for New Reviews - select how often you want to receive the notifications on new reviews.
Email Template to Notify Admin - choose the email template to use when informing admins on new reviews.
Admin Email Address - insert the email address of the admin who will receive the notification emails. You can set several emails, separated by a comma, no spaces between.
Email Sender - select which store email address to use when sending the email notifications.
Discount Coupons
To get the access to the Advanced Product Reviews for Magento 2 settings, go to Stores → Configuration → Amasty extensions → Advanced Product Reviews and expand the Discount Coupons section.
Please note that Discount Coupons feature will only work, if the Review Reminder Emails are enabled. To configure the Review Reminders, proceed to the Review Reminder configuration.
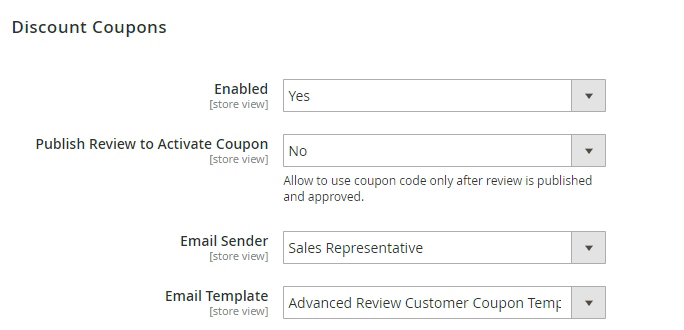
To let the module automatically generate discount coupons, set the Enabled dropdown to Yes.
Publish Review to Activate Coupon - set to Yes if you want to enable using discount coupons only after the review was monitored by an admin and published. If set to No, the coupon will be valid immediately.
Please be aware that, if you leave a review via a link that was received in a test review reminder email, a discount coupon won’t be generated for it. Coupons get activated with real orders only.
Email Sender - select, from which name the discount coupon will be sent.
Email Template - select the template for an email with the discount coupon.
All settings regarding the discount amount will be applied to all generated coupons. Please, make sure you explained in the email template, on which terms customers can apply the provided discount coupon.
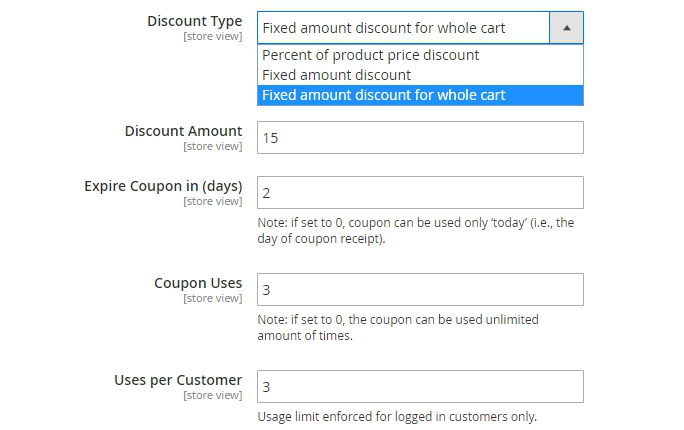
Discount Type - choose the type of discount that will be generated with this extension. You can provide 3 different discounts based on your business needs.
Discount Amount - set the number, which will represent the discount amount.
For example, if it's a fixed amount discount, the number 15 means that 15 US will be deducted from each item in the cart - for 3 items, the discount will be 45 US.
If it's a fixed amount discount for the whole cart, the discount for 3 items will be only 15 US.
In the case of percent of product price discount, it will mean that 15% will be deducted from the price of each item in the cart.
Expire Coupon in (days) - set the number of days, to adjust how long customers can use the coupon.
Coupon Uses - set the necessary number to limit the number of coupon applications.
Uses per Customer - adjust how many times a customer can apply the discount coupon.
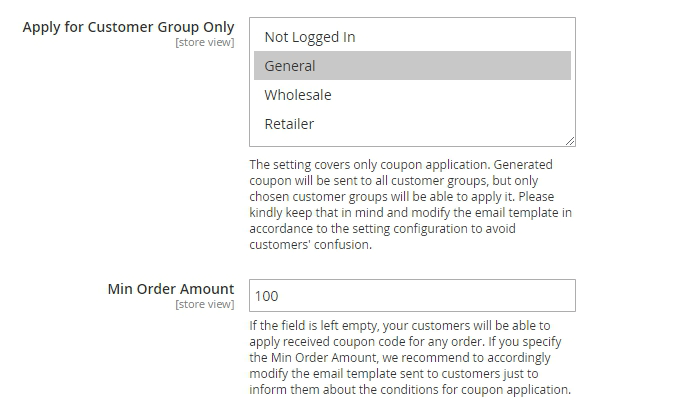
Apply for Customer Group Only - select which customer groups can use discount coupons. Please, keep in mind that you may need to modify the email templates to avoid customers' confusion.
Please note, that if a Guest (Not Logged In) customer leaves a review without providing an email address, they won't receive the email with a discount coupon. If you need to make the email field mandatory for all customers, please contact our support.
Min Order Amount - set the amount the customer needs to spend to receive the discount. You may need to appropriately modify the email template to inform clients about discount coupons terms.
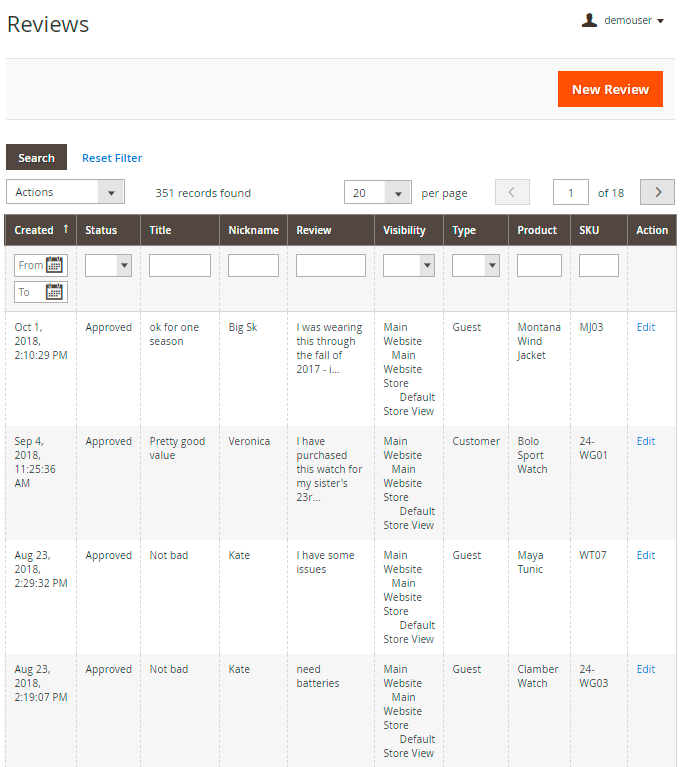
Manage and Approve Reviews
To manage and approve the reviews, go to Admin Panel → Marketing → All Reviews.
Mass Actions for Approving Reviews
With the extension you can select multiple reviews and approve/update/delete them in a single click using mass actions.

Delete - use this action to delete reviews (for example, spam, offensive or false reviews).
Update Status - use this action to update the paricular reviews' statuses.
Approve for All Store Views - choose this option to approve reviews for all store views and on all websites.
Approve for All Store Views within the Website - use this action to approve review from all the store views within the website from which the review was sent.
Approve for All Store Views Where Product is Assigned - choose this action to approve a review on all store views where the reviewed product is assigned.
Edit Review
Select a pending review to approve it in the Status field.
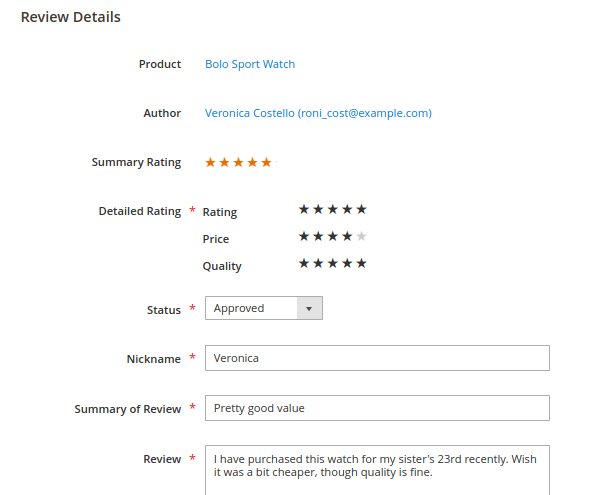
In the Customer Images field, you can remove the images that you believe are inappropriate.
In the Verified Buyer field, check if shoppers actually purchased the product they are reviewing.
In the Helpfulness field, you can check the number of people who find a review helpful or unhelpful.

A front-end sample of pros & cons (advantages & disadvantages). 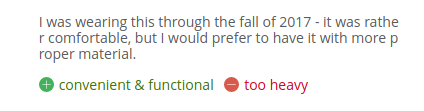
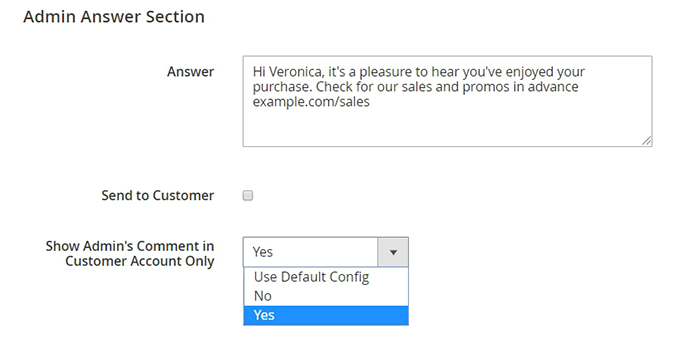
Admin Answer Section - Respond to customers' reviews right from this form. A comment is editable. A comment will be displayed right under the customer's review.
By setting the Show Admin's Comment in Customer Account Only to Yes you can reply to each review in private. The Admin comment will be visible only in the Customer Account under the 'My Product Reviews' tab. If this option is set to Default, the Admin comment will be published as set in module's General settings.
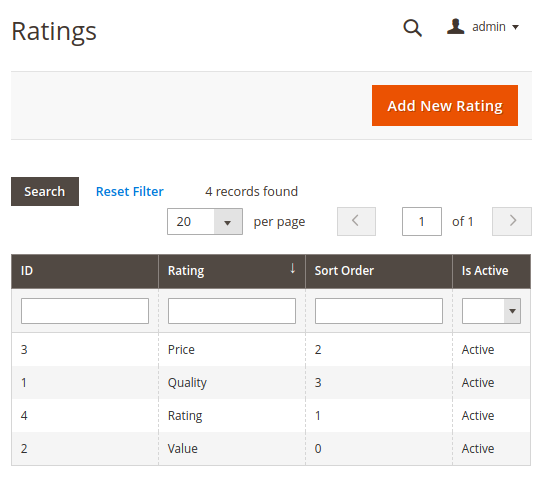
Ratings
To add and manage additional star ratings, go to Admin Panel → Stores → Attributes → Ratings
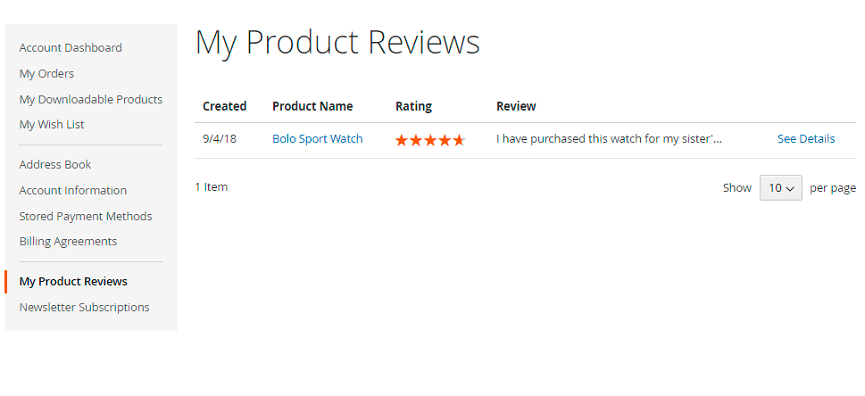
Customers' Product Reviews
Each customer can find all provided reviews in the special section of its account:

Customers can see all the reviews with accompanying data in their accounts on the My Product Reviews tab.
Add Widget With Product Reviews
Show catchy blocks with reviews on any store page to attract customers' attention to certain products. Please, go to Content → Widgets → Add Widget button.
On the Storefront Properties tab:
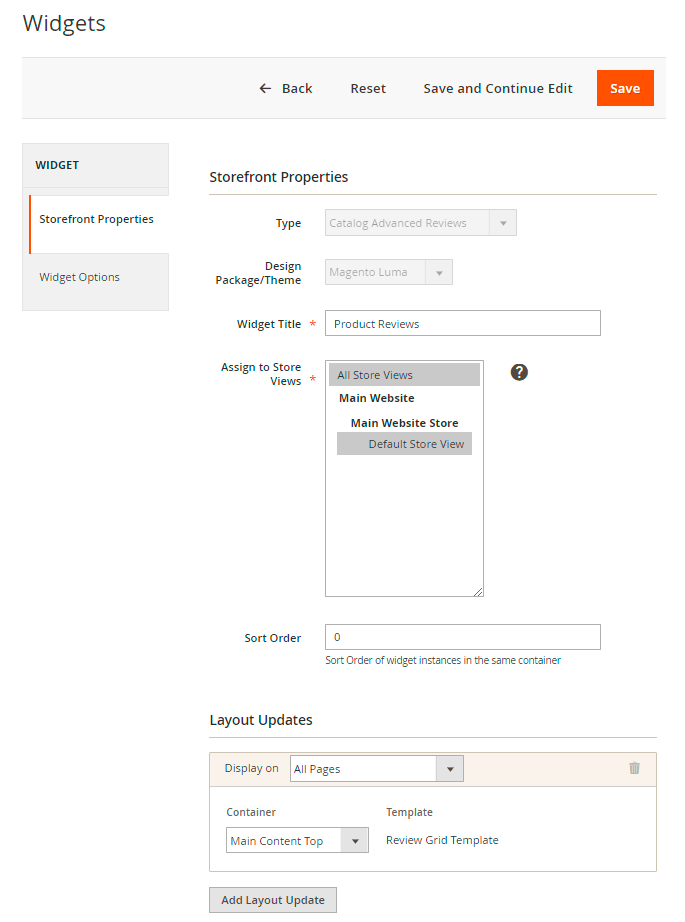
- Type - choose the Catalog Advanced Reviews widget type.
- Design Package/Theme - choose the appropriate theme.
- Widget Title - specify the widget title.
- Assign to Store Views - select store views to show the widget to.
- Sort Order - sort the priority for the widget display in the same container.
- Display on - choose a container in which you want to display the widget.
On the Widget Options tab:
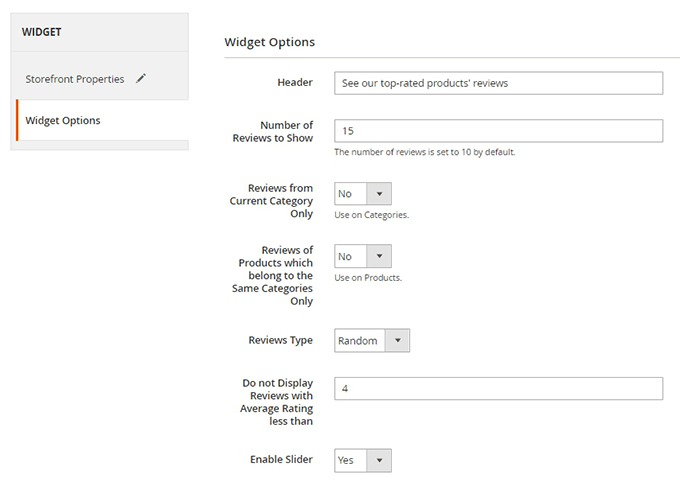
- Header - specify the header for a product review block.
- Number of Reviews to Show - define the number of reviews to show in a block.
- Reviews from Current Category Only - choose if the product reviews in a block should be for products from the current category only.
- Reviews of Products Which belong to the Same Categories Only - set to yes if you want to display reviews for Shoes category when a customer browsing the Shoes, and show reviews for Tops when looking in the Tops category.
- Reviews Type - select the reviews type: show either recent or random reviews.
- Do not Display Reviews with Average Rating less than - specify the minimal rating for reviews to be displayed.
- Enable Slider - set to Yes to enable slider.
If you have Magento 2.3 Page Builder module installed, add product reviews widget to any store page with Magento Page Builder drag-and-drop.To make it compatible, install the additional package with composer require amasty/advanced-reviews-page-builder command.
Here's how the product reviews block displays on the frontend:
1. With slider:

2. Without slider:
Encourage your customers to leave more reviews with Reward Points extension for Magento 2. Grant bonus points for reviews and increase customer retention rates.
Add Product Review Summary Widget
Attract customers' attention to specific products to promote them. Display a Reviews Summary widget on pages of your web-store to show reviews for the selected product(s). To configure the Review Summary, please go to the Content → Widgets → Add Widget button.
Then, select the Amasty Advanced Reviews: Product's Review Summary widget type and your Design theme. Press on the Continue button.
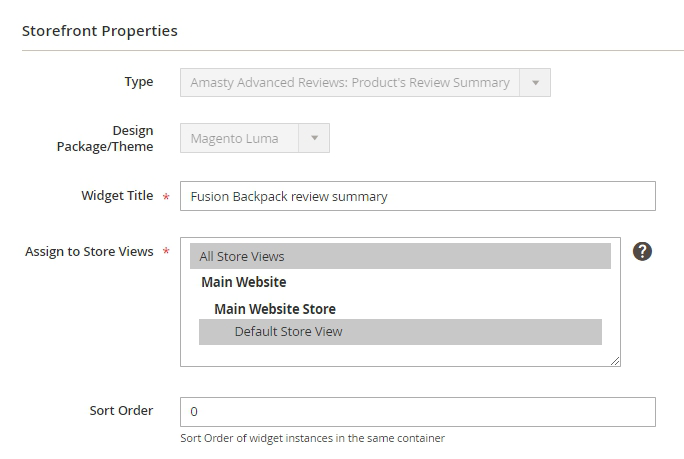
First, start from setting up options in the Storefront Properties tab.
As you've already set up the Type and Design Package/Theme configs on the previous step, they are greyed out.
Widget Title - enter an easy-to-read widget title, that will be visible only on the backend.
Assign to Store Views - choose, in which store views the widget will be shown.
Sort order - sort the priority for the widget display in the same container.
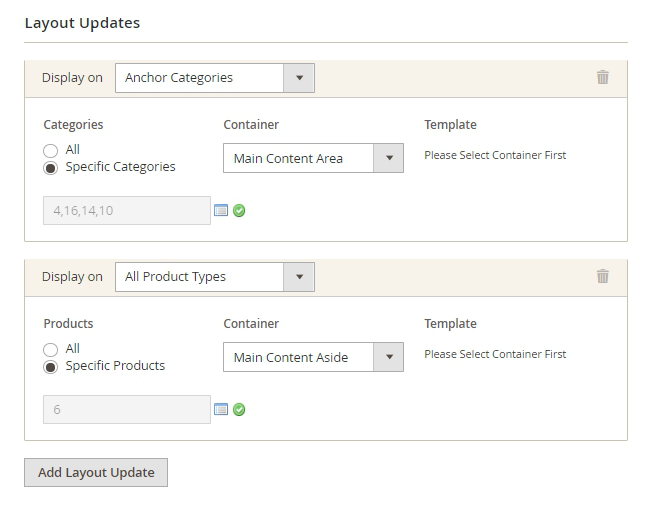
Then, in the Layout Updates block below, you can precisely configure, where the Review Summary widget will be placed. To add new placement, press the Add Layout Update button.
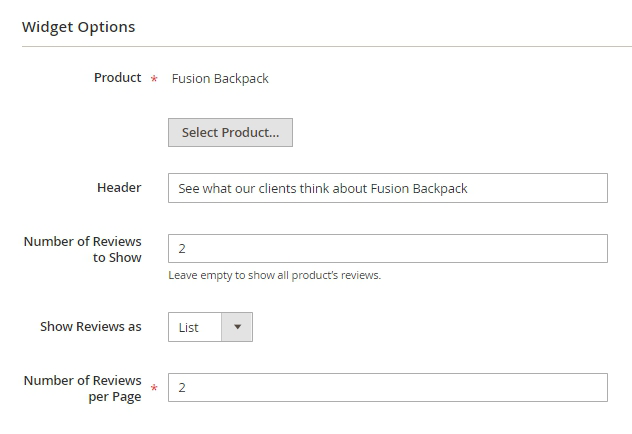
To adjust other specs for Review Summary widget, go to the Widget Options tab.
Product - click the Select Product button to select the required product in the pop-up.
Header - enter the title of the Review Summary widget, which will be visible for customers on the frontend.
Number of Reviews to Show - add the number of reviews that will be available to display in the widget.
Show reviews as - choose whether you want to display review's summary as List or Slider.
Number of reviews per Page - add the number of reviews you want to be visible simultaneously. The setting only appears if the Show Reviews As is set to List.
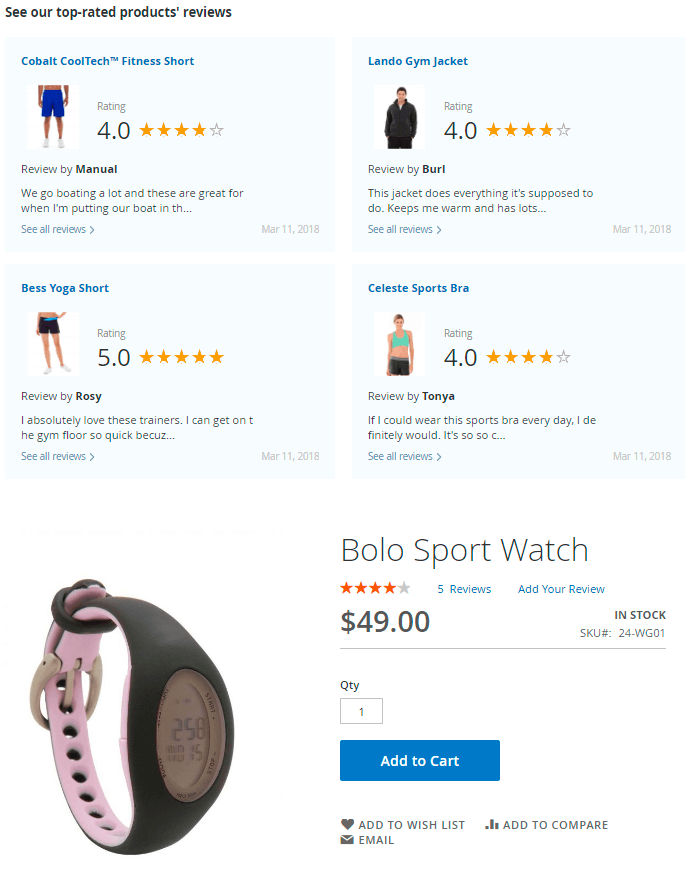
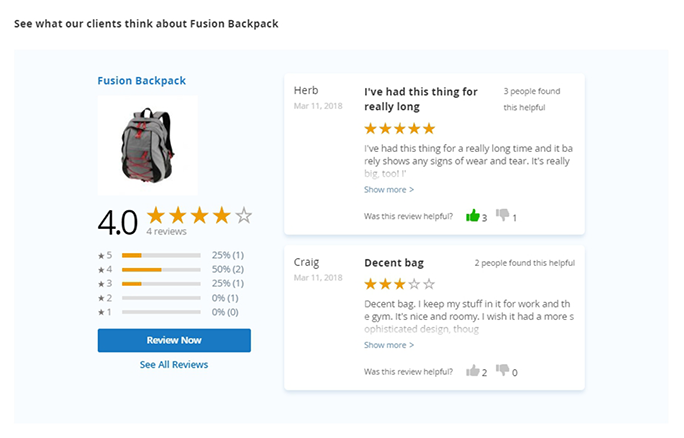
This is the frontend example of Product's Review Summary, configured as shown in screenshots above.
Cron Tasks List
Easily check cron performance by monitoring all existing cron tasks in one place. Please, go to System → Cron Tasks List.
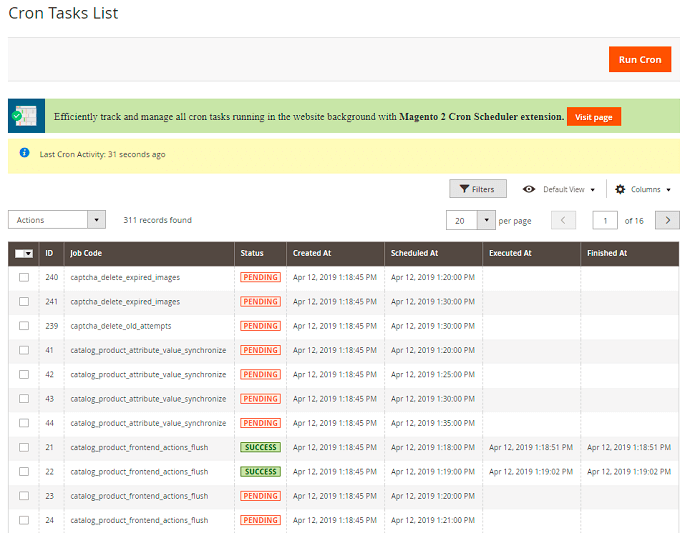
Here, you can see all the existing cron tasks and their statuses. Run cron tasks and generate their schedule by clicking the ‘Run Cron’ button. Also, delete tasks in bulk, apply filtering and sorting options when it is needed.
Invisible Captcha Settings
To get the access to the 'Invisible Captcha' settings please go to Stores → Configuration → Amasty extensions → Google Invisible Captcha and expand the General Settings section.
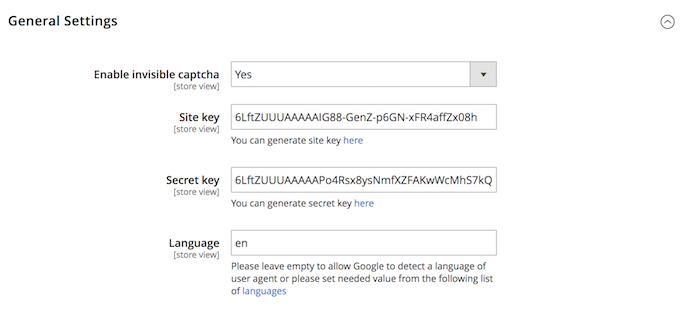
Choose Yes to enable invisible reCaptcha on your website.
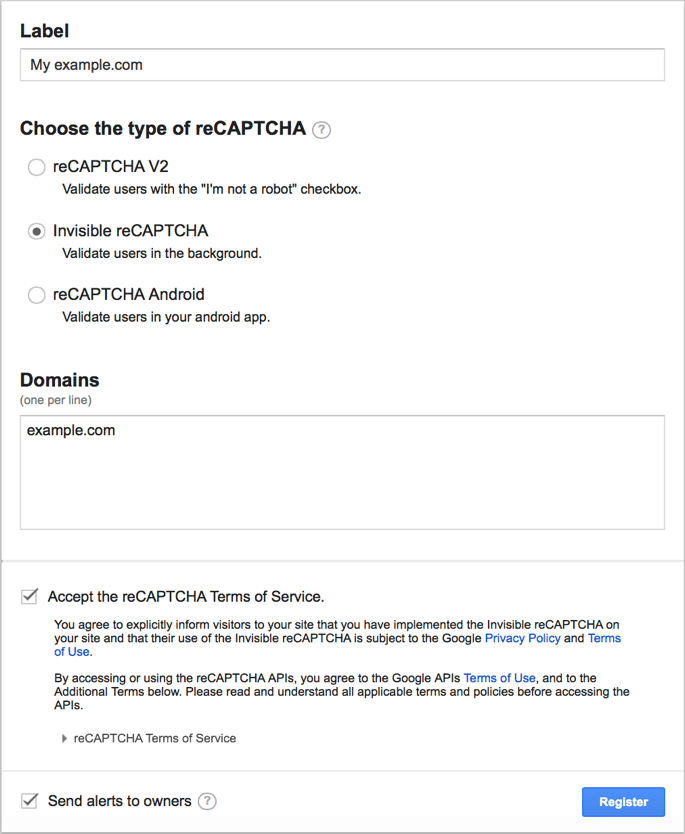
To get the Site key and Secret key click the link.
Then, set the name, select the Invisible reCAPTCHA option, define the domain of your website, tick the Terms of use checkbox and press the Register button.
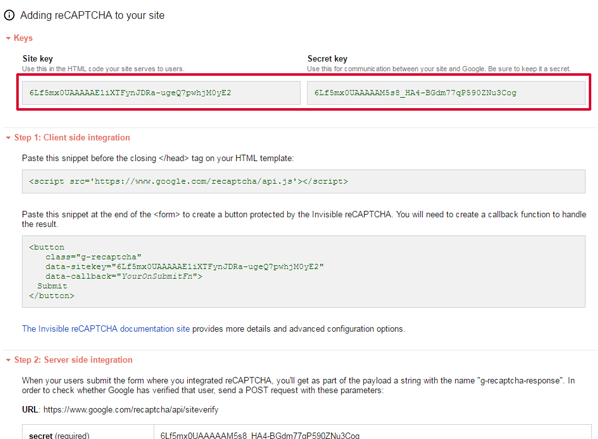
Copy keys from this page:
Next, you can specify the Language of the Google Invisible reCaptcha that will be used for all users instead of their browsers' preferences. You can see the list of the available languages here.
Invisible Captcha for Amasty Extensions
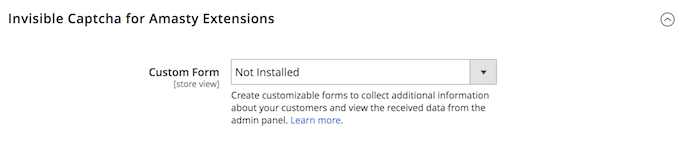
In this section, you can enable or disable the Google Invisible reCaptcha for supported Amasty modules. Choose Yes to enable the Captcha for the extension or No to disable it. Please note that you will get the Not Installed status when you do not have the appropriate extension.
Advanced Settings
To add Google Invisible reCaptcha to any custom form on your website please go to the Advanced Settings section.
In the Urls to enable field, you need to put the URL where a form is sent.
Note! It’s not the URL where your form is located.
For example, you would like to add a Google reCAPTCHA to a registration form. This is how to get the URL:
1. Go to the registration form page.
2. Fill in the form.
3. Open the 'Inspect' window, and then the 'Network' tab.
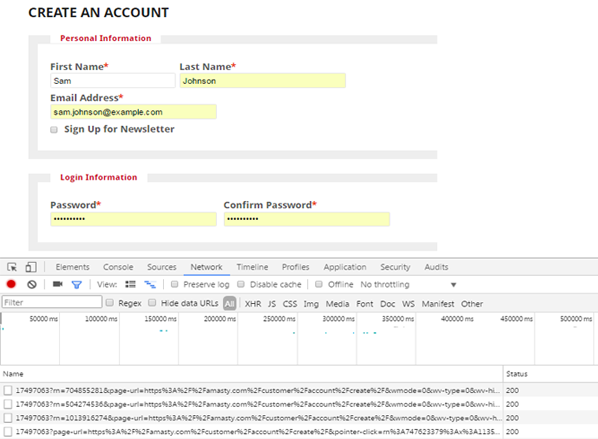
4. After submitting the form you need to find a request with POST in the 'Method' column and 302 Status.
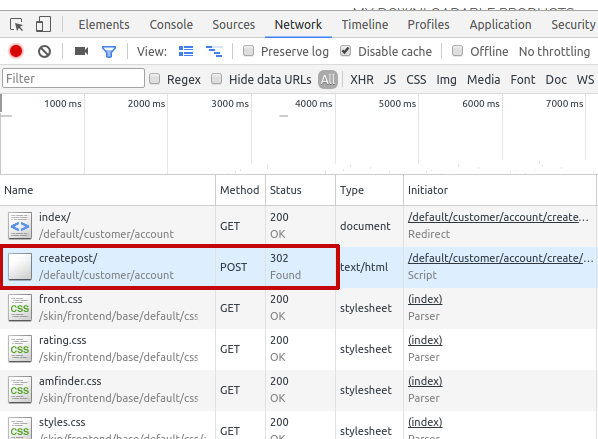
5. Click on this request and in the 'Headers' tab find a 'Request URL'. Сopy the path from the URL (in our example it is customer/account/createpost/).
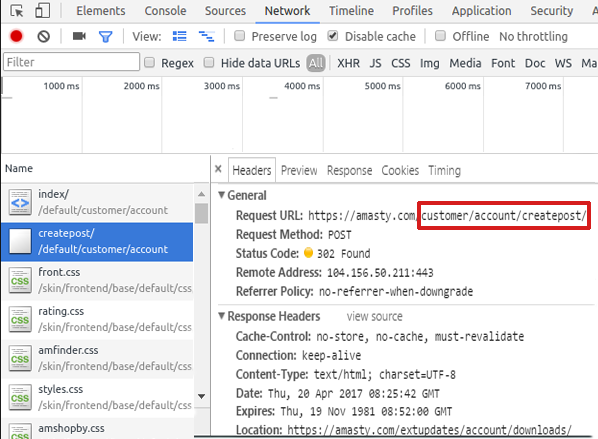
6. Paste the URL in the URLs to enable field.

In the Selector for forms field, you need to put a CSS selector of the form.
For example, this is how to get a CSS selector for 'Create an account' form:
1. Go to the Create an account page and open the Inspect window.
2. Find the HTML code of the form, click on the right mouse button and choose Copy → Copy selector
Note! You should be 100% sure that the selector is unique. Otherwise, Google CAPTCHA would be added to all elements that have this selector name. Ask your developer to check it.
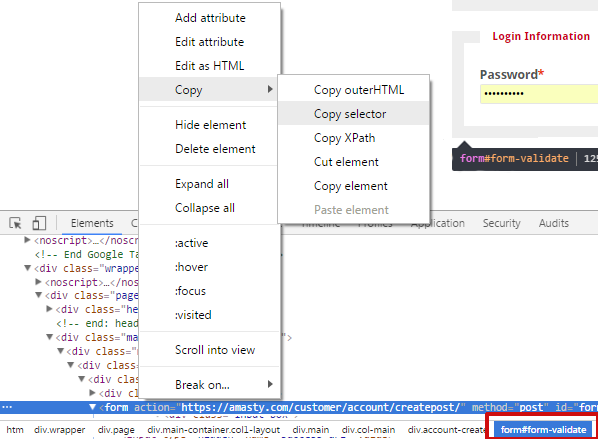
3. In our case the selector is .customer-account-create .account-create form and we add it to the Selector for forms field.
Don't forget to click on the 'Save' button after you add a CAPTCHA to all forms that you need.
The extension supports three forms by default. In case you don't need any of them, you can disable these forms manually.
How to Check Invisible reCaptcha
When everything is set, it is important to check how reCaptcha works. Please, follow these steps:
- Open the page which has a form protected by Google Invisible reCaptcha;
- Open your browser console;
- Choose to perform as any other browser or device;
- Try submitting the form several times until Google shows you the reCaptcha test.
Reviews in Google search preview
Let shoppers see the product star rating and the number of reviews right on the Google result page. This information will be automatically transferred to the Google results page.
This is how it will be displayed:

If you want to display a short product description and thus strengthen your SEO activity, take a look at our Google Rich Snippets for Magento 2 extension.
API Methods
API methods allow admin to get (or edit) product reviews from other systems such as ERP and CRM. This compatibility is available as a part of an active product subscription or support subscription.
The following methods are available:
- “/V1/amasty_advancedreview/product/review/:reviewId” method=“GET” - to get the data about a particular review.
- “/V1/amasty_advancedreview/product/reviews” method=“GET” - to get all reviews list
- “/V1/amasty_advancedreview/product/reviews/by-product-id/:productId” method=“GET” - to get all reviews of a particular product
- “/V1/amasty_advancedreview/product/reviews/by-customer-id/:customerId” method=“GET”- to get all reviews of a particular customer
- “/V1/amasty_advancedreview/product/review” method=“POST” - create a review
- “/V1/amasty_advancedreview/product/review/:reviewId” method=“PUT” - change / update a review
- “/V1/amasty_advancedreview/product/review/:reviewId” method=“DELETE” - delete a review
PRO: Discounts for Active Reviewers (Add-On)
The improved extension functionality allows you to thank customers for leaving reviews by granting them flexibly adjusted discounts.
Can be enabled only after purchasing a Discounts for Active Reviewers Add-On.
With the add-on, you can create specific promotions based on Cart Price Rules for:
- active customers who review a lot;
- customers who reviewed particular product(s).
To enable the add-on, navigate to Stores → Configuration → Amasty Extensions → Advanced Reviews → Discounts for Active Reviewers tab and enable the functionality.

Be aware, that disabling the Discounts for Reviewers functionality in configuration will not automatically disable all the rules, created with the add-on: each rule should be inactivated separately.
To create discount rules, go to Admin Panel → Marketing → Promotions → Cart Price rules.
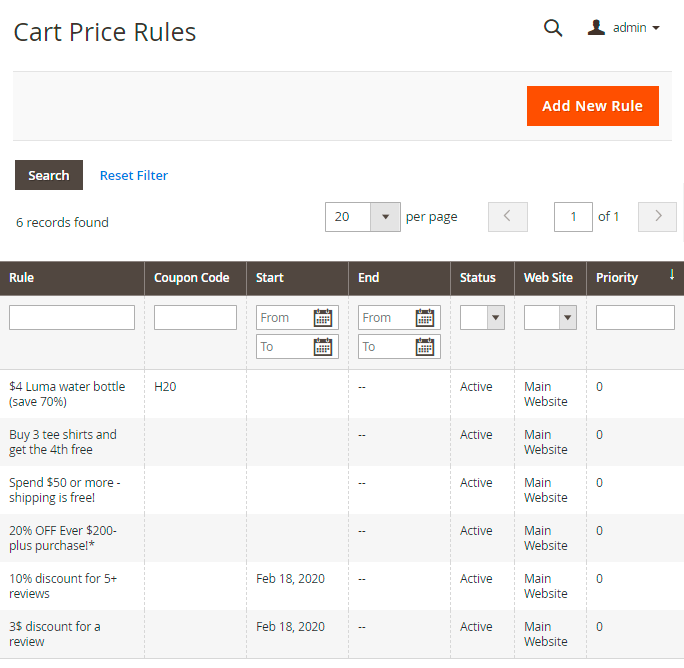
'Quantity of Approved Reviews' Rule
To build loyalty among the most active reviewers, you can give discounts according to the quantity of approved reviews. For example, let's see how to grant discounts for more than 5 reviews left.
Click the Add New Rule button and go to the Rule Information tab.
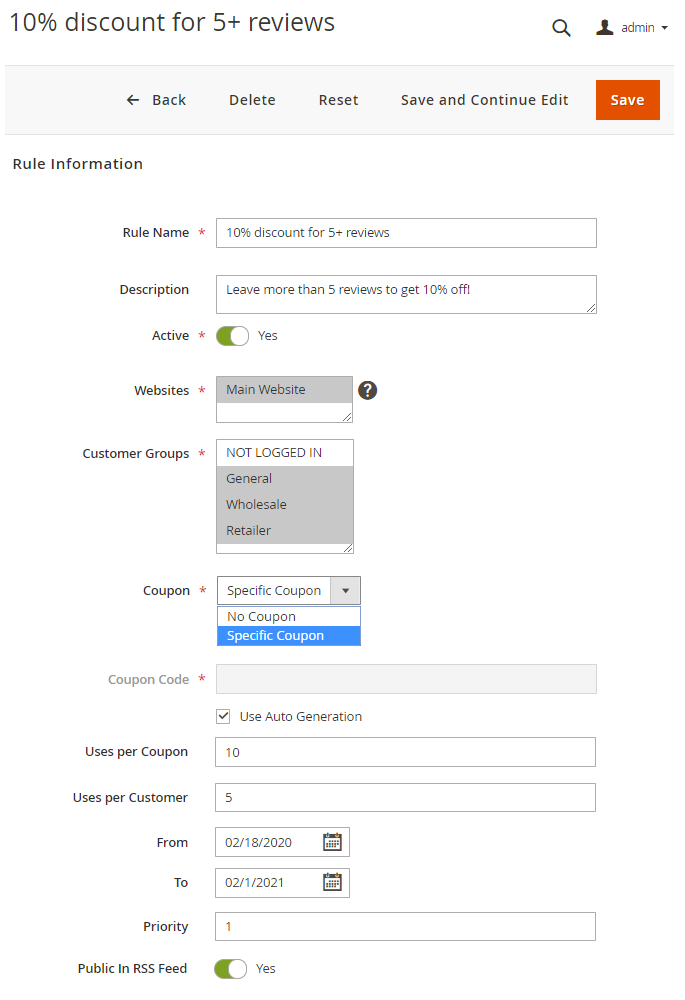
Rule Name - set the title of the rule that will be displayed on the rules grid.
Description - specify a short description of the rule if needed.
Active - choose Yes/No to enable or disable the rule.
Websites - select all or particular websites for which the rule should be applied.
Customer Groups - define customer groups for which the discount rule will be applicable.
The add-on discounts are available for the registered customers only.
Coupon - you can activate the coupon option and specify a particular coupon code (or generate it automatically) with the usage limit. Inactivate the option to apply discounts to cart automatically.
Uses per Customer - specify how many times the rule can be used by the same customer.
From - To - select the time period during which the rule will be active in case you want to make a temporary promo action. Leave empty to implement discount on a regular basis.
Priority - choose the priority among the other rules to set the order for rules application.
Public In RSS Feed - swipe to Yes to notify your subscribers about special promotions.
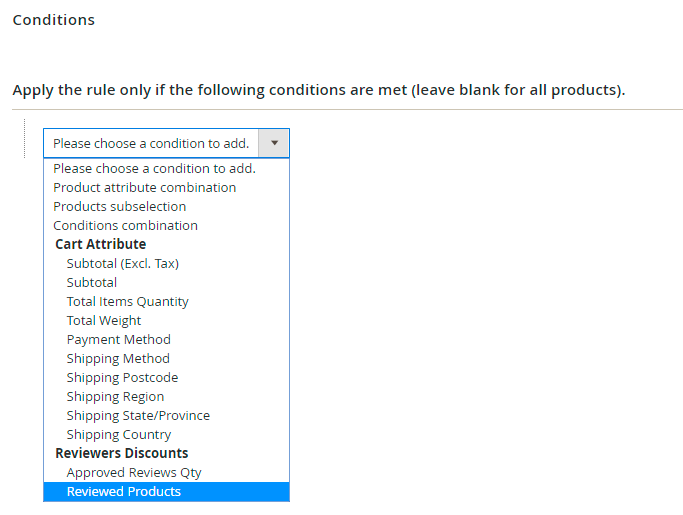
Expand the Conditions tab.
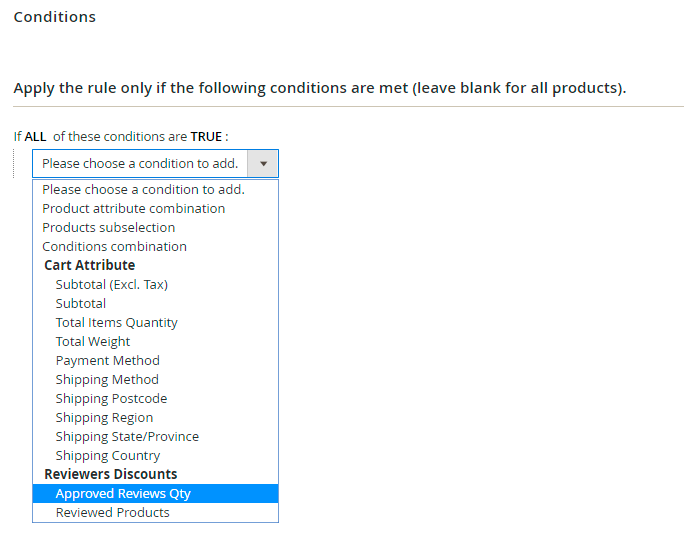
Scroll to the Reviewers Discounts tab and select the Approved Reviews Qty option.
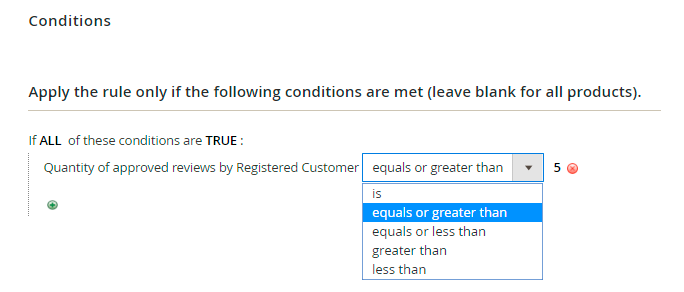
Choose the required comparison type: in our case we want to grant discount for 5 and more left reviews, so the equals or greater than type is selected.
In the last text filed specify the particular number of reviews.
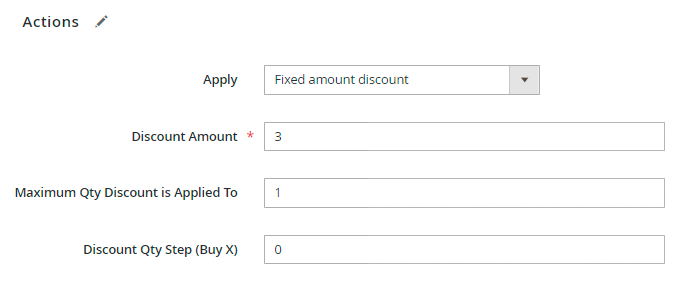
Proceed to the Actions tab.

With the add-on you may configure the following type of discounts:
- Percent of product price discount
- Fixed amount discount
- Fixed amount discount for whole cart
- Buy X get Y free (discount amount is Y)
Discount Amount - specify here the amount of the discount you would like to give. In our case, it's 10%. But keep in mind, that for the Fixed amount discount, for example, the value will be numerical.
Maximum Qty Discount is Applied To - set the maximum number of items to which the discount can be applied.
Discount Qty Step (Buy X) - provide a step by which a discount will be iterated. For example, if you set '2', the discount will be applied for every second product in the cart.
Apply to Shipping Amount - if Yes, the discount amount will be applied to subtotal and shipping amount separately. If No, it will be applied to subtotal only.
Discard subsequent rules - enable this option to stop other rules with lower priorities if this rule is applied.
Finally, set the frontend discount title in the Labels tab.

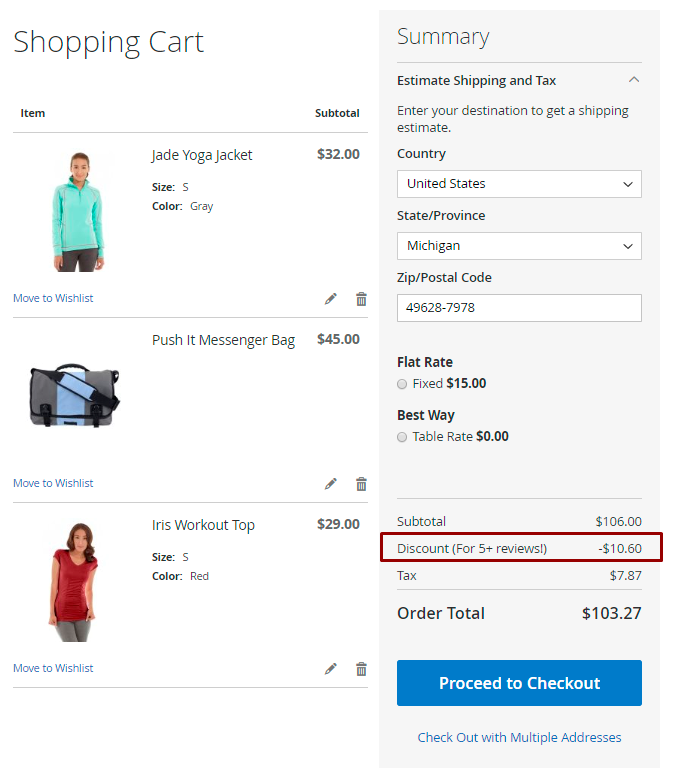
Save the rule.
As a result, a registered customer who left more than 5 approved reviews will see the following discount in a shopping cart:
'Reviewed Products' Rule
With the add-on, you can also configure a rule, according to which a registered customer will get a discount for reviewing particular product(s).
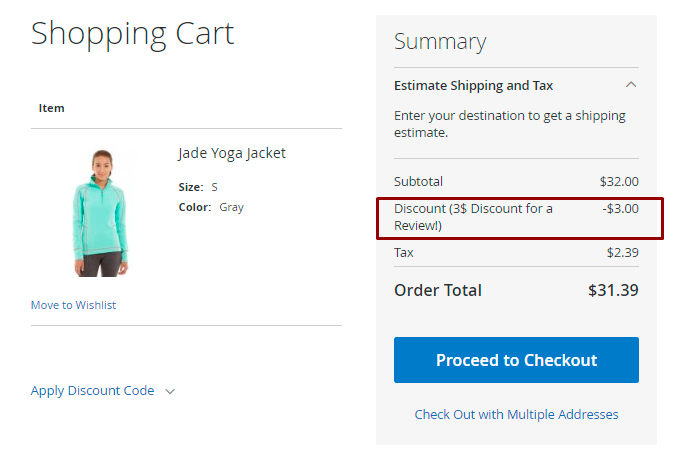
Let's check an example of 3$ discount for a review rule.
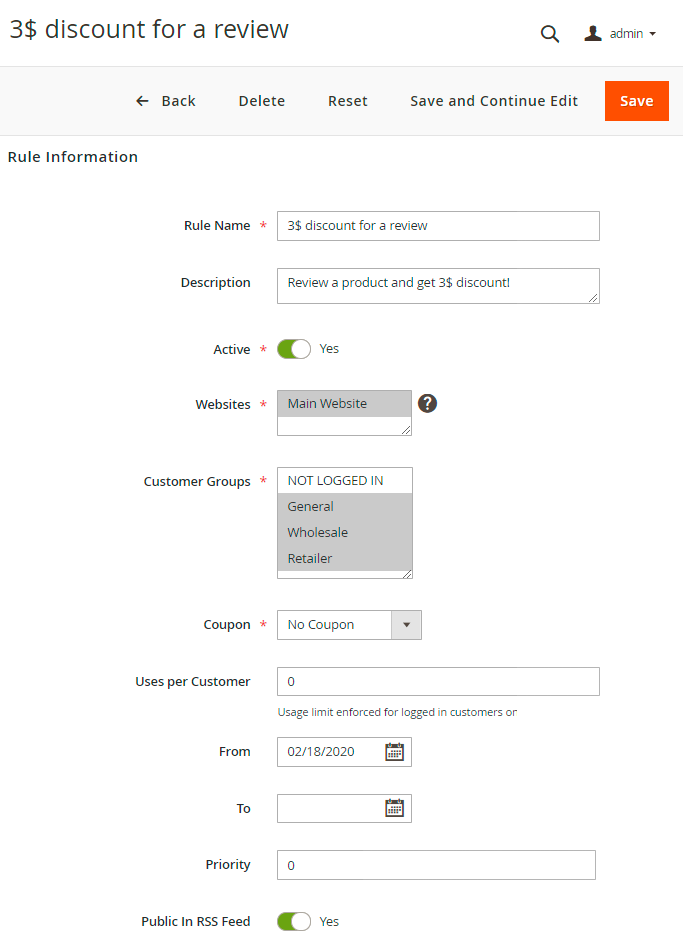
Set the general rule settings similar to the previous sample.
In the Conditions tab choose the Reviewed Products option.
Specify the products that a customer should review to get a discount.
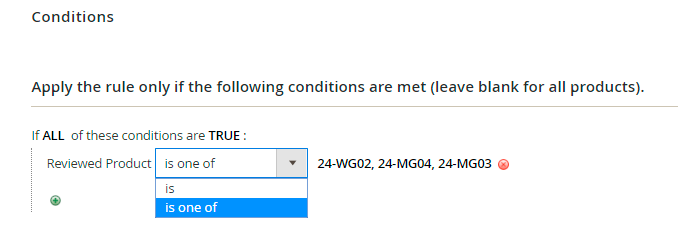
Keep in mind, that you may set more complex conditions based on cart attributes.
Proceed to the Actions tab and specify the discount type and amount. In our case, we grant a fixed 3$ discount for each product in a cart.
Using the actions, it is possible to apply a fixed discount to the whole cart, not to each product in it.
Set the frontend Label and Save the rule.

A customer will see the discount in a shopping cart.
PREMIUM: Import & Export Reviews (Add-On)
With the extension it is possible to import or export reviews via a CSV file.
Can be enabled only after purchasing an Import & Export for Advanced Reviews Add-On.
Import Settings
To import the reviews, please go to System → Import.
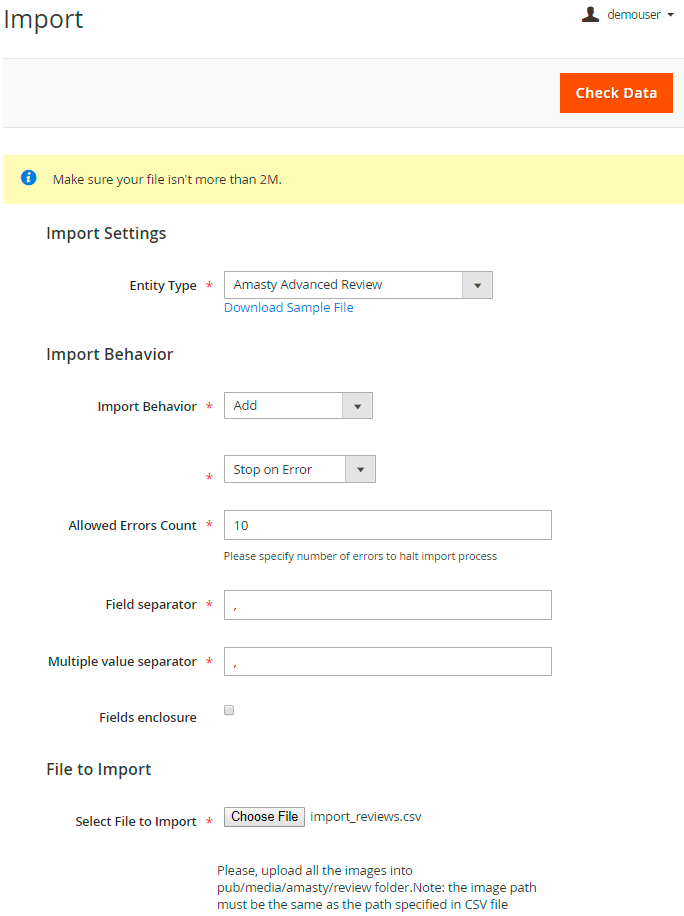
In the Entity Type option select Amasty Advanced Reviews.
Set Import Behavior options and Select File to Import in a CSV format.
The example of a CSV file:
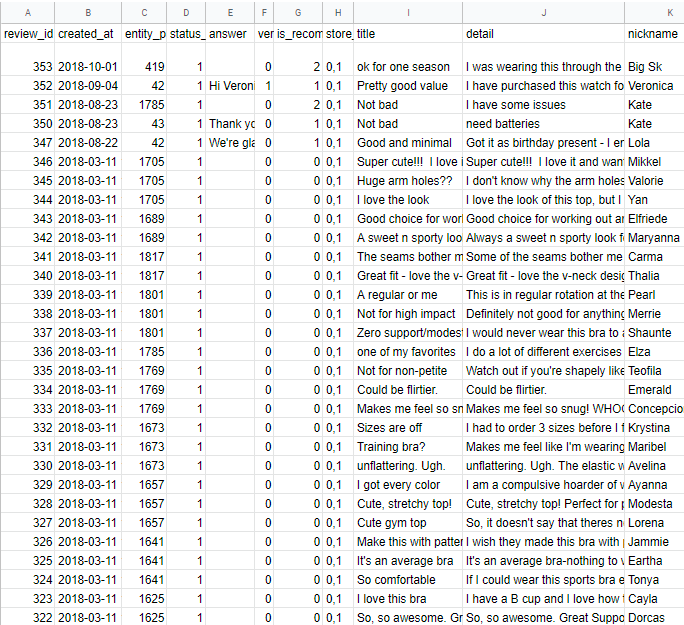
You may also download a sample of the file right from the admin panel.

The import feature allows you to upload the images as well. The pictures should be added manually to the following folder:
pub/media/amasty/review
The image path must be the same as the path specified in CSV file.
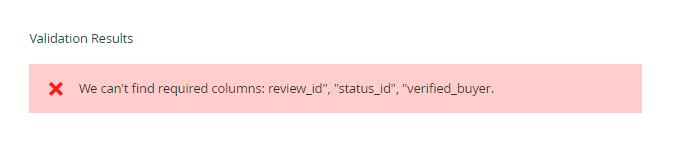
To make sure your file matches module requirements, click Check Data .
The extension will validate your file and warn you about the errors.
Export Settings
To export all the reviews from your Magento 2 store, navigate to System → Export tab.
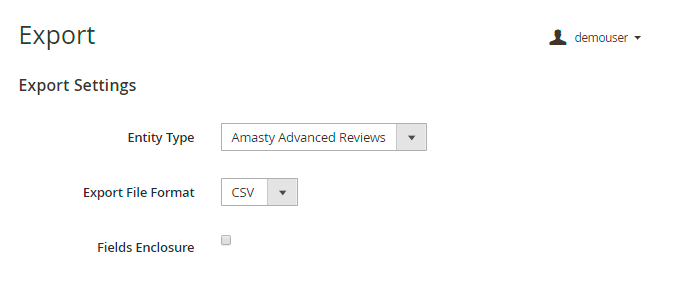
Entity Type - choose Amasty Advanced Reviews.
Export File Format - CSV format is needed.
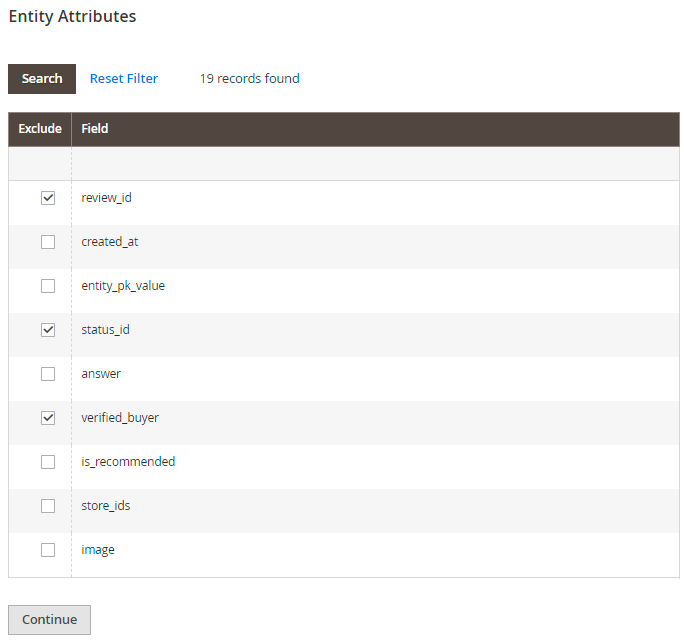
You may also exclude particular attribute values from the exporting if needed. In the Entity Attributes table tick the attribute columns you want to exclude and hit the Continue button.
PREMIUM: Google Customer Reviews
Using the Premium version, attract customers’ attention to your remarkable store rate by showing Google Customer Reviews badge in your footer. Show the opt-in survey on an order success page and automatically send shoppers a feedback form provided by Google.
PWA for Advanced Product Reviews (Add-On)
Now the extension supports PWA Studio 8.0.0. Please, kindly note: since the system is under development the lower versions of PWA Studio are no more supported.
The extension also works smoothly on mobile devices. For this please use our ready-made PWA solution which helps store admins to significantly improve the cross-device shopping experience of their customers.
This feature can be enabled only after purchasing the PWA for Advanced Product Reviews Add-On. For correct work of the add-on, please install PWA Studio first.
In order to correctly install a PWA add-on, please install the corresponding GraphQL system package first. For the correct name of it, please check the composer.json file of the main module. For example, the GraphQL system package name of the PWA add-on for the Blog Pro extension would be the following: amasty/blog-graphql

If the add-on is installed, the Venia theme will display a mobile section for leaving customer reviews in the following way:

PWA component supports all the original Advanced Product Reviews extension features except for the following due to the Magento Venia limitations:
- the Product Review Summary widget;
- the reviews tab in Customer Account;
- lightbox sliders for the images attached to reviews.
Have a look at how the reviews with uploaded images will look like on mobiles:

Here's the example of review threads with the pros and cons feature enabled and an example of the response from the store admin:

See how the overall product rating will be displayed on the Venia storefront. The screen on the right shows how filtering and sorting for the reviews will work:

Find out more about Magento PWA integration here.
Additional packages (provided in composer suggestions)
To make additional functionality available, please install the suggested packages you may need.
Available with no additional fees:
amasty/advanced-reviews-page-builder- Install this module to activate PageBuilder and Advanced Product Reviews integration.
amasty/advanced-review-graphql- Install this module to activate GraphQl and Advanced Product Reviews integration.
amasty/cron-schedule-list- Install this module to view and run cron jobs from the admin panel.
Available as a part of an active product subscription or support subscription:
amasty/module-advanced-review-purchased- Install this package to enable the possibility to limit reviews only for customers who bought the product.
amasty/module-advanced-review-api- Install this package for REST API compatibility.
amasty/module-invisible-captcha-subscription-package- Install this package to enable compatibility with captcha subscription features.
amasty/module-advanced-review-hyva- Install this package to activate the integration with Hyva Theme.
amasty/module-advanced-review-purchased-hyva- Install this package to make the feature of limiting reviews only for customers who bought the product compatible with Hyva.
Find out how to install the Advanced Product Reviews extension for Magento 2 via Composer.
magento_2/advanced_product_reviews.txt · Last modified: 2025/05/14 14:07 by asemenova