
Sidebar
magento_2:google_automated_discounts
Table of Contents
Guide for Google Automated Discounts for Magento 2
Implement all essential Google requirements to enroll your Magento 2 for the Automated Discounts Program. Let Google algorithms define optimal discounts for your products and automatically showcase them across your Shopping ads and website’s product pages to specific users.
- Set up a connection with your Google Merchant Center
- Configure your store to apply Google-recommended prices
- Prepare relevant merchant feeds for uploading
- Ensure conversion tracking with reporting cart data
This user guide fully describes the Premium extension version that includes the functionality of the Amasty Product Feed and Google Analytics 4 with GTM support extensions and allows you to cover all technical requirements outlined in Google documentation for participation in the Automated Discounts Program.
Also, you can choose the Standard or Pro extension versions.
However, please note that if you select Standard or Pro versions, you will need to fulfill feed (for Standard) and conversion reporting (for Standard and Pro) requirements on your own. That is why we recommend opting for the Standard or Pro versions only if you already utilize the Product Feed and Google Analytics 4 with GTM support extensions from Amasty, or if you are confident in implementing the mentioned requirements independently.
Pre-implementation stage
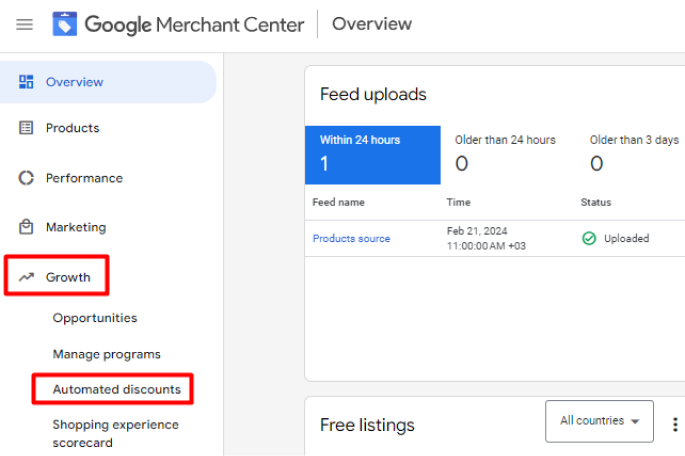
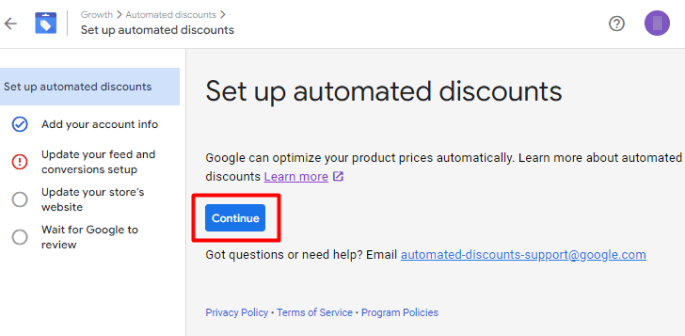
Please, log in to your Google Merchant Center account, go to Growth → expand the Automated Discounts tab, and click the Continue button to add account info, including preferred currency for reporting. Then, you can move to the next steps. If you don’t see the Automated Discounts tab, provide the requested information here to activate it.
Please make sure that your account has at least 1000 product clicks per week at the merchant level, as it is one of the strict requirements for participation. Check out this article to learn more about this and other requirements.
Product Feed Generation (Pro and Premium)
To have automated discounts properly applied to your products, you must set up an appropriate feed containing two additional attributes (price types):
- cost_of_goods_sold
- auto_pricing_min_price
After uploading such feed to the Google Merchant Center, the added attributes will transmit information to Google regarding the minimum allowable price for products and cost of goods sold (COGS). This enables Google not only to prevent excessively large discounts but also to more effectively monitor and optimize performance.
Please note that the maximum price must be the regular price attribute already provided in your product feeds.
The included (in Pro and Premium versions) Magento 2 Product Feed extension provides the needed attributes: cost_of_goods_sold and auto_pricing_min_price with price type and allows to add them to product feeds.
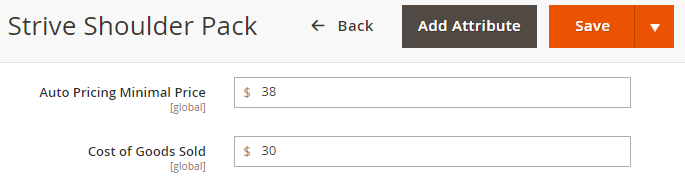
First, you need to enter the values of these additional attributes for the necessary products on their edit pages:
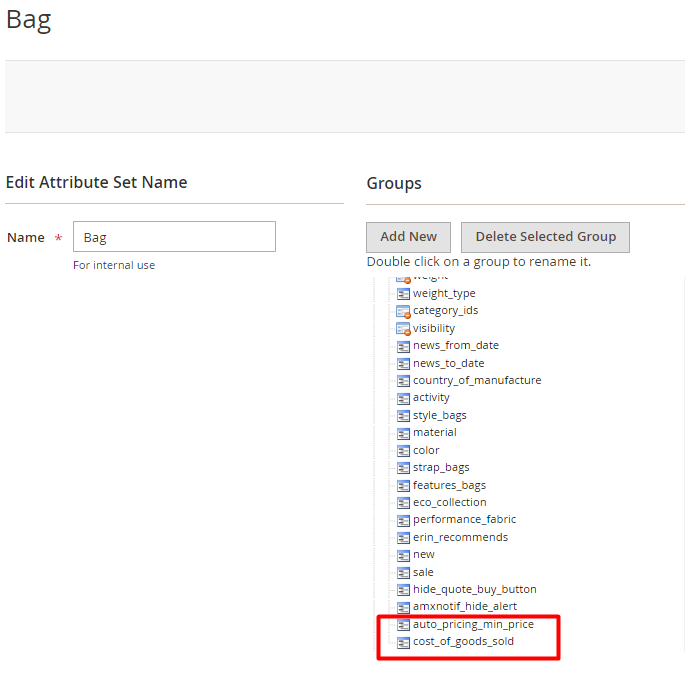
To make attribute fields visible on the particular products edit pages, please navigate to Stores → Attributes → Attribute Set and add them to the needed attribute set. Save the changes.
To create a product feed, please go to Catalog → Feeds → Profiles → click the Add New Feed button.
Configure general feed settings and add the attributes to the Google feed output as follows (example):
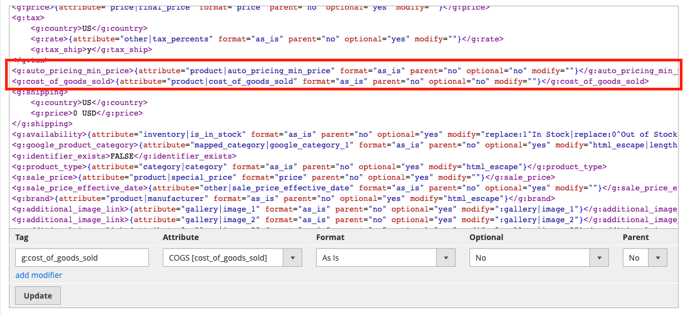
When the feed configuration is finished, import it to your Google Merchant Center.
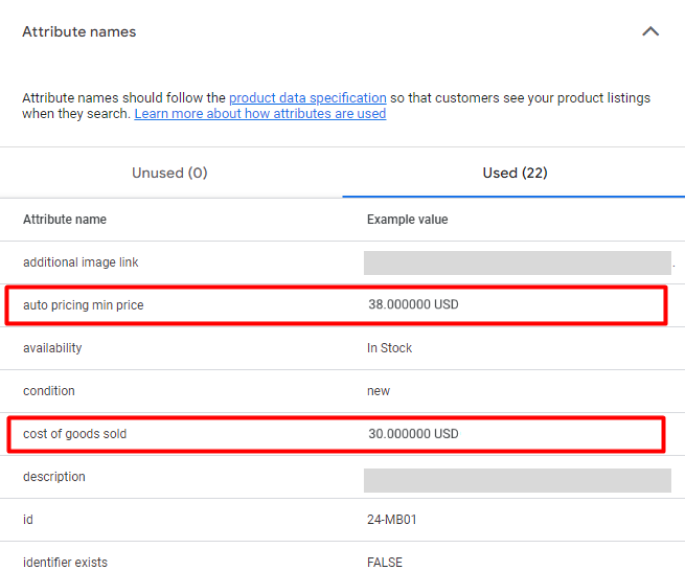
The provided attributes are passed to Google in the following way (example):
You can access detailed information about product feed configuration with the help of the Magento 2 Product Feed extension in this user guide.
Conversion Reporting Setup (Premium only)
We offer to fulfill the conversion reporting with cart data requirement through the included Magento 2 Google Analytics 4 with GTM support extension.
Go to Stores → Configuration → Amasty Extensions → Google Analytics 4 with GTM → General → expand the Google Adwords Conversion tab.
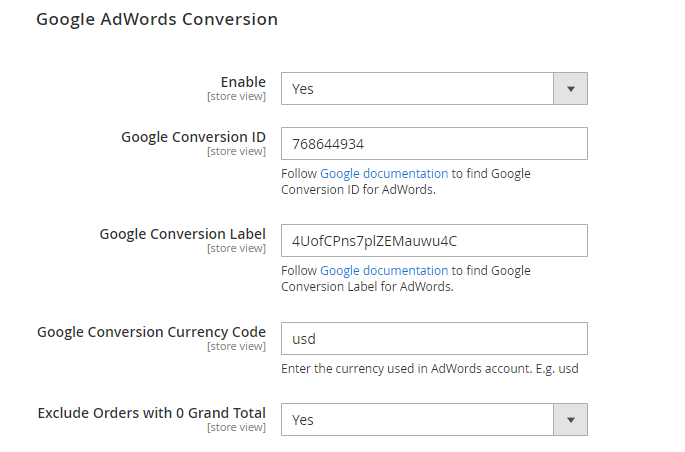
Enable - set to Yes to enable the functionality of conversion tracking.
Google Conversion ID - paste the Google Conversion ID copied from your Google Ads account.
Google Conversion Label - paste the Google Conversion Label copied from your Google Ads account.
Please learn this Google support article to get comprehensive instructions about the setup of conversion reporting with cart data.
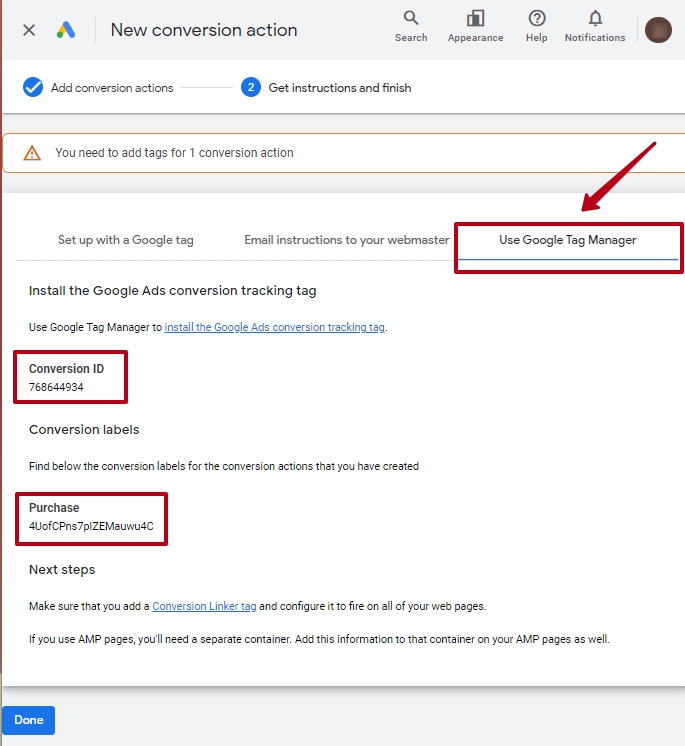
To find and copy the Conversion Label and Conversion ID, we recommend taking the following steps (they can slightly vary depending on whether you use an updated Google Ads interface or not):
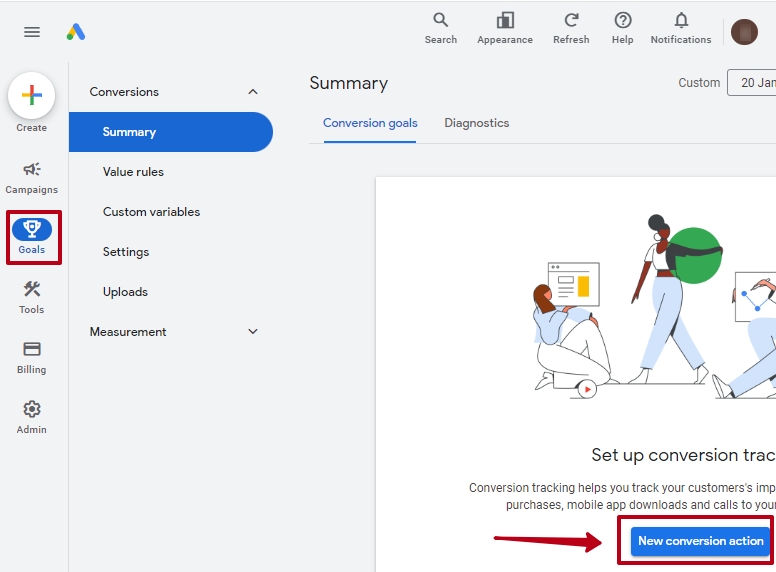
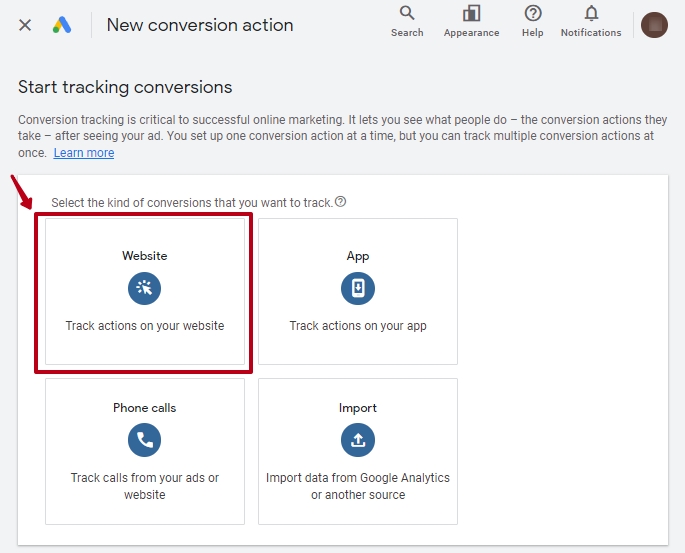
Step 1. Sign in to your Google Ads account and go to Goals → Conversions → Summary. If you don’t have any created conversion actions, click the New Conversion Action button:
Step 2. Then, select the kind of conversion:
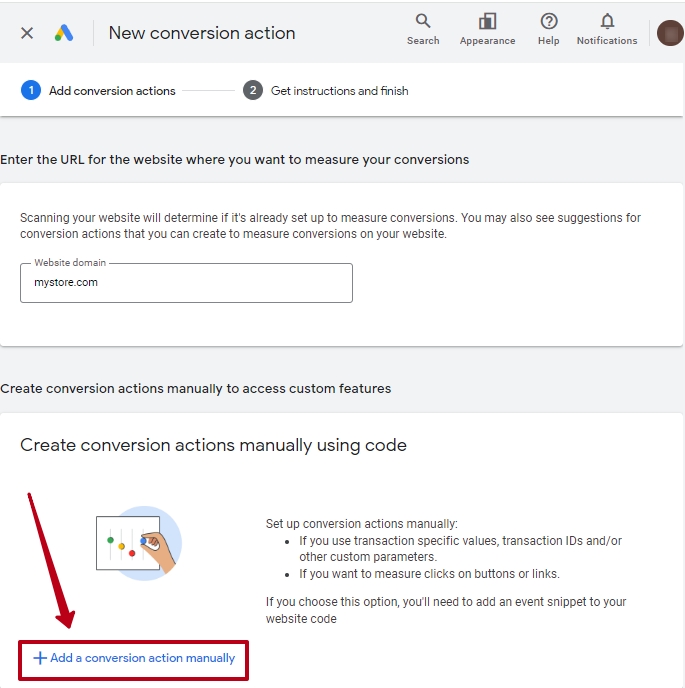
Step 3. After this, specify and scan your website domain. Click the Add a Conversion Manually button:
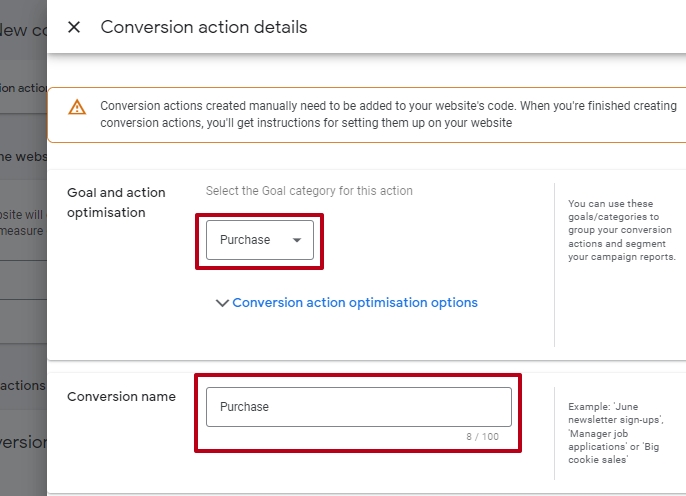
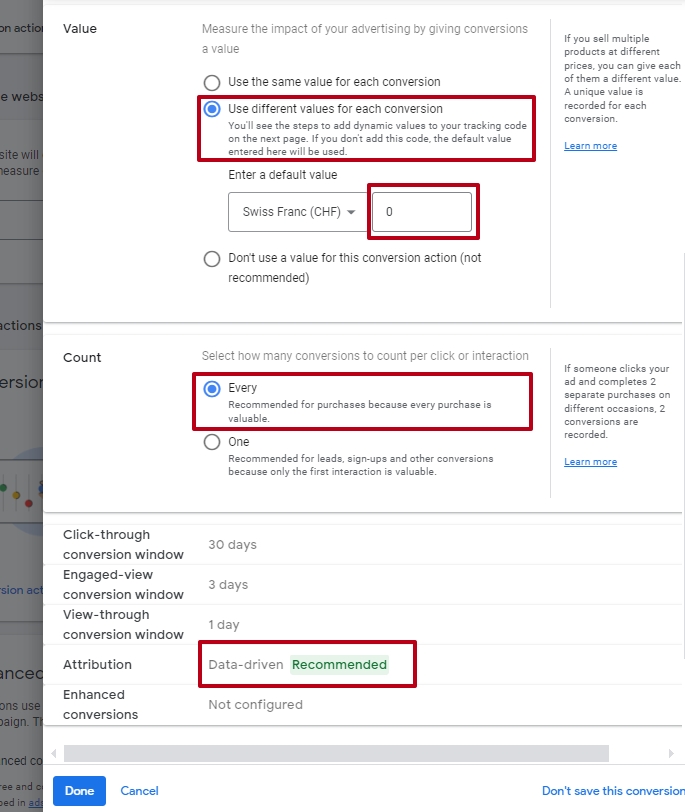
Step 4. We suggest you use the following default settings:
- Category: Purchase
- Conversion name: Purchase
- Value: Use different values for each conversion
- Default value: zero
- Count: Every
- Attribution: Data-Driven
Step 5. Once the Purchase conversion action is created, click to open it and copy the Conversion ID and Conversion Label from the Use Google Tag Manager tab.
In case you have such a conversion action already created, you can just open it and copy the conversion ID and label (no need to take the above creation steps).
Google Conversion Currency Code - enter the currency used in the Google Ads account. For example: USD, EUR, etc.
Exclude Orders with 0 Grand Total - select Yes to exclude orders with 0 Grand Total.
You can find more information about the Magento 2 Google Analytics 4 with GTM support extension configuration in this user guide.
General Settings
Please navigate to Stores → Configuration → Amasty Extensions → Google Automated Discounts → General to configure general extension settings.
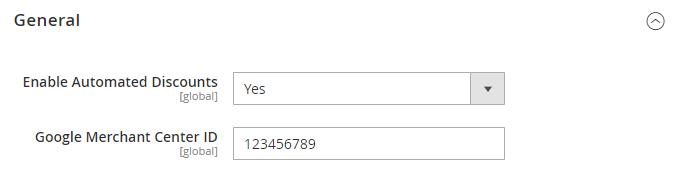
Enable Automated Discounts - select Yes to enable the Google Automated Discounts extension.
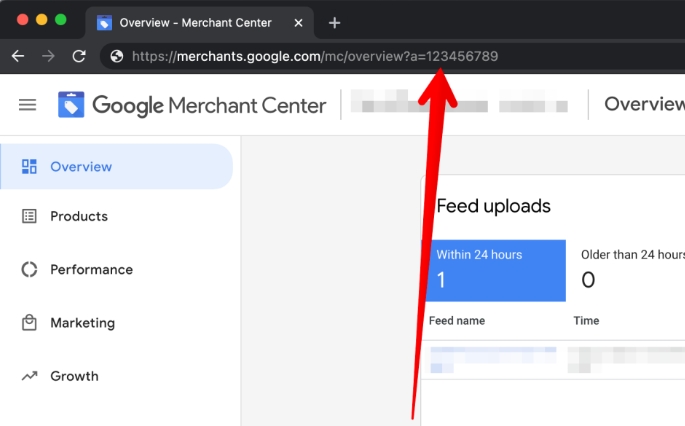
Google Merchant Center ID - specify your Google Merchant Center ID.
You can copy this ID from the URL after entering your Google Merchant Center account.
Post-implementation stage
When the above technical requirements are fulfilled, you will find example URLs for testing in the Merchant Center (Growth → Automated Discounts → Update your store's website). Сlicking on these links, you should obtain the price mentioned in the link description, which includes the discount:

The final step is to ask for a full review by clicking the Request Verification button.
Once your account receives approval from Google, you're ready to start using the automated discounts feature.
As a rule, Google offers to start from a ramp-up period - an A/B experiment that shows the discount prices to only a fraction of users (starting from 1% and ramping up to more than 50%). You will be able to monitor your ramp-up percentage in Merchant Center by navigating to the Performance tab and clicking Automated Discounts.
Find out how to install Google Automated Discounts for Magento 2 via Composer.
magento_2/google_automated_discounts.txt · Last modified: 2024/02/28 07:35 by kkondrateva