
Sidebar
magento_2:social_login
Table of Contents
For more details see how the Social Login for Magento 2 extension works.
Guide for Social Login for Magento 2
Social Login extension significantly fastens the registration process for customers. It improves customers' shopping experience and collects consumers' social profile data.

- AJAX pop-up for the login/register purpose
- AJAX login pop-up on the cart and checkout pages
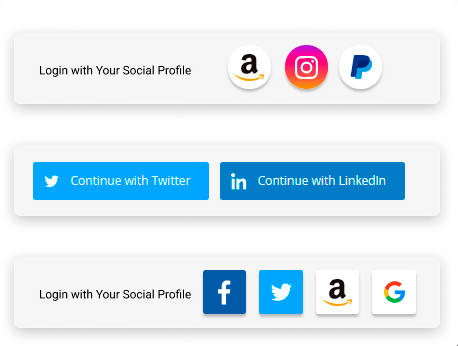
- 4 positions of the social login bar
- Redirect after login
- Included reCAPTCHA
- Supports Google, Facebook, Twitter, Instagram, LinkedIn, Amazon, Paypal, Twitch, Microsoft Azure, Pinterest
- Hyva-ready storefront and Hyvä Checkout ready
- WCAG compliance (for the extension with Luma and Hyvä Theme)
Before Configuration
Prior to enabling the Social Login for Magento 2 extension, please make sure that you have installed the additional hybridauth plugin.
But, please consider that the separate hybridauth installation is required only in case you have installed your Social Login extension manually (via app/code). If you have installed the extension via composer, the hybridauth plugin has been already installed together with the extension.
In Social Login v.1.9.0 we added the support of the HybridAuth v3.7.1.
That means that after extension installation or update to version 1.9.0 or higher, you need to update your Hybridauth. To do so, please run the following command:
composer require hybridauth/hybridauth:~3.3
After upgrade to 1.9.0 version, you'll see the setting option Use New Redirect URI in Configuration → Social Login → General Settings. If you used previous Social apps configurations, the Use New Redirect URI option will be set to No by default.
If you switch this option to Yes, old Redirect Uri settings will be refreshed and you'll need to re-configure the app and insert the Redirect URLs anew, to re-connect extension to socials.
For new modules installation, the Use New Redirect Uri option is set to Yes by default. Please proceed with configuring the extension as described in the User Guide.
The extension is compatible with Hyvä Theme. You can find the 'amasty/module-social-login-hyva' package for installing in composer suggest.
The compatibility is available as part of an active product subscription or support subscription.
The extension is compatible with Hyvä Checkout. The compatibility is provided in one package with the Hyvä Theme, you can find the 'amasty/module-social-login-hyva' package for installing in composer suggest.
The compatibility is available as a part of an active product subscription or support subscription.
Install Hybridauth
To install Hybridauth, you can use Composer.
Add the following entry to the composer.json file in the root of your project.
{
    "require" : {
        "hybridauth/hybridauth" : "~3.8.*"
    }
}
Via Composer, run a command to install Hybridauth and its dependencies:
$ php composer.phar install
Composer will download the latest version of Hybridauth Library and locate it in the /vendor/ directory.
For more information, check the Hybridauth 3 Documentation.
General Settings
To configure the Social Login for Magento 2 extension, go to Stores → Configuration → Amasty extensions → Social Login and expand the General Settings section.
Enable Social Login - Set to Yes to enable the display of social media buttons, which allow to login via social networks.
If after enabling the extension, you receive the following notification: Additional Social Login package is not installed. Please, run the following command in the SSH: composer require hybridauth/hybridauth, then install the missing plugin.
Add Social Login to - Use multi-select to add social media login buttons to various places on the website.
Available locations:
- Login Popup
- Above customer login form
- Below customer login form
- Above customer registration form
- Below customer registration form
- Shopping cart page
- Checkout page

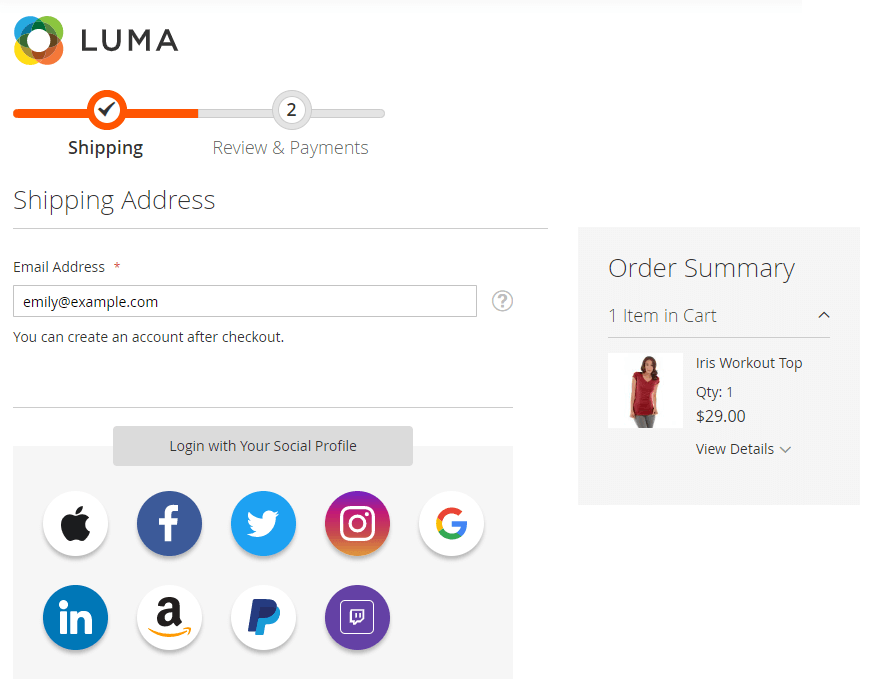
Social Login on checkout example:
Login Buttons Shape - Make the Social Login Buttons catchy by specifying the shape: round, rectangular or square for 3 and more buttons enabled.
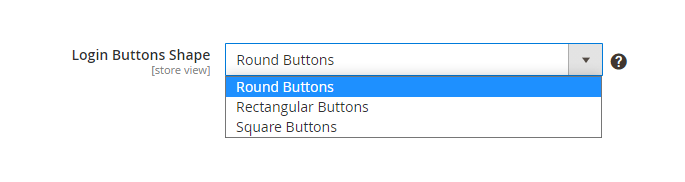
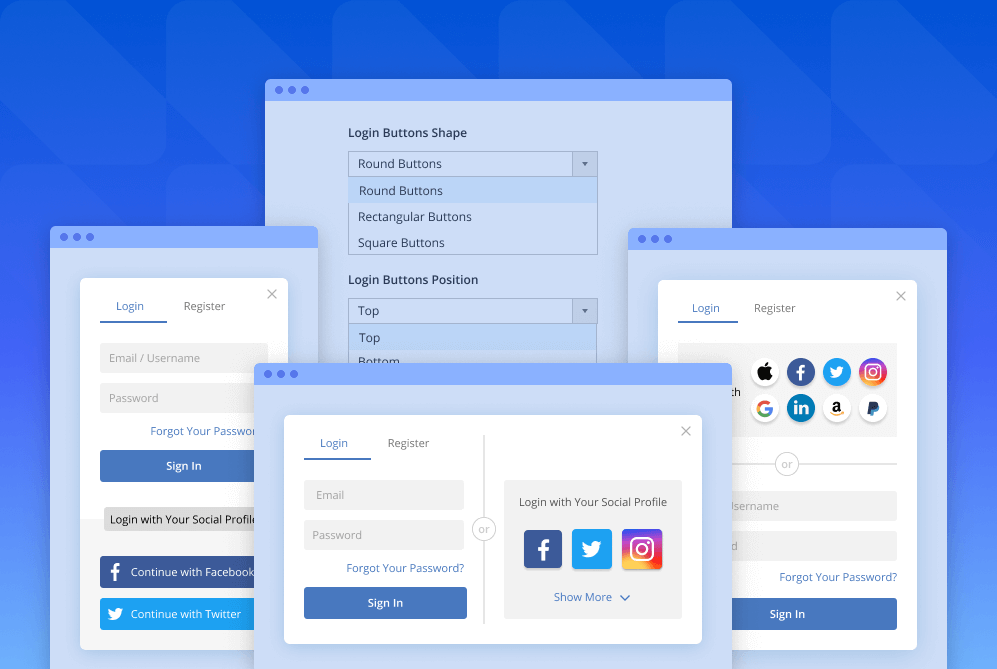
See the frontend example of the available button designs:
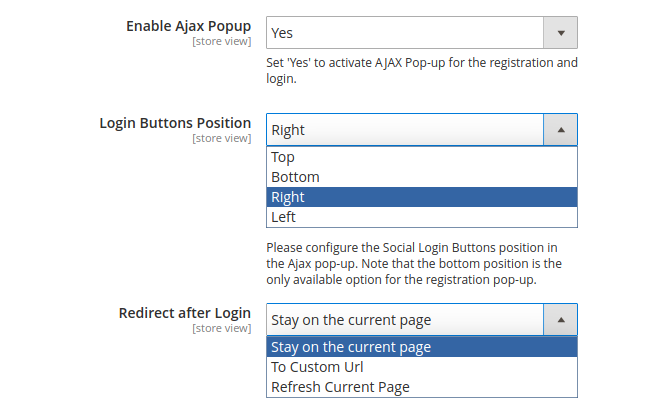
Enable AJAX popup - Set to Yes to enable the AJAX pop-up for the registration and login.
Login Button Position - Choose the place to display social login buttons.
Available positions:
- Top
- Bottom
- Right
- Left
Redirect after Login - Select the necessary page, where to direct customers after their social login.
- Stay on the current page
- To custom URL
- Refresh Current Page
After login via social button, you can redirect customers to the registration form to fill in the necessary data. To do that, you have to set at least one attribute with required values. To do that, please navigate to the Stores → Attributes → Customer.
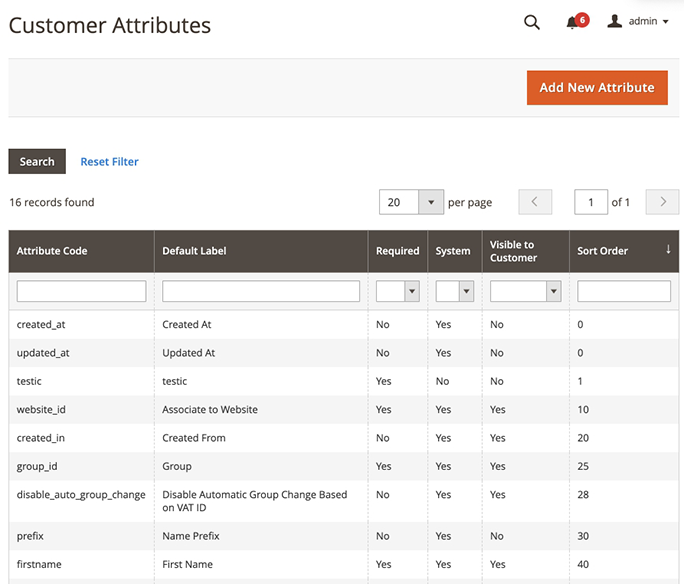
When creating a new attribute, please note that you have to set the Values Required to Yes, as shown in the example below.

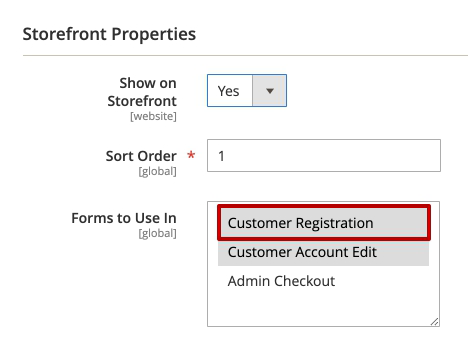
Also, for the attribute to display at the Registration form, in the Storefront Properties block the attribute should be allowed for displaying on the frontend. Also, include the attribute for displaying on the frontend.
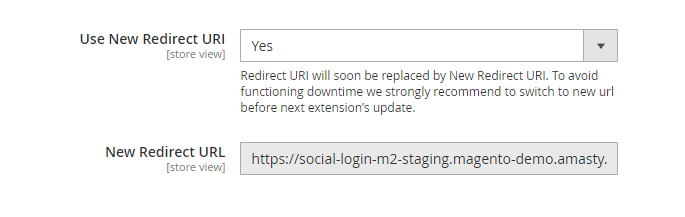
Use New Redirect URI - if you updated the extension, the option will be set to No by default. If you installed the extension version 1.7.0 or higher, the option will be automatically set to Yes. Learn more in the Before Configuration - about Hybridauth section of the User Guide. Note that this setting will be applied to all social networks you use for social login.
New Redirect URL - in this field you'll see the URL of your store, that will be used for redirects after social login.

Close a Popup When Clicked Outside of It - Set 'Yes' to enable closing the social login popup by clocking outside of it.
Specifics of the module's operation with the setting “Require Email Confirmation = Yes” (Customer Configuration > Create New Account Options).
- Social Login Functionality: Social Login allows users to authenticate via an external platforms. The user's information, including their email, is retrieved directly from the external platform and stored in Magento's database.
- Email Verification: Since the email is already verified by the external platform, there's no need for additional email confirmation through Magento. The platform guarantees the authenticity of the email associated with the user.
As a result, the Social Login module does not send additional confirmation emails.
Enabled - Set to 'Yes' to enable the display of the Google login button.
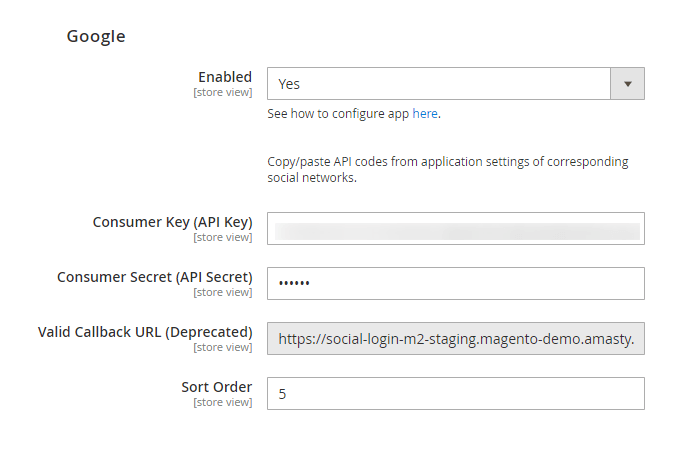
Please note that the 'Valid Callback URL (Deprecated)' setting will be seen only if you set to 'No' the setting 'Use New Redirect URI' at the section General Settings above.
To create Google App, go to
https://cloud.google.com/console/project.
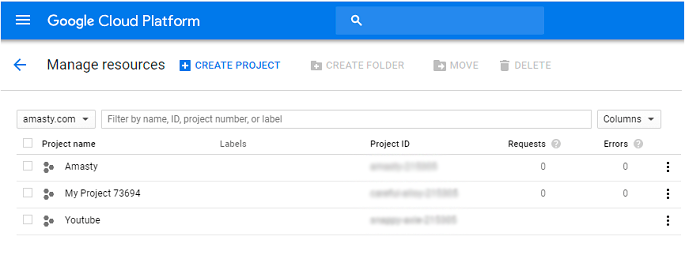
Click on the CREATE PROJECT button and configure your app settings.
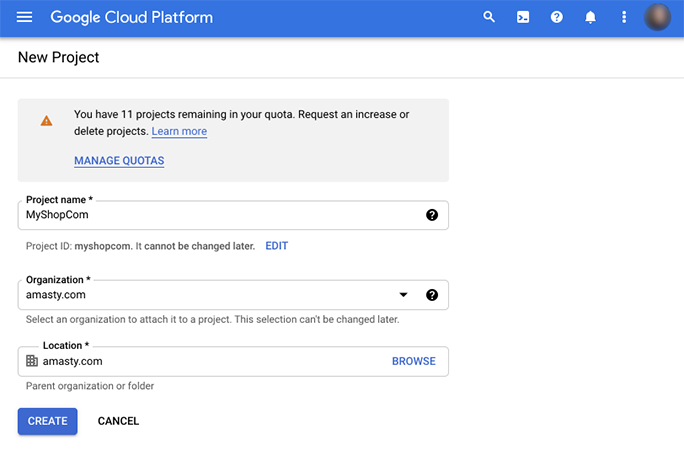
Specify your project name. The project ID will be generated automatically. Google might also ask to specify an organization to attach it to a project. In this case, select an organization to which your G-suite account belongs. Then, press the CREATE button.
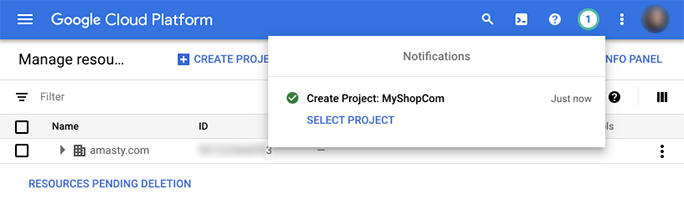
After successful project creation, a new message will appear on the notifications bar. Please kindly press the Select Project link in the notification.
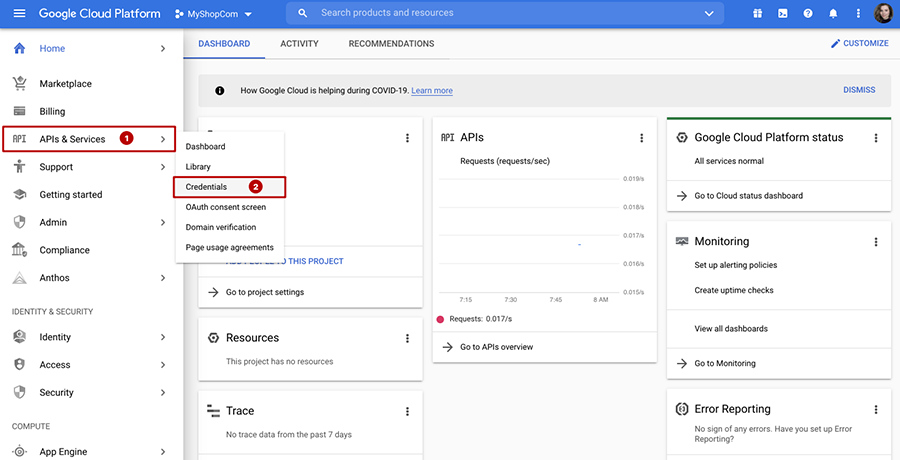
You will be redirected to the main dashboard of the newly created project. To proceed with creating new credentials for Amasty Social Login extension for Magento 2, please go to APIs and Services → Credentials as shown on the screenshot below.
In the Credentials window, please press the + CREATE CREDENTIALS button. Then, a dropdown appears, where you need to select the OAuth Client ID option.
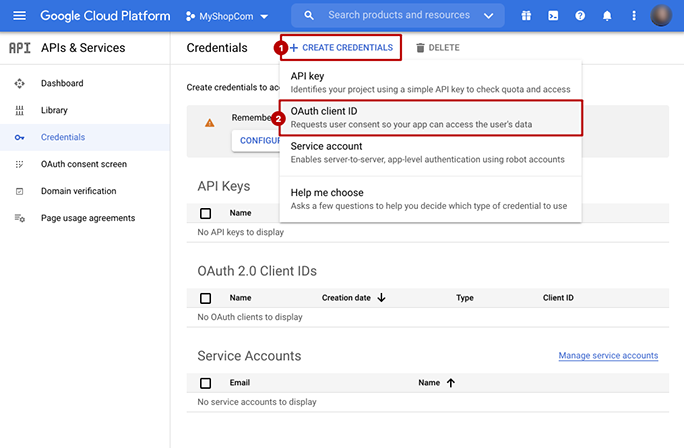
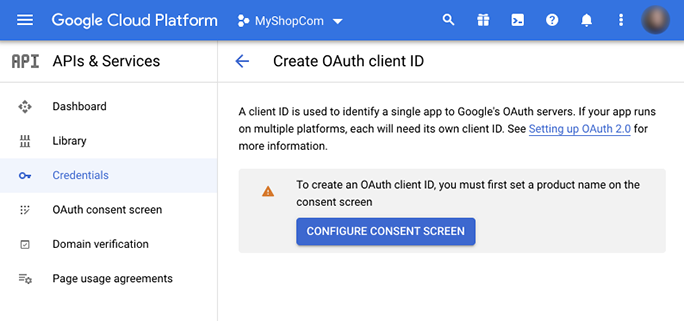
In case you haven't created any credentials for this project before, Google will ask you to configure a Consent Screen. It is required step, as here you can set up the extension name and other details that the client will be able to see when agreeing to use social login in your store.
To start the OAuth Consent Screen configuration, please press the CONFIGURE CONSENT SCREEN button.
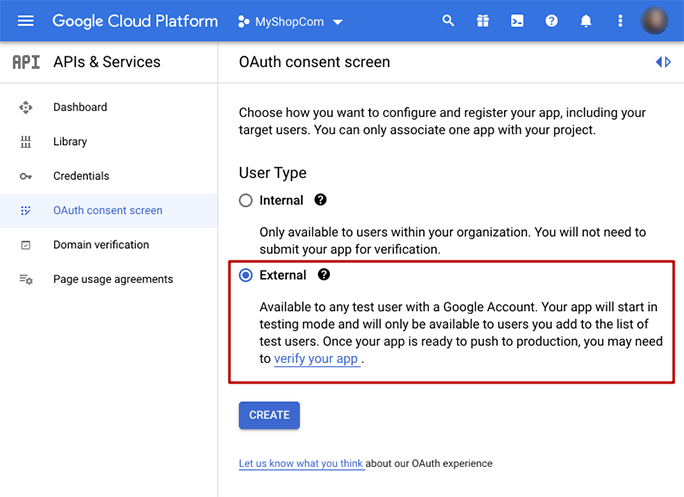
In thee first step, you need to select whether the extension will be Internal or External. As the Social Login M2 extension is aimed to assist with quick customer login, please select the External option as shown on the example screenshot below. Press the CREATE button.
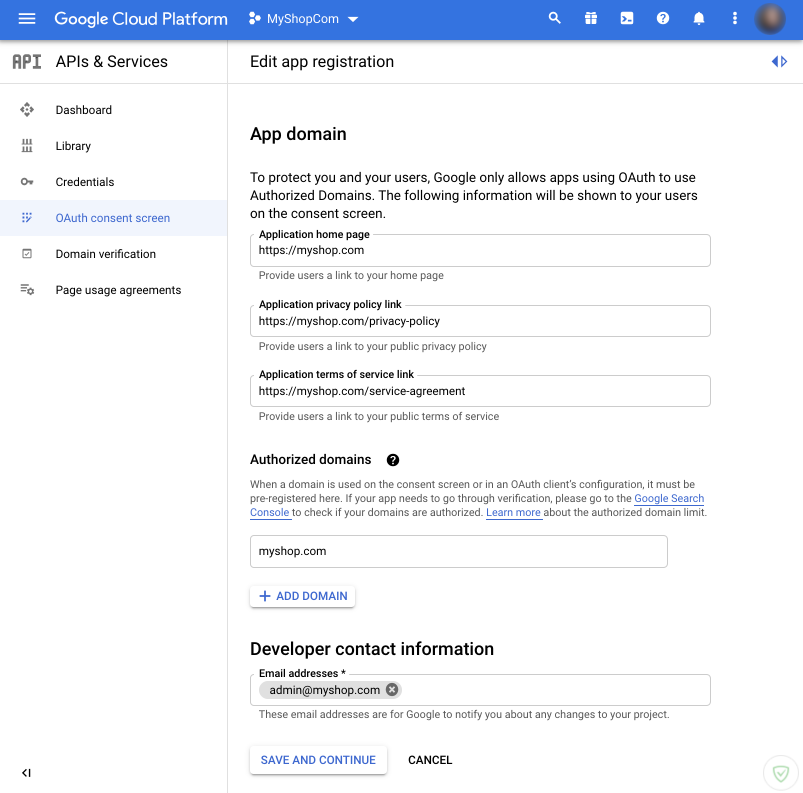
On the next step, you need to fill in some data on your store, for example, add App Name, Support Contact Email, App Icon, etc. For more information, please see Google's tips on the left side of this page.
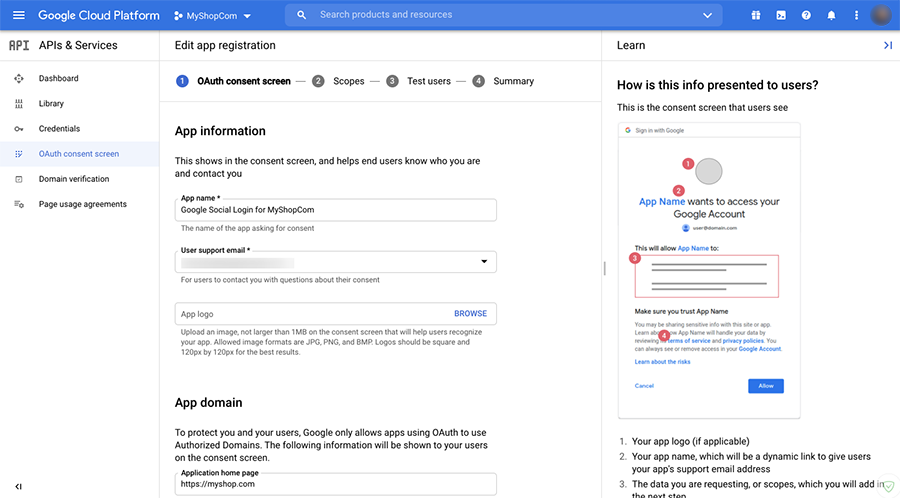 After filling in all the necessary rows, press the SAVE AND CONTINUE button.
In the second step, named SCOPE, simply press SAVE AND CONTINUE button. As an OAuth Consent Screen is created in the very beginning of the project setup, there is no credentials to add to the scopes. You will create all necessary credentials few steps later, and they'll be automatically added to the scopes.

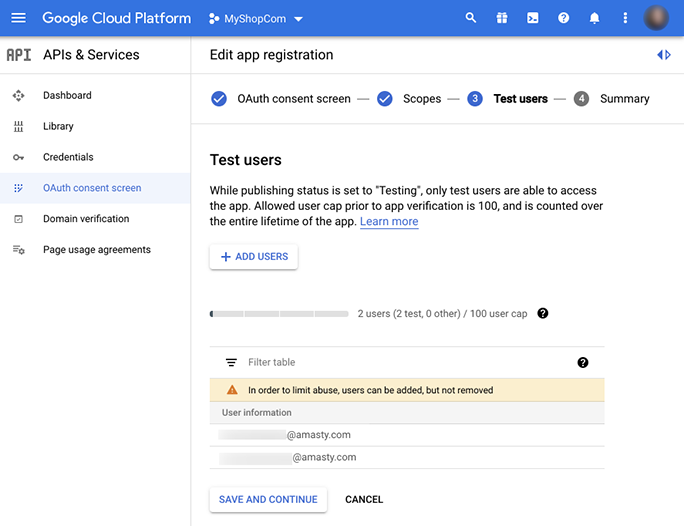
In the third step, you can add users that can access who can access your application in the test mode. To add new users, click the + NEW USERS button.
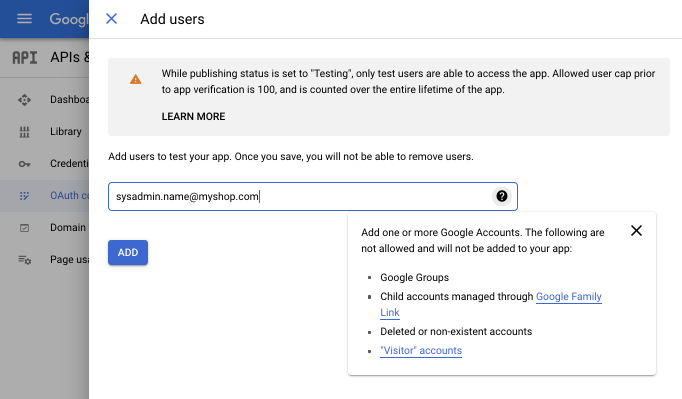
Then, a pop-up window will appear. Here, you can enter up to 100 emails of users who will be able to access the app. Press the ADD button. Then, click on the SAVE AND CONTINUE.
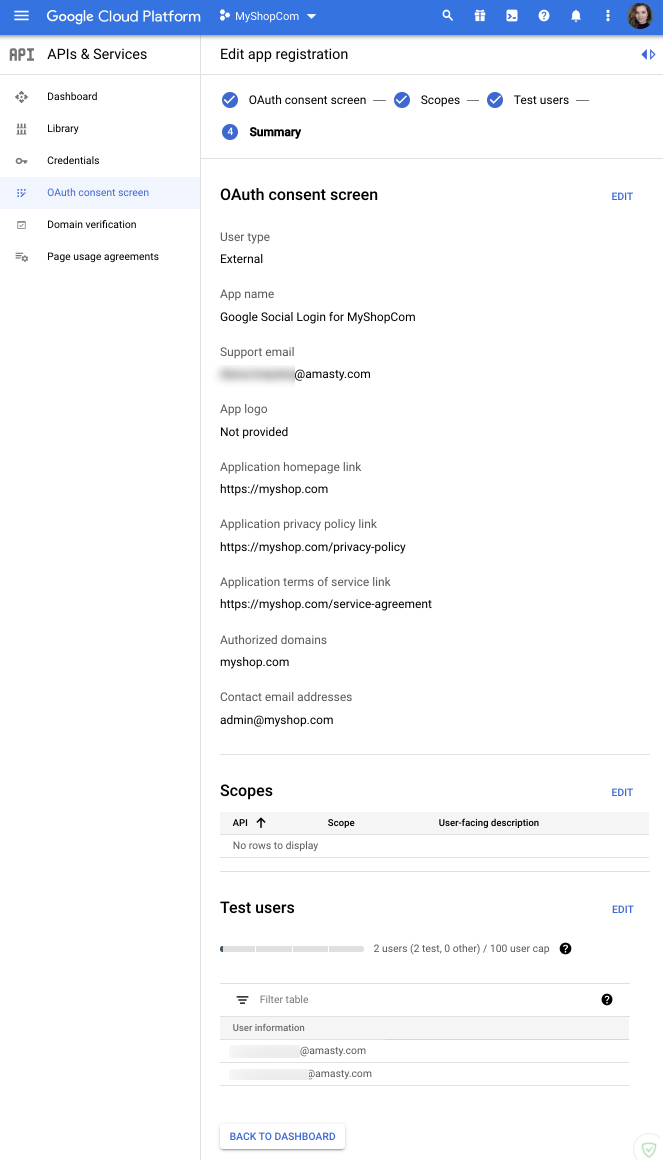
In the third step, you can read the summary of your configurations. Press the BACK TO DASHBOARD button.
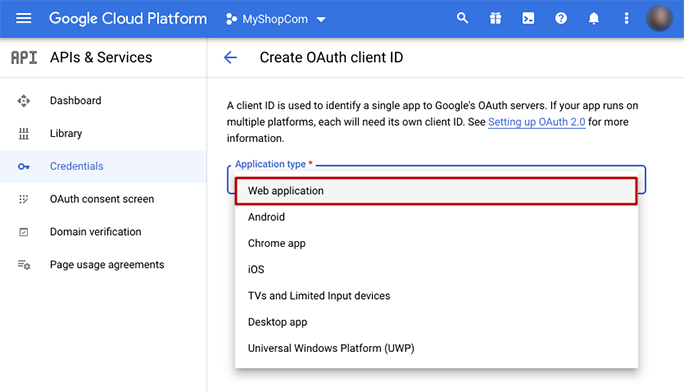
Once you've been redirected to the project dashboard, once again go to APIs and Services → Credentials, and then select the + CREATE CREDENTIALS → OAuth Client ID. This time, you will be taken to the OAuth Client ID Creation. To proceed, please select the Web Application type.
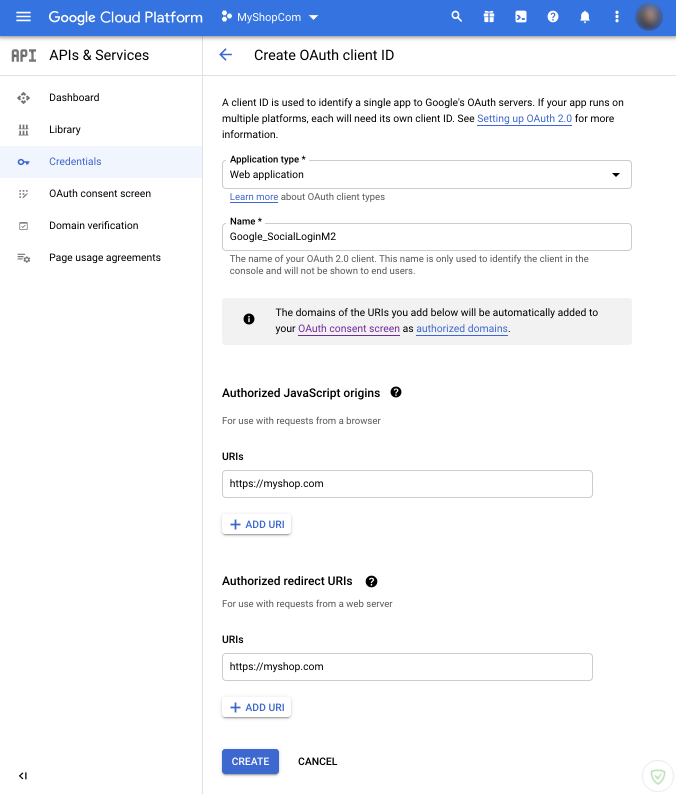
After you set the config as Web Application, additional fields will appear. Fill them in as required by Google, then click CREATE button.
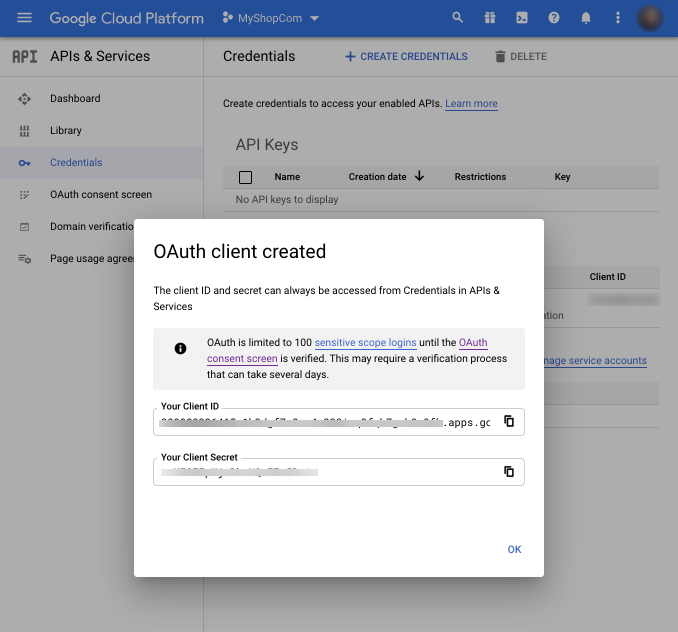
After a successful OAuth Credentials creation, a pop-up window with a Client ID and Client Secret will appear. Please copy the Client ID and Client Secret, then insert your API KEY (Client ID) and API Secret (Client Secret) in the appropriate fields in the backend and save the configuration.
For instant access to your store backend and easy onboarding of new team members try Google Account Login for Magento 2.
Enabled - Set to Yes to enable the display of the Facebook login button.
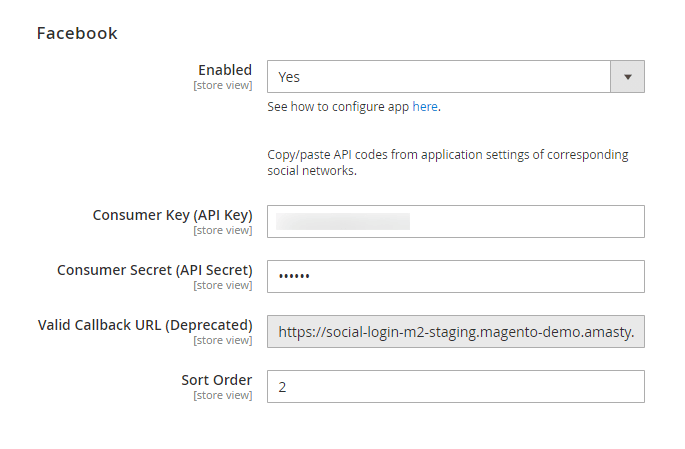
Please note that the 'Valid Callback URL (Deprecated)' setting will be seen only if you set to 'No' the setting 'Use New Redirect URI' at the section General Settings above.
To create a Facebook app, go to Facebook Developers
Use the video guide to set up Facebook login
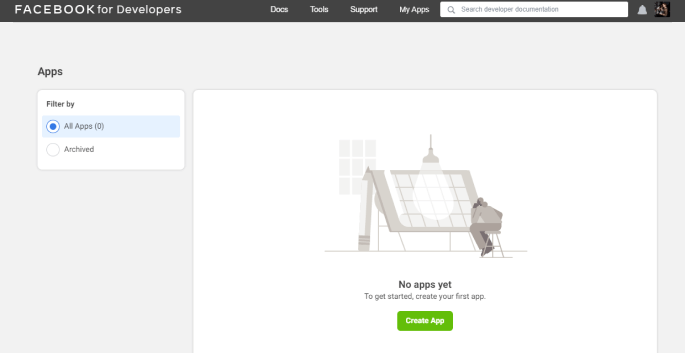
First, follow this link (Facebook Developers) and register as a developer or log in.
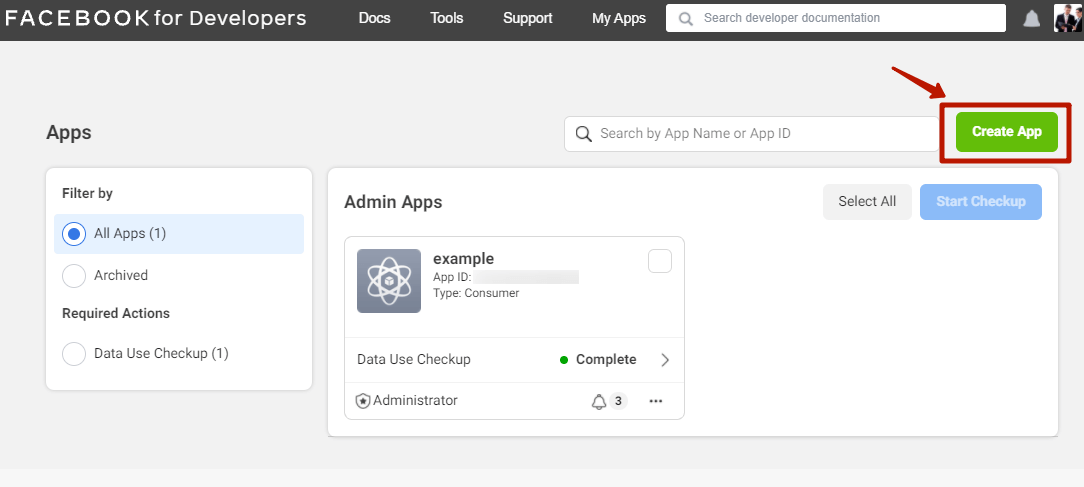
Then, click on the button 'Create App'.
On the next window that opens, choose 'Other' and click 'Next'.
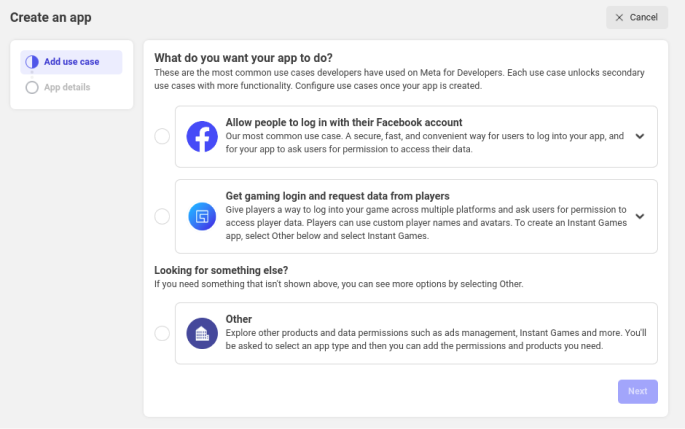
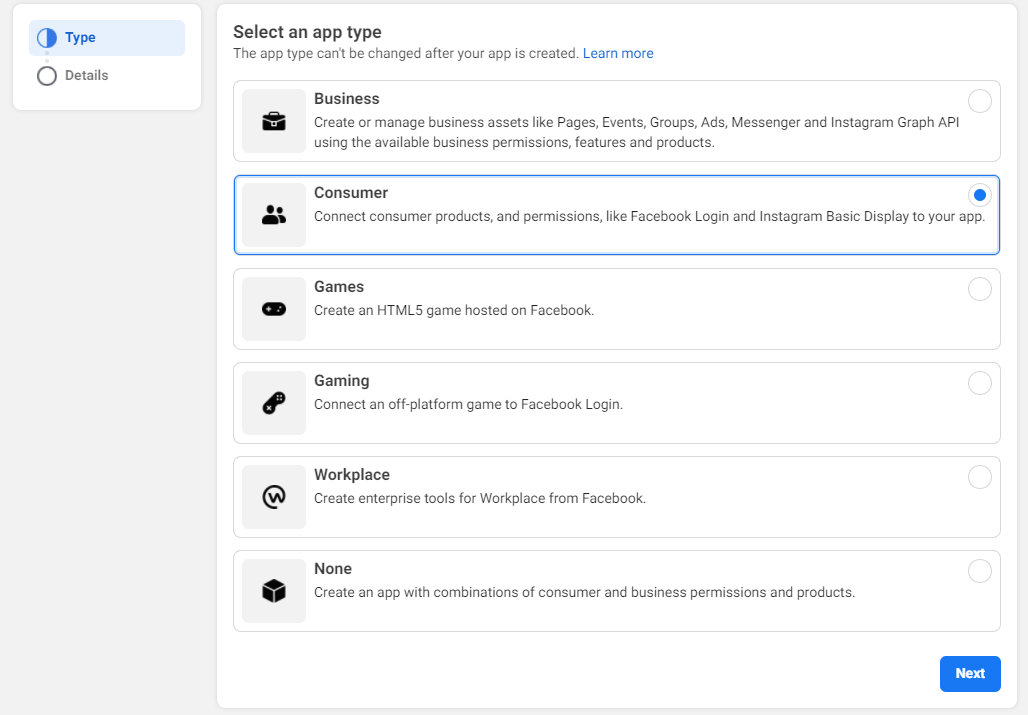
Choose the 'Consumer' app type from the list and click 'Next'.

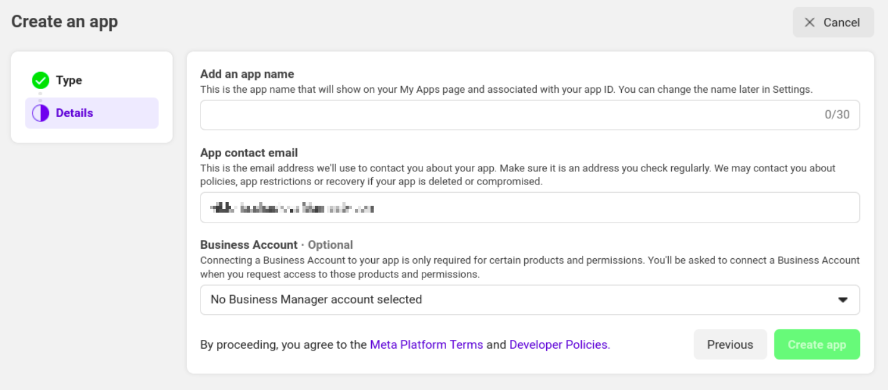
Specify the App's name, your contact email, and a Business Manager Account if you already have one (it's optional).
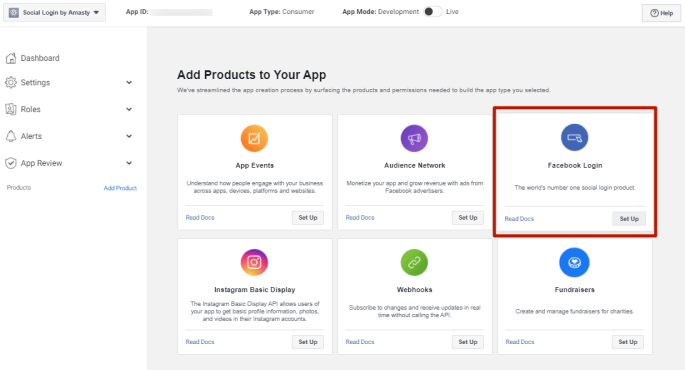
Click the 'Set Up' button at the Facebook Login product card to proceed.
Then navigate to Settings → Basic on the left menu and fill in the corresponding fields.

The App ID and App Secret will be generated automatically. Fill in the App Domains field and choose your app Category.
Please make sure that you configure the field 'User Data Deletion'.
According to Facebook:
Apps that access user data must provide a way for users to request that their data be deleted. Your app can satisfy this requirement by providing either a data deletion request callback or instructions to inform people how to delete their data from your app or website.
Facebook offers two ways to configure this field:
- to specify the Data Deletion Callback URL or
- to specify the Data Deletion Instructions URL.
In order to follow Facebook's Data Protection guidelines by means of the Social Login extension by Amasty please select the 'Data Deletion Instructions URL'.
To get this URL, please create a separate CMS page for your customers where you describe the process of how they can delete or request the deletion of their data from your website.
We recommend describing the following info on your Data Protection CMS page:
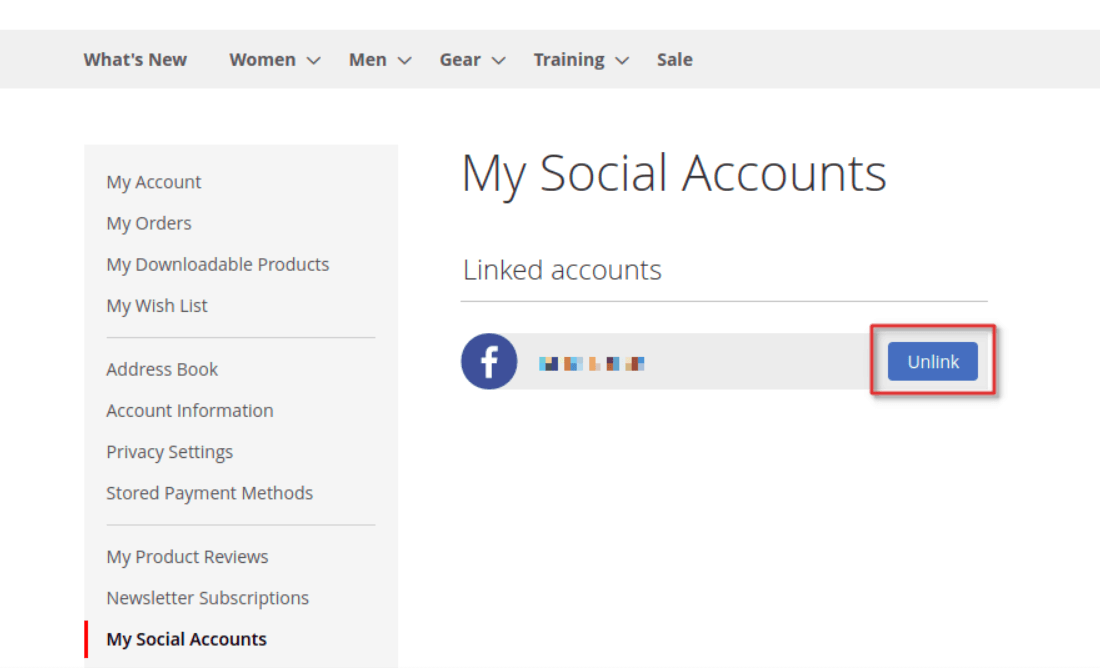
- how to unlink a social account from Customer Account ('Customer Account → My Social Accounts');
- add the instructions on how to contact your admin for further Data Deletion process.
Alternatively, if you have our GDPR extension for Magento 2 installed it allows customers to delete all info by themselves. Then just add some steps on how to delete data using our GDPR module functionality.
Staying on the section 'Settings → Basic' scroll down to click on the Add Platform button to choose the platform for your social apps.

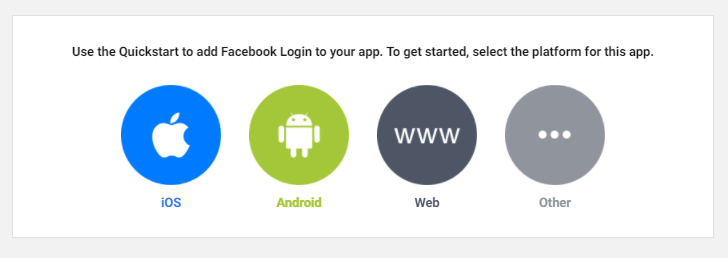
After clicking on the Add Platform button you’ll see the grid with various platform types. Please select Website.

In case you're picking up a platform via the Quickstart settings it will look like the following:
After specifying the platform type, insert your website URL here and click on the Save Changes button.
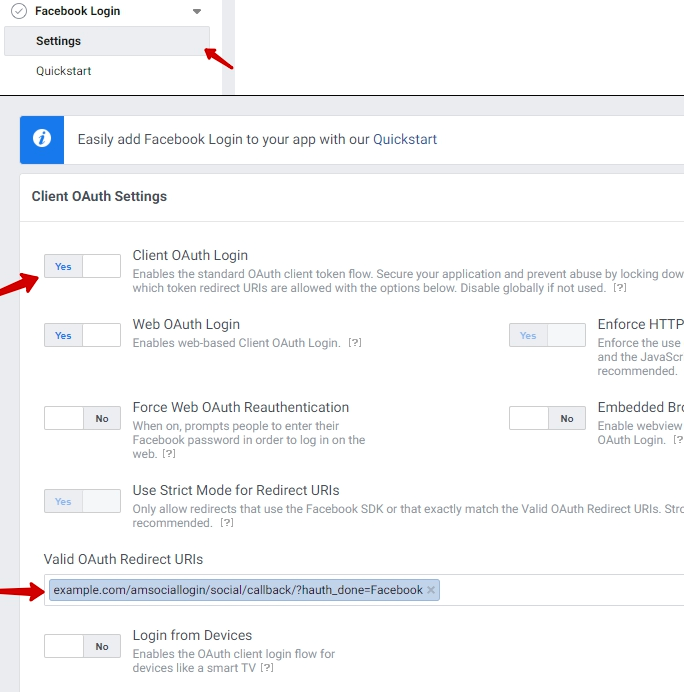
Enable the Client OAuth Login and fill in the Valid OAuth redirect URIs on the Facebook Login → Settings tab.
Specify the URL of your website in the Allowed Domains for the JavaScript SDK.

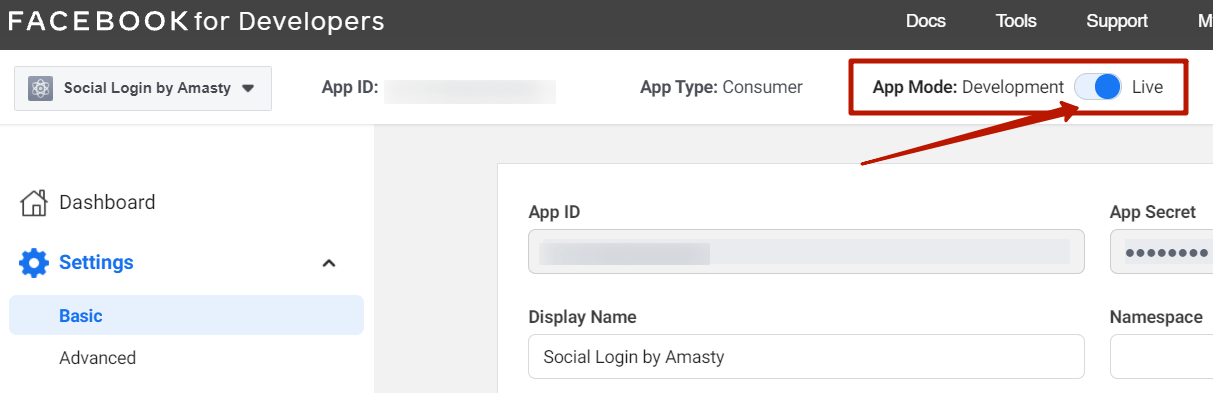
To apply the configuration, change the Status from In development to Live.
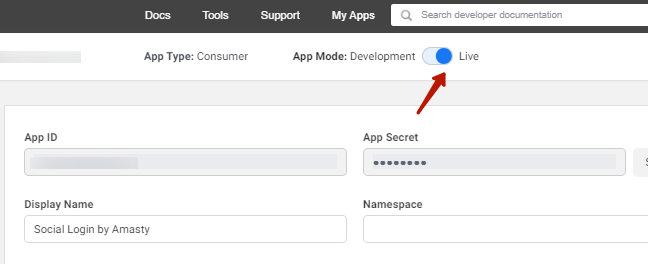
Insert your Consumer Key (API Key) (matches with App ID from the Facebook Dev account) and Consumer Secret (API Secret) (matches with App Secret from the Facebook Dev account) in General extension settings and Save the configuration.
Import customers' date of birth and gender from Facebook
You can import users' date of birth and gender from Facebook. With the date of birth, you can automatically verify customers' age.
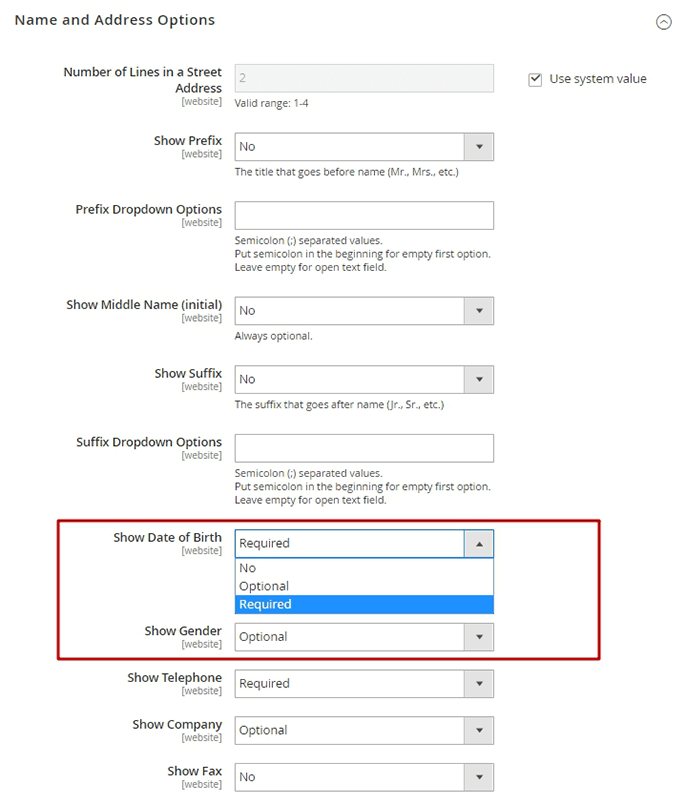
To make that feature work, first, go to the Stores → Customers → Customer Configuration → Name and Address Options and enable corresponding Show Date of Birth and Gender switches.
After that, go to the Facebook Developers application dashboard, which you created before. Click on the App Review → Permissions and Features
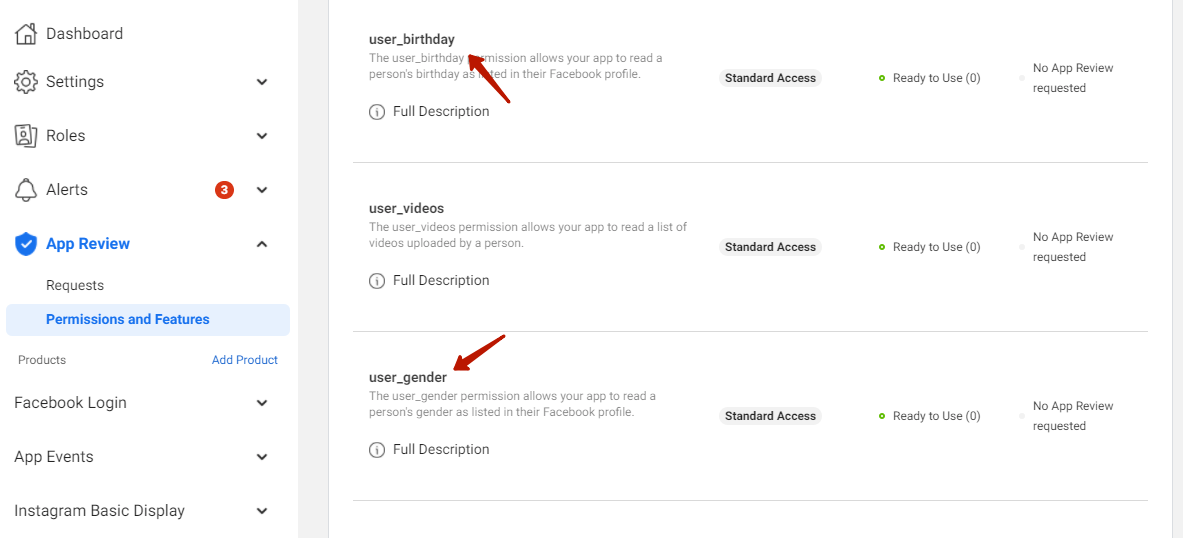
On this tab, search for the user_gender and user_birthday permissions. Then submit the request for approval, according to the Facebook requirements.
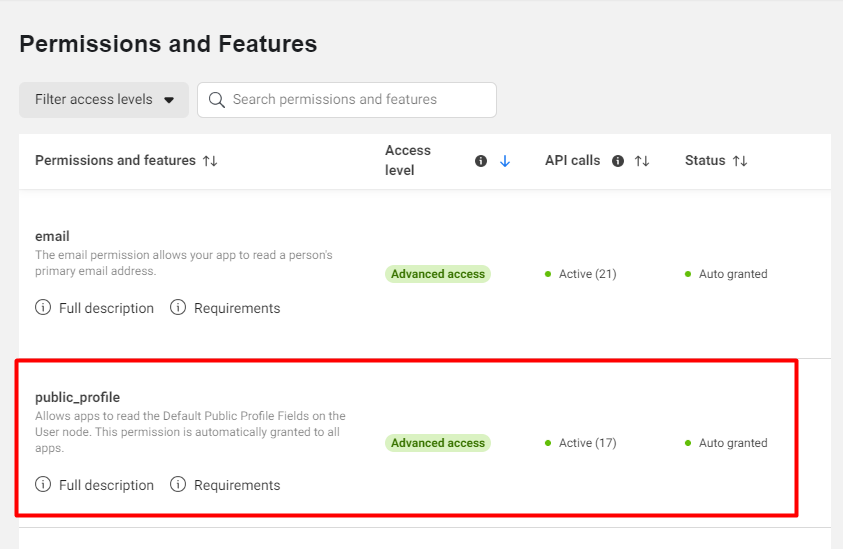
For the correct extension work, the public_profile permission access should be set to advanced, because it allows apps to read the Default Public Profile Fields on the User node. This permission is automatically granted to all apps.
All successfully approved requests will be displayed at the App Review → My Permissions tab, where you can easily manage them.
You can see all imported data on the All Customers grid, which you can find at the backend via going to the Customers → All Customers. Also, it will be displayed at each customer's account page.
Facebooks' Annual Data Use Checkup
In 2020, Facebook introduced Data Use Checkup to safeguard data and respect people’s privacy when using the Facebook platform and tools.
As Facebook explains, “Through Data Use Checkup, developers will be asked to review the permissions they have access to and commit that their API access and data use comply with the Facebook Platform Terms and Developer Policies within 60 days or risk losing their API access.”
For you, as a user of Social Login for Magento 2 extension, it means that once a year you'll be asked to confirm that all Facebook-related APIs that you use as part of Social Login authorization options are complying with Facebook Platform Terms and Developer Policies.
The once a year checkup is flexible. This means, that the exact checkup deadline is linked to the day when you created the API connection in the Facebook Developers account. So if you created several connections at various dates, the checkup deadline for them will also differ.
Facebook triggers a special reminder in the Facebook Developers account. This is an example of how the notification might look. Please remember that the dates might differ based on the API creation date.
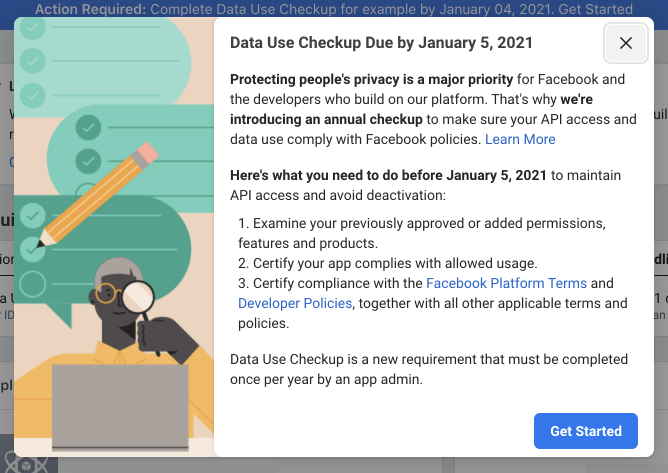
Simply click on the Get Started button to proceed with the checkup.
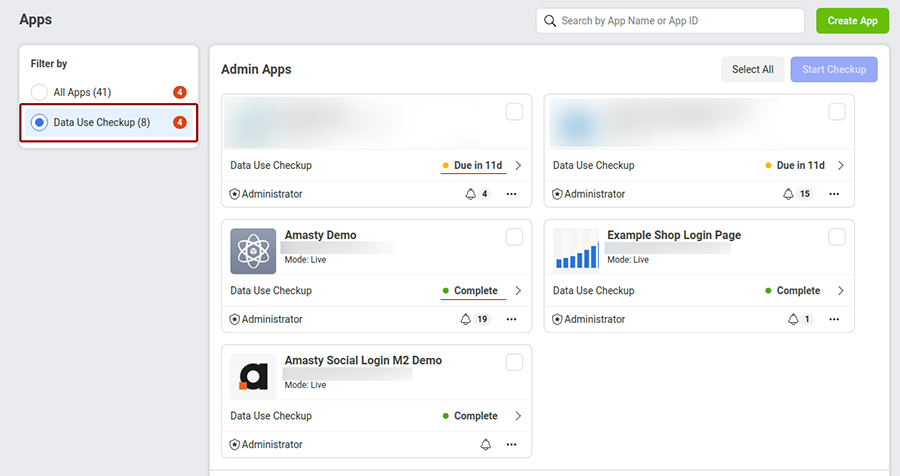
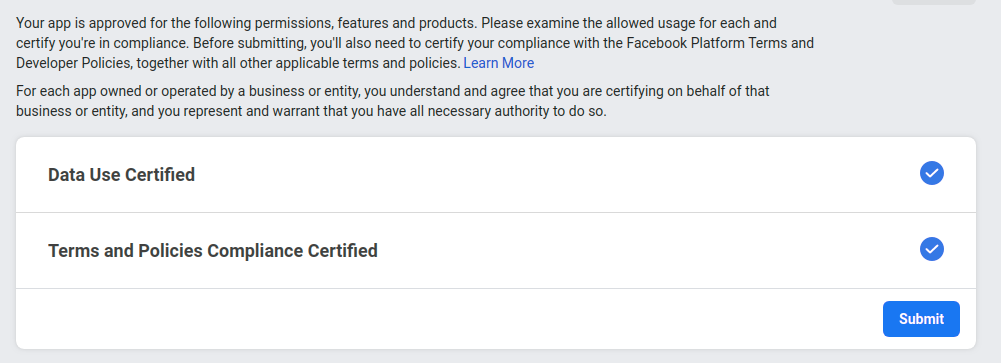
Here's an example of how the checkup looked in December 2020 for our Facebook API that we used for our Facebook Social Login on demo-store.
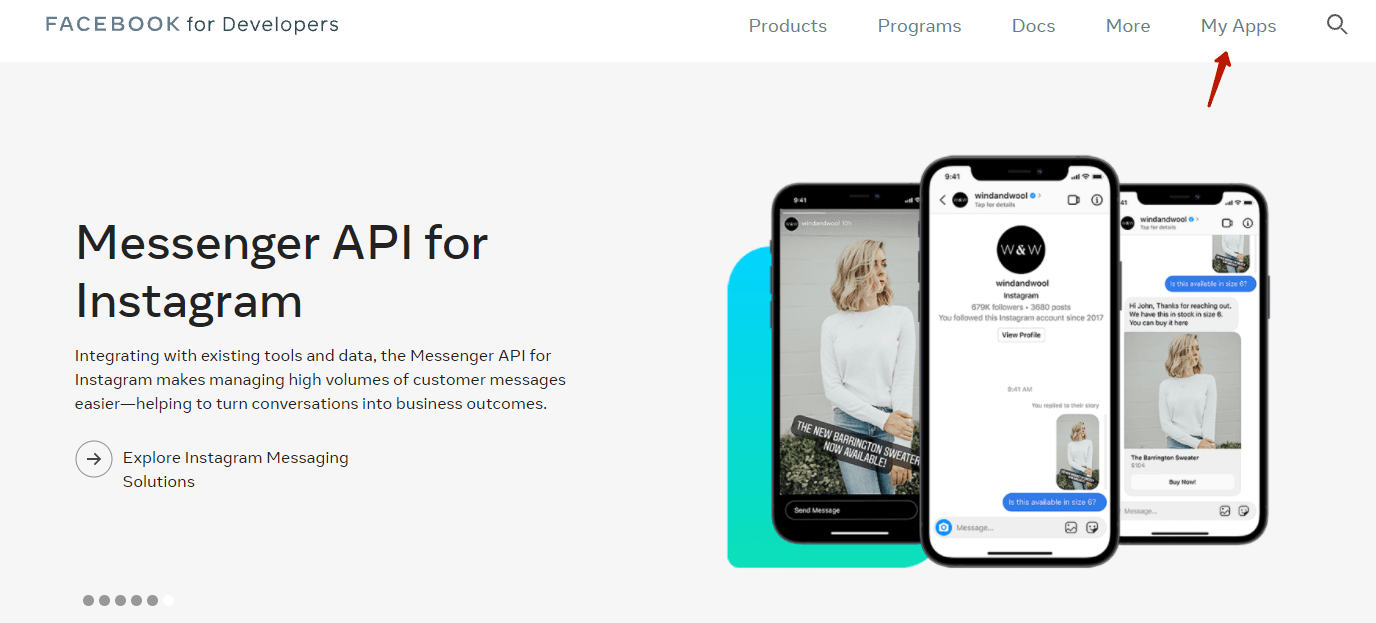
First, go to the My Apps section.
Then, proceed by reading Facebook requirements and proving that you comply with them.
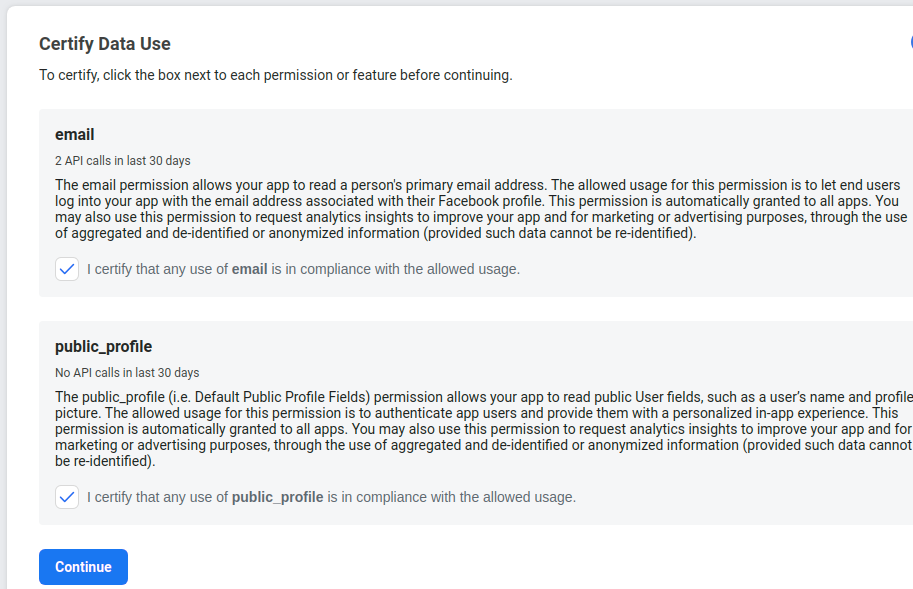
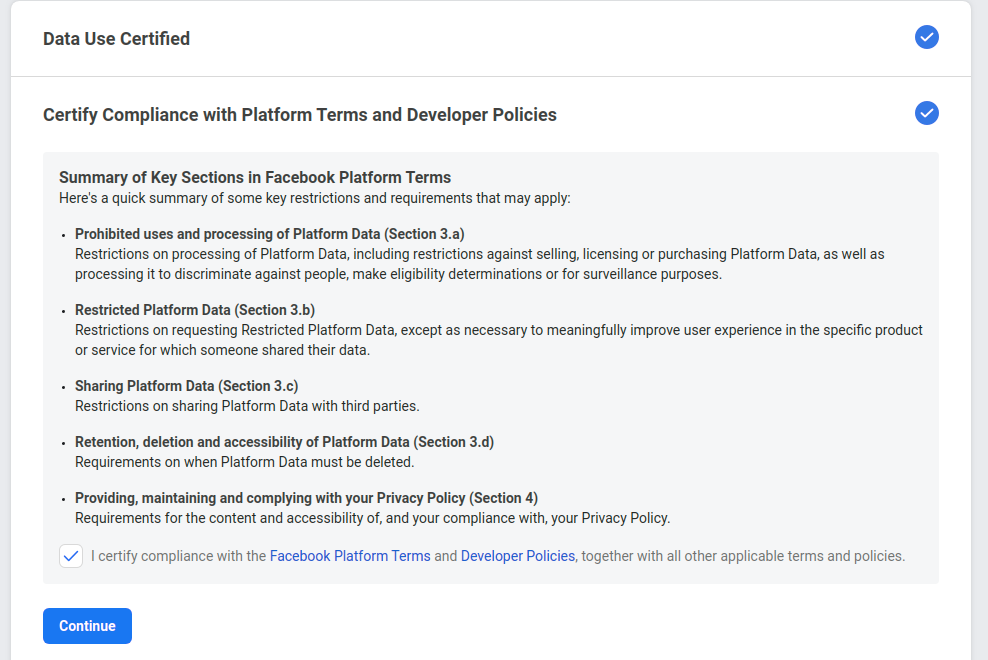
Lastly, click Submit.
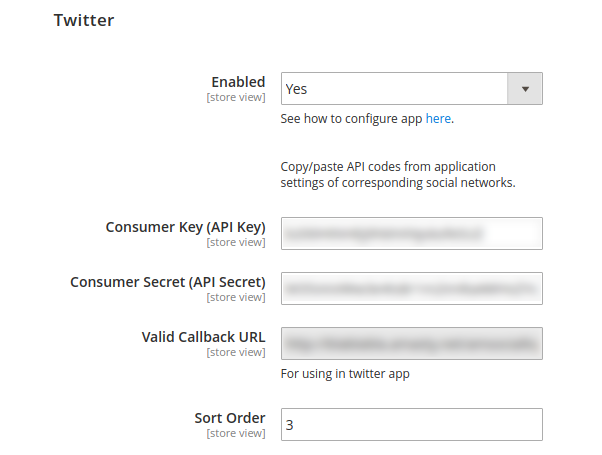
Enabled - Set to Yes to enable the display of the Twitter login button.
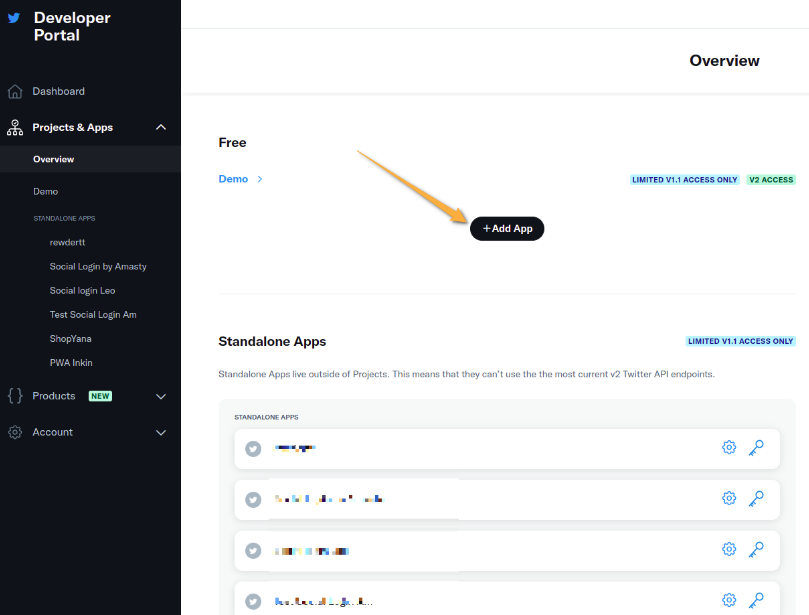
To create a Twitter App, go to https://apps.twitter.com/.
Click on the Add App button to create a new Twitter app.
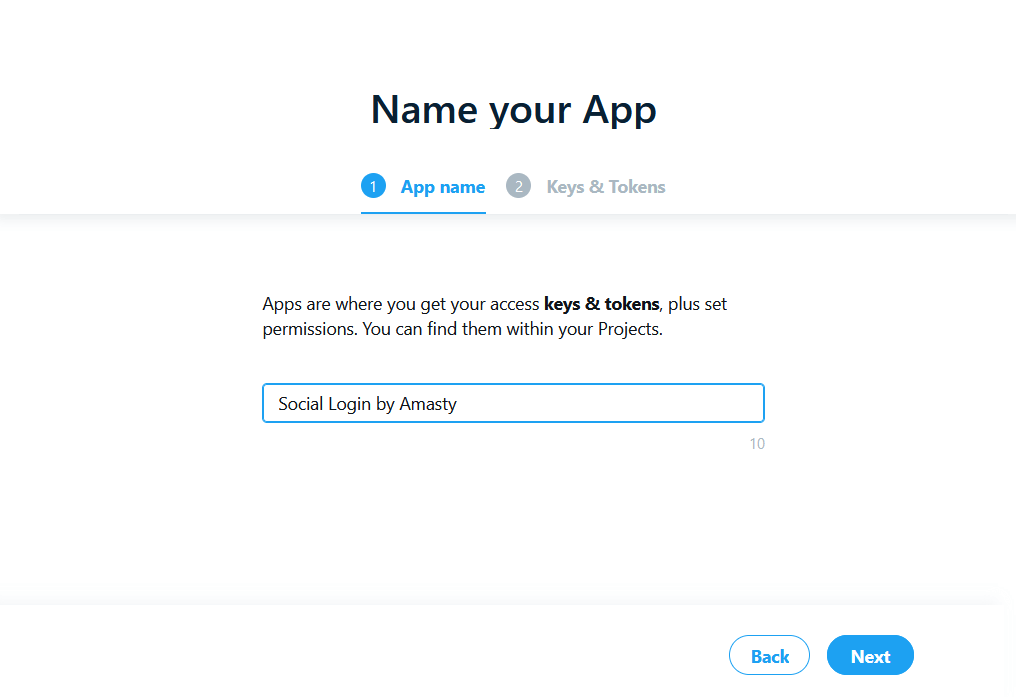
Specify your App name here, and click the button 'Next'.
Copy the generated API key from the field to use it on the Magento backend for the corresponding field.

Hit the button 'App settings' and give a detailed description for the application.

Scroll down to User authentication settings and click 'Edit'. Specify the necessary permissions, enable request email from users if necessary. Also, here you can specify the Type of App.

Scroll down to App Info. Please add the data into the Callback / Redirect URLs and the Website URL fields (required). You can also fill in optional fields like Organization name, Organization URL, Terms of service and Privacy policy. Please note, that Terms of service and Privacy policy are required if you enable Request email from users. Don't forget to Save the changes.

Go to the Keys and tokens tab, here you can regenerate and copy the API key and the API secret key if necessary.

Insert the API key and Secret, obtained from the Keys and tokens tab, to the fields in the Magento backend. Save configuration changes.
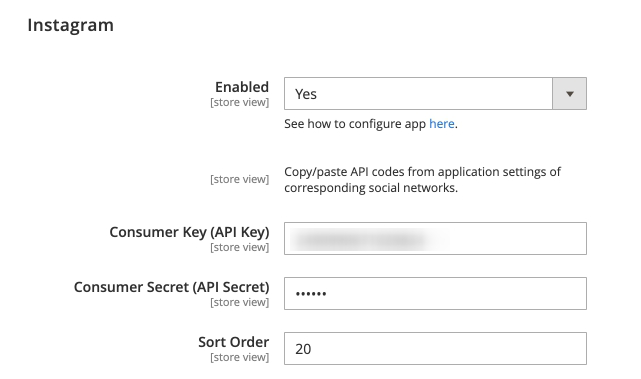
Enabled - Set to Yes to enable the display of the Instagram login button.
To configure the connection to Instagram, first, you have to adjust an app in your Facebook Developer account. Then, adjust the necessary settings for the Instagram app itself. The user manual will guide you through both steps.
To configure the Instagram social login connection, you have to get a Facebook Developer account.
First, go to My Apps → Create App via Facebook for the developers' navigation panel.
Choose the 'Consumer' app type from the list and click 'Next'.
Fill in the details about the App. Specify the App's name, your contact email, and a Business Manager Account if you already have one (it's optional).

Click the 'Set Up' button at the 'Instagram Basic Display' product card to proceed.

Then navigate to 'Settings → Basic' on the left menu and fill in corresponding fields.

Staying on the section 'Settings → Basic' scroll down to click on the 'Add Platform' button to choose the platform for your social apps.

After clicking on the 'Add Platform' button you’ll see the grid with various platform types. Please select Website.

After specifying the platform type, insert your website URL here and click on the Save Changes button.
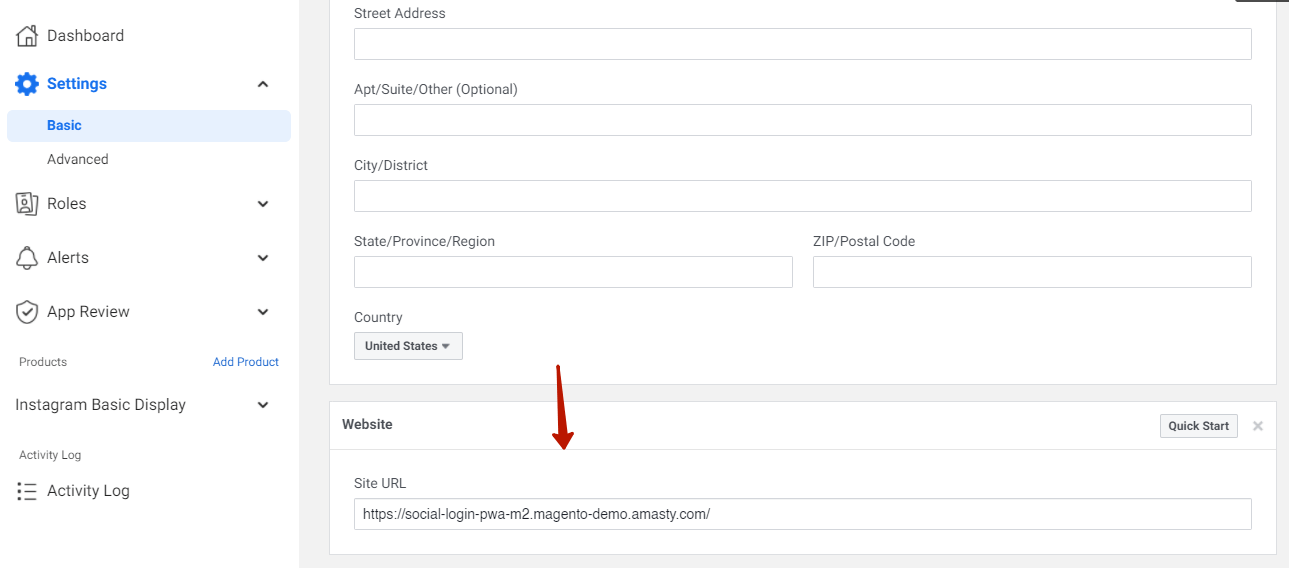
Then navigate to the tab 'Instagram Basic Display → Basic Display' and click 'Create new app'. Then copy the API secret key and the App ID to paste it to the corresponding fields of the Magento admin panel.
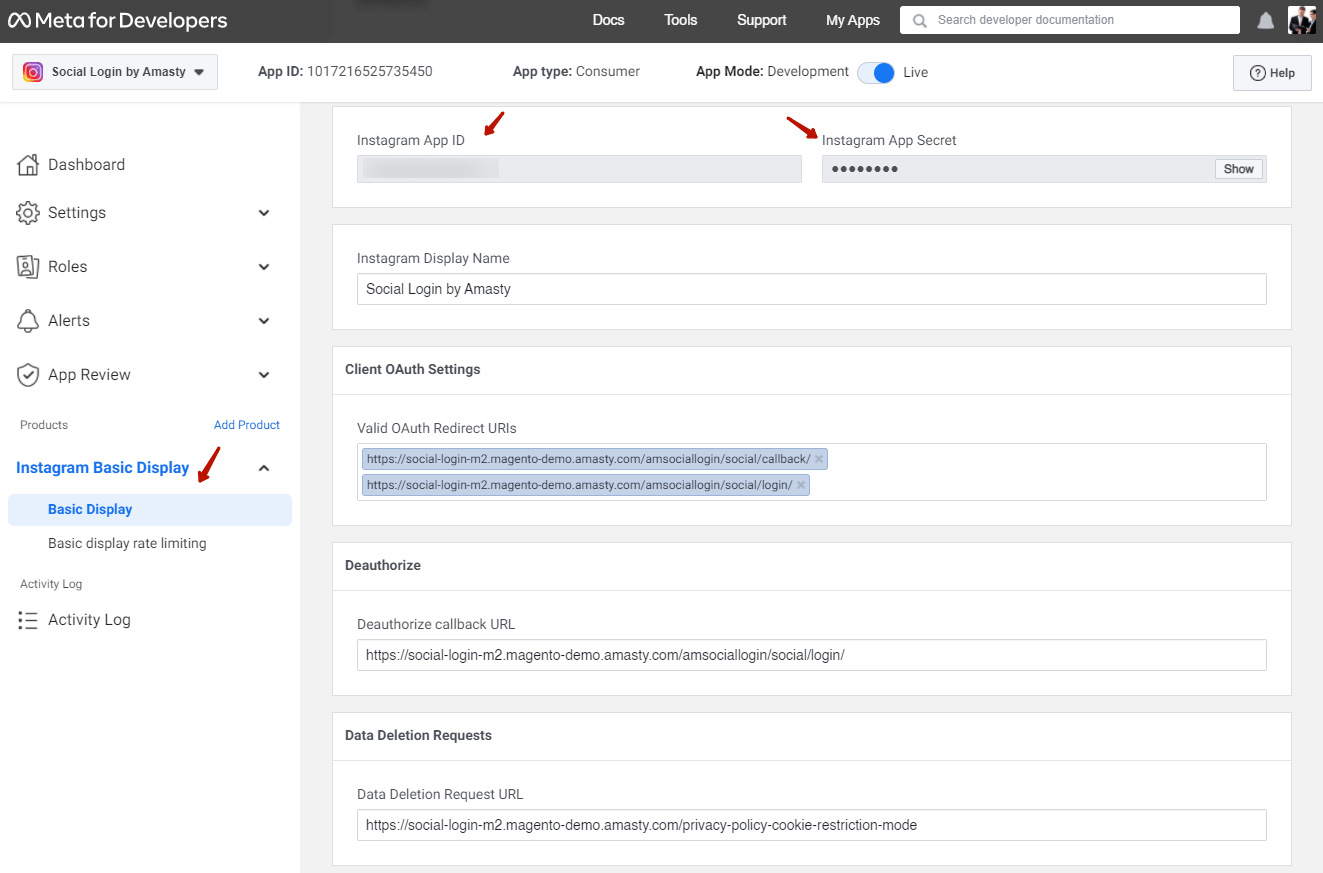
The Instagram social login will be available for all website visitors only AFTER app activation (publishing to LIVE). To do that, please click the tumbler 'In development' to change the status to 'Live', as shown in the screenshot below.
In development mode, customers will be unable to login to your website using their Instagram account.
Note that, you can test the Instagram API connection with test user accounts.
The Instagram API doesn't return the email that is necessary for user registration. Therefore, at first login attempt, the user will be redirected to the 'Create an Account' page.
Enabled - Set to Yes to enable the display of the LinkedIn login button.
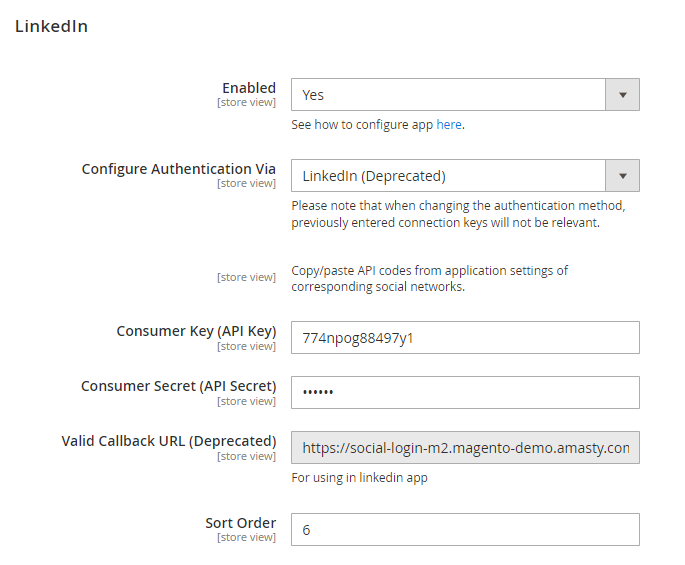
Configure Authentication Via - choose the authentication version you want to use:
- LinkedIn (Deprecated) - this is an old, default version.
- LinkedIn OpenID Connect - recently released version. OpenID Connect (OIDC) is an identity layer built on top of OAuth 2.0, enabling applications to authenticate members and obtain lite profile information about the member. OIDC will simplify the partner integration onboarding experience and eliminate dependencies on making additional API calls to find who the authenticated member is. Keep in mind Sign In with LinkedIn using OpenID Connect does not verify user identities and should not be marketed as such. Explore more about this type of authentication here.
Please note that when changing the authentication method, previously entered connection keys will not be relevant. So if you change the authentication method, you should also update the connection keys.
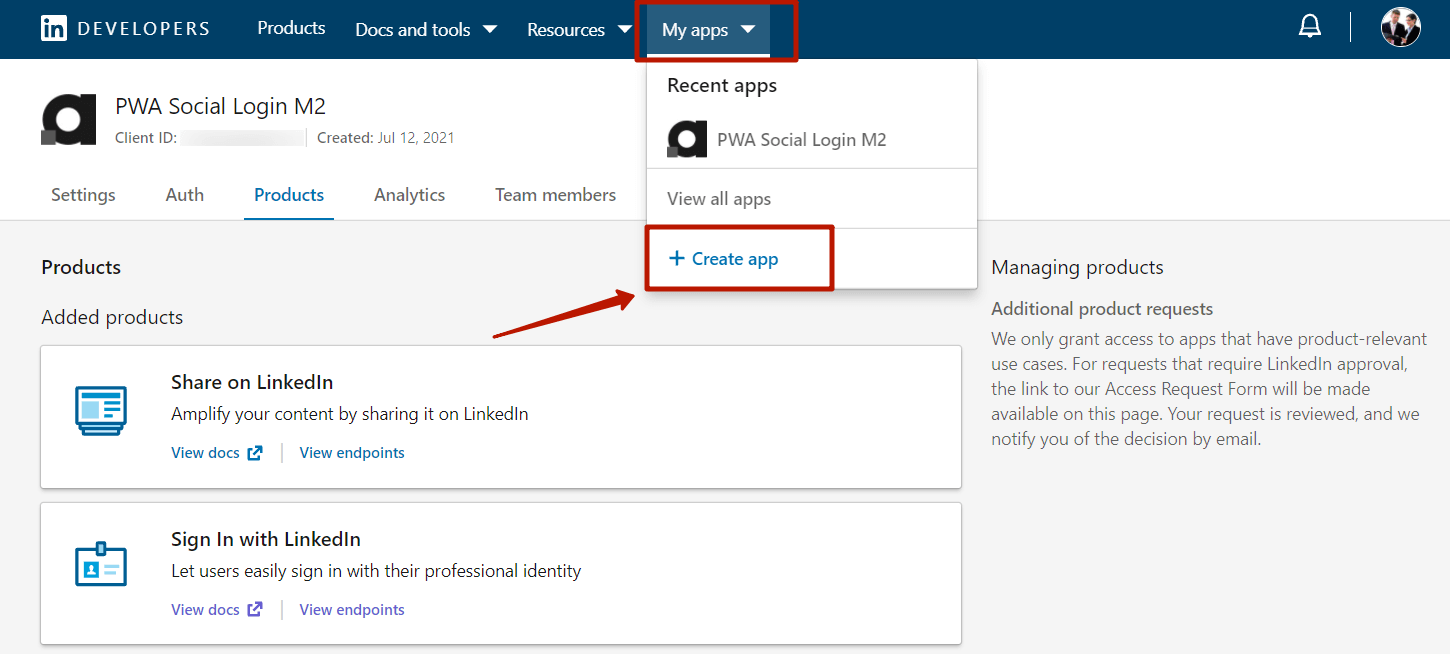
To create LinkedIn App, go to https://www.linkedin.com/secure/developer.
Register or log in and then please go to the My Apps and click on the Create app.
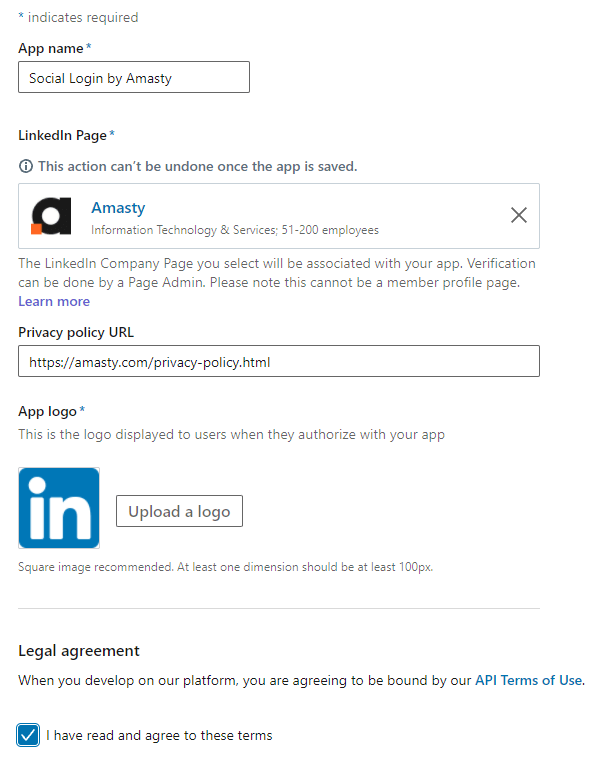
Specify your App name and Linkedin Page (i.e. your company page on Linkedin), Privacy Polucy URL (optional), App logo and proceed to the next page.
On the tab 'Auth' please specify the authorized redirect URs for your app.

Copy the Client ID and the Client Secret and paste it in Consumer Key (API Key) and Consumer Secret (API Secret) tabs in the module settings. Save the configuration.
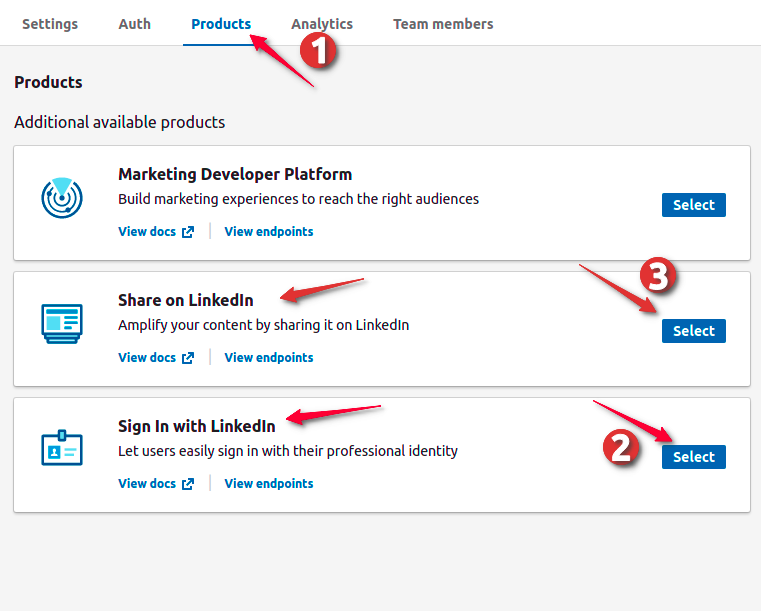
Go to 'Products' tab and make sure that you've selected 'Share on LinkedIn' and 'Sign in with LinkedIn' options.
Then go back to the 'Auth' tab and make sure that the permissions on the 'OAuth 2.0 scopes' section look like on the screen below:

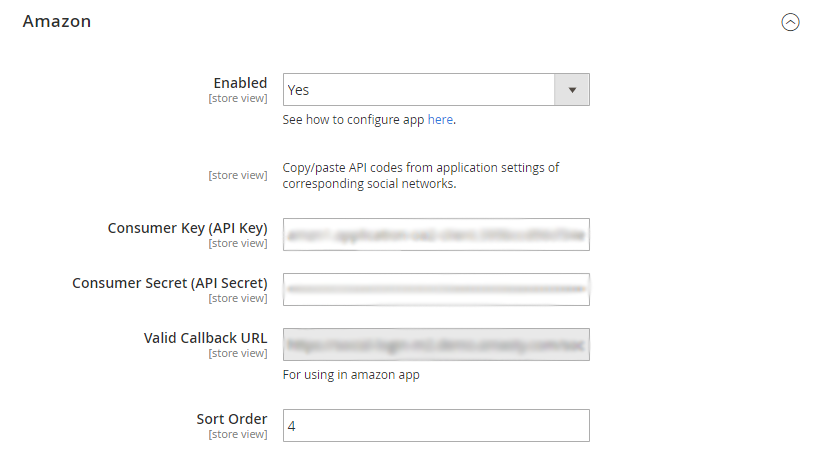
Amazon
Enabled - Set to 'Yes' to enable the display of the Amazon login button.
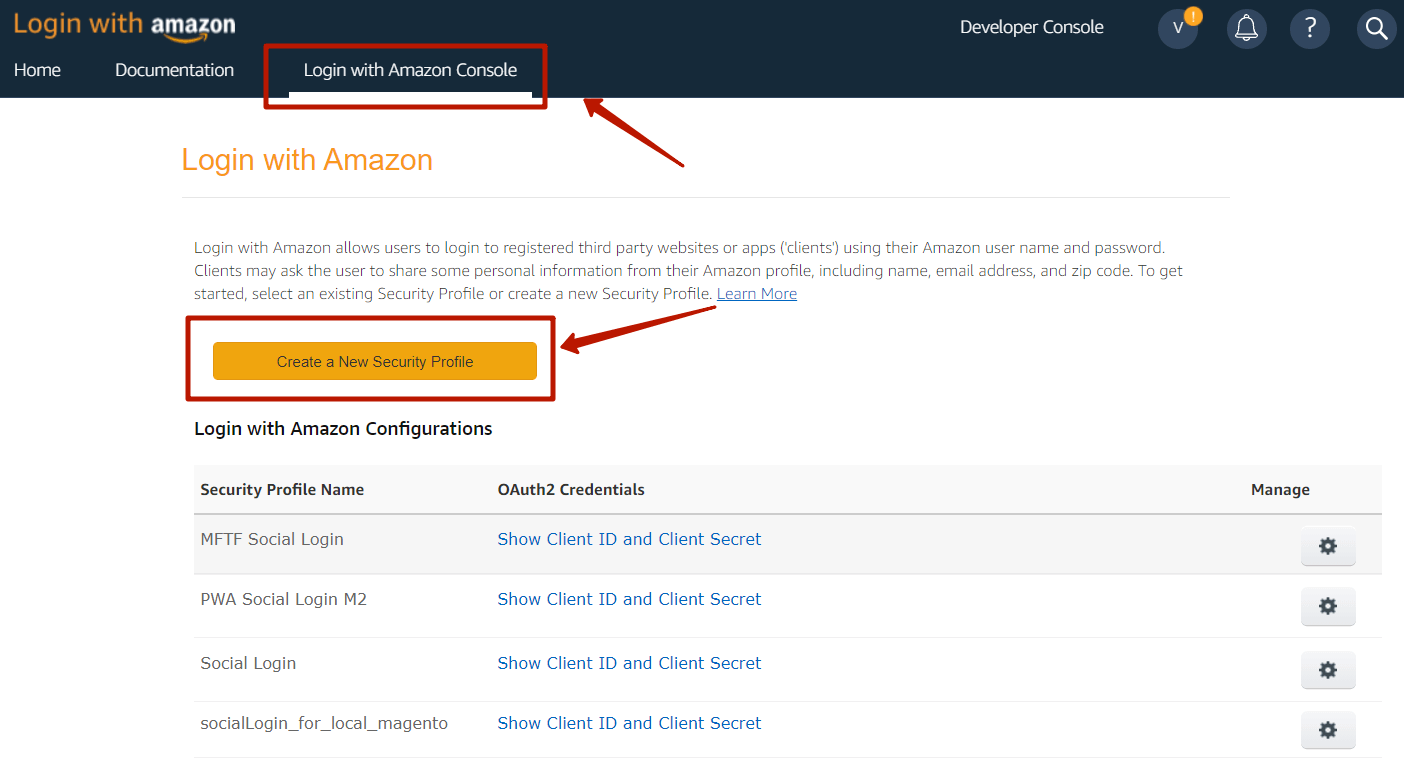
To create Amazon App, please, go to https://login.amazon.com/website
Sign in or register and navigate to the 'Login with Amazon Console tab'. Hit the 'Create a New Security Profile' button.
Fill in the corresponding fields on the 'Security Profile Management' page: the profile name, description, the consent privacy notice URL, and the consent logo image (optional). Click 'Save' to proceed.

After saving the config you'll see the success notification (see example on the screenshot below). Click the 'Settings' sign to manage Security Profile.
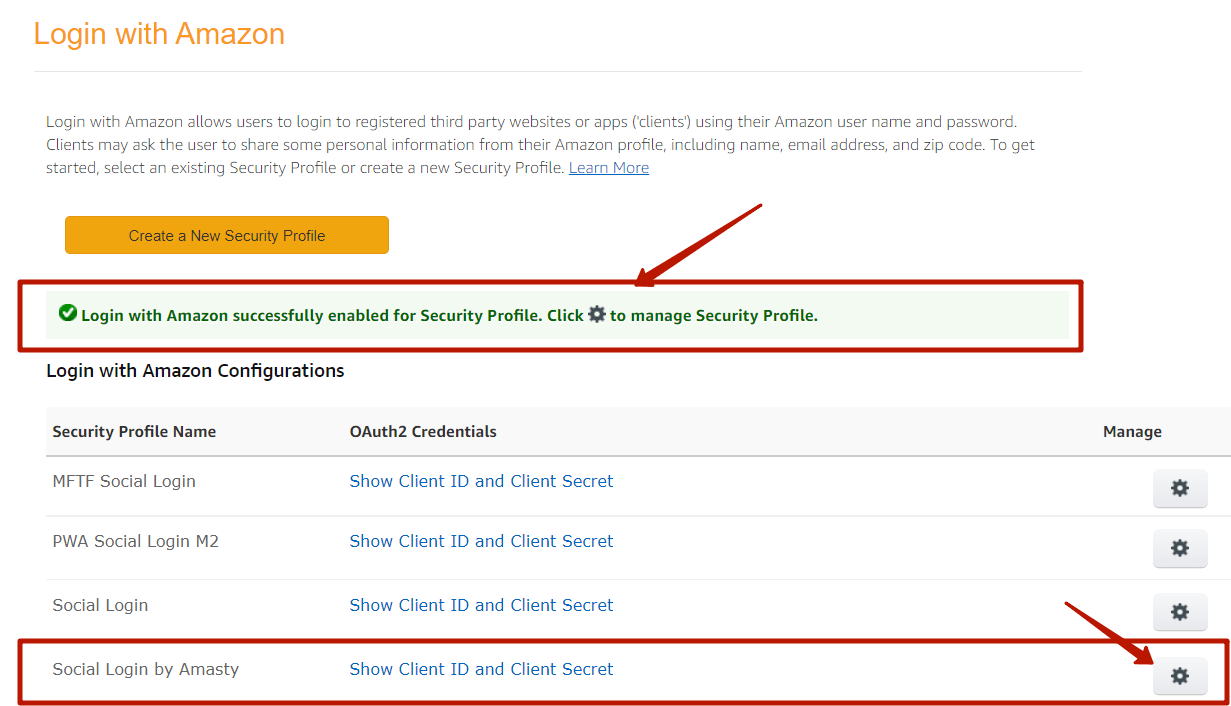
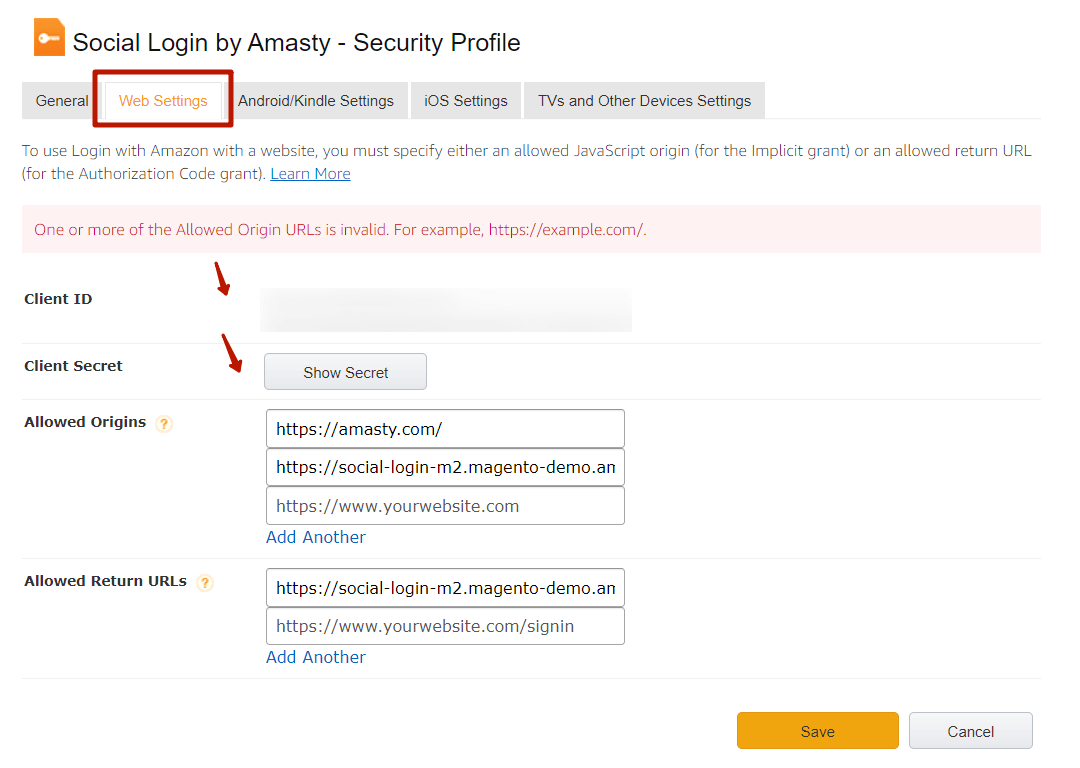
Then navigate to the 'Web Settings' tab to specify the Allowed Origins (URLs) and the Allowed Return URLs.
The values for Client ID and Client Secret will be generated automatically. Click the Show Secret button to reveal and copy it and paste it in Consumer Key (API Key) and Consumer Secret (API Secret) tabs in the module settings. Save the configuration.
Paypal
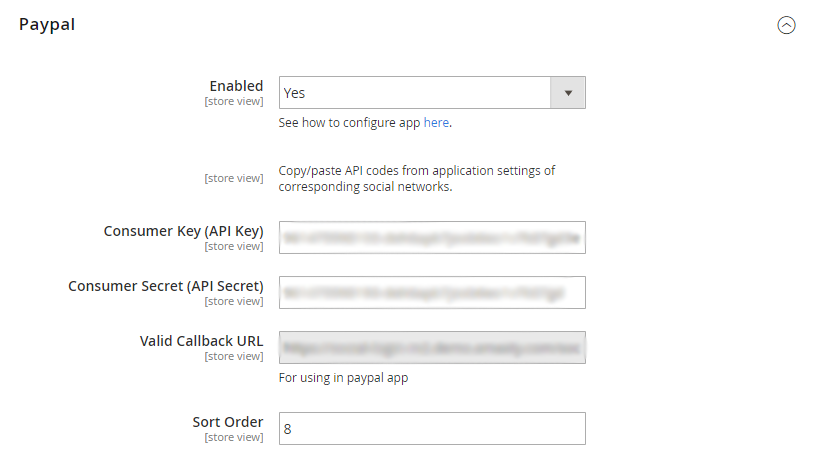
Enabled - Set to Yes to enable the display of the Paypal login button.
To create Paypal App, go to https://developer.paypal.com/developer.
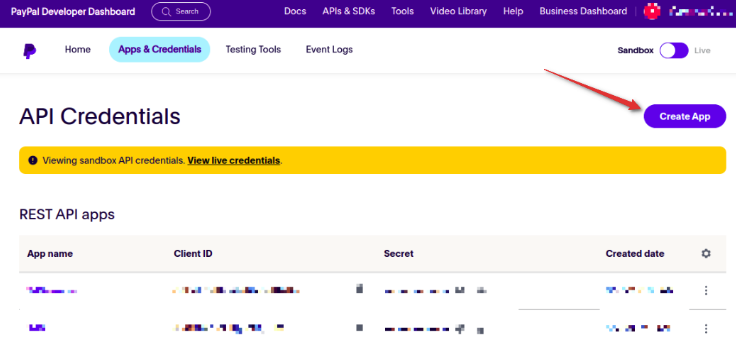
Register as a developer and click Create App in the REST API apps.
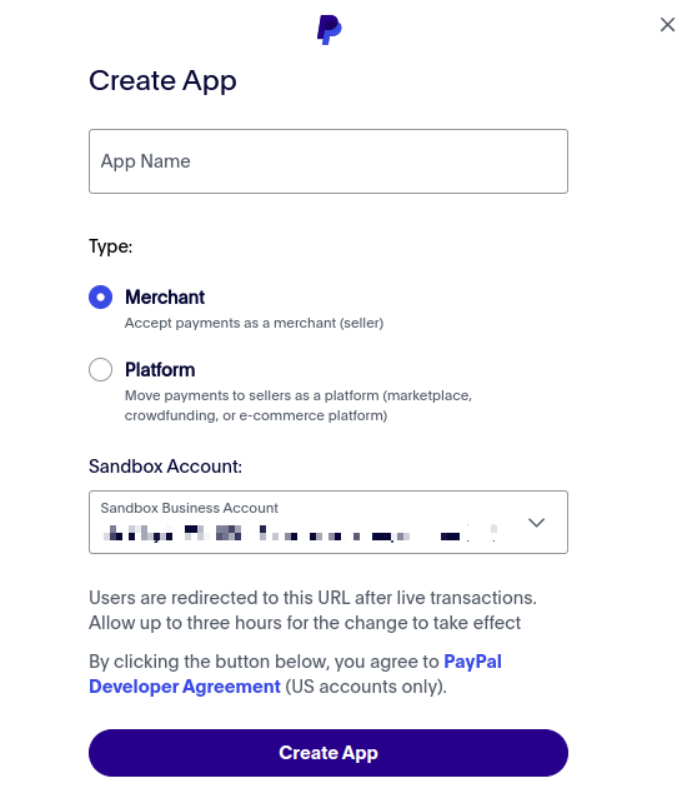
Specify App Name and your Sandbox developer account. Then hit the Create App button.
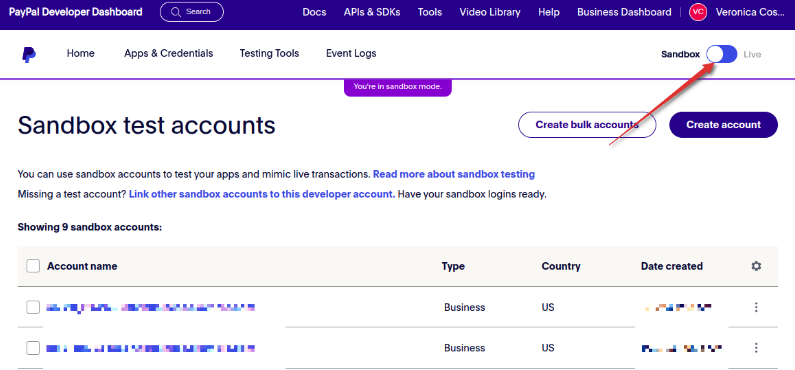
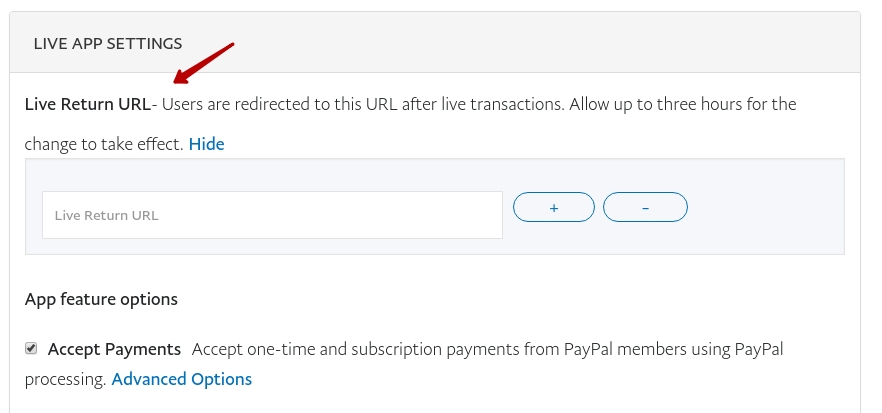
To see Live App Settings click Live button above all the tabs.
Find Live Return URL in the Valid Callback URL tab on the module general setting page. Copy it and paste here.
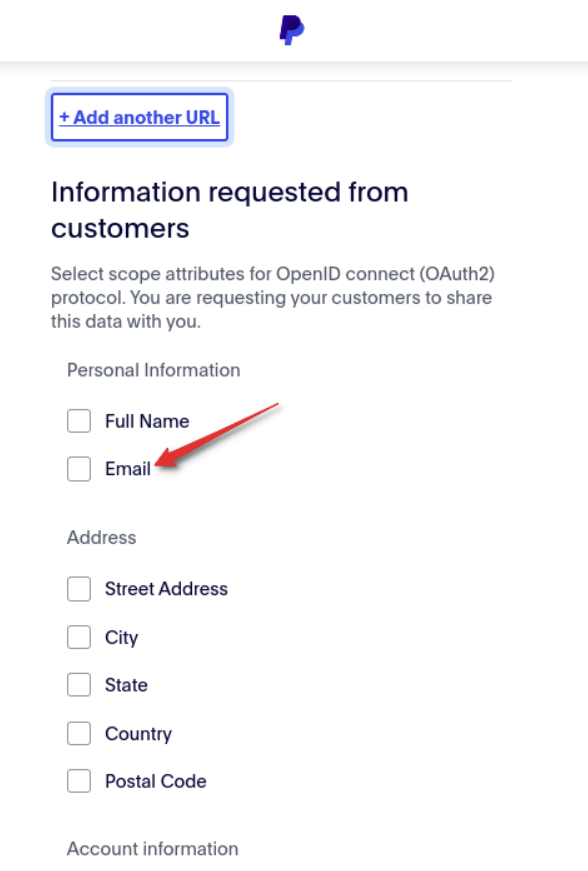
Approve your app following this guide.
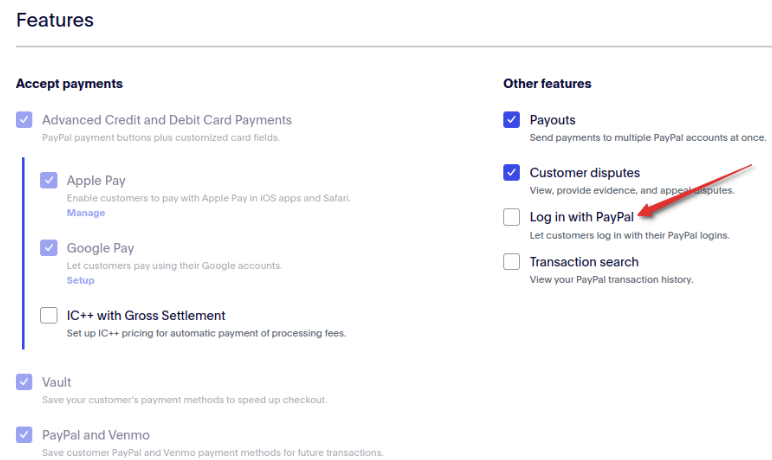
After the successful identification, you will see a tick near Email address.
The values for Client ID and Client Secret will be generated automatically.
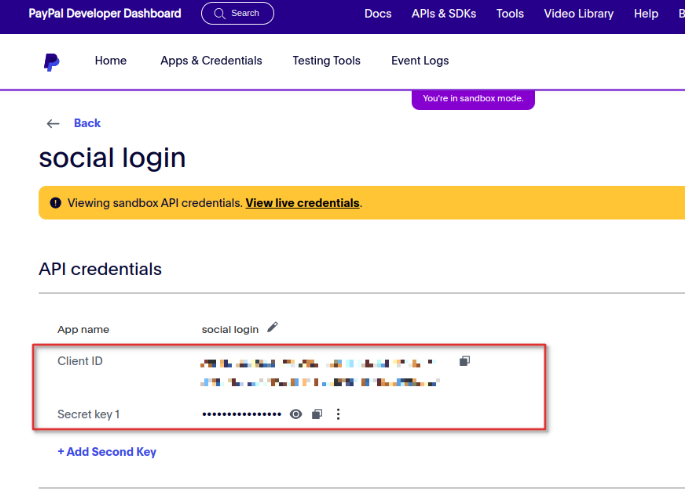
Copy the information and fill in Consumer Key (API Key) and Consumer Secret (API Secret) tabs in the module settings. Save the configuration.
Social Login for Magento 2 allows collecting authentiс customer data safely as it is equipped with reCAPTCHA. Let your admins enable reCAPTCHA in the login/register process and forgot password pages or pop-up to avert spam accounts. Easily customize the type and design of reCAPTCHA from the Magento 2 backend.
Twitch
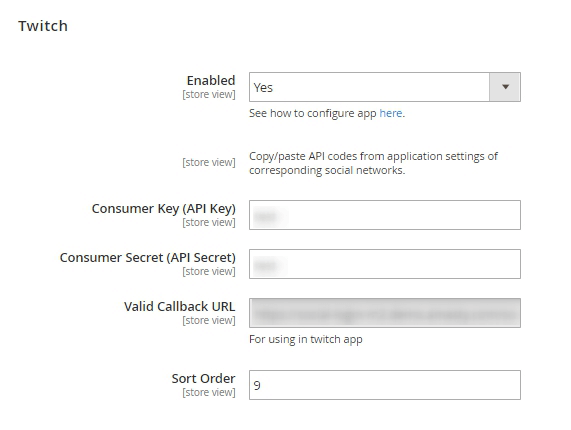
Enabled - Set to Yes to enable the display of the Twitch login button.
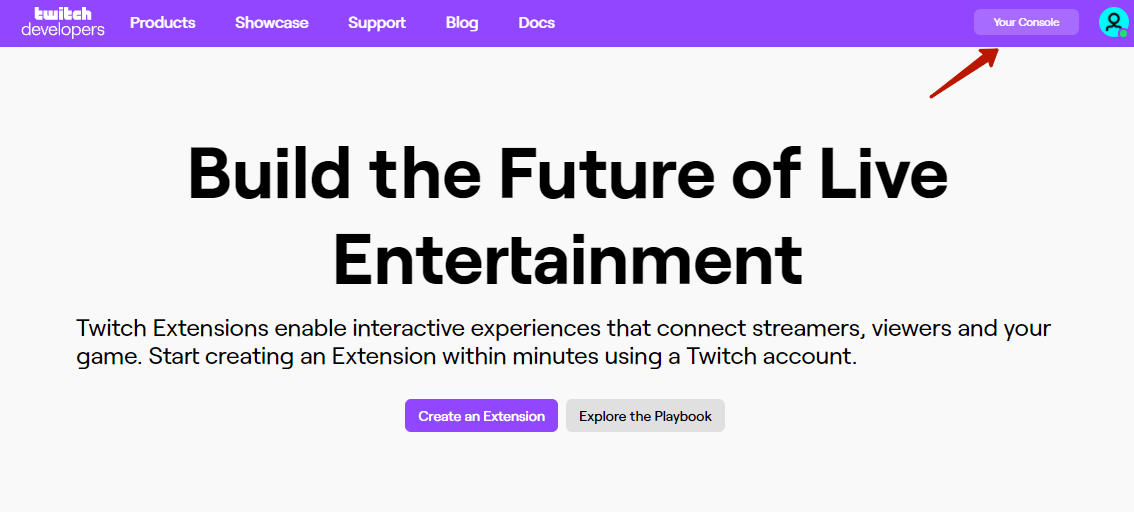
To create Twitch App, go to https://dev.twitch.tv/.
Log in or register and then please navigate to 'Your Console'.
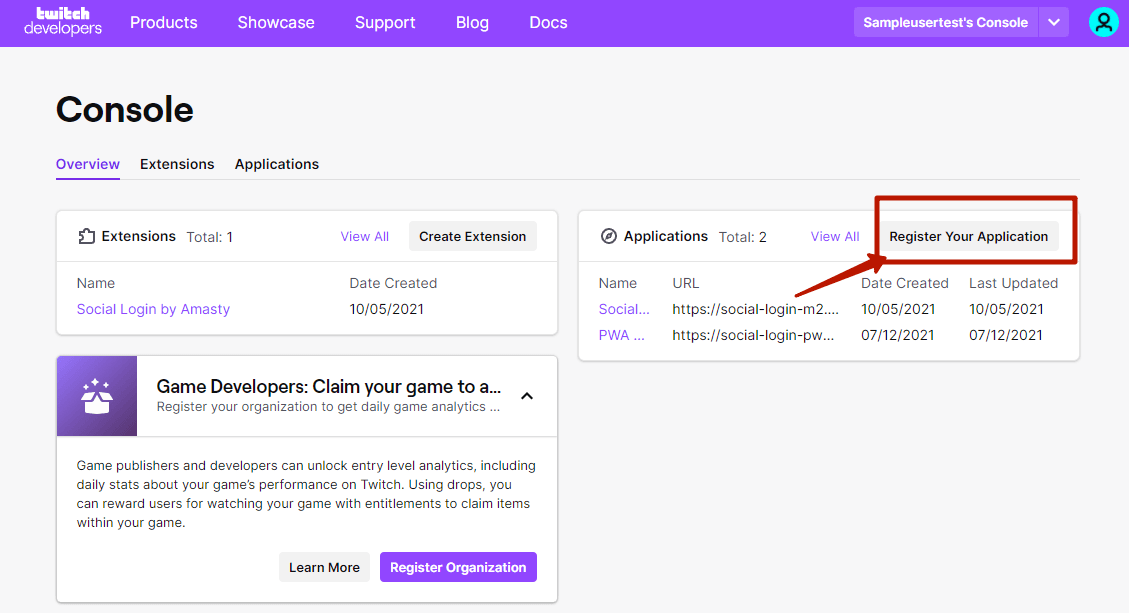
Now you need to create a new Application. Click 'Register Your Application'.
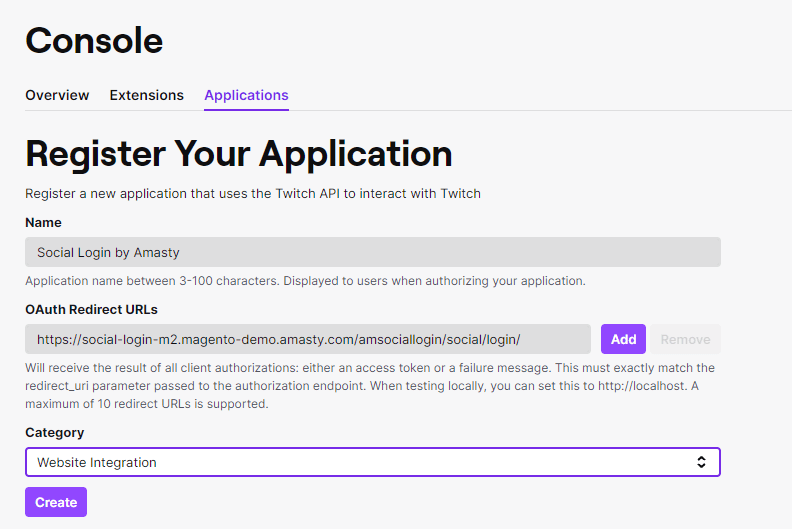
On the tab 'Applications' please specify your app's name, OAuth Redirect URLs, and choose the category.
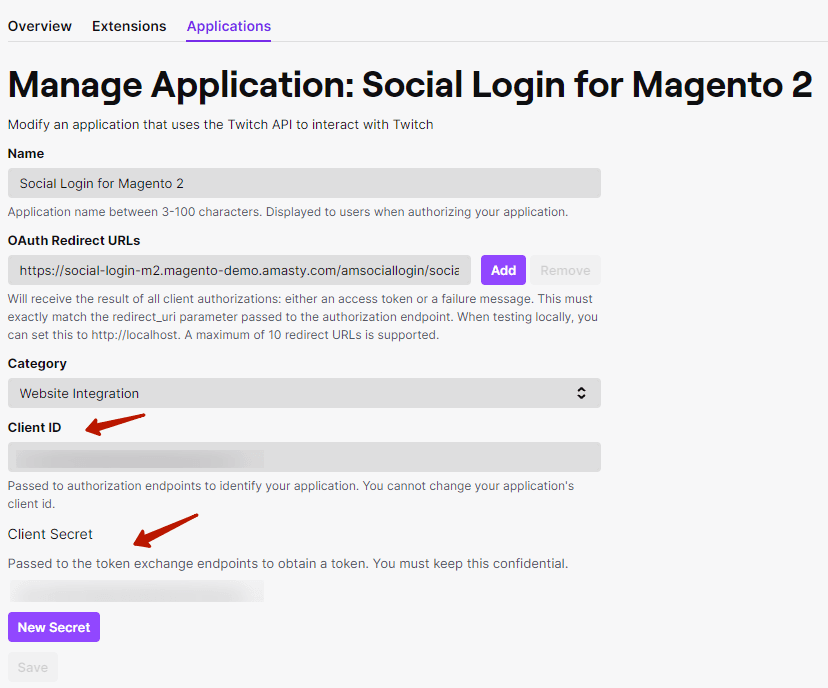
On the 'Developer Applications' grid click on the 'Manage' button.

Copy your API KEY (Client ID) and API Secret (Client Secret) in the appropriate fields in the backend and save the configuration.
Microsoft Azure (Pro)
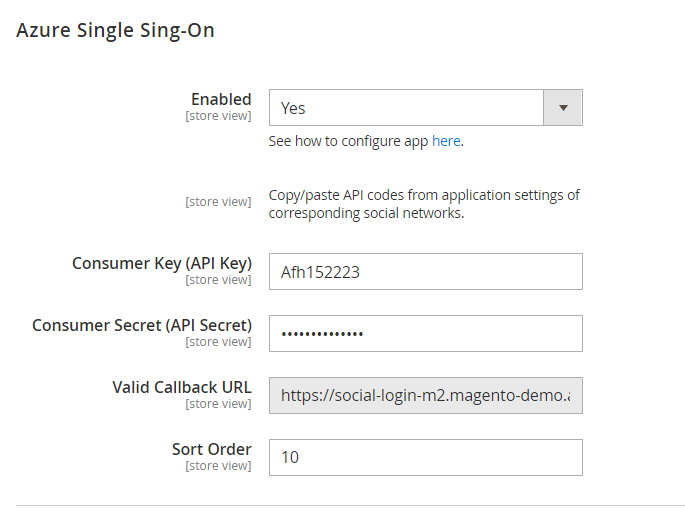
Enabled - Set to Yes to enable the display of the Microsoft Azure login button.
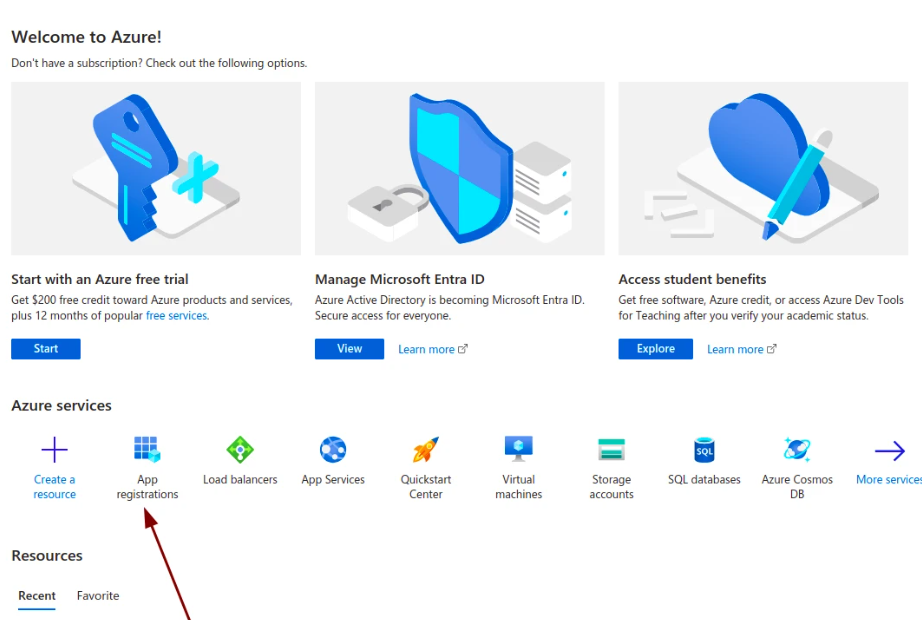
To create Azure App, go to https://portal.azure.com/.
Log in or register and navigate to Azure Services. Then choose App Registrations.
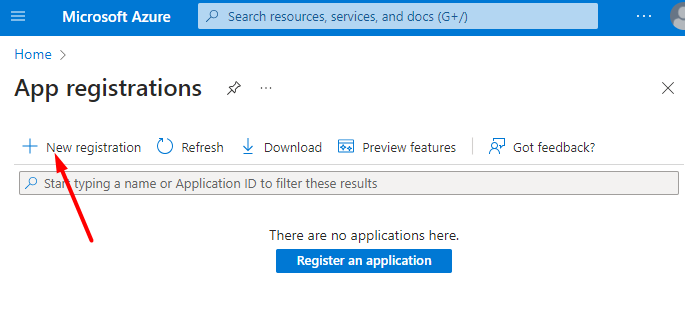
Click 'New Registration'.
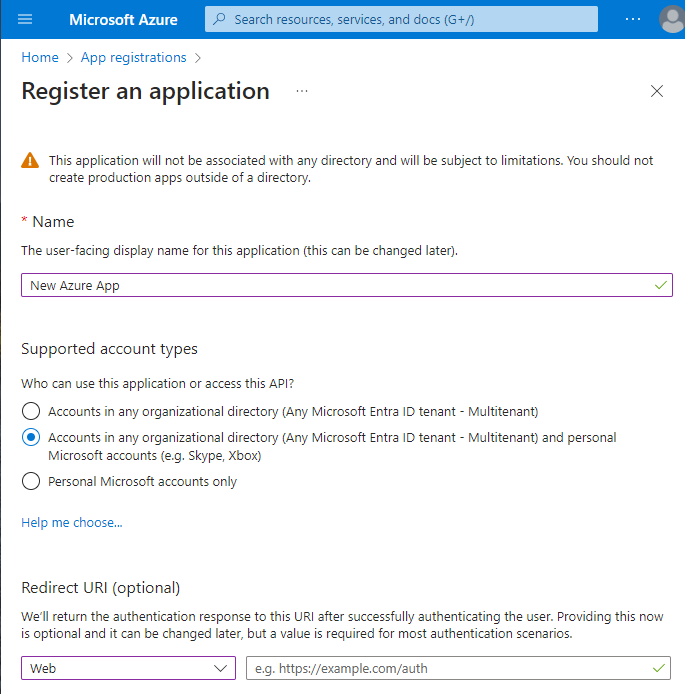
Fill in all the fields for the app registration.
Upon registration, the App Overview window will appear. Here, you will find the Application (client) ID, which is equivalent to the Consumer Key (API Key). You'll need to input this key into the Azure Single Sign-On settings of the Social Login extension.
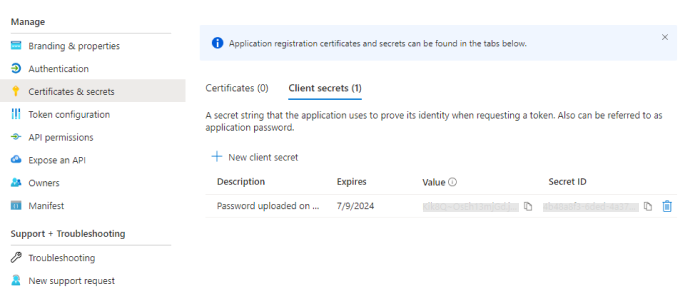
To obtain the Consumer Secret (API Secret), click on 'Add a certificate or secret' on the right side of the page.

Then click 'New client secret' to obtain Consumer Secret (API Secret) that can be inputed into the Azure Single Sign-On settings of the Social Login extension.
Copy the information and fill in Consumer Key (API Key) and Consumer Secret (API Secret) tabs in the module settings. Save the configuration.
This functionality is available as part of an active product subscription or support subscription. To ensure proper operation, please install “amasty/module-social-login-pinterest” from composer suggest for Luma Theme and “amasty/module-social-login-hyva” for Hyvä Theme.
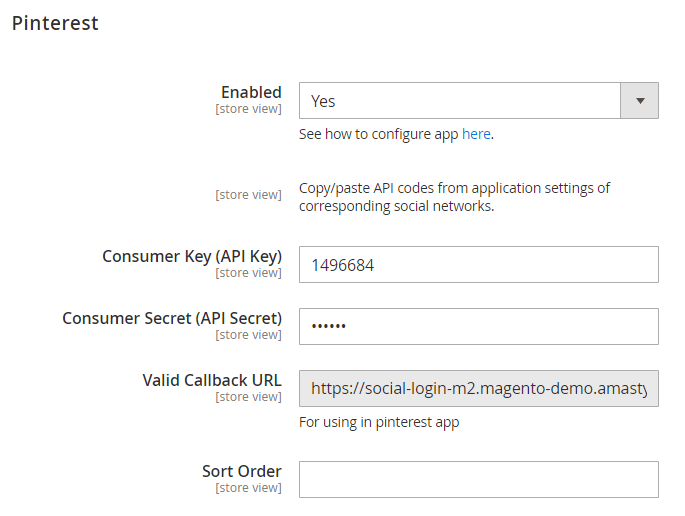
Enabled - Set to Yes to enable the display of the Pinterest login button.
To create Pinterest App, go to https://developers.pinterest.com/.
Log in or register and navigate to My Apps. Then choose Connect App.
Follow this checklist to create a Pinterest app, and this guide to build a working authentication.
When the app is created, go to My Apps, choose the needed App, and click 'Manage' button:

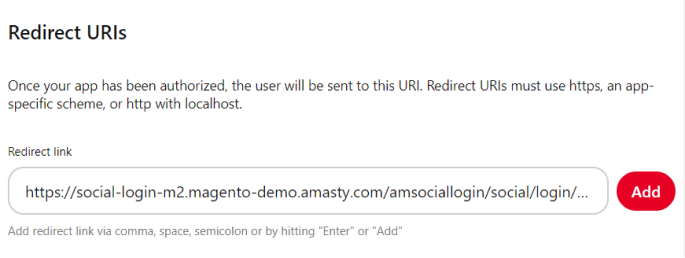
In the 'Redirect link' field insert the value from the 'Valid Callback URL' setting of the Social Login extension general settings (Pinterest section).
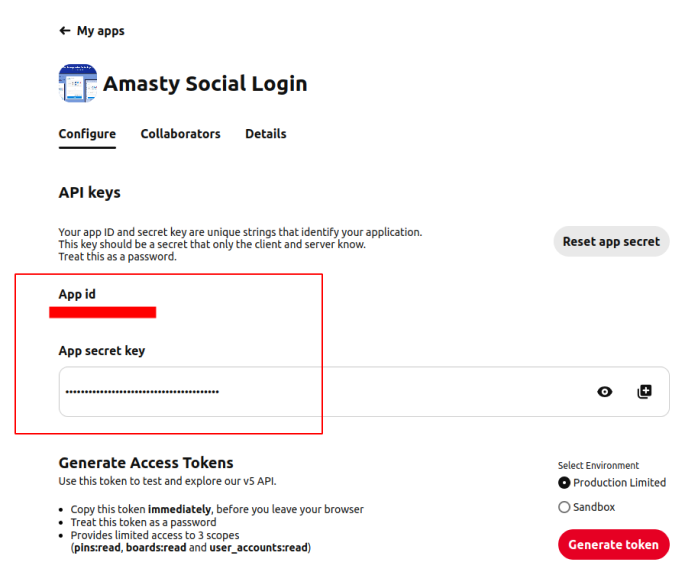
Copy the App ID and the App Secret Key and paste it in Consumer Key (API Key) and Consumer Secret (API Secret) tabs in the module settings. Save the configuration.
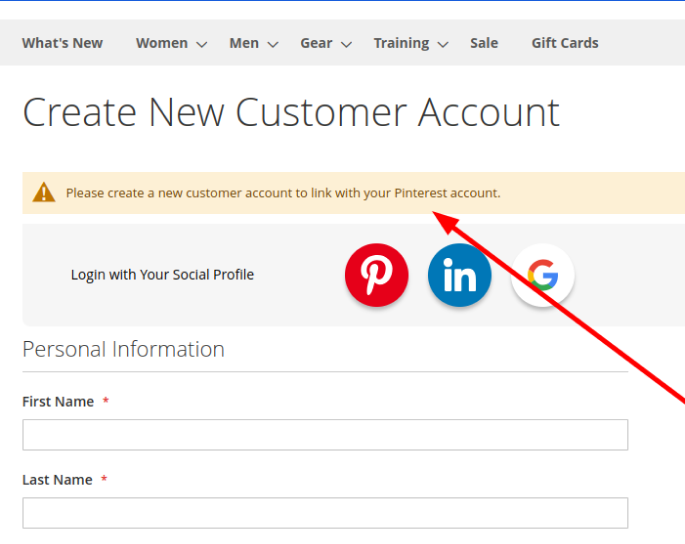
Please note, that since Pinterest doesn't provide the customer's email to the store, new visitors will be redirected to the standard registration page on their first visit. After completing this registration, in subsequent visits, the immediate login through Pinterest becomes available.
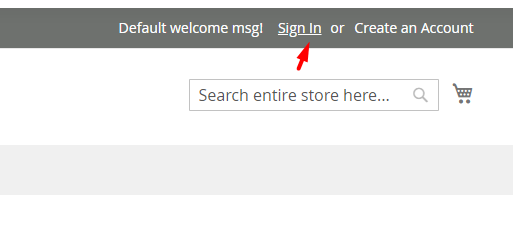
This is an example of how the Pinterest sign-in process may appear for customers on the storefront.
A customer clicks Sign in in the Header.
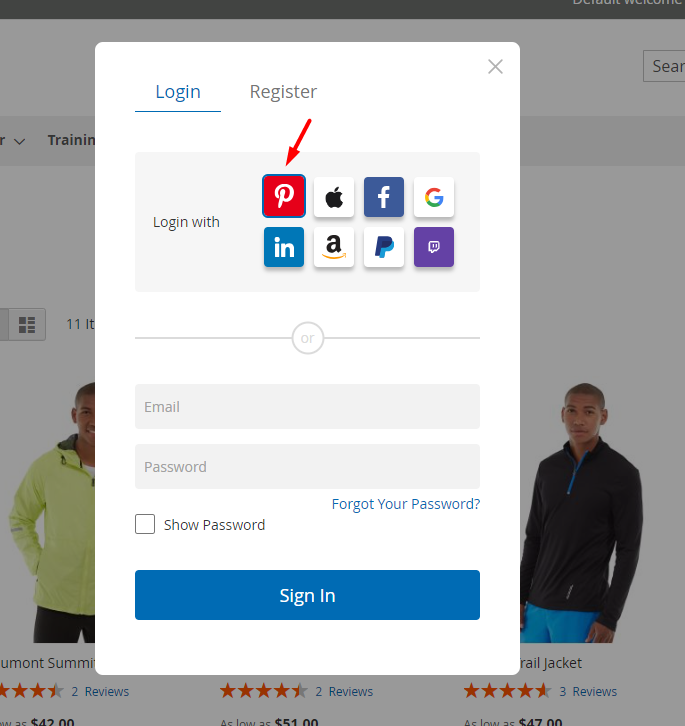
Then they click the Pinterest button in the Login popup.
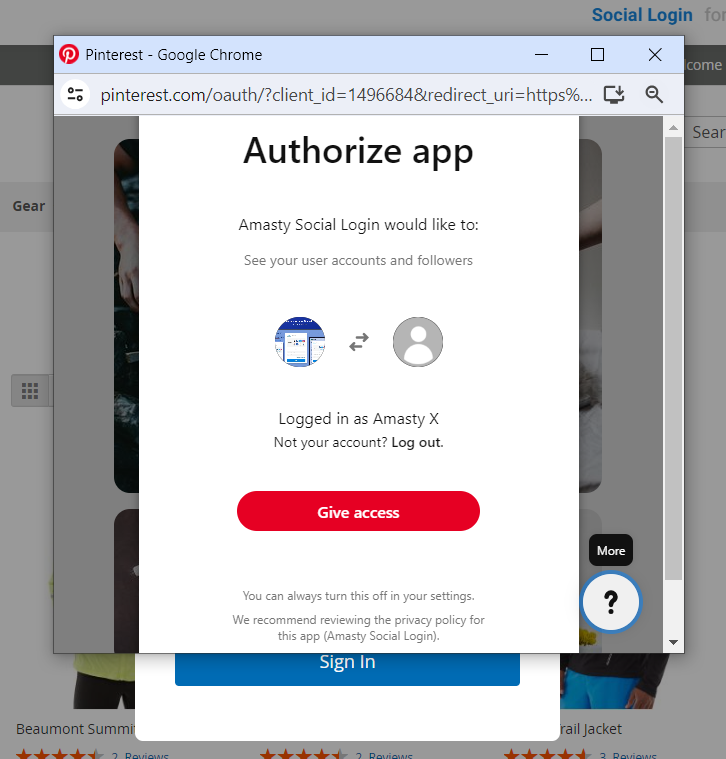
Then a customer should click 'Give access' in the appearing window.
If it's a previously registered customer, they will be instantly logged into your store. If it's a new customer, they will be redirected to the registration page.
After the registration is complete, the customer is registered in your store and they can found their linked Pinterest account in their Account settings.
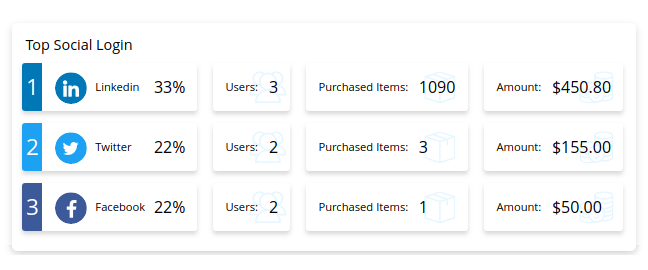
Analytics Dashboard
To have a better understanding of your customer base with intuitive UI, chart and table, go to Customers → All customers and expand the Social Login Analytics tab.

Easily analyze data while monitoring the number of customers, purchased items and revenue by social login.
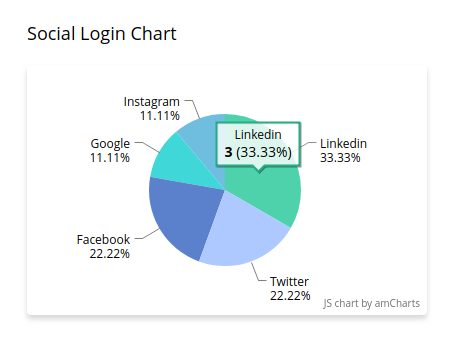
Use a handy Social Login Chart to better target strategy through audience segmentation.
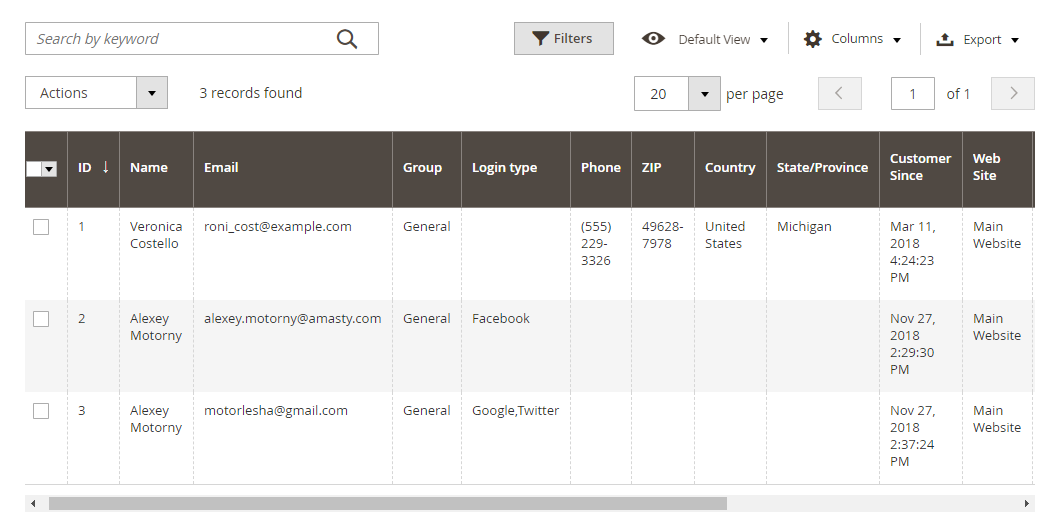
Monitor all your customers in one place and track them by the following data: name. email, login type, phone, zip, country, state/province and registration date.
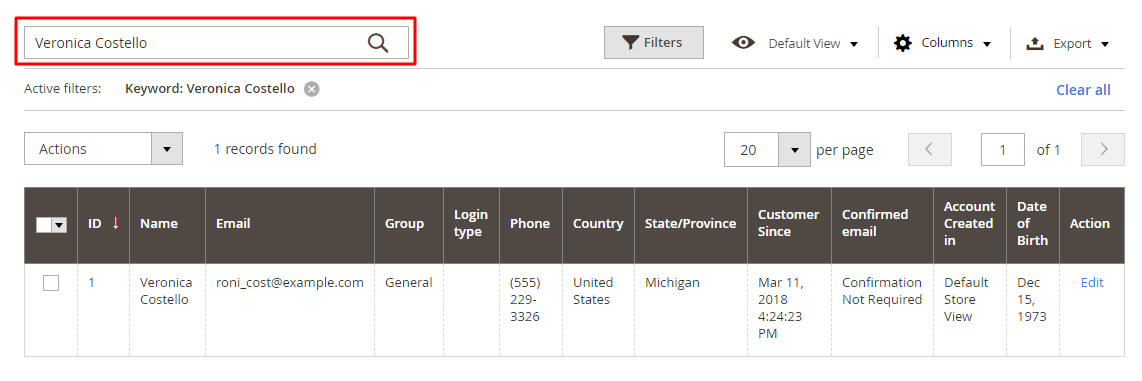
You can easily find any customer in one click by filling in a keyword in the Search tab.
You can perform mass actions right in the grid. Tick needed customers and then choose the Action from the dropdown menu to apply:
- Delete
- Edit
- Subscribe to Newsletter
- Unsubscribe from Newsletter
- Assign a Customer Group.
The extension allows downloading the list of your customers with detailed data. Just click the Export and get the file.
You can also Add New Customer right from the admin panel.

Hit the Add New Customer button and specify the account information.
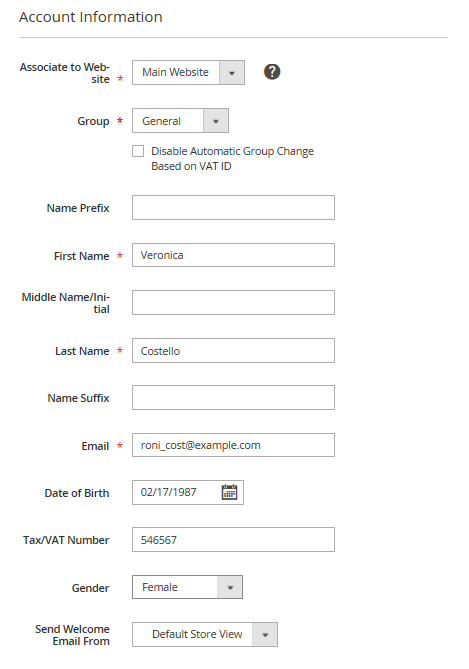
Please specify a customer name and email, then associate it with the website and customer group to send welcome email form.
To add the address, expand the Addresses tab.
Here you can specify default billing or shipping addresses for a related customer.
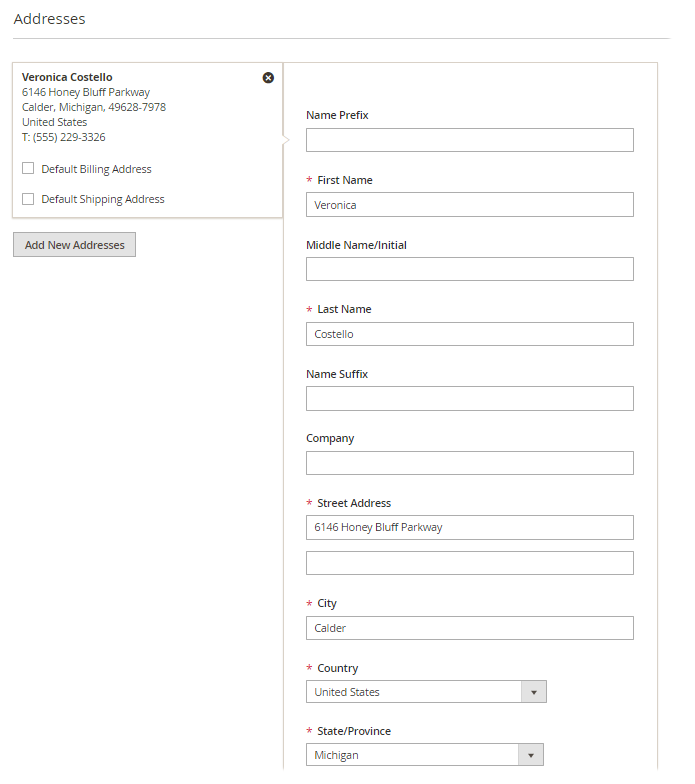
After adding necessary information hit the Save Customer button.
Social Login networks on the Orders grid
Additionally, on the Orders grid, you can track what social login options were used by the paying customers who actually created orders. All info will be displayed on the Login Network type column.

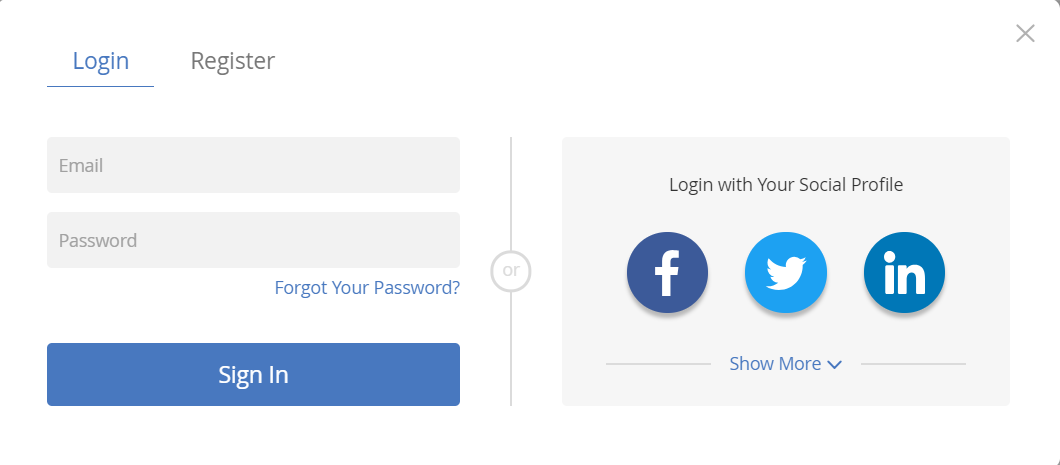
Ajax Pop-Up
Comfort your customers with an accessible AJAX pop-up that offers one-click login and registration. Set the Social Login bar position: below, above and in the header of any page. Use color and style configuration to match your brand style.
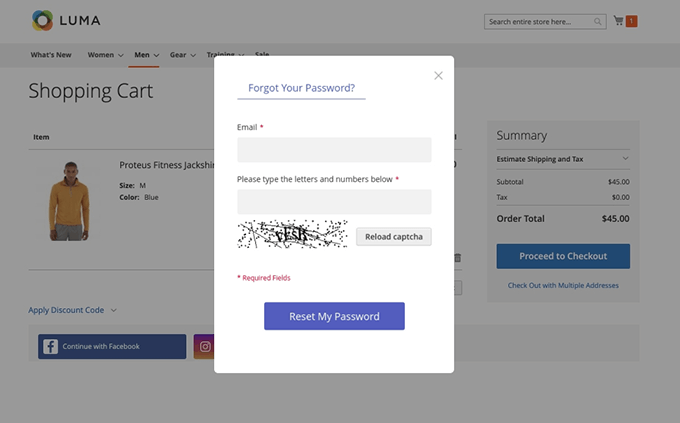
Keep customers from abandoning the checkout with handy password restore pop-up. It appears when a customer clicks on the “Forget Your Password” text button on the login pop-up. No more redirecting - the customer will remain on the same page during the whole password restoring process.
Social Buttons Design
Customize social buttons design to fit your original style. Choose the buttons’ shape according to your preferences:
- Round for all buttons used;
- Rectangular for 2 or fewer buttons used;
- Square for 3 and more buttons enabled.
Increase the number of completed orders with Amasty Abandoned Cart Emails extension.
We improved the compatibility of the Social Login extension with our Advanced Product Reviews extension. Now the not logged-in customer’s process of writing a review is more optimized. In case the login popup is enabled and guests are not allowed to leave reviews, the Write a Review button is anyway displayed for guest visitors but it calls forth the social login popup. After the successful login, the customer is directed right to the review form.
Apple ID (Add-On)
With this extension, you can enable log-in via Apple ID on your website.
The feature can be enabled only after purchasing a Login with Apple ID for Social Login Add-On
Now the add-on is available in Pro version of the Social Login for Magento 2 extension.
Configuration
To configure the extension, it is required to have an Apple Developer account. If you don't have it, please go to the Apple Developer page to create one. Note that account creation and its approval might take some time.
To configure the module, navigate to the Apple ID section of Social Login.
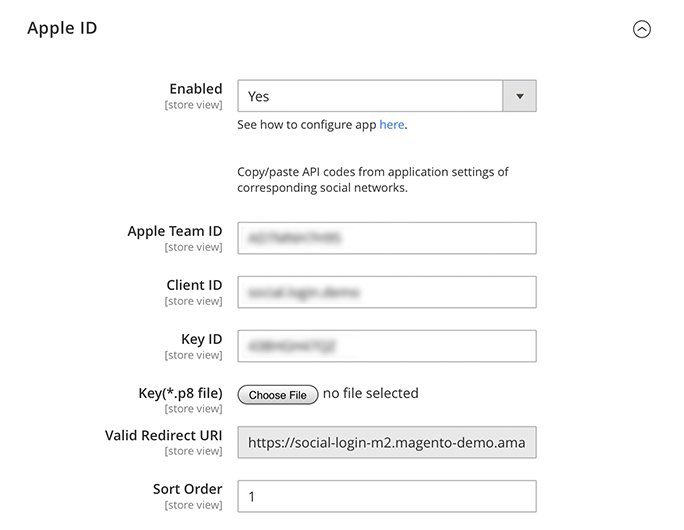
Set the Enabled to Yes to allow logging in via Apple ID.
Enter the Apple Team ID, Client ID, Key ID that were previously generated at the Apple Developer account.
Learn how to configure the Client ID and the Key ID in appropriate sections of this User Manual.
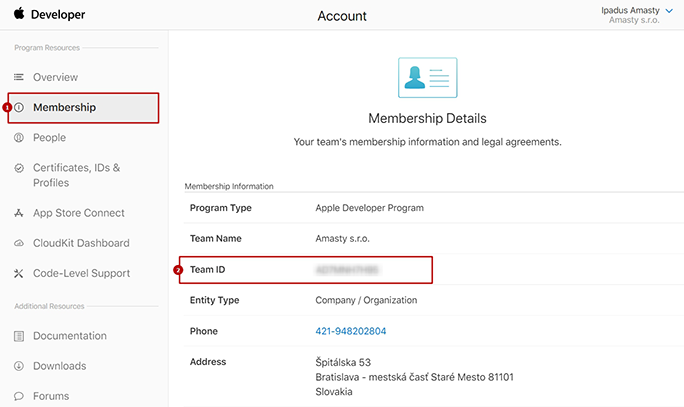
To find the Apple Team ID, please go to your Apple Developer Account, Membership tab. The ID will be located as shown in the screenshot below.
Choose the Key(*.p8 file). You can obtain it when creating the Private Key for Client Authentication at the Developer account.
Define the Valid Redirect URI - the page on your website to which user will be redirected after a successful authorisation.
Set the Sort Order to decide in which order the 'Login with Apple ID' button will be displayed.
Create credentials in developer account
Apple may charge some fees for participating in the Apple Developer Program. Learn more about it here.
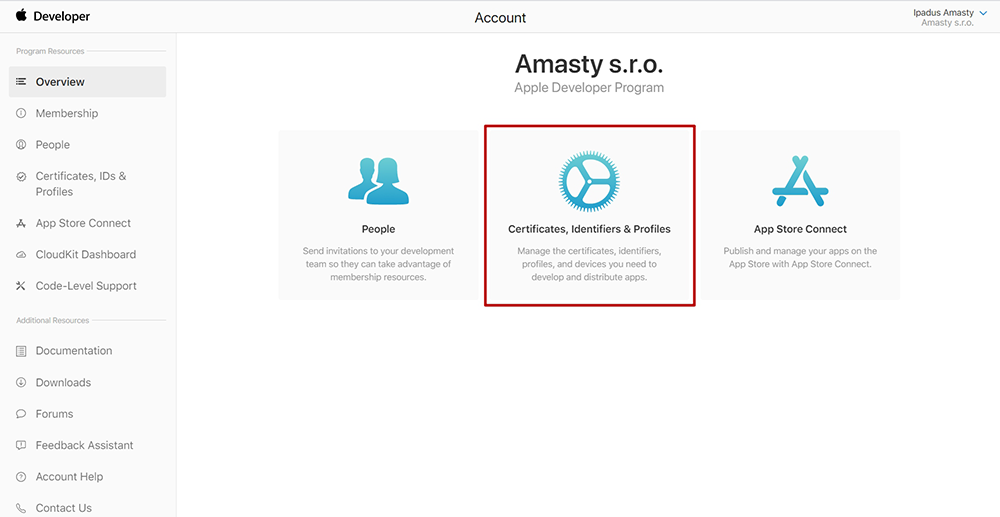
Sign in to the Apple Developer Portal and click on Certificates, Identifiers and Profiles.
Create an App ID
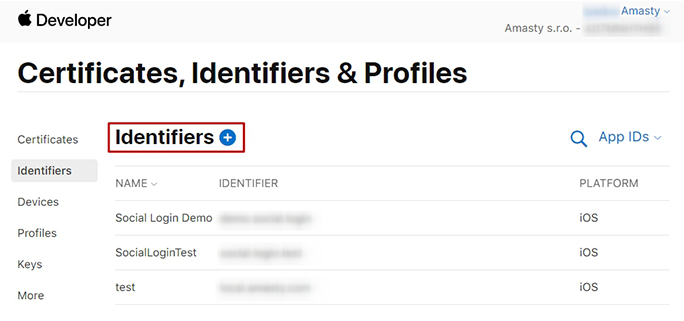
First, you will need to create an App ID. In the Apple Developer Account, navigate to the Certificates, Identifiers & Profiles > Identifiers. Then, click the blue plus icon.
On the next page, enter the description and Bundle ID for the AppID.

Please note that description is more for the internal use, so you can name it any way you want. The best practice is to use the descriptive naming so that you can easily understand to which website the App ID belongs.
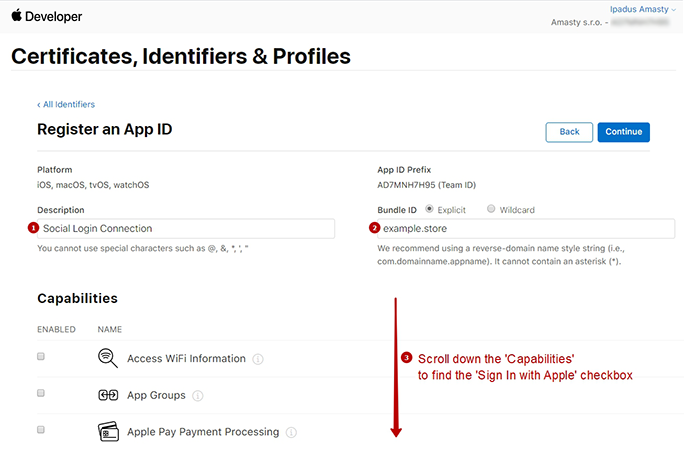
On the screenshot example above, the Description name is Social Login Connection for the example.store Bundle ID. The Bundle ID is best when it’s a reverse-dns style string.
Then, scroll down the 'Capabilities' to find the 'Sign In with Apple' checkbox. Enable it by ticking the checkbox. Then, press the Continue button in the upper-right corner. Save the App ID.
Create a Services ID
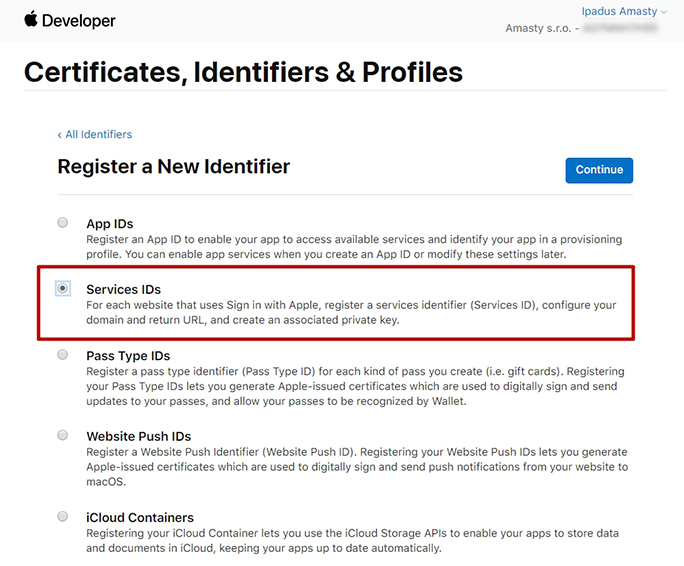
Then, separately create the Services ID. The flow is similar to the App IDs creation. First, go to the Apple Developer Account, navigate to the Certificates, Identifiers & Profiles > Identifiers. Then, click the blue plus icon to create a new identifier. This time, choose the Services IDs option, as shown in the screenshot below.
The Services ID will identify the particular instance of your app and is used as the OAuth
client_id.
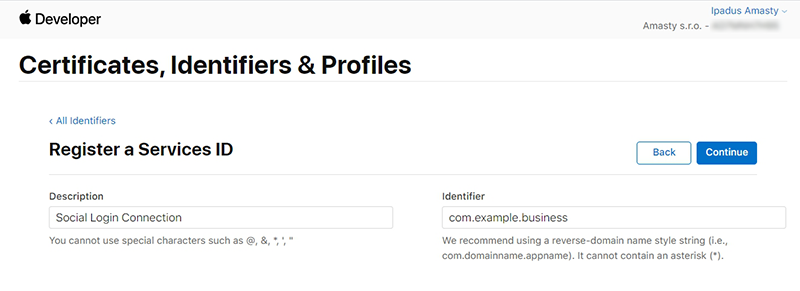
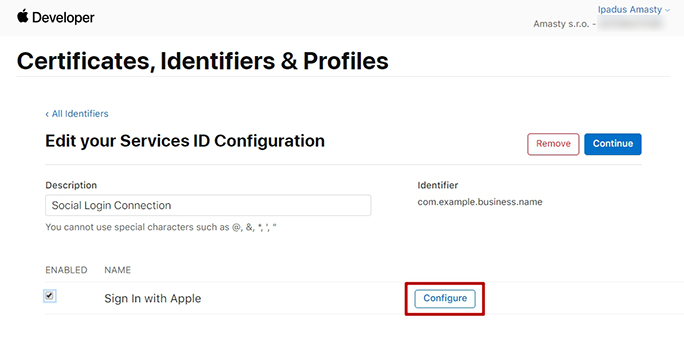
In the next step, please enter the Description that the user will see during the login flow and the Identifier which becomes the OAuth client_id. similarly, check the Sign In with Apple checkbox.
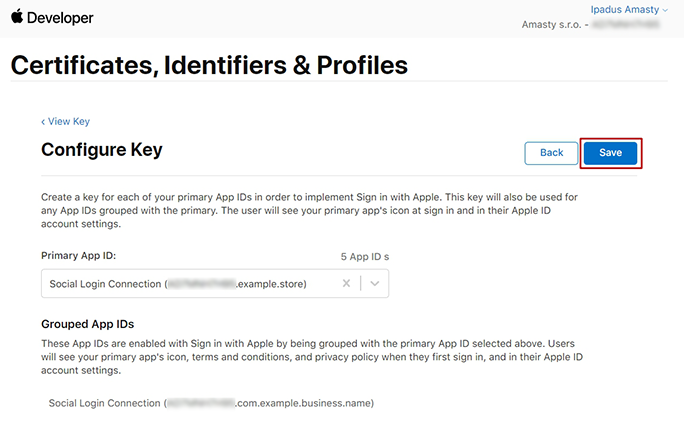
Then, click on the Configure button next to the Sign In with Apple checkbox. This is the stage where you define the domain your app is running on, and the redirect URLs used during the OAuth flow.
This is the way the configuration pop-up will look like. Make sure that the App ID you created on the previous step is chosen as the Primary App ID. If this is the first App ID you’ve made that uses Sign In with Apple, most likely it will already be selected.
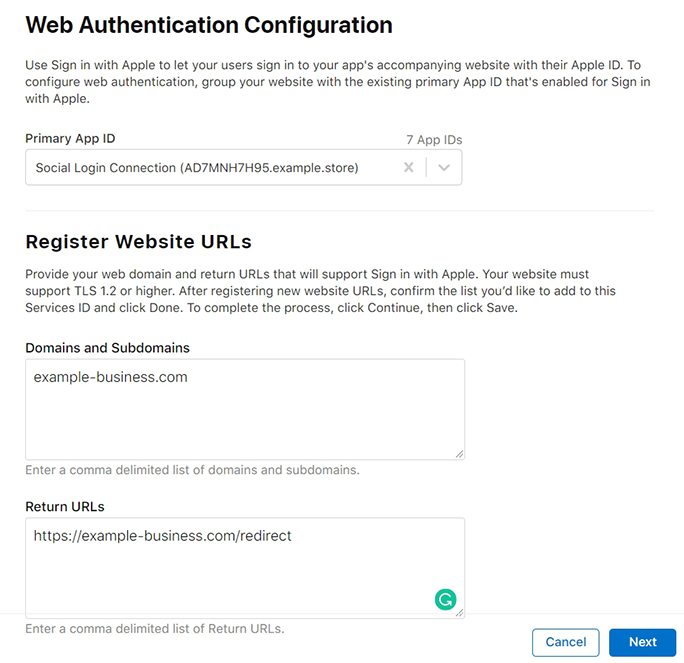
Please kindly note that Apple doesn't allow the
localhost URLs in this step. So if you enter an IP address like 111.0.0.1, it will fail later in the flow. Please use a real domain name here.
Save the entered data by clicking on the Next → Save → Continue → Register buttons to finalize the Services ID configuration.
Create a Private Key for Client Authentication
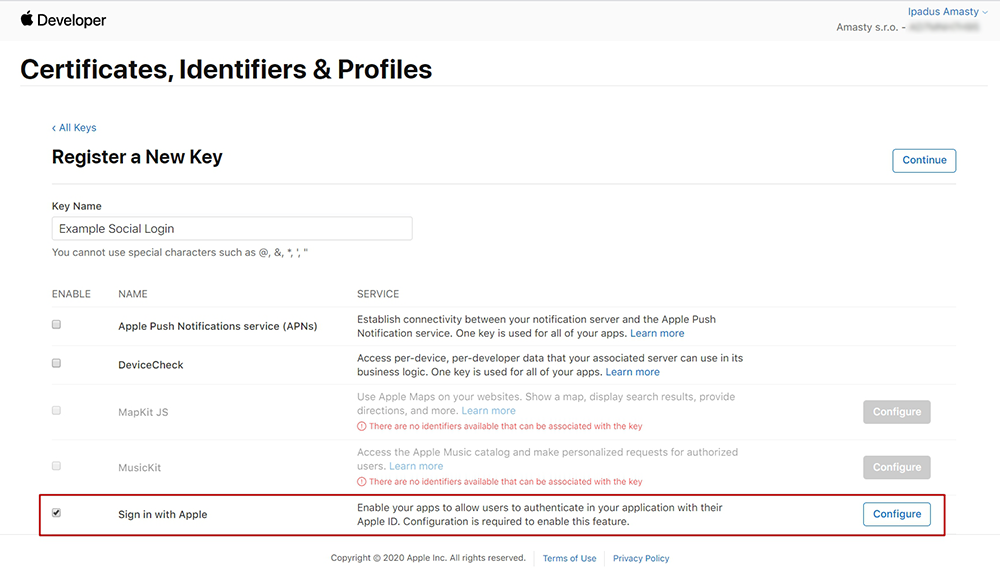
Third, you will need to create Key ID. In the Apple Developer Account, navigate to the Certificates, Identifiers & Profiles > Keys. Then, click the blue plus icon.

Enter the key name, similarly to the example on the screenshot below. Remember to tick the Sign In with Apple checkbox and configure all required options.
Then, press Continue. In the next step, link the Primary App ID in the dropdown to the App ID you created earlier.
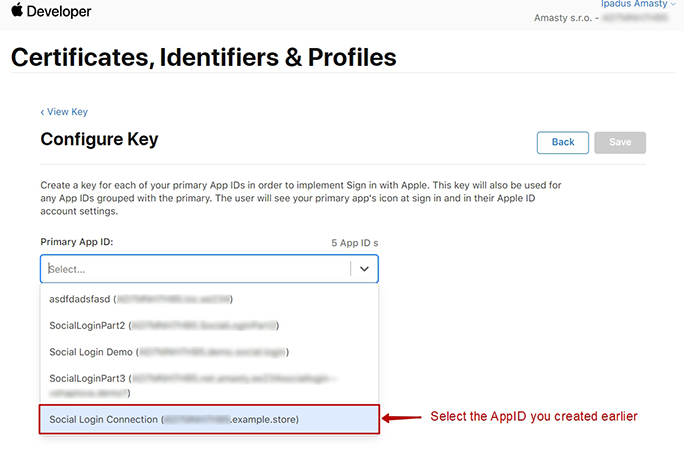
Press the Save → Register buttons in order to proceed with the successful configuration.
After a successful key configuration, Apple will generate a new private key for you. You will be offered to download the Key file in the '*.p8' format.
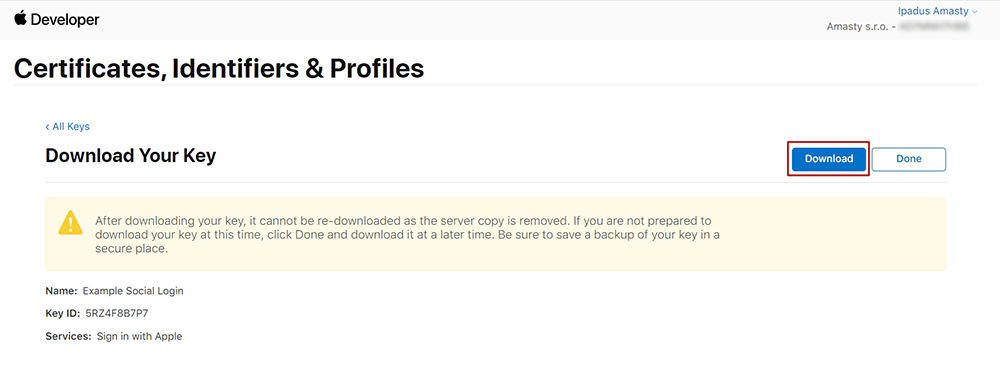
Please keep in mind that you can download the Key file ONLY ONCE. Please, make sure you saved the file in a secured place so that you can get back to it later if necessary.
Lastly, check the key information to find your Key ID which you'll need to configure the extension in the Magento 2 backend.
Download and save the Key file. Then, upload in it the Apple ID configurations.
After a successful Key ID verification, the file will no longer be stored at your Magento server. This is to prevent creating excessive files on a server.
Please take into consideration that all Apple Developer credentials that you have created will be valid for 6 months, as designed by Apple guidelines. Please timely update all necessary API credentials to guarantee proper add-on functioning.
Login to social networks via GraphQL
Please note, that this method is only valid for PWA.
With the extension you can log in to various social networks using GraphQL module. Do the following steps to use this feature:
- Install the GraphQL module for Social Login
composer require amasty/social-login-graphql - Run GraphQl query 'amSocialLoginButtonConfig' to get the list of available configured social networks along with their corresponding URLs to complete the login.

- Open the URL you need, appending 'generateToken=true' to it at the end.
- Then you will see the confirmation that your login was successful and the token has been generated.
- After obtaining the token, you can use it to access various types of customer information through GraphQL.
Frontend example (Login with Apple ID add-on)
This is an example of the Login via Apple ID button on the frontend.

When a customer logins directly via Apple ID by entering their email, they'll proceed through the standard authorization process. Based on an individual's Apple account preferences, authorization might include two-factor authentication. If this user doesn't have an existing account, a new account will be automatically created based on a provided Apple ID email. In such cases, the default username will be New User. The username can be changed later in the Customer Account settings.
Additional packages (provided in composer suggestions)
To make additional functionality available, please install the suggested packages you may need.
Available for all tariff plans with no additional fees:
amasty/social-login-graphql- Install amasty/social-login-graphql module to activate Graphql and Social Login integration.
amasty/module-social-login-recaptcha- Install amasty/module-social-login-recaptcha module to activate Google ReCaptcha and Social Login integration.
amasty/aminvisiblecaptcha- Install amasty/aminvisiblecaptcha module to activate Amasty Google Invisible reCaptcha and Social Login integration.
amasty/module-social-to-builder- Install Amasty_SocialToBuilder module to activate the integration with Custom Reports Builder extension and create valuable reports about your Social Networks.
Available as a part of an active product subscription or support subscription:
For Basic and Pro versions:
amasty/module-social-login-hyva- Install this module for the compatibility with Hyva Theme.
amasty/module-invisible-captcha-hyva- Install module-invisible-captcha-hyvam module to activate the integration Captcha module with Hyva Theme.
amasty/module-social-login-pinterest- Install this package for Pinterest compatibility.
For Pro tariff plan only:
amasty/module-social-login-microsoft-graph- Install this package for Microsoft Azure Single Sign-On compatibility.
PWA for Social Login (Add-On)
With a ready-made PWA solution, you can provide shoppers with a smooth user experience on mobile. Provide shoppers with an intuitive way to log in with social networks on any device and browser.
The feature can be enabled only after purchasing the PWA for Social Login Add-On. Also, you need to install PWA Studio first.
In order to correctly install a PWA add-on, please install the corresponding GraphQL system package first. For the correct name of it, please check the composer.json file of the main module. For example, the GraphQL system package name of the PWA add-on for the Blog Pro extension would be the following: amasty/blog-graphql

If the add-on is installed, then the Venia theme will display social login options as follows:
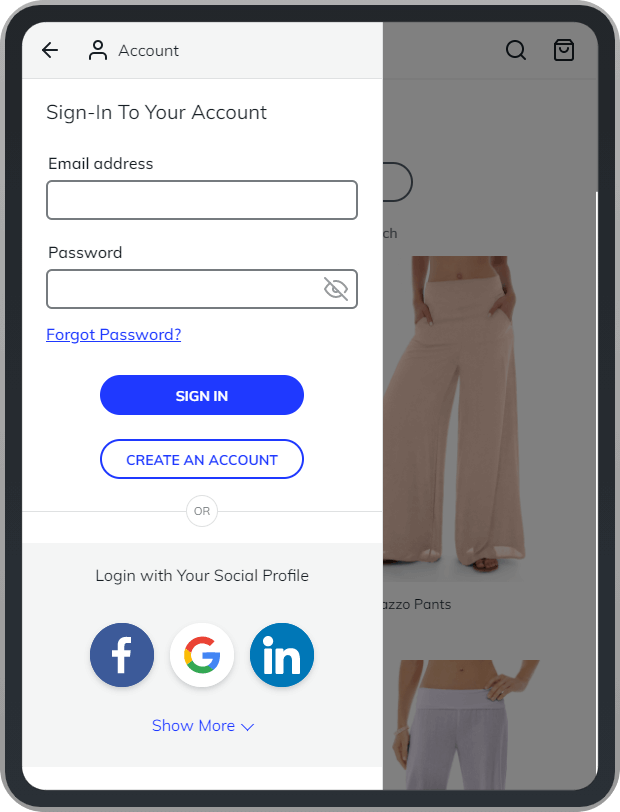
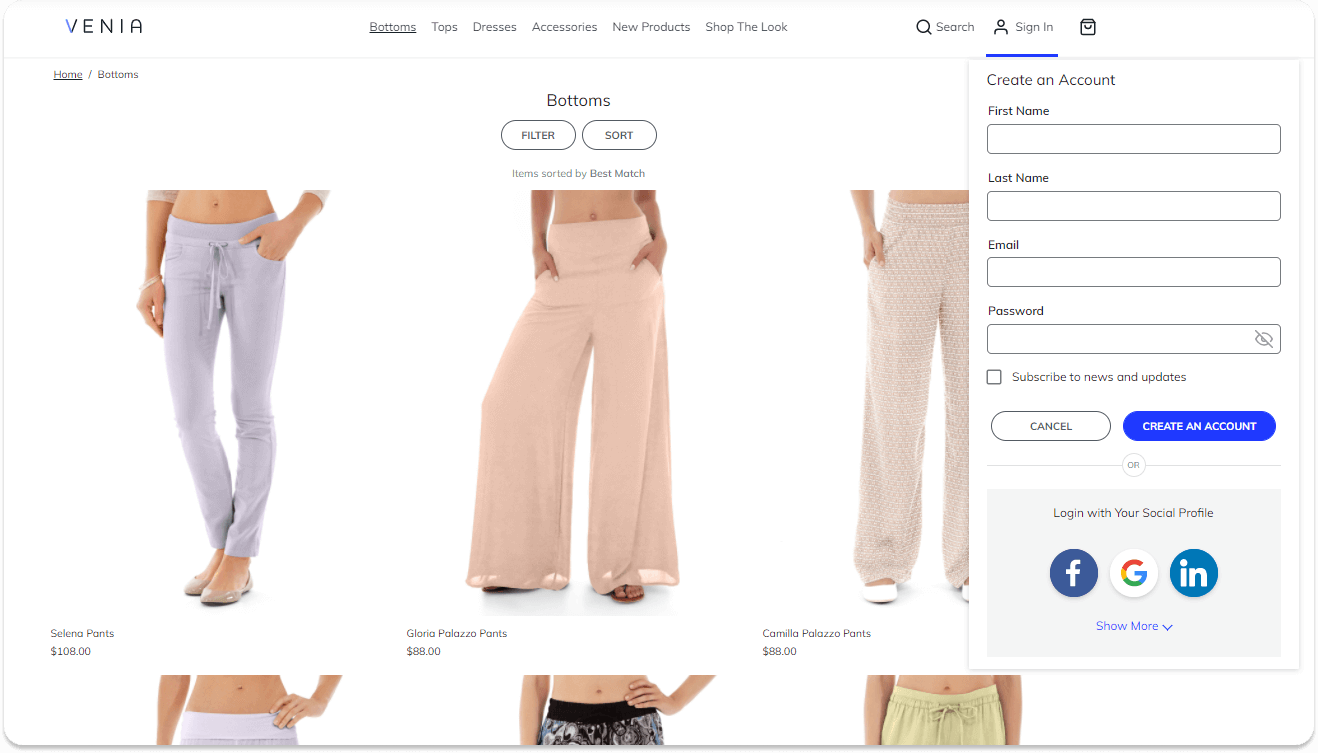
Please note that the login via Instagram will work only if you log in from the profile page.
Find out more about Magento PWA integration here.
Troubleshooting (PWA add-on)
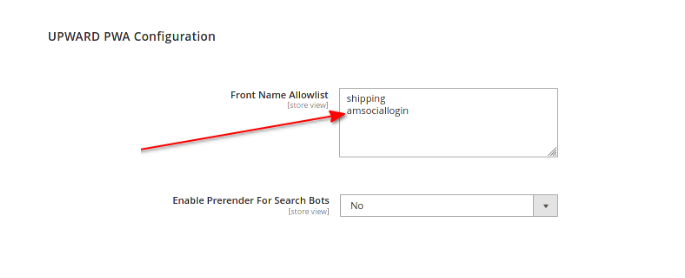
- I have the magento2-upward-connector module installed so that if I made an attempt to login via Google it redirects me to 404 page. What can I do?
Please navigate to Stores → Configuration → General → Web → UPWARD PWA Configuration and add the URL 'amsociallogin' to the list of allowed names for the UPWARD configuration.
Find out how to install the Social Login extension via Composer.
magento_2/social_login.txt · Last modified: 2025/04/08 14:53 by asemenova