
Sidebar
magento_2:order_attributes
Table of Contents
For more details see how the Order Attributes extension works.
Guide for Order Attributes for Magento 2
Add an unlimited number of extra fields to your checkout page to easily collect and process additional order related data. Display all created order attributes on a handy backend grid to keep necessary information at hand.
- Create order attributes of different types
- Use flexible conditions for attribute fields display
- Show additional attributes info on the order grid
- Add custom attributes to emails and PDF documents
- Show extra attributes depending on a selected shipping method
- WCAG compliance (for the extension with Luma and Hyvä Theme)
Due to flexible settings and intuitive interface, the Order Attributes for Magento 2 extension will help you easily fine tune the checkout page according to your requirements. Create as many additional order attributes as you need. Add Magento custom field input types to orders and quickly process collected data on the backend.
Magento 2 Order Attributes extension is compatible with Hyvä theme. You can find the amasty/module-orderattr-hyva-compatibility package for installing in composer suggest (Note: the compatibility is available as part of an active product subscription or Support Subscription).
The extension is compatible with Hyvä Checkout. You can find the 'amasty/module-orderattr-hyva-checkout-compatibility' package for installing in composer suggest. The compatibility is available as a part of an active product subscription or support subscription.
The extension is compatible with Adobe Payment Services. You can find the 'amasty/module-order-attributes-adobe-payments' package for installing in composer suggest. (Note: the compatibility is available as part of an active product subscription or support subscription).
In Order Attributes FAQ you can find answers to the most popular questions about the extension functionality.
General Settings
To configure the Magento 2 Order Attributes extension, please go to Stores → Configuration → Amasty Extensions → Order Attributes.
Checkout Settings
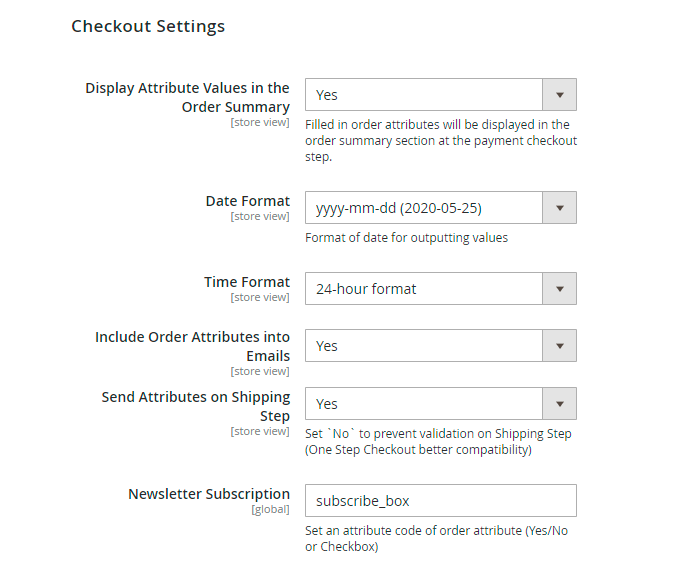
Please, expand the Checkout Settings section:
Display Attribute Values in the Progress Sidebar — set the option to Yes if you want to display custom order attributes on the checkout progress bar;
Date Format — select the default date format for related attributes;
Time Format — choose the default time format for related attributes;
Include Order Attributes into Emails — enable this options to have the ability to include order attribute values into email.
Send Attributes on Shipping Step — set 'Yes' to display order attributes on the shipping step. Set 'No' to prevent validation on Shipping Step (One Step Checkout better compatibility).
Newsletter Subscription - enable the option to display Newsletter Subscription option on the checkout via an order attribute. Set an attribute code of order attribute (Yes/No or Checkbox).
PDF Documents

Then, expand the PDF Documents section:
Include Order Attributes into Shipment (packing slip) — enable this option to include the completed attributes into the shipping documentation;
Include Order Attributes into Invoice — enable this option to include the completed attributes into the invoice documentation.
The Magento 2 Order Attributes extension is fully compatible with Magento 2 PDF Customizer. Easily create custom PDF invoices according to your business needs.
Invoices and Shipments
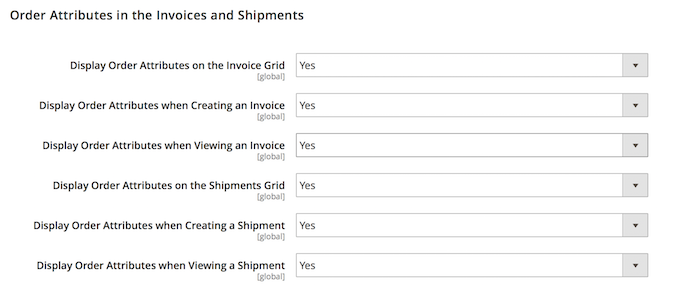
Next, proceed to the Invoices and Shipments section:
Display Order Attributes on Invoices Grid — enable this option to display order attributes on the invoices grid;
Display Order Attributes on Invoices Create — enable this option to display order attributes when creating an invoice;
Display Order Attributes on Invoices View — enable this option to display order attributes when viewing an invoice;
Display Order Attributes on Shipments Grid — enable this option to display order attributes on the shipments grid;
Display Order Attributes on Shipments Create — enable this option to display order attributes when creating a new shipment;
Display Order Attributes on Shipments View — enable this option to display order attributes when viewing a shipment.
New Attribute Creation
To add custom Magento 2 attribute to order, please, go to Sales → Manage Order Attributes.

All created attributes will be displayed on the special grid. Click the Add New Order Attribute button to create an attribute or select the existing one to edit it.
Add One Step Checkout for Magento 2 and you will be able to sort order attributes relatively each other and relatively checkout fields on a 'Manage Checkout Fields' page.
Attribute Properties

Default Label — specify the attribute label that will be displayed on the frontend;
Attribute Code — specify the attribute code that will be used for internal needs;
Store View — select the store view for which the attribute will be available;
Customer Groups — select customer groups for which the attribute will be shown;
Frontend Input Type — choose the appropriate input type for an attribute. It’s possible to choose among various input types depending on your specific needs:
- Text Field
- Text Area
- Date
- Date With Time
- Yes/No
- Dropdown
- Checkbox Group
- Radiobuttons
- HTML
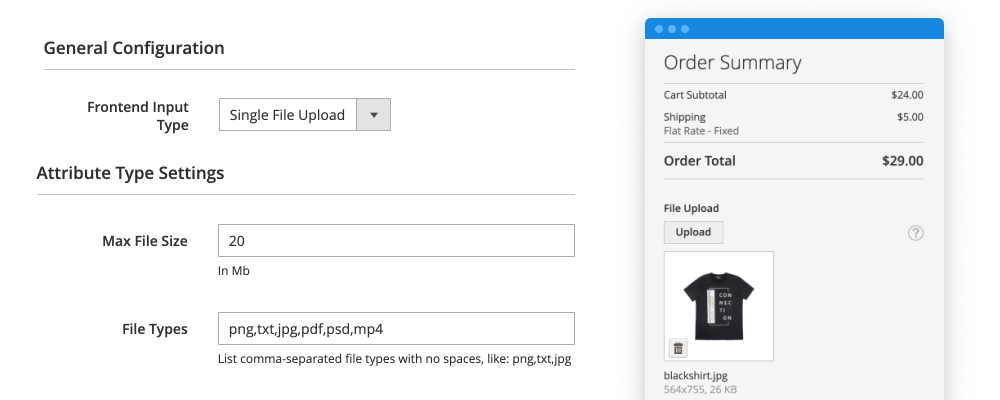
- Single File Upload
For all input types except Dropdown, Checkbox Group, and Radiobuttons you can define the default value in the corresponding field.
For the Dropdown, Checkbox Group, and Radiobuttons input types you can add multiple options in the Manage Label/Options tab.
For the Single File Upload input type, you'll need to specify the list of allowed file types and max allowed size per file. A configuration example is shown on the screenshot below, with the frontend example on the right section of the image.
NOTE: after the attribute code and the catalog input type are specified and saved they can’t be changed.
Values Required — when the option is set to Yes customers won’t be able to leave this attribute field blank while getting registered.
Attribute Type Settings

Visible on frontend — enable this option to display the attribute on the frontend;
Visible on backend — enable this option to display the attribute in the backend;
Default Value — specify the value which will be preselected by default if necessary;
Input Validation — enable this option to check the filled in information for being valid before submission;
Minimum Text Length — specify the minimum text length for text-related attributes;
Maximum Text Length — specify the maximum text length for text-related attributes;
Input/Output Filter — this option is used for security reasons with the text and text-area input types. Choose the Strip HTML Tags option to exclude the code injections or the Escape HTML Entities option in order to screen the code injection. This option affects both frontend and backend sides.
Attribute Display Settings
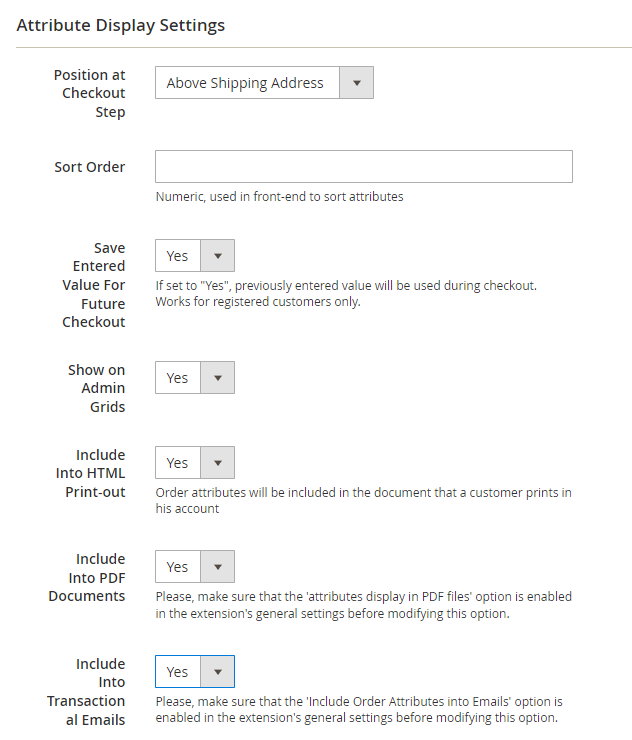
Position at Checkout Step — specify at which place on checkout step the attribute should be displayed:
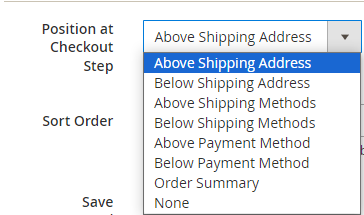
You can choose one of the following positions:
- Above Shipping Address
- Below Shipping Address
- Above Shipping Methods
- Below Shipping Methods
- Above Payment Method
- Below Payment Method
- Order Summary
- None
Please note that the order attribute with conditions based on the Payment method will only be visible on the frontend if one of the following checkout positions is selected: Above Payment Method, Below Payment Method, or Order Summary.
Sort Order — set the sorting order for the attribute display on the frontend;
Save Entered Value For Future Checkout — if you set the option to Yes, the registered customers will need to fill in the field only once, after that the field will be automatically filled in (with the possibility to edit);
Show on Admin Grids — enable this option to display the attribute on the backend grids;
Include Into HTML Print-out — enable this option to include the attribute into the HTML print-outs;
Include Into PDF Documents — enable this option to include the attribute into the PDF documentation;
Include Into Transactional Emails — enable this option to include the attribute into the transactional emails.
Please, make sure that the Include Order Attributes into Emails option is enabled.

Then, switch to the Title, Tooltip, Options tab:
Manage Titles — specify the attribute title for each store view for which it is enabled;
Manage Tooltip — set a tooltip to display near the attribute on the frontend.
When done, please, proceed to the Conditions tab:

Display the attribute only if the following conditions are met (leave blank to display it always) - the list of conditions in dropdown covers all created product attributes at the store with the 'Use for Promo Rule Conditions=Yes' configuration.
Shipping Methods — specify particular shipping methods to show the extra attribute only to those customers who choose the specified methods.
Please note that the list of conditions and shipping conditions don't conflict with each other or exclude each other. If you set both conditions, the order attribute will only display when all conditions are met.
Payment Methods - customize the display of Order Attributes based on the selected payment method.
Please note that the order attribute with conditions based on the Payment method will only be visible on the frontend if one of the following checkout positions is selected: Above Payment Method, Below Payment Method, or Order Summary.
Please, note the functionality of Payment Methods is available as part of an active product subscription or support subscription.
Attribute Relations
To manage attribute relations please go to Sales → Order Attributes → Manage Attribute Relations.
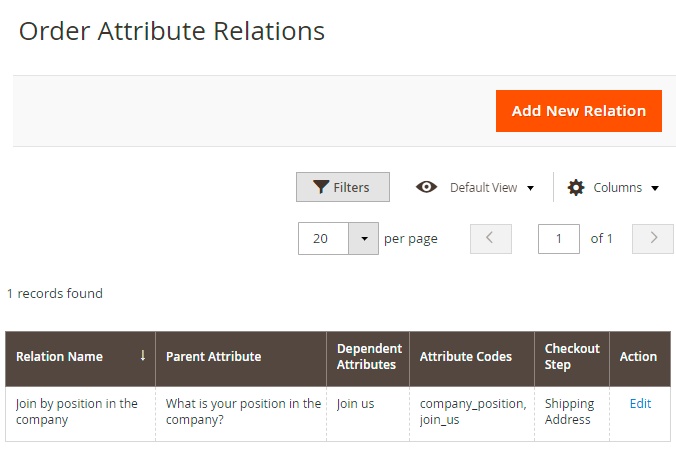
On the Order Attribute Relations grid you'll see all created relations. It's possible to add an unlimited number of new relations and manage the already created one.
Please note, that attribute relations can be set for the attributes within the same Checkout Step only.
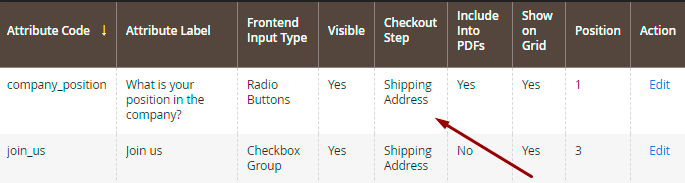
If the Checkout Steps are different, you will not be able to set the dependency.
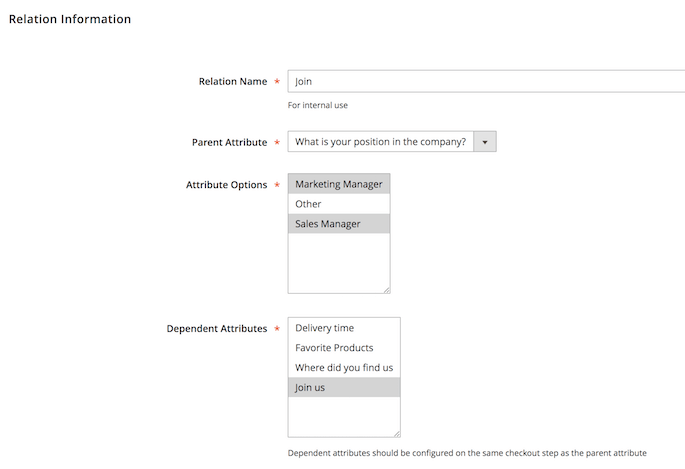
Relation Name — specify a relation name that will be used for internal needs only;
Parent Attribute — choose the attribute that will be a parent;
Attribute Options — select attribute values that will trigger the display of the dependent attributes;
Dependent Attributes — specify which attributes will be dependent. These attributes will be displayed only if a customer selects one of the specified values of a parent attribute.
Please, mind that you can create relations only for the following types of attributes:
- Dropdown
- Checkbox Group
- Radio Buttons
Attributes Display in the Admin Panel
Order Grid
When you add a custom attribute to Magento order, it will appear on the Orders Grid.
Order View Page
Additional order attributes data will be displayed on the Order info page.
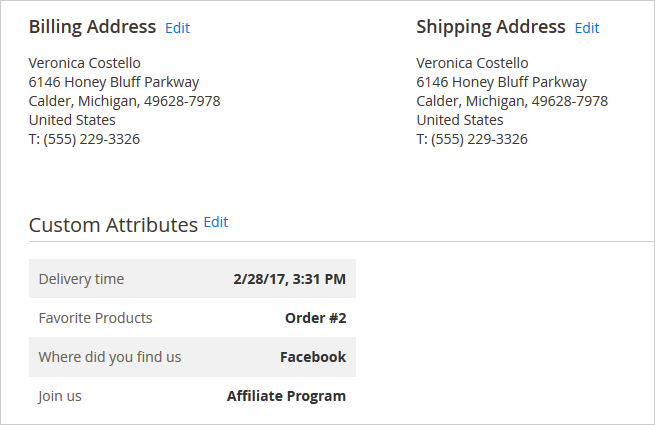
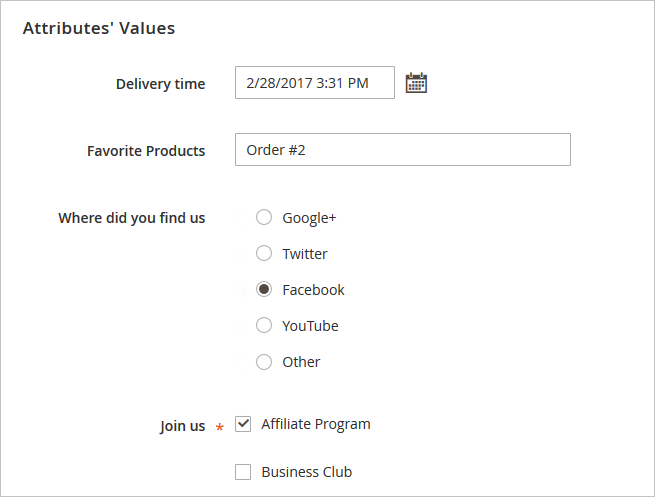
Click Edit to modify custom attributes from the admin panel.
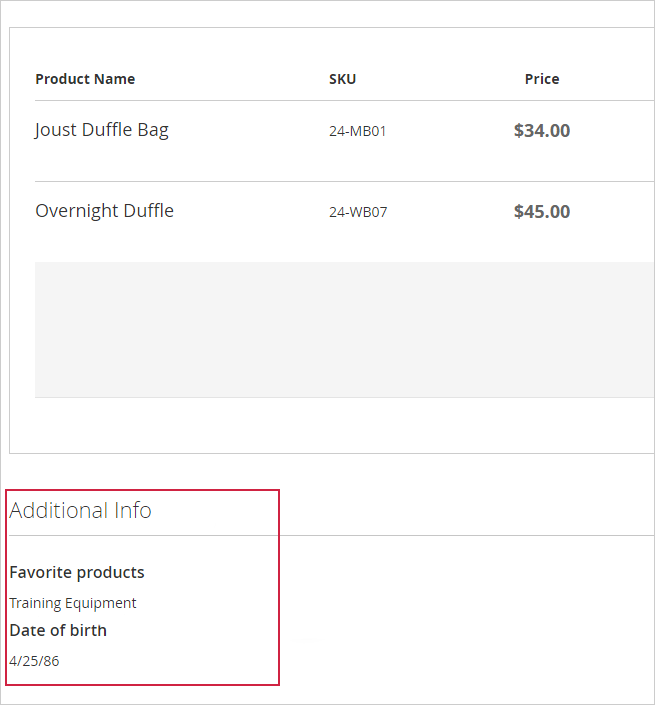
HTML Printouts
Include custom attributes in HTML and PDF printouts.
Attributes on the Registration and Checkout Pages
See the example of custom order attributes with different input types (text fields, dropdowns, radio buttons, multiple checkboxes).
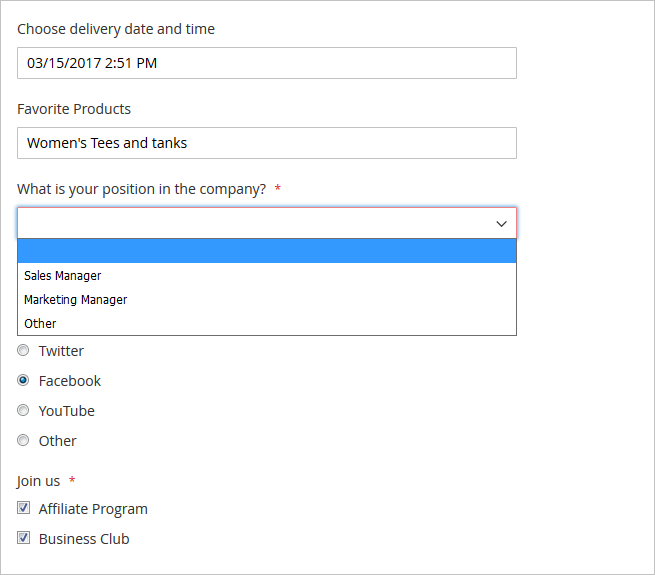
Display a handy calendar for the Date and Date and Time input types. The calendar appears once a customer clicks on the attribute field.

Also, the customers will be provided with the selected attributes on the checkout page.
Attribute Variables in Email Templates
With the Magento 2 Order Attributes extension, you can include order attributes into the email templates.
Please, go to Marketing → Email Templates and hit the Add New Template button.
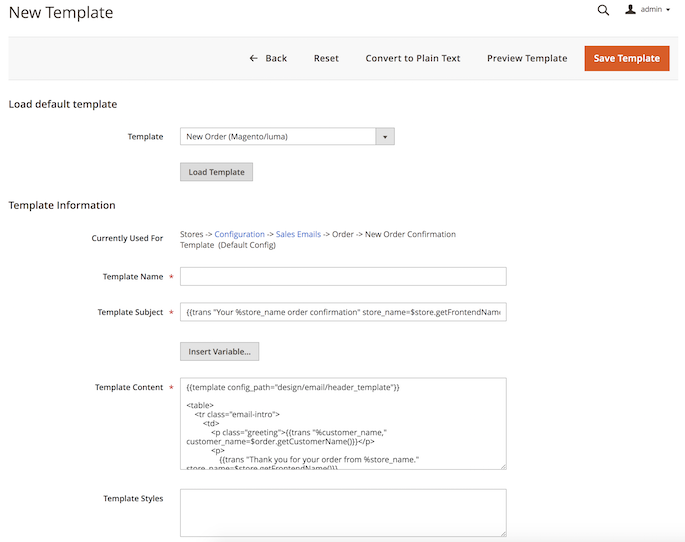
Next, select the required template from the Template dropdown menu and click the Load Template button. Then, specify the Template Name and proceed to the Template Content field. You can add the order attributes here. Click the Insert Variable button and choose the attribute you need to insert it in the template.

When done, click the Save Template button.

Additionally, you may need to set the new template as the main one for emails. Please, go to Stores → Configuration → Sales → Sales Emails. Then, expand the required tab and select the newly created template.
Generate Reports based on order attributes
We added compatibility with Amasty Custom Report Builder extension. The 'Amasty Order Attributes' entity is now available for report creation within the Custom Reports Builder module (Note: the compatibility is available as part of an active product subscription or support subscription).
- The compatibility is available with both modules installed;
- Install this package to enable this compatibility amasty/module-orderattr-builder ;
- On the custom report creation page for OrderEntity, the new entity “Amasty Order Attributes” has been added.By selecting the Chosen Option, you can manage the fields based on your business needs. All fields, except for OrderID, can be deleted.
 ;
; - See it in action in Custom Report demo.
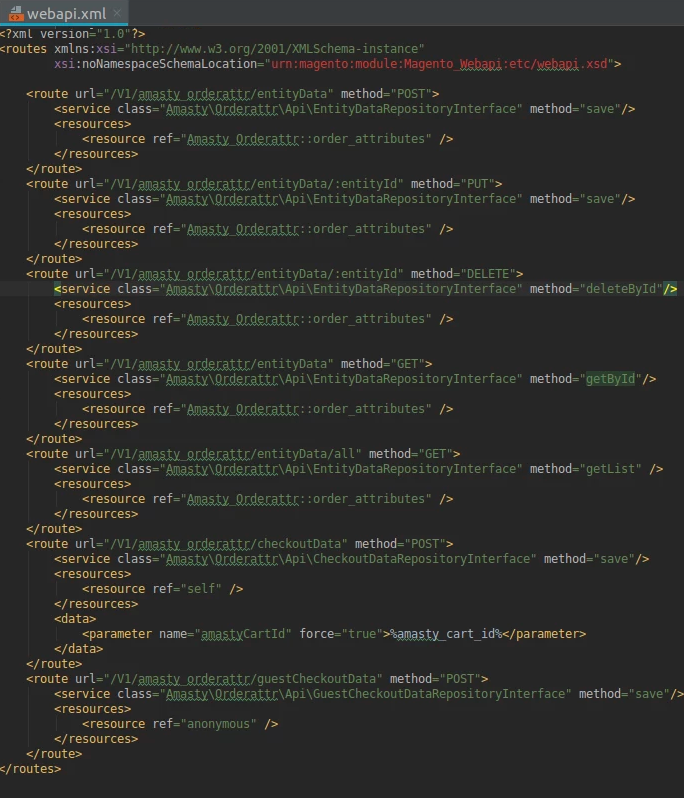
Compatibility with REST/SOAP API
Order Attributes extension for Magento 2 supports API. To get order attributes using the API, please look through these steps and methods:
- To get order data you should be authorized as admin and have the API Authorization token
- Use the API URLs specified in webapi.xml file:
This is how it works:
When you navigate to the second step of the checkout page or place an order (depending on the location of the attribute), the system creates an API query and sends it to the:
class="Amasty\Orderattr\Api\CheckoutDataRepositoryInterface" method="save"
This class takes the obligatory parameters:
int $amastyCartId
string $checkoutFormCode
string $shippingMethodCode
\Amasty\Orderattr\Api\Data\EntityDataInterface $entityData
Now the information about order attributes is recorded in database.
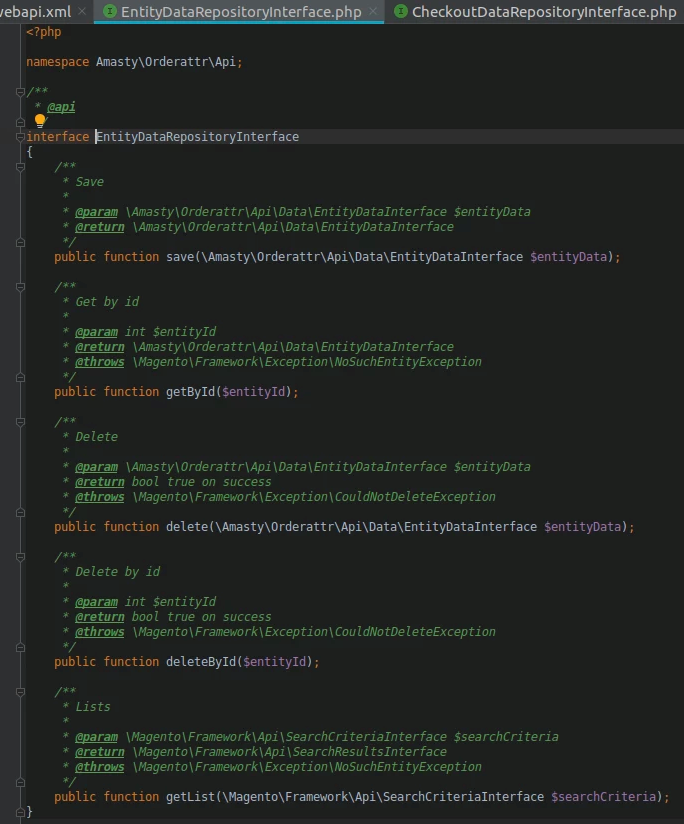
In order to pull the order attributes data out of DB, the following class was added:
class="Amasty\Orderattr\Api\EntityDataRepositoryInterface"
Steps:
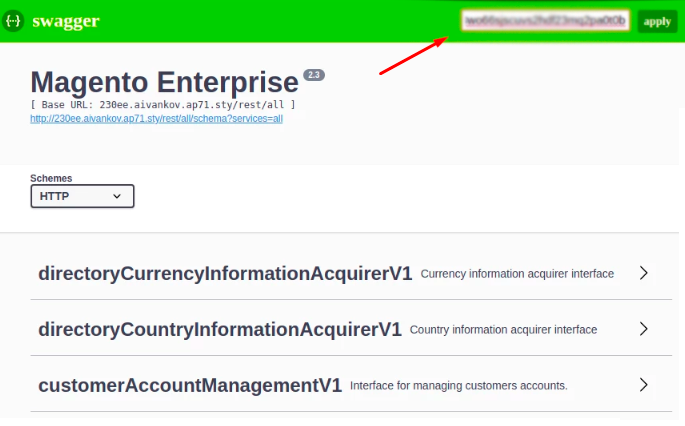
1. Go to Swagger (http://.../swagger).
2. Find integrationAdminTokenServiceV1 and log in with admin rights.
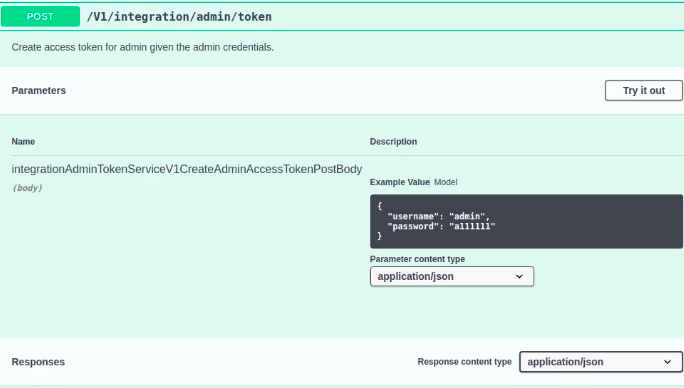
3. Take the token in Response body.
4. Enter the token in a search string and click Apply.
5. Find a particular method (for example, amastyOrderattrEntityDataRepositoryV1)
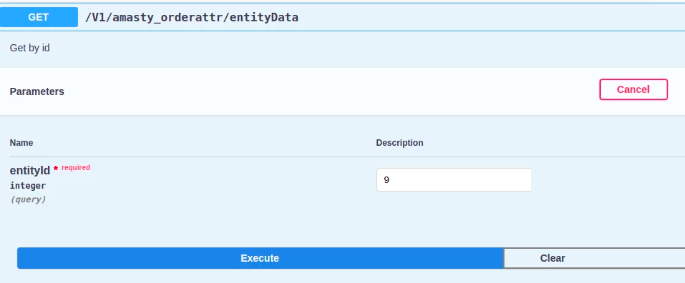
6. Enter entityId (it's in amasty_order_attribute_entity table)

Done! The result will show up in Response body.
Besides, all of these manipulations can be carried out with Remote Access simply by sending a query to your website specifying url/rest/all/V1/amasty_orderattr/entityData?param=value, for example:
http://.../rest/all/V1/amasty_orderattr/entityData?entityId=9
Troubleshooting
Compatibility with Magento 2 Multishipping
Please kindly note that the Order Attributes extension is not intended to use with Magento Multishipping functionality.
Additional packages (provided in composer suggestions)
To make additional functionality available, please install the suggested packages you may need.
Available as a part of an active product subscription or support subscription:
amasty/module-orderattr-graphql- Install this package to enable compatibility between the Order Attributes extension and GraphQL.
amasty/module-orderattr-hyva-compatibility- Install this package to ensure the Order Attributes extension works with the Hyva Theme.
amasty/module-orderattr-hyva-checkout-compatibility- Install this package to ensure the Order Attributes extension works with Hyva Checkout.
amasty/module-orderattr-subscription-functionality- Install this package to customize the display of Order Attributes based on the selected payment method.
amasty/module-order-attributes-adobe-payments- Install this package to ensure compatibility with Adobe Payment Services for Order Attributes.
amasty/module-orderattr-builder- Install this package to ensure compatibility with Amasty Custom Reports Builder extension.
FAQ
* Why don't the Order Attributes relations work while placing an order in the Backend?
* My Order Attribute relations don't work, how can I check if everything is configured correctly?
* Is it possible to allow customers to upload files using the Order Attributes M2 extension?
Find out how to install the Order Attributes extension for Magento 2 via Composer.
magento_2/order_attributes.txt · Last modified: 2025/04/25 13:04 by avronskaya