
Sidebar
magento_2:automatic_related_products
Table of Contents
See how the Automatic Related Products extension works.
Guide for Automatic Related Products for Magento 2
Motivate customers to purchase more from your store using special blocks with cross-sells, up-sells, or related products. Automatically promote products with smart algorithms for product relation and increase the average order value.
- Use smart rule-based algorithm to offer related items, up-sells, and cross-sells
- Show related products based on history of views or purchases
- Display items on category, product, shopping cart pages, and custom positions
- Display multiple related products blocks on one page
- Offer bundle packs with fixed or percentage discount
- Create a specified CMS page with all bundles
- Monitor related offers efficiency with advanced analytics
- Import and Export bundle packs data
- WCAG compliance (for the extension with Luma Theme)
- Hyva-ready storefront
- Hyva Checkout ready
Explore our internal Knowledge Base to gain even more valuable insights and uncover answers to popular questions about the configuration and features of the Magento 2 Automatic Related Products extension.
Magento 2 Automatic Related Products extension is compatible with Hyvä themes. You can find the 'amasty/module-mostviewed-hyva' package for installing in composer suggest. The compatibility is available as part of an active product subscription or Support Subscription.
Please note that for the correct Hyvä compatibility work, the GraphQL module 'amasty/customers-also-viewed-graphql' should be also installed.
The extension is compatible with Hyvä Checkout. You can find the 'amasty/module-mostviewed-hyva-checkout' package for installing in composer suggest (Note: the compatibility is available as a part of an active product subscription or support subscription).
General Settings
To configure the extension please go to Stores → Configuration → Amasty Extensions → Automatic Related Products and expand the General section.
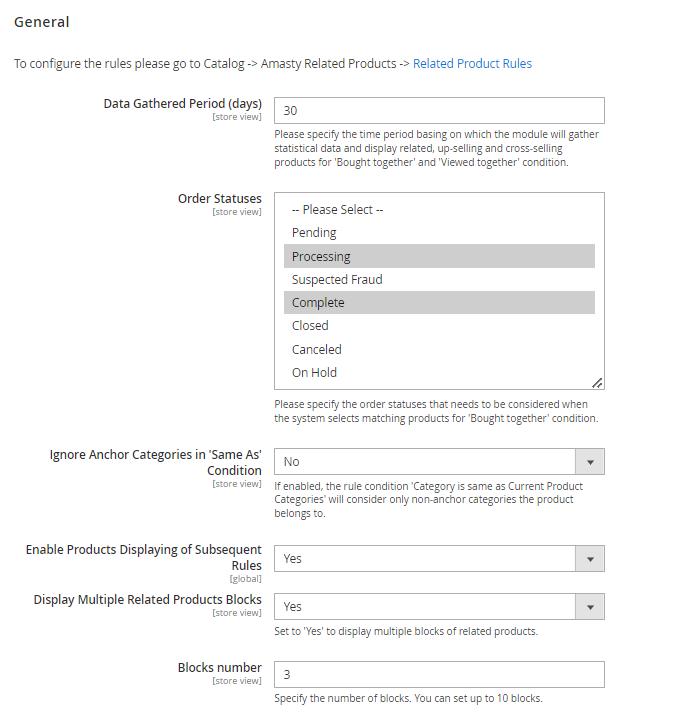
Data Gathered Period (days) - specify a time period for stats data gathering that will be used in related, up-selling, cross-selling, ‘bought together’ and ‘viewed together’ products.
Order Status - specify order statuses that need to be considered when the system selects matching products for the 'Bought together' condition.
Ignore Anchor Categories in 'Same As' Condition - If enabled, the rule condition 'Category is the same as Current Product Categories' will consider only non-anchor categories the product belongs to.
[Narrow case] Please note that the condition rule you created will be ignored (all store products will be applied) if both of the conditions below are applied:
- the product you're configuring belongs to an anchor category ONLY;
- the setting 'Ignore Anchor Categories in 'Same as' Condition' is enabled.
Enable Products Displaying of Subsequent Rules - set to 'Yes' to display subsequent rules products if there are no products matching the condition in the priority rule.
Please consider, that due to its specifics, the 'Enable Products Displaying of Subsequent Rules' setting may affect webstore performance if enabled. Please, enable this feature only in cases when it is needed.
Display Multiple Related Products Blocks - set to 'Yes' to display multiple related products blocks on one page. The feature is available as a part of an active product subscription or support subscription.
Blocks number - this is a dependent setting from the previous one. Here you can specify the number of blocks. You can set up to 10 blocks.
Related product blocks will appear on the page provided that corresponding rules have been created. For instance, if you've set up two rules that are relevant to the scenario, and the blocks number in general configuration is set to four, only two blocks will be displayed.
Bundle Packs
In the Bundle Packs section, you can fine-tune the main settings of product bundle packs.
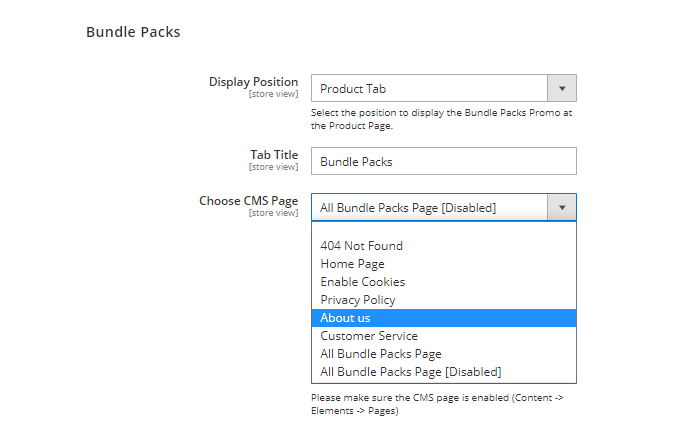
Display Position - choose the position to display product bundle packs: below product info, on a product tab, or in a custom position.
Tab Title - when displaying bundle packs on a product tad, specify a custom title for the tab.
Choose CMS Page - Choose a CMS page to show bundle packs on.
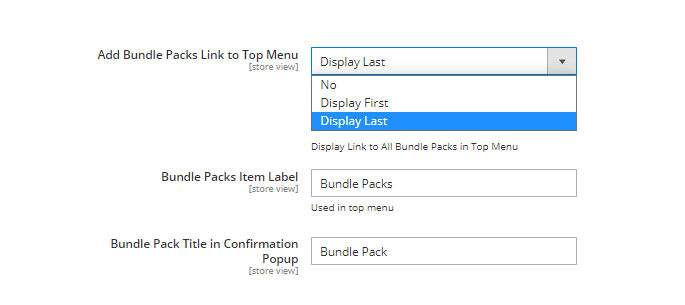
Add Bundle Packs Link to Top Menu - choose the position for a bundle packs link on the top menu.
Bundle Packs Item Label - specify the bundle packs item label that will be used for a link in the top menu.
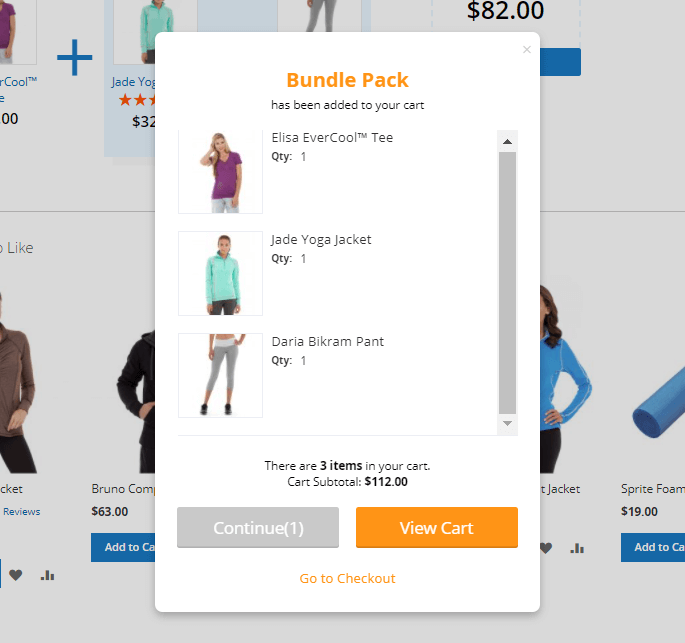
Bundle Pack Title in Confirmation Popup - Here you can specify the bundle pack title to be displayed in the confirmation popup (used in the top menu).
Please note that this option ('Bundle Pack Title in Confirmation Popup') becomes available only if the AJAX Shopping Cart for Magento 2 extension by Amasty is enabled as well.
See the example of the popup:
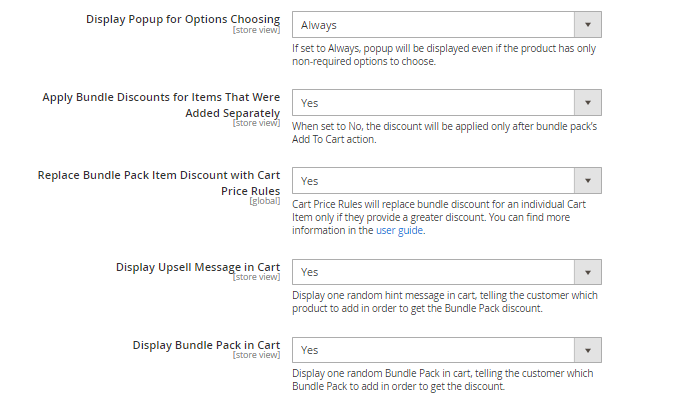
Display Popup for Options Choosing - Use this setting to configure the display of the popup for choosing custom product options.
The setting offers two ways of display:
- 'Only if Product has Required Options' - choose this option to show the popup only if a product has any required options to be configured;
- 'Always' - if set to 'Always', the popup will be displayed even if the product has only non-required options to choose from.
Apply Bundle Discounts for Items That Were Added Separately -
- Set this setting to 'No' if you want a discount to be applied to a certain combination of products bought in a format of the bundle only.
- Set this setting to 'Yes' if you're okay if a customer accidentally gets a discount in case certain 2 or 3 products get to the shopping cart together without being added to the cart intentionally as a bundle.
Replace Bundle Pack Item Discount with Cart Price Rules - set to 'Yes' if you want to replace a bundle item discount with a cart price rule discount. A cart price rule will replace bundle discount for a particular item only if it provides a greater discount.
Display Upsell Message in Cart - display one random hint message in a cart, telling a customer which products to add to get the Bundle Pack discount.
Display Bundle Pack in Cart - display one random Bundle Pack in a cart, telling a customer which Bundle Pack he can add to get a discount.
If you want to set a custom position for Bundle Pack Display, copy the necessary embedding code and paste in a suitable position.

Analytics Set Up
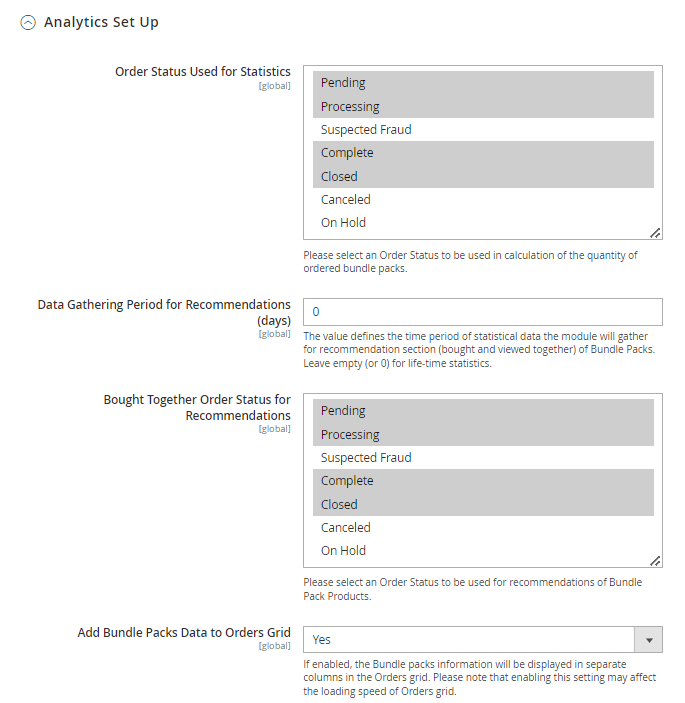
Order Status Used for Statistics - Please select an Order Status to be used in the calculation of the quantity of ordered bundle packs.
Data Gathering Period for Recommendations (days) - The value defines the time period of statistical data the module will gather for the recommendation section (bought and viewed together) of Bundle Packs. Leave empty (or 0) for lifetime statistics.
Bought Together Order Status for Recommendations - Please select an Order Status to be used for recommendations of Bundle Pack Products.
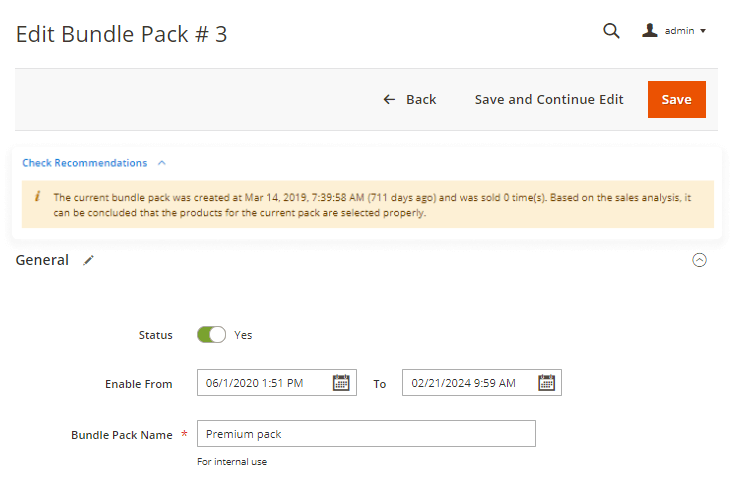
Analytics-based recommendations
The extension shows custom recommendations for every bundle pack you ever created based on its sales performance. Check the notice at the top of any bundle pack edit page (section 'Check Recommendations') to see the recommendation.
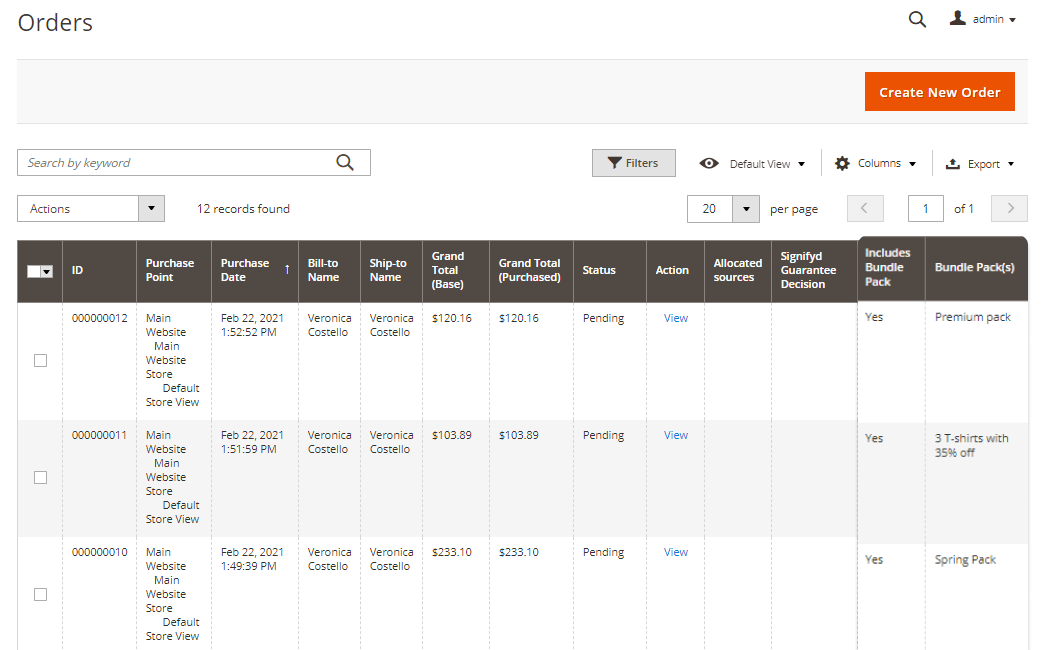
Add Bundle Packs Data to Orders Grid - If enabled, the Bundle packs information will be displayed in separate columns in the Orders grid. Please note that enabling this setting may affect the loading speed of Orders grid.
Discount in Mini Cart
With the extension, you can display the cart discounts in Mini cart (Note: this functionality is available as a part of an active product subscription or support subscription). To enable this feature, please go to Stores → Configuration → Amasty Extensions → Discount Info for Mini Cart.

Show Discount in Mini Cart - Enable this setting to display the cart discount value in the mini cart.
Here’s an example of how this discount appears on the frontend:

Please note, that to enable the Discount Info for Mini Cart functionality with Hyvä Theme, you need to install the additional Hyvä Theme compatibility package – amasty/module-mini-cart-discount-info-hyva.
Related Product Rules
To create rules for linking products, please go to Catalog → Amasty Related Products → Related Product Rules.
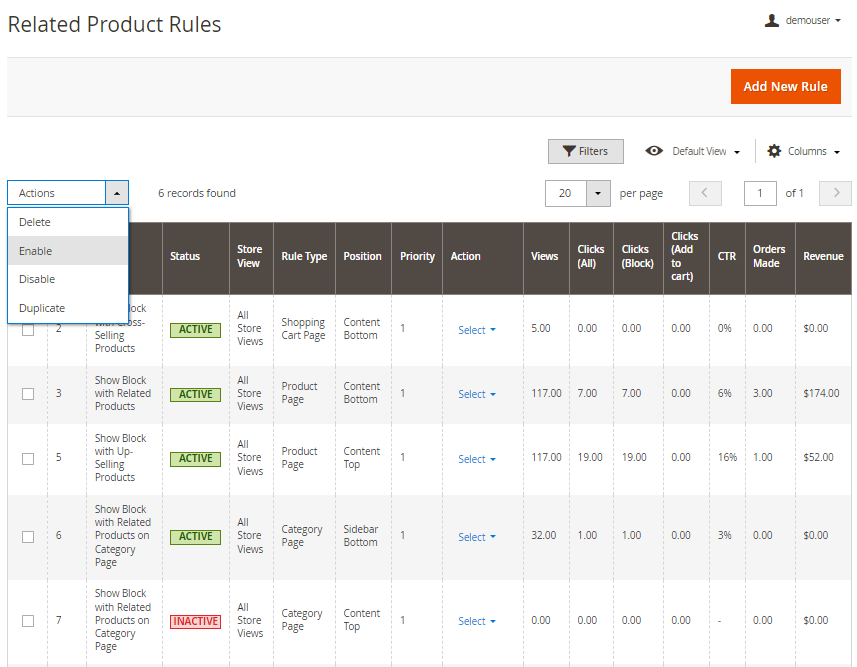
On the product rules grid, you can see all existing rules for displaying related, up-sell and cross-sell items on different pages and in various positions in your store.
The rules are sorted by the ID and the Name. You can see the Status of each rule and change it right from the grid by clicking the necessary rule and setting the Enable Rule option to Yes or No.
All the rules are provided with the information about the Store View, Rule Type, its Position on the frontend. You can also check the Priority of each rule.
Only one rule can be applied in one position. If there are several rules, the rule with the highest priority will be executed.
Check the progress and effectiveness of each product block performance by tracking the number of Views, Clicks, CTR, Orders Made and the final Revenue.
When a related products block appears, it is counted as Views. When any product from the block is clicked, it is counted as Clicks. Firstly, all views are placed in a temporary table, and then the info is transferred to a permanent one via Cron jobs. After that, the temporary info is cleared.
Cronjob tasks:
amasty_mostviewed_analytics_collect_view
amasty_mostviewed_analytics_collect_click
amasty_mostviewed_analytics_clear_temp
Tables:
pref_mostviewed_view_temp - cleared
pref_mostviewed_click_temp - cleared
pref_mostviewed_analytics - contains data
Change the columns’ position with a handy drag-and-drop function.
The dropdown menu allows to Delete, Enable, Disable, Duplicate or Edit each rule or several rules in one click.
It is possible to handle CRUD actions on Automatic Related Products rules via REST API. The following actions are supported:
- /V1/amasty_mostviewed/rules, POST method
- /V1/amasty_mostviewed/rules/:groupId, PUT method
- /V1/amasty_mostviewed/rules/:groupId, DELETE method
- /V1/amasty_mostviewed/rules/:groupId, GET method
- /V1/amasty_mostviewed/rules, GET method
How to create Magento 2 related products rules for linking products? Our Magento 2 Related Products extension will help you to do it easily.
Magento 2 Automatic Related Products plugin is designed to analyze the interests of online shoppers to display the relevant related products table for them. It is possible because of a smart personalized system of autosuggestions that uses rules based on product conditions and helps to offer customers only those goods that are more likely to be additionally purchased.
Check the video guide to learn how to create a new related product rule step-by-step

To create a new algorithm for displaying relevant products automatically, click Add New Rule button and expand the Rule Information tab.
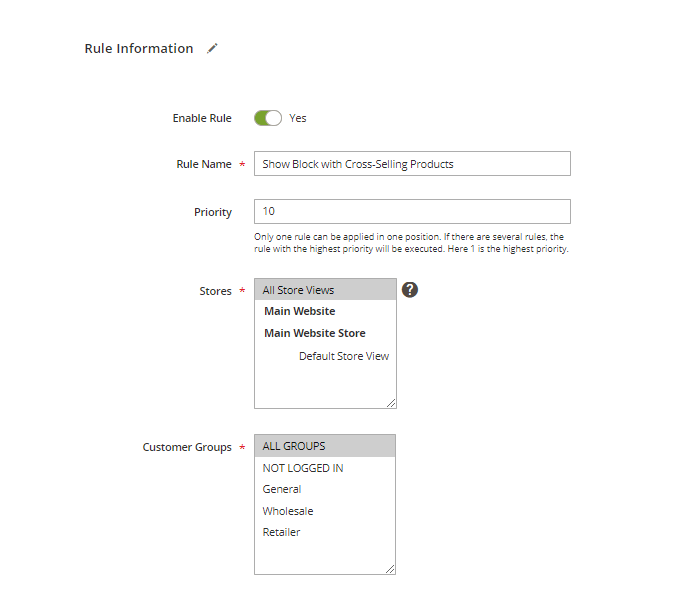
Enable Rule - set to Yes to activate the rule.
Rule Name - create the rule title that will be displayed on your backend settings so that you could easily manage it from the grid.
Priority - only one rule can be applied in one position, but if some products fall under several rules, the extension will execute the rule with the highest priority. Here 1 is the highest priority.
Stores - set up products display according to the particular store.
Customer Groups - specify particular customer groups for which the block will be visible or just select the 'ALL GROUPS' option to enable applying the rule for all groups.
Recommend products on various pages
Go to the ‘Where to Display’ Conditions tab.
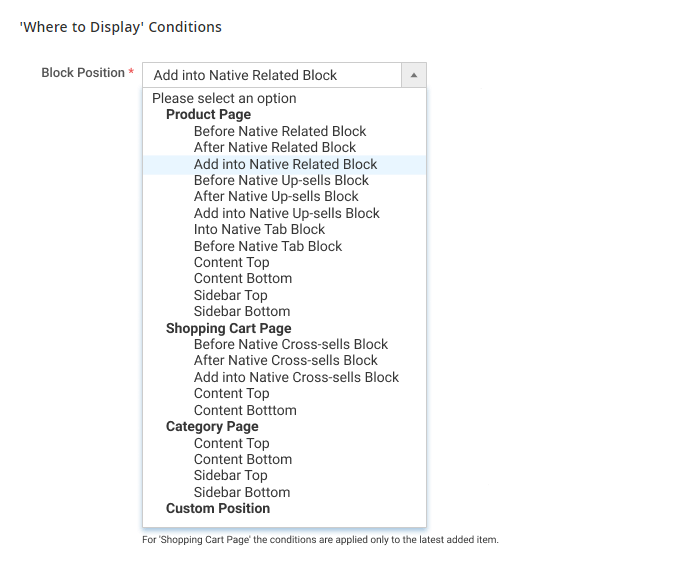
Block Position - customize the location for your related products block. Choose its position on the Product Page, Shopping Cart Page or Category Page.
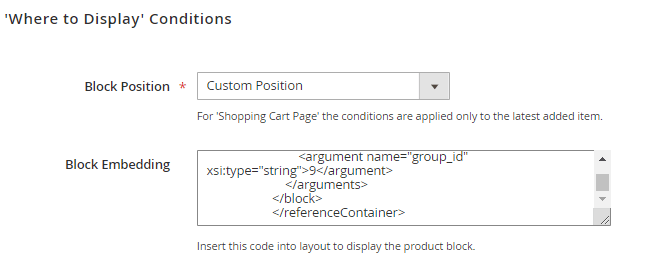
You may also configure a Custom Position for the block with related products. This option provides a custom code to be inserted into layout. Thus you can place the block anywhere on your website. To use the option create a New Rule, choose 'Custom Position' in Block Position window and save the rule. A custom code will appear in the 'Block Embedding' window. Copy the code to the xml file with needed page layout (commonly xml files are located here:
your_magento_instance_folder/design/layout/catalog_product_view.xml
Use before/after tags to indicate the exact position of the widget. You may also add the code to any product or category page by inserting it into the 'Layout Update XML' window in Design section.
For 'Shopping Cart Page' the conditions are applied only to the latest added item.
If Add into Native Up-sells Block on a product page or Add into Native Cross-sells Block on a shopping cart page is chosen, you will have an option to specify the Replace Type.
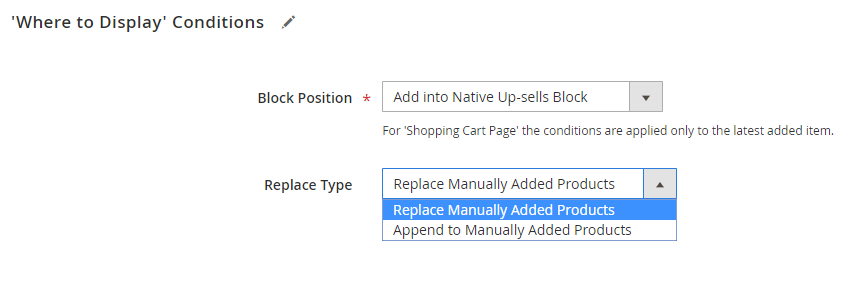
The extension matches related products automatically. However, you can not only replace manually added products, but also append to them.
See how to add related products manually here.
After specifying the position, choose the conditions to define the products the “related items” block will be displayed according to color, size, price, category, etc. You can use the combination of the attributes if needed.

The extension is compatible with Amasty Improved Sorting extension. Therefore, having this module installed, you can use bestsellers data in related block product conditions in the 'Where to Display Conditions' tab and in the 'Products to Display' tab.
Show only for ‘Out of Stock’ Products - enable this option to display related products block for ‘out of stock’ products and provide customers with the items they can purchase.
Check the products that fall under the conditions created by clicking the Preview Products button.
You can see the Thumbnail, the Name, the Type and other additional information about each product. Use handy filters to find necessary products according to the name, type, price, status, visibility, etc.
If you are not satisfied with the list of products, change the conditions and hit the Preview Products button again.
Choose products to display
To sort the items that will be shown at the related products block, expand the Products to Display tab.
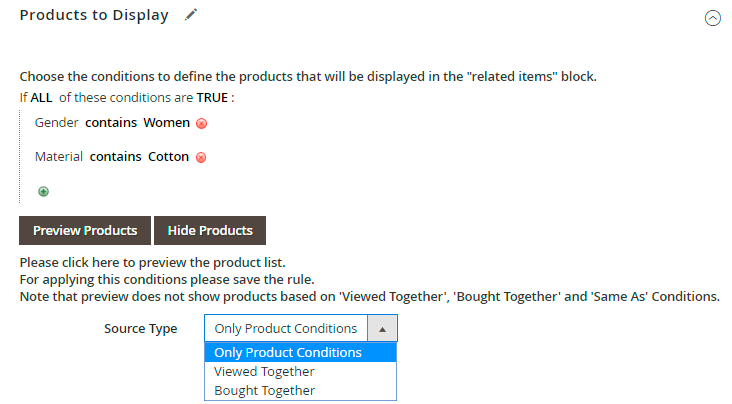
Conditions - select the attributes according to which the products will be shown.
Click Preview Products to check the products list if needed.
Note that preview does not show products based on frontend variable parameters: 'Viewed Together', 'Bought Together', 'Same As' and 'Current category only' Conditions.
If you want to show related products block on a product page, specify the Source Type.
Source Type - choose the way for related products to be assorted.
Only Product Conditions - choose this source type to display the items that fall under the conditions specified.
Viewed Together - enable this type to let the system show the products according to the history of views based on the statistical data.
Please enable 'Product View' report at the Configuration → General → Reports for the 'Viewed Together' data source works properly.
Please note that updates to the 'Viewed Together Products' block may not immediately appear on the storefront. This block is automatically refreshed every hour through a Cron job.
If records for the 'Viewed Together Products' block already exist in the 'amasty_mostviewed_product_viewed_index' index table, those products are displayed on the storefront. However, if there are new or different products that should appear in the 'Viewed Together' block but are not yet included in the index table after an update, they will not be immediately visible on the storefront. This delay occurs because the 'amasty_mostviewed_build_together_index' Cron job runs once an hour. Therefore, the 'Viewed Together Products' block will automatically update shortly after the next Cron job execution.
Bought Together - this type displays products according to the statistical data of purchases.
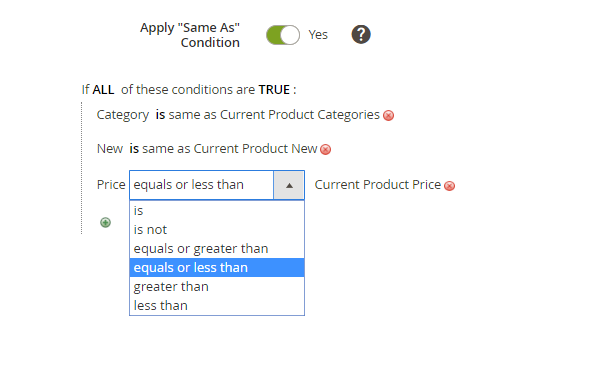
Apply “Same As” Condition - enable this option to select products by the same attribute value to display in the block.
For ‘same as’ condition you can set any attribute value: category, material, size, color, price and etc. For example, you can choose how to show products: display from any category or only from the same category with the selected item. The price is also variable.
If you would like to show related items on a category page, you also may enable the option to display the products from the current category only.

Please note that it is possible to use both 'is' and 'is not' configurations for the 'same as' condition.

Display settings
To customize the related products block according to your needs, go to the Display Settings tab.

Block Title - add a custom title to capture customers' attention.
Block Layout - choose the style of the block: grid or slider.
Display “Add to Cart” Button - enable this option to let your customers add products to the cart right from the block.
Display “Add to Wish List” Button - set to 'Yes' to allow customers to add products to their wish lists.
Display “Add to Compare” Button - enable this option to let your store visitors add products to comparison.
Sort by - define the way to display the products: sort them by name, price, newest or leave it random.
Get Amasty Improved Sorting extension to enable additional sorting methods: by Best Seller, Most Viewed, Reviews Count and Top Rated.
Max Products to Display - specify the suitable for your website max number of products displayed in a product block.
Show “Out of Stock” Products - exclude out-of-stock items from displaying to provide your customers with the products they can purchase immediately.
Update Related Products Block for Configurable Product Options - Set to 'Yes' to display related product blocks for configurable product options when they are selected and meet the conditions. Note, that this functionality is available as part of an active product subscription or support subscription and only if the “Apply 'Same As' Condition” option is enabled. Here are some specifics of this feature:
- If no matches are found for child products, the related items block for the parent product will be displayed instead.
- If the rule conditions yield no matches for the parent product, no related items will be displayed for the child product either.
The extension is compatible with read-only GraphQL. It allows to expose product data like SKU, name, link, image, price etc. in order to build PWA/JS based frontend.
Replace Items Manually
According to the rules, the extension matches related products automatically. However, you can replace or add related items manually in each product block.
Go to the Catalog → Products.
Choose the product needed and expand the Related Products, Up-Sells, and Cross-Sells tab.
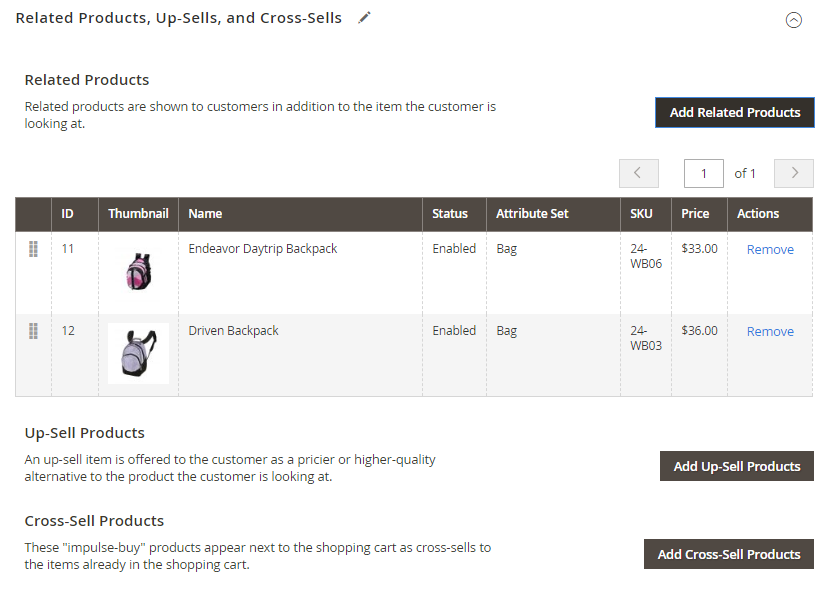
To add items to the necessary category, click the Add Related/Up-Sell/Cross-Sell Products button.
Choose the items and hit the Add Selected Products button.
On the preview grid you may see the information about the products: the thumbnail, the name, active status and attribute set, SKU, price.
Also, you can Remove them in one click if needed.
Related Product Sales Report
You can analyze the performance of the rules in a separate report.
To view the report, navigate to Reports → Amasty Related Products → Related Product Sales.

Here, you can:
- view detailed information about purchases made from the Related Products block;
- analyze the effectiveness of the rules;
- calculate revenue generated from related product offerings;
- use filters to find specific rules, products, or orders;
- sort information by any parameter;
- export data.
Bundle Packs
To configure and manage product bundle packs, please, go to Catalog → Bundle Packs.
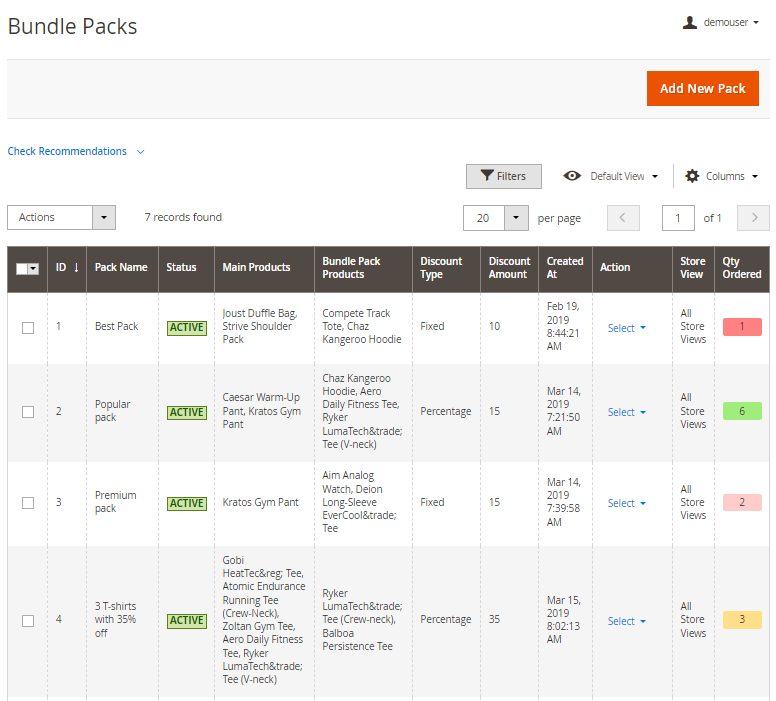
Here, you can do the following:
- easily manage all existing bundle packs (add new/delete, enable/disable and duplicate existing);
- get the necessary information on each of them (including Main and Bundle Pack Products included, Discount Amount and Discount Type, the date of creation, etc.);
- check the statistics and analyze the bundle packs' sales (Qty ordered) to get valuable insights and improve their performance;
- check the general recommendations upon the specific bundle packs and follow hyperlinks leading to packs to enhance their performance in accordance with the recommendations.
Create New Bundle Pack
To create a new bundle pack, please, go to Catalog → Bundle Packs → Add New Pack button.
Analytics-based recommendations
The extension shows custom recommendations for every bundle pack you ever created based on its sales performance. Check the notice at the top of any bundle pack edit page (section 'Check Recommendations') to see the recommendation.
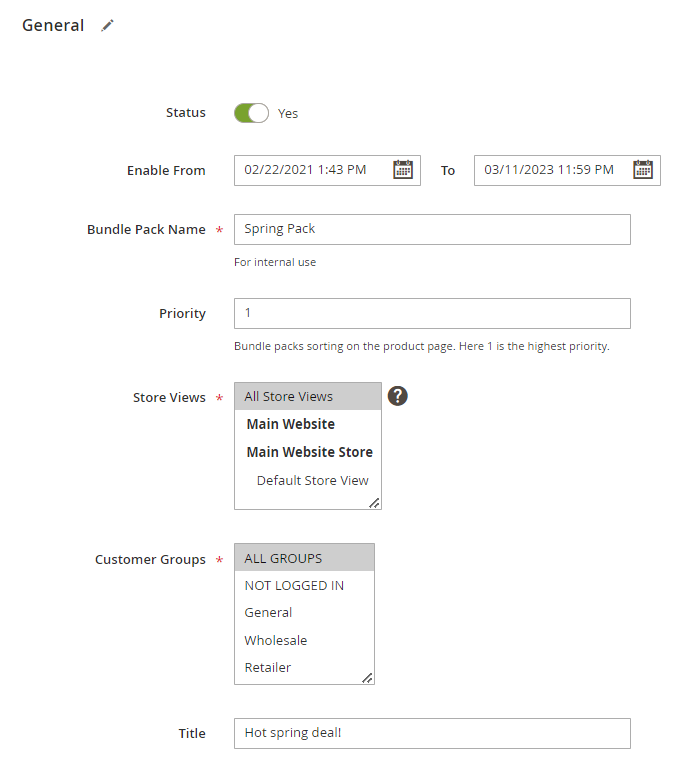
Status - set to Yes to make the bundle pack active.
Enable From - specify the period during which the bundle pack will be active. The bundle will be automatically enabled and disabled on the specified date and time.
Bundle Pack Name - define the name of a bundle pack (for internal use only).
Priority - set bundle pack order on the product page. Here 1 is the highest priority.
Store Views - choose the store views to show a bundle pack for.
Customer Groups - select customers groups to show a bundle pack for.
Title - specify the bundle pack title that will be displayed on the products page.
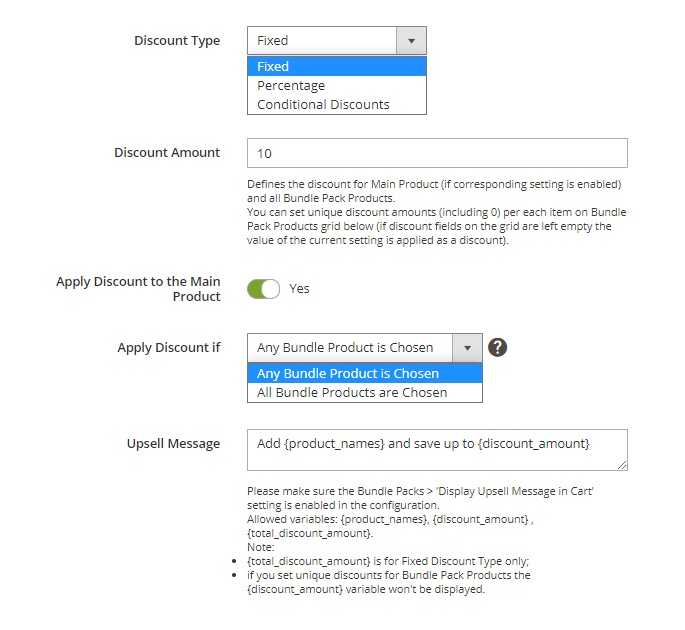
Discount Type - three discount types are available, please choose one of them from the dropdown:
Fixed - set 'Fixed' type of the discount to apply a discount like '$10', i.e. the fixed sum of money; Percentage - set 'Percentage' type of the discount to apply a discount like 10% from the final price of the bundle pack, which means that the actual discount amount will vary from bundle to bundle; Conditional Discounts - choose this option if you want to configure a differentiated discount depending on how many products are added to the cart.
Please note that the options 'Discount Amount', 'Apply Discount if' and the 'Upsell Message' won't be available if you choose the 'Conditional Discounts' type. But there becomes available a new tab ('Conditional Discounts') for further configurations of the conditional discounts.
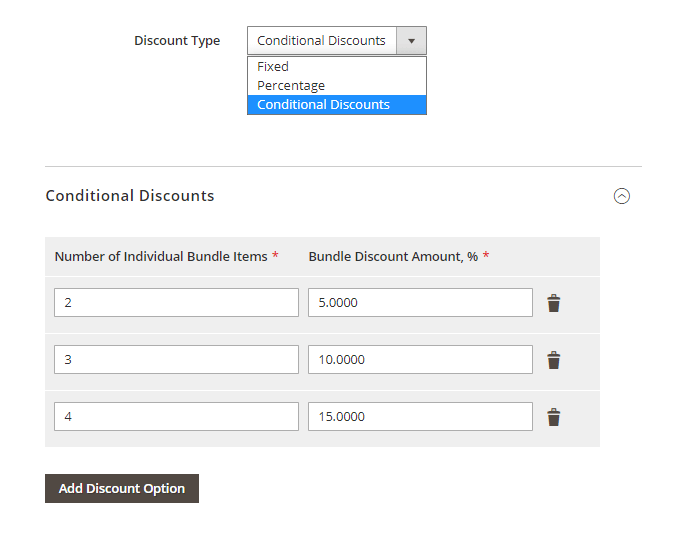
You can set a certain discount amount depending on how many products have been added to the shopping cart and thus encourage the site visitors to purchase more.
These 4 settings below are available only if you have chosen Fixed or Percentage discount type.
Discount Amount - specify the discount amount.
The setting defines the discount for the Main Product (if the corresponding setting is enabled) and all Bundle Pack Products. You can set unique discount amounts (including 0) per each item on the Bundle Pack Products grid below (if discount fields on the grid are left empty the value of the current setting is applied as a discount).
The discount for bundle packs products will be applied above the special price if it is set.
Apply Discount to the Main Product - enable the option to apply the discount to the main product in a bundle pack.
Apply discount if - Choose from the two available options:
- Any Bundle Product is Chosen - the discount will be applied if any product from the bundle is chosen;
- All Bundle Products are Chosen - the discount will be applied only if all products from the bundle are chosen.
Pleasee note that if set to ‘All Bundle Products are Chosen’:
- Bundle Pack discount will be canceled if any of bundle product is unchecked;
- Bundle Pack will not be displayed if any of bundle items is not present on the storefront.

Upsell Message - specify the upsell message that will be displayed in a shopping cart. Use variables: {product_names}, {discount_amount}. The upsell message will appear only when the Bundle Packs → 'Display Upsell Message in Cart' setting is enabled in the configuration.
Please make sure the Bundle Packs → 'Display Upsell Message in Cart' setting is enabled in the configuration.
Allowed variables: {product_names}, {discount_amount} , {total_discount_amount}.
Please note that:
- {total_discount_amount} is for Fixed Discount Type only;
- if you set unique discounts for Bundle Pack Products the {discount_amount} variable won't be displayed.
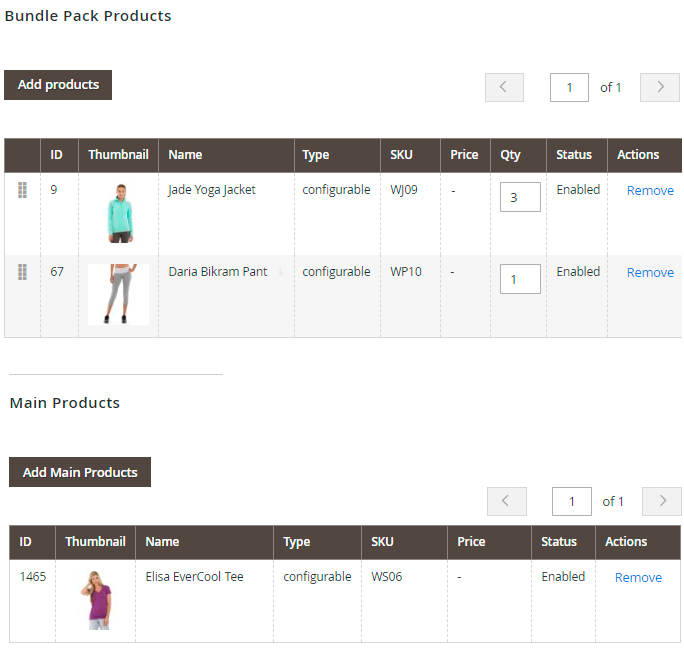
On the Bundle Pack Products and Main Products grids, you can choose the main and bundle pack products accordingly. Choose the order of bundle pack products on the appropriate grid via drag-and-drop and specify each bundle pack product quantity.
Bundle Packs do not work with Grouped and Gift Card product types.
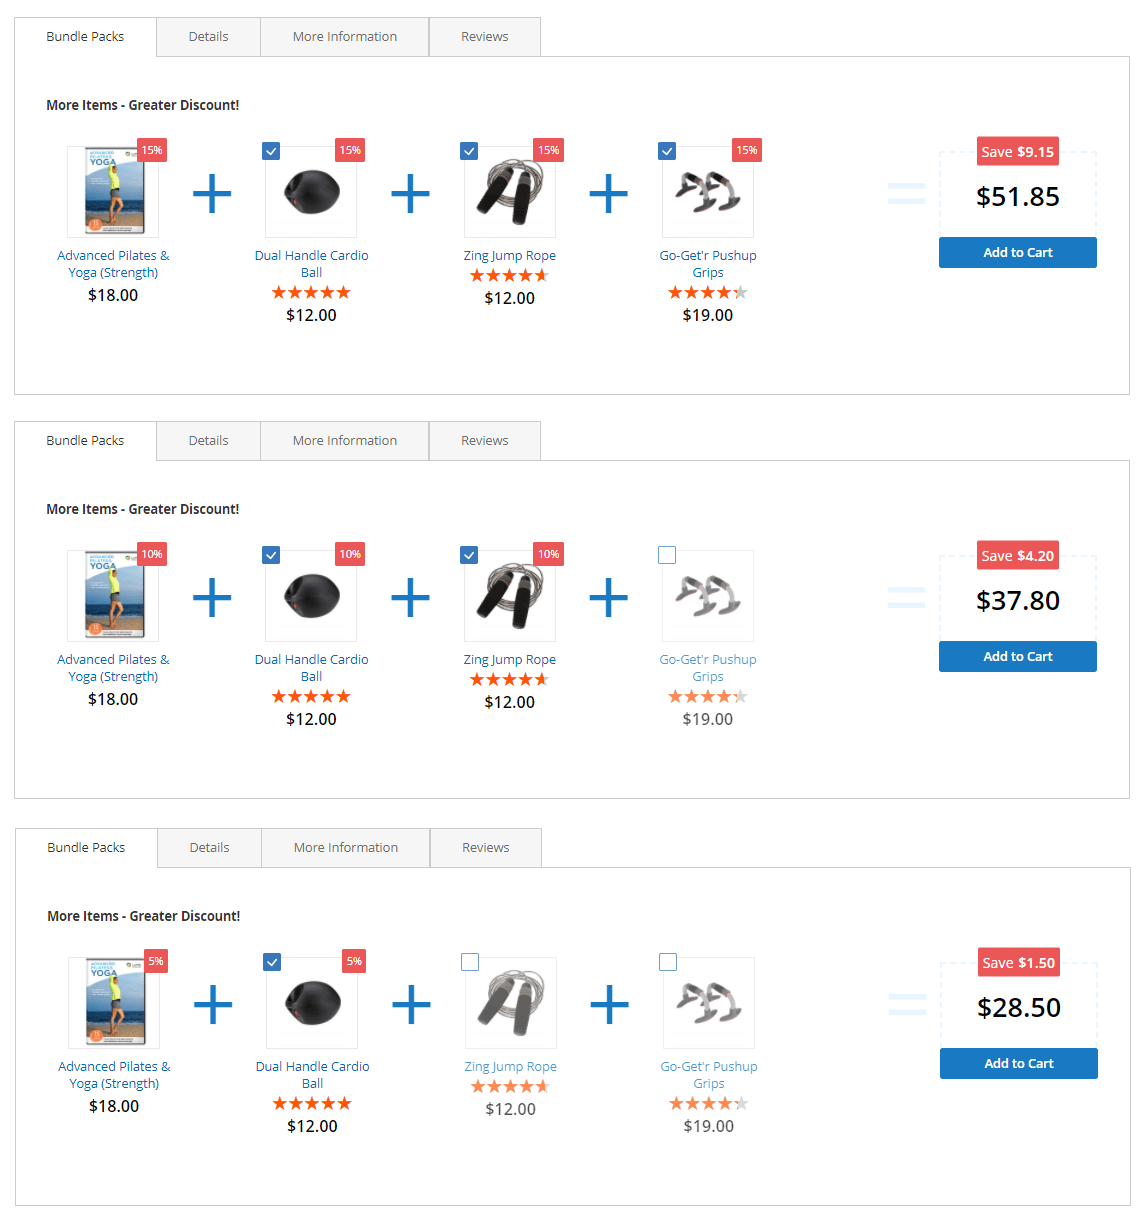
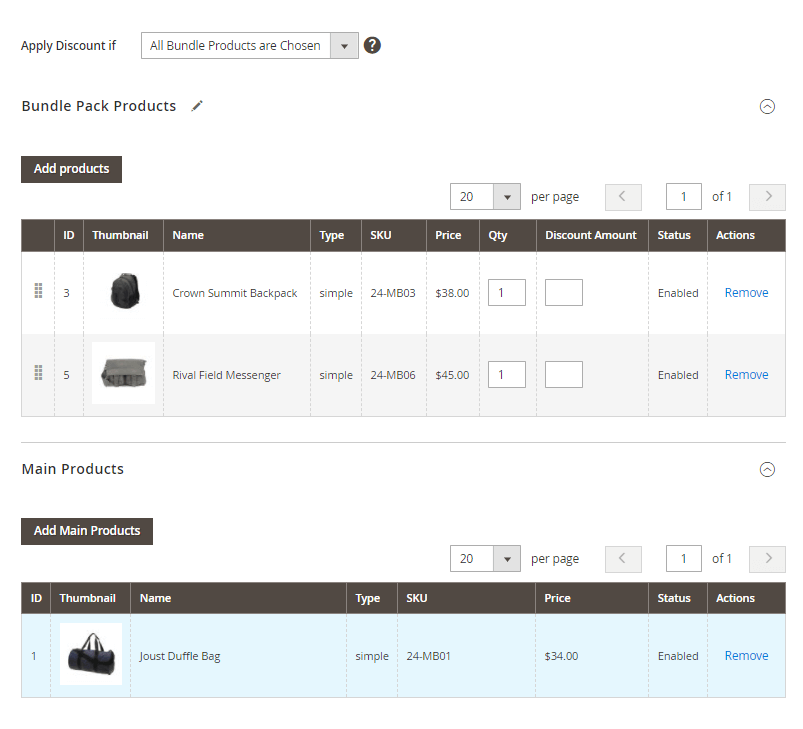
Bundle Pack Use Case
In case you want to set up three cross-promotional bundles with the three same products, configuration will look like the following:
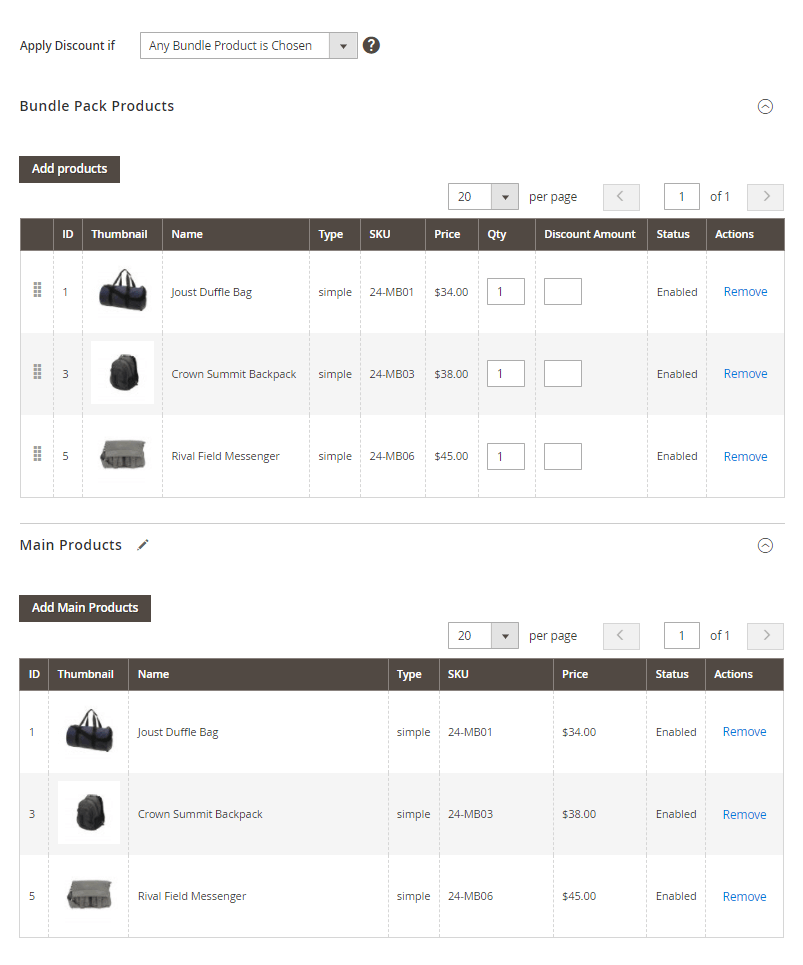
Please note that for this very case you can only set up a 'flexible' bundle with the setting 'Apply discount if' set to 'any bundle product is chosen' only.
In case you need to set up three cross-promo bundles with the setting 'Apply discount if' set to 'all bundle products are chosen' (the 'strict' bundle discount rule), then you need to create three separate bundles for each promo case for now, meaning, only with one main product at a time.
For example:
Cron Tasks List
To manage all existing cron tasks, please, go to System → Cron Tasks List.
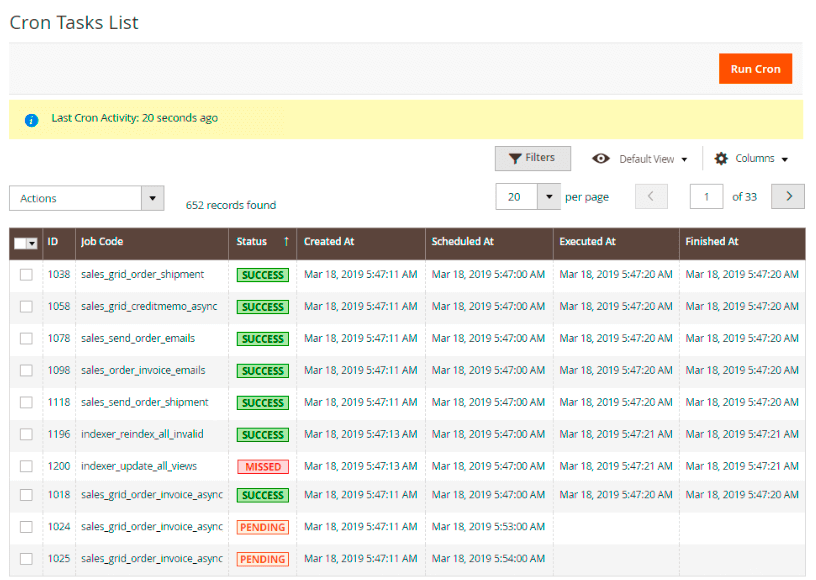
Here, you can see all the existing cron tasks and their statuses. Run cron tasks and generate their schedule by clicking the ‘Run Cron’ button. Also, delete tasks in bulk, apply filtering and sorting options when it is needed.
Add Related Products Blocks or Bundle Packs via Widget
You can also add the blocks with related products and bundle packs to your website pages via widgets.
For now, the following types of widgets are available within the extension:
- Bundle Pack
- Bundle Pack List
- Product Page Bundle Pack
- Products Block by Rule Id
To add a widget, please navigate to Content → Widgets → Add Widget.
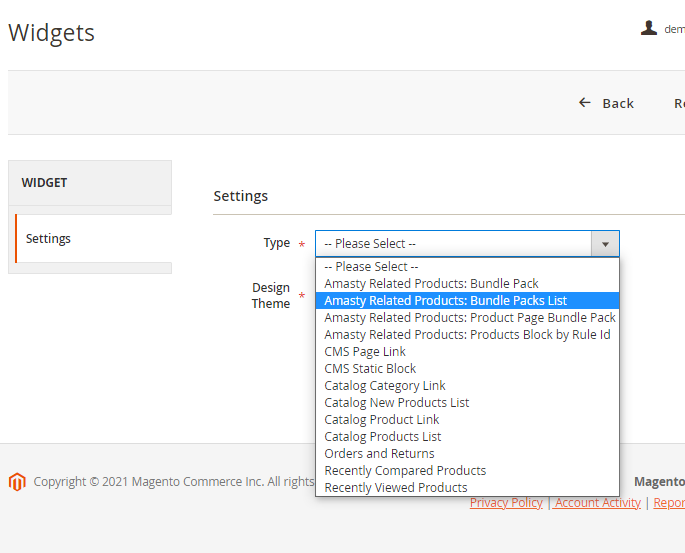
Choose the Type of widget, the Design Theme and click 'Continue'.
Specify the other Storefront Properties according to your needs, similar to the default settings of Magento widgets.
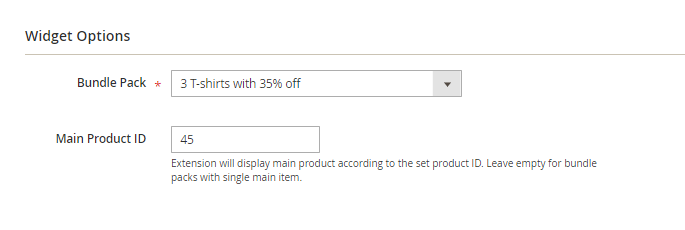
Then adjust the Widget Options.
- For the Bundle Pack widget, please choose the particular Bundle Pack from the dropdown and indicate the Main Product ID (or leave this field empty for bundle packs with the single main item).
- For the Bundle Pack List widget, specify the Number of Columns for products display.

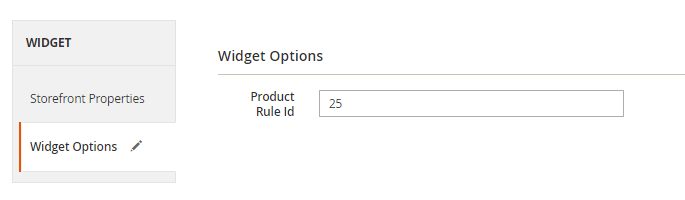
- For the Products Block by Rule Id widget, please specify the Product Rule Id, according to which the related products will be displayed.
- For the Product Page Bundle Pack widget, it is possible to configure only Storefront Properties, where you can choose the page for the widget display, assign the store view, set the sort order, and the widget title.
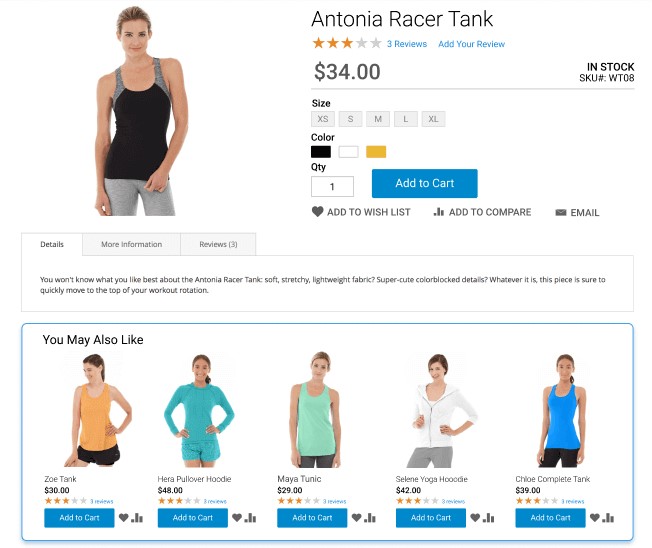
Show Related Products Block on the Frontend
Automatically show highly demanded items on a product page.
Add Magento 2 Product Labels extension to equip your related products blocks with catchy labels! Drive customer attention to particular items, highlight new arrivals, or special products.
Increase revenue with up-selling products based on specified parameters.

Get more orders by showing cross-selling products on a shopping cart page.
Speed up the search, catalog and related products with improved indexing with the Elastic Search extension.
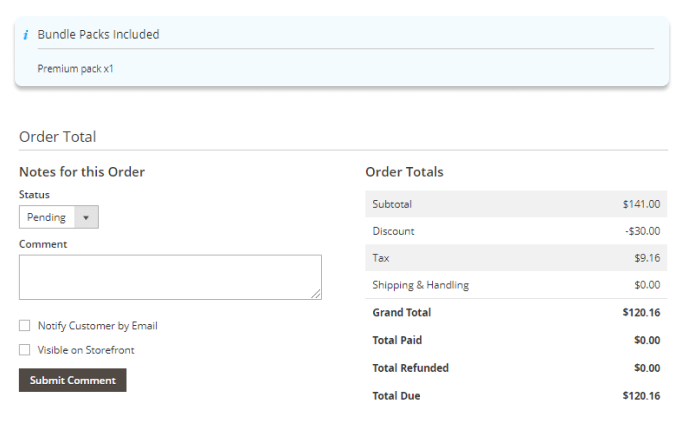
Show Bundle Packs order info on the Backend (Orders Grid)
The extension adds one more column to the Orders grid and ads an extra notice to the order info to show more details about the purchased bundle packs:
Bundle Pack Sales
The extension provides a separate grid for tracking sales statistics of the bundle packs - the 'Bundle Pack Sales' grid.
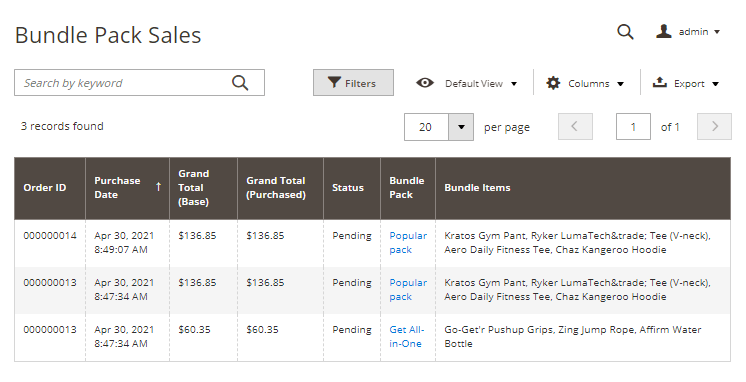
Please navigate to Reports → (Amasty Related Products) → Bundle Packs Sales to use this grid.
Here's the description of the columns that you can find on the grid:
- Date purchased - date when the bundle pack was ordered;
- Order ID - ID of the orders containing the bundle packs;
- Grand Total (Base) - the base price of the ordered bundle;
- Grand Total (Purchased) - actual bundle price (in main store currency);
- Order status - actual order status;
- Bundle Pack - name of the bundle pack;
- Bundle Items - names of the products from the bundle purchased.
Import and Export
With the Automatic Related Products extension you can import and export Bundle Packs data. This functionality is available as a part of an active product subscription or support subscription.
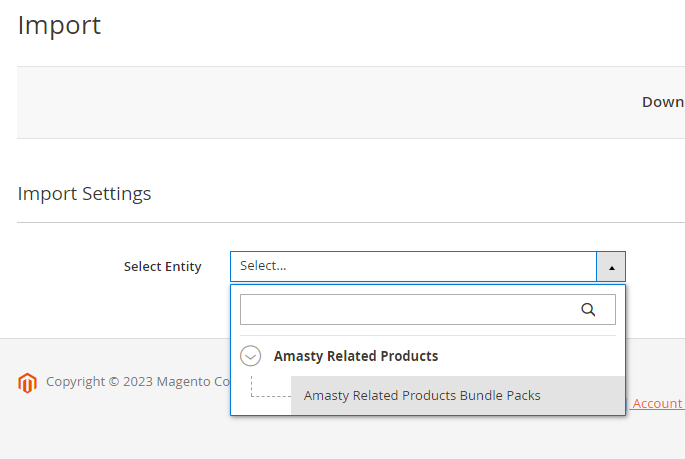
To Import the bundle packs data, please navigate to System → Amasty Import → Import → Select Entity → Amasty Related Products → Amasty Related Products Bundle Packs:
Then, scroll down to the Fields Configuration tab and enable the needed subentities for import.
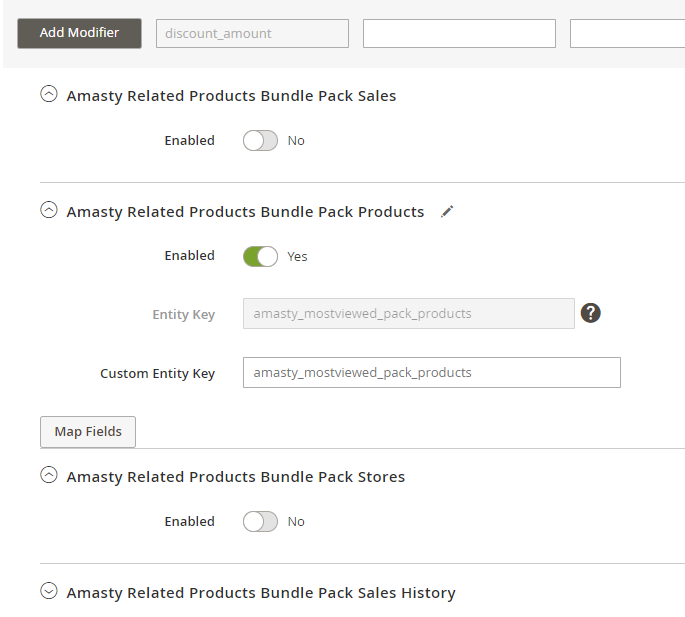
Then adjust other settings for the import according to your needs.
To Export bundle packs data, please navigate to System → Amasty Export → Export → Select Entity → Amasty Related Products → choose the needed entity:
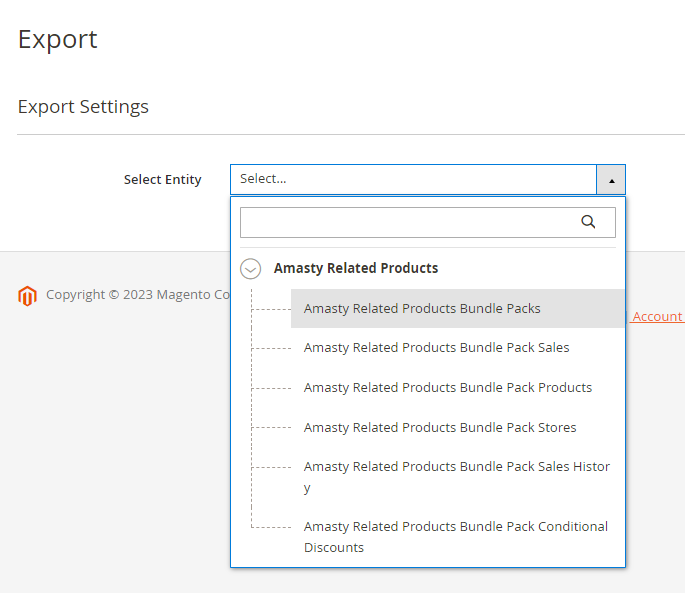
Then adjust other settings for the export according to your needs.
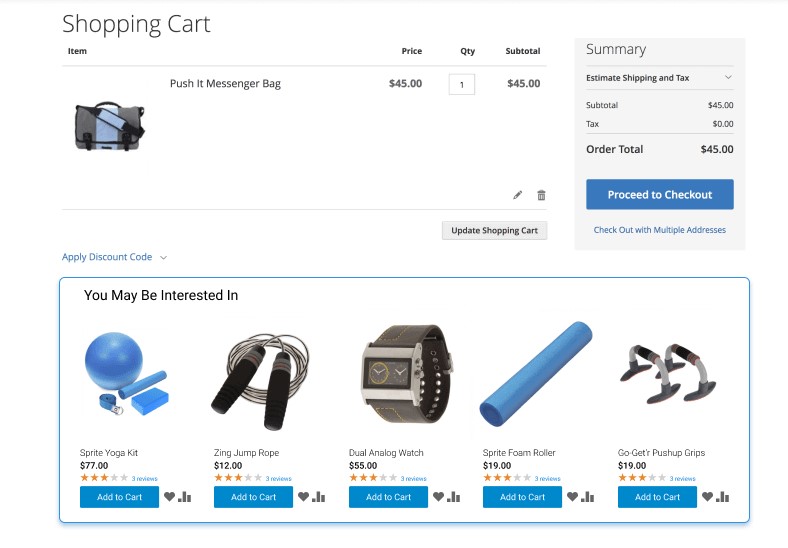
Frontend Examples (Bundle Packs)
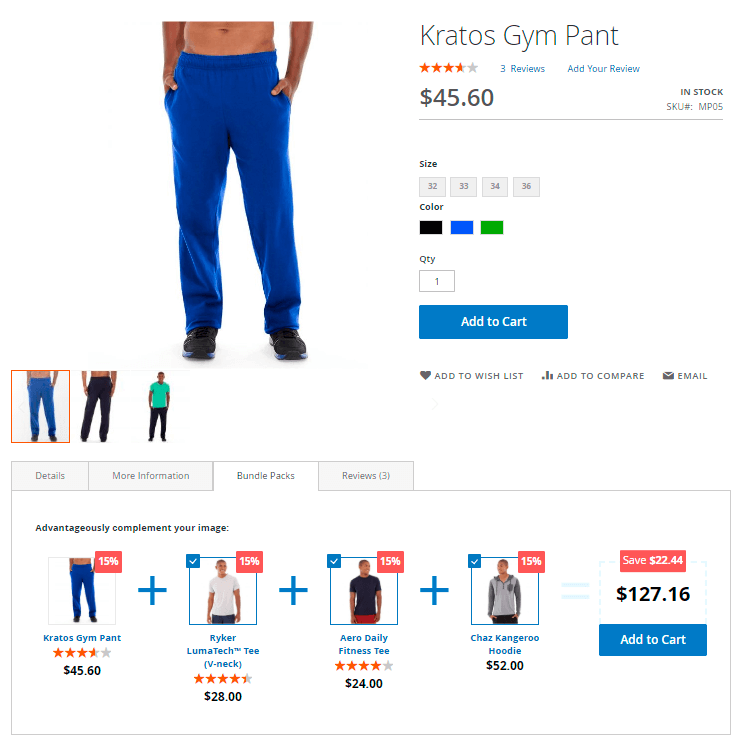
Here's how product bundle packs display on the frontend:
1. On the product tab:
With adjusted bundle pack products quantity:
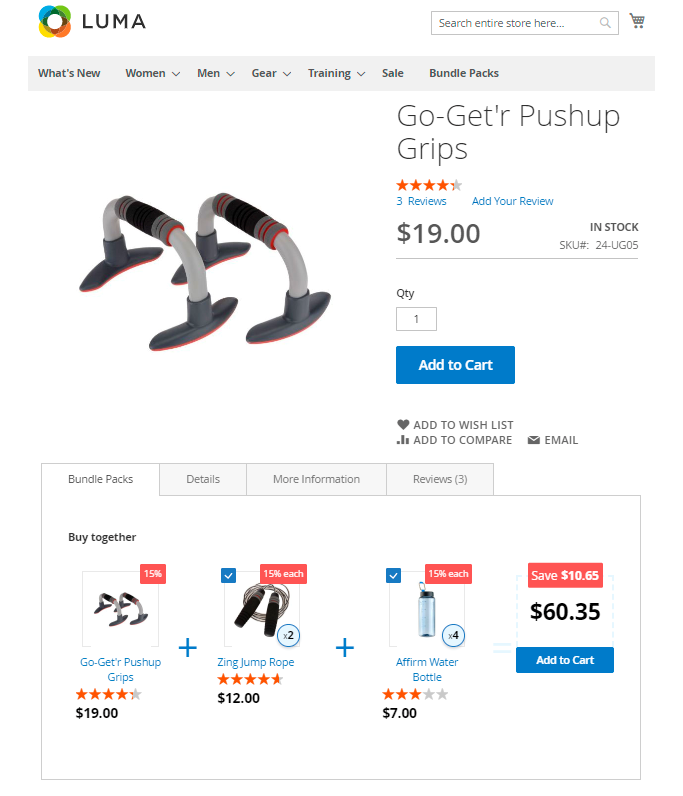
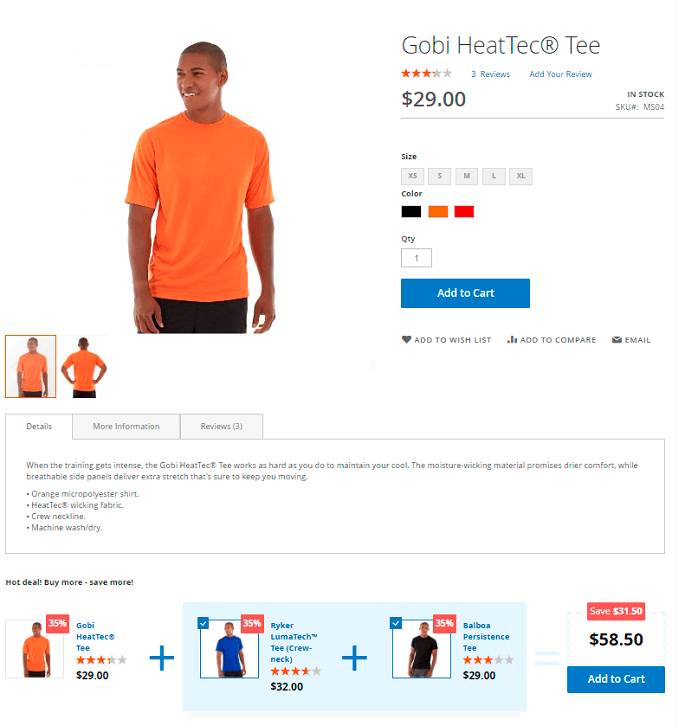
2. After product description:
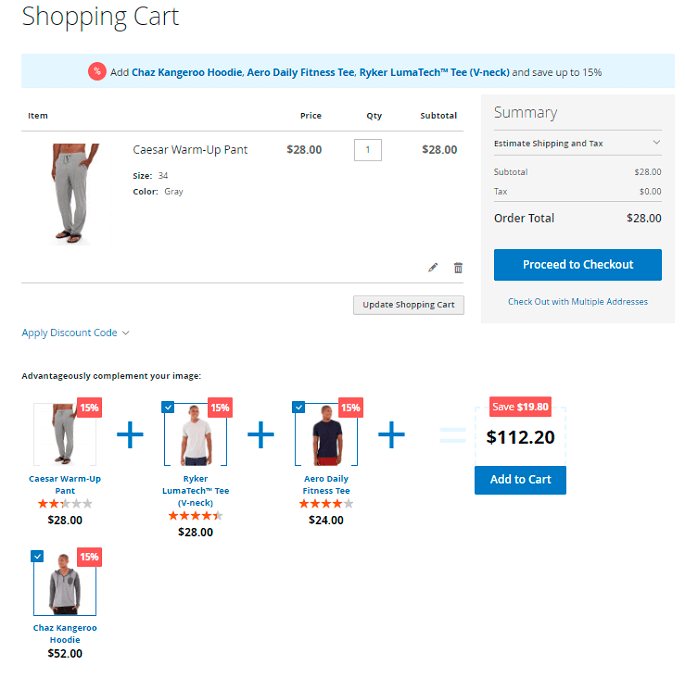
3. In the shopping cart:
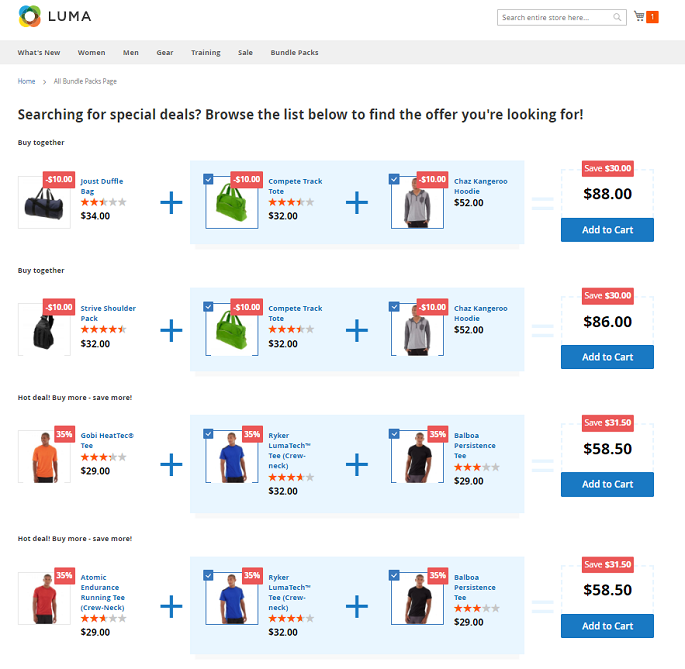
4. On a CMS page:
Find out how to install the Automatic Related Products extension via Composer.
PWA for Automatic Related Products (Add-On)
The extension also works smoothly on mobile devices if combined with a ready-made PWA solution, due to which store admin can significantly improve the user shopping experience on smartphones.
The feature can be enabled only after purchasing the PWA for Automatic Related Products Add-On. Also, you need to install a PWA theme first.
In order to correctly install a PWA add-on, please install the corresponding GraphQL system package first. For the correct name of it, please check the composer.json file of the main module. For example, the GraphQL system package name of the PWA add-on for the Blog Pro extension would be the following: amasty/blog-graphql

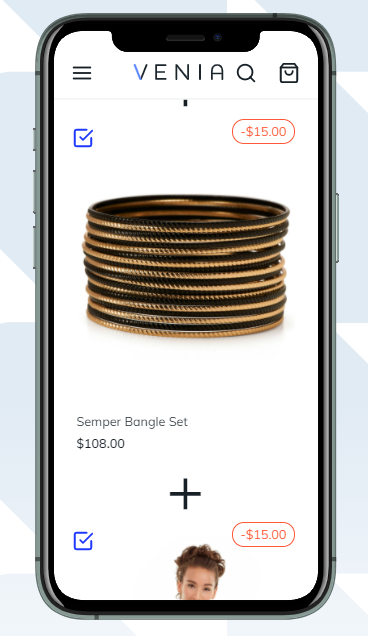
If the add-on is installed, Venia theme will be displayed for this extension in the following way:
Products in a bundle on Venia storefront:
Products in a related items block on a product page with Venia:

Find out more about Magento PWA integration here.
How to add new components of the Automatic Related Products M2 extension on Venia theme
Before you start further configuration, please read the following instructions on Venia configuration components here.
You can freely add new components like blocks with related products or bundles on any place in your Venia-based store. For this, please navigate to store backend and configure the related product items display by specifying the following in the extension parameters:
For the blocks with the related products you need to specify:
- categoryId - ID of the category or product for which the related offering will be displayed;
- Position - you need to specify the position where the related offering will be displayed on the front.
Please have a look at the list of the available positions for this extension working in combination with the PWA add-on:
- 'product_before_related',
- 'product_after_related',
- 'product_into_related',
- 'product_before_upsell',
- 'product_after_upsell',
- 'product_into_upsell',
- 'product_content_top',
- 'product_content_tab',
- 'product_before_tab',
- 'product_content_bottom',
- 'product_sidebar_top',
- 'product_sidebar_bottom',
- 'cart_before_crosssel',
- 'cart_after_crosssel',
- 'cart_into_crosssel',
- ‘cart_content_top',
- 'cart_content_bottom',
- 'category_content_top',
- 'category_content_bottom',
- 'category_sidebar_top',
- 'category_sidebar_bottom',
- 'custom'
For the bundle packs you need to specify:
- Id - the ID of the product for which the bundle packs’ display is configured.
Please note that the option of placing bundle packs on the shopping cart is currently unavailable due to the limited Venia theme functionality as per now.
Please note that bundle packs are currently working only for configurable and simple types of products due to the limited Venia theme functionality as per now.
Please note that it’s currently unavailable to place and manage bundle packs on the CMS pages due to the limited Venia theme functionality as per now.
Here’s an example of how to add the related product components on the Cart page:
Please note that as per the moment of creation of this guide the Shopping Cart page on Venia theme is not fully developed yet.
1. Copy the component’s folder of the search page into the folder with our components:
cd myproject
mkdir -p src/lib/components/
cp -R node_modules/@magento/venia-ui/lib/components/CartPage src/lib/components/
Edit the component searchPage.js. Change all relative ways of components import to absolute:
@magento/venia-ui/lib/PATCH_TO_COMPONENT_FOLDER
for example:
import Button from '../Button';
to
import Button from '@magento/venia-ui/lib/components/Button';
Add import of the component Related Products import RelatedProducts from
'../../components/AmRelatedProducts';
Choose the place where to place the component:
<RelatedProducts categoryId={3} position={'cart_content_bottom'}/>
As a result, the file searchPage.js should look like the following below:
import React, { useMemo } from 'react';

import { useCartPage } from '@magento/peregrine/lib/talons/CartPage/useCartPage';

import { Title } from '@magento/venia-ui/lib/components/Head';
import Button from '@magento/venia-ui/lib/components/Button';

import PriceAdjustments from '@magento/venia-ui/lib/components/SearchPage/PriceAdjustments';
import PriceSummary from '@magento/venia-ui/lib/components/SearchPage/PriceSummary';
import ProductListing from '@magento/venia-ui/lib/components/SearchPage/ProductListing';
import { mergeClasses } from '@magento/venia-ui/lib/classify';
import defaultClasses from '@magento/venia-ui/lib/components/SearchPage/cartPage.css';
import { GET_CART_DETAILS } from '@magento/venia-ui/lib/components/SearchPage/cartPageQueries';
import RelatedProducts from '../../components/AmRelatedProducts';


const CartPage = props => {
   const talonProps = useCartPage({
       queries: {
           getCartDetails: GET_CART_DETAILS
       }
   });

   const {
       handleSignIn,
       hasItems,
       isSignedIn,
       isCartUpdating,
       setIsCartUpdating
   } = talonProps;

   const classes = mergeClasses(defaultClasses, props.classes);

   const signInDisplay = useMemo(() => {
       return !isSignedIn ? (
           <Button
               className={classes.sign_in}
               onClick={handleSignIn}
               priority="high"
           >
               {'Sign In'}
           </Button>
       ) : null;
   }, [classes.sign_in, handleSignIn, isSignedIn]);

   const productListing = hasItems ? (
       <ProductListing setIsCartUpdating={setIsCartUpdating} />
   ) : (
       <h3>There are no items in your cart.</h3>
   );

   const priceAdjustments = hasItems ? (
       <PriceAdjustments setIsCartUpdating={setIsCartUpdating} />
   ) : null;
   const priceSummary = hasItems ? (
       <PriceSummary isCartUpdating={isCartUpdating} />
   ) : null;

   return (
       <div className={classes.root}>
           <Title>{`Cart - ${STORE_NAME}`}</Title>
           <div className={classes.heading_container}>
               <h1 className={classes.heading}>Cart</h1>
               {signInDisplay}
           </div>
           <div className={classes.body}>
               <div className={classes.items_container}>{productListing}</div>
               <div className={classes.price_adjustments_container}>
                   {priceAdjustments}
               </div>
               <div className={classes.summary_container}>
                   <div className={classes.summary_contents}>
                       {priceSummary}
                   </div>
               </div>
               <div className={classes.recently_viewed_container}>
                   <a href="https://jira.corp.magento.com/browse/PWA-270">
                       Recently Viewed to be completed by PWA-270.
                   </a>
               </div>
           </div>

           <RelatedProducts categoryId={3} position={'cart_content_bottom'}/>
       </div>
   );
};

export default CartPage;
2. Add the edited file into the override map of standard components componentOverrideMapping.js
[`@magento/venia-ui/lib/сomponents/CartPage/cartPage.js`]: 'src/lib/сomponents/CartPage/cartPage.js',
module.exports = componentOverride = {
   [`@magento/venia-ui/lib/RootComponents/Category/category.js`]: 'src/lib/RootComponents/Category/category.js',
   [`@magento/venia-ui/lib/RootComponents/Product/product.js`]: 'src/lib/RootComponents/Product/product.js',
   [`@magento/venia-ui/lib/сomponents/CartPage/cartPage.js`]: 'src/lib/сomponents/CartPage/cartPage.js',
};
3. Run the Watch command: ‘yarn watch’.
Additional packages (provided in composer suggestions)
To make additional functionality available, please install the suggested packages you may need.
Available with no additional fees:
amasty/customers-also-viewed-graphql- Install this module to activate Graphql and Automatic Related Products integration.
Available as a part of an active product subscription or support subscription:
amasty/module-mostviewed-hyva- Install this package to ensure the Automatic Related Products extension works with Hyvä Theme.
amasty/module-mostviewed-hyva-checkout- Install this package to ensure the Automatic Related Products extension works with Hyvä Checkout.
amasty/module-mostviewed-export-entity- Install this package for Export Bundles compatibility.
amasty/module-mostviewed-import-entity- Install this package for Import Bundles compatibility.
amasty/module-related-product-sales-report- Install this package for the ability to collect data on Related Product Sales.
amasty/module-automatic-related-products-subscription-functionality- Install this package for the possibility of Multiple Related Products Blocks displaying.
FAQ
Why a bundle pack is not displayed on the frontend?
I’ve set up a rule with the ‘same as’ condition, but it doesn’t seem to work.
Why taxes are applied to bundle products after discount?
Why can’t I use an attribute as a condition in Where to Display and Products to Display tabs?
Find more questions and answers here.
You can also explore some best practices of product recommendations in our recent blog article.
magento_2/automatic_related_products.txt · Last modified: 2025/04/22 10:42 by asemenova