
Sidebar
magento_2:smtp-email-settings
Table of Contents
For more details see how the SMTP Email Settings for Magento 2 extension works.
Ultimate Guide for Magento 2 SMTP Email Settings
Send only reliable emails from a popular local hosting or a custom Magento 2 SMTP server. Run tests before emails dispatch to make sure that customers and partners receive all emails you send.
- Secure Magento 2 SMTP authentication and connection
- Pre-defined settings for popular email service providers
- Debug mode for email testing
- Log all sent emails and view any message in detail
- Significantly decrease email rejection


Explore our internal Knowledge Base to gain even more valuable insights and uncover answers to popular questions about the configuration and features of the Magento 2 SMTP Email Settings extension.
Extension Configuration
To configure Magento 2 SMTP server, please go to Stores → Configuration → SMTP Email Settings
General Settings
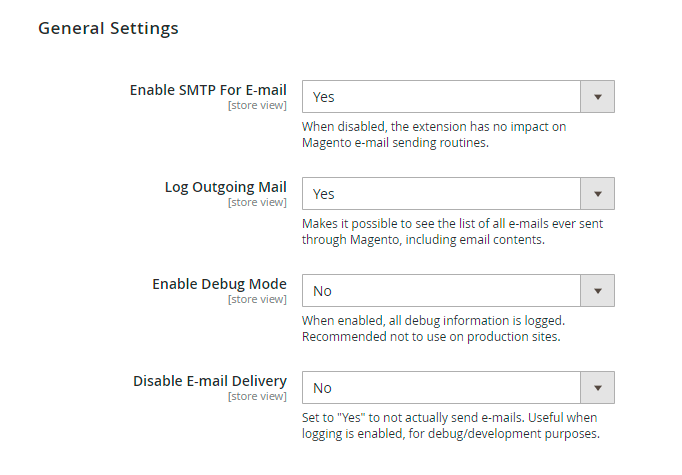
Enable SMTP For E-mail - When set to ‘No’ this setting disables all features of the module including debug and emails log.
Log Outgoing Mail - Set this option to ‘Yes’ to log all emails sent from Magento. The feature enables you to view the list of the emails, including the contents at any time.
Enable Debug Mode - Debug information can help to set up emails dispatch. Please disable the debug option when emails sending works properly.
Disable E-mail Delivery - Set this option to ‘No’ to send out emails. When set to ‘Yes’, emails will not be sent. The system will ‘pretend’ that it is sending emails - the messages will still be added to the log and you will see all debug info. It’s helpful for testing the system.
Get 14 additional detailed report types with the Magento 2 reports extension.
SMTP Basic Configuration

SMTP Provider - Choose your SMTP provider and click ‘Autofill’ to fill in some fields automatically. This way you can connect your Magento 2 store to Gmail SMTP. Select ‘Other’ if you own a server.
Server Address - Specify the hostname or IP address of the server.
Port - Define the port number.
Authentication Method - Set the required method:
- Authentication Not Required
- Login/Password (Deprecated for Microsoft)
- OAUTH2 Client ID (Google)
- OAUTH2 Service Account (Google)
- OAUTH2 Client ID (Microsoft)
For Login/Password
Login - Specify your login in this field.
Password - Define a password for your login.
For OAUTH2 Client ID (Google)
Client Email, Client ID, Client Secret and Refresh Token should be provided by Google. Read in this section how to get these credentials.
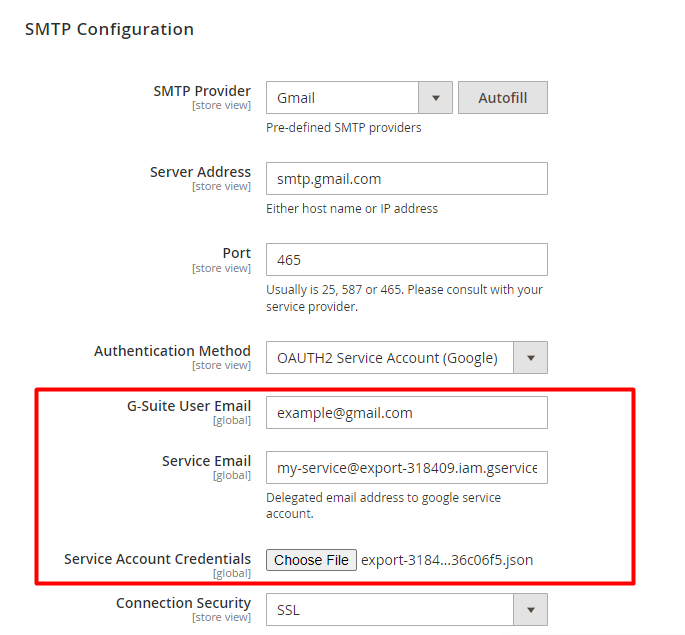
For OAUTH2 Service Account (Google)
G-Suite User Email - provide the email of a user who has access to the service account specified in the Service Email field. This email will be used for the authentication in Google.
Service Email - provide the email for SMTP configuration generated by Google.
Service Account Credentials - upload the credentials in the json format. Check ow to get the credentials in this section.
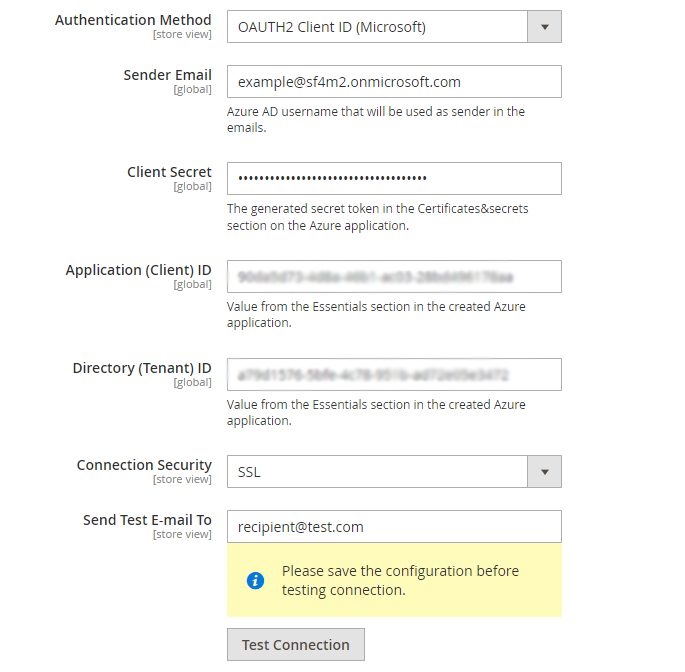
For OAUTH2 Client ID (Microsoft)
Sender Email - specify Azure AD username that will be used as sender in the emails.
Client Secret - insert the generated secret token in the Certificates&secrets section on the Azure application.
Application (Client) ID - provide the value from the Essentials section in the created Azure application.
Directory (Tenant) ID - the value is also specified in the Essentials section in the created Azure application.
Explore the detailed configuration guide of the method in this section.
Connection Security - Specify the protocol used for secure communication (the field can be filled automatically).
Custom 'Reply To' - Enter the email address where you want to receive replies. Leave it empty to receive replies to the original email address.
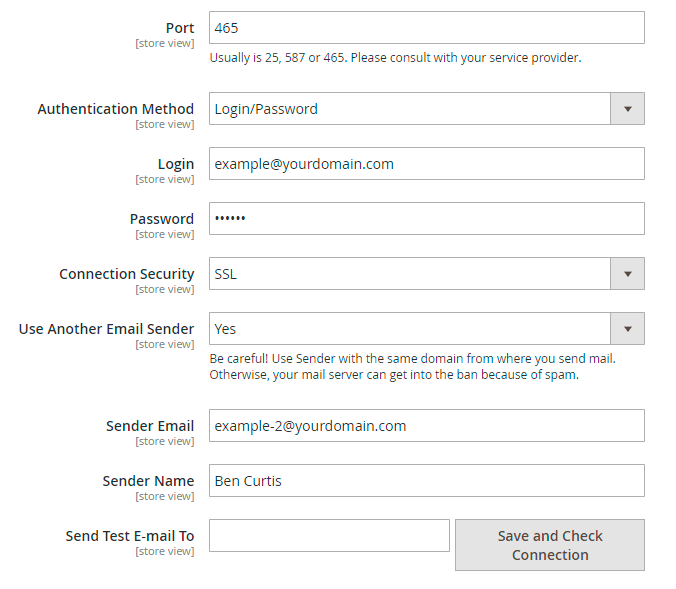
Use Another Email Sender - Choose Yes, if you want to replace the sender email (the option is available only when the SMTP Provider is defined as “Other”).
When Use Another Email Sender is set to Yes, two additional fields will appear: Sender Email and Sender Name.
Sender Email - Define a new sender email for which the original sender email will be changed.
Sender Name - Specify the name of a new sender.
Send Test E-mail To - Specify an email for the test and click the ‘Check Connection’ button to run a test and make sure that you filled in the correct data and the setup works well. As a result, you should get the ‘Connection Successful’ message and receive a test email.
OAuth 2.0 for Google Client ID
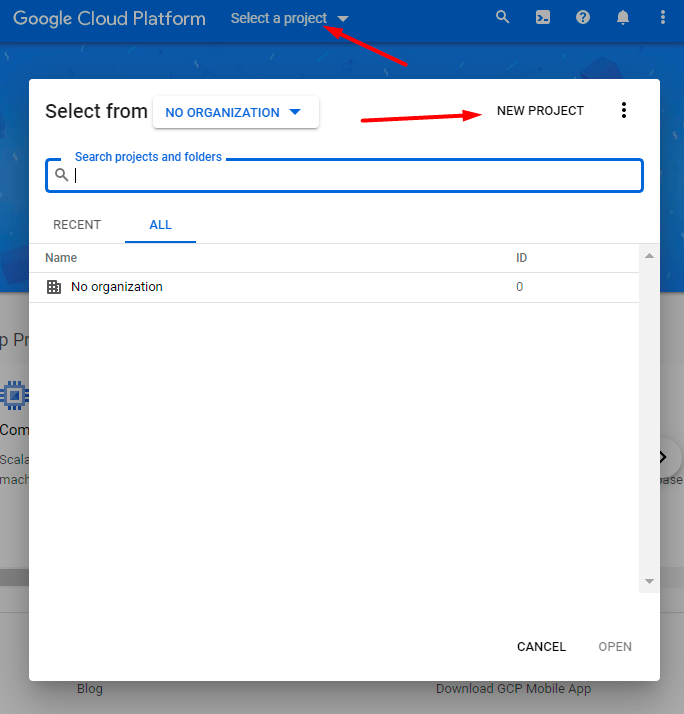
To get credentials for setting up a new authentication method OAUTH2 Client ID (Google), first of all, log in to your Google account and go here.
You need to create a new project. To do this, click the Select a project dropdown and hit the New Project button.
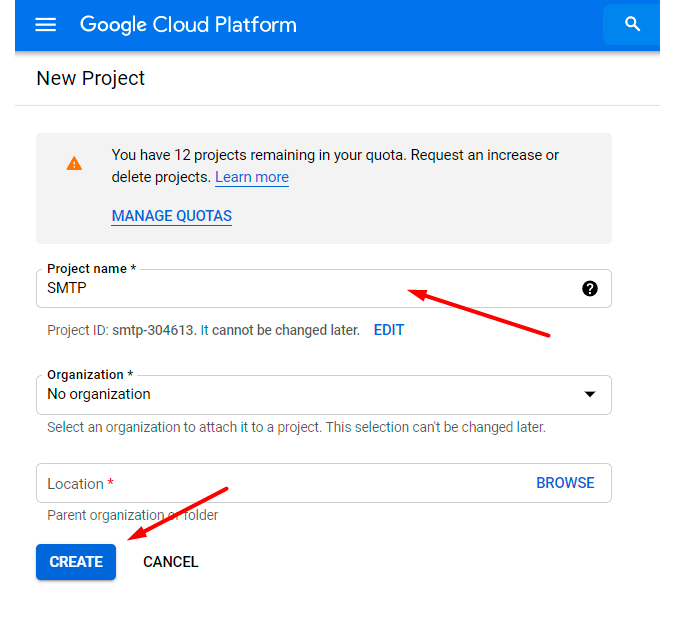
Set project name, organization and location. Click Create.
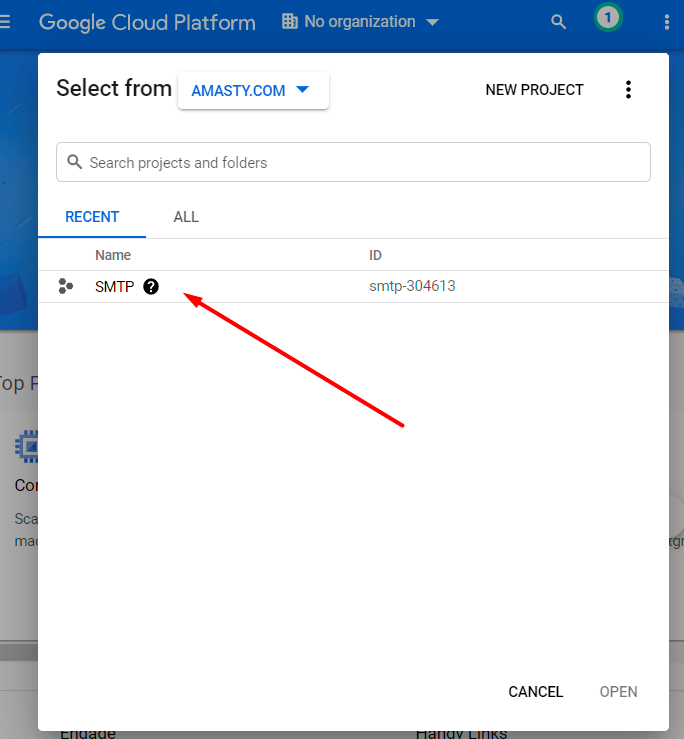
Choose a newly created project in the Select a project dropdown.
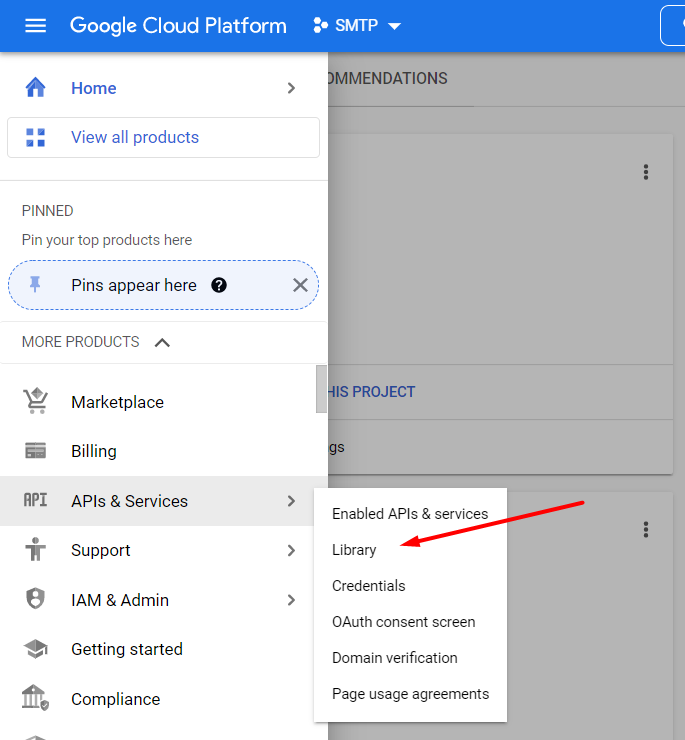
Navigate to APIs & Services → Library.
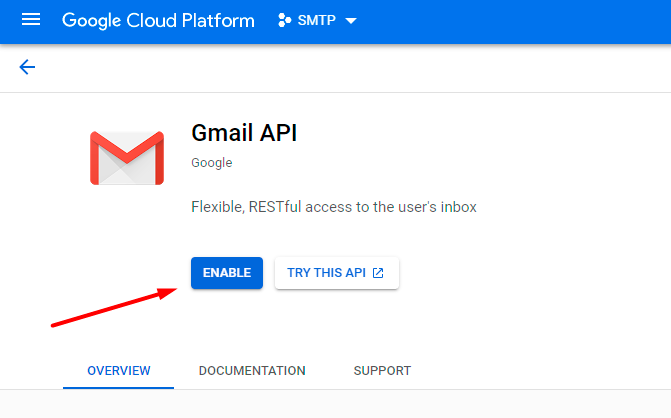
Choose Gmail API.

Hit the Enable button.
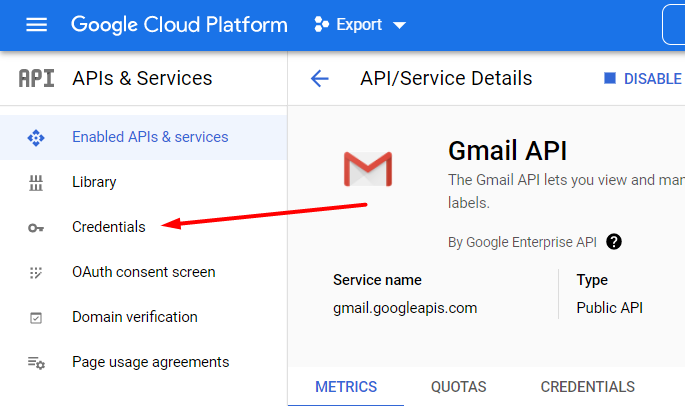
Now you need to create credentials. Proceed to the appropriate tab.
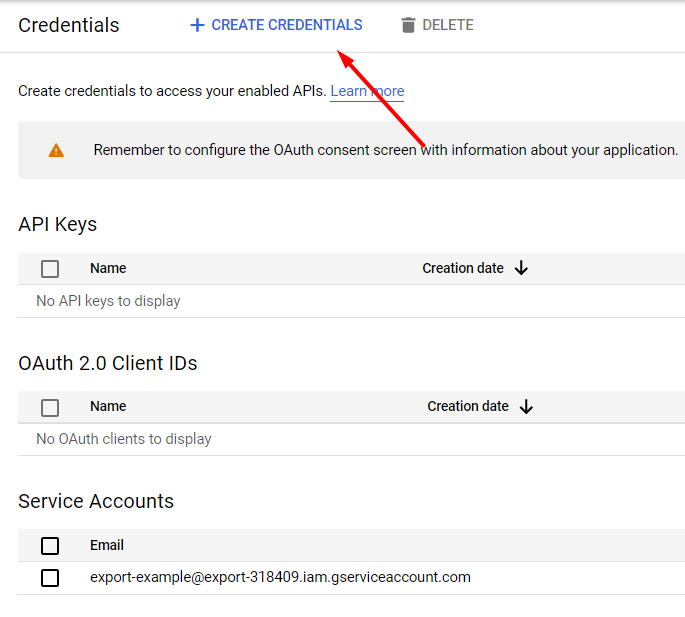
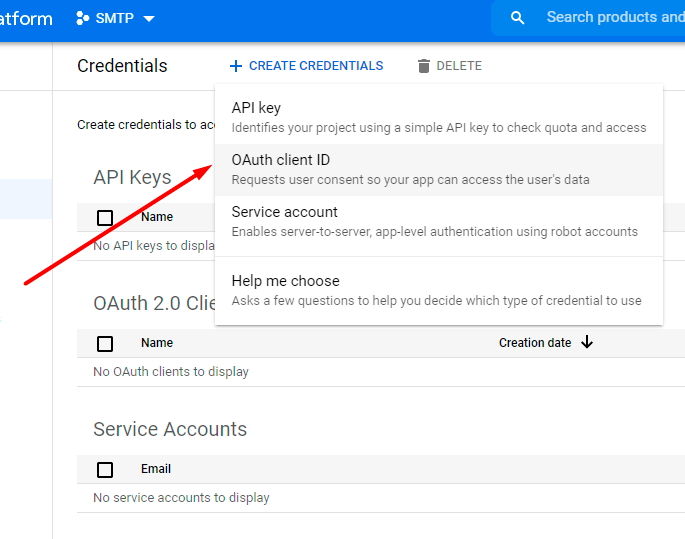
Click Create Credentials.
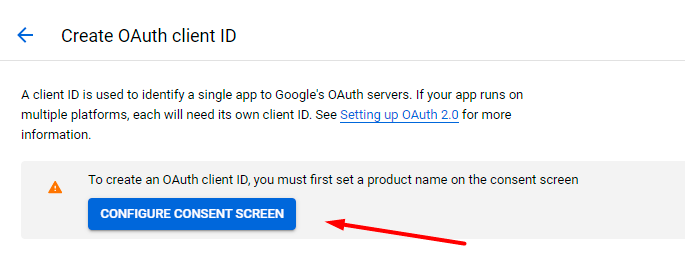
Select the client ID credential type.
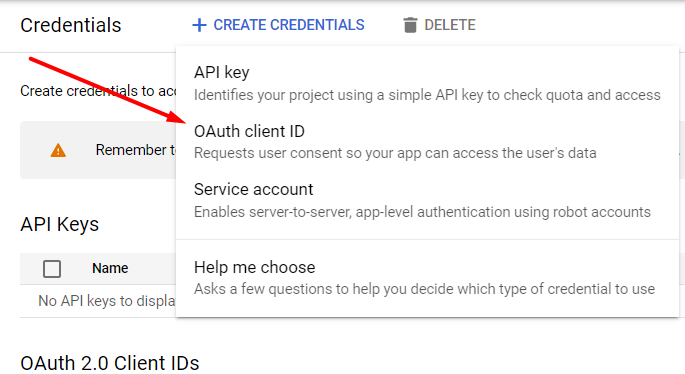
Hit the Configure Consent Screen button.
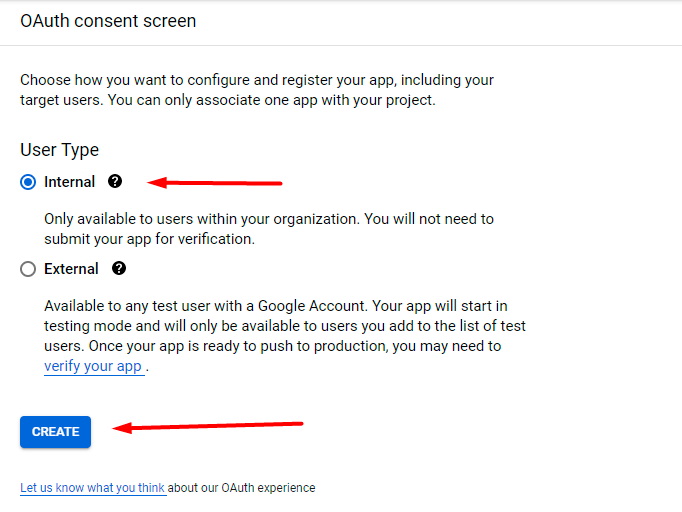
Select the Internal user type and click Create.
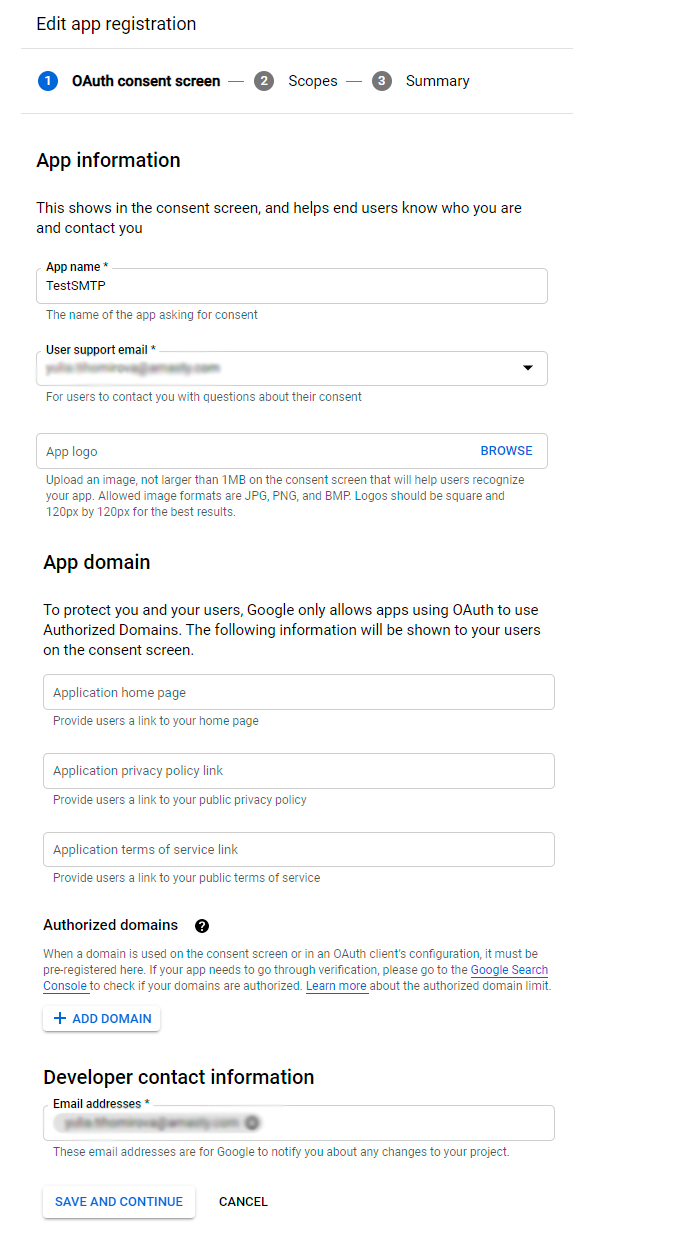
Now fill in the required fields (App Name, User Support Email, Email Addresses), then Save and continue.
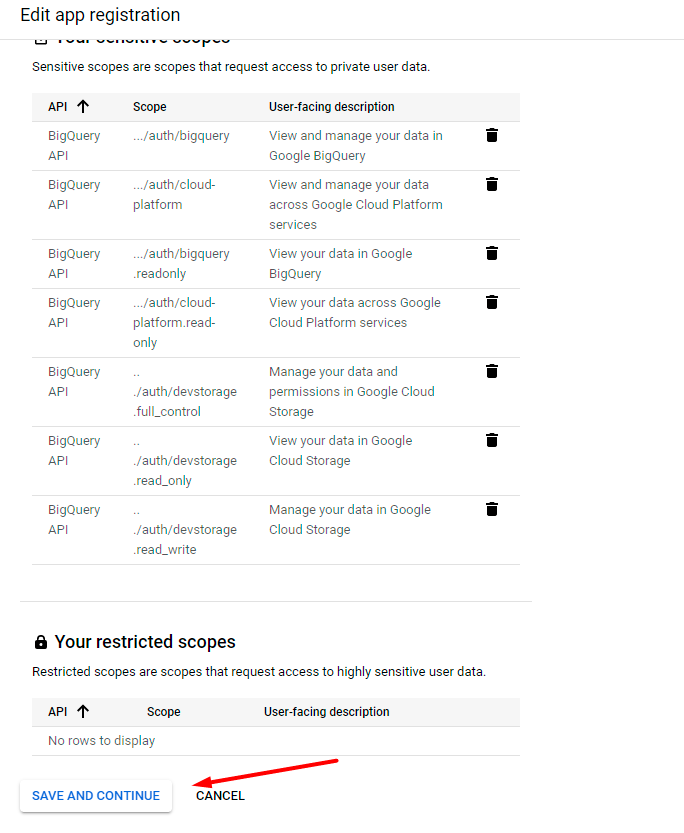
Proceed to Add or remove scopes.

In the appeared pop-up, select all items and click Update.
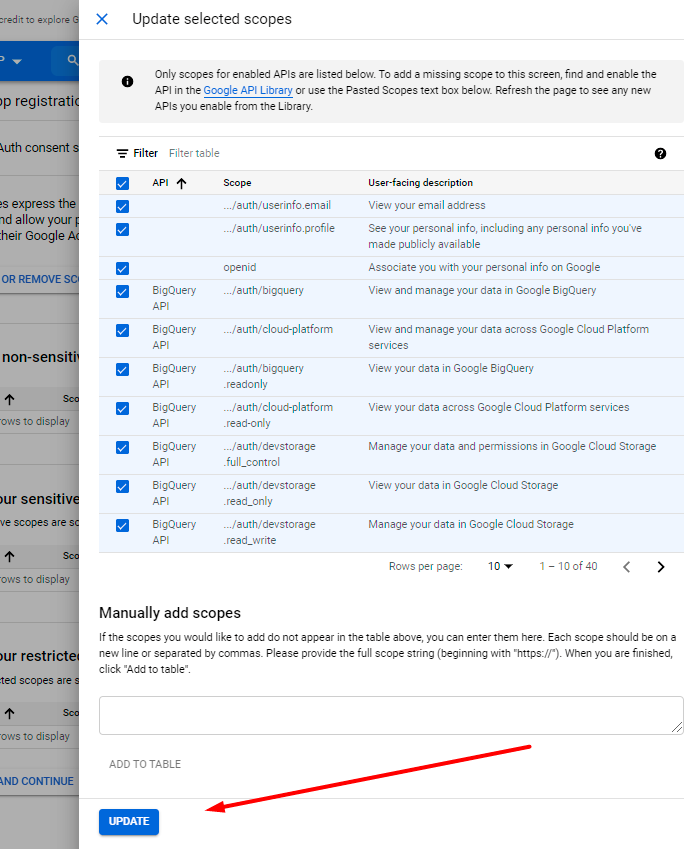
Save the changes.
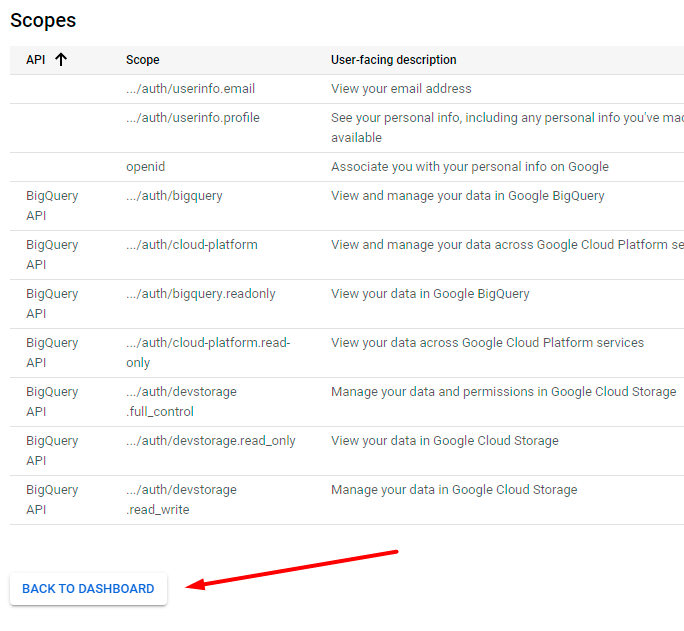
Go back to the dashboard.
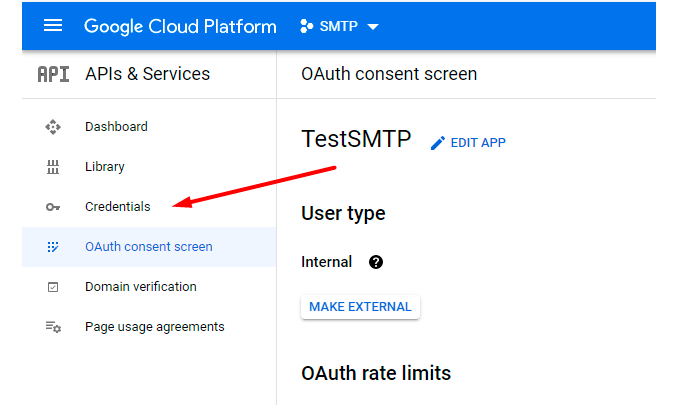
Return to the Credentials section.
Once again hit the Create Credentials button and choose OAuth Client ID.
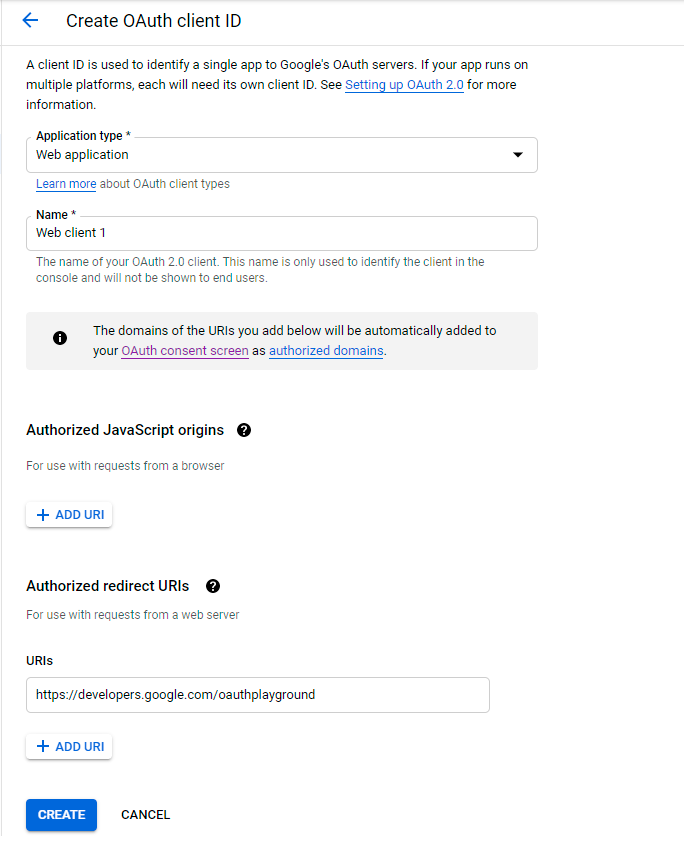
Specify Application type, Name and Authorized redirect URLs (for tests we used the following one: https://developers.google.com/oauthplayground).
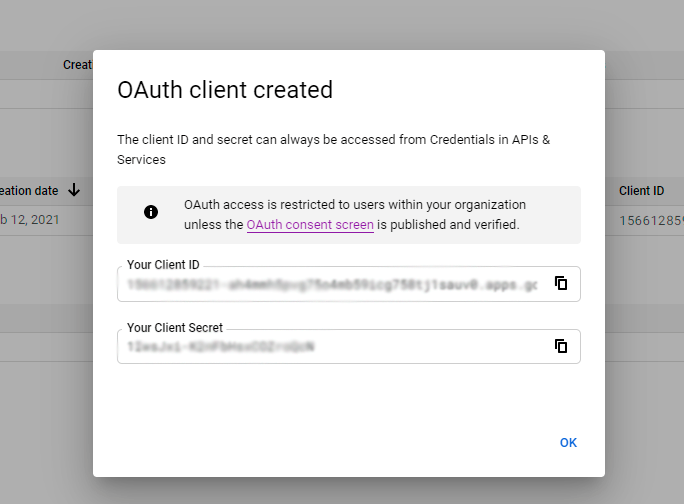
Your Client ID and Client Secret have been generated. Copy them.
Now go to the specified in the settings URL - https://developers.google.com/oauthplayground/. Open the settings, hit the Use your own OAuth credentials checkbox and paste the copied values.

In the list of methods, find the Gmail API v1 and select https://mail.google.com/.
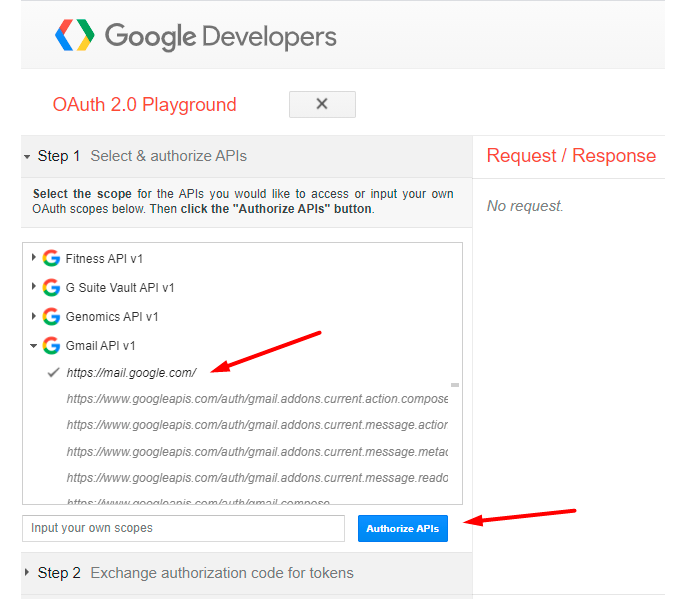
Then click Authorize APIs.
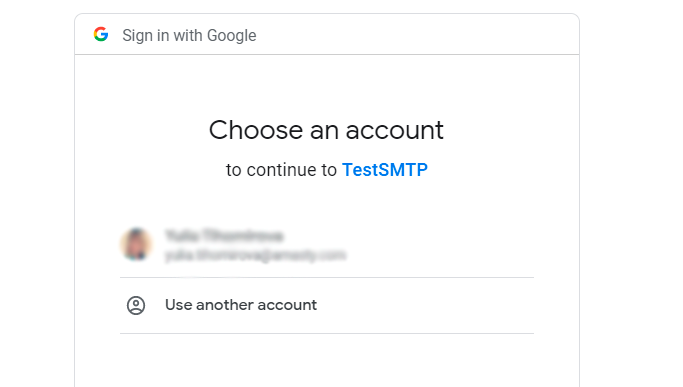
Choose the required Google account and hit Allow in the next window.
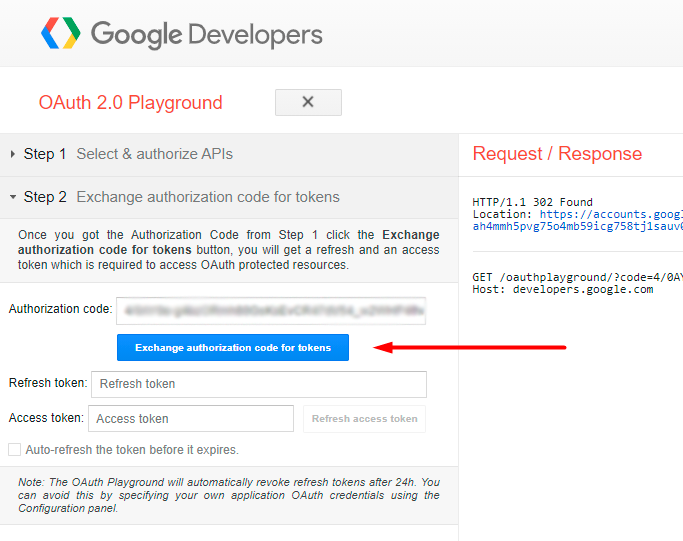
On the appeared page, click the Exchange Authorization code for tokens.
Thus, you get the Refresh Token. Copy it.
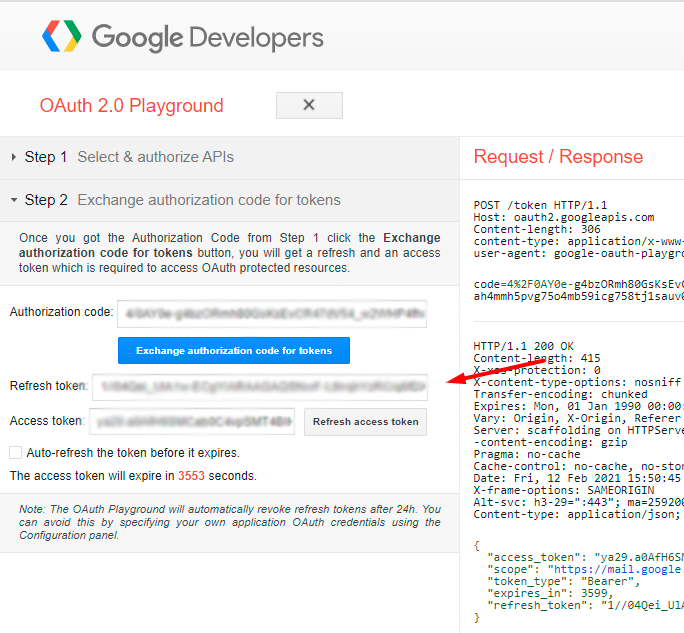
Now you have all credentials and may configure the extension.
Choose the OAUTH2 Client ID (Google) authorization method and fill in the data you got.
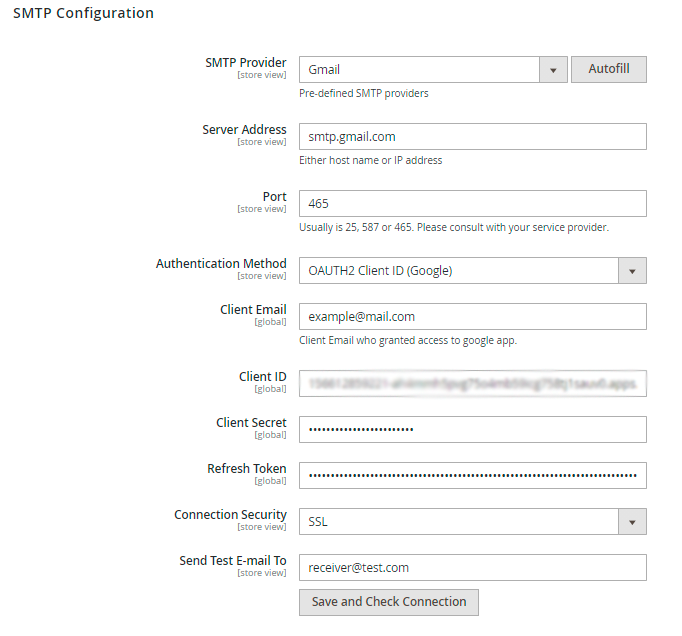
Save and test the connection.
OAuth 2.0 for Google Service Account
Service accounts only works for G-Suite users, it doesn't work for personal Gmail accounts. It means that any Google user can create a service account, but the G-Suite administrator has to authorize it in G-Suite Admin Console to access the user mailbox.
To get the credentials, go to Google Developers Console.
Create a new project as described for the client ID configuration.
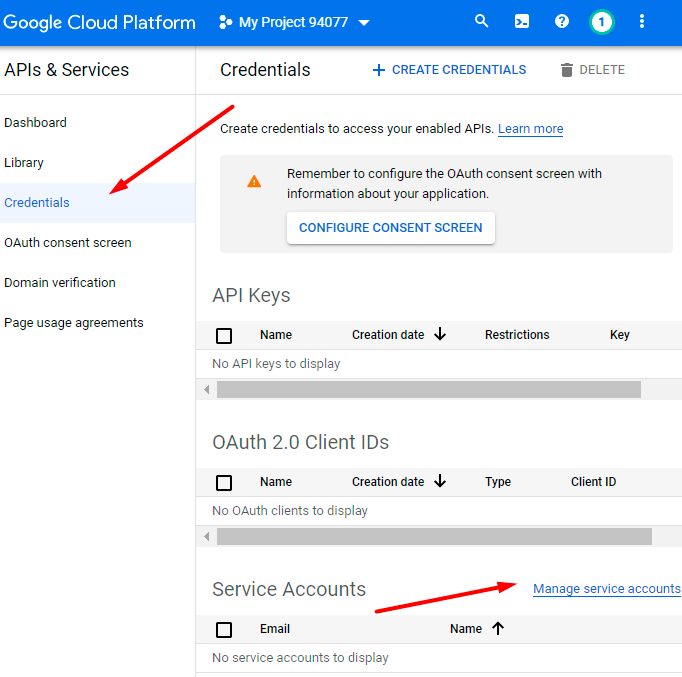
If ready, open this project and proceed to Credentials → Manage service accounts.
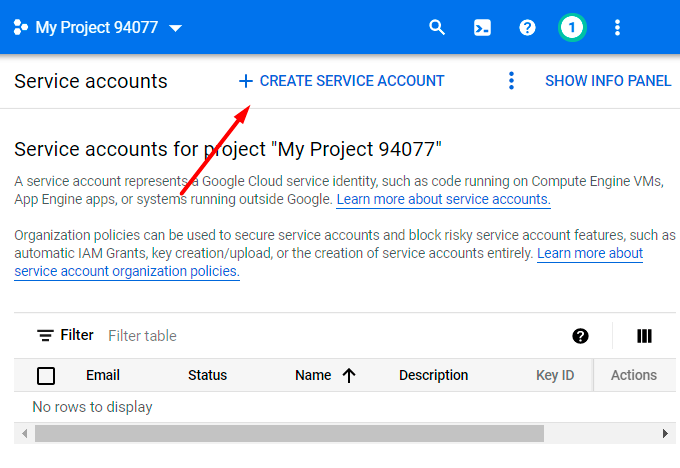
Hit the Create Service Account button.
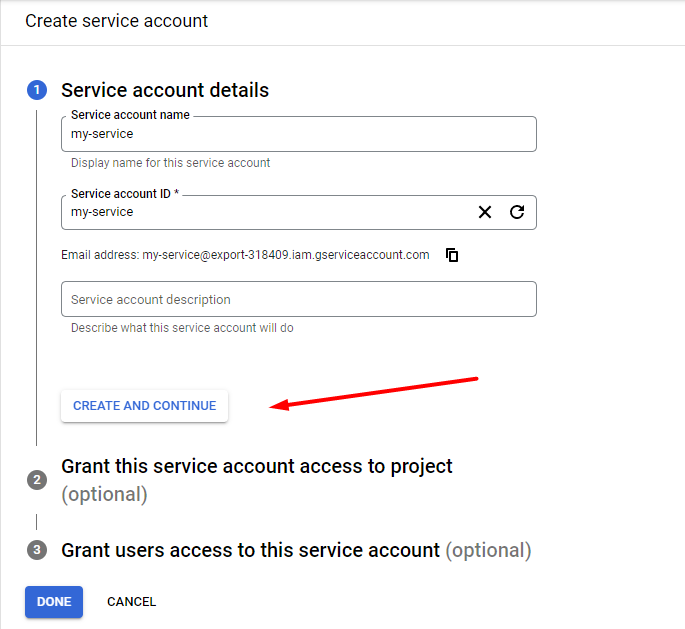
Provide Service account name and Service account ID. Click Create and continue.
Select a role - Owner.
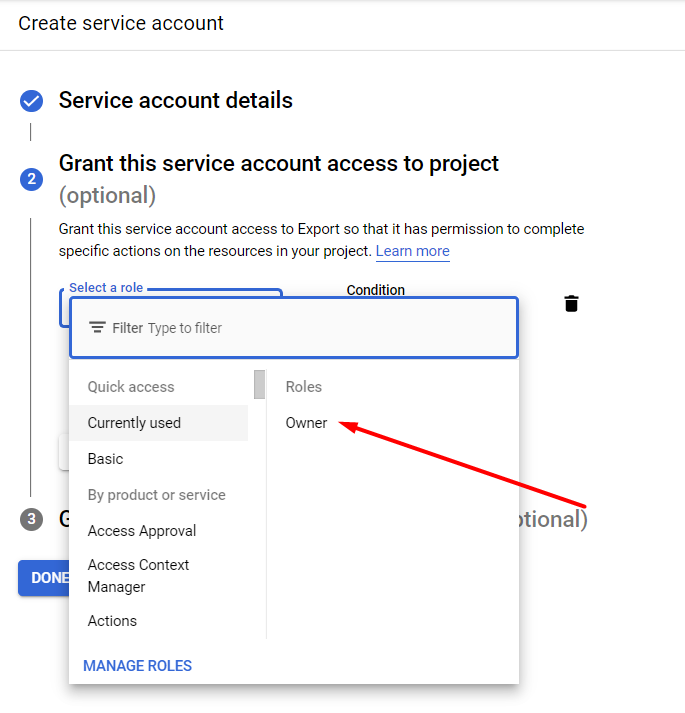
Then you can click Done without the changes.
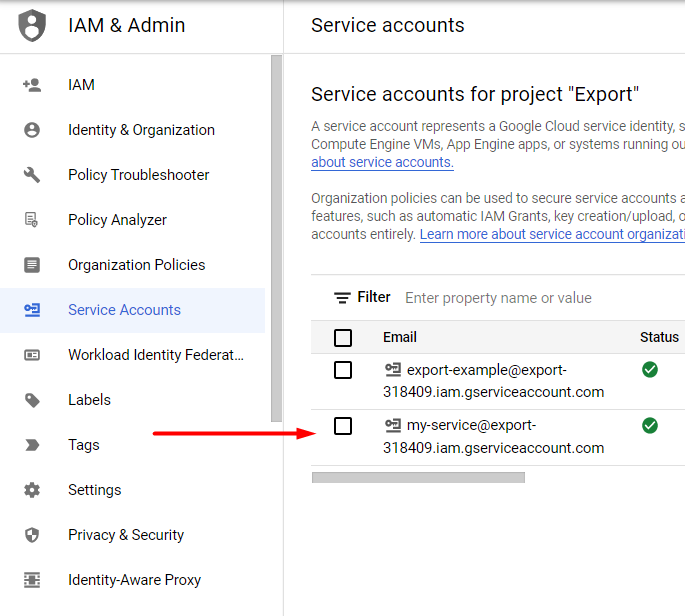
Now the account is created. Navigate to Service Accounts and open the newly created account.
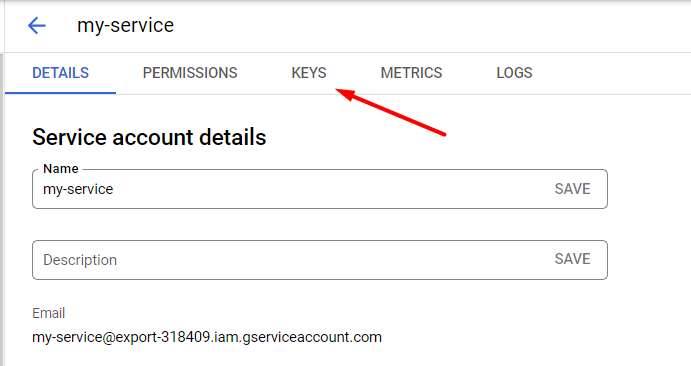
Proceed to the Keys section.
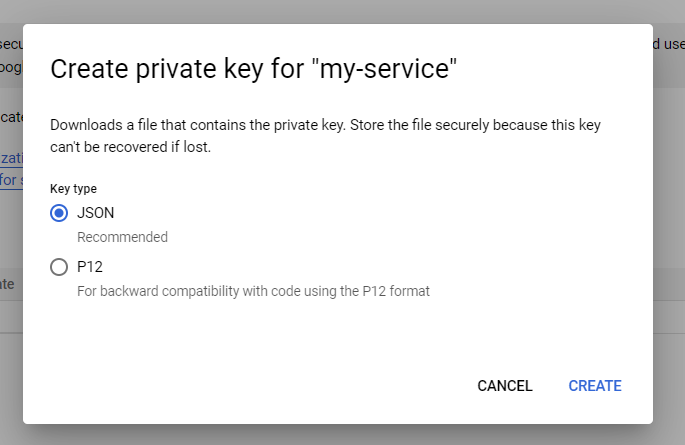
Click Add Key → Create new key.

Choose JSON type.
After this, you will automatically get a JSON file with the keys downloaded. Now go back to the admin panel and fill in the following information:
G-Suite User Email - insert the email of the account on which the service account was created.
Service Email - paste the email from the service account.
You can find this email here:
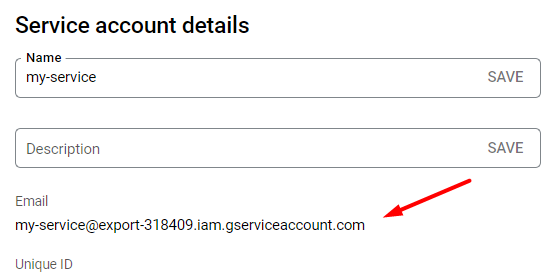
Service Account Credentials - upload the JSON file with the keys.
Done! Test the connection to make sure everything is correct.
How to replace an email sender?
Changing of email sender will help you to avoid email overflowing: the Magento store email addresses you usually use won't be shown to customers - they will see another sender email instead.
Note! The option, that allows you to change the email sender, is available only if you have your own SMTP server.
Complete two easy steps to replace the sender's email:
Step 1. Specify the value Other in the field SMTP Provider .

Step 2. Set the option Use another Email Sender to Yes, then specify the Sender Email and the Sender Name fields. You can use either an existing email or a fake one.
Make sure, you use the same domain, from which you send the mails. If the domains will differ, your mail will be considered as spam and your mail server will get into the ban.
OAUTH2 Client ID (Microsoft)
To enable Microsoft two-factor authentication, you need to create and configure an Azure App and fill in the appropriate fields in the module.
You can find Microsoft documentation here.
Azure App Configuration
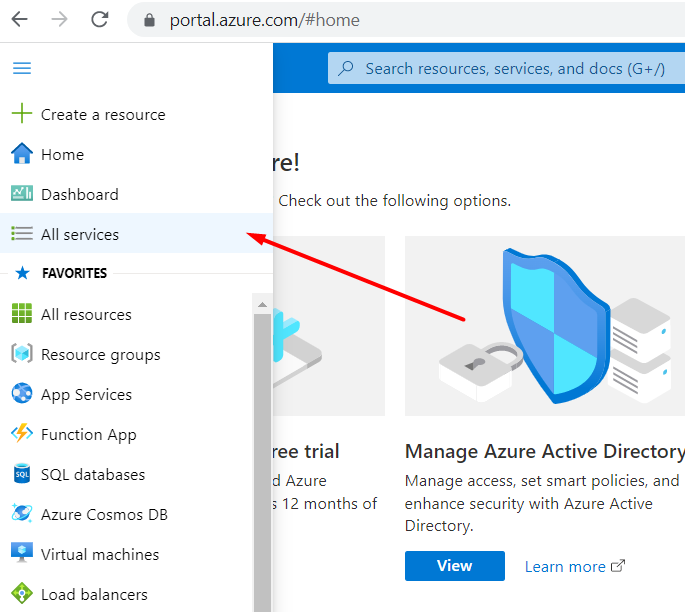
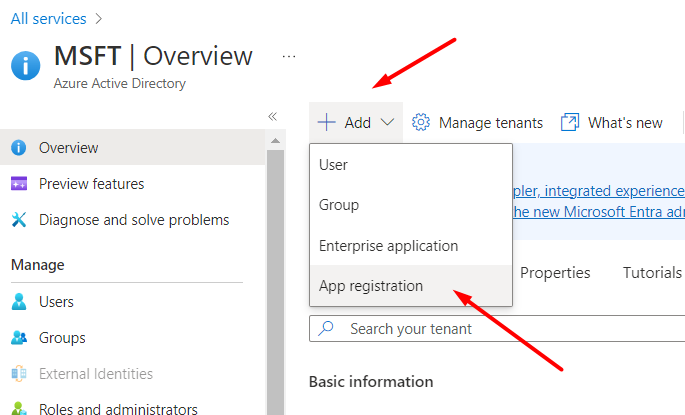
To create an app, go to the Azure home page and select All Services.
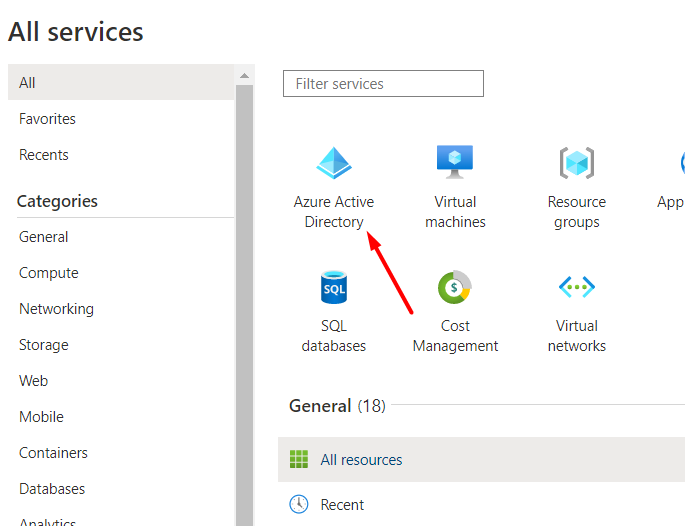
Then proceed to the Azure Active Directory.
Click the Add dropdown and choose the App registration option.
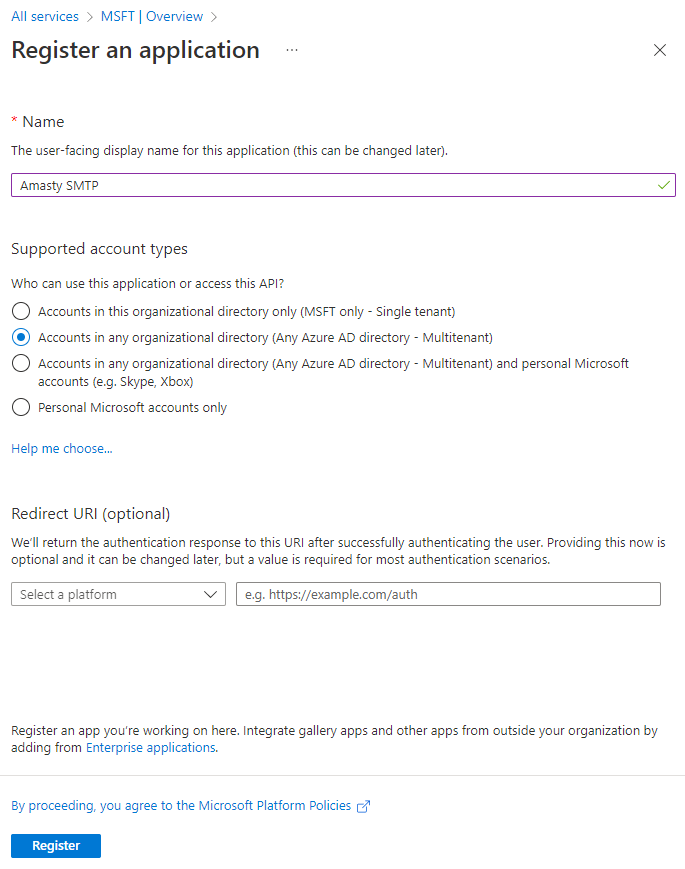
Next, specify the application name and choose access options for the application API. In this step, leave the Redirect URI parameter unchanged (it will be configured later) and click Register.
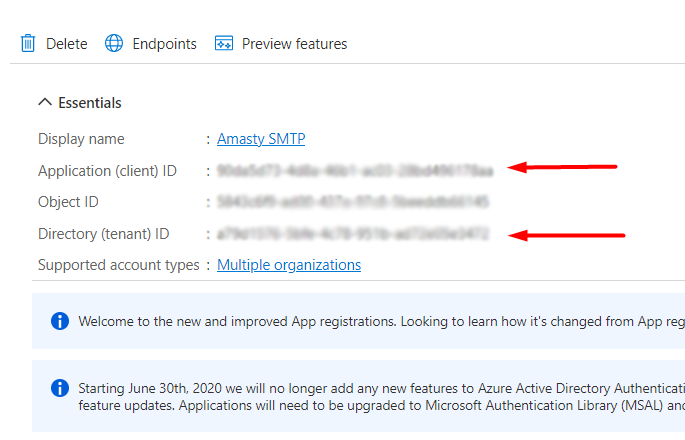
After the registration, you'll get to the application home page. Here you can find the Application (client) ID and Directory (tenant) ID required for the SMTP configuration.
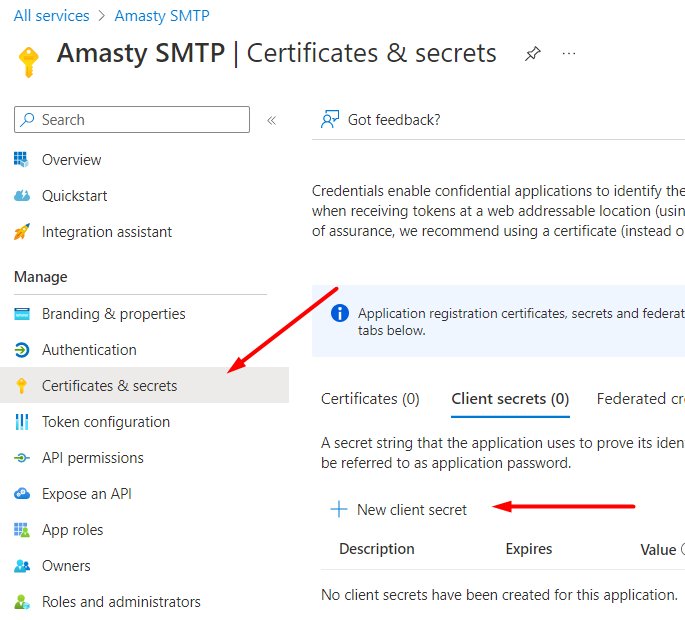
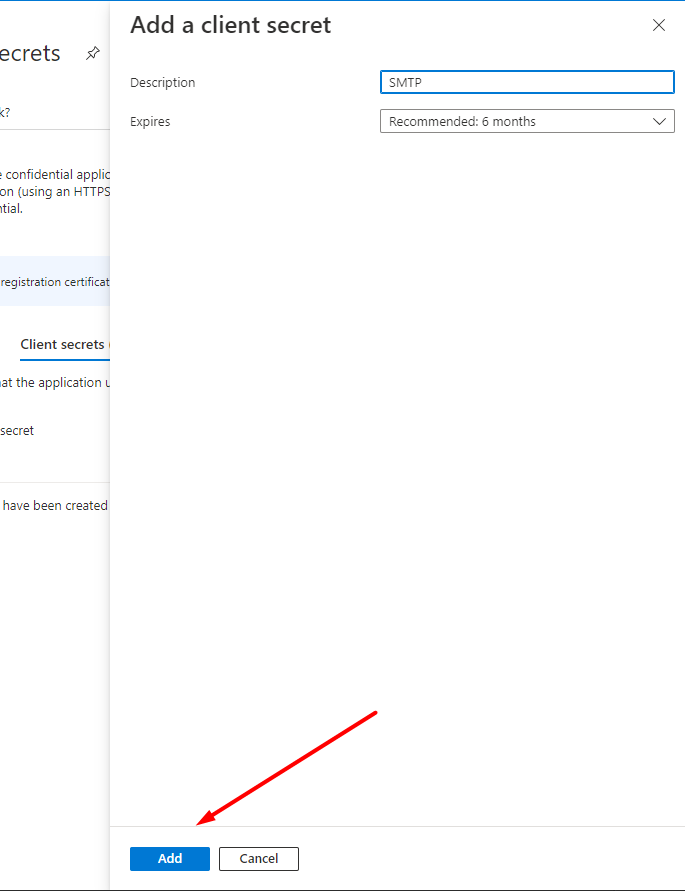
Next, you need to generate a Client Secret key. Navigate to the Certificates & Secrets section and click New client secret.
Enter the description for internal usage and choose the expiration date (or leave it unchanged). Hit the Add button.
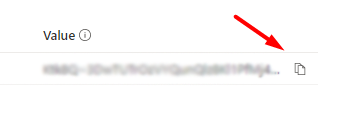
Be sure to copy the Value of the Secret Key, because after reloading the page it disappears and it becomes impossible to get the value. This key is obligatory for the SMTP settings.
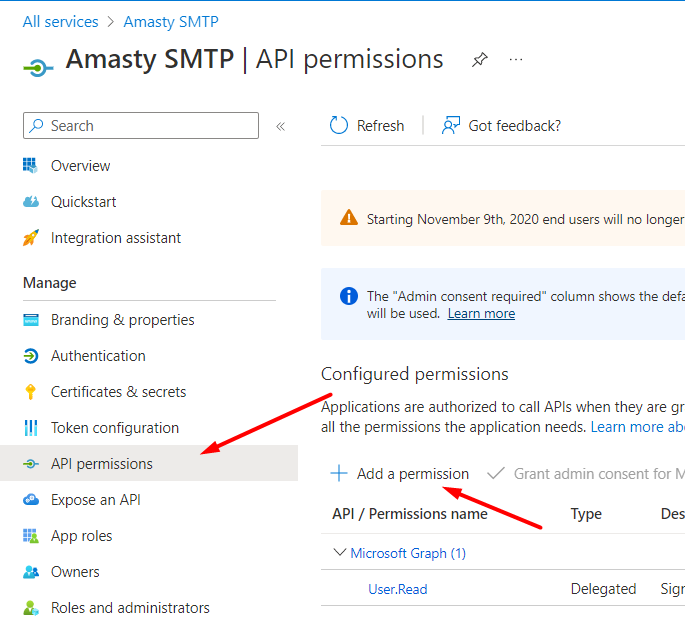
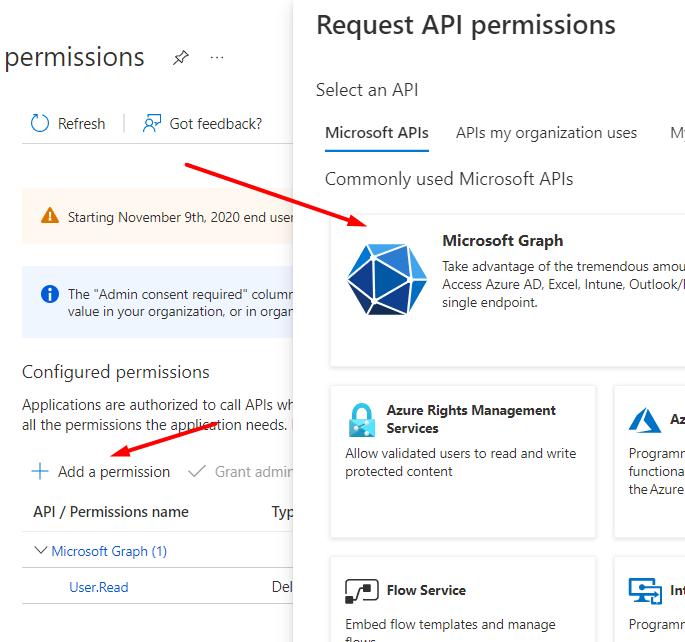
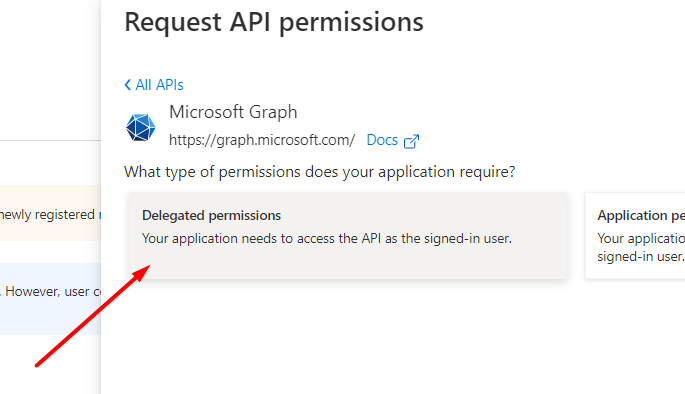
The next step is to set up API access. Go to API permissions → Add a permission.
Choose Microsoft Graph.
Then click the Delegated permissions option.
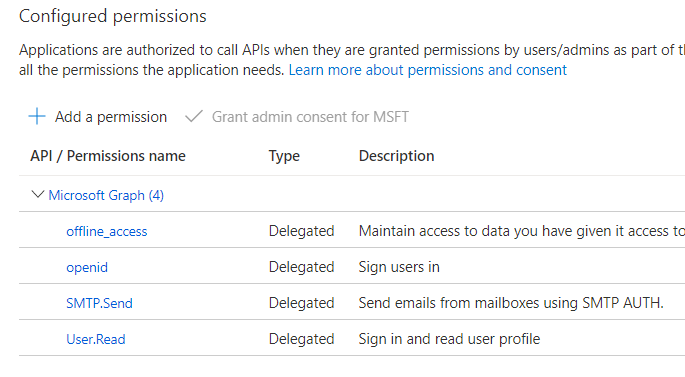
Here you can see the list of permissions. Please, choose the following ones:
openid
offline_access
SMTP.Send
User.Read
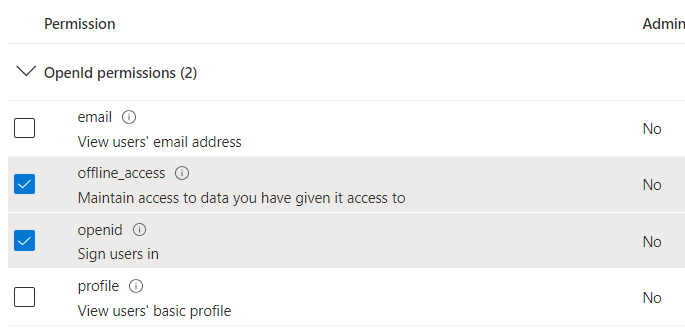

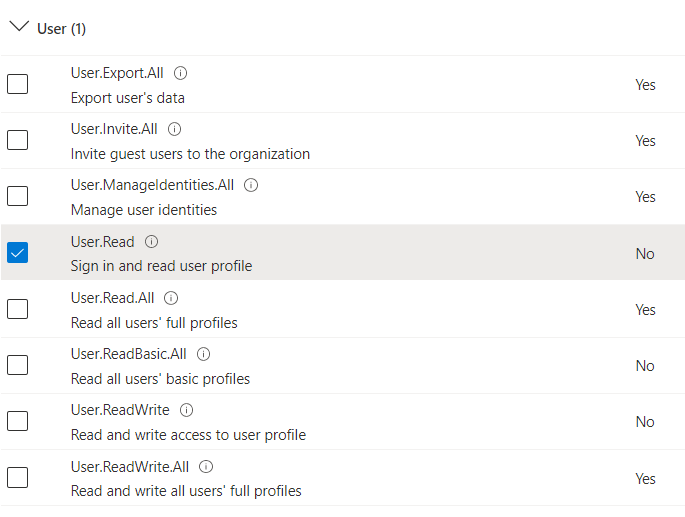
Click Add permissions and check the correctness.
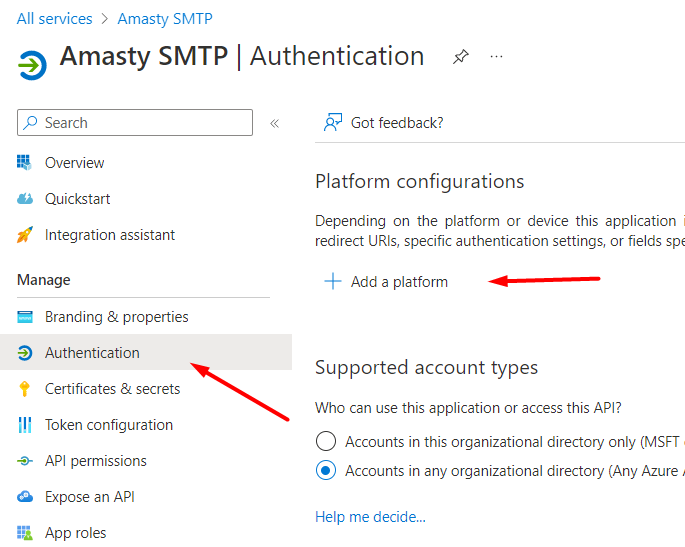
Now we can set up the “Redirect URI” for our Magento website, where the replies from Microsoft will be sent. Go to Authentication → Add a platform:
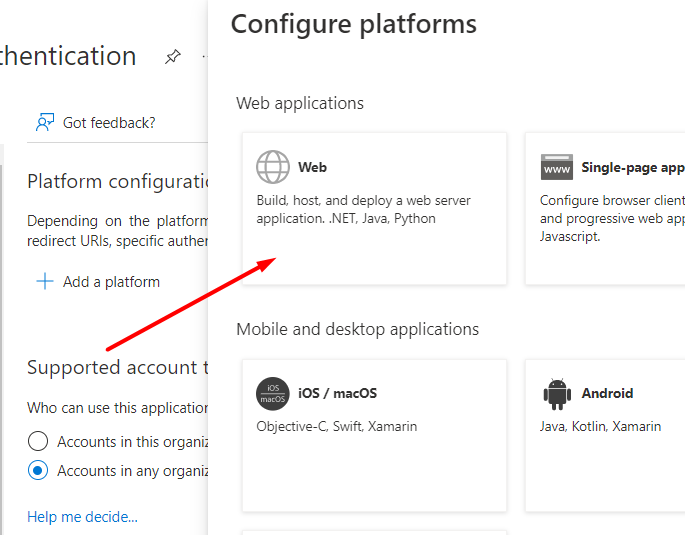
Choose Web.
Next, specify the Redirect URL in the following format:
https://*your_magento_url*/amasty_smtp/oauth/callback
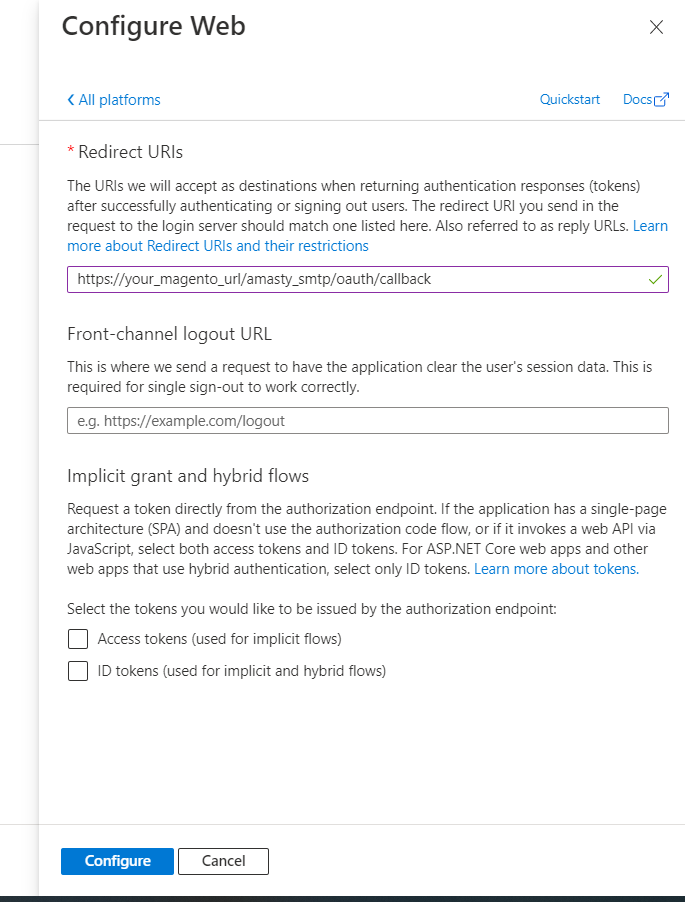
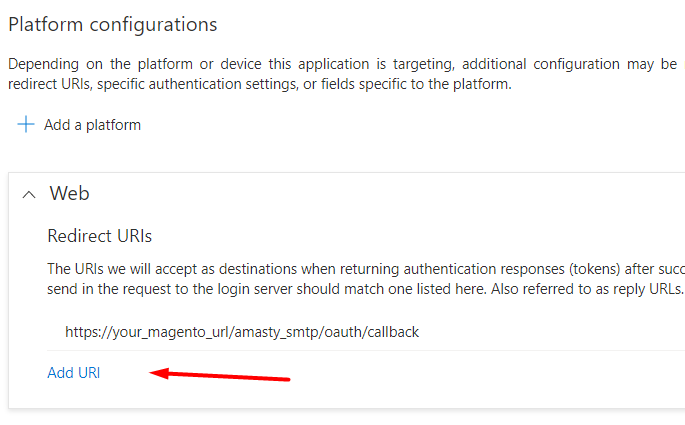
Click Configure. If you need to specify several Redirect URLs for one application, you can add one more URL:
Extension Configuration
Insert the Client Secret you've copied (the Value field from the Certificates & Secrets tab).
Paste the values of the Application (Client) ID and Directory (Tenant) ID from the Overview tab.
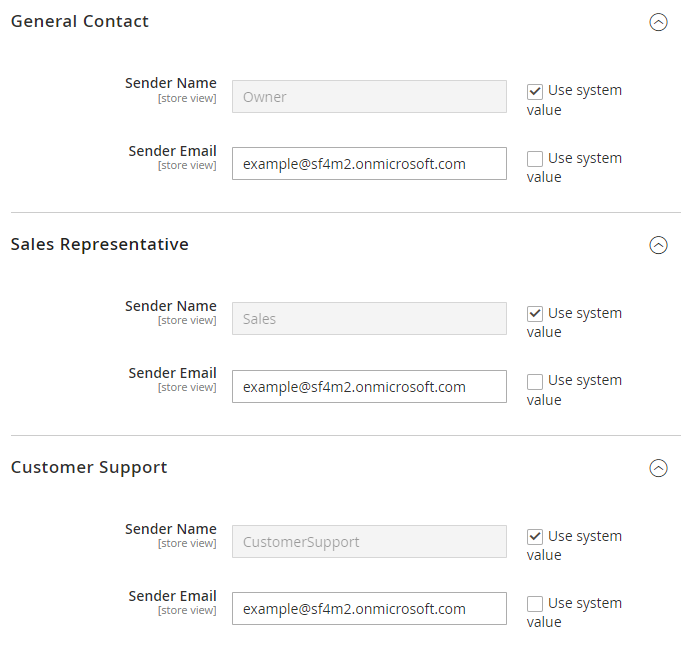
Sender Email Update
Please, note that you need to change Sender Email in the general configuration as well.
Navigate to Stores → Configuration → General → Store Email Addresses. Update the address in the Sender Email field in all the tabs.
Automatic Log Clearing
Old log records can be removed after a certain period (in days). If you set the auto clean to
0, the option won't be applied.

Blacklist Emails
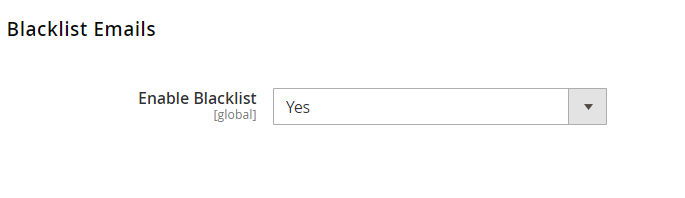
Enable Blacklist - Set to Yes to block emails from being sent to blacklisted email addresses.
The blacklisted email addresses are stored on the Blacklist grid. To find this grid, navigate to Reports → SMTP Email Settings → Blacklist.
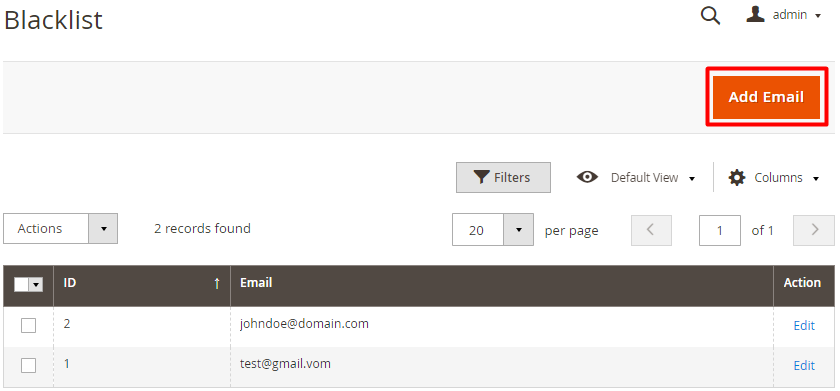
Please note that with enabled blacklist functionality, invalid email addresses (e.g. [email protected]) will be automatically blacklisted and recorded on the Blacklist grid. Also, it is possible to add email addresses to this grid manually if needed. If the email address is in blacklist, a notification will inform you when attempting to send an email to it.

Sent Emails Log
To see the list of sent emails please go to Reports → SMTP Email Settings section → SMTP Sent Emails Log.
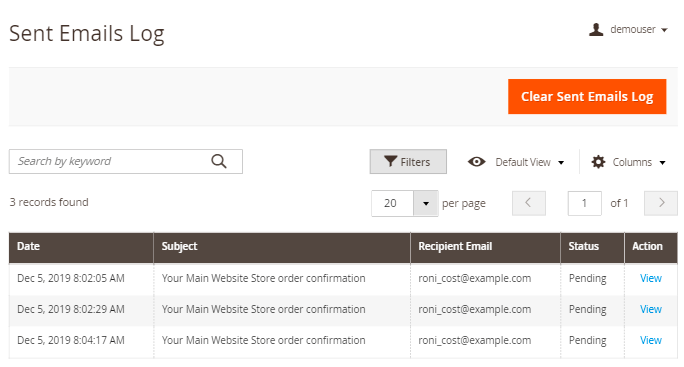
In the log, you can see the email subject, the date it was sent, the recipient's email address, and the email status. Click 'Select' in the Action column and choose 'View' to see the email content or 'Resend' to resend the email.
Please note that to use the resend functionality, you need to install the amasty/module-smtp-email-reply-to-setting package.
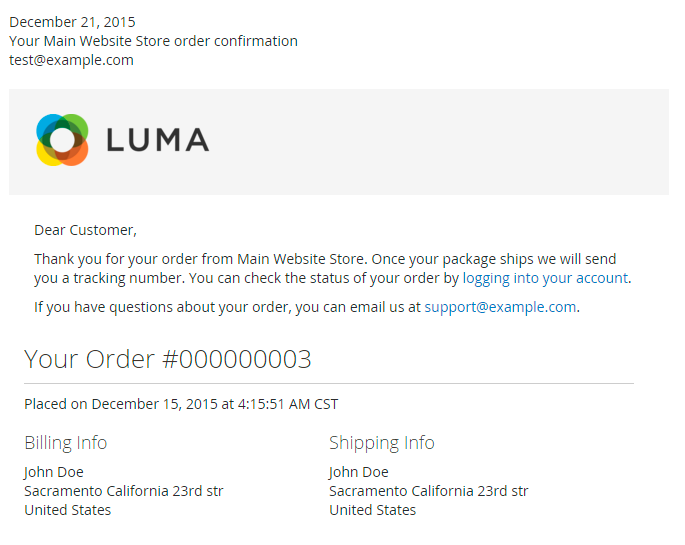
View Sent Emails
After clicking 'View' on the Sent Emails grid you can see the content of the selected email.
Debug Log
To see the extension debug log please go to Reports → SMTP Email Settings section → SMTP Debug Log.
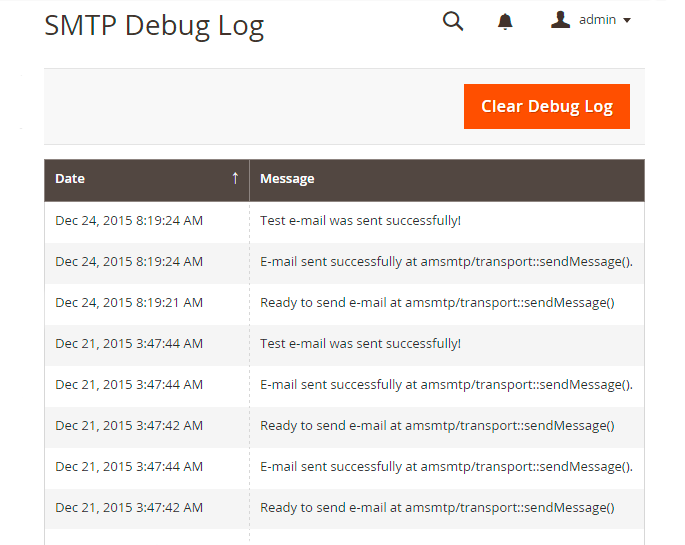
At this page you can find out if emails are sent and what errors if any, occur. This data will help you to configure the module. It’s recommended to disable the Debug Mode once you’ve successfully setup the module and run the necessary tests.
What is SPF Record and How to Configure it
Please be aware that it is not mandatory to setup SPF record, however doing so you will increase the chance of email delivery.
Sender Policy Framework (SPF) is an email validation system created to prevent email spam on the Internet by detecting email spoofing (creation of emails with forged sender addresses).
SPF technology consists of two parts - SPF-record in DNS (Domain Name System) zone of your domain; - email server component of the message recipient or the component of its spam combating system; SPF record is configured by email sender. It contains information about the servers that are allowed to send emails from your domain name.
Although SPF record is optional, today due to the spam issue most email servers may refuse to accept your email without this record or mark it as suspicious or unwanted.
How to set SPF record for your own SMTP server
If you use your own email server to send emails for your domain (below we use the example.com domain for demonstration) that has IPv4 address xxxx, the SPF record will look like this:
example.com. IN TXT “v=spf1 a mx ip4:x.x.x.x ~all”
example.com. IN SPF “v=spf1 a mx ip4:x.x.x.x ~all”
If your server has more than one IPv4 address, you can list them like that: “v=spf1 a mx ip4:x.x.x.x ip4:y.y.y.y ip4:z.z.z.z -all”.
If you use IPv6 addresses, the record will be: “ip6:xx:yy::zz”, where “xx:yy::zz” is the IPv6 of your email server. In this example, the SPF record allows sending emails for the example.com domain from the IP address specified in the «A» record of the example.com domain (a), mail-exchangers of the example.com domain (mx) and from IP address x.x.x.x (ip4:x.x.x.x). The recipient’s server will make the decision whether to mark as spam emails from other senders (~ all).
To restrict sending emails from senders not listed in the SPF record, you can use the “-all” option instead of “~all”. However, in case there are any inaccuracies in your settings you risk to restrict receiving of your mail.
Therefore, use this option only if you are sure that all your settings are correct.
How to set SPF record for Google Apps
If you use Google Apps service to send emails for your domain, the SPF record settings will be slightly different.
The addresses of the email servers that are used by Google Apps can vary and consequently you’ll have to enable Google Apps SPF configuration.
In case you use Google Apps to receive emails, but send emails using your own SMTP server you need to specify it in the SPF record:
example.com. IN TXT “v=spf1 a mx ip4:x.x.x.x include:_spf.google.com ~all”
example.com. IN SPF “v=spf1 a mx ip4:x.x.x.x include:_spf.google.com ~all”
If you use Google Apps Service both for sending and receiving emails, the SPF record will be the following:
example.com. IN TXT “v=spf1 include:_spf.google.com ~all”
example.com. IN SPF “v=spf1 include:_spf.google.com ~all”
To get more details about SPF settings for Google Apps, click here.
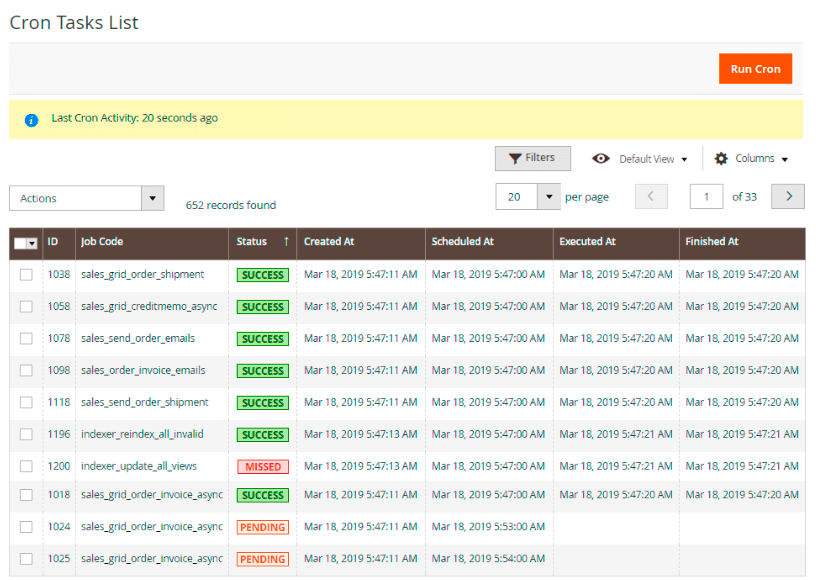
Cron Tasks List
Magento 2 SMTP Email Settings extension is preintegrated with Cron Tasks List to provide store owners with an opportunity to track and manage all cron tasks running in the website background.
To view all scheduled and executed cron tasks, go to System → Cron Tasks List
Run all cron tasks and generate their schedule by clicking the ‘Run Cron’ button. Also you can delete separate tasks in bulk, apply filtering and sorting options when it is needed.
Find out how to install the SMTP Email Settings extension via Composer.
magento_2/smtp-email-settings.txt · Last modified: 2024/11/15 10:38 by kkondrateva