
Sidebar
magento_2:pwa_installation_user_guide
Table of Contents
PWA Installation User Guide
The PWA Studio is distributed with the Project Scaffolding. Project Scaffolding is a method of automatic file creation, aimed to support a specific project structure.
PWA Studio offers various instruments to simplify project creation. Also, it allows you to create your own PWA theme, layered on Magento 2. The full documentation is available via Magento PWA Studio documentation.
PWA Studio Installation
Before you start to install Magento PWA Studio, please make sure you have installed all the tools, mentioned below:
- NodeJS >=10.14.1 LTS;
- Yarn >=1.13.0;
- Python 2.7 and build tools, see the Installation instructions on node-gyp for your platform;
- A running instance of Magento 2.3.1 or above.
1. New Project Creation
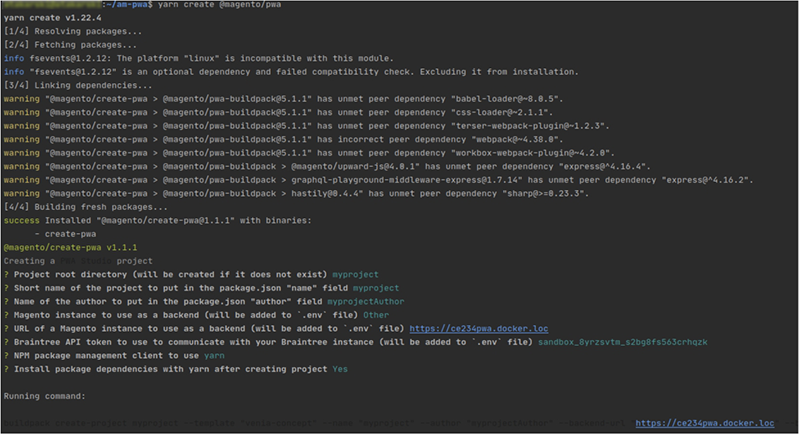
To create a new project, please run the following command:
yarn create @magento/pwa
After that, an interactive installation process will be started. You’ll have to enter the following information:
- The directory name, where the project will be created (installed);
- Project name;
- Author name;
- Magento backend url. If you don’t have one, you’ll be offered to install a new Magento instance and token.
In the screenshot below, an example of the installation process is shown.
To go to the project’s directory, run the following command:
$ cd myproject/
2. Project Domain Creation
You need to create a unique, safe, configurable domain for your new project. To do that, please run the following command.
yarn run buildpack create-custom-origin .
Please, note that, for the successful command execution, you need to run the command by a user with the administrator's permissions. For this step, the admin password is required. This is why you can be asked to enter the admin password in the command line.
3. Project Start
To run the project in the developer mode, please execute the following command:
yarn watch
The project will be started and will be available via address, given to you in the console window. For example, see the screenshot below.

PWA Module Installation
In order to install a PWA add-on, please install the corresponding GraphQL system package first. For the correct name of it, please check the composer.json file of the main module. For example, the GraphQL system package name of the PWA add-on for the Blog Pro extension would be the following: amasty/blog-graphql

To get more detailed info, check the README.md file in the module package.
To install the PWA modules to your instance, you need to follow the next steps:
1. Proceed to the required folder using the cd your_project/src command.
2. Create a new folder with mkdir @amasty.
3. Copy module folder and paste it to @amasty.
4. For development mode, run yarn add link:src/@amasty/%module_name% .
For production mode, run yarn add file:src/@amasty/%module_name%.
Both commands should be run from the directory (your_project folder).
5. If the extension has the Ovverrides folder, copy folder overrides from @amasty/%module_name% into src/ and install VeniaUiOverrideResolver for PWA Studio with the commands:
yarn add @fooman/venia-ui-override-resolver
6. Restart your project using the yarn watch command.
Please, note that adding a new file requires restarting the watch process for the file to get recognised.
Replacing a component can be dangerous. It is not a compound change, so if two extensions are intended to replace the same file, it can lead to errors.
To learn more about PWA theme customizations with Project Scaffolding, you can read the following blog post.
magento_2/pwa_installation_user_guide.txt · Last modified: 2022/11/29 12:10 by kkondrateva