
Sidebar
magento_2:seo_toolkit
Table of Contents
For more details see how the SEO Toolkit for Magento 2 extension works.
Guide for SEO Toolkit for Magento 2
The extension is a collection of seven efficient SEO tools. It significantly simplifies the process of specifying the meta tags, short and full SEO descriptions, and rich snippets as well as making product URLs unique. Furthermore, you can quickly generate XML and HTML sitemaps for better interaction with Google and customers.
- Eliminate duplicate content with unique product URLs
- Highlight more information in search with rich snippets
- Mass-optimize pages meta values with SEO templates
- Connect all relevant pages with automatic cross-linking
- Enhance store indexation with HTML and XML sitemaps
- Avoid broken links with smart redirects
- Monitor any page SEO health in real-time
- Amasty ChatGPT AI Content Generator included
- Hyva-ready storefront
The extension is compatible with Hyvä Theme. You can find the packages for installing in composer suggest. The compatibility is available as a part of an active product subscription or support subscription.
Note: To ensure the module functions correctly on Hyva and for correct breadcrumbs generation, please enable 'Hyva Themes > Catalog > Hyvä Client-Side Breadcrumbs Rendering > Enable on Product Detail Pages' setting.
Amasty SEO Toolkit is read and write compatible with GraphQL. You can find the amasty/module-seo-toolkit-lite-graphql package for installing in composer suggest (Note: the compatibility is available as part of an active product subscription or Support Subscription).
In SEO Toolkit FAQ you can find answers to the most popular questions about the extension functionality.
Pager Optimization for Magento 2
General Settings
How to enable the extension?
When the SEO Toolkit module is installed, it is automatically enabled. All further settings are performed inside the appropriate extention sections.
To enable redirect option, go to Stores→ Configuration→ SEO Base Settings
301 Redirects to Home Page - Enable redirect option to avoid duplicating content and make store URLs SEO-friendly.
Enable Redirect from 404 to Search Results - The feature redirects customers to a search result page instead of 404 page not found. For instance, when customers navigate to exmaple.com/shorts page, which does not exist (404 not found), the extension redirects them to a page with shorts search results.
Custom URL Key for Default Search Results Page - set to Yes if you want to use the neat and easy-to-read URL to display in search results. URL will look 'search/yellow' instead of 'catalogsearch/results/q=yellow'

Pagination Settings
Add Link Rel=“next/prev” - This option is visible only if the Use Canonical to ‘View All' for Paginated Pages is set to 'No’. The feature provides precise pagination: the links are grouped with the sequences and not dispersed between pages. Customers receive the first page of the series: e.g. example.com/extensions.html instead of example.com/extensions.html?p=1). If you are interested in more details, see Googleblog
Add Page Number to Meta Title/Description - The feature adds page numbers to meta titles/descriptions to fasten the work of search crawlers and the index building process.
- Adds the Page Number at the end of the Meta Title, for instance, Apparel | Page 5
- Adds the Page Number at the end of the Meta Description, e.g. Apparel Description | Page 5

SEO Toolbar
Enable SEO Toolbar - The feature helps quickly make the SEO analysis of any page.
Show Only for IP - Enable display the SEO statistics only for the page with the entered IP.

The SEO Toolbar provides the following page statistics on the front-end: robots meta header, canonical URL compliance, number of H1 tags, meta title and description, images alt tag, in-page links, iframes, microformats tags, schema.org tags, page content state and applied meta tags template.

Thanks to the compatibility between SEO Toolkit Pro/Premium and Amasty ChatGPT AI Content Generator solution, you can fix meta content issues on category, product, and CMS pages directly during the page inspection using the SEO Toolbar feature. For detailed compatibility information, refer to the ChatGPT AI Content Generator section of this user guide.
Add Advanced Reviews - Install the Advanced Product Reviews for Magento 2 extension to get higher search ranking positions, engage customers, and build up trust in your business.
Products' SEO
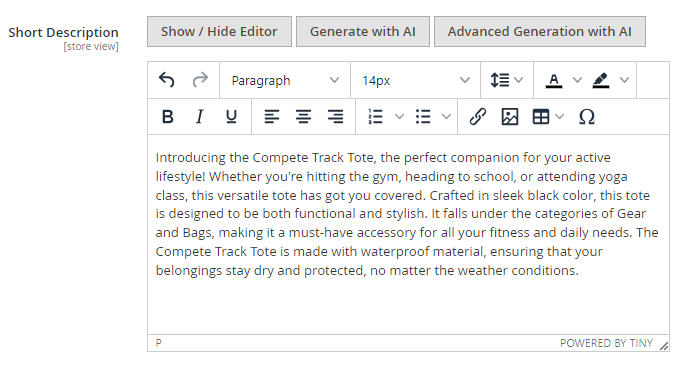
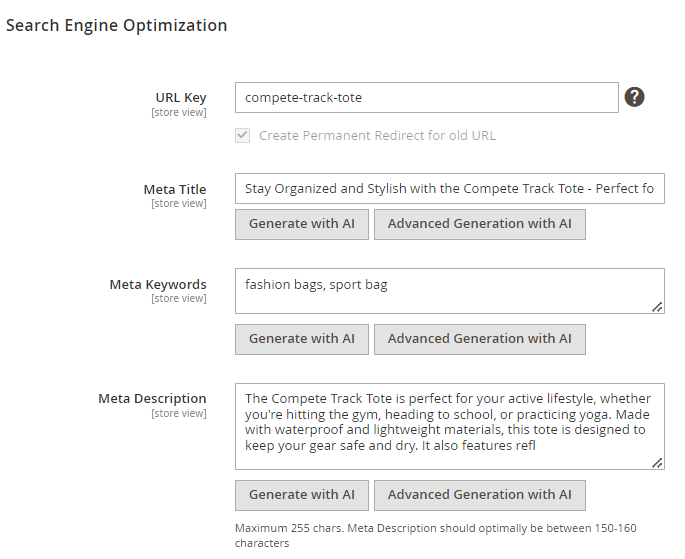
The extension also adds several extra configs for Products Search Engine Optimization. To access them, please go to Catalog → Products → (any product name) → Edit→ Search Engine Optimization tab in Products' configs.

URL Key, Meta Title, Meta Keywords, Meta Description - the default Magento's SEO options.
Canonical Link - set the URL that will be used as a canonical link for a specific product.
Robots - choose the appropriate options on what directions will be given to Google crawlers via Robots file.
CMS Pages SEO
With the extension, it is also possible to add Canonical Links and adjust Robots settings for CMS pages. To do this, please go to Content → Pages → (choose any cms page) → Edit → Search Engine Optimization tab' configs. These settings can be configured the same way, as it was described before in the 'Products' SEO' section.

Categories' SEO
With the extension, it is also possible to adjust Robots settings for categories. To do this, please go to Catalog → Categories → (choose needed category) → Search Engine Optimization tab. These settings can be configured the same way, as it was described before in the previous sections.

Redirects
Expanded redirect settings allow users to use third-party services like Tilda together with Magento. You can set up redirects from any domain or platform
The module allows you to configure custom redirects to meet your business demands. To do that, please go to Marketing → Manage Redirects. The Redirects functionality allows you to create various redirect types, use wildcards redirects, create redirects for 404 error pages, and assign redirects for various store views.
On the Redirects grid, you can see all redirects that are created for this store.

To add a redirect, please click the Add New Redirect button.

Status - turn the switch to Enabled, to apply redirect.
Request Path - here, insert the URL of origin page that should be redirected.
Target Path - enter the URL of the end page, to which the user will be redirected.
You can use wildcards to indicate the 'any path' option. Use the wildcard symbol * to activate it.
For example, you need to create the redirect for all URLs that start with'men/tops-men/' to URLs that start with 'men/tops/'.
To do that, fill the settings as follows:
Request Path:
men/tops-men/*
Target Path:
men/tops/*
Redirect Type - choose if you want the URL to be moved permanently as 301 redirect, or temporary as 302 found redirect.

Use for 404 Pages Only - set to Yes if this redirect applies only to pages with 404 error.
Description - write an explanation for the redirect. This is handy if you need to maintain a large number of redirects. A clear description that states the redirect's purpose saves lots of time on redirects maintenance.
Store Views - select, on what store view level the redirect will be applied. You can create a custom redirect for a specific store view if needed.
Priority - in case of several redirects that have an identical Request Path, the redirect with the highest priority will be executed. 1 is the highest priority.
Automatic redirect for deleted products/categories

Automatically redirect deleted product and category pages. This feature improves website overall SEO and reduces the number of 404’s.
To enable redirects for deleted products, please navigate to Stores → Configuration → SEO Base Settings → Redirects Settings → Deleted Products Redirects

Create Redirects for Deleted Products - set to ‘Yes’ to enable redirects for deleted products
Redirect Type - choose if you want the URL to be moved permanently as 301 redirect, or temporary as 302 found redirect.
Redirect Lifetime (days) - set up a duration for created redirects to be available
To enable redirects for deleted categories, please navigate to Stores → Configuration → SEO Base Settings → Redirects Settings → Deleted Categories Redirects

Create Redirects for Deleted Categories - set to ‘Yes’ to enable redirects for deleted categories
Redirect Type - choose if you want the URL to be moved permanently as 301 redirect, or temporary as 302 found redirect.
Redirect Lifetime (days) - set up a duration for created redirects to be available
SEO Open Graph
To configure Open Graph meta tags, please go to Stores → Configuration → SEO Open Graph
Product Page
For the Product Pages you can use product attribute codes to display its value in Open Graph tags on the frontend. Please make sure “Used in Product Listing” is set to Yes for the selected attribute. The extension will use Meta Tags Templates values if applicable.

Enabled - set to ‘Yes’ to enable Open Graph meta tags on product pages
Open Graph Title - enter an attribute code for the title that will be displayed on the frontend
Open Graph Description - enter an attribute code for the description that will be displayed on the frontend.
Please note that if the value of meta_title or meta_description attribute is not set, then the product name and product description will be used by default.
Category Page

Enabled - set to ‘Yes’ to enable Open Graph meta tags on category pages
Open Graph Title - enter an attribute code for the title that will be displayed on the frontend
Open Graph Description - enter an attribute code for the description that will be displayed on the frontend
Available variables for Category Pages:
- meta_title - Category Meta Title
- meta_description - Category Meta Description
- name - Category Name
- description - Category Description
CMS Pages

Enable Open Graph on Home Page - set to ‘Yes’ to enable Open Graph meta tags on the Home Page
Enable Open Graph on CMS Pages - set to ‘Yes’ to enable Open Graph meta tags on CMS Pages
Open Graph Title - enter an attribute code for the title that will be displayed on the frontend
Open Graph Description - enter an attribute code for the description that will be displayed on the frontend
Available variables for CMS Pages:
- meta_title - CMS Page Meta Title
- meta_description - CMS Page Meta Description
- title - CMS Page Title Name
- content_heading - CMS Page Content Heading
HTML Sitemap for Magento 2
Go to the HTML Sitemap for Magento 2 guide page to configure the plugin.
- Add various products and categories to a sitemap;
- Add CMS-pages and additional links to a sitemap;
- Add a search box to a sitemap;
- Specify a sitemap layout;

Google Rich Snippets for Magento 2
Go to the Google Rich Snippets for Magento 2 guide page to configure the plugin.
- Enrich site presentation in organic search;
- Include breadcrumbs, company name, logo in snippets;
- Include rating, minimal price, and stock status in snippets;
- Add a search box;

Meta Tags Templates for Magento 2
Go to the Meta Tags Templates for Magento 2 guide page to configure the plugin.
- Specify meta info, keywords and H1 tag for products & categories;
- Use handy templates with variables;
- Set short and full product descriptions;
- Set unique meta data for any page by URL;

Unique Product URL
Go to the Unique Product URL for Magento 2 guide page to configure the plugin.
- Set the desired length of product URLs
- Specify the criteria to choose the product path
- Avoid multiple secondary links with canonical URL
- Improve breadcrumbs on product pages
Please note that the extension doesn't enable full breadcrumbs if they are not available on your site. It just changes their formation logic. For this configuration to work, full breadcrumbs should be displayed by default.

XML Google Sitemap for Magento 2
Go to the XML Google Sitemap for Magento 2 guide page to configure the plugin.
- add or remove group of pages
- set frequency of updates for each group of pages
- specify priority of importance for group of links
- add images with titles and templates

Cross Linking for Magento 2
Go to the Cross Linking for Magento 2 guide page to configure the plugin.
- automatically generate the internal links to the product and category pages
- automatically generate the external links to any site
- limit the number of links per page (product, category, CMS)
- specify variations of keywords
- auto replace the modified keywords with links

URL Rewrites Regenerator
Go to the URL Rewrites Regenerator for Magento 2 guide page to configure the plugin.
- Rewrite URLs for categories and products without the command line
- Apply all default Magento SEO settings
- Regenerate URLs for specific store views
- Skip reindex and cache flush


ChatGPT AI Content Generator
Visit the ChatGPT AI Content Generator for Magento 2 guide page to configure the plugin.
Automatically generate compelling descriptions and metadata for your online store pages.
- Supports GPT-3.5-turbo, GPT-4, GPT-4o, GPT-4-turbo, GPT-4o-mini
- Generate content for product, category and CMS pages
- Add metadata to product, category and CMS pages
- Create content for multiple products via mass action
- Add metadata to multiple CMS pages via mass action
- Generate texts via Page Builder
- Generate content in any language
- Generate various content for each store view
- and many more features in the Chat GPT AI Content Generator Pro version
SEO Toolkit Pro includes Amasty's ChatGPT AI Content Generator.
SEO Toolkit Premium includes Amasty's ChatGPT AI Content Generator Pro.
If both the SEO Toolkit (Pro/Premium) and ChatGPT AI Content Generator Pro (Basic/Pro) extensions are installed on your instance, you can automatically fix metadata issues found during the SEO Toolbar inspection on product, category, or CMS store pages using AI in real-time.
For this:
1. Navigate to the desired store's product, category, or CMS page on the frontend and open the SEO Toolbar;
2. Check if there are any issues detected in the page's metadata (for instance, the meta description is missing in the example below);

3. If you'd like to correct the issues with AI, click the Fix issues with AI button;
4. After that, you will be redirected to the content generation page, where the store view and the type of metadata with issue are pre-selected;

5. Then, click the Generate button if you'd like to auto-generate the selected metadata (meta description in example below) for the chosen store view;

6. Refresh the page on the frontend and verify that the issue no longer appears in the SEO Toolbar and the meta description has been generated.

ChatGPT AI Content Generator (in SEO Toolkit Pro) and ChatGPT AI Content Generator Pro (in SEO Toolkit Premium) are available only as part of an active support or product subscription.
The option to fix metadata issues detected by the SEO Toolbar with the help of AI is also only available as part of an active support or product subscription. You can find the amasty/module-seo-toolbar-ai-fix package for installating in composer suggest.
Facebook Pixel
Please note, that this functionality is available only for the Premium pricing plan of the SEO Toolkit.
Please navigate to the Facebook Pixel for Magento 2 guide page to configure the plugin.
Connect your Magento store to Facebook in a split second. Gather more relevant data for the customer behavior analysis during your promo campaigns where Facebook or Instagram are involved.
- Choose the events to track
- Set up remarketing audiences
- Optimize your ads configurations
- Create lookalike audiences
- Configure custom events

Alt Tags Generator
Please note, that this functionality is available only for the Premium pricing plan of the SEO Toolkit.
Alt tags provide context to what an image is displaying, informing search engine crawlers and allowing them to index an image correctly.
With our Alt Tags Generator, you can automatically generate Alt Tags for product and category images in bulk. This way your images (and hence your products) will be more visible and understandable for search engines.
Alt Tag Rules Grid
To start Alt Tags generation you need to create Alt Tags rules. Please, navigate to Marketing → Amasty AltTagGenerator → Alt Tag Rules (Products).

From this grid, you can manage the Alt Tag rules and create new ones. Please note, that when you open this page for the first time the grid will be empty.
Create an Alt Tag Rule
To create a rule, please click the Add New Rule button above the grid.

Enabled - Set to ‘Yes’ to enable the functionality.
Title - Specify the title for the rule.
Priority - Set the rule priority. If a product meets conditions in several templates, the alt tag template with the highest priority will be applied. 0 is the highest priority.
Stores - In this tab, you can specify the store view to apply the rule.
Alt Tag Replacement Logic - Here you can choose the logic for the automatic Alt texts adding to the images. Three options are available:
- Only Replace Empty Alt Text - the Alt text will be added if the image doesn’t have the alt tag.
- Replace Filled Alt Text - the new Alt text will replace the existing Alt Text.
- Append to Existing Alt Text - the new Alt text will be added to the existing Alt text.
Alt Tag Template - In this tab, you can specify the Alt tag template using variables
Example: Buy {name} [by {manufacturer|brand}] [of {color} color] [for only {price}] [in {categories}] at [{store},] {website}. Available variables:
- Image Number Increment (for products with several images) - {N}
- Name - {name}
- Category - {category}
- All Categories - {categories}
- Store View - {store_view}
- Store - {store}
- Website - {website}
- Price - {price}
- Special Price - {special_price}
- Final Price - {final_price}
- Final Price with Tax - {final_price_incl_tax}
- Price From (bundle) - {startingfrom_price}
- Price To (bundle) - {startingto_price}
- Brand - {brand}
- Color - {color}
You can use any product code as a variable {attribute_code} to display its value. Please make sure that the attribute is used in the product listing.
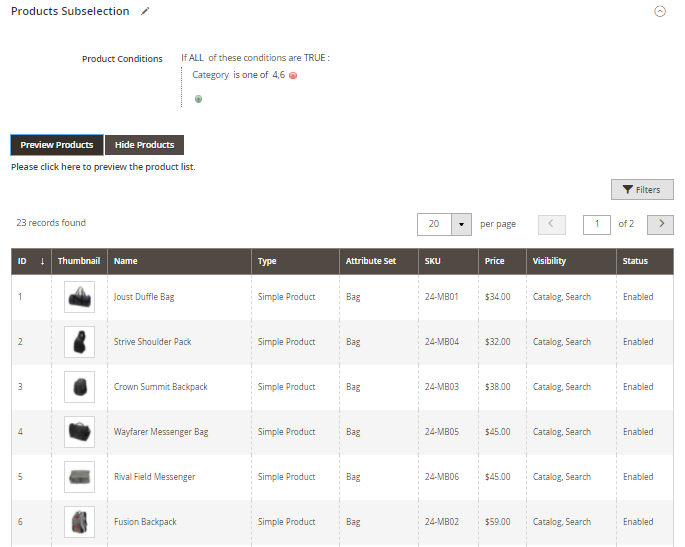
Products Subselection - In this tab, you can specify the conditions to select the products to which the Alt Tag template will be applied.
Click the Preview Products or Hide Products buttons to preview or hide the products list to which the Alt Tag rule will be applied.
If everything is correct - Save the rule.
Google Indexing API
Please note, that this functionality is available only for the Premium pricing plan of the SEO Toolkit.
Visit the Google Indexing API for Magento 2 guide page to configure the plugin.
Significantly speed up the process of indexing recent changes to your website pages.
- Establish a connection with the Indexing API provided by Google
- Send indexing requests directly to Google from the Magento admin panel.
- Submit URLs for indexing manually or enable auto-indexing
- Request URL deletions from index with just a few clicks
- Monitor the indexing status of each URL using a convenient grid
- Initiate indexing right from any edit page (product, category, CMS)


Website SEO Health Check
SEO Health Check is a SaaS Tool that helps to discover the most severe SEO mistakes which can damage your website. Enter your domain name, submit the request and get the list of improvements.
Website SEO Health Check is included for free in the tariff plans SEO Toolkit Pro and Premium. To start use it just leave us a request.
Please see the instruction on how to activate your access to Website SEO Health Checker below.
1. Log in your Amasty Customer Account;
2. Go to My Account and click on the Amasty SaaS tab;

3. Login to Amasty SaaS Platform using your credentials for Amasty account;

4. Navigate to Website SEO Health Check and click on the 'go to application' button;

5. Enter the domain of the website you’d like to scan.

6. Click on the 'start scan' button.

7. You can view the scanning status in the upper right corner.

8. When the scanning process is complete, you can see the statistics for your website.

9. You can view the scan results anytime by clicking on the ‘view results’ button.

If the page doesn’t respond for more than 5 minutes, the tool considers it unavailable and reports 404.
Import and Export
With the Pro and Premium versions of SEO Toolkit extension you can import and export Redirects data. This functionality is available as a part of an active product subscription or support subscription.
To import redirects data, please navigate to System → Amasty Import → Import → Select Entity → Amasty SeoToolkit Redirect → Amasty SeoToolkit Redirect Import Entity:

To export redirects data, please navigate to System → Amasty Export → Export → Select Entity → Amasty SeoToolkit Redirect → choose the needed subentity:

Cron Tasks List
Magento 2 SEO Toolkit extension is preintegrated with Cron Tasks List to provide store owners with an opportunity to track and manage all cron tasks running in the website background.
To view all scheduled and executed cron tasks, go to System → Cron Tasks List
Run all cron tasks and generate their schedule by clicking the ‘Run Cron’ button. Also you can delete separate tasks in bulk, apply filtering and sorting options when it is needed.

Additional packages (provided in composer suggestions)
To make additional functionality available, please install the suggested packages you may need.
Available as a part of an active product subscription or support subscription:
For Pro and Premium versions:
amasty/module-seo-toolkit-lite-graphql- Install this module to activate GraphQL and Toolkit Lite integration.
amasty/module-seo-toolkit-lite-hyva- Install this module to activate the integration SEO Toolkit Core with the Hyva Theme.
amasty/module-seotoolkit-import-entity- Install this package to import redirects data.
amasty/module-seotoolkit-export-entity- Install this package to export redirects data.
For Premium tariff plan only:
amasty/module-avif-image-optimizer- Install this package to enable AVIF optimization support.
amasty/module-facebook-pixel-hyva- Install this package to ensure the Facebook Pixel extension works with the Hyva Theme.
The suggested packages related to separate extensions that are included in the Pro and Premium versions of the SEO Toolkit extension:
Google Rich Snippets
amasty/module-seo-rich-data-subscription-package- consists of 3 packages. Let’s consider each of these packages separately:
1. amasty/module-google-rich-snippets-graphql - Install this module to activate GraphQL and Seo Rich Data integration.
2. amasty/module-seo-rich-data-hyva - Install this package to ensure the SEO Rich Data extension works with the Hyva Theme.
3. amasty/module-seo-rich-data-subscription-functionality - Install this package to activate the following compatibilities: Return Policy Rich Data compatibility, Local business structured data compatibility, Shipping Rich Data compatibility, Product Variant Structured Data compatibility.
Cross Linking
amasty/module-cross-linking-hyva- Install this module to activate the SEO Cross Linking and Hyva Theme integration .
amasty/module-cross-linking-blog-reference- Install this package for Amasty Blog Pro compatibility.
amasty/module-cross-linking-faq-reference- Install this package for Amasty FAQ and Product Questions compatibility.
amasty/module-cross-linking-custom-tabs-reference- Install this package for Amasty Product Tabs compatibility.
HTML Sitemap
amasty/module-seo-html-sitemap-hyva- Install this module to activate the HTML Sitemap and Hyva Theme integration.
ChatGPT AI Content Generator
amasty/module-seo-toolbar-ai-fix- Install this package to fix metadata issues found by the SEO Toolbar with the help of AI, when both the SEO Toolkit (Pro/Premium) and ChatGPT AI Content Generator Pro (Basic/Pro) extensions are installed together on your instance.
FAQ
How the Google Rich Snippets extension changes the source code of a website?
How to remove a store view from the XML Sitemap hreflang tags?
How to use meta tags templates?
How to hide a page from Google (block indexation)?
What's the difference between an HTML SItemap and an XML Sitemap?
How to customize the SEO content of the pages with SEO Meta Tags Templates?
Does the SEO Toolkit allow users to automate product image alt text?
Find out how to install the SEO Toolkit extension for Magento 2 via Composer.
magento_2/seo_toolkit.txt · Last modified: 2025/07/02 15:13 by kkondrateva