Sidebar
magento_2:admin_actions_log
Table of Contents
See how the Admin Actions Log extension works.
Guide for Admin Actions Log for Magento 2
Enable the detailed tracking of all backend actions performed by store administrators. Check log history and login attempts on the special grid and improve your backend users' performance with the help of the real-time tracking mode.
- Log actions of all admin users
- Save log details for a predefined period of time
- Record the backend login attempts
- Check admin actions in real-time
- Get the detailed page view history
- Track actions executed via API
Visit our FAQ section to get even more valuable information and find out answers to popular questions about the configuration and features of the Magento 2 Admin Actions Log extension.
General Settings
To configure general extension settings, please go to Stores → Configuration → Amasty Extensions → Admin Actions Log.
General Settings
Expand the General section.
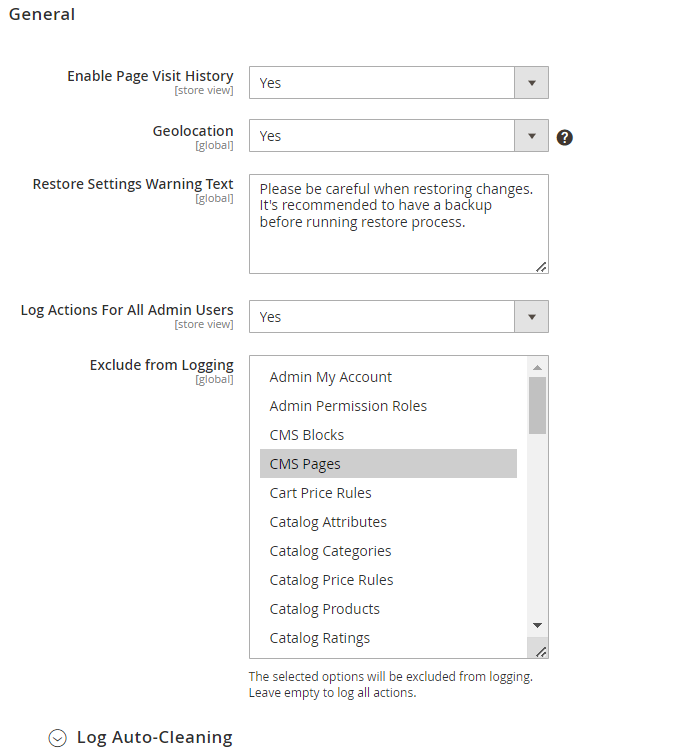

Enable Page Visit History — set this option to Yes if you want to collect the history of all pages, visited by the administrators;
Use GeoIP — enable or disable GeoIP support to determine the country and city from which admin users get logged in;
Restore Settings Warning Text — fill in the warning message for the Restore feature;
Log Actions For All Admin Users — set this option to Yes to keep track of all admin actions. If you are only interested in the actions of certain administrators, choose No.
If No is set, select admin users whose actions need to be logged.

Exclude Entities from Logging - select entities you don’t want to log actions for.
Please note that the Exclude Entities from Logging feature allows you to exclude from logging only actions on the specified set of key Magento entities. Actions on entities that are added through external customizations or with the help of third-party modules will still be logged.
Exclude Actions from Logging - select the types of actions you'd like to exclude from being logged.
The Exclude Entities from Logging and Exclude Actions from Logging features are available as a part of an active product subscription or support subscription.
Database Installation
This product includes GeoLite2 Data created by MaxMind, available from 24.10.2023 (last update date).
To install the Admin Actions Log database, go to Stores → Configuration → Amasty Extensions → GeoIP Data.
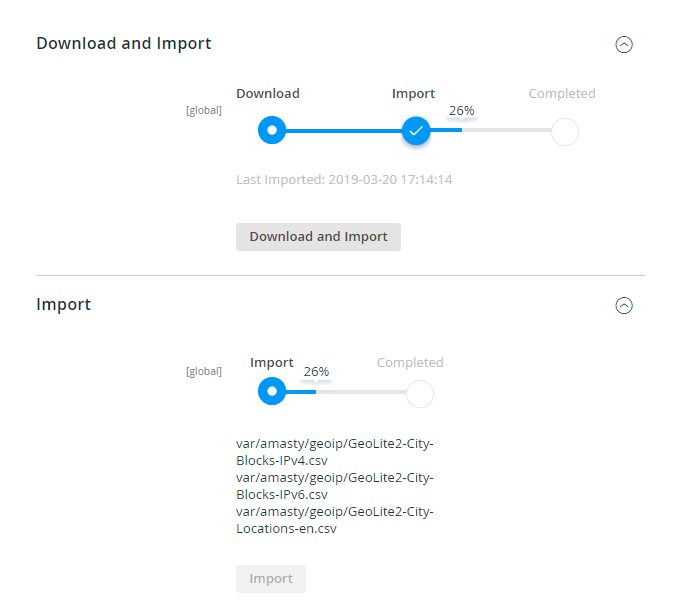
Databases are required if you want to use the Geo IP option. Also, you need to install php bcmath or gmp extension on your server.
You can get the databases automatically or import your own data.
Hit the Download and Import button to make the extension download the updated CSV dump file and import it into your database automatically.
To import the files from your own source, use the Import option. Path to the files should look like this (the part 'var/amasty' should be replaced with your folders’ names):
var/amasty/geoip/GeoLite2-City-Blocks-IPv4.csv
var/amasty/geoip/GeoLite2-City-Blocks-IPv6.csv
var/amasty/geoip/GeoLite2-City-Locations-en.csv
In the Import section, the Import button is grayed out by default. It will be available right after you upload the CSV files. The red error notification will switch to green success notification when the import is completed.
IP Database Update Settings
The database included in the extension was last updated on October 24, 2023. To keep the IP database current, you can update it using one of two methods.
Please note that regardless of the updating method chosen, you need to import the IP database first.

Refresh IP Database - select the appropriate method for refreshing the IP database:
- Manually - to manually upload the updated database files;
- Update via Amasty Service - to update the database automatically and regularly via Amasty Service, which is complimentary for you until August 2024.
Debug Mode
You can enable IP forcing, which makes it possible to set a specific IP address that will be used instead of the visitor's real IP address when determining geolocation. The feature is useful while configuring or testing the extension.

Enable Force IP - set to Yes to replace the real IP address.
Force IP Address - specify the address to use instead of a real one.
Log Auto-Cleaning
Return to the Admin Actions Log → General tab and expand the Log Auto-Cleaning. Here you can configure automatic log cleaning to avoid database overload.
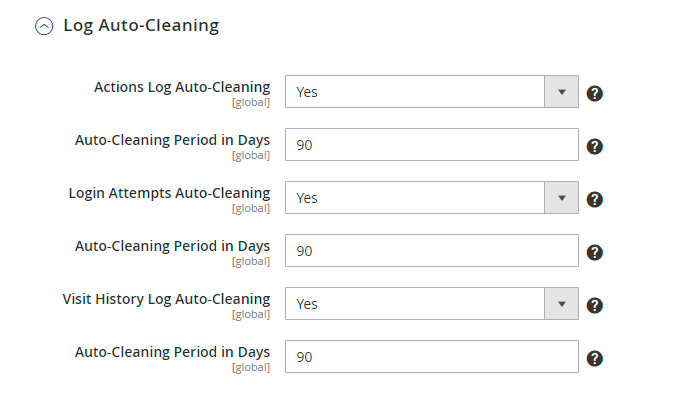
Actions Log Auto-Cleaning, Days — enable the cleaning of the Actions log and specify the number of days after which all action logs would be automatically deleted;
Login Attempts Auto-Cleaning, Days — specify the number of days after which all login attempts would be automatically deleted;
Visit History Log Auto-Cleaning, Days — specify the number of days after which all page history would be automatically deleted. Set 0 for an unlimited number of days.
Email Notifications
With the extension, you can get notifications about Successful, Unsuccessful, and Suspicious admin panel login attempts. To enable any type of notifications, configure the following options:
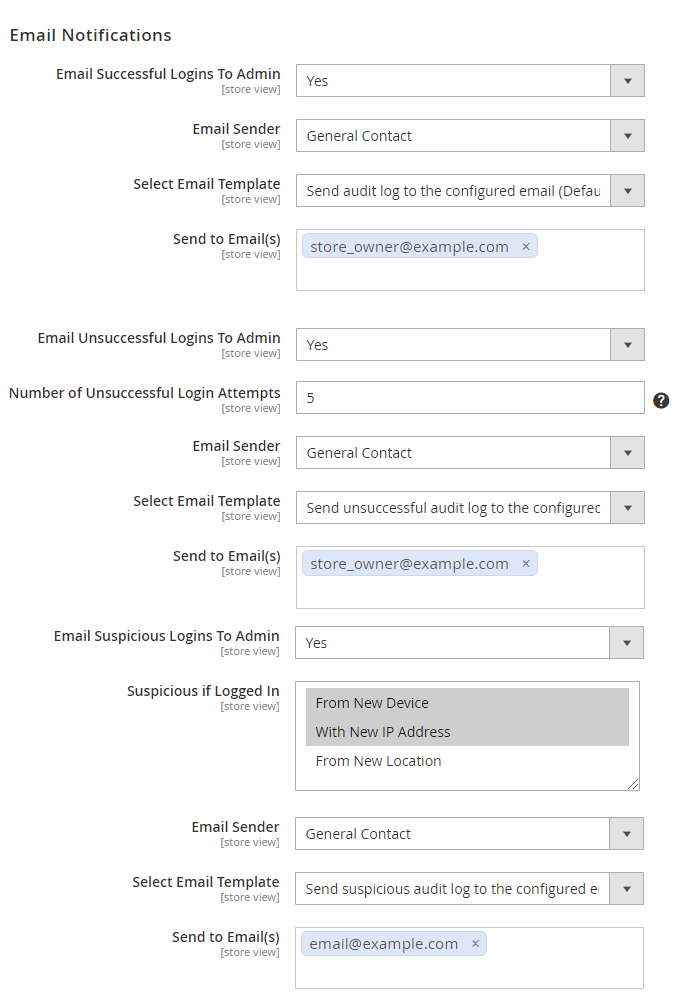
Email Successful / Unsuccessful / Suspicious Logins To Admin — enable or disable a certain notification type;
Email Sender - select an email address from which the notifications will be sent;
Select Email Template — choose the email template to use for notifications;
Send to Email — specify the email address to send notifications to;
Suspicious if Logged In - define which login actions should be considered as suspicious:
- From New Device
- With New IP Address
- From New Location
Actions Log
To see the Action Log of all administrators, please go to System → Actions Log. The actions are logged only for the users you specified on the General Settings page.
In the Action Log table you can find the following details:
- Date;
- Username;
- Full Name;
- IP Address;
- Interaction via;
- Action Type;
- Object;
- Store View;
- Item;
- Item ID;
- Action.
The extension offers the capability to log actions performed both through the Admin Panel and API. To identify how actions were performed, refer to the Interaction via column on the grid (Note: the functionality is available as a part of an active product subscription or support subscription).
Logging for mass product updates
This extension is compatible with Amasty Mass Product Actions. When both extensions are installed, it enables logging of bulk changes made via mass product actions — except for the Relate, Cross-sell, and Up-sell action groups.

Additionally, you can log product updates made using the Upgrade Attributes mass action. To ensure these changes are applied and properly logged, you may need to run the following command:
php bin/magento queue:consumers:start product_action_attribute.update

Logging for the mentioned mass product actions is available only with an active product or support subscription. You can find the amasty/module-admin-actions-log-subscription-functionality package for installation in composer suggest.
Use the Actions dropdown to restore changes in bulk.
Click Preview Changes in the Actions column to see the brief info about the action which has been performed by the user.
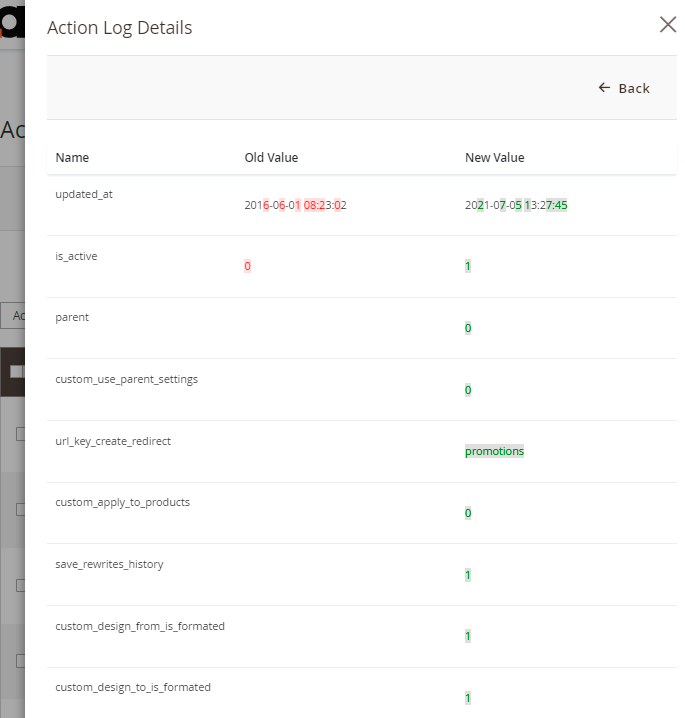
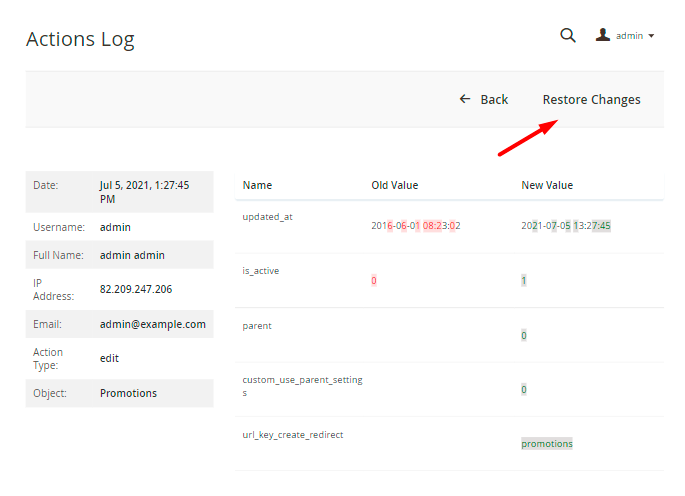
Click View Details in the Actions column to see the details of an action. You can use the Restore Changes button to cancel all changes of this action.
It is possible to display attribute labels instead of attribute IDs in the Action Log Details section for easier tracking of changes. For example, you'll see labels of the material attribute: Cotton, Nylon, and Polyester instead of their corresponding IDs 33, 37, and 38.

This option is available only with an active support or product subscription. You can find the amasty/module-admin-actions-log-subscription-functionality package for installation in composer suggest.
Then, a pop-up window should appear to confirm aborting the changes.
You can modify the pop-up message in the General Settings.
The extension provides the capability to log not only the creation of Scheduled Changes but also their automatic execution. When a scheduled change is run, you can view a recording about it in the Actions Log grid under the Schedule Run action type. This functionality is exclusively available as a part of an active product subscription or support subscription for the Magento Enterprise (EE) version of the extension.
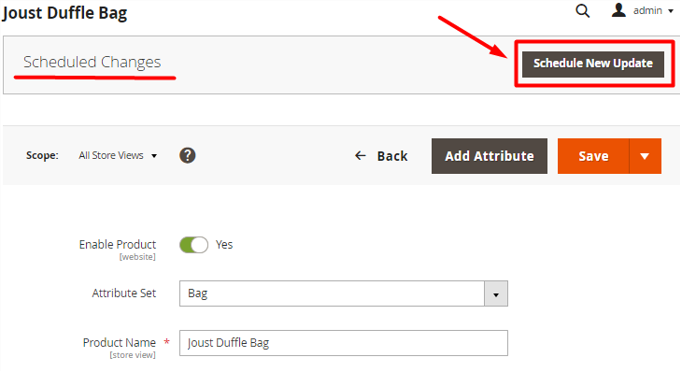
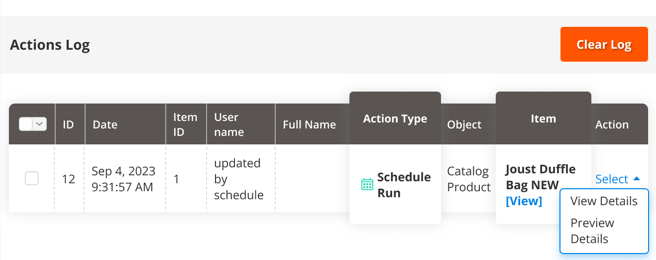
Please note that changes made by the Schedule can’t be directly restored from the Actions Log grid.
Active Sessions
To view administrator sessions that are active right now, please go to System → Admin Actions Log → Active Sessions.
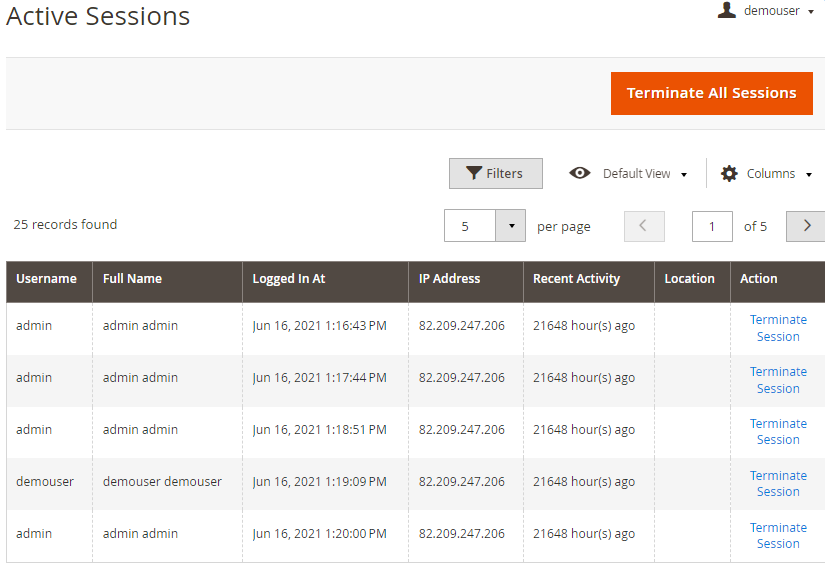
In the table you can find the following information:
- Username;
- Full Name;
- Logged In At;
- IP Address;
- Location (see the General Settings section to enable this column);
- Recent Activity;
- Actions.
Hit the Terminate Session link in the Actions column to terminate any session if necessary.
Please be informed that clicking the Terminate All Sessions button will terminate and delete all existing sessions from the log, including your current session.
Login Attempts Log
To access the Login Attempts grid, please go to System → Admin Actions Log → Login Attempts.
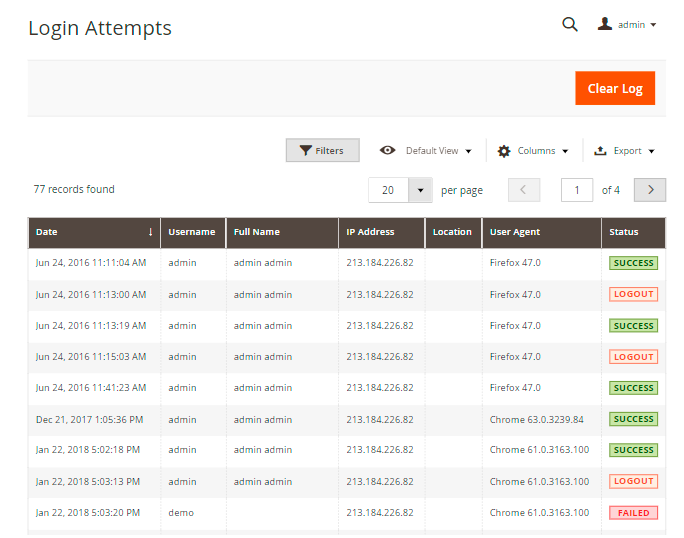
On the grid you can find the following details:
- Date;
- Username;
- Full Name;
- IP Address;
- Location;
- User Agent;
- Status.
Generally, each store administrator can have one of three available statuses:
Success — this status appears when a user is successfully logged in to the admin panel;
Logout — this status appears when a user is successfully logged out from the admin panel;
Failed — this status is shown when the person tries to log in with the wrong username or password.
You can filter the information on the Login Attempts grid by all available columns.
Page Visit History
To see the history of pages visited by all administrators please go to System → Admin Actions Log → Page Visit History.
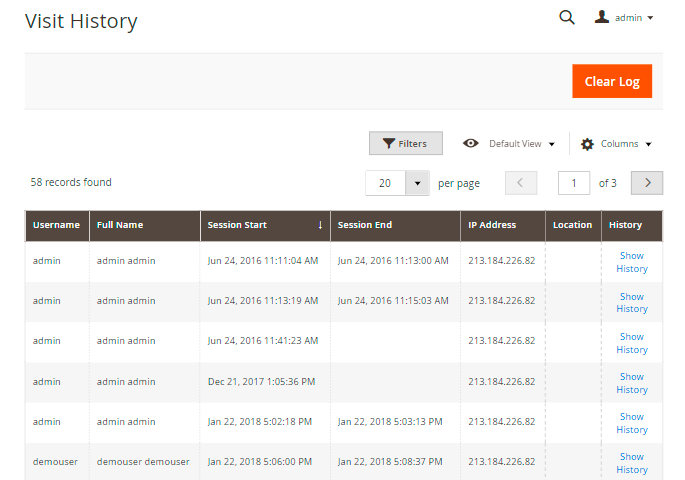
Actions are logged only for the users you specified on the General Settings page.
On the grid you can find the following details:
- Username;
- Full Name;
- Session Start;
- Session End;
- IP Address;
- Location (see the General Settings section to enable this column).
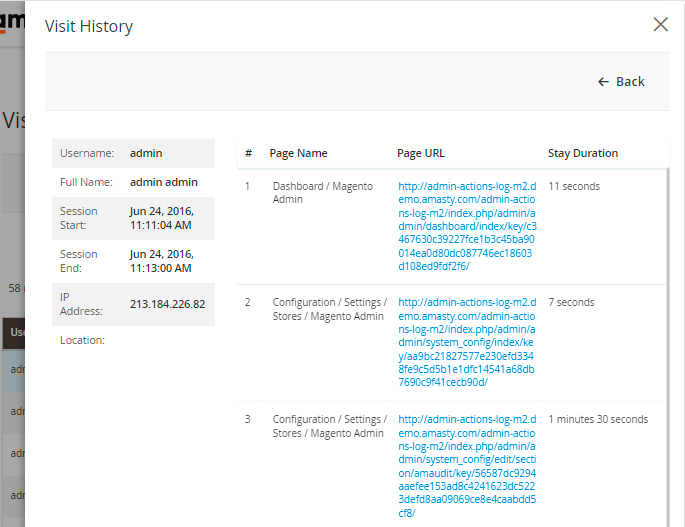
Click the Show History button to see the details of a particular visit.
Changes History
The new History of Changes tab is available for a product, customer and order info pages.
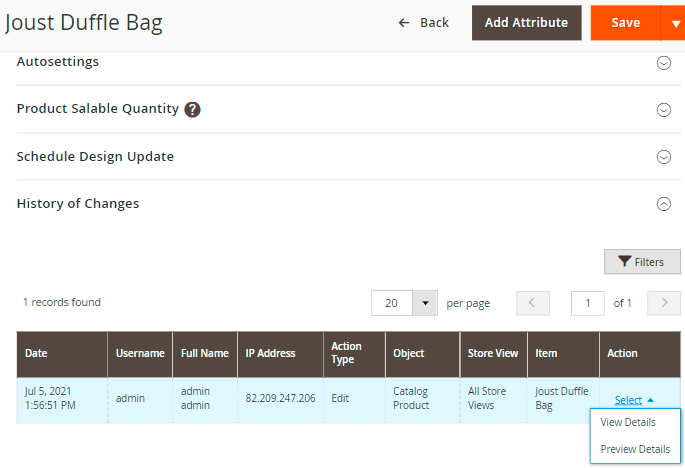
You can preview each particular page modification or view its details via the Select button. On top of that, you can restore recent changes using the Restore Changes button in the detailed view.
Cron Tasks List
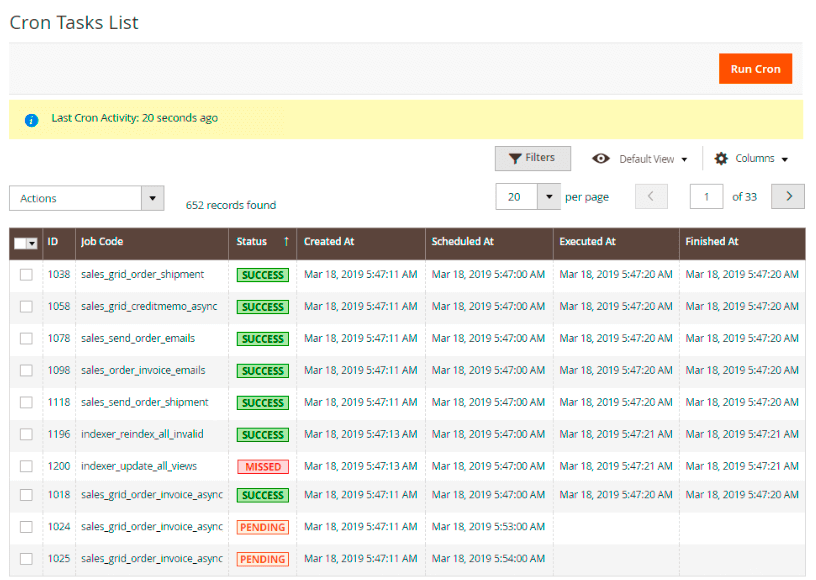
Magento 2 Admin Actions Log extension is preintegrated with Cron Tasks List to provide store owners with an opportunity to track and manage all cron tasks running in the website background.
To view all scheduled and executed cron tasks, go to System → Cron Tasks List
Run all cron tasks and generate their schedule by clicking the ‘Run Cron’ button. Also, you can delete separate tasks in bulk, apply filtering and sorting options when it is needed.
FAQ
* Does the extension log actions done by the system, e.g. cron scheduler?
* Does the extension log actions made via API functionality?
Find out how to install the Admin Actions Log extension via Composer.
magento_2/admin_actions_log.txt · Last modified: 2025/03/31 11:45 by kkondrateva

