Sidebar
magento_2:import_and_export
Table of Contents
For more details see how the Import and Export for Magento 2 extension works.
Guide for Import and Export for Magento 2
Import and Export for Magento 2 is the solution for data migration and synchronization. Connect your Magento store with ERP/CRM systems and third-party sources like marketplaces. The extension is not based on Magento import and export functionality, which makes it more flexible and adjustable for any third-party software.
- Build profiles for regular data synchronization or perform a one-time transfer
- Map fields and change the values with modifiers
- Schedule automatic import and export tasks via cron
- Use various file formats, including Google Sheets
- Validate import files to avoid errors
- Set performance options to speed up migration and avoid server overload
This guide fully describes the solution Premium version, which includes all Import and Export functionalities and by now, allows you to manage the following entities:
- import/export Orders;
- import/export Products;
- import/export Customers;
- import/export CMS blocks;
- import/export CMS pages;
- import/export URL rewrites;
- import/export Catalog Price Rules;
- import/export Cart Price Rules;
- import/export EAV attributes;
- import/export Search Terms and Synonyms.
Also, you can choose the Lite or Pro solution versions, which will provide you with facilitated feature sets according to your specific business needs.
Lite version includes the following functionalities:
- One-time manual import/export tasks
- 3 entities: order, product, customer
- 2 file formats (CSV, XML)
- 2 sources (file upload/local directory)
Pro version includes the following functionalities:
- One-time manual import/export tasks
- 3 entities: order, product, customer
- Mini-automation using cron jobs
- 6 file formats (CSV, XML, ODS, XLSX, Template, JSON)
- 9 file sources
- Export history
![]() You can also refer to this comprehensive article prepared by our support team for expert recommendations on extension configuration and import/export execution.
You can also refer to this comprehensive article prepared by our support team for expert recommendations on extension configuration and import/export execution.
Explore our internal Knowledge Base to gain even more valuable insights and uncover answers to popular questions about the configuration and features of the Magento 2 Import and Export extension.
Import & Export Structure
Amasty Import and Export solution has 3 separate interfaces that cover different migration tasks:
- Import/Export Profiles: an interface to create profiles for regular synchronization; profiles are created separately for different entities
- Amasty One-time Import/Export: a simplified interface suitable for a one-time import or export of any available entity
- Amasty Import/Export Cron Jobs: a separate module to create cron jobs concerning import and export activity
Thus, you can use the solution both for multiple integrations and non-regular data transferring.
Please, note: URL rewrites and CMS blocks can be imported and exported using a one-time interface or cron jobs. This way, you can't create automatic profiles for these entities.
Performance Settings
The solution has multiple options for performance optimization. The settings are different for import and export so that you could flexibly configure both processes according to your server capabilities. Also, the settings are split by entities, e.g. you can make the export of products faster than the export of orders.
Export Settings
The performance of regular exports:
Go to Stores → Configuration → Amasty Extensions → Export Orders/Products/Customers.
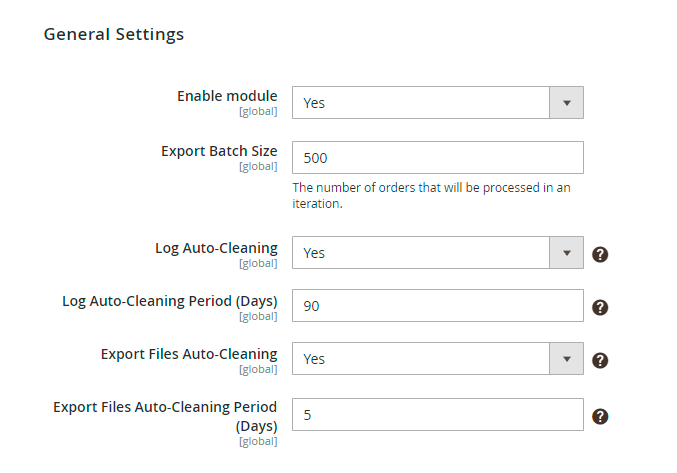
Enable module - select Yes to activate the extension.
Export Batch Size - set the number of orders that will be processed in an iteration.
Log Auto-Cleaning - choose Yes to clean logs automatically. The records will be removed from Export History after the period specified below.
Log Auto-Cleaning Period (Days) - define the period after which export history will be cleaned.
Export Files Auto-Cleaning - if enabled, the generated export files will be automatically removed from the server after the period specified below.
Export Files Auto-Cleaning Period (Days) - identify the period after which the files will be removed from the server.

Enable Multi-Process Export - set to Yes to speed up the export of orders. Remember, that this option is added specifically for orders.
The 'Multi-Process Export' feature requires the PHP extension 'pcntl' to be installed on the server. If you enable the feature and no performance boost happens, please ask your hoster/system administrator to check if the 'pcntl' extension is installed.
Number of Parallel Processes - specify the number of processes according to your server capabilities. The more parallel processes are set, the faster the export process goes, but the higher the server loads.
The performance of one-time exports:
You can also configure the setting for additional interfaces separately.
To configure the basic options for One-time Export, navigate to Stores → Configuration → Amasty Extensions → Export.

Enable Multi-Process Export - set to Yes to speed up the export.
The 'Multi-Process Export' feature requires the PHP extension 'pcntl' to be installed on the server. If you enable the feature and no performance boost happens, please ask your hoster/system administrator to check if the 'pcntl' extension is installed.
Number of Parallel Processes - specify the number of processes according to your server capabilities. The more parallel processes are set, the faster the export process goes, but the higher the server loads.
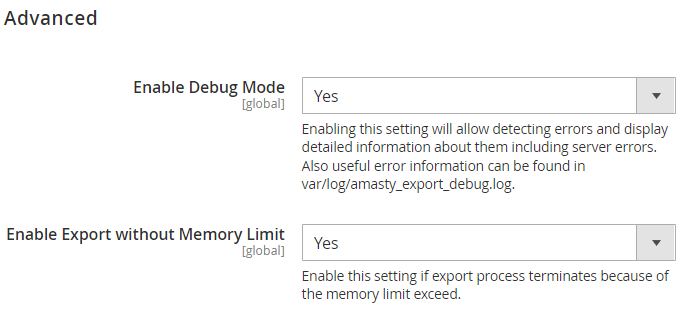
Enable Debug Mode - set to Yes to allow the system to detect errors and display detailed information about them in the popup (including server errors). Also, error information can be found in var/log/amasty_import_debug.log.
Process Status Check Mode - select the Statuses option if you are using a multi-node environment (this helps prevent possible errors). If you are not using a multi-node environment, please leave the System Process ID option selected.
Enable Export without Memory Limit - enable the setting if the export process terminates because the memory limit exceeds to allow using all available memory volume for the export process.
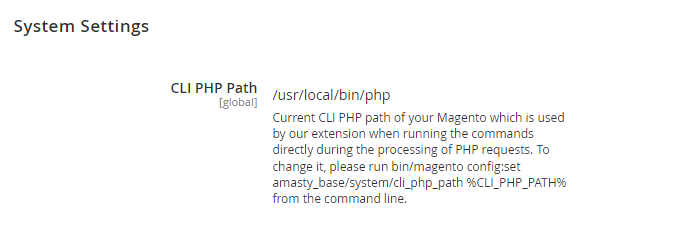
CLI PHP Path - using this option, you can check the Magento path which is used by our extension when running the commands directly during the processing of PHP requests. To change it, please run the following command:
bin/magento config:set amasty_base/system/cli_php_path %CLI_PHP_PATH%
If you run a command and a new path is not displayed in this setting, please recheck the path you've specified. In case the path is incorrect, the changes won't be applied to the admin panel and you'll see the default path.
Import Settings
The performance of regular imports:
Before building import profiles, configure the basic import performance options.
Go to Stores → Configuration → Amasty Extensions → Import Orders.
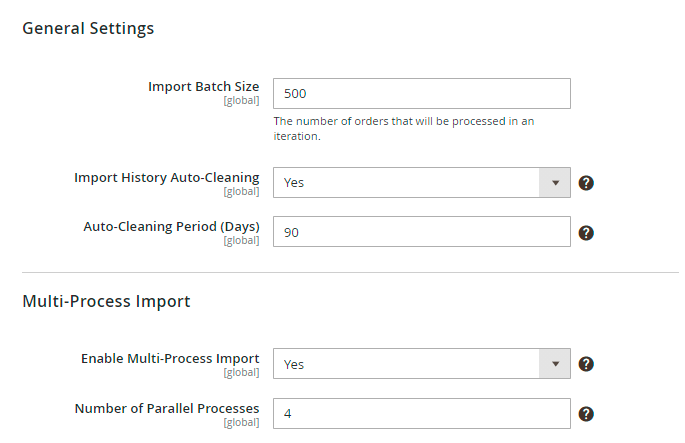
Import Batch Size - set number of orders that will be processed in an iteration.
Import History Auto-Cleaning - choose Yes to clean logs automatically. The records will be removed from Import History after the period specified below.
Auto-Cleaning Period (Days) - define the period after which import history will be cleaned.
Enable Multi-Process Import - enable this option to perform import in multiple threads and speed up the import process.
Number of Parallel Processes - if the previous option is enabled, specify the number of processes according to your server capabilities. The more parallel processes are set, the faster the import process goes, but the higher the load on the server is.
The performance of one-time imports:
The same options can be enabled for non-regular imports separately. Navigate to Stores → Configuration → Amasty Extensions → Import.

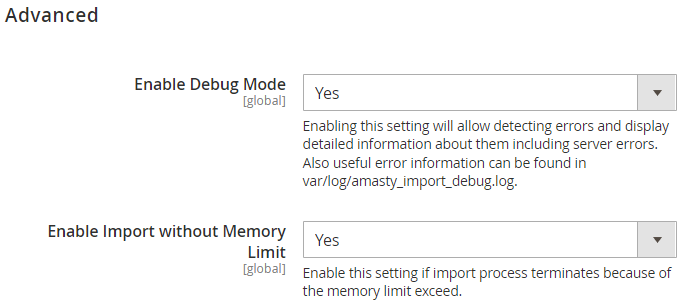
The import performance settings exclusively include the Max File Size Upload (MB) option in the Advanced tab.
Max File Size Upload (MB) - specify the maximum allowed size (in MB) for the import file. This setting applies to both one-time imports and import profiles.
The Max File Size Upload (MB) setting manages file size restrictions within the extension. However, the allowed file size may also be restricted by PHP (upload_max_filesize) or server (client_max_body_size) settings. If the file size limit in the server or PHP settings is lower than the value set in Max File Size Upload (MB), an error will occur. To prevent conflicts, you may need to adjust the file size limits in PHP and server settings accordingly.
The Max File Size Upload (MB) setting is available only as a part of an active product subscription or support subscription. You can find the amasty/module-import-subscription-functionality package for installation in composer suggest.
As for the export settings, you can also change the PHP path for the import.

Export Profiles Configuration
The extended order export functionality allows you to create flexible profiles for export and execute it on regular basis. To view all the profiles, proceed to System → Amasty Export → Export Orders/Products/Customers.
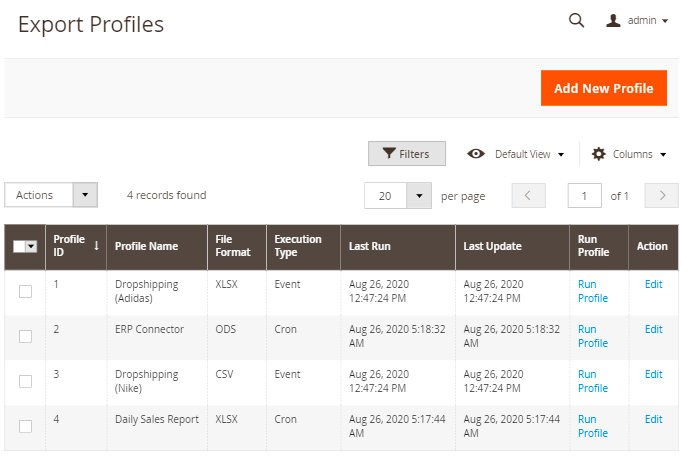
You can view, delete, add new profiles or run any of them manually right from the grid.
To create a new one, hit the Add New Profile button and follow a profile setup steps.
We will describe the settings based on the Export Orders example, but you can check specific manuals for each particular entity to find the cases and configuration samples.
General Configuration
In the first tab adjust the general information of the profile.
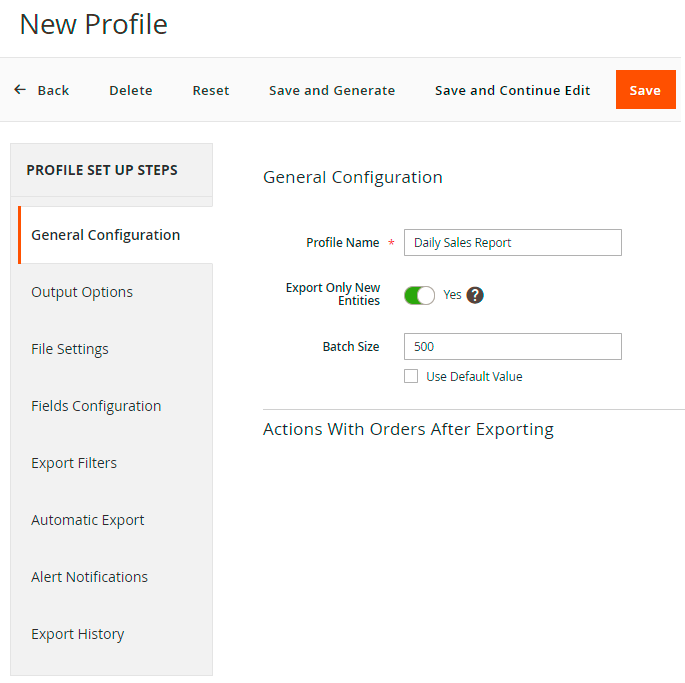
Profile Name - specify the name of the profile for internal usage. This name will be displayed in the grid.
Export Only New Entities - the previously exported orders will be skipped if the setting is enabled. The option is useful in case you export the profile regularly and only newly created orders are needed.
Batch Size - set the number of orders that will be processed in an iteration. You may configure batch size for each profile separately or specify the value in general configuration and use this default value.
You can duplicate the already created profiles if you want to build a profile similar to the existing one.

Actions With Orders After Exporting
You can also automatically execute particular actions when the orders are exported.
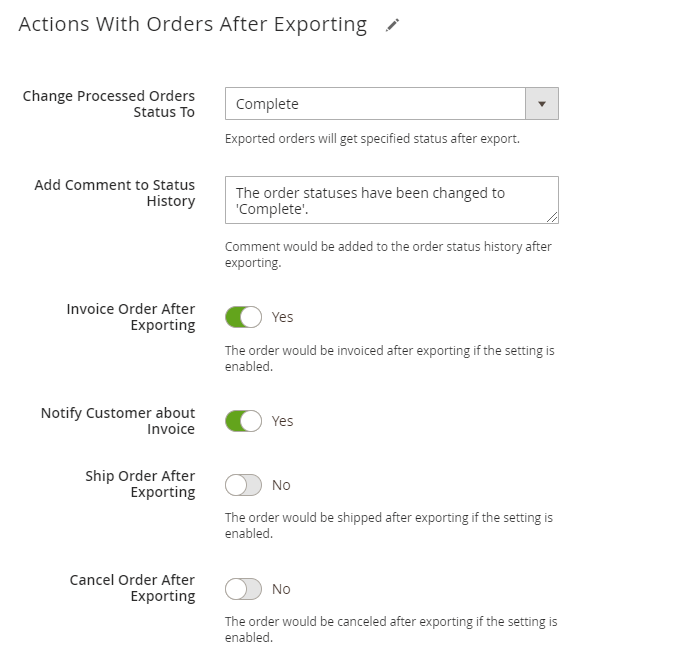
Change Processed Orders Status To - specify the status that exported orders will get.
Add Comment to Status History - comment would be added to the order status history after exporting.
Invoice, Ship or Cancel orders after the export if needed. When any of these actions are enabled, you can additionally notify customers.
Output Options
Proceed to the configuration of output options.
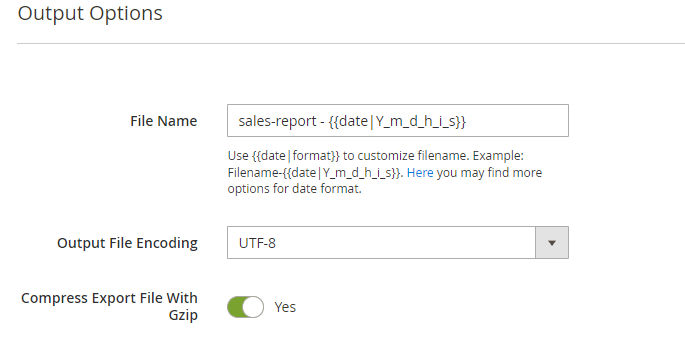
File Name - specify the title for the export file.
Use {date|format} to customize filename. Example: Filename-{date|Y_m_d_h_i_s}. Here you may find more options for date format.
Output File Encoding - choose the suitable type of export file encoding from the dropdown. UTF-8 is used by default.
Compress Export File With Gzip - enable the toggle to compress the file and save extra space on a server.
Export File Storage
Specify where to export the profile: on internal or external server, send the exported file by email or using API.
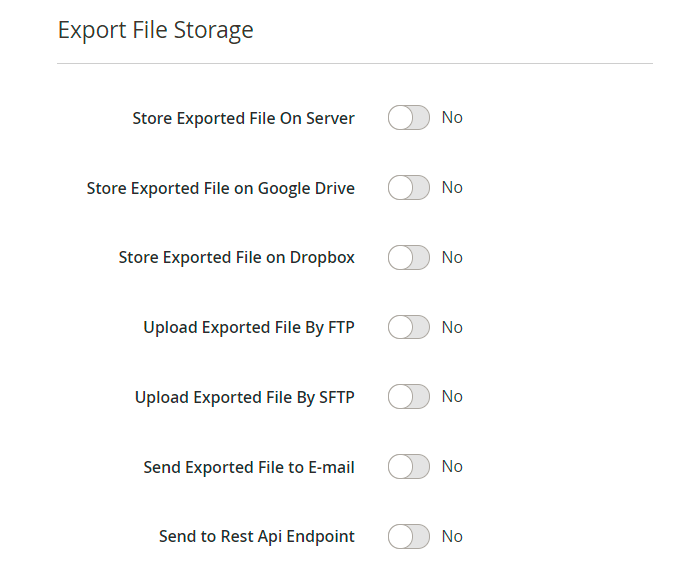
If Store Exported File On Server is enabled, provide File Path and File Name on Server. The file will be saved in Magento 'var' directory relative to the specified path.
If you want to Upload Exported File By FTP / SFTP, you will need to fill the following fields:
- Host
- User
- Password
- File Path
- File Name for FTP/SFTP.
For FTP you can also enable a Passive Mode.
In case you want to Send Exported File to Email, provide:
- Email Sender
- Email Recipients
- Email Message Subject
- Email Template.
If you are using Send to Rest Api Endpoint, provide:
- Rest Api Endpoint
- Auth (No Auth / Bearer / Basic)
- Method (POST / PUT)
- Content Type (JSON / XML).
Dropbox Configuration
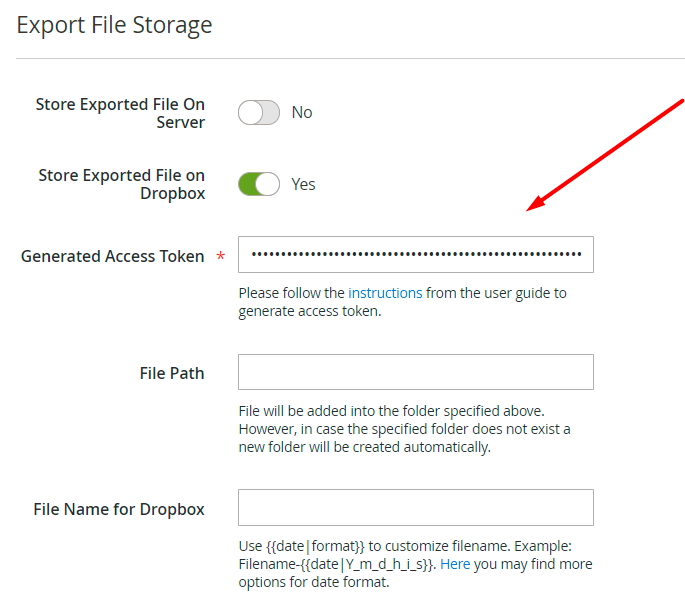
To export to Dropbox, you will need to provide the access token. Follow the steps below to get the token.
1. Go to https://www.dropbox.com/developers and sign in.
2. Hit the Create Apps button.
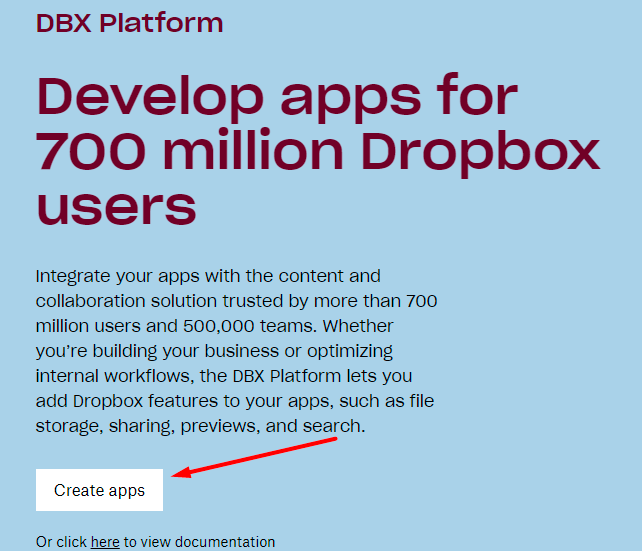
3. Choose an API, a type of access you need and specify the title for your folder.
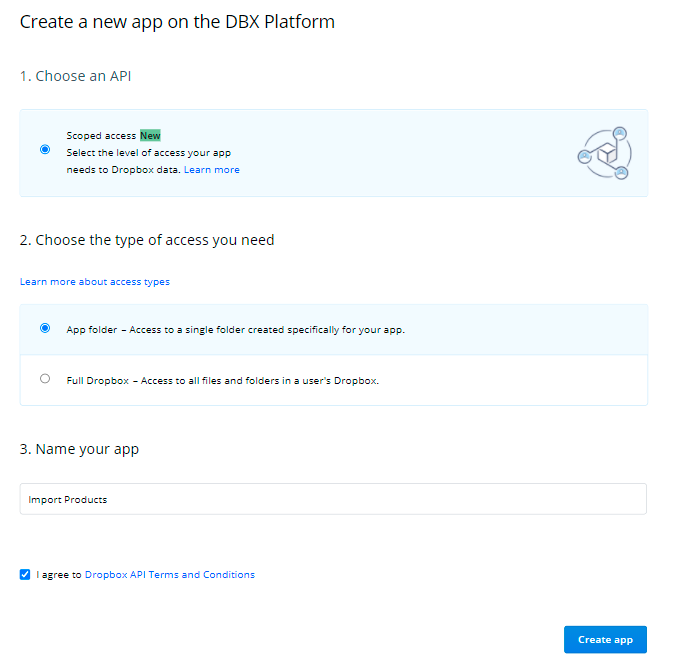
Agree with the terms & conditions and click Create App. You will be automatically redirected to the folder configuration.
4. Proceed to the Permissions tab.
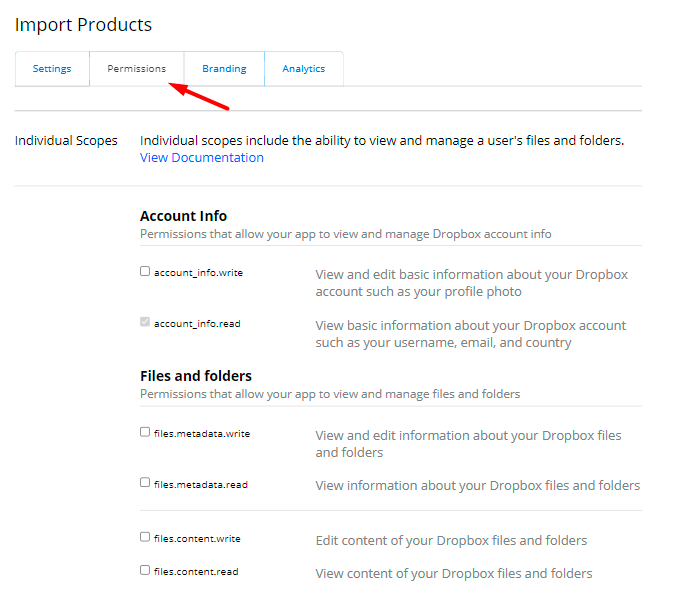
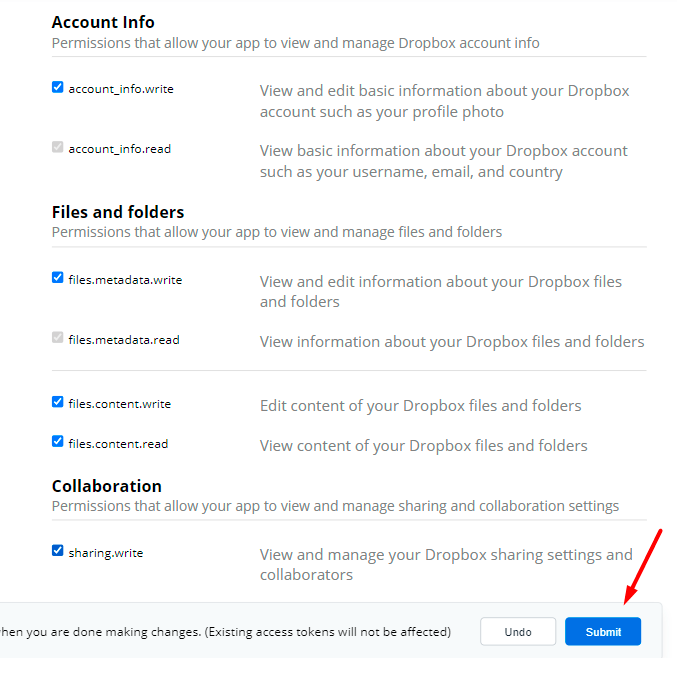
Grant the permissions to write the files and click Submit.
5. Return to the Settings tab.
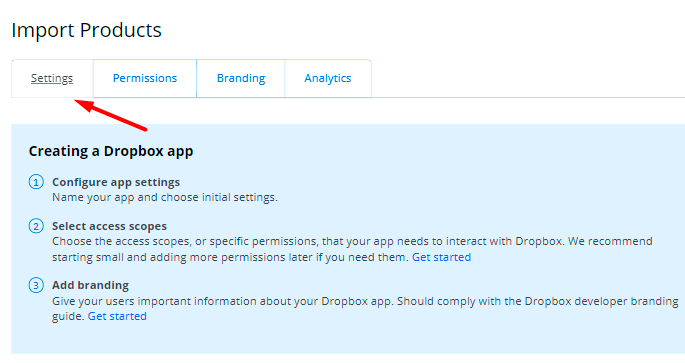
6. Find the OAuth 2 section and hit the Generate button below the Generated access token field.
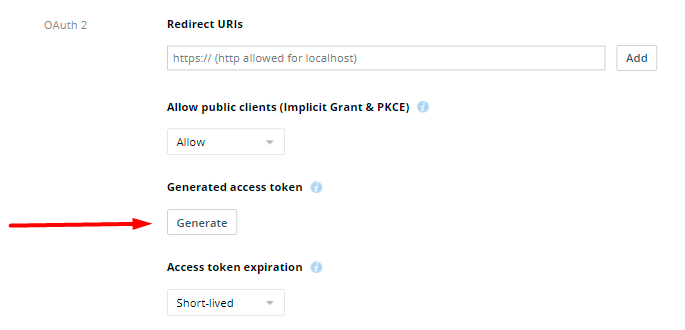
7. Copy the token and paste it into the Generated Access Token field.
Google Drive Configuration
To set the integration with Google Drive, you need a specific API key. To get the key and configure this output option correctly, follow the steps below.
1. First of all, you need to install Google APIs Client Library on your Magento instance. Click here and install composer require google/apiclient:“^2.0”.
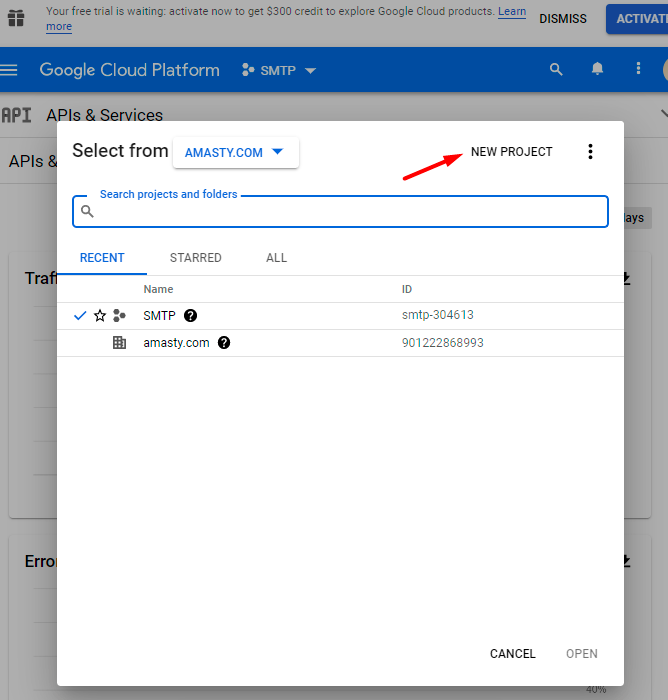
2. Go here and choose a project or create a new one if necessary.
3. When the required project is chosen, return to this page and enable Google Drive API.
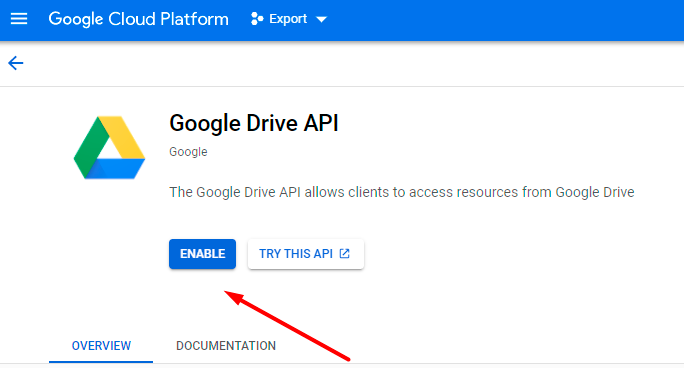
4. If everything is correct, you will see the following status:
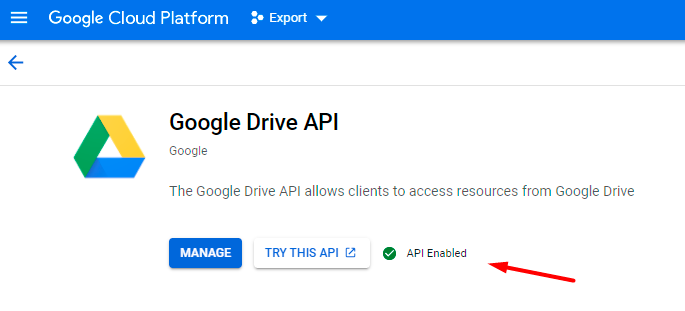
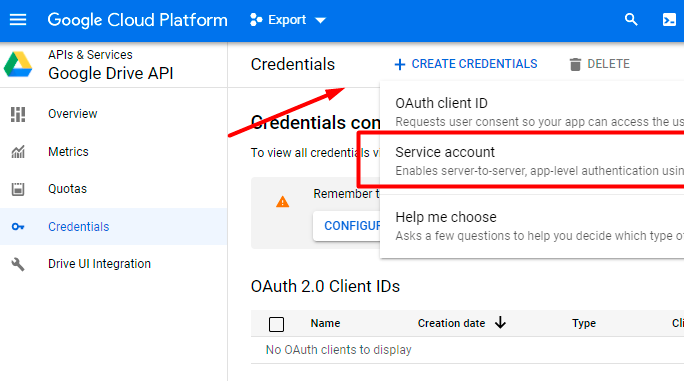
5. Click Manage and proceed to APIs & Services → Credentials. There click Create Credentials →Service account.
6. Provide Service account details. You can skip Step 2 and Step 3.
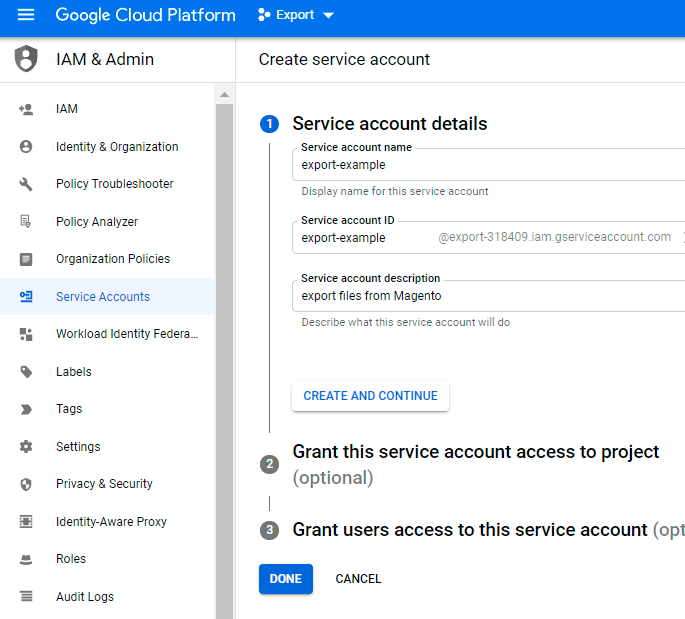
Click Done.
7. Navigate to the Service accounts tab and find the required service. Expand the Actions dropdown and hit the Manage keys option.
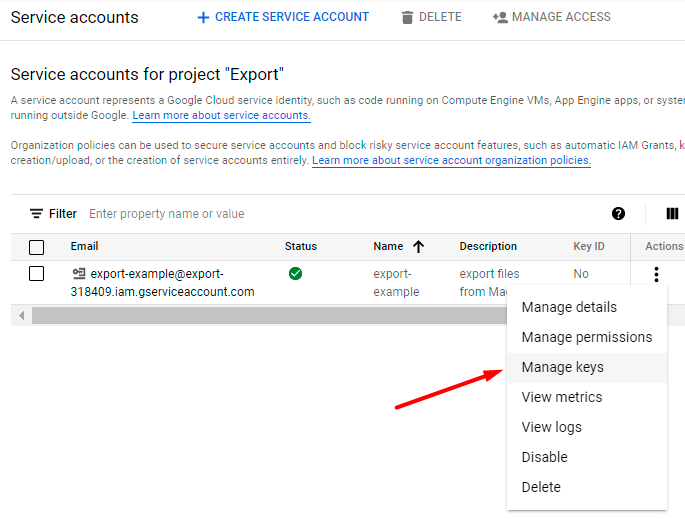
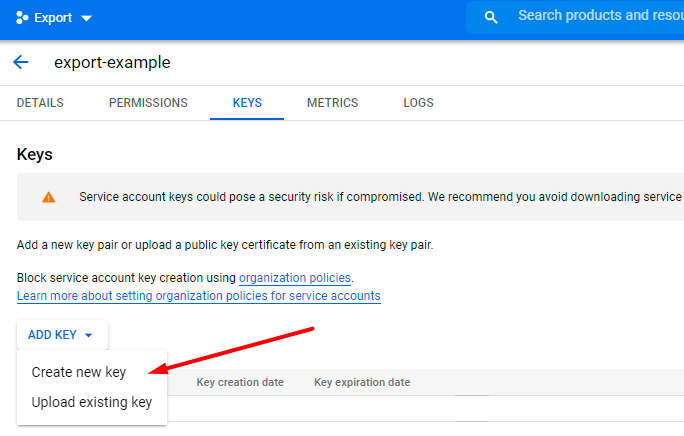
8. Expand the Add Key dropdown and select Create new key.
9. Choose JSON file format and hit the Create button.
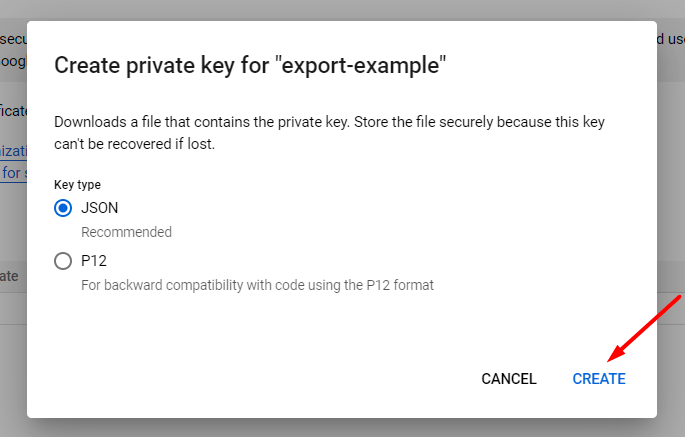
The file will be automatically generated and downloaded.
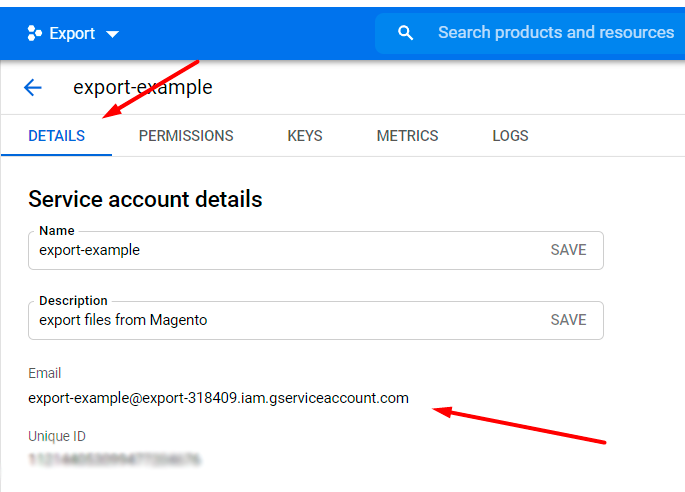
10. Proceed to the Details tab and copy the email.
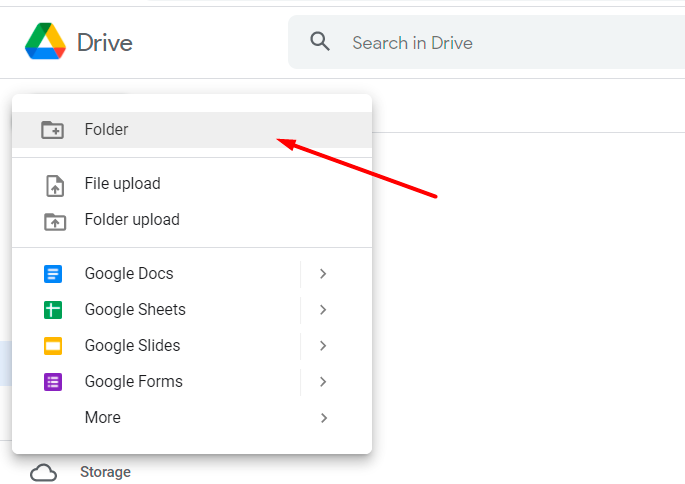
11. Go to My Drive. Create a folder to which export files will be output from Magento. Specify the title.
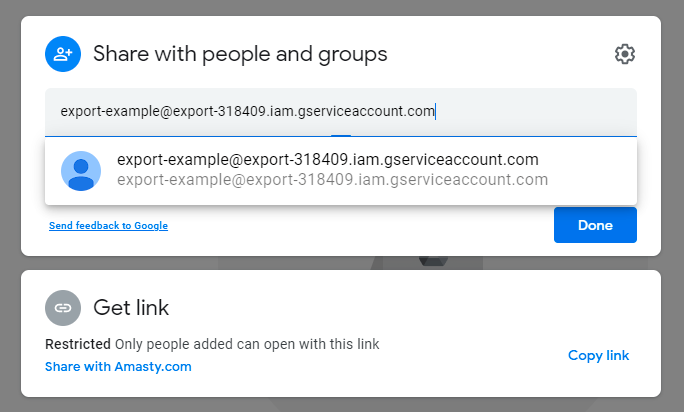
12. Now click Share and insert the email that you've copied. Click Done.
13. Return to the admin panel. Upload a JSON file, provide the path to the created folder and specify an export file naming with or without data format.
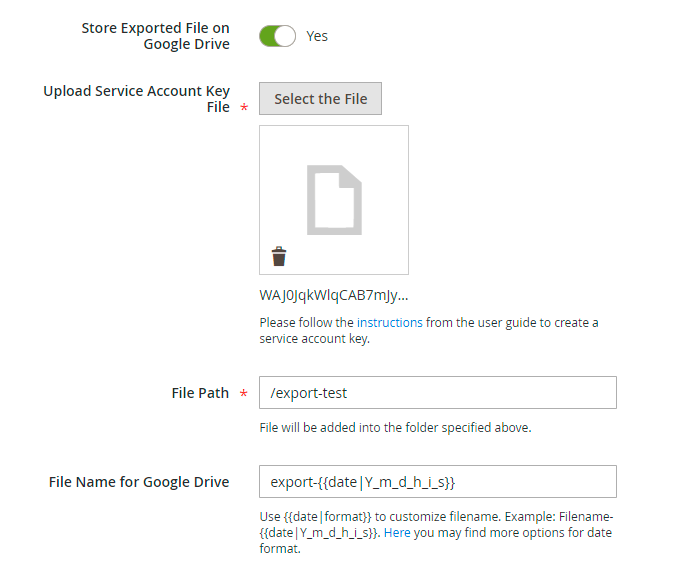
The configuration is ready. Run export profile and check the file in the Drive folder.
File Settings
In the following step, you need to choose the required file type and configure its general settings.
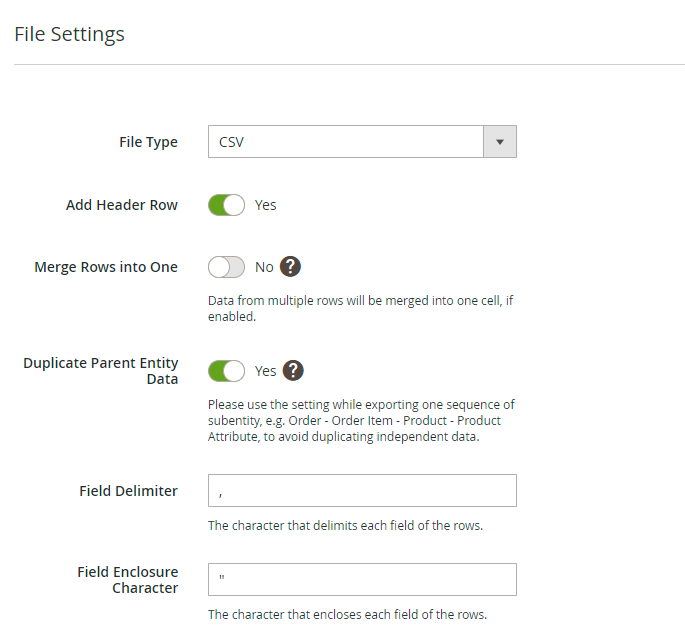
The following formats are available:
- CSV
- XML
- ODS
- XLSX
- JSON
- Template
For CSV, ODS and XLSX formats you can:
Add Header Row - column titles will be displayed in this row.
Merge Rows into One - data from multiple rows will be merged into one cell if enabled. The character that delimits each field of the child rows is customizable. Check the GIF in a demo to see how it works.
Duplicate Parent Entity Data - if enabled, the values of the child entities will be duplicated from the parent one.
See how it works
If disabled, child values are empty:

If enabled, the values are duplicated:

Please, use the setting while exporting one sequence of subentity, e.g. Order - Order Item - Product - Product Attribute, to avoid duplicating independent data.
For a CSV file you can additionally set:
- Field Delimiter
- Field Enclosure Character
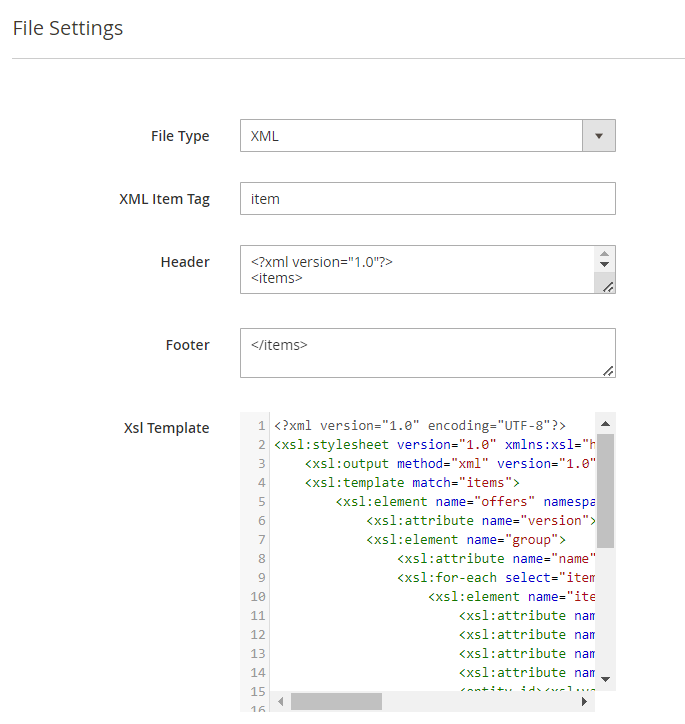
For an XML file you can customize:
- XML Item Tag
- Header
- Footer
XSLT Editor
The extension includes an XSLT editor so that you could output XML files with any custom formatting. Using this functionality, you can create custom templates for XML documents and add, remove, rearrange or sort elements in the file.
What is XSLT?
A lot of 3rd-party platforms you are integrating with use custom XML table formatting. Magento itself can't adapt such files automatically since each platform has its own requirements. XSLT (Extensible Stylesheet Language Transformations) helps to interpret the values from the Magento database and put them in an XML document. The editor helps to organize data in the file and make it acceptable for the platform you are exporting to.
Find out how the XSLT works in this tutorial.
Before exporting a custom XML file, review the formatting requirements and find out how the attributes provided in the document are named and structured in Magento. Then, create an Xsl Template to match the values.
To simplify template creation, download this ready-made sample file:
xsl-template-for-export.zip
For JSON specify:
- Header
- Footer
For Template:
Using the Template option, you can build a unique file suitable for specific needs. Thanks to the integrated Twig PHP template engine, you can create any template you want to:
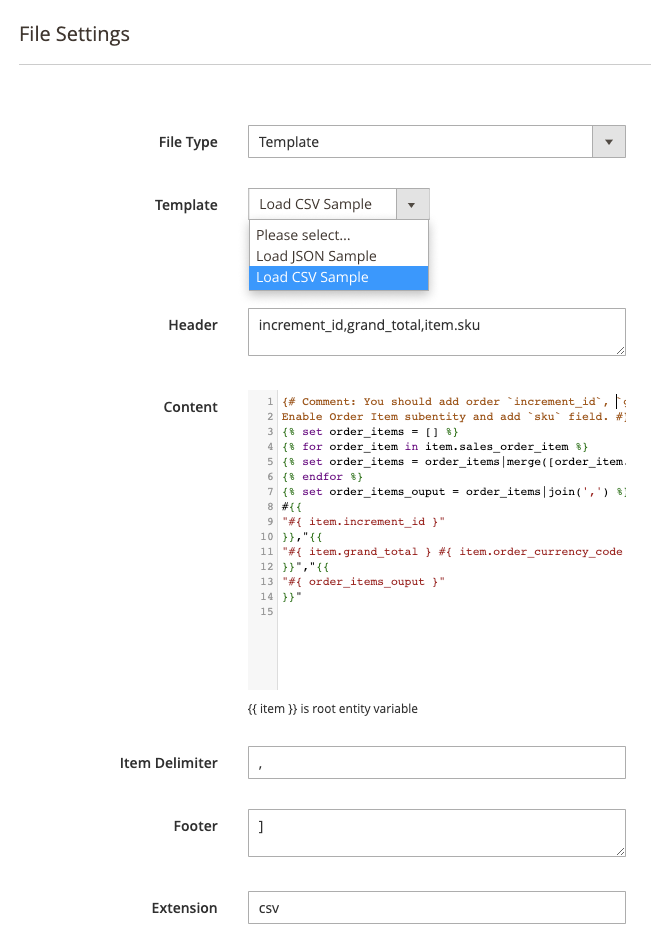
The extensions offers templates for .CSV and .JSON file types. To help you export subentities via .CSV using Twig template engine, please follow the steps below.
How to export subentities to CSV file using Twig
1. Enable the required subentity (‘Order Item’ for example) and add the fields you would like to export (‘sku’).
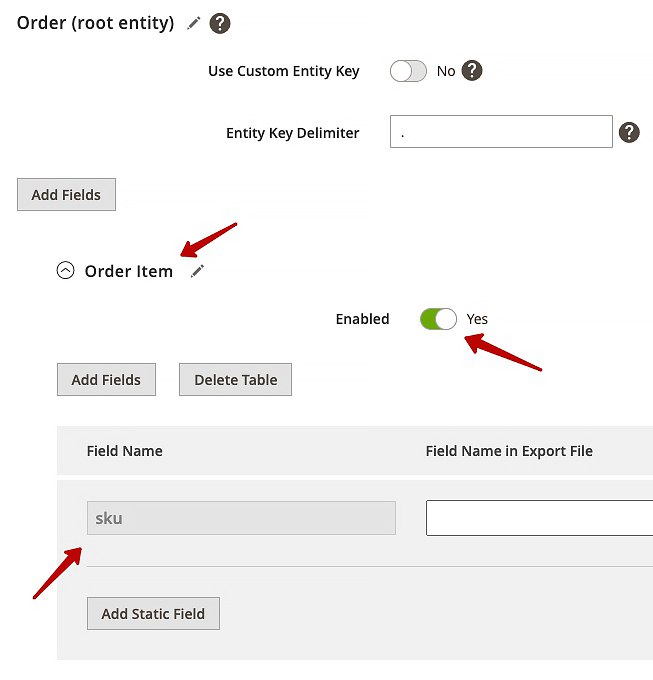
2. Determine the property name of each entity element in the chain. For example, for ‘Order Item’ subentity, the property name will be ‘sales_order_item’ of the root entity variable ‘item’ (item.sales_order_item).
The property name of the required entity can be found in the corresponding entity definition file. For example, for the subentity ‘Order Item’ it will be the file etc/entity/sales_order_item.xml (path is relative to ‘Amasty_OrderExportEntity’ extension files). The file can be found by the entity name contained in the name element, for example ‘<name>Order Item</name>’. Next, the required entity relation should be found in the file. In our case, ‘Order (root entity)’ → ‘Order Item’. Information about relations is contained in the elements ‘relation’ and the essence of relations is described in the attribute ‘code’. So we find the element ‘<relation code=“order_order_item”>’. The child element ‘sub_entity_field_name’ will contain the name of the property we are interested in (‘sales_order_item’).
3. Then use the loops to get information from subentities. To access the subentity ‘Order Item’ (‘sales_order_item’), use the following construction of the Twig template engine: {% for order_item in item.sales_order_item %}
As a result, the ‘sku’ property of the ‘order_item’ variable will contain the necessary information (‘order_item.sku’).
4. You can also use the filter ‘join (',')’ Twig to join an array of elements into a string.
{# Comment: You should enable Order Item subentity and add sku field. #}
{% set order_items = [] %}
{% for order_item in item.sales_order_item %}
{% set order_items = order_items|merge([order_item.sku]) %}
{% endfor %}
{% set order_items_ouput = order_items|join(',') %}
"{{
"#{ order_items_ouput }"
}}"
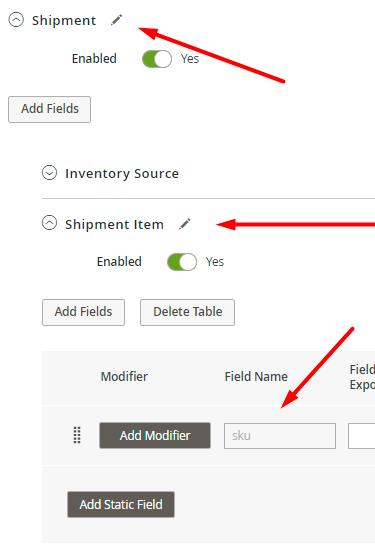
5. To access more nested entities, you need to use several loops. For example, to access the subentity ‘Shipment Item’, you need to go through the chain of entities ‘Order (root entity)’ → ‘Shipment’ → ‘Shipment Item’.
See Twig documentation to learn more about the features and configuration.
Fields Configuration
In this tab, you can start building your export file by choosing the data to export. The functionality has a tree structure. Thus, you can add any entity, any field within a particular entity, customize prefixes/tags/delimiters and so on to match the requirements of the system you are exporting to.
Keep in mind, that each export extension has a specific set of entities.
See how the tree-structures file is built:
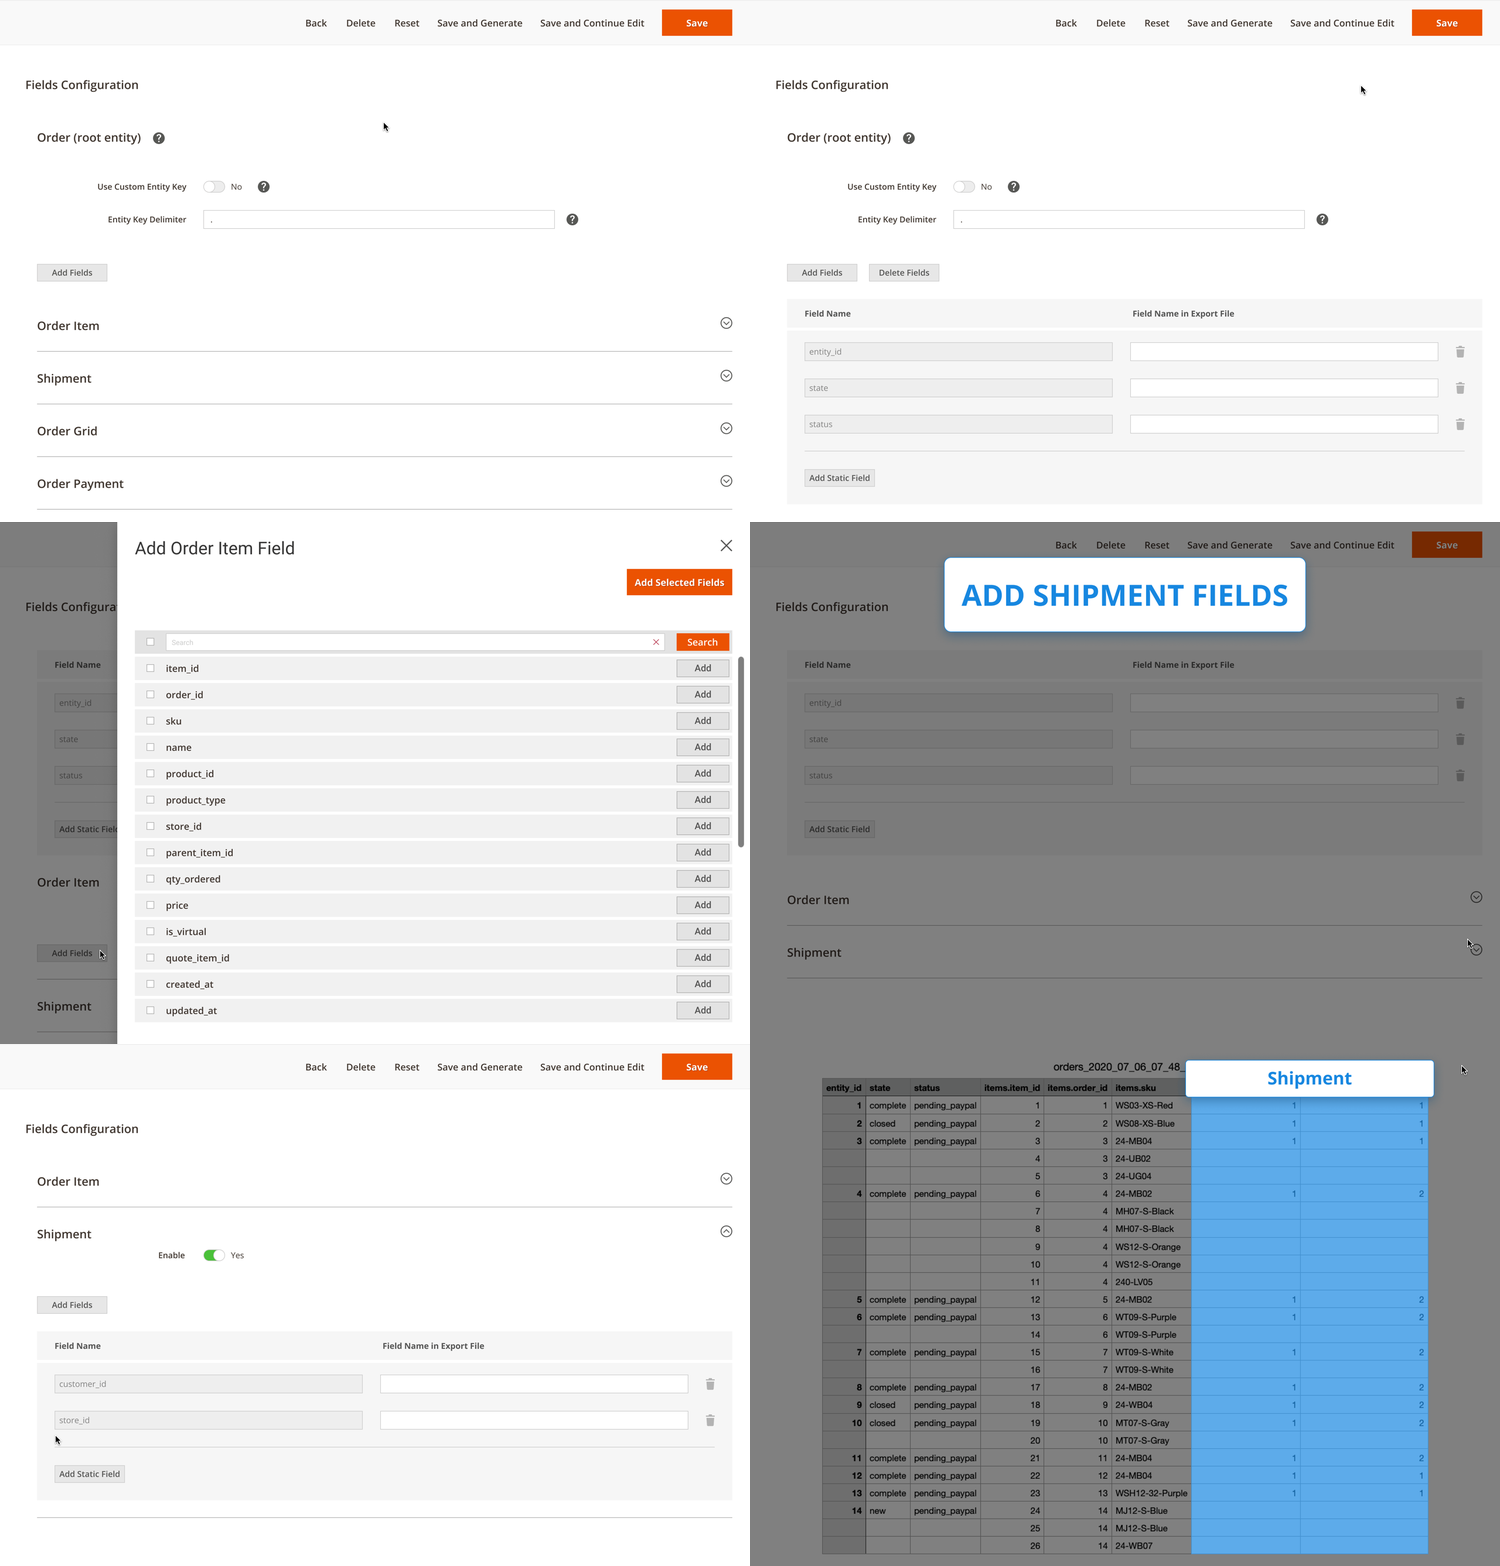
Step 1. Add root entities
First, you need to configure the basic order entity and select the fields that will be added to the file on the root level.

Click Add Fields button and choose the relevant data to add to the export file.
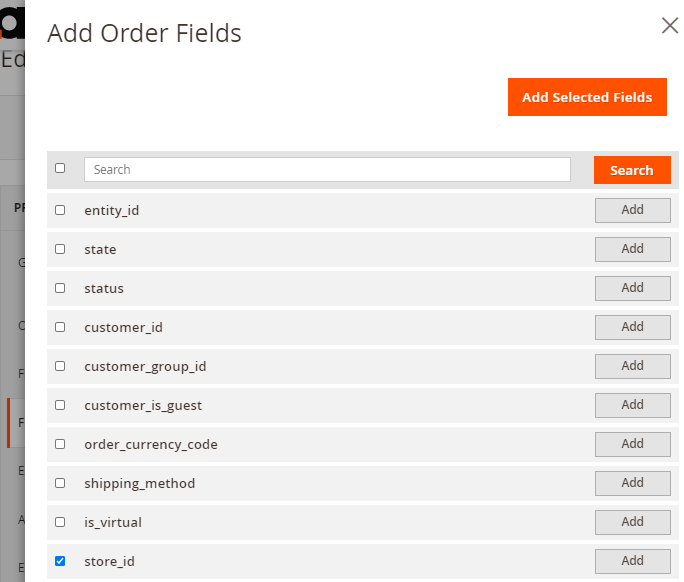
Use a search window right in the popup to find the required fields faster. Click Add Selected Fields.
When a field is added, you can customize a column title that will be displayed in the exported file. Moreover, use the Add Static Filed button to create columns that will remain unchanged in the file.
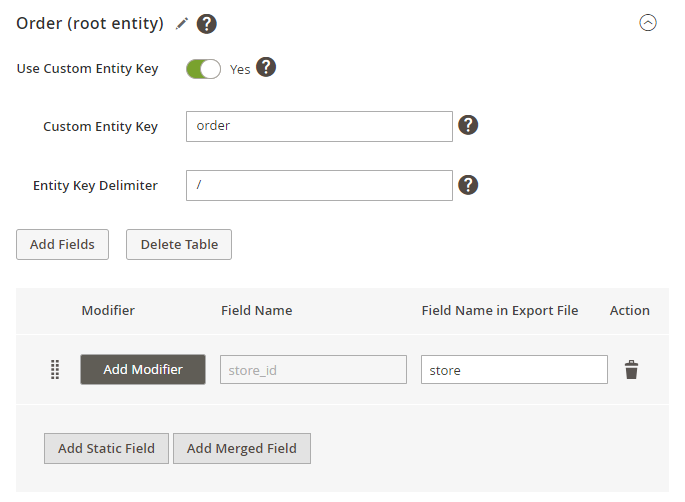
By clicking the Add Merged Field button, you can create custom columns that combine data from multiple fields. Also, it’s possible to customize the names of these columns and use symbols or words (such as 'and' or '/') to separate the data within them.
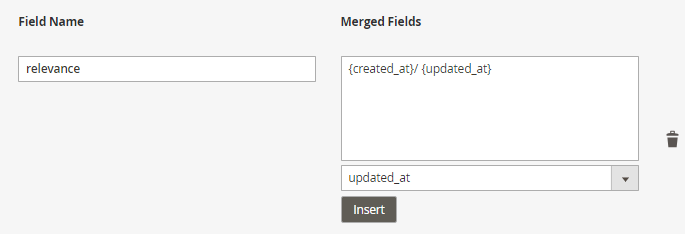

Please note that adding merged fields is available as a part of an active product subscription or support subscription.
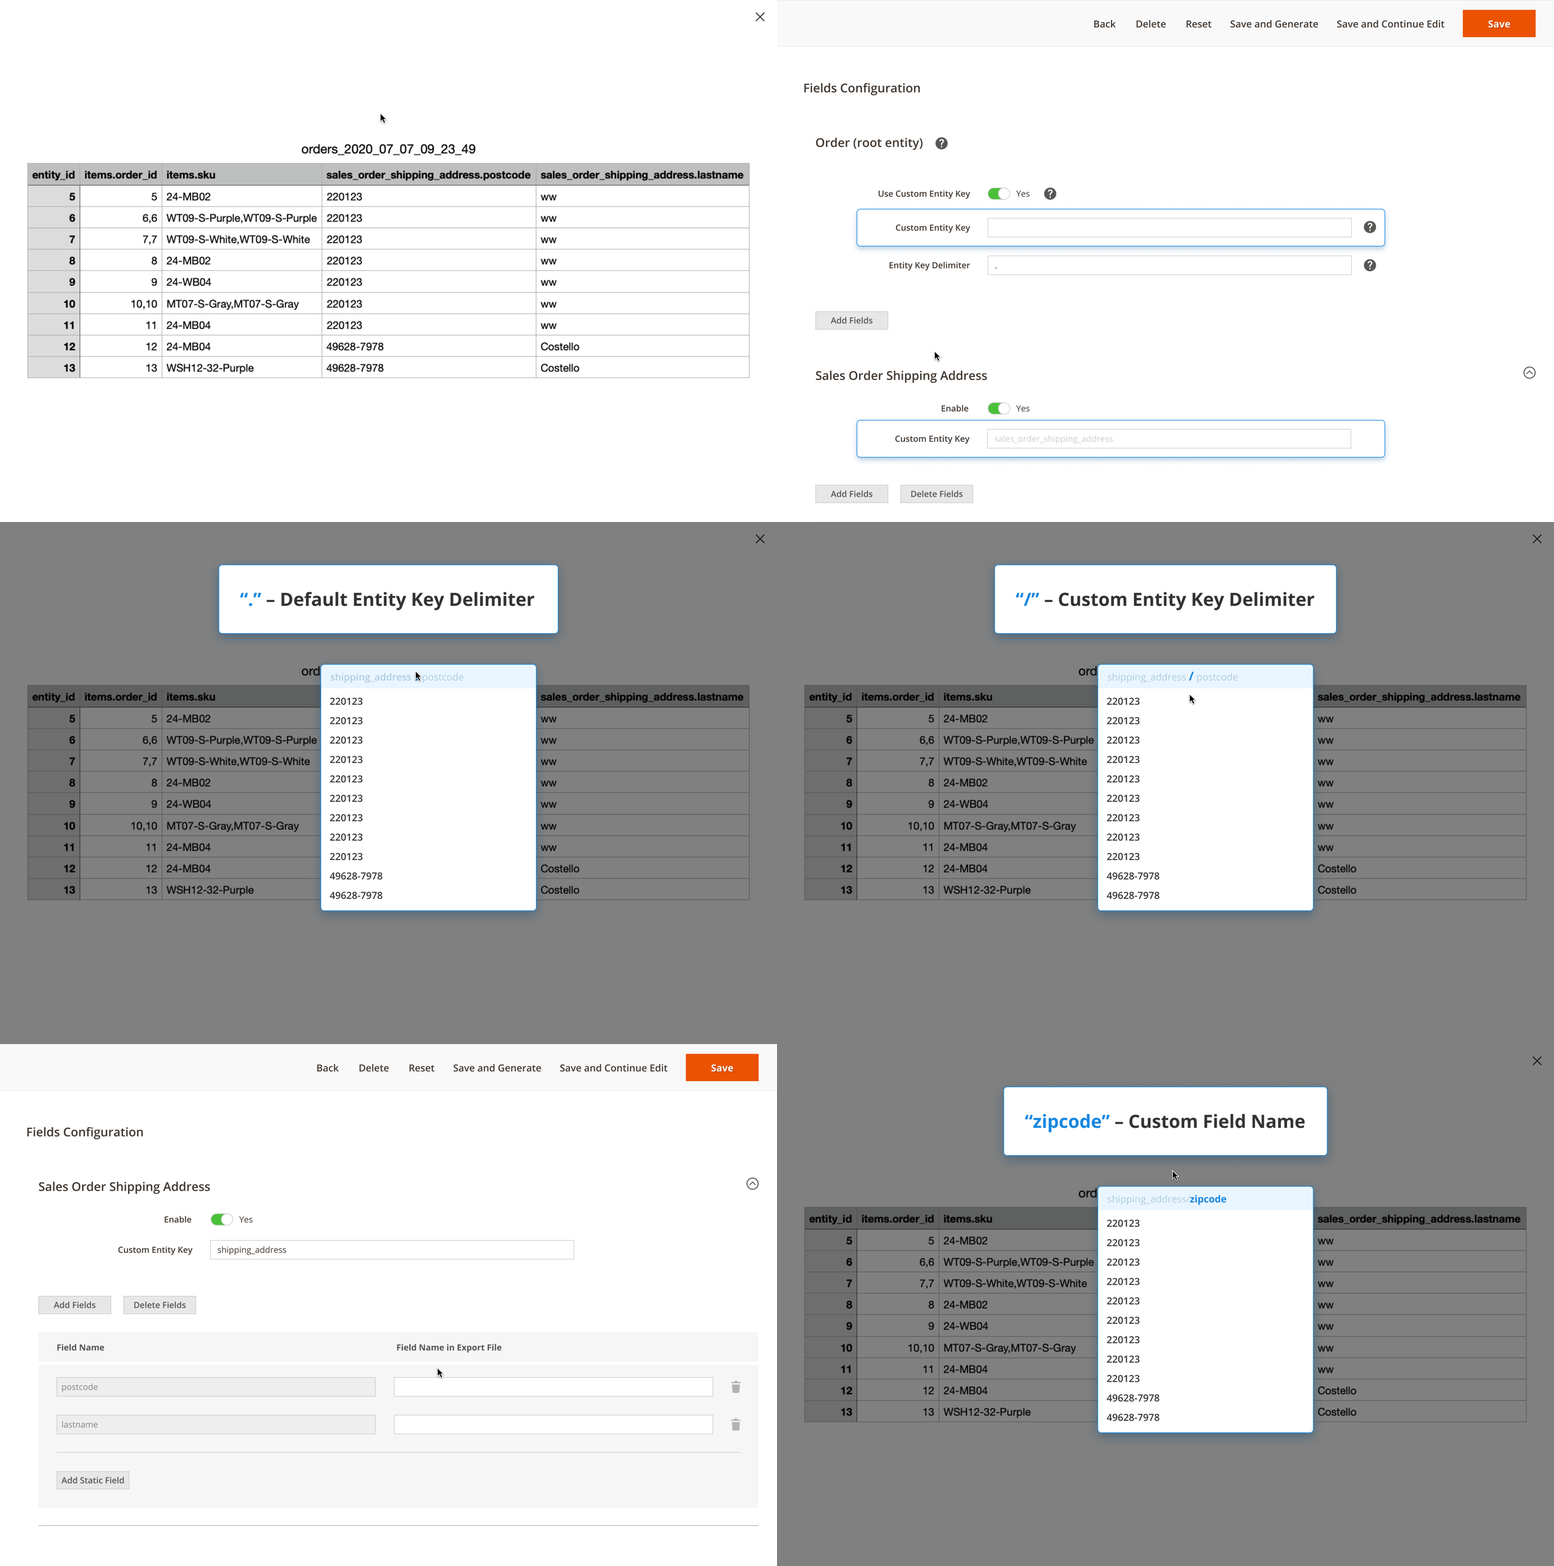
Also, for each file level, you can set a custom entity key, delimiter and a field name. Check how it works:
Step 2. Add subentities
Then you can go down the entity list and enable any you need.
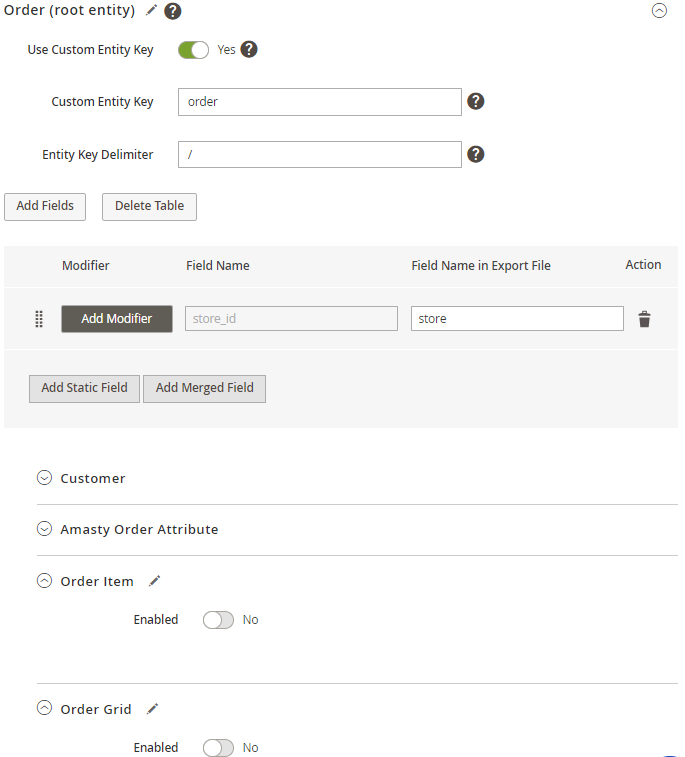
Just hit the Enabled toggle and Add Fileds button. As it was described above, a popup will appear and you will be able to add all required fields concerning a particular entity. For example, for the Order Item entity, you may add product type, sku, price, etc.
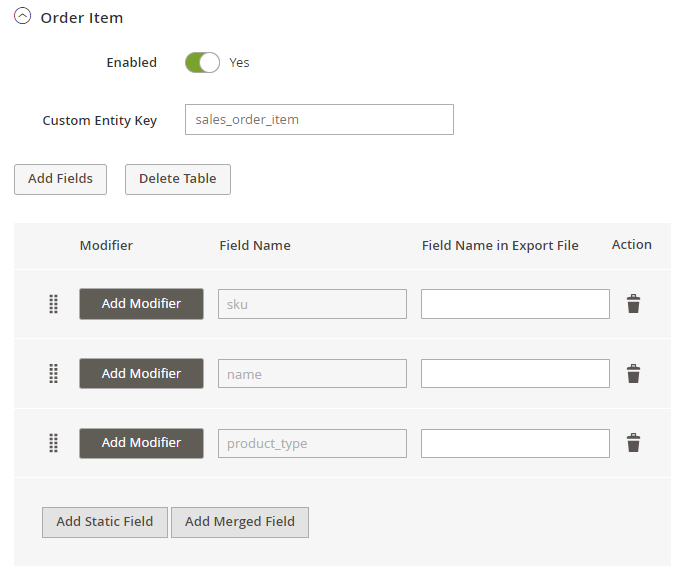
The same can be done for the entities with a lower level, such as Order Item Attribute or Order Item Custom Option.
The MSI Inventory Reservation subentity, nested within the Order Item entity, allows specifying the reserved product quantities in the export file, provided the fields of this subentity are properly mapped.
Also, the extension support MSI functionality. You can find the required fields on the Shipment level in the Inventory Source tab.
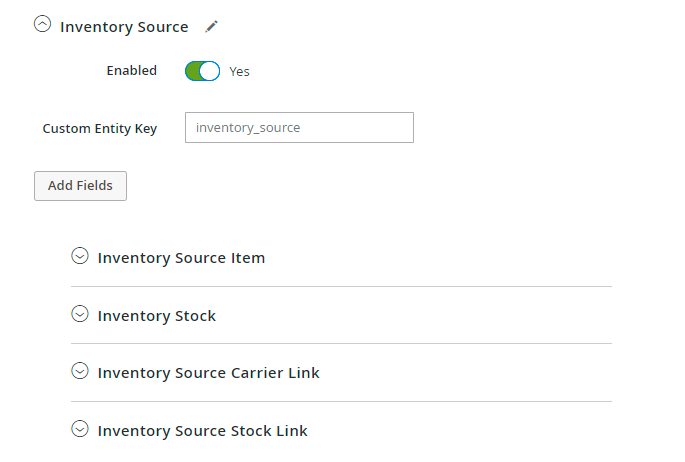
Thus, you can build a unique profile, suitable for a particular system. Check the requirements from a system (as, for example, ERP or B2B invoicing company needs different order data) and match the details.
Adding Product Attributes
To include particular product attributes into the export profile, navigate to Stores → Attributes → Product.
For example, we want to add a manufacture attribute. So, we open a particular attribute and proceed to the Order Export tab.
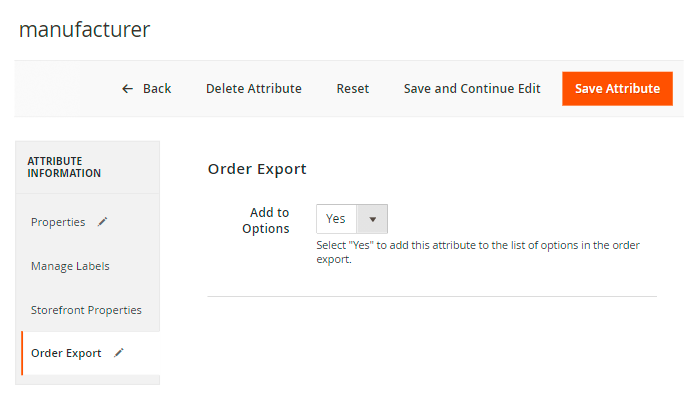
Choose Yes in the Add to Options field and Save the attribute.
After that, you need to run Reindex, as the attribute will become available in the export configuration profile only after the reindexation.
Check the result. You will see the manufacture attribute in the Fields configuration tab of the export profile (Order Item → Order Item Attribute section).
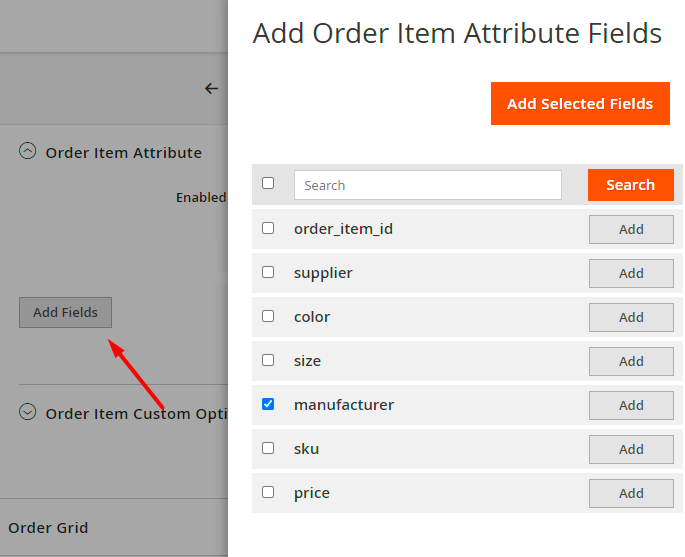
Also, now you can filter orders by the added product attribute.
Modify Values in Export Files
Now you can use modifiers to change the values in the export file. For example, you can change the date format, add any text and apply various mathematical actions to prices (e.g. rounding, multiplication, etc.).
Modifiers are added right during the fields configuration.
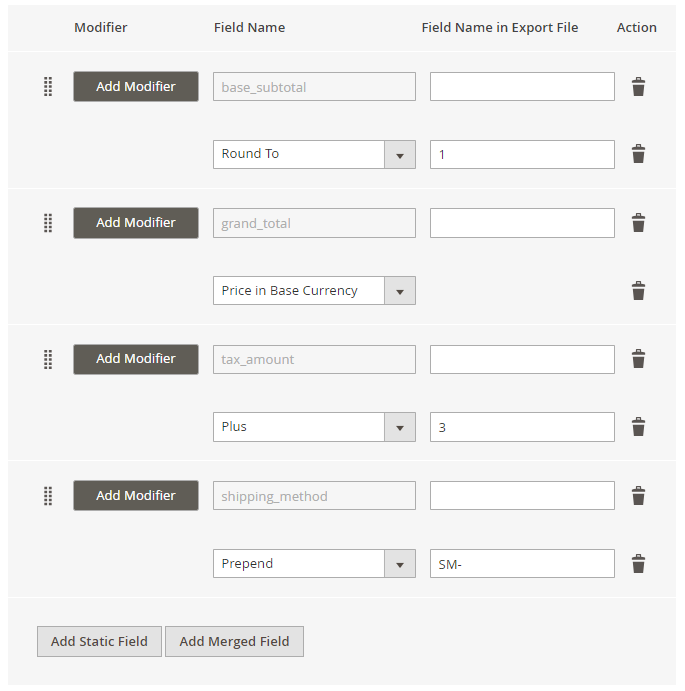
Hit the Add Modifier button and choose the required action in a dropdown.
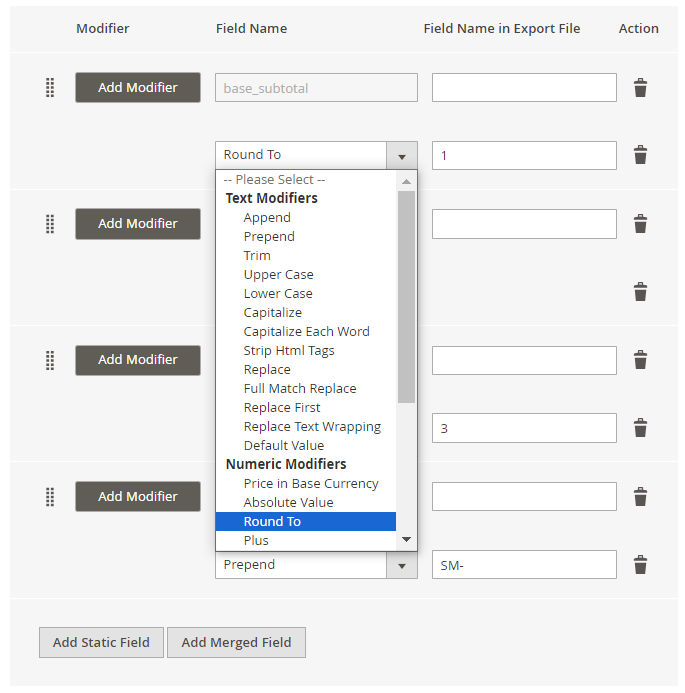
Types of modifiers you can use:
- Text Modifiers: Adjust the text of the text values by appending, prepending, capitalizing, etc.
- Numeric Modifiers: Use for number modifications, e.g. rounding prices.
- Date Modifiers: Specify a suitable date format.
- Custom Modifiers: Replace the output of one field with the value of another.
Text Modifiers
Append - Adds the text after the value in the column. The text is specified in an additional field that appears when this modifier is selected.
Prepend - Adds text before the value in the column. The text is specified in an additional field that appears when this modifier is selected.
Capitalize - After selecting this modifier, the value in the column is capitalized.
Lower Case - After selecting this modifier, the whole word is written in lowercase.
Upper Case - After selecting this modifier, the entire word in a value field is capitalized.
Capitalize Each Word - After selecting this modifier, each word starts with a capital letter.
Strip Html Tags - Modifier removes all HTML tags from the string (the modifier is useful when exporting meta titles, descriptions, etc.).
Replace - After choosing this modifier, 2 fields appear: in the first one we indicate the word that needs to be replaced, and in the second one - the word to be replaced with.
Full Match Replace modifier functions similarly to the Replace modifier. However, it only replaces the value from the first field (From) with the value from the second field (To) when the value from the first field is fully matched.
For example, if you specifically need to replace only '2' with '3', it's better to choose the Full Match Replace modifier. This is because if you opt for the Replace modifier instead, specifying From: '2' and To: '3', it might result in '122' being replaced with '133' due to the presence of '2'.
Replace First - the same as Replace, but for the first case only.
Replace Text Wrapping - After selecting this modifier, the wrapping of multiline text is replaced with the space by default. You can remove the space in the dependent field and enter another character you’d like to replace the wrapping of multiline text with.
Default value - When this modifier is selected, indicate the value that is added to the corresponding column by default (there is already a defaultValue).
Trim - This modifier removes spaces from the beginning and the end of the string (there is already a trim).
Numeric Modifiers
Price - Modifier adds currency to the value in the column.
Absolute Value - Modifier changes the negative value in the column to positive. Example: was -5 → now is 5.
Round To - When this modifier is selected, an additional field appears, in which we indicate the number of decimal places to which we round the number in the column. Example: 33.75 → enter 1 → get 33.8.
Plus - When this modifier is selected, indicate the number that is added to the number in the column.
Minus - Indicate the number that is subtracted from the number in the column.
Multiplied By - Specify the number that is multiplied by the number in the column.
Divided By - Provide the number by which the number in the column is divided.
Modulo - Indicate the number by which the number in the column is divided, and when division occurs, we get the remainder of the division in the export file. Example: we have 10, entered the number 3, received 1 in the file.
Truncate - Modifier removes decimal numbers without rounding. For example: 33.75 → Truncate → 33.
Ceil - Modifier allows you to round a number up to the nearest whole number.
Floor - Modifier allows you to round a number down to the nearest whole number.
Date Modifiers
Date Format - Specify the date format that is applied to the date in the file.
Apply Timezone - Choose the modifier for a timezone in UTC format.
Custom Modifiers
Сustom modifiers replace the output of the value of one field with the value of another. For example, Value to Label: instead of value, the label will be displayed. Or, for instance, set id to set name: instead of id, the name will be displayed.
Export Filters
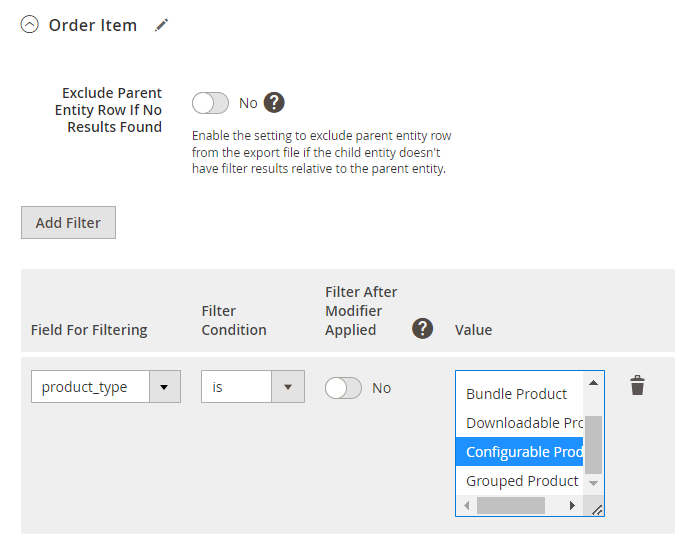
In the next tab, you can define which orders should be exported using filtering. For example, you may add only configurable products to the export file. Filtering also has a tree structure and is on the same level as export fields.
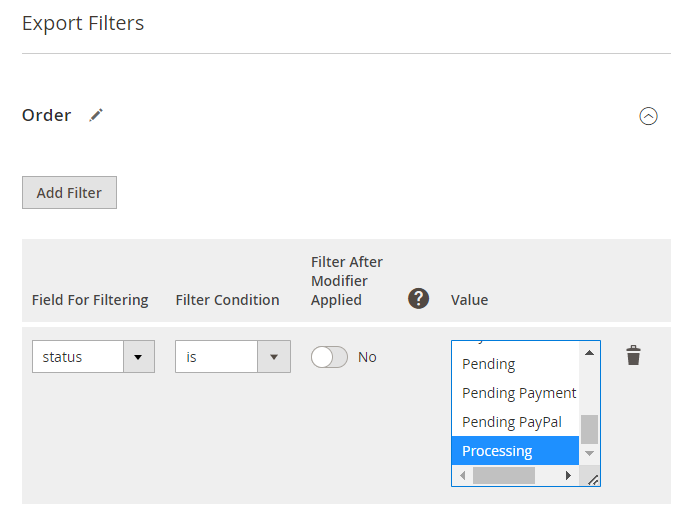
Expand the necessary entity, click Add Filter and specify the value you need to export.
Also, you can use specific filters for the Date parameter, e.g. export orders placed in the last X days or weeks.
Filter After Modifier Applied - check this toggle to filter data only after apllying particular modifier. For example, you can modify the timezone and apply date filter to the 'created_at' field after the modification.
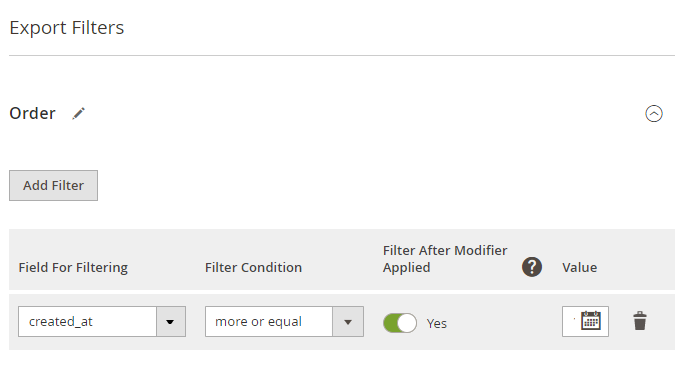
Please make sure the field with a corresponding modifier is added to the export file. Otherwise, the setting won't be applied.
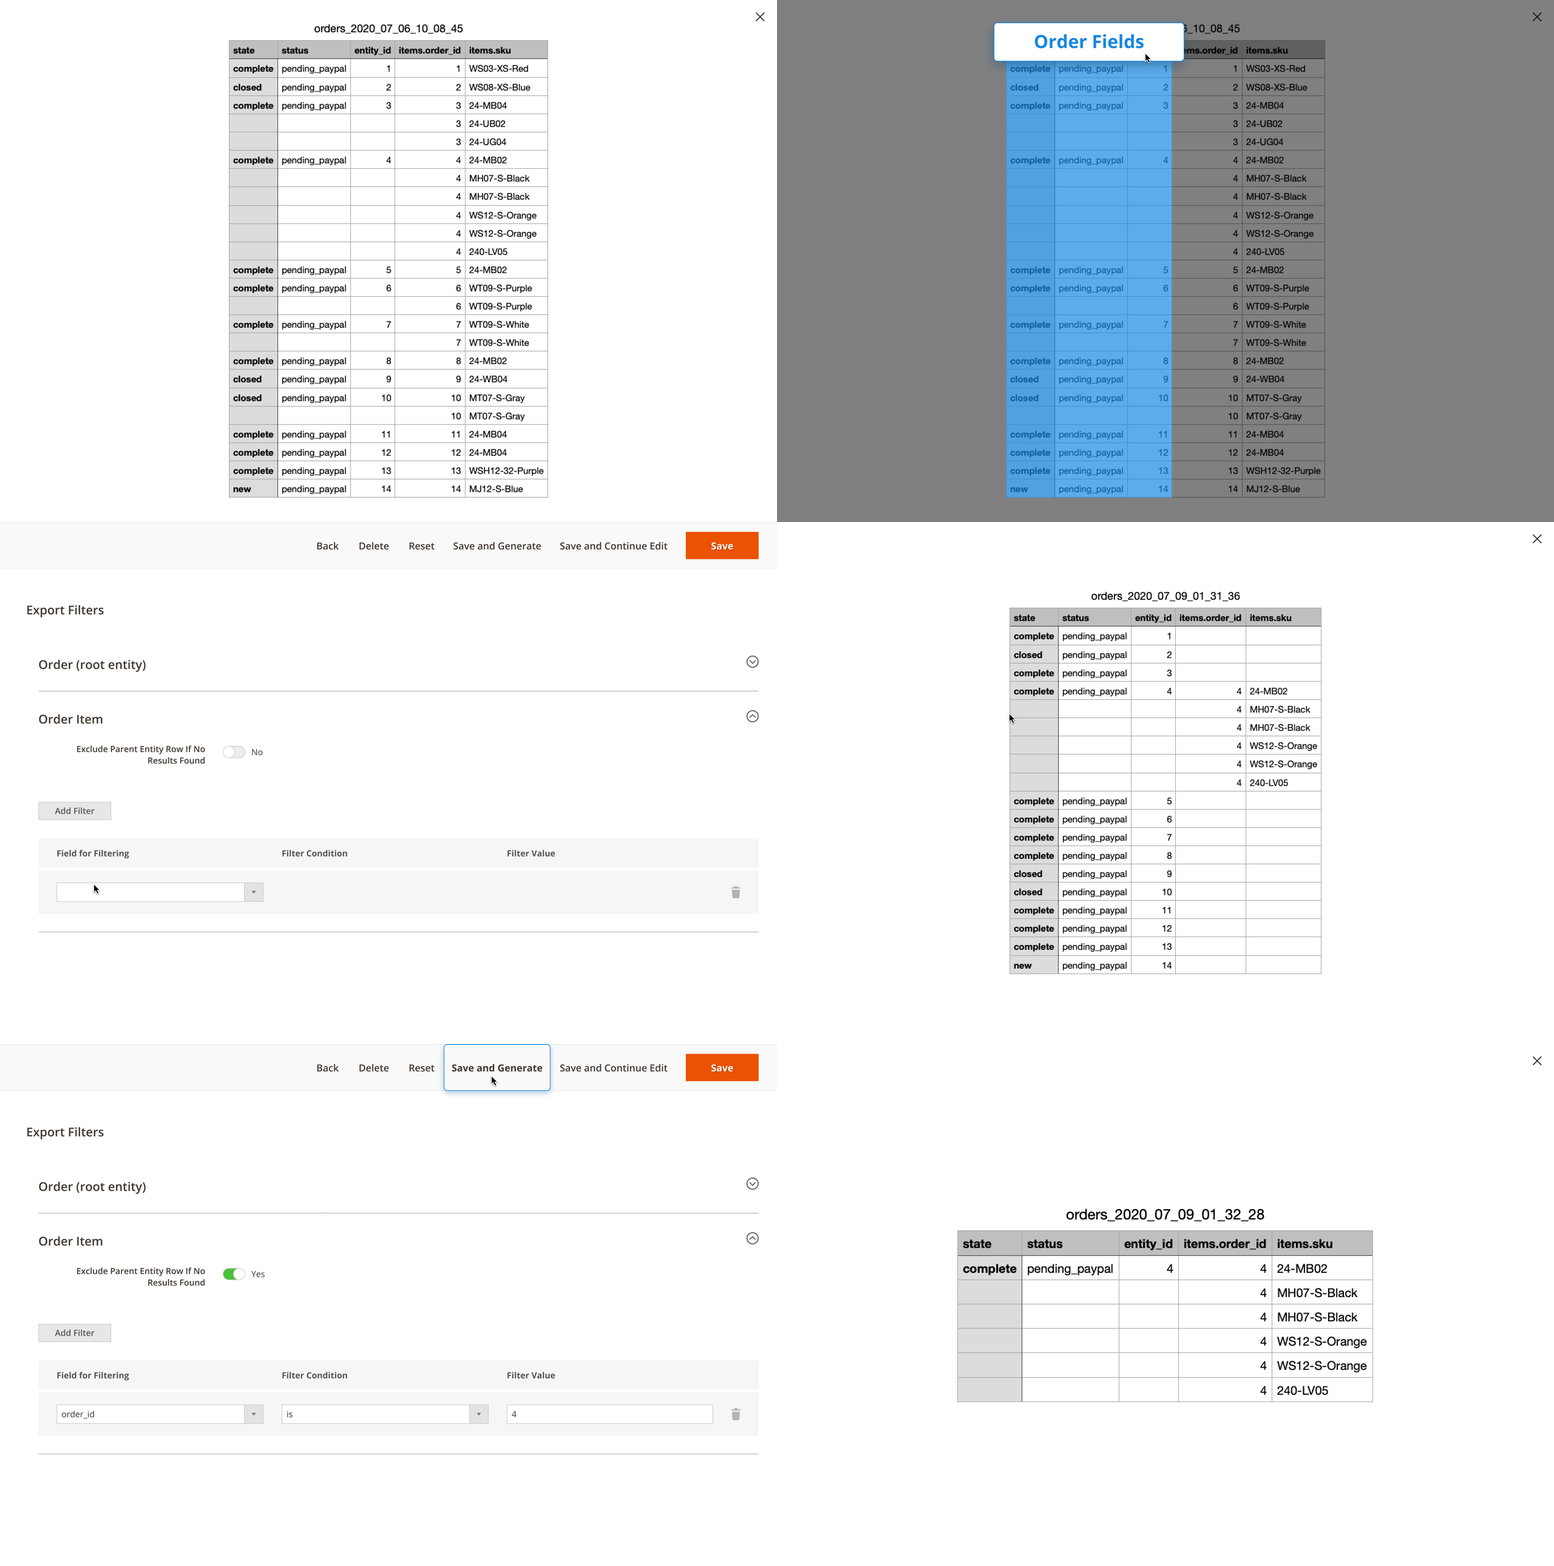
Additionally, you can Exclude Parent Entity Row If No Results Found. It means that the parent entity row will be excluded from the export file if the child entity doesn't have filter results relative to the parent entity.
Check how it works:
Automatic Export
Set the frequency to run the profile. 2 modes to run a profile are available:
- by Cron
- by event
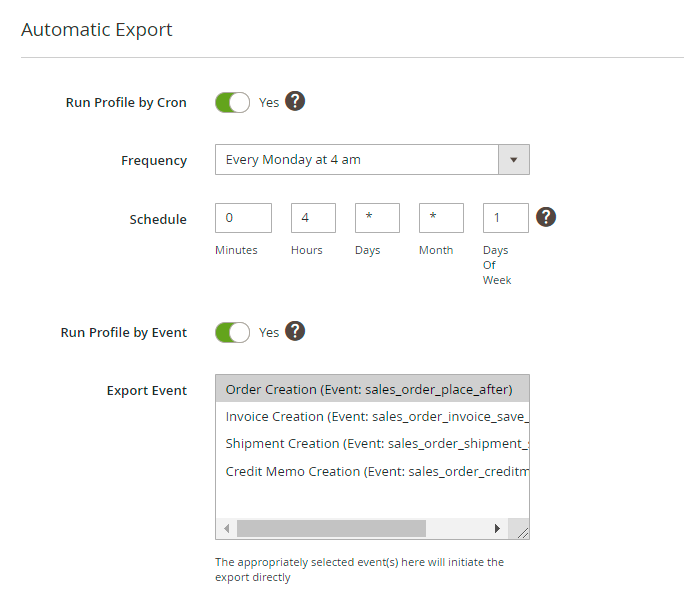
For exporting by cron, you need to set one of the ready-made schedules or create a custom one.
For exporting by event, choose the particular event that will trigger a profile export.
For Export Products and Export Customers, you will find other events, e.g. for customer entity the “customer registration” event is available, while for products a profile can be executed by the “product save” event.
Alert Notifications
Using this tab, you can enable email notifications about errors for a particular profile.
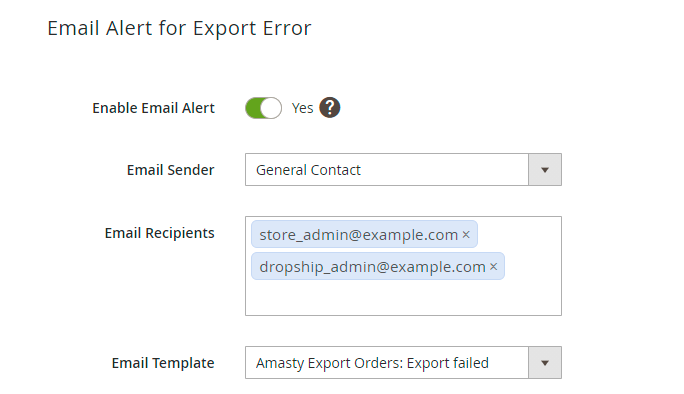
Enable Email Alert - set to Yes to notify the recipients about failed exports.
Email Sender - choose the contact that will send automatic emails.
Email Recipients - set to whom the emails will be sent.
Email Template - select the template for failure notifications.
Profile Export History
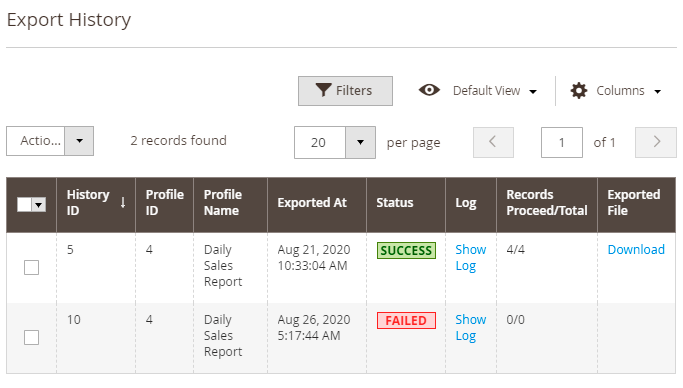
For each profile a separate export history is available. Check the statuses, dates, logs and the exported number of orders. Download a file if necessary.
General Export History
You may also check the logs for all exports (one-time, cron jobs, and profiles) of all entities (not only orders but also products and customers) in one place. Navigate to System → Amasty Export → Export History. See the statues and check the details to get a full picture.

You can easily identify the export method in the Entity column:
- Manual - one-time exports;
- Cron – exports via cron job interface;
- Export Products, Export Orders, Export Customers – profile exports.
3rd Party Links
With the extension, you can link the data generated by 3rd party extensions to the export functionality. All created connections are displayed in the System → Amasty Export → 3rd Party Connections tab.

Hit the Add New Connection button to create a new link.

Name - specify the connection title for internal usage.
Export Type - select the entity for 3-rd party connection (Export Orders, Export Customers, or Export Products).
Table to Join - indicate a table name that needs to be joined.
Parent Entity - choose the entity table to which the foreign table will be joined.
Referenced Table Key - the field from the foreign table, by which the table chosen in 'Table to join' will be joined to the parent entity table.
Base Table Key - specify the field from the parent entity table which will be used for joining with the foreign table.
Save the changes. Now you can add this entity to the export file.
Import Profiles Configuration
We will describe the settings based on the Import Orders example, but you can check specific manuals for each particular entity to find the specifications and configuration samples.
Struggling with the import setup?
Check out the Useful Tips and Popular Import Use Cases section of this guide for valuable insights to help you get started with import tasks and complete them with confidence.
The extended order import functionality allows you to create flexible profiles for import and execute it on regular basis. To view all the profiles, proceed to System → Amasty Import → Import Orders.
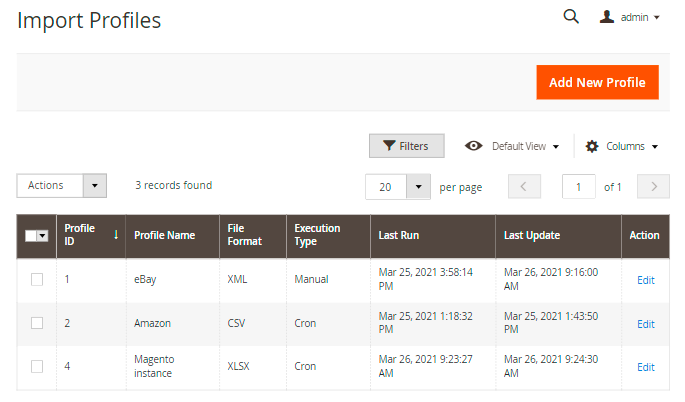
Here you can see all existing profiles, their IDs, names, file formats, execution types and the dates of the last run/update.
Sample Files
To avoid mistakes and complete configuration faster, you can use sample files.
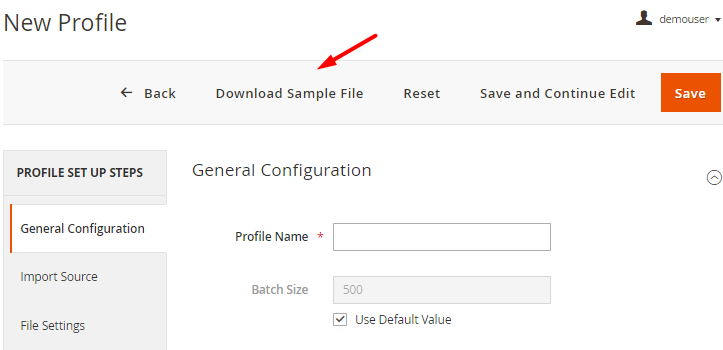
To download it, fill in the required fields for profile creation (such as Name, Import Source, etc.). If you have no fields added yet, the file will include all possible data. If you want to generate a specific sample file, proceed to the Fields Configuration first so that the generator could compose a relevant file including only those fields that you've added.

General Configuration
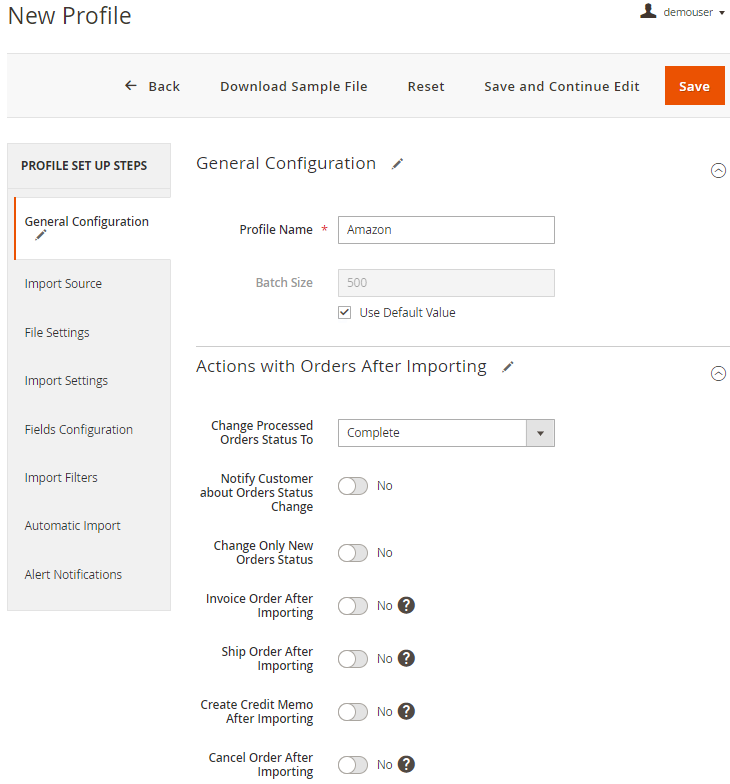
Profile Name - specify the name of the profile for internal usage. This name will be displayed in the grid.
Batch Size - set the number of orders that will be processed in an iteration. You may configure batch size for each profile separately or specify the value in general configuration and use this default value.
Actions With Orders After Importing
You can also automatically execute particular actions when the orders are imported.
Change Processed Orders Status To - specify the status that imported orders will get.
Change Only New Orders Status - if enabled, the action will only apply to new orders that were created during the import process and not affect the orders that were just updated.
Actions that can be applied to order documentation:
- Invoice Order After Importing
- Ship Order After Importing
- Create Credit Memo After Importing
- Cancel Order After Importing
All these actions can also be applied to newly-created orders only. Additionally, you can send automatic notifications to customers.

File Settings
Now we need to choose the required file type and configure its settings.
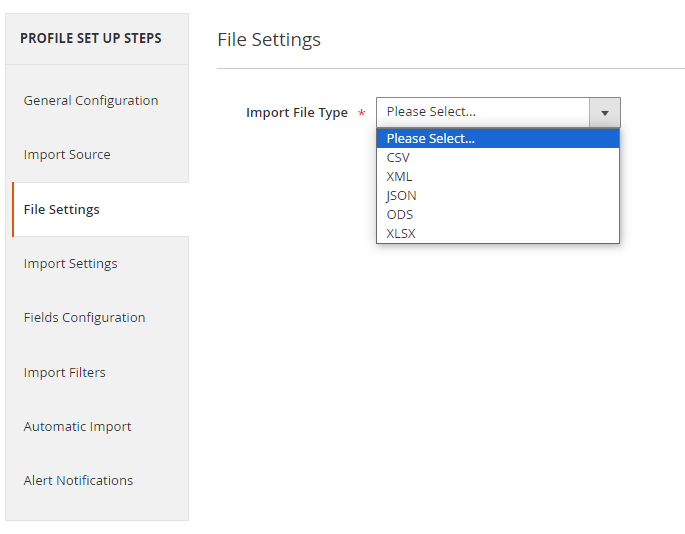
The following formats are available:
- CSV
- XML
- JSON
- ODS
- XLSX
For CSV, ODS and XLSX formats you can:
Add Header Row - column titles will be displayed in this row.
Rows Merged into One - enable this option if the rows in the import files are merged.
For a CSV file you can additionally set:
- Merged Rows Data Delimiter
- Field Delimiter
- Field Enclosure Character
For a JSON file you can additionally set:
- Header
- Items Container Name
- Footer
For a XML file specify the path to the node in the Data XPath field, e.g. if you have <items><item>1</item><item>2</item></items>, the path will be items/item.
XSLT Editor
The extension includes an XSLT editor so that you could import XML files with any custom formatting. Using this functionality, you can create custom templates for XML documents and add, remove, rearrange or sort elements in the file.
What is XSLT?
A lot of 3rd-party platforms you are integrating with use custom XML table formatting. Magento itself can't import such files since it is impossible to match the attributes with the custom names properly. XSLT (Extensible Stylesheet Language Transformations) helps to interpret the document, match the values in the file with the Magento database and import data correctly.
Find out how the XSLT works in this tutorial.
Before importing a custom XML file, review the formatting and find out how the attributes provided in the document are named and structured in Magento. Then, create an Xsl Template to match the values.
To simplify template creation, download this ready-made sample file:
xsl-template-for-import.zip
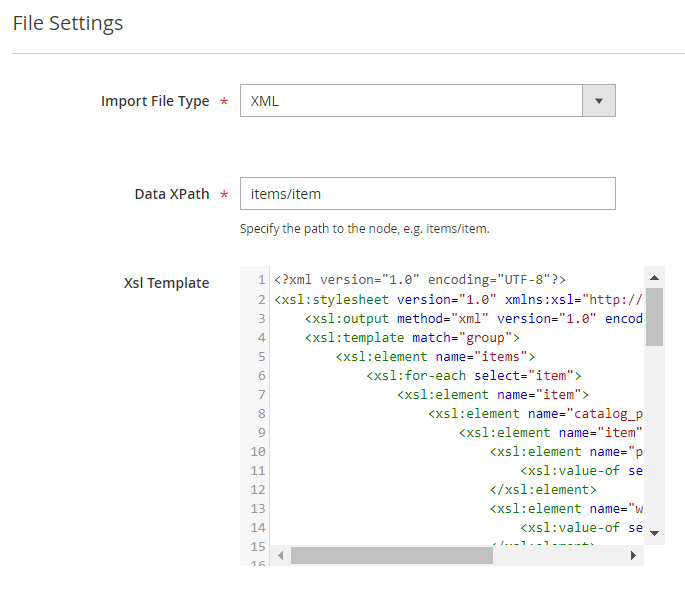
We've chosen a CSV format.
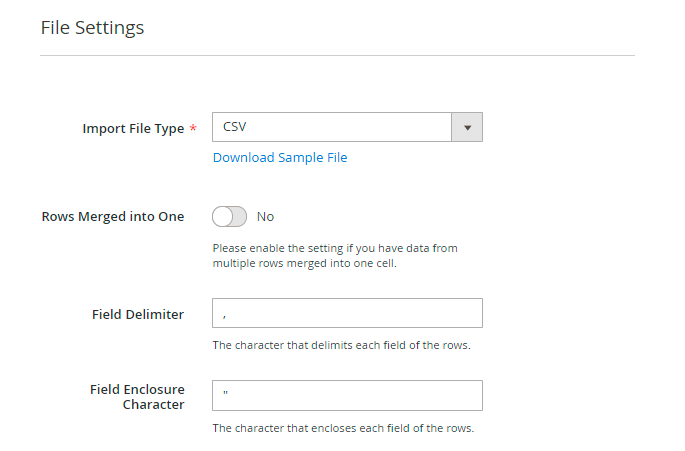
You can download sample files for the appropriate file formation.
Import Source
Now choose a suitable import source.
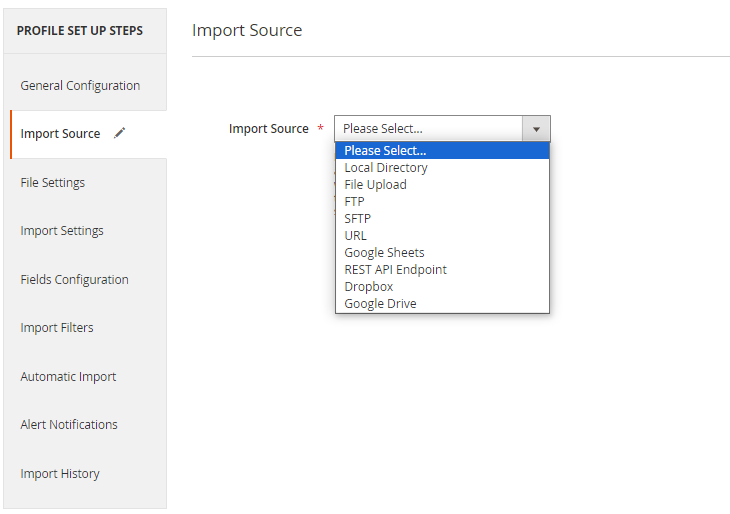
Available sources:
- Local Directory
- File Upload
- FTP
- SFTP
- URL
- Google Sheets
- REST API Endpoint
- Dropbox
For Local Directory specify a File Path relative to Magento installation (e.g. var/import/import.csv).
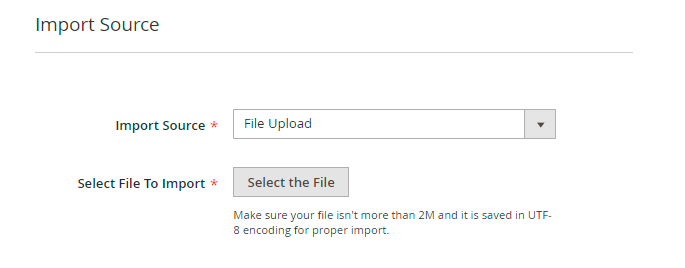
For File Upload select the file to import. Make sure your file isn't more than 2M and it is saved in UTF-8 encoding for proper import.
If you want to use FTP / SFTP for import, you will need to fill the following fields:
- Host
- User
- Password
- File Path
- File Name for FTP/SFTP.
For FTP you can also enable a Passive Mode.
For URL source, apart from the URL itself, provide Basic Authentication Username and Password.
The document should be opened by a direct URL, and the URL should contain the file format, e.g.
https://example/download?id=19&file=-1.xml (here we use XML format). It is necessary since in Google Cloud the link to the file is used without an extension, and the Import Orders extension can't validate it. Thus, you need to add the format. Additionally, if the access is shared for all users, then the username and password fields are not required. If only certain users can see the file, then you need to enter their credentials for access.
For Google Sheets specify the required URL.
When using Google Sheets (you can import a file of different formats there), you need to specify the required format and specify the same format when importing. The link to the doc should be shared with everyone.
For REST API Endpoint provide the endpoint (e.g. https://magento.instance/rest/all/V1/some/endpoint) and choose the required authentication method.
How it works
The extension provides an option to customize the import source but does not have its own API. When the import button is pressed, the module uses Rest API Endpoint (the specified URL with the specified authorization type) to receive a JSON file that will be imported into Magento. You can use another Magento instance or any other API as an import source.
Keep in mind that only CSV и XML file types can be used when importing with REST API Endpoint.
Dropbox Configuration
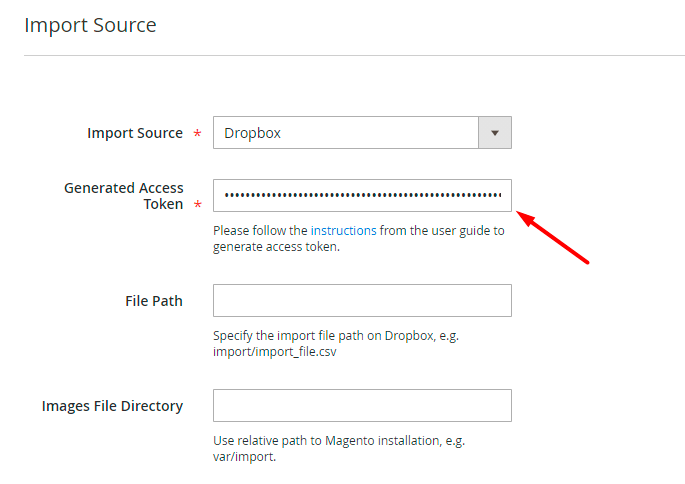
To import using Dropbox, you will need to provide the access token. Follow the steps below to get the token.
1. Go to https://www.dropbox.com/developers and sign in.
2. Hit the Create Apps button.

3. Choose an API, a type of access you need and specify the title for your folder.

Agree with the terms & conditions and click Create App. You will be automatically redirected to the folder configuration.
4. Proceed to the Permissions tab.

Grant the permissions to write the files and click Submit.

5. Return to the Settings tab.

6. Find the OAuth 2 section and hit the Generate button below the Generated access token field.

7. Copy the token and paste it into the Generated Access Token field.
Google Drive Configuration
To set the integration with Google Drive, you need a specific API key. To get the key and configure this import source correctly, follow the steps below.
1. First of all, you need to install Google APIs Client Library on your Magento instance. Click here and install composer require google/apiclient:“^2.0”.
2. Go here and choose a project or create a new one if necessary.

3. When the required project is chosen, return to this page and enable Google Drive API.

4. If everything is correct, you will see the following status:

5. Click Manage and proceed to APIs & Services → Credentials. There click Create Credentials →Service account.

6. Provide Service account details. You can skip Step 2 and Step 3.

Click Done.
7. Navigate to the Service accounts tab and find the required service. Expand the Actions dropdown and hit the Manage keys option.

8. Expand the Add Key dropdown and select Create new key.

9. Choose JSON file format and hit the Create button.

The file will be automatically generated and downloaded.
10. Proceed to the Details tab and copy the email.

11. Go to My Drive. Create a folder from which the files will be imported to Magento. Specify the title.

12. Now click Share and insert the email that you've copied. Click Done.

13. Return to the admin panel. Upload a JSON file, provide the path to the created folder and file title.
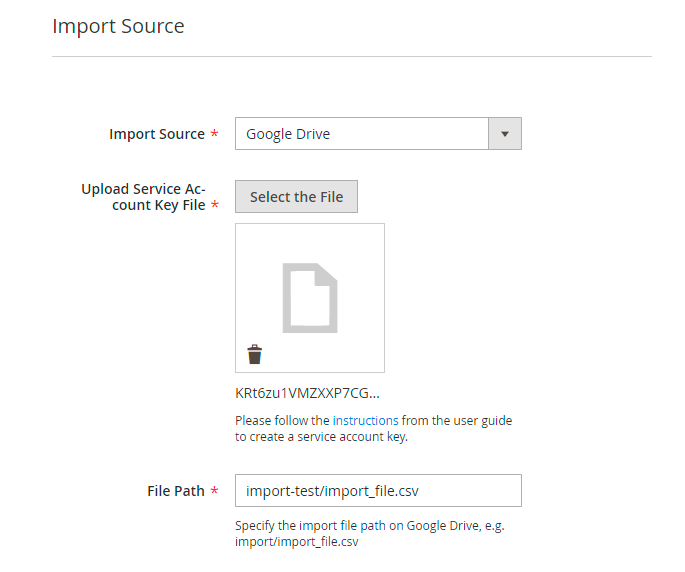
The configuration is ready. Run import profile and check the result.
As we already have a CSV file to import, we've chosen the File Upload option.
Import Settings
In this tab, you can adjust import behavior.
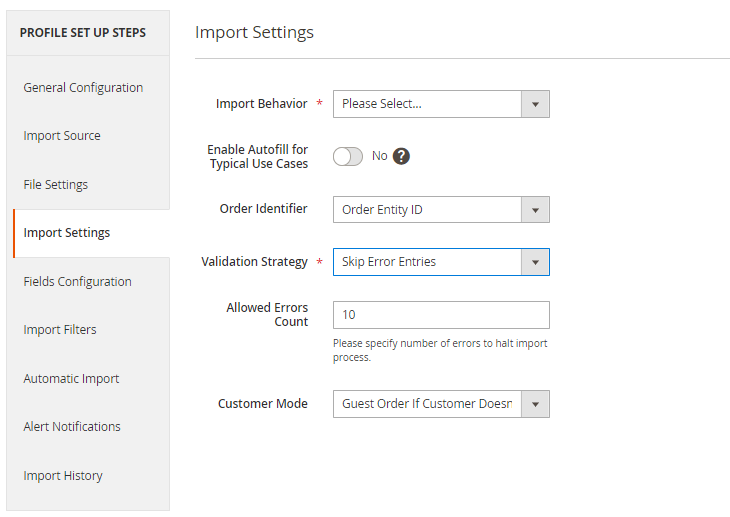
Import Behavior - choose a suitable behavior for import:
- Add/Update - in this case, the extension compares order IDs from the import file and the already existing orders in the Magento instance. If an order ID is unique and doesn't exist in Magento, a new order will be created. If an order with the same ID exists, the extension just changes/adds the data specified in the import file.
- Only Add - the extension imports orders with new IDs and skips the already existing ones.
- Only Update - the extension updates the information in the existing orders and skips not existing ones.
- Delete - the extension deletes the orders specified in the import file from Magento.
Enable Autofill for Typical Use Cases - if enabled, Fields Configuration will be automatically filled in with the settings to perform the typical use cases for importing orders from third-party systems. The setting can be used only during new profile creation.
Each behavior has a specific pull of the required fields, e.g. if you add new orders, your import file must contain more columns than in the update behavior.
The required data for add behavior: Order, Order Item, Payment, Shipping Address, Billing Address.
Please, enable the autofill option to avoid errors during import and map fields properly.
Order Identifier - choose Order Entity ID or Order Increment ID as an identifier.
Order Entity ID is the ordinal number in the database provided by Magento. Order Increment ID is used for Order purpose and order fetching/display information of a specific order based on the increment id.
Validation Strategy - you can either stop the import process if any error appears (Stop On Error option) or skip invalid data and continue importing (Skip Error Entries option).
Please, note that if you Skip Error Entries and some configuration issues exist, the extension will complete the import with a 'Success' status, but 0 orders will be imported.

If you choose Stop on Errors option, the status will be 'Failed'.

When importing products, if errors occur with images, the import process will proceed without interruptions, provided the Skip Error Entries option is selected.
Allowed Errors Count - specify the number of errors to halt the import process.
Customer Mode - select the strategy to deal with customers:
- Guest Order If Customer Doesn’t Exist - if a customer is not registered in the Magento store, the orders will be imported as if a guest customer has placed them. If the extension finds the specified customer in Magento, the order will be assigned to this customer.
- All Orders as Guest Orders - in this case, all imported orders will be placed as if guest customers have placed them.
- Create Customer If Customer Doesn’t Exist - if a customer is not registered, the extension will create this customer using the data from the import file and assign the order to the newly-created customer.
As we want to import orders from Amazon for the first time, we've selected the Only Add import behavior and a Guest Order If Customer Doesn’t Exist strategy.
Fields Configuration
In this tab, you need to choose the required entities and map fields. If you enabled the Autofill for Typical Use Cases option previously, the required fields will be automatically added and you can proceed to mapping. If the option was not enabled, you need to add the entities and fields manually.
Please, attentively check all the fields before importing. Otherwise, the extension won't be able to match the columns and will display an error.
The functionality has a tree structure. Thus, you can add any entity, any field within a particular entity, customize entity keys/field names/delimiters and so on to match the requirements of the import.
See how the tree-structure configuration is created:
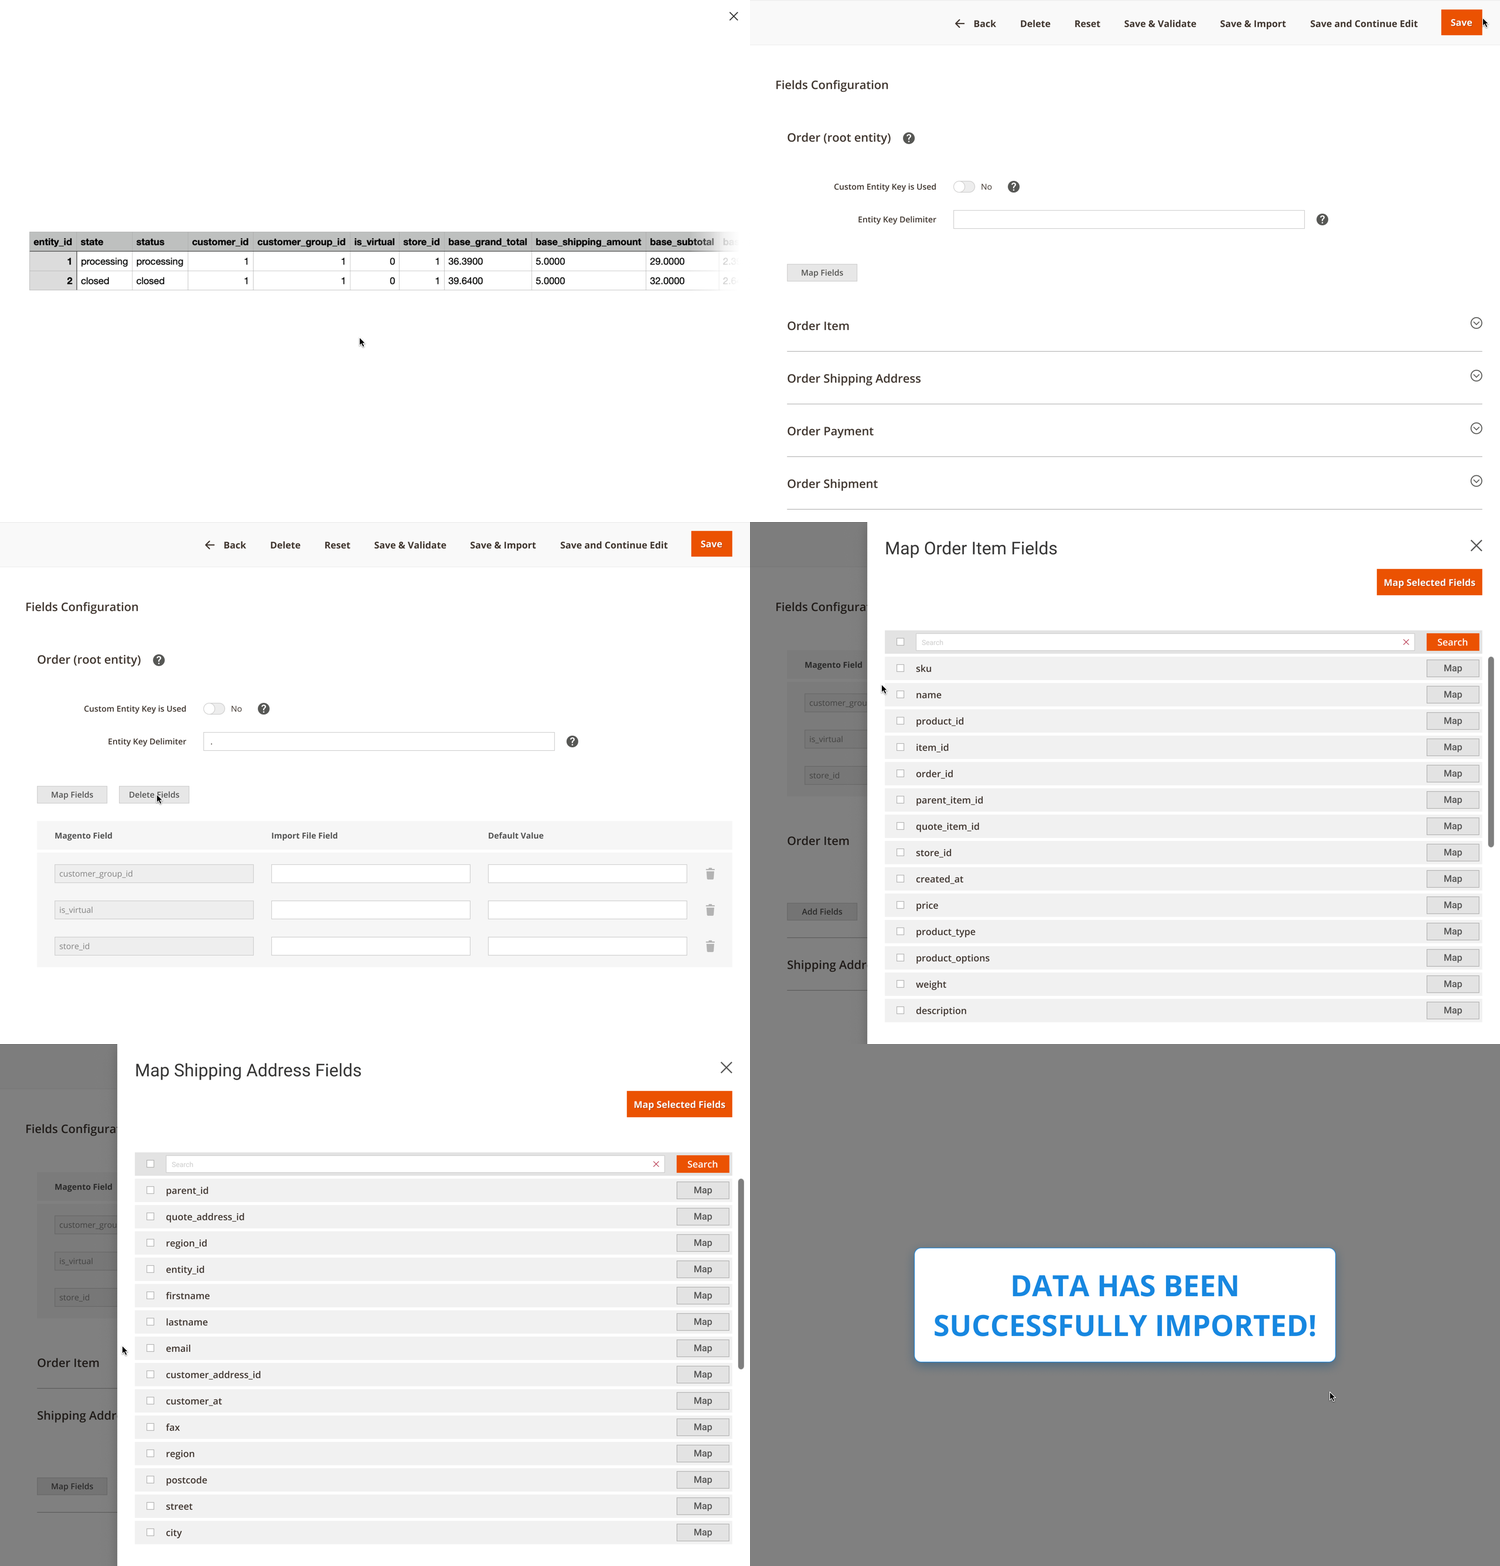
Below you can see all available for importing entities:
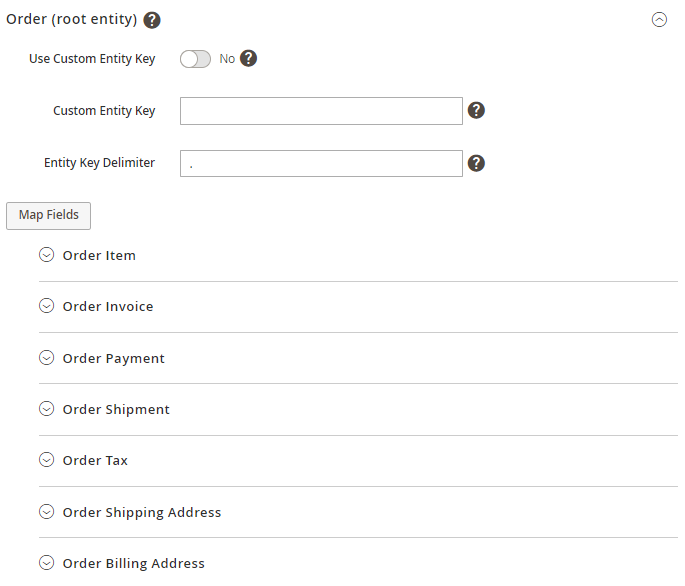

The MSI Inventory Reservation subentity, integrated into the Order Item entity, ensures that the imported product quantity is reserved after an order import (if the fields of this subentity are properly mapped). After creating a shipment for such an order, the product quantity will decrease accordingly.
Apart from adding required entities and fields, you need to map all required fields and additional fields that you want to import from the file.
Let's see how to configure the mapping.
First of all, open your import file and check how it is configured. Pay attention to column names and delimiters.
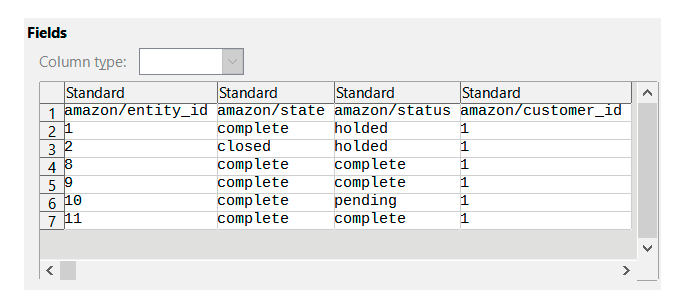
As we see, in our file all columns have a custom entity key - amazon.
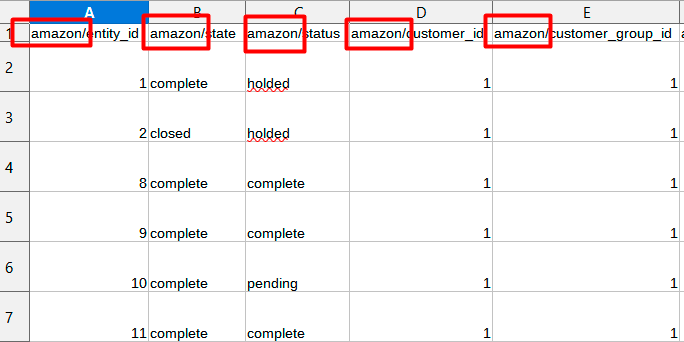
In this case, we need to provide the same entity key in the fields configuration.
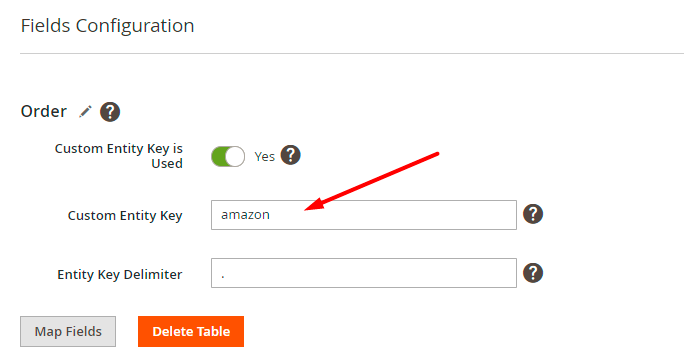
Then we check the delimiters. In our file we have a slash as the delimiter:

Thus, we need to specify the same delimiter in the configuration:
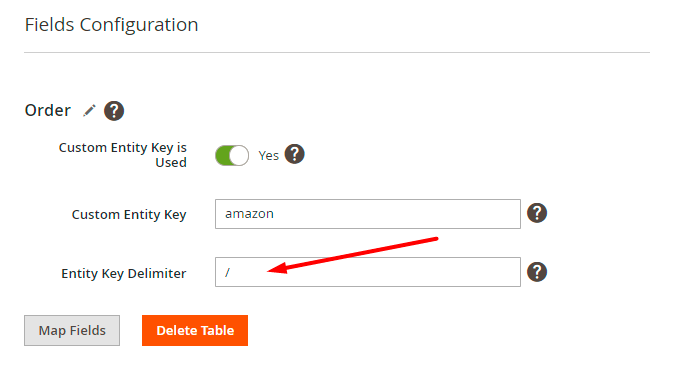
If ready, proceed to column names.
In the configuration, we see that the entity_id, state and status are the required fields (as they were autofilled).
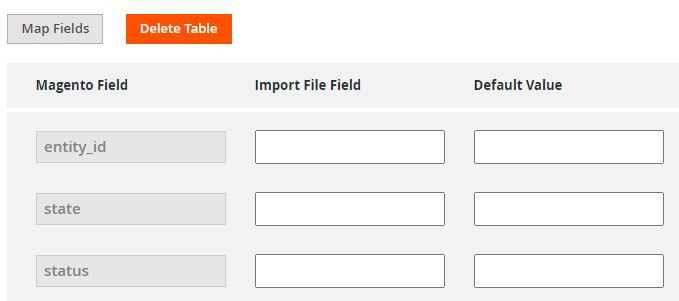
Now we check if we have the same columns in our import file.

Here we see that the columns are present, but they have a different column name, e.g. instead of entity_id we have just entity. In this case, we should match the title from the import file with the title in Magento.
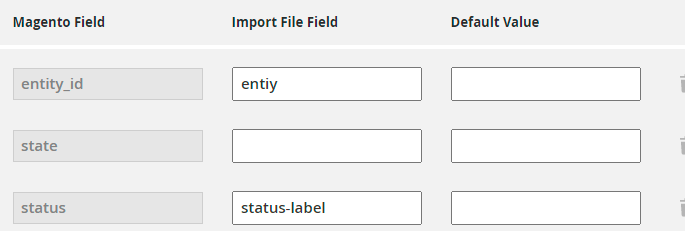
If the titles are identical (as we have for the state column), just leave the Import File Field empty.
If you check all fields and see that some of the required ones are absent in the import file, set the Default Value. For example, Magento requires store_id column, but we don't have this one in our file as Amazon doesn't have this parameter. In this case, we can just provide the required ID in the Default Value field (e.g. 1).

This way, you need to check all fields and map the titles so that the extension could import orders properly. Add any entities and provide custom entity keys if needed.

To add the fields, click Map Fields and choose the necessary ones in the modal window. Use the search field to speed up configuration.
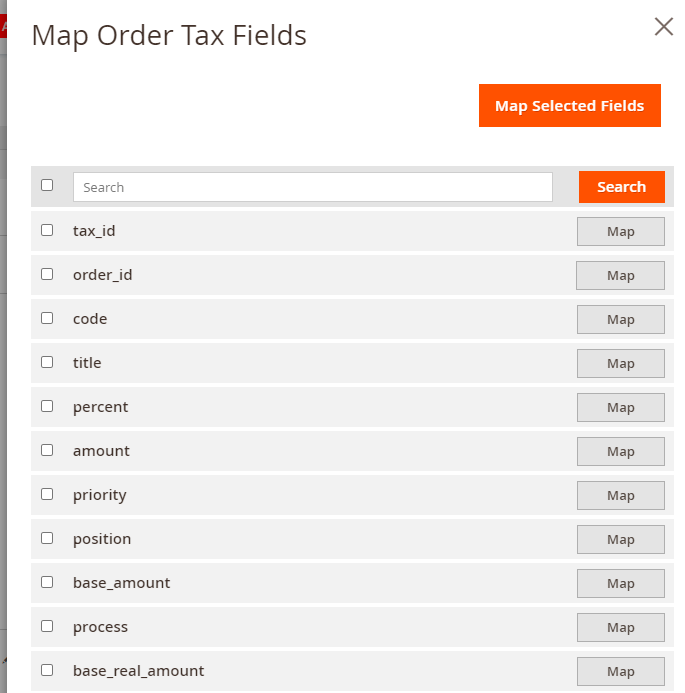
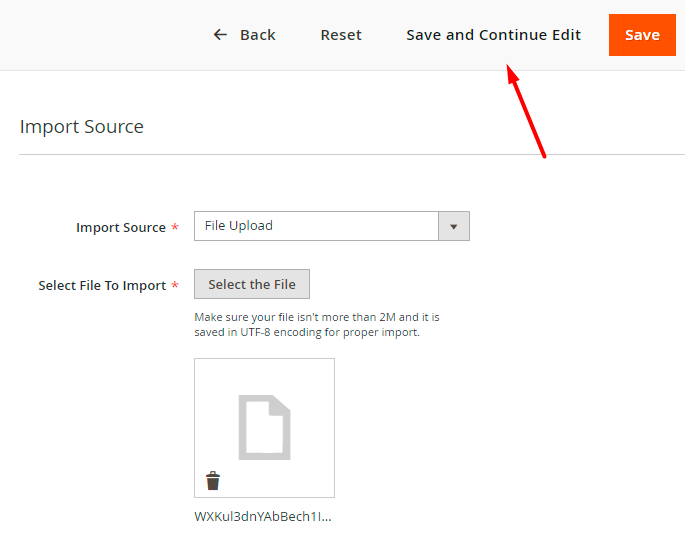
When the configuration is ready, upload the file in the Import Source tab. Click Save and Continue Edit.
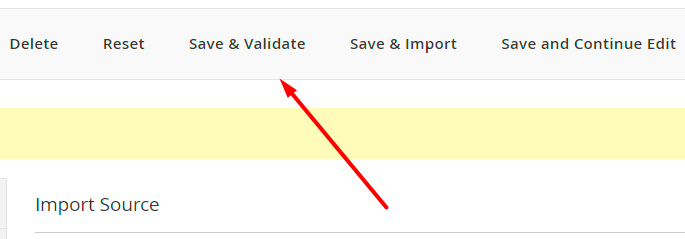
Now you can Validate the file.
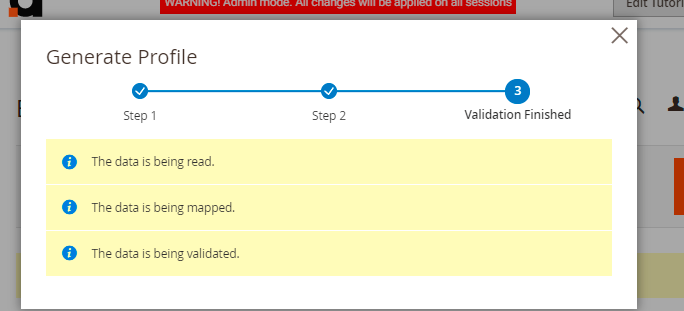
The extension will display validation progress and results in a popup window.
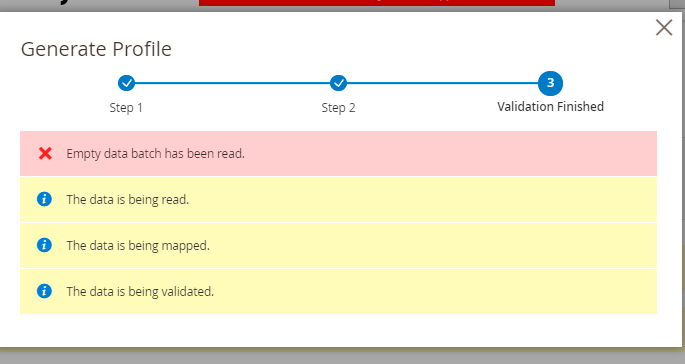
If the configuration was incorrect, you will see an error.
In case of successful validation, you can start the import.
Modify Values Before Import
Now you can use modifiers to change the values specified in a file before importing. For example, you can change the date format, add any text and apply various mathematical actions to prices (e.g. rounding, multiplication, etc.).
Modifiers are added right during the fields configuration.
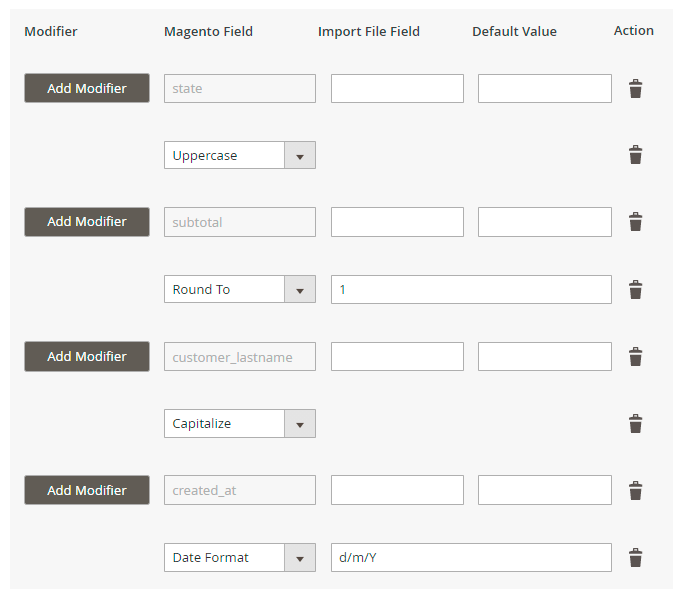
Hit the Add Modifier button and choose the required action in a dropdown.
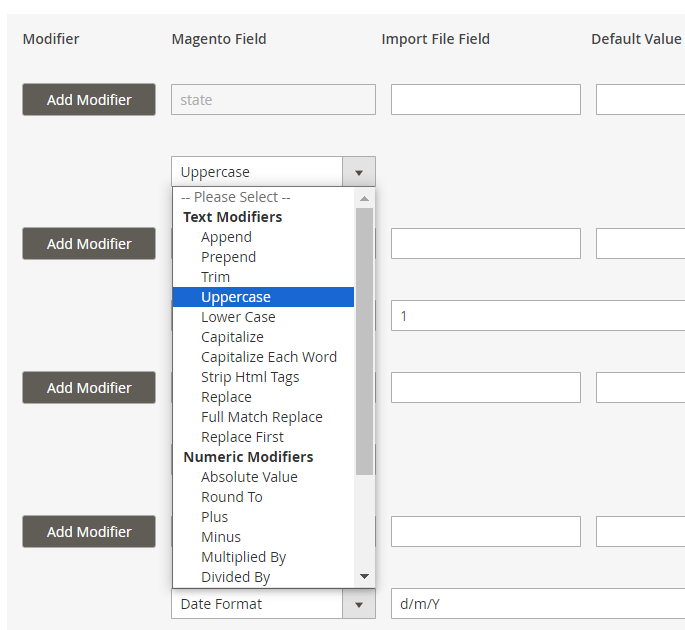
Types of modifiers you can use:
- Text Modifiers: Adjust the text of the text values by appending, prepending, capitalizing, etc.
- Numeric Modifiers: Use for number modifications, e.g. rounding prices.
- Date Modifiers: Specify a suitable date format.
- Custom Modifiers: Replace the output of one field with the value of another.
Text Modifiers
Append - Adds the text after the value in the column. The text is specified in an additional field that appears when this modifier is selected.
Prepend - Adds text before the value in the column. The text is specified in an additional field that appears when this modifier is selected.
Trim - This modifier removes spaces from the beginning and the end of the string (there is already a trim).
Upper Case - After selecting this modifier, the entire word in a value field is capitalized.
Lower Case - After selecting this modifier, the whole word is written in lowercase.
Capitalize - After selecting this modifier, the value in the column is capitalized.
Capitalize Each Word - After selecting this modifier, each word starts with a capital letter.
Strip Html Tags - Modifier removes all HTML tags from the string (the modifier is useful when importing meta titles, descriptions, etc.).
Replace - After choosing this modifier, 2 fields appear: in the first one we indicate the word that needs to be replaced, and in the second one - the word to be replaced with.
Full Match Replace modifier functions similarly to the Replace modifier. However, it only replaces the value from the first field (From) with the value from the second field (To) when the value from the first field is fully matched.
For example, if you specifically need to replace only '2' with '3', it's better to choose the Full Match Replace modifier. This is because if you opt for the Replace modifier instead, specifying From: '2' and To: '3', it might result in '122' being replaced with '133' due to the presence of '2'.
Replace First - the same as Replace, but for the first case only.
Numeric Modifiers
Absolute Value - Modifier changes the negative value in the column to positive. Example: was -5 → now is 5.
Round To - When this modifier is selected, an additional field appears, in which we indicate the number of decimal places to which we round the number in the column. Example: 33.75 → enter 1 → get 33.8.
Plus - When this modifier is selected, indicate the number that is added to the number in the column.
Minus - Indicate the number that is subtracted from the number in the column.
Multiplied By - Specify the number that is multiplied by the number in the column.
Divided By - Provide the number by which the number in the column is divided.
Modulo - Indicate the number by which the number in the column is divided, and when division occurs, we get the remainder of the division in the export file. Example: we have 10, entered the number 3, received 1 in the file.
Truncate - Modifier removes decimal numbers without rounding. For example: 33.75 → Truncate → 33.
Ceil - Modifier allows you to round a number up to the nearest whole number.
Floor - Modifier allows you to round a number down to the nearest whole number.
Date Modifiers
Date Format - Specify the date format that is applied to the date in the file.
Custom Modifiers
In most cases, custom modifiers replace the output of the value of one field with the value of another. For example, Option Label to Option Value: instead of label, the value will be imported. Or, for instance, Status Code for Status ID: instead of code, the id will be imported.
Moreover, in some import cases (for some EAV attributes), you can use the Create New Attribute Value modifier. This modifier allows you to import specific attribute values, even if they are not currently present in the system, automatically generating them after import.
Please note that the Create New Attribute Value modifier can be used only alongside with the Add/Update and Only add options of the Import Behavior setting.
Import Filters
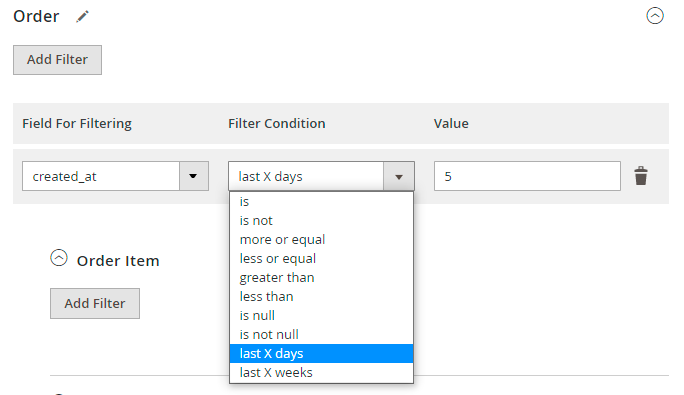
In this tab, you can filter orders and import only required ones. For example, import only Complete orders.
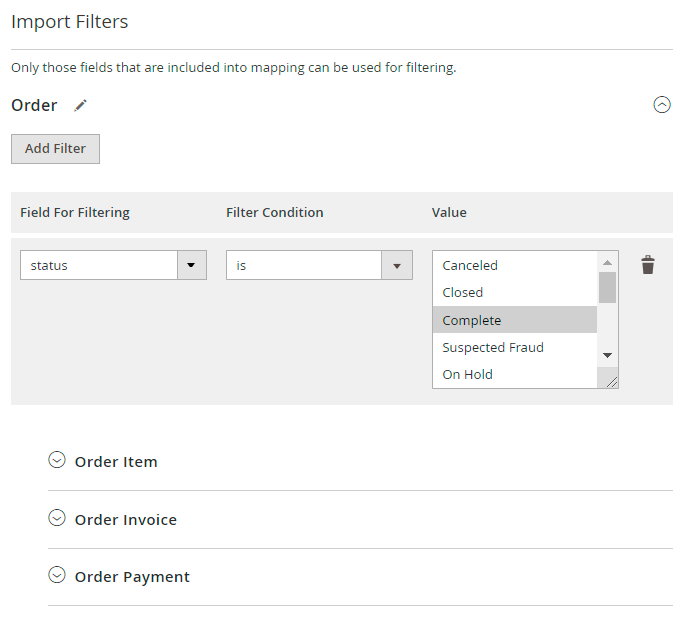
Filtering duplicates the field configuration structure, which means that you can filter data by any field you've added.
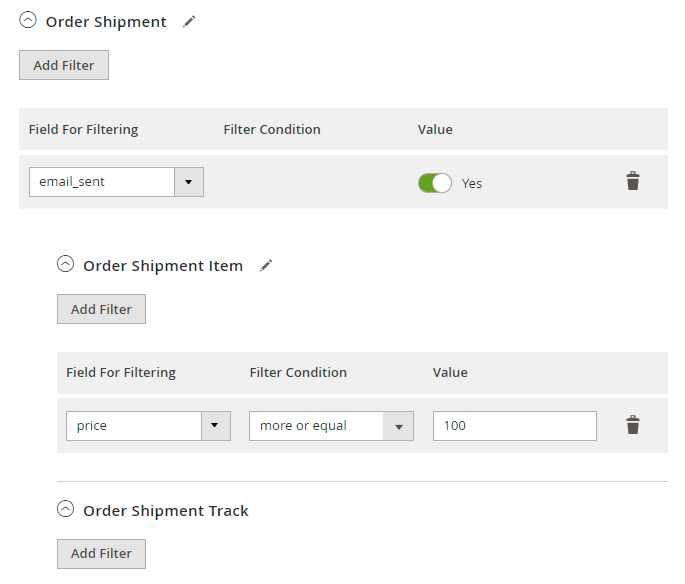
Additionally, you can use specific filters for the Date parameter, e.g. upload orders placed in the last X days or weeks.
Automatic Import
If you have configured the mapping and the orders were imported successfully, you can set the automatic import of future orders.
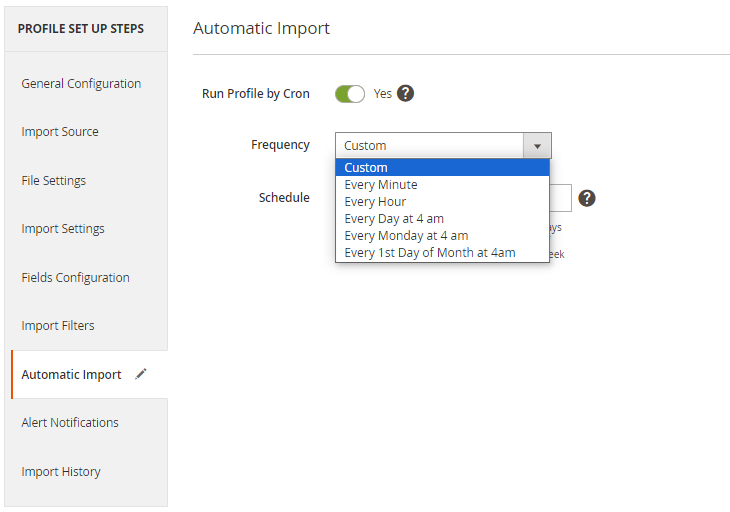
Run Profile by Cron - if enabled, the import will be initiated automatically by cron according to the schedule specified.
Frequency - choose a suitable import schedule.
If you choose a custom one, provide the schedule manually.
Alert Notifications
Using this tab, you can enable email notifications about errors for a particular profile.
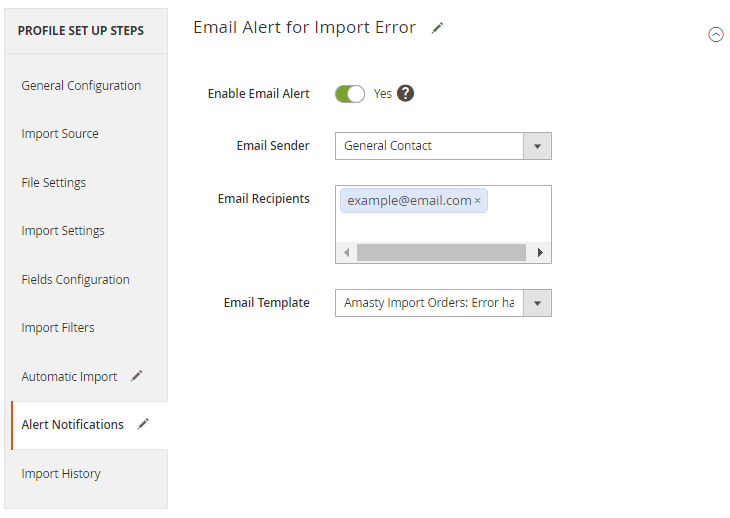
Enable Email Alert - set to Yes to notify the recipients about failed imports.
Email Sender - choose the contact that will send automatic emails.
Email Recipients - set to whom the emails will be sent.
Email Template - select the template for failure notifications.
Profile Import History
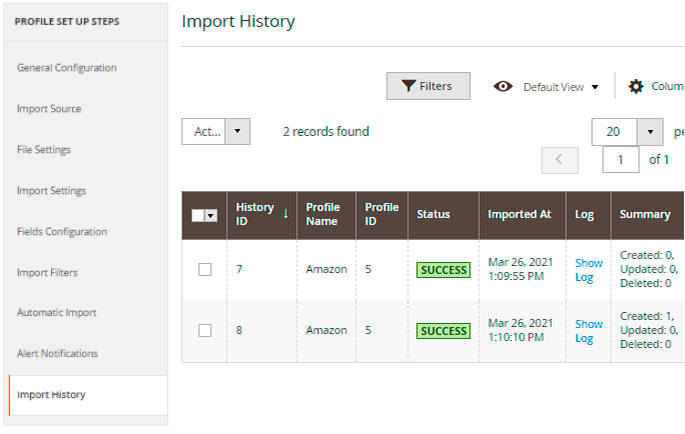
For each profile a separate import history is available. Check the statuses, dates and logs.
General Import History
You may also check the logs for all imports (one-time, cron jobs, profiles) of all entities (not only orders but also products and customers) in one place. Navigate to System → Amasty Import → Import History. See the statues and check the details to get a full picture.

You can easily identify the import method in the Entity column:
- Manual - one-time imports;
- Cron – imports via cron job interface;
- Import Products, Import Orders, Import Customers – profile imports.
REST API and CLI requests
It is possible to run import and export profiles using the REST API and CLI.
REST API:
- “/V1/am_import_export/get_profile_runners/” method=“GET” - to get available profile runners
- “/V1/am_import_export/run_profile/” method=“POST” - to run a profile
- “/V1/am_import_export/check_profile_status/” method=“POST”- to check profile status
CLI:
- php bin/magento am-import-export:show-profile-runners-list
- php bin/magento am-import-export:run-profile product_import_profile 1
- php bin/magento am-import-export:check-profile-status product_import_profile %identity_from_run_command%
One-time Import and Export Interfaces
This solution is helpful to perform one-time operations as it has a simplified UI. You can easily export any available entity in one place. Moreover, this interface contains some entities that are not available as profiles.
There are 2 different tabs for import and export operation, as their logic is different.
To perform exports, go to System → Amasty Export → Export and select the entity to export.
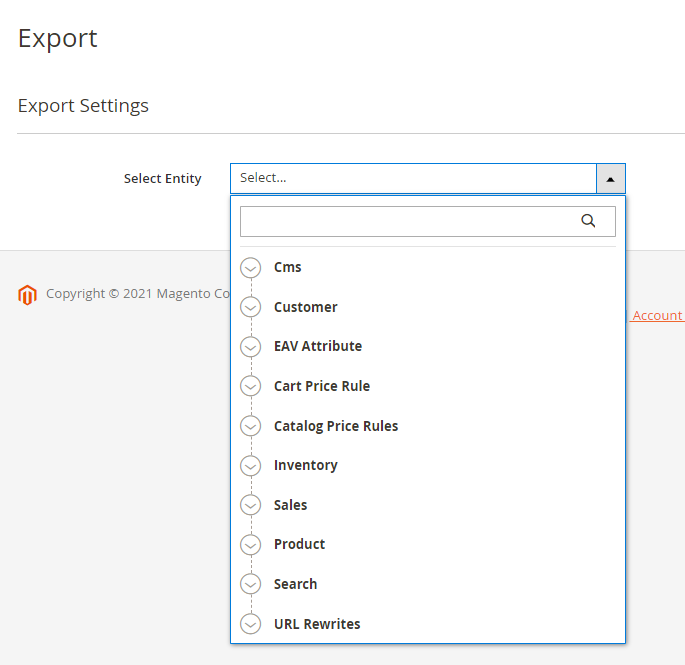
As soon as you choose the entity, you will be able to configure export details, such as format, title, included fields, etc. Check each configuration details for each tab in the Export Profile Configuration sections.
Note: you can export URL rewrites with product SKU or ID to match rewrites on different instances correctly.
For managing imports, proceed to System → Amasty Import → Import and select the entity to import.
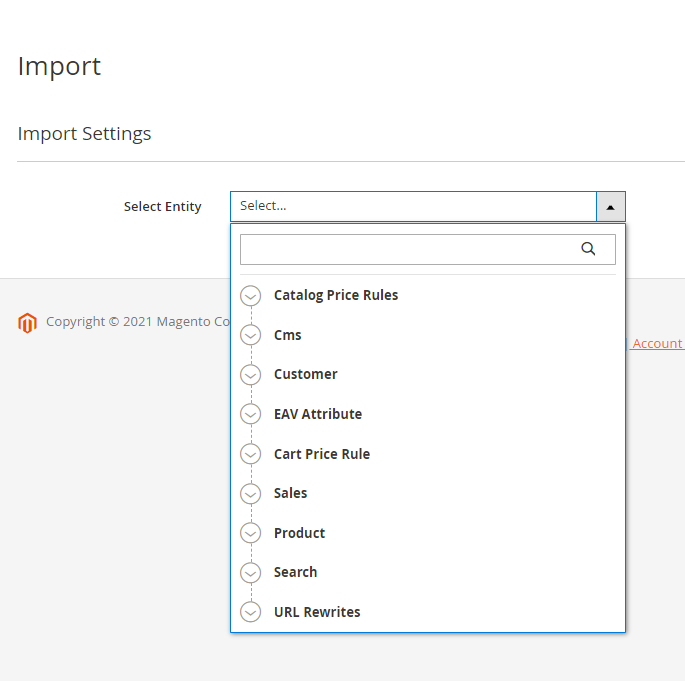
Here you can also configure import details, such as format, title, included fields, etc. Check each configuration detail for each tab in the Import Profile Configuration sections.
IMPORTANT: Please, run reindex after the import of Catalog Product Rules.
Import and Export Cron Jobs
Also, the extension includes Amasty Cron Jobs features: you can create regular cron jobs to export or import any available entity.
For export, go to System → Amasty Export → Cron Jobs.
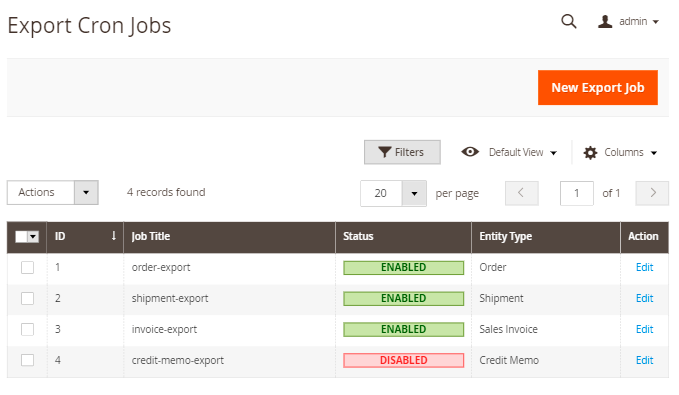
Click New Export Job.
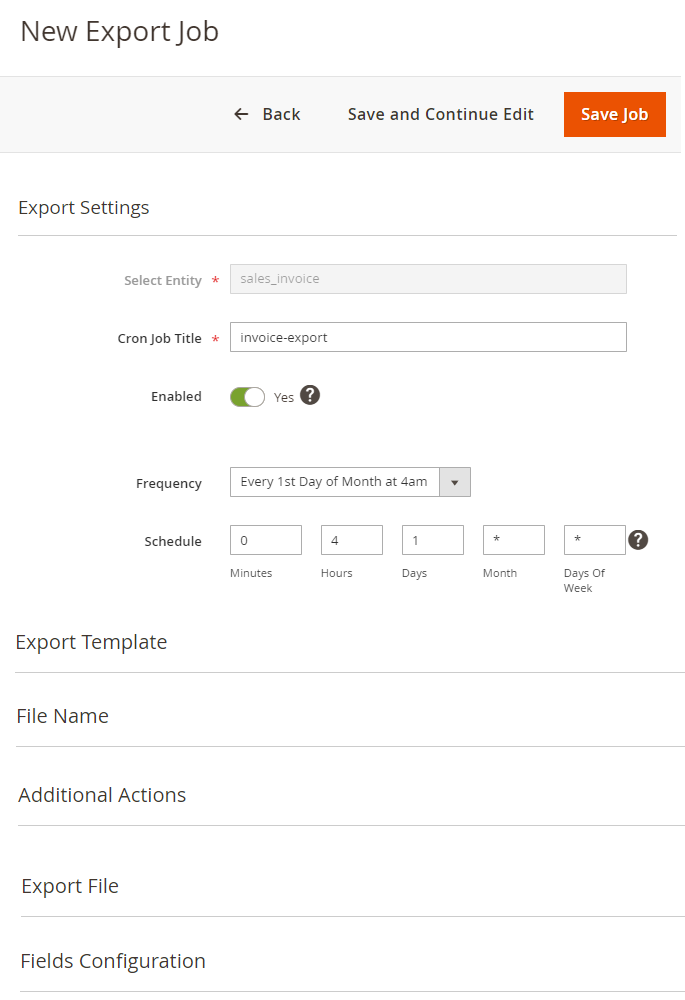
Specify the cron job title for internal use and set the schedule for exporting. The file configuration algorithm is the same as described in the Export Profile section.
Google Product Review Template
With an active support subscription or product subscription for Pro or Premium solution versions, you gain access to the Google Product Review template on the Export Cron Jobs grid. This pre-configured template helps to export product reviews from your Magento 2 to the feed (XML file type) suitable for uploading into Google Merchant Center. Furthermore, if you have the Amasty Advanced Product Reviews extension installed, you can enhance your export file with additional review-specific fields using the Advanced Product Review template. For more detailed information, click here.
For import, navigate to System → Amasty Import → Cron Jobs.
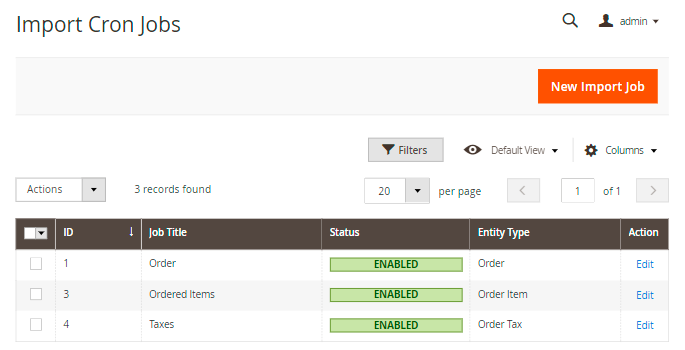
Click New Import Job.
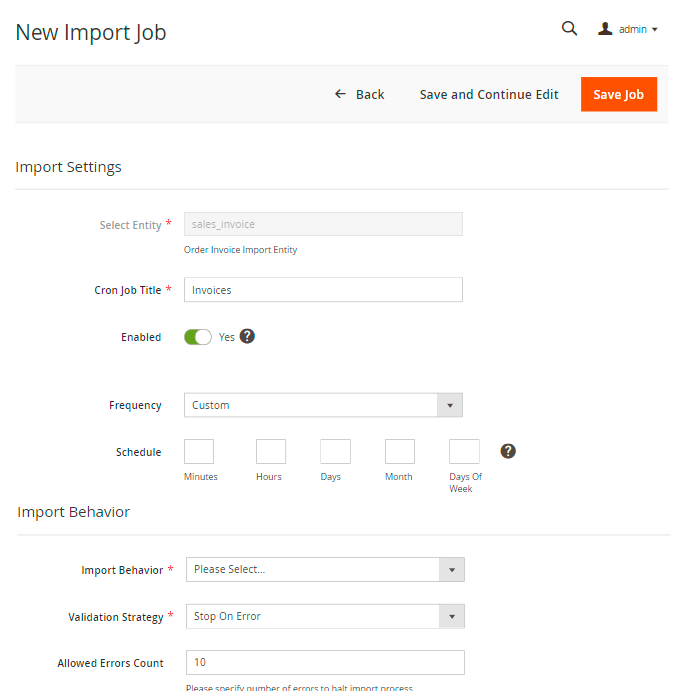
Specify the cron job title for internal use and set the schedule for importing. The file configuration algorithm is the same as described in the Import Profile section.
Useful Tips and Popular Import Use Cases
It may not always be easy to start using the Import and Export extension. In this part of the guide, we’ll focus on more practical use cases and example files that will guide you along the way.
Understanding Logic and Features for Successful Imports
We’ll start with the requirements for CSV files, as this is the format that requires a specific structure, which may not always be clear at first glance.
Any import profile has a tree structure and starts with a root entity. This is a fieldset containing the most important information, e.g. SKU/Product ID/Attribute Sets for products, Order ID for orders, etc.

It’s absolutely necessary to select an identifier here; here are the identifiers you may choose from:
- for products - product ID/product SKU/custom attribute
- for orders - increment ID/order ID
- for customers - email/customer ID

This is the way the extension uses to differentiate between unique records in the file. Other fields, such as product attributes, categories, websites, etc. are imported via subentities. The important difference here is that subentities require custom entity keys or prefixes.
For example, the module doesn’t currently support the name Price for the price column. It requires an entity key, hence by default, the column will be named catalog_product_attribute.price. The default prefix can be found in the profile:

For your convenience, you may replace a default prefix with a custom one, e.g. attributes.price. However, keep in mind that it should always be added to the field names (unless they belong to a root entity), as this is how the module connects to the relevant database table.

As for the column names, they can also be changed via the Import File Field setting. Let’s say you’d like to rename the description field to specification. You may simply put the custom name to the Import File Field of the relevant attribute:

In this case, the full name of this column will be as follows: catalog_product_attribute.specification.
You may also pay attention to the Default Value field next to each attribute in the profile. You may use this field in case you want to import the same value to all products/customers/orders. For example, if all the products in the file belong to the same brand, you may skip this field in the file, but enable the Default Value for it like this:

If this field has a value in the import file, then leave the Default Value empty.
To copy the default value, go to Stores > Attributes > Product, open the edit page of the specific attribute, find the desired attribute option, right-click, and select Inspect.
Click on the screenshot to enlarge it.
It’s a good practice to arrange the fields in the file in the same order as they go in the import profile. The module doesn’t allow mixing the fields between the entities. For example, if you have a catalog_product_attribute.price field, then all the other product attribute fields should go together with it. Root entity fields are to be placed first at all times.
To make the process a bit easier, when you first create any import profile, there is an option Enable Autofill for Typical Use Cases:

It can come in handy when you first try the import tool because it will automatically preselect a minimal number of fields. For example, if you enable it for orders, it will select the necessary fields used to import an order. Then you may download a sample file and try to fill it with your values.
Import Use Cases (+ Google Sheets Sample Files)
First, we’ll briefly walk through the most frequent use cases regarding each entity:
1. Import Orders. You may start with scrutinizing a sample file with the minimum number of fields for importing an order. Another thing that may be useful is importing tracking numbers for existing orders, which you may do via this file. You may also automatically create invoices/shipments/credit memos for orders right in the profile:

2. Import Customers. Here is a file with a minimal number of fields. However, you may also need to import addresses, payments, and other important information about customers. Then you may use the following sample file.
3. Import Products. The minimal number of fields to import and successfully open a new product in the backend can be viewed here. All the other fields are optional. For example, if you’d like a more detailed import that will help you import products that will be displayed on the frontend after the import process, you may use the following file.
Let’s dive more deeply into the product import, as it’s the most requested entity. Below you will find a list of subentities you may import with our module along with the sample files.
1. Assign categories to existing products. Please note that the extension requires a full path to the category as provided in the file.
2. Stock quantity:
3. Import of product values based on store views. Here’s a sample file for this case.
4. Images: To import existing images, they should be downloaded to the Magento folder first. Then you provide a path to an image in the import file. Alternatively, the module accepts image URLs. In this case, please fill in the Images File Directory field where the images will be downloaded during the import:

- images with roles (thumbnail, small image, base image, etc.) - sample file;
- media gallery - sample file. It’s necessary to include value_ids for images. However, the value can be set to any number; the extension automatically replaces it with the correct ID during the import.
5. Import of configurable-simple product links. Both configurable and simple products should already exist; this file only imports the links between them.
6. Product reviews - sample file.
7. EAV attribute (import of a new attribute in Magento). This can only be imported via one-time import in Amasty → Import → Import → EAV Attribute. Here’s a sample file for this case.
8. EAV attribute option - sample file. Also can be done only via one-time import Amasty → Import → Import → EAV Attribute. Please, note that you may create a new attribute value in the import profile, by using a Create New Attribute Value modifier:

9. Category import - sample file. Available via one-time import, Amasty → Import → Import → Product Category.
10. Bundle product import - sample file.
11. Grouped product import - sample file.
12. Simple product with customizable options import - sample file.
Some of the listed use cases you can see on import profile grids in this product demo.
XML file format usage
In case such strict requirements for files don’t suit you, then you may try the XML format. One of its advantages is that the module provides support for XSL templates. It means that you may import an XML file of almost any structure by mapping its fields to the fields required by the module in an XSL template.
If you require more information on XSLT, please visit:
For example, let’s say you’d like to import the following file to Magento:

Strictly speaking, the extension doesn’t allow importing it as is. However, you may create an XSL template and map the values to the ones the module expects. In the current example, our XSL template will look like this:

Example files to download: xml-xsl-example-files-for-import.zip
Please note that each separate entity except for the root entity (e.g. catalog_product_attribute) requires a new node, as in the example above: <xsl:element name=“catalog_product_attribute”> </xsl:element>. You may find the correct name of the node in the import profile:

Inside the node, you list the fields that should be imported for this entity. The tags like <xsl:element name=“price”> indicate the name of the tag in your XML file. Then, we map it to the field name in the import profile, e.g.: <xsl:value-of select=“price”/>. The result for this one field is:
                        <xsl:element name="price">
                            <xsl:value-of select="price"/>
                        </xsl:element>
Compatibilities
Part I
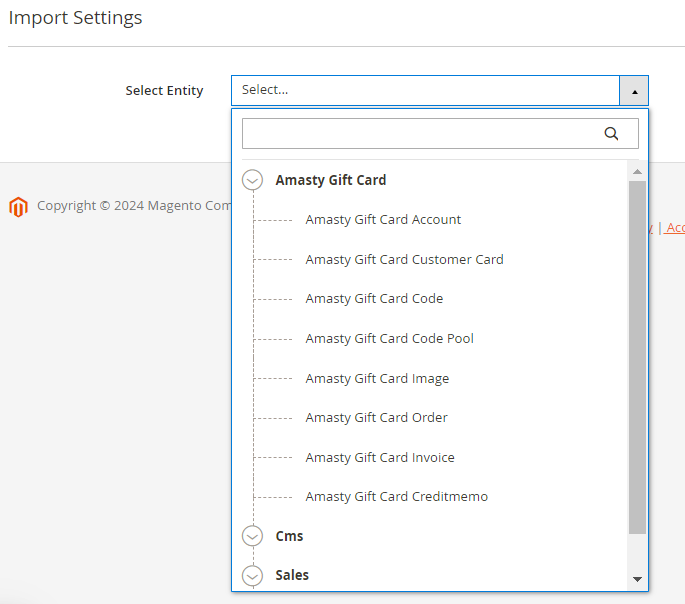
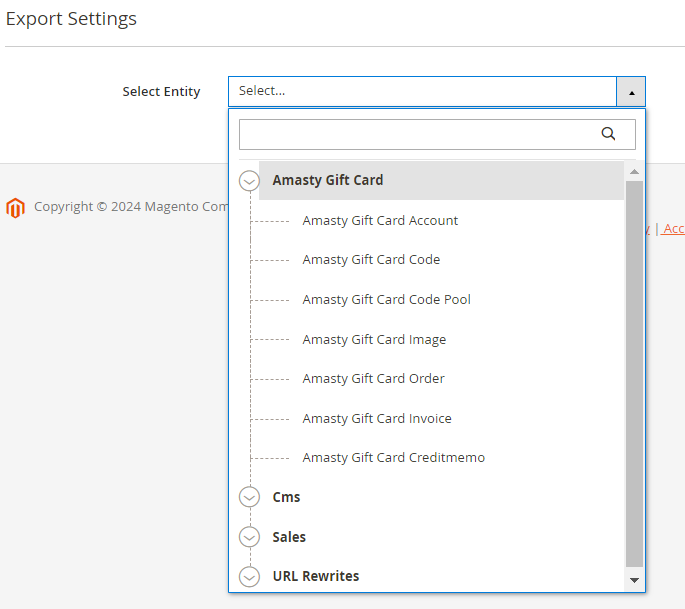
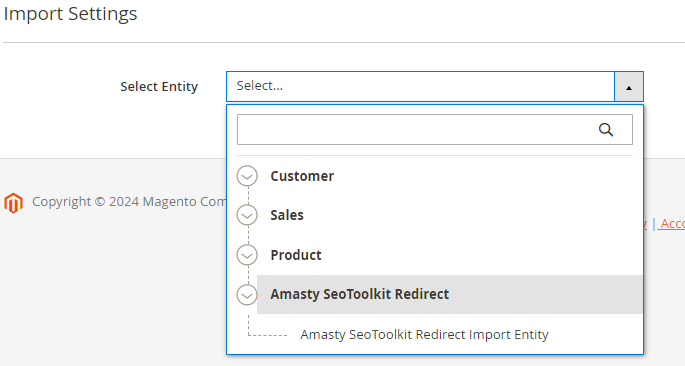
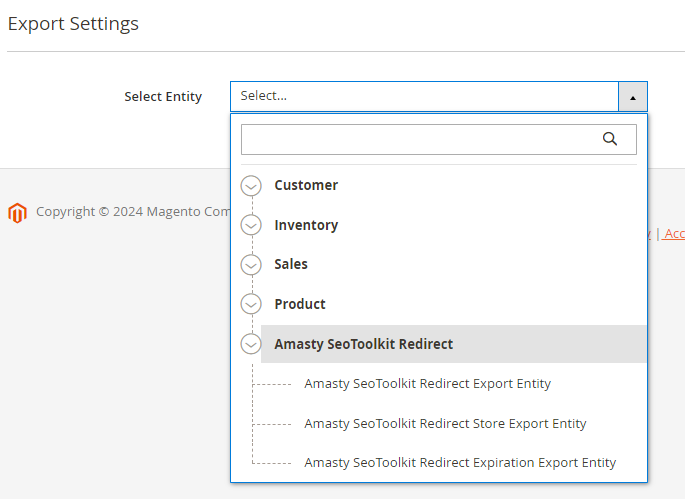
A wide range of Amasty extensions come equipped with import and export core functionality. By purchasing them, you can migrate even more types of store data and thus achieve specific business goals faster.
1. Gift Card Pro and Premium
2. Improved Layered Navigation Pro and Premium
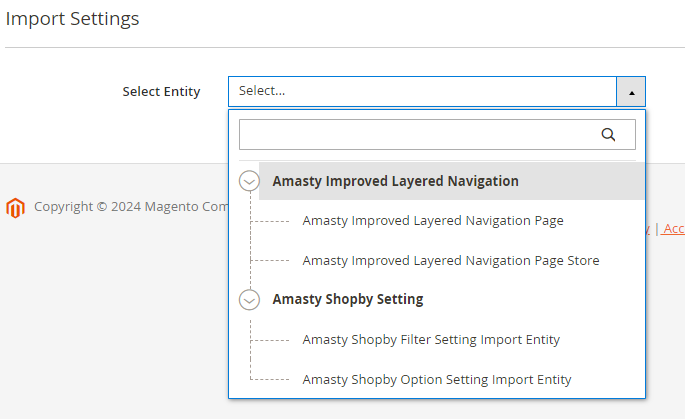
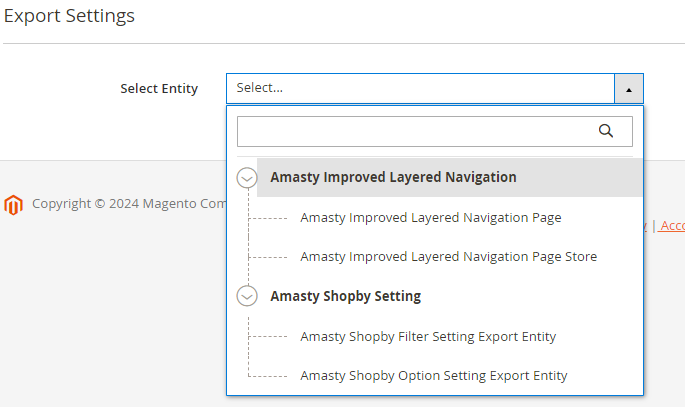
3. Special Promotions Pro
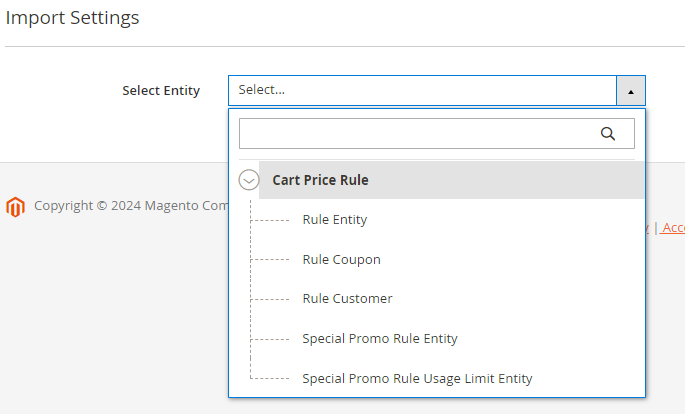
You can export the same types of special promo data.
4. RMA Pro and Premium
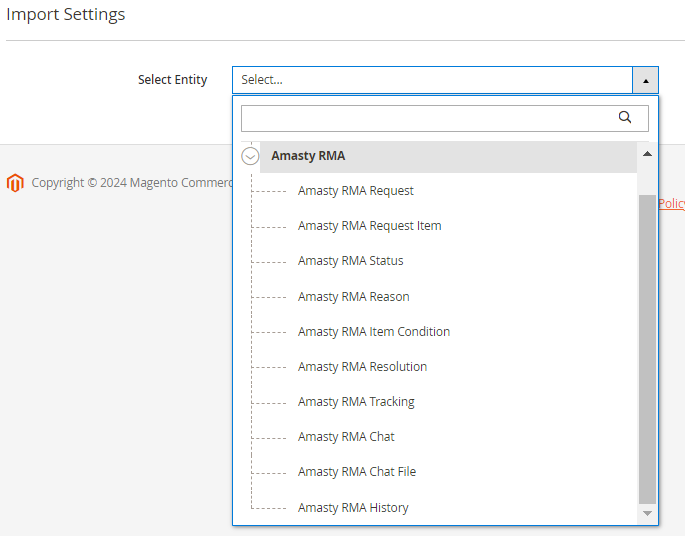
For exporting RMA data, you have access to the same options.
5. SEO Toolkit Pro and Premium
6. Reward Points Pro
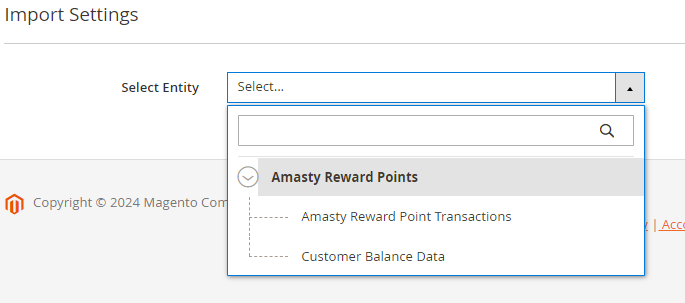
You can utilize the same options for exporting reward points details.
7. Store Locator and Store Pickup with Locator
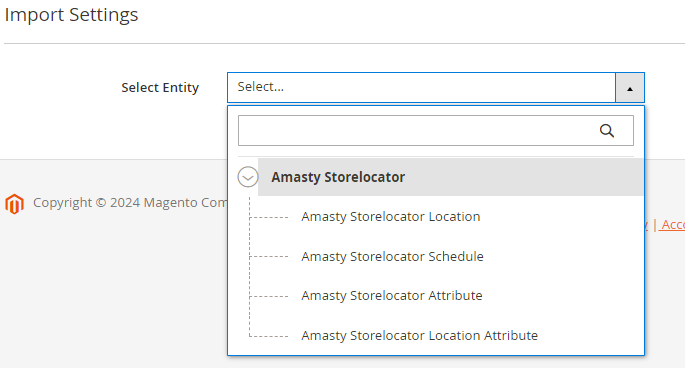
The same options are available for store locator info export.
8. Blog Pro
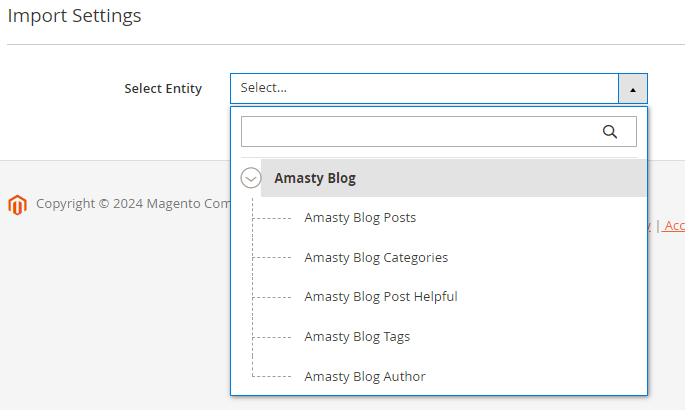
The same blog components are available for exporting.
9. Store Credit & Refund

For exporting store credit data, you have access to the same options.
10. Automatic Related Products


Part II
Furthermore, with the installation of the Import and Export solution alongside other Amasty extensions, you gain the ability to incorporate extra fields into your export files.
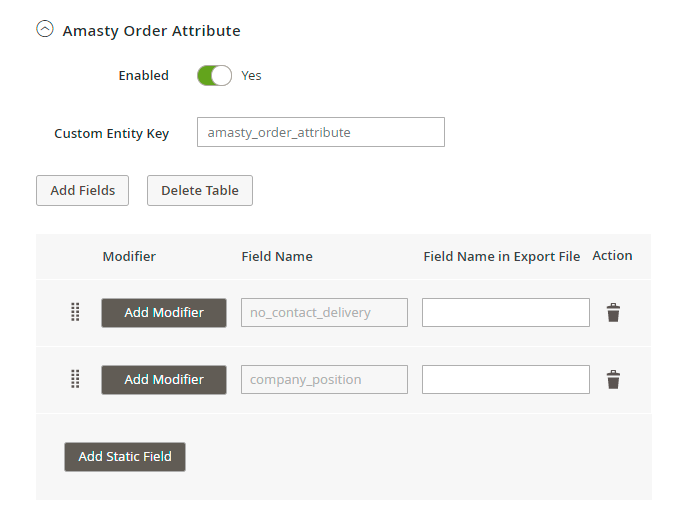
1. Export orders component is also compatible with Amasty Order Attributes extension. Thus, you can find and add custom order fields to the export file.
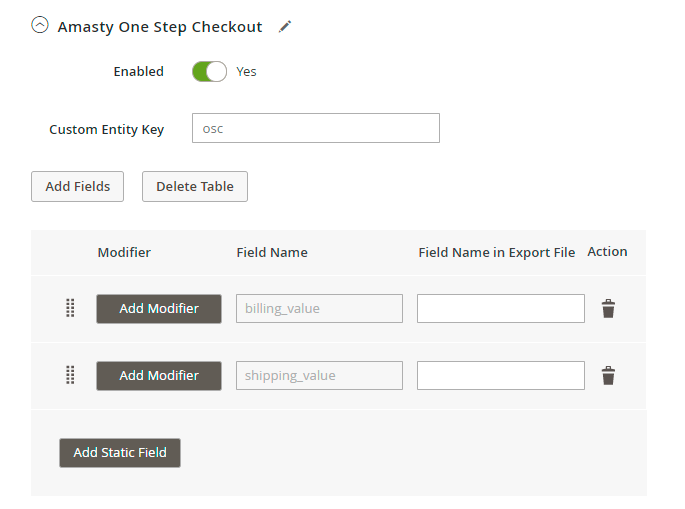
2. The extension supports Amasty One Step Checkout so that you could add more order details from your checkout page to the export file.
3. With the Amasty Advanced MSI extension installed, you can export multi-source inventory data.
Additional packages (provided in composer suggestions)
To make additional functionality available, please install the suggested packages you may need.
Available as a part of an active product subscription or support subscription:
For Basic, Pro, and Premium versions:
amasty/module-export-merged-fields- This package provides the possibility of merging several export field values into one field.
amasty/module-import-subscription-functionality- This package allows you to set a maximum size (in MB) for import files.
For Pro and Premium versions:
amasty/module-product-review-export- This package provides the option to utilize the 'Google Product Review' template placed on the Export Cron Jobs grid.
amasty/module-product-advanced-review-export- This package provides the option to utilize the 'Advanced Product Review' template placed on the Export Cron Jobs grid (if you have the Amasty Advanced Product Reviews extension also installed).
For Premium tariff plan only:
amasty/module-customer-export-subscription-functionality- This package provides new types of events to trigger customer exports.
amasty/module-product-import-subscription-functionality- This package allows you to remove product categories during product imports.
FAQ
* Is it possible to import data to Magento with a custom file?
* What is the required minimum of fields to import orders/products/customers?
* Is it possible to integrate a third-party system into Magento via the Import & Export solution?
* I see half-empty columns in the export file. How can I fix it?
* Can I shuffle export fields between entities in export modules?
* The Amasty: Order Export - Product Attributes index gets stuck in the Processing state
Find out how to install the Import and Export extension for Magento 2 via Composer.
magento_2/import_and_export.txt · Last modified: 2025/04/30 13:10 by kkondrateva

