
Sidebar
magento_1:full_page_cache
Table of Contents
For more details see the Full Page Cache extension page.
Guide for Full Page Cache
Speed up your Magento using cache to the full. Decrease pages time load and improve user experience, which leads to a better conversion rate and higher search rankings.
- Magento loads pages much-much faster
- Huge decrease of your server load
- Better search engine indexing and higher rankings
- Dynamic blocks / “hole punch” support
- Includes cache crawler!
When you don’t have FPC extension installed, each time a visitor comes to any page of your website, Magento first reads a bunch of configuration files to check which blocks need to be displayed on the page. After that Magento takes each block and starts 'generating' it and placing on the page. This all takes much time.
The guide is divided into three main parts to help you find the answers for most of the questions you may have during the installation and configuration processes. Below you will find:
Extension Configuration
To get access to the 'Full Page Cache' settings go to: System → Configuration → Full Page Page
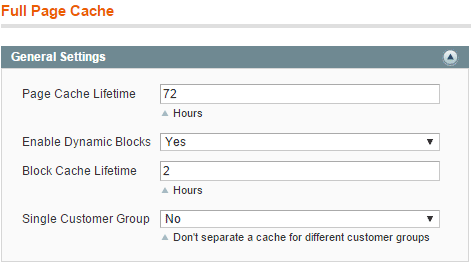
General Settings
Page Cache Lifetime - the option displays a period of time the page cache is valid. When the indicated time period is over the cache will get the status 'invalid'. A first one who visits a page will get the status 'Cache Miss' (all next visitors get 'Cache Hit').
When the value equals 0, the page cache lifetime will be zero.
Enable Dynamic Blocks - the option enables or disables dynamic blocks on the front end:
Yes - option allows to refresh certain blocks on the front end, e.g when a product is added to a shopping cart and than go to a category page the only content which will be refreshed is: 'mini_cart' block (the block name may differ based on a custom theme), the page status is 'Cache Hit'.
No - option disables block refreshing on the front end, e.g when a product is added to a shopping cart, the cache stops work and all the pages get the status 'Cache Miss'.
Block Cache Lifetime - the option is available only if 'Enable Dynamic Blocks' = 'Yes' and indicates the period of time block cache is valid.
Single Customer Group - when this option is enabled, the website pages are being cached only once for all customer groups. If set to No then the pages are cached separately for each group of customers.
Pages
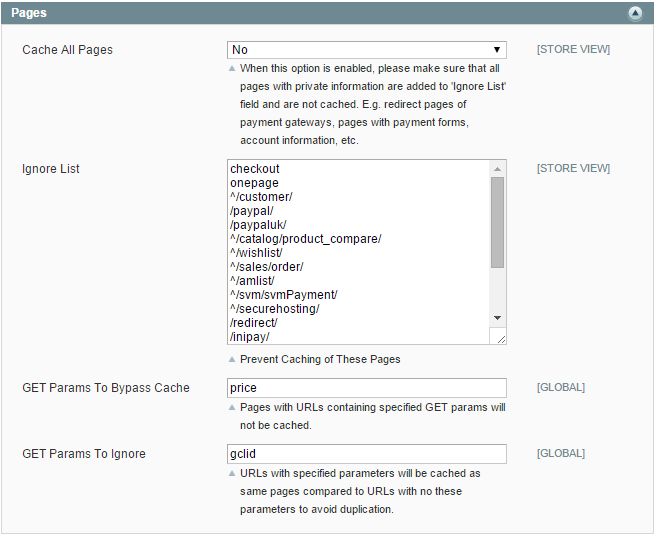
Cache All Pages - determines the 'FPC' behavior.
'No' (default value) - only the following pages will be cached: product, category, CMS. The pages like: checkout, shopping cart page, customer account page, wishlist, product comparison and also URLs related to 3rd party module(s) are not cached.
Yes - all URLs associated with a web shop will be cached. When this option is enabled please make sure that all pages with private information are added to 'Ignore List' (text area below) to avoid caching private information, e.g. redirect to payment gateways, pages with payment forms, customer account information, etc. Also the option allows to cache pages from 3rd party extensions. For example page like: example.com/custom-url/ will be cached.
It is extremely important to keep shopping cart page, customer account and all checkout pages uncached for correct operation of checkout process.
Ignore list - these URLs are out of cache and never be cached till they are in the list.
How to use special symbols:
^ - it indicates a part of the URL right after the domain name.
For example the following line is added to the ignore list ^url1 and the URL is: example.com/url1/url2/ - it will be ignored by the cache as it matches the ignore list condition.
But the url: example.com/url2/ulr1 - will be cached as the ulr1 part doesn't follow the domain name
/urlkey/ - any URL where the /urlkey/ is a part of a full path will be ignored, e.g. : example.com/url1/urlkey/url2/url3
urlkey - any URL with the part urlkey in the URL will be excluded from the cache for example, e.g. : example.com.com/url1/urlkeyurl2/url3
GET Params To Bypass Cache - Pages containing specified GET params in their URLs will not be cached.
GET Params To Ignore - Pages containing specified parameters in URLs will be cached like the same pages without these parameters in their URLs. This will help to avoid content duplication.
Product

Flush Type - the option allows to set how the cache behaves itself when product information is updated (for example changes are made via the Magento admin panel: Catalog → Manage Product → Edit a product → Save or Save and Continue).
Flush Only Product Page - a specific product page cache will be flushed. First visit = 'Cache Miss', e.g. a product A is modified from the admin area and change are saved. The cache for product A page is flushed.
Also Flush associated pages - the cache of a specific product and all associated category pages will be flushed. For example the product is assigned to: Category → Subcategory - after some changes in admin area both 'Category' and 'Subcategory' cache will be flushed.
Flush Product Page Cache After Each Purchase - if set to 'Yes' keeps visible stock status information on the product and category pages up-to-date. In case module like 'Custom Stock Status' → https://amasty.com/custom-stock-status.html is installed.
Category

Flush Entire Page Cache After Each Category Update - if the option is set to 'Yes' the cache will be flushed each time when a category is edited and saved at: Catalog → Category Management → Save Category
Mobile Design
These settings can be used when your Magento store utilizes a mobile theme.
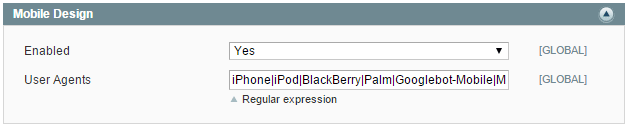
Enabled - the option either enables or disables separate design for mobile devices and PC.
User Agents - available only when the option 'Enabled' has value 'Yes'. Includes all agents which will get a mobile version on page load. The agents listed in the field should be the same as agents listed at: System → Configuration → Design → Themes (if a custom theme is set via Magento native functionality).
Cache Storage Settings

Enable GZIP - the option enables cache compression and allows to save some space. It takes a chunk of data and makes it smaller also may increase CPU load.
Compression Level - The level of gzip compression simply determines how compressed the data is on a scale from 1-9, where 9 is the most compressed. The trade-off is that the most compressed data usually requires the most work to compress/decompress, so if you have it set fairly high on a high-volume website, you may feel its effect.
Maximum Storage Size - In Megabytes. If the limit is reached a new cache won't be saved (no new records in a database).
All the changes are reflected in the core_cache table in the database.
Search Engines
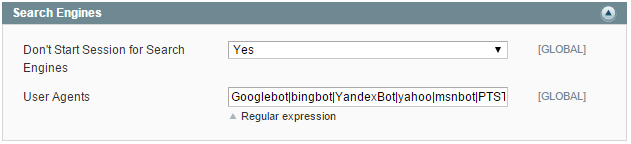
Don't Start Session for Search Engines - don't start the session for agents listed below however the agents still see the results.
User Agents - the list of agents do not start the session to.
Statistics

Collect Page Visit Statistics - if the 'Amasty FPC module built-in table' is set as the 'Query Generation Source' it should be set to 'Yes'. The option saves customer's visit history and pass it to the cache crawler.
Cache Regeneration

Reset Page Lifetime When It Visited By Customer - the option reset the page lifetime each time it is visited. For example the life time = 72 hours and 22 hours have been passed so the current life time = 50 hours. If a customer visits a page it will reset the life time back to 72 hours again.
Crawler Action:
None - nothing happens with the page when a crawler visits it.
Regenerate cache lifetime - similar behavior to 'Reset Page Lifetime When It Visited By Customer option'
Re-crawl page - the action updates cache record in the database.
General Improvements
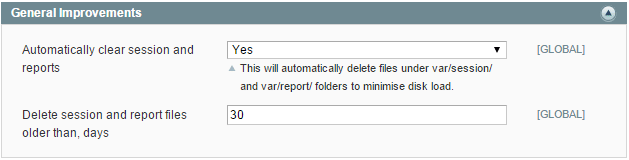
Automatically clear session and reports - automatically deletes files under var/session/ and var/report/ folders to minimize disk load. The time period depends from: Delete session and report files older than, days
Developer Settings
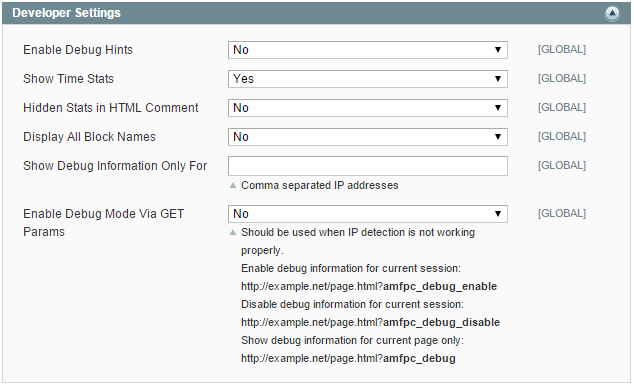
Enable Debug Hints - allows to show the debug hints on the front end. The hints are available only when the page cache status = 'Cache Hit'
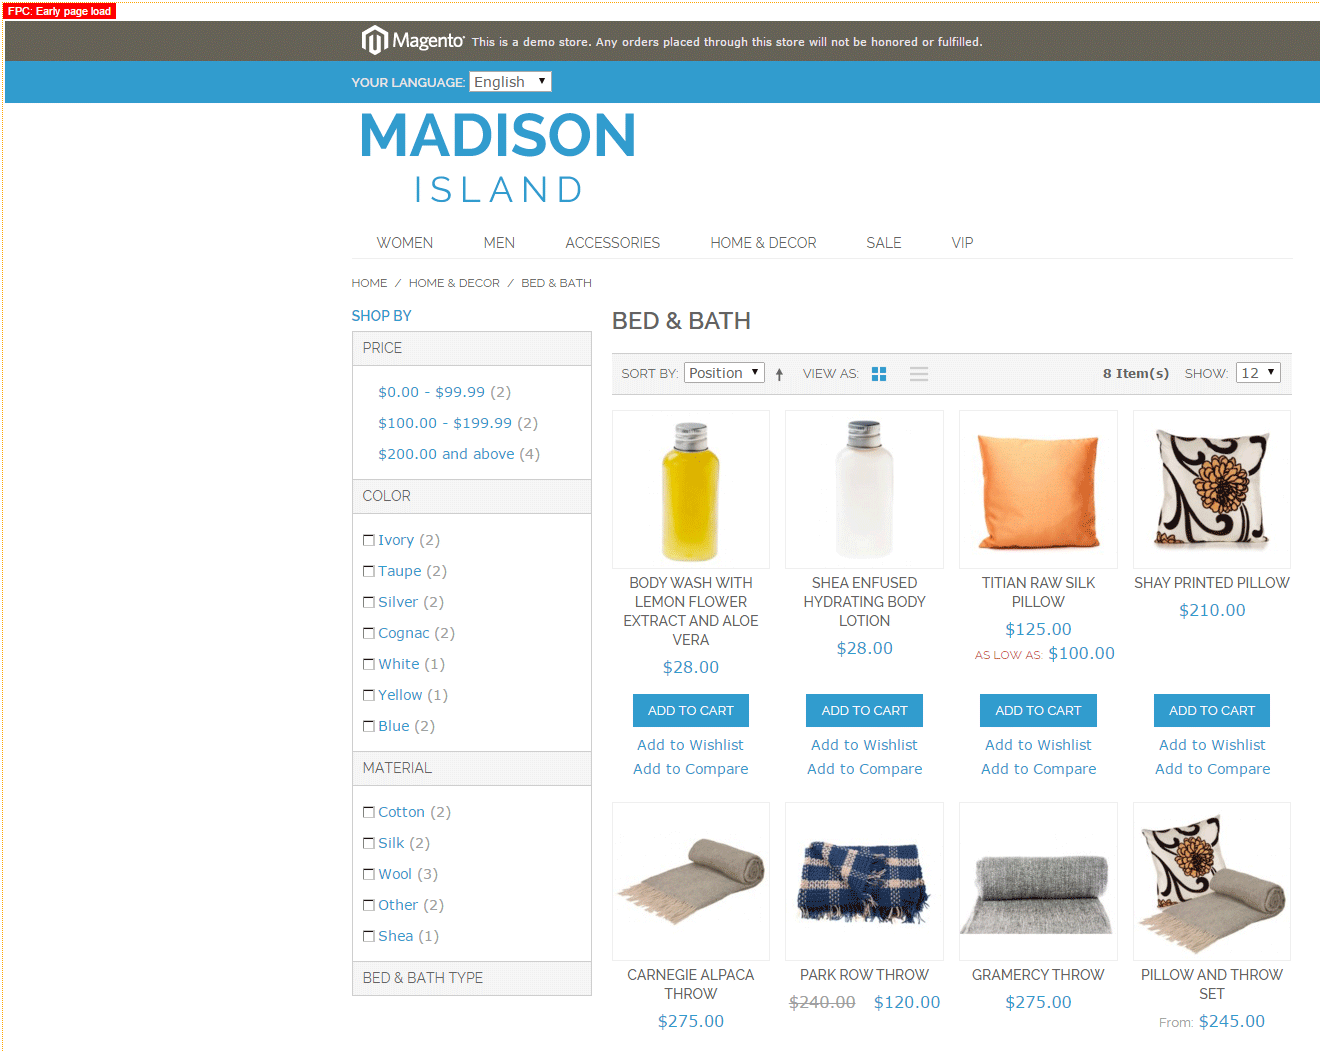
The hints on the front end:
Show Time Stats - when set to 'Yes' shows the current page generation time and page status
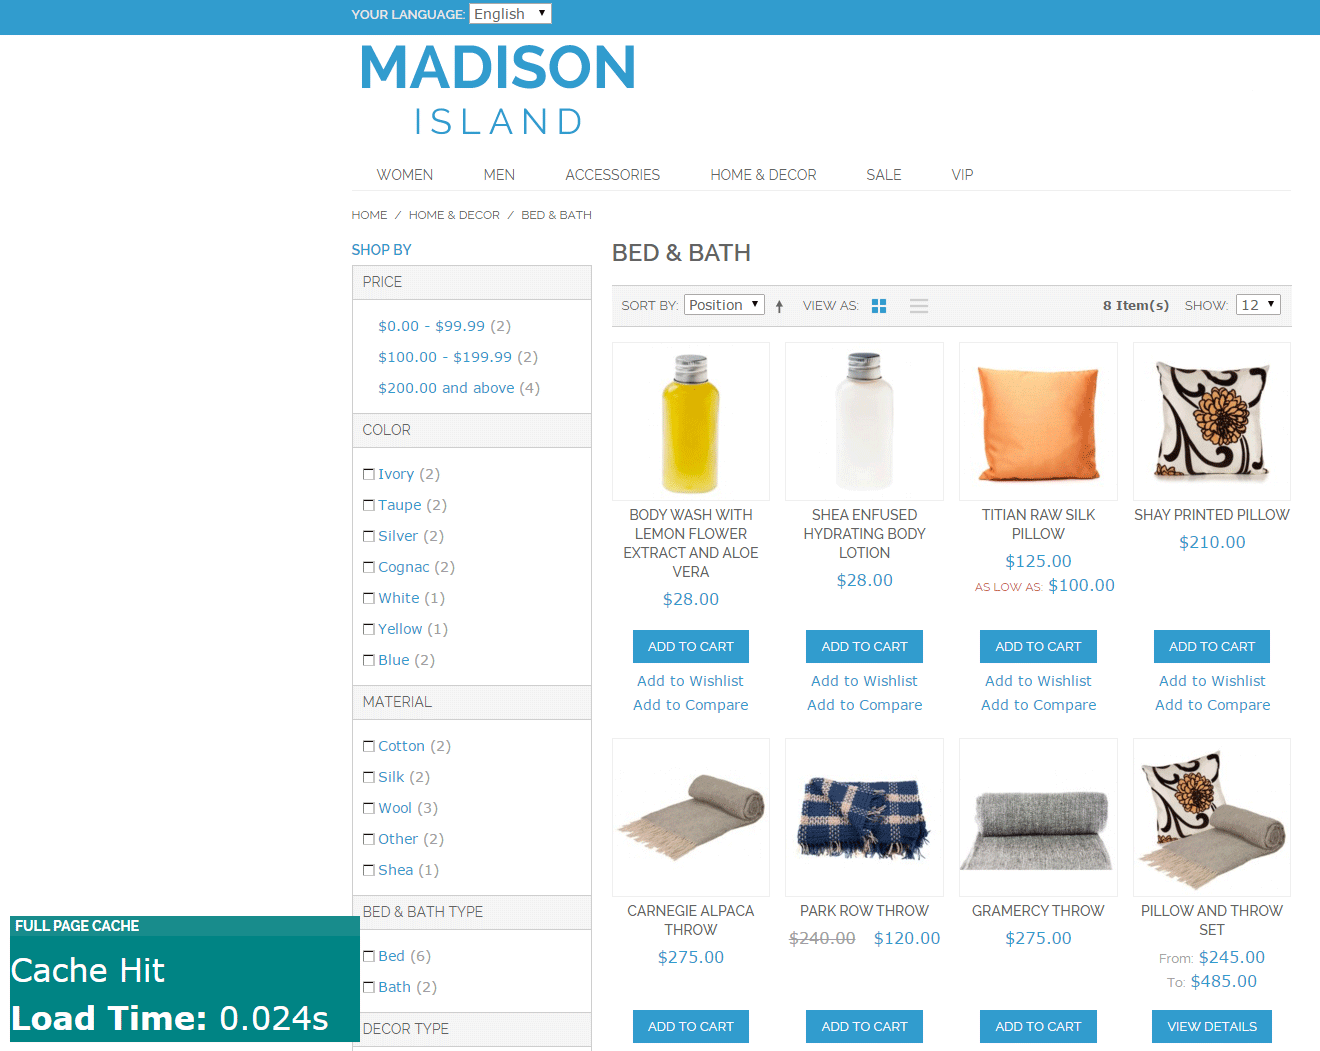
The time stats on the front end:
Hidden Stats in HTML Comment - adds
<!-- AMFPC|Cache Hit|0.025s -->
to the end of the page HTML source. Where 0.025 is a current page generation time.
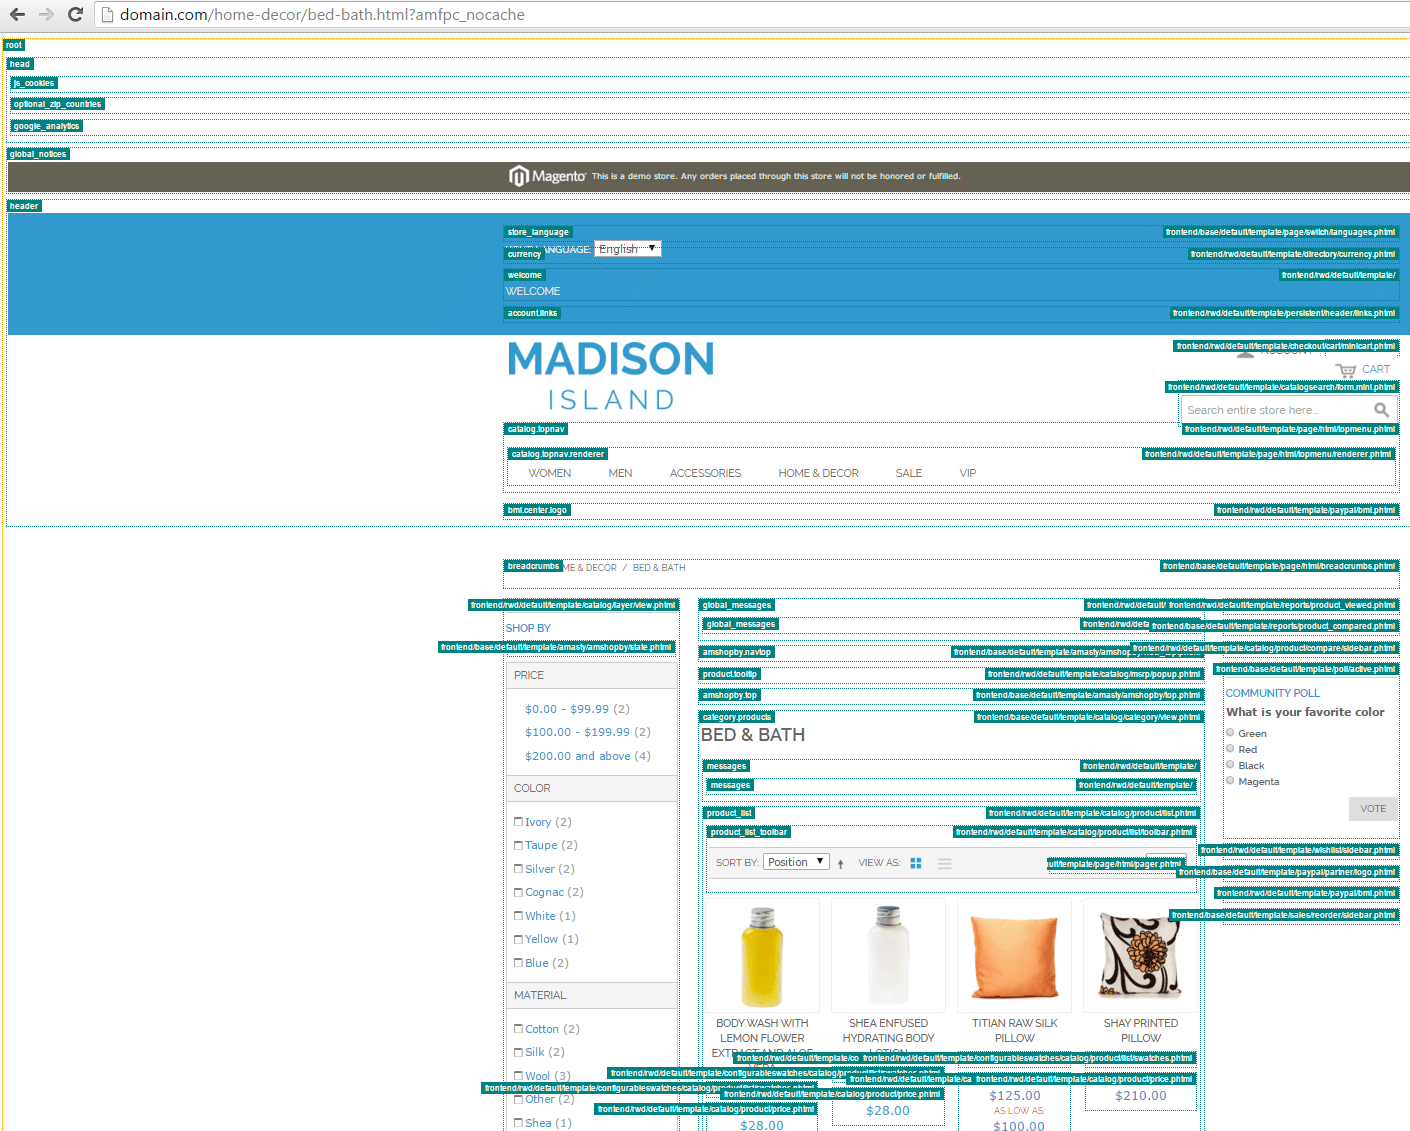
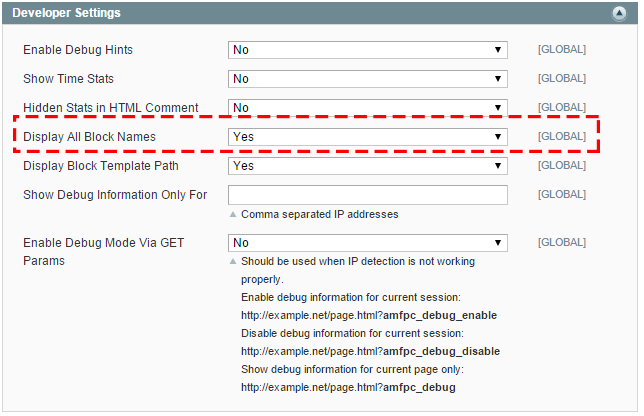
Display All Block Names - allows seeing all block names on the front end. The block names will be shown on the page where the status is equal to 'Cache Miss' or 'Contains ignored params'. If you have a page and want to show the hint but don't flush the cache just add the following parameter to the URL: ?amfpc_nocache
Block names on the front end:

Display Block Template Path - adds full template path to block name which allows to find a correct template.
Show Debug Information Only For - comma separated list of the Ips which will see all the debug info.
Enable Debug Mode Via GET Params - usually are used when a server cannot correctly detect IP. Enable debug information for current session:
http://example.net/page.html?amfpc_debug_enable
Disable debug information for current session:
http://example.net/page.html?amfpc_debug_disable
Show debug information for current page only:
http://example.net/page.html?amfpc_debug
Full Page Cache Crawler
To get access to 'Full Page Cache Crawler' settings go to: System → Configuration → Full Page Page Crawler
All queue operations including its generation and processing have built-in protection from simultaneous activation. It means that if a task is not finished yet and it was called by cron again, the operation won’t be activated again before the first task is finished. This algorithm is implemented through blocking a specific file in the /var/tmp folder using a FLOCK() PHP function. Thus, this feature may not work on Windows Servers.
General Settings
Enable crawler - enables or disables the cache crawler. The option has a 'Global' scope so it is not possible to run the crawler on a certain web store/store view.
Page combinations

Please be aware that each link from the queue is to be checked with all settings combinations from the General Settings tab and with default settings (when there is no directions for the link).
Example:
You’ve chosen the following settings:
«Customer Groups» = General, Wholesale «Stores» = English, French «Currency» = USD, EUR, RUR «Process mobile view» = no
You have four settings chosen: two for a customer group, one for stores, two for currency, Process mobile view isn’t chosen.
Thus, here’s the number of combinations for one link:
1 link * 2 customer groups * 2 store * 3 currencies = 12 request variants
As a result, each link will be checked in the following 12 combinations:
- General + English + USD
- General + English + EUR
- General + English + RUR
- General + French + USD
- General + French + EUR
- General + French + RUR
- Wholesale + English + USD
- Wholesale + English + EUR
- Wholesale + English + RUR
- Wholesale + French + USD
- Wholesale + French + EUR
- Wholesale + French + RUR
Crawler Options
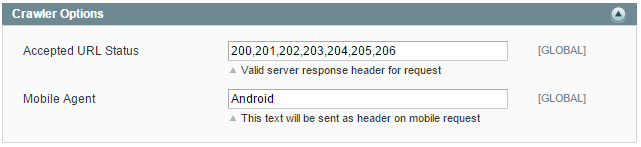
Accepted URL Status - the list of page statuses which will be accepted by the crawler. You may check the page status following way:
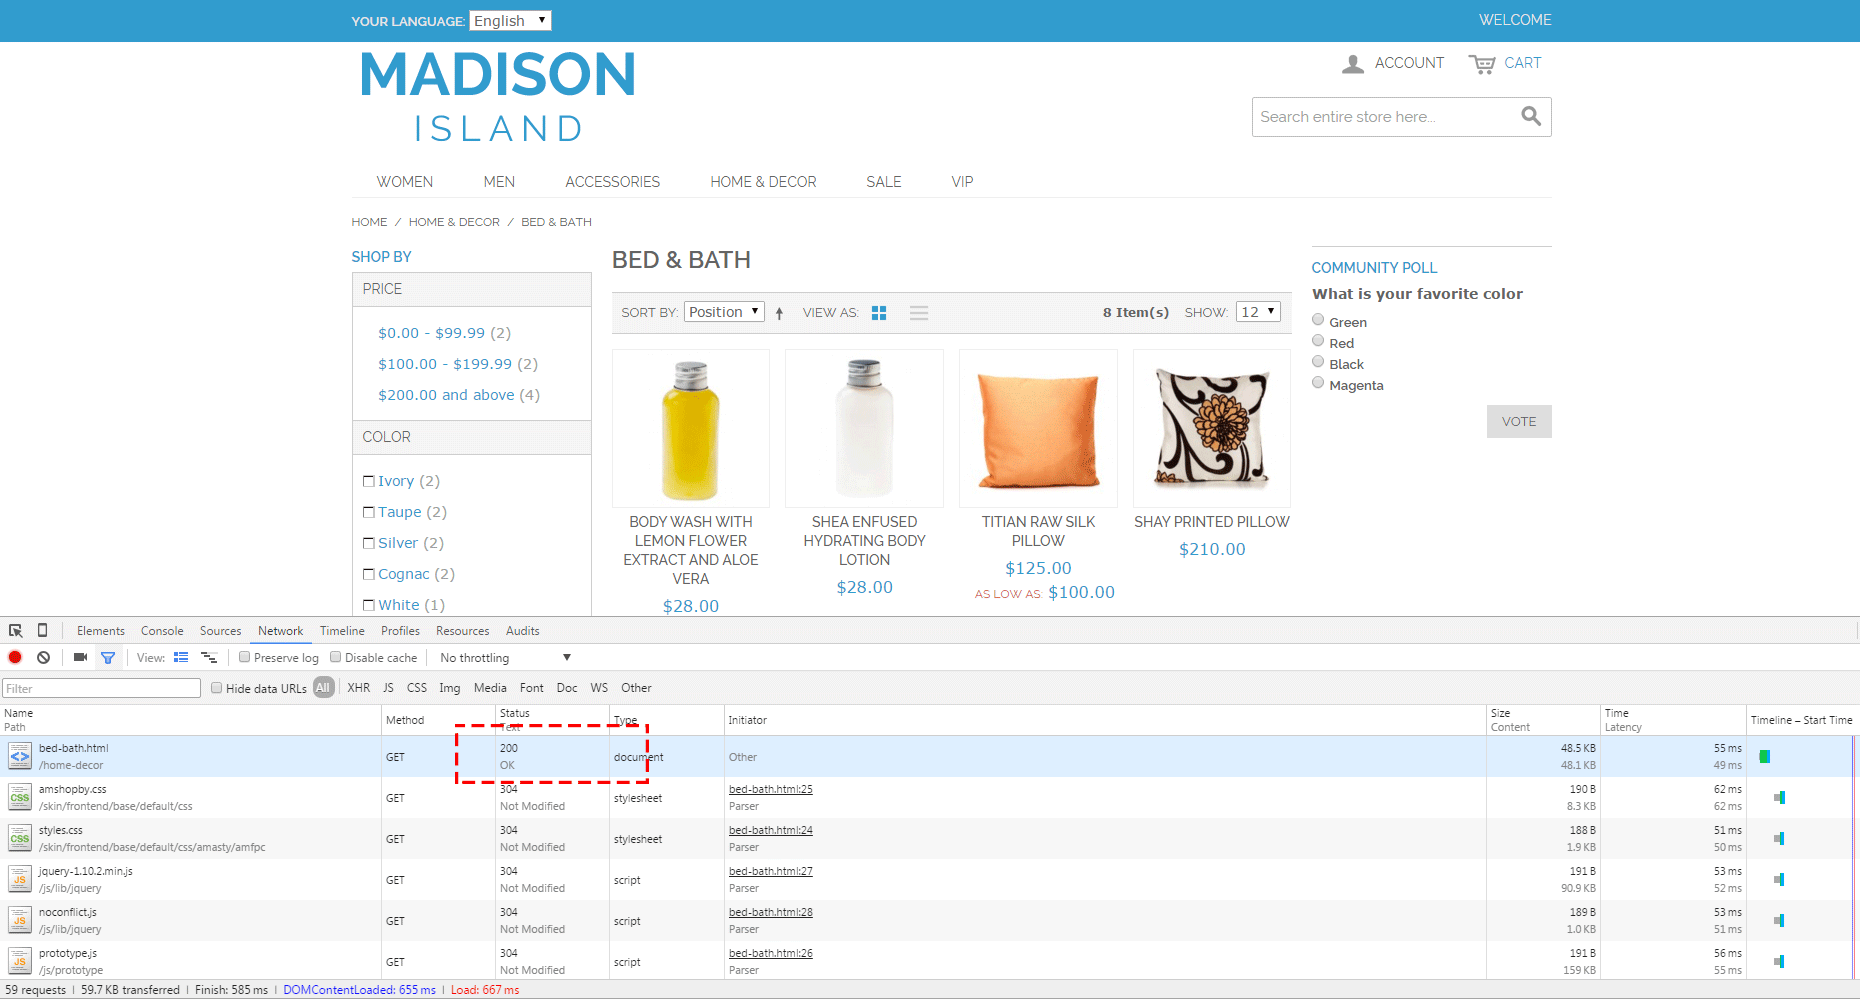
If the page status is differ from entered in the list it won't be accepted by the crawler.
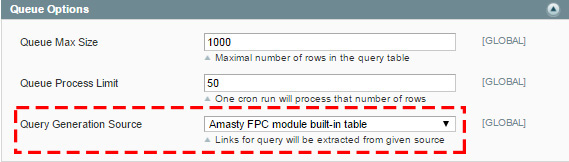
Queue Options
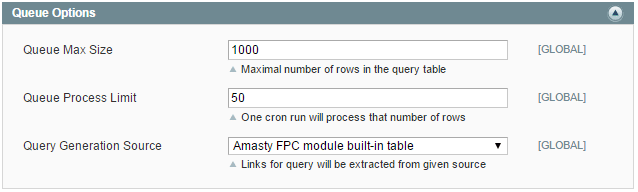
Queue Max Size - allows to set the maximum queue size.
Queue Process Limit - the number of rows which will be processed by one cron run (recommended value is: 50)
Query Generation Source - allows to select any of 4 available generation sources.
Amasty FPC module built-in table - default option. If the option is chosen the crawler will take information about URLs to add to queue from the database table: amasty_amfpc_url
Magento built-in log table - this option makes crawler use the follow table: log_url_info
Text file with one link per line - some custom text file with a list of links to be crawled (one link per line).
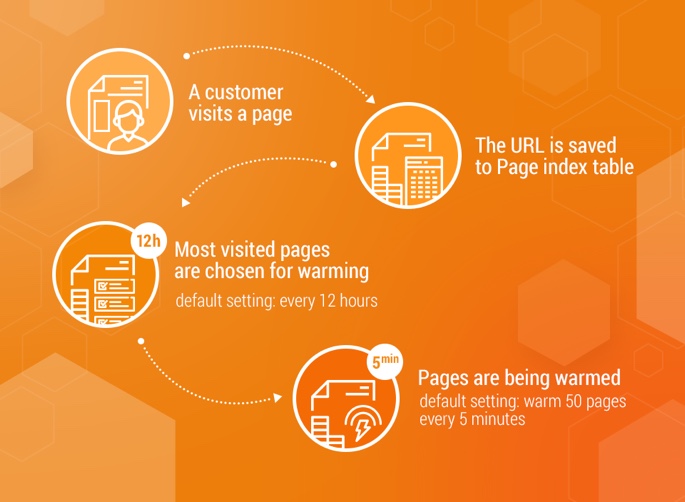
By default, Crawler works in the following way:
Every 12 hours the process of adding pages to the Crawler queue is started. When the queue is generated, every 5 minutes the page warming process is initiated according to the predefined queue.
Logging Options

Log Max Size - Maximal number of rows in the log table.
Force cron job actions

Generate queue - allows manually generate the queue. The crawler will take URLs to create a queue from Reports → Full Page Cache → Pages to index
The queue is stored in the am_fpccrawler_queue table and contains a link and a rating value. Only links not less than 5 characters long are added to the queue. The queue is populated with links and cleaned down to the size specified in the settings after each 500 links added, and also every time when queue generation begins.
Process queue - allows manually process the queue.
Queue processing is done link by link and, after all parameter combinations are done, the link is deleted from the queue. All requests are performed using CURL PHP library. If you don’t have it installed on your server, you’ll have a warning message in the extension settings. The queue has five nested loops for passing through enumeration of all possible parameter combinations: Customer Group, Store, Currency, Language, Mobile.
Plus, there’s an option when each parameter may be not set and won’t be added to the request, in other words, a default setting is used to load the page.
Currency and group switch is performed with getting a specific cookie for this combination of currency and customer group, which is then attached to the HTTP request header. Every time the tool checks if there is such a cookie, and if there is no cookie or it’s expired, another one is received, otherwise the available one is used.
Logging in as an account from one of the customer groups is also performed with a specific cookie. To get the authorization data a specific user is created. Its name will be FPC.Crawler.ххх, where xxx is the customer group number (ID). This user is designed for extension’s internal use and will be created each time during queue processing, if there isn’t any or if it was previously deleted.
Advanced
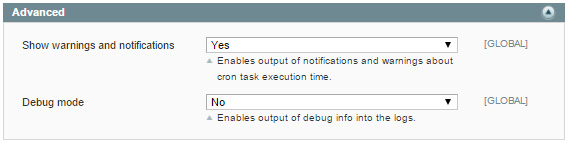
Show warnings and notifications - Enables output of notifications and warnings about cron task execution time.

Debug mode - Enables output of debug info into the logs.
Full Page Cache Reports
Visual Stats
To see the visual stats, please, go to Reports → Amasty FPC Crawler → Visual Stats.
Status Codes
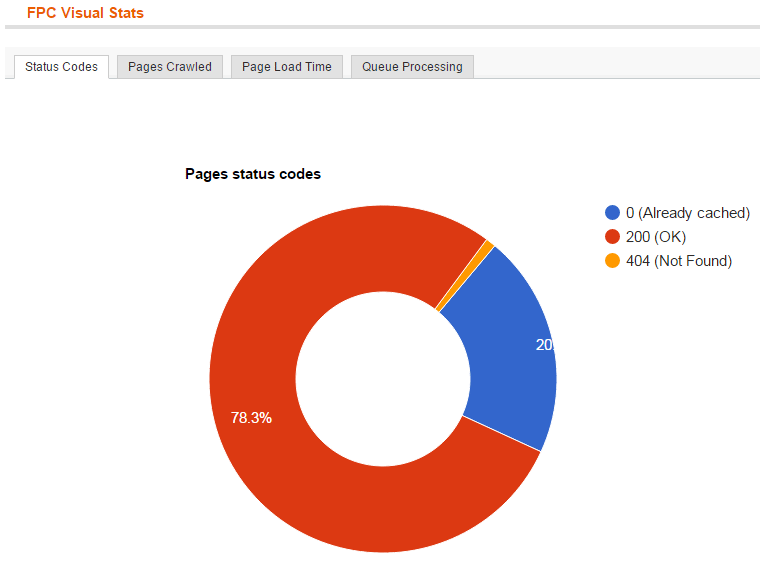
Status Code - The statistic shows page status and the quantity of each statuses for all pages returned after the link request are shown. Very informative for showing percentage of errors and success loads.
Pages Crawled
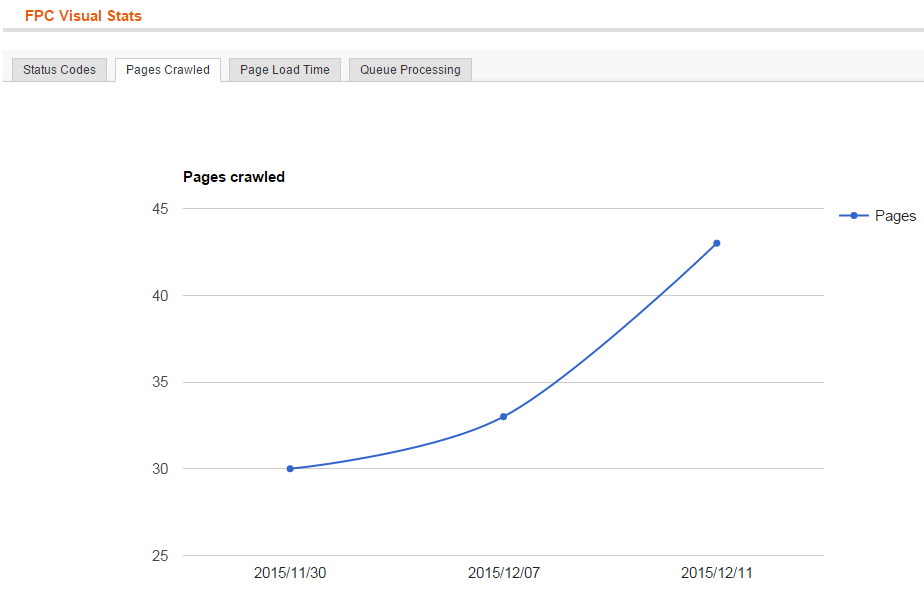
Pages Crawled - Summary stats of requested pages for the previous time period by day.
Page Load Time
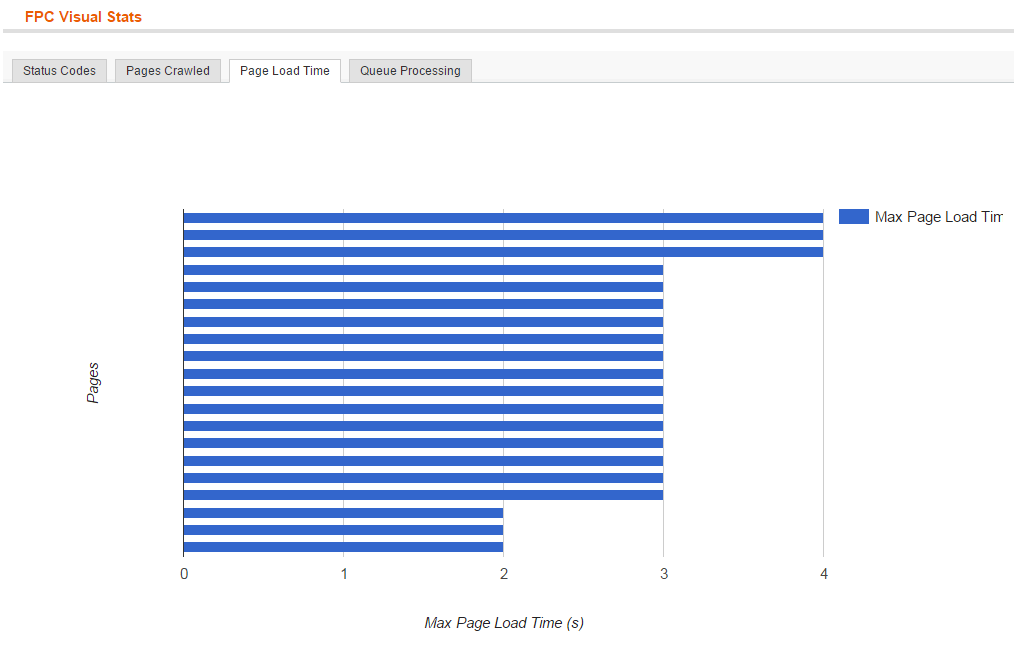
Page Load Time - the list of top 20 of the slowest pages.
Queue Processing
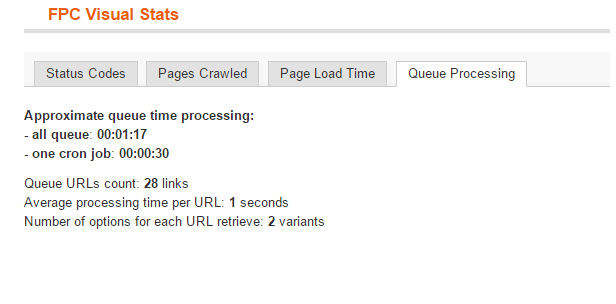
Queue Processing - shows all necessary information about current queue. A detailed description of time needed to process the whole queue.
Log
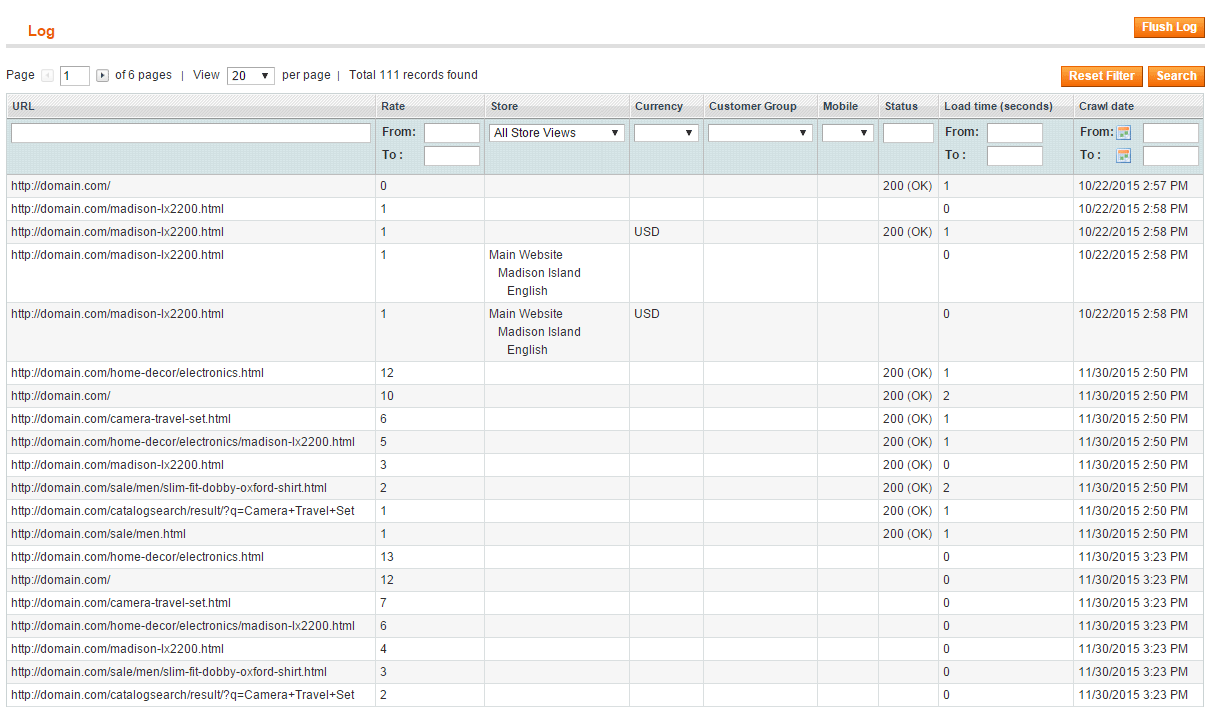
The log shows all the URLs which were crawled. The log contains all possible variants based on selected 'Pages Combinations' This is a table with vivid display of values from the logs table. You can make use of handy search by any parameter.
Queue
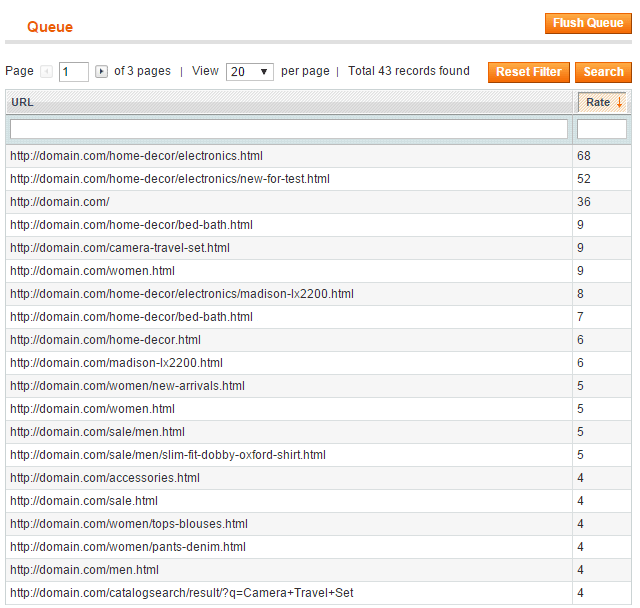
The list of all links which wait for be crawled. This is a table with vivid display of values from the current queue table.
Pages to Index
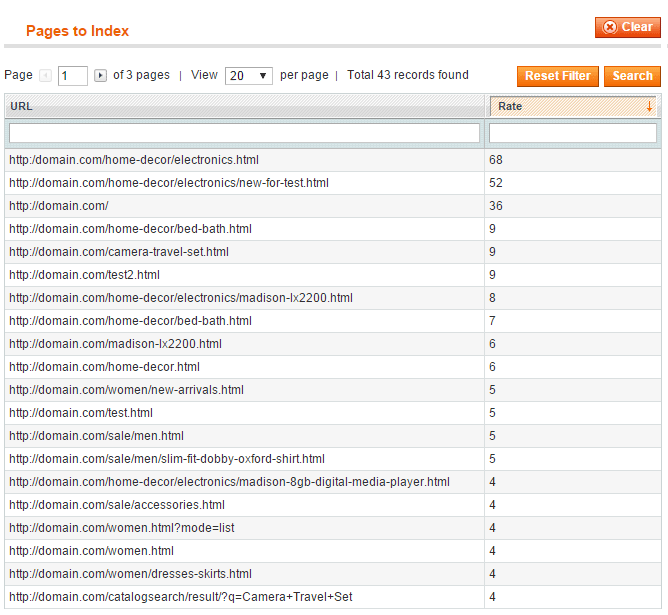
The list of all URLs visited at the web shop. The pages with the highest rank (the most popular) will be submit to cache crawler queue next time.
How to exclude blocks from the FPC caching
General Information
The Full Page Cache module caches the entire page. However, there could be some blocks on the page which content is dynamic. Dynamic means that the content can vary on a page reloading or depending on some actions (e.g. when adding a product to cart). Those dynamic blocks should be excluded from caching.
The module will cache a page without the excluded blocks. The process of creating such exclusions is called hole punching.
To add the block to the Full Page Cache's exclusions, you will need to complete the 3 steps:
- Find the name of the block;
- Add the block's name to the extension's configuration file;
- Flush Magento cache.
Finding the Block's Name
To find the name of the required block, please, do the following:
1. Go to System → Configuration → Full Page Cache and adjust the Developer Settings section like on the screenshot below:
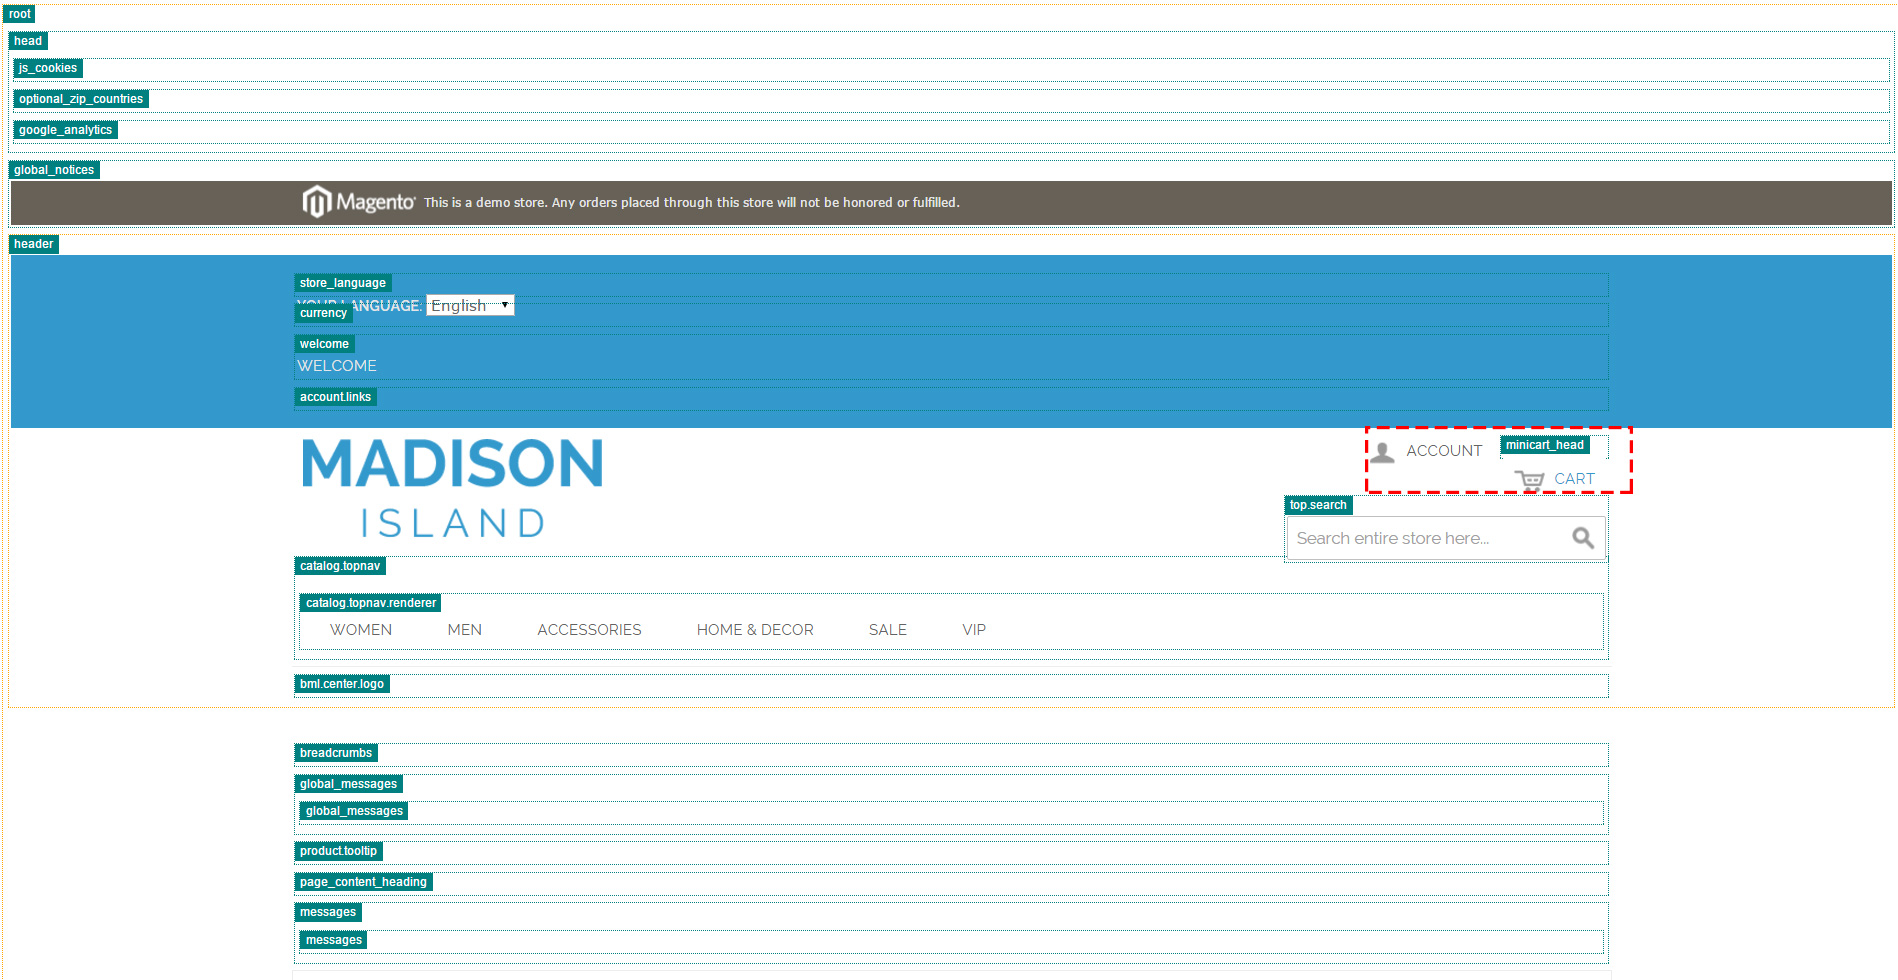
2. Next, you should get the following result on the front end:
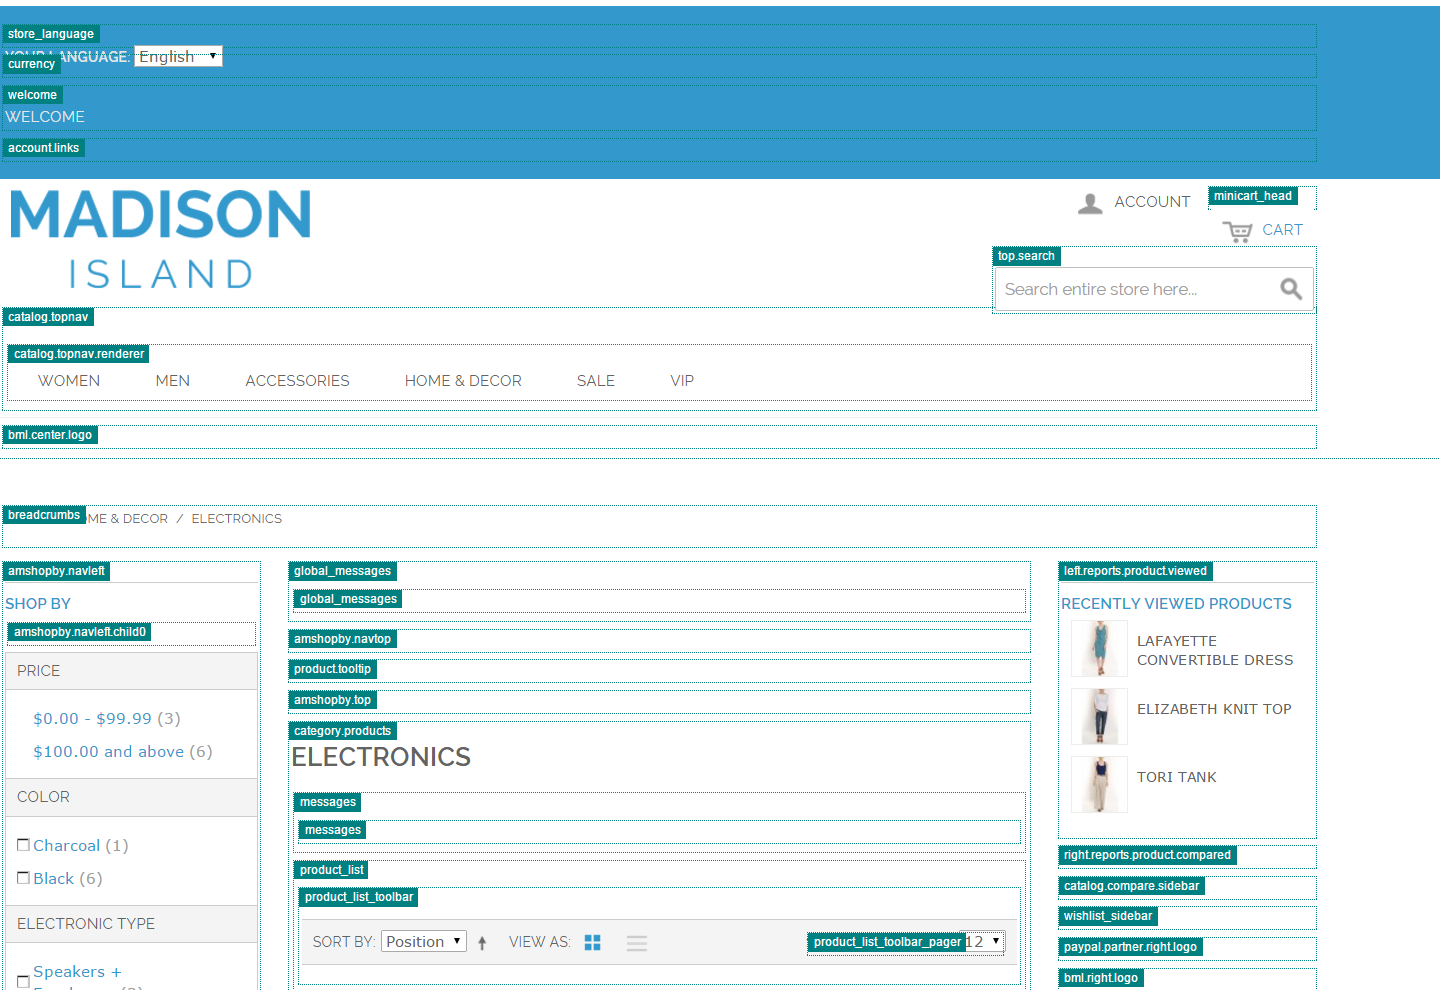
If there are no block names add the ?amfpc_nocache parameter to URL to receive the not cached page. Reload it to get the result.
3. Now, find a necessary block name:
4. Go to: app/etc and open the file amfpc.xml
Block Types
Generally, there are 3 types of blocks:
1. 'Cart block' or 'User welcome block'. This block can be cached but the cache can be reset under certain conditions. For example, the minimap block. Until a product is added to the cart, this block can be loaded for all pages right from the cache. When a product is added to the cart or removed from it, than the cache for this block must be cleared and the new data should be received to display an item in the shopping cart. The same occurs when a user logs in — the welcome block's cache should be updated.
2. Blocks that shouldn't ever be cached. For example, the related products block on product pages should always contain new items when a page is reloaded. The data for this block will be delivered separately when the rest of the page will be loaded from the FPC's cache.
3. Static blocks and widgets that were created in the CMS section of the Magento admin panel.
This is how to hole punch each of the block types:
Hole Punching the Cart / Welcome Blocks
1. Open the file and find <blocks>…</blocks> section
2. Add new block e.g:
<custom.block.name cart="1" /> //to hole punch cart block, customer="1" - login block
The screenshot for details: 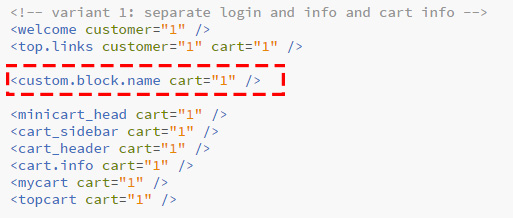
Where 'custom.block.name' block name on the front end.
When done, please, navigate to System → Cache Management and hit the Flush Magento Cache button.
Hole punching the blocks via Ajax
1. Open the file and find the following section:
<ajax_blocks>
                <messages />
                <global_messages />
                <right.reports.product.viewed />
                <left.reports.product.viewed />

                <optimiseweb_cookienotice />

                <multipledeals_recent />
                <multipledeals_list />
                <multipledeals />
                <multipledeals_sidedeals />
                <multipledeals_cms />
</ajax_blocks>
2. Add new block e.g:
<newly.added.products />
The screenshot for details: 
Where 'newly.added.products' block name on the front end
When done, please, navigate to System → Cache Management and hit the Flush Magento Cache button.
Anonymous blocks
Note, you should check the block name when adding to exclusions. The anonymous block types won't be added. For example:
- Should not use PRODUCT.INFO CART=”1”
- Should not use ANONYMOUS.255 CART=”1”
- Should not use <ANONYMOUS.255 /> in the section with AJAX blocks.
If one of the blocks have this name, then it doesn't specified in your sites' template.
When done, please, navigate to System → Cache Management and hit the Flush Magento Cache button.
Hole punching the CMS blocks
1. The original block code line looks (example):
{{block type="reports/recently_viewed" template="reports/recently_viewed.phtml"}}
To hole punch it from cache it should have a unique name (example)
{{block type="reports/recently_viewed" template="reports/recently_viewed.phtml"
nameInLayout="blockname" }}
Where 'blockname' is a value of 'nameinlayout' you may set any name and but it should be unique (required option)
2. Open app/etc/amfpc.xml and find <ajax_blocks>…</ajax_blocks> section
3. And add <blockname />
Where <blockname /> should be equal to blockname from the block content.
In the same file find the line:
<cms_blocks>0</cms_blocks>
Replace 0 with 1 and it should look:
<cms_blocks>1</cms_blocks>
When done, please, navigate to System → Cache Management and hit the Flush Magento Cache button.
Advanced Configuration
Changing cache storage location
For the Full Page Cache module you can choose one of the four available cache storages that will influence the overall cache's performance. These are:
- Redis
- Database
- Server
- Memcache
You can read more about cache storage types in the blog.
You can use multiple storages for the module. By default the cache is saved to your sites' database. However, you can store the cache data locally on the server and in Redis.
Modify the app/etc/amfpc.xml file to change the storage location.
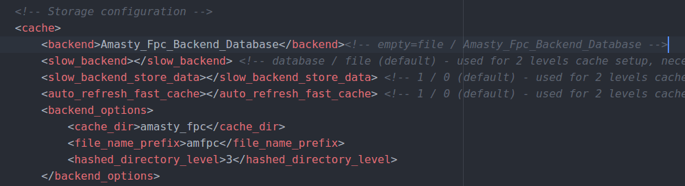
You can store cache data in the following ways:
- In the database by default (use: <backend>Amasty_Fpc_backend_Database</backend>);
- Store data on the server in the var\amasty_fpc\ folder (use <backend></backend>);
- Store data in Redis (see the FPC + Redis section);
- Handle data in Memcache (should be installed and configured on a server).
How to check the cache crawler
To check how the 'FPC Cralwer' works, please follow these steps (manual way):
1. Set the 'Amasty FPC module built-in table' as 'Query Generation Source' at: System → Configuration → Full Page Cache Crawler »
2. Make sure that the following setting is enabled: System → Configuration → Full Page Cache → Statistics

3. Go to home page
4. Visit some category and product pages (required option)
5. Go to admin panel: System → Configuration → Full Page Cache Crawler → Force cron job actions → Click to 'Generate queue'
6. Check new records at: Reports → Full Page Cache Crawler → Queue
7. Go to admin panel: System → Configuration → Full Page Cache Crawler → Force cron job actions → Click to 'Process queue'
8. Check new records at: Reports → Full Page Cache Crawler → Log
How to flush home page cache + FPC
Create a php file with the content below and run it in a browser
<?php
    require_once 'app/Mage.php';
    Mage::app();
    Mage::getSingleton('amfpc/fpc')->clean('amfpc_index_page');
How to flush certain pages
<?php
    require_once 'app/Mage.php';
    Mage::app();
    Mage::app()->cleanCache('CATALOG_PRODUCT_12345');
    Mage::app()->cleanCache('CATALOG_CATEGORY_12345');
replace 12345 with product and category IDs
Flush cache + FPC
Create a php file with the content below and run it in a browser
 <?php
    require_once 'app/Mage.php';

    //Flush Magento cache
    Mage::app()->getCacheInstance()->flush();

    //Flush Amasty FPC
    if (Mage::helper('core')->isModuleEnabled('Amasty_Fpc')) {
    Mage::getSingleton('amfpc/fpc')->flush();
    }
FPC + Redis
To set Redis as a cache storage, you need to install it and configure on your server. Please, contact your system administrator or hosting provider for assistance.
When Redis is installed, download pre-configured XML file by clicking to the link
Edit the file with Redis data.
Upload the file to: app/etc
Check the result (the database table core_cache shouldn't be increased)
Cookies issue
If there is the issue with a cookies block:
1. System → Configuration → Full Page Cache → Developer Settings → Display All Block Names → Set to Yes
2. Check the front end for the cookie block name: 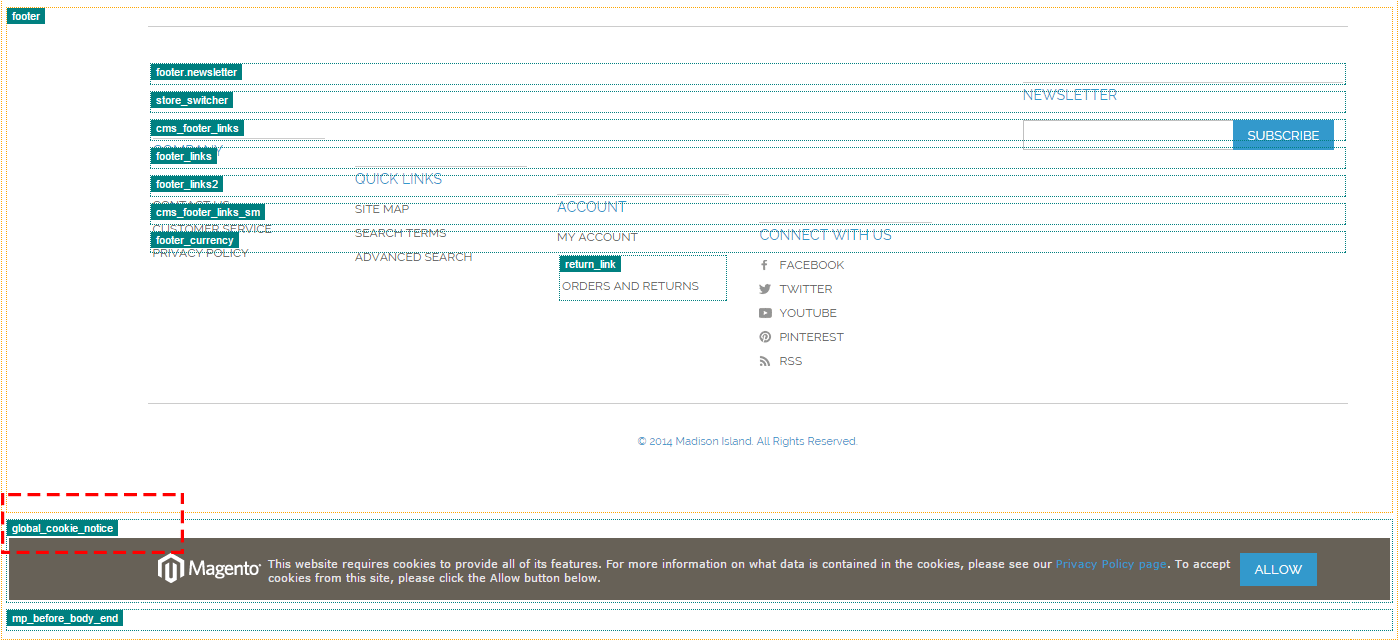
3. Open the file: app/etc/amfpc.xml
4. Find the line:
<cookie_notice_block>global_cookie_notice</cookie_notice_block>
and replace global_cookie_notice with your cookie block name
5. Flush all the cache and check the result
How to disable FPC at a certain store (multi store setup)
1. Open the file: app/code/local/Amasty/Fpc/Model/Observer.php
 protected function _canPreserve()
{
    if (Mage::app()->getStore()->getId() == 123)
        return;
replace 123 with store ID
How to exclude Home page from the cache
Check the option: System → Configuration → Full Page Cache → Pages → Cache All Pages
If the option 'Cache All Pages' is set to 'Yes' please add the following line to the 'Ignore List' ^/$
If the option set to 'No', please open the following file: app/etc/ampfc.xml
and comment these lines:
<index>
<path>cms/index/index</path>
<tags>cms_page,amfpc_index_page</tags>
</index>
How to clear cache for specific pages individually
It may be necessary to clear cache on each specific page individually.
Programmatically. With the extension, you can clear cache for specific page, using the code. You should use the code for specific page (e.g. “eyewear.html”) the following way:
Mage::getSingleton('amfpc/fpc')->clearByUrl('http://example.net/default/accessories/eyewear.html');
GET Param. Use the following request with GET Parameters.
"?amfpc_refresh"
To activate the option for a specific product, employ product grid update attributes mass action.
Internal errors logging
Each time there’s an error due to the script’s performance it is logged into internal files in the logs folder. These files are beginning with amfpccrawler_хххх and can be distinguished by the name of the script part which the error refers to. For instance, their names can be: amfpccrawler_auth_cookie.log and amfpccrawler_queue_add.log.
Requests logging
Each request is logged into am_fpccrawler_log internal table, which stores all the request parameters, the link rating, the reply (status) code, and page load speed. You can use Log Max Size setting to specify the max number of records for logs.
Full Page Cache Optimal Configuration
The Full Page Cache extension is designed to work well with the out of the box configuration. To activate the module, please, go to System → Cache Management and enable Amasty Full Page Cache from the cache configuration table.
If you want to adjust the module's settings to your particular Magento installation, please, follow these steps:
The best option is to use Redis. By default the cache storage is set to the database.
2. Configure the cache lifetime.
The higher the lifetime value is, the less often the server will need to refresh the cache. On the one hand, this lowers the chance a customer can see the non-cached page and the cache will be kept in the storage and take space. Hence, it is important to find balance for each individual site. If your store performs well, you can increase this value in System → Configuration → Full Page Cache → General Settings.
3. Enable the unified cache for all customer groups if possible.
In some cases, a single page can display different information for various customer groups. For example, the prices may vary for registered users and guests. Separate advertising blocks can be displayed, or even specific products and categories. However, if all your store pages look the same for all customer groups, than you can switch the Single Customer Group option to Yes in order to shorten the amount of cache and free more system resources.
4. Check if custom pages should be added to the caching list.
By default, only CMS, product and category pages are being cached. In case, you have custom pages to be cached, modify the Cache All Pages option (System → Configuration → Full Page Cache → Pages) to Yes. Also, please, check the Ignore List to make sure all pages that shouldn't be cached are included in the list.
5. Enable Full Page Cache for a mobile theme.
If you are using a separate mobile theme for your Magento store, it is better to use the Full Page Cache module for it. Modify the Enabled option (System → Configuration → Full Page Cache → Mobile Design) and set it to Yes.
Also, check the Crawler configuration (System → Configuration → Full Page Cache Crawler → Page combinations) — the Process Mobile View option should be enabled.
6. Enable the cache compressing.
If you enable the cache compressing capabilities, than the cache storage will take less space but the server CPU load will increase. If your server's CPU is capable to bear the higher loads, than try compressing the cache: System → Configuration → Full Page Cache → Cache Storage Settings and switch the Enable GZIP option to Compress pages and blocks.
7. Set up Cache Lifetime Reset.
We recommend to set the cache lifetime reset capability to reset the cache lifetime when a customer or bot visits a page. This should help to store pages in the cache longer and decrease the server load. Also, the chance that a customer will visit a page without the cache decreases. This feature is enabled by default but you can make sure just in case you already modified the default settings: System → Configuration → Full Page Cache → Cache Regeneration, the Reset Page Lifetime When It Visited By Customer option should be set to Yes as well as the Crawler Action option to Regenerate Cache Lifetime.
8. Enable General Improvements.
It is recommended to enable the automatic session and reports clearing. This won't increase the performance of the server but will erase the unused files to help keep it well. Please, go to System → Configuration → Full Page Cache → General Improvements and change the Automatically clear session and reports option to Yes.
9. Limit a number of pages for warming.
A cached page takes space in the storage and the crawler consumes resources for cache warming. That's why sometimes it is better not to cache certain page. For example, the pages that are visited not very often or with lots of visitors where the cache is always valid. If you want the crawler not to warm the cache for certain websites, store views, customer groups or currencies, you can use the following option to adjust the groups that should be warmed and those that shouldn't: System → Configuration → Full Page Cache Crawler → Page combinations.
10. Configure the page warming logic.
There are several options for crawler in the Full Page Cache extension. We recommend to use the default one: System → Configuration → Full Page Cache Crawler → Queue Options, where the Query Generation Source option should be set to Amasty FPC built-in table.
In result, the crawler will warm the most visited pages and the chances for a customer to see a non-cached page decrease. To make sure that everything works correct, please, go to System → Configuration → Full Page Cache → Statistics and check the Collect Page Visit Statistics option is set to Yes. This setting is responsible for stats collecting and creates a list with the page visits index to be used by the crawler.
11. Exclude dynamic blocks from the Full Page Cache.
If you utilize custom dynamic blocks on your site, than they should be excluded from caching. Use this step by step guide to learn how.
12. Try different queue options.
The Queue Max Size and Queue Process Limit values are set by default to make the plugin work properly on almost any server. And you can try to improve it. The crawler creates a new URL queue for warming every 12 hours. If the crawler manages to handle it fast enough, you can increase the value of the Queue Max Size option. Next, the crawler handles the queue by 50 URLs every 5 minutes. If the process is fast enough, you can think of increasing the Queue Process Limit.
Please, take a look at reports from the Reports → Amasty FPC Crawler section to figure out the approximate time for handling queues.
Compatibility with Product Parts Finder
To make Full Page Cache and Product Parts Finder compatible, open the amfpc.xml file among the other Full Page Cache files.
Find the commented out section in the code:
<amfinder89 scope="url">
<route>amfinder/index/search</route>
<tags>catalog_product</tags>
</amfinder89>
Uncomment this part.
After that these two extensions will work together.
Troubleshooting
Problem: When the Full Page Cache module is enabled, the page displays the wrong data.
When you enable the extension, you can notice that site pages display the incorrect information. For example: the wrong price, the incorrect user name in the welcome block, or some blocks are missing.
Solution: In some cases this problem can be caused by the Full Page Cache module. You can check it by yourself: add the get parameter ?amfpc_nocache to the page URL address and try reloading it.
domain.com/product.html → domain.com/product.html?amfpc_nocache
If this solution worked for you, than the problem is caused by the extension. Please, follow this link for a complete problem solution.
Problem: The module is enabled but the pages are not cached.
Solution: First, you need to make sure that the cache is active. Please, enable the Show Time Stats hint and visit the site page. If you see Hit — the cache is working. If Missed — try reloading the page. If you still get Missed, please, proceed to the next step.
Next, please, make sure that the page you visited on the first step is not included into exclusions. Learn how to check this here.
Then, check if the cache storage is set correctly in the app/etc/amfpc.xml file.
If none of the steps managed to solve your problem, contact our support team.
Problem: There are no new notes in the Crawler log.
Solution: Check the Crawler. Then, make sure that the crawler errors display is enabled and check if errors occur when you run the crawler manually.
Problem: Cache tables are using too much storage.
Solution: This problem has multiple solutions:
- Think of Redis implementation
- Make sure you need a single customer group
- Check the necessity of the mobile design
- Enable the cache compressing
- Decrease the cache lifetime
- Set the exceptions for the crawler
Problem: The information block about the cookies usage is being displayed constantly.
Solution: You need to holepunch this block — see details.
magento_1/full_page_cache.txt · Last modified: 2019/10/17 07:58 by arhipenko