
Sidebar
magento_2:xml-google-sitemap
Table of Contents
For more details see how the XML Google Sitemap for Magento 2 extension works.
Guide for XML Google Sitemap for Magento 2
Automatically generate XML Sitemaps in an efficient way. Let your web store communicate with the search engines quickly and properly.
- Index your content way faster
- Include or exclude groups of links in the sitemap
- Individually set frequency and priority for each group of links
- Add images with titles and templates
Sitemaps are critical to search engine optimization. Basically, search engines may judge your web store by your sitemaps. Generate them with the XML Sitemap extension to meet all the necessary requirements and introduce your web store to Google in an appropriate way.
The extension is fully compatible with Magento 2 Full Page Cache Warmer extension. Create XML Google sitemap and easily use it for creating the URL cache warming queue.
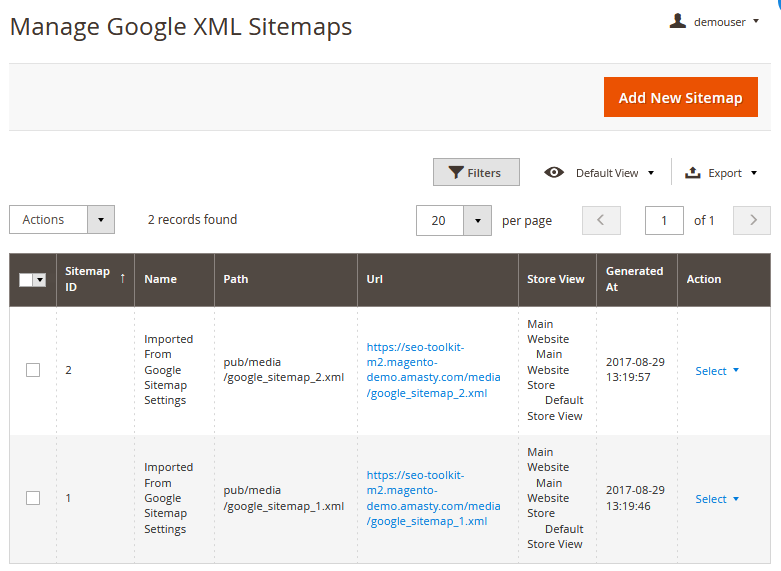
XML Google Sitemaps Grid
Please navigate to Admin panel → Content → SEO Toolkit → XML Google Sitemaps
Use a grid to manage work with the sitemaps. To generate, duplicate and edit sitemaps use a drop-down in the Action column.
To create a new sitemap, click Add New Sitemap red button.
You can use Filters to apply a more detailed search within the grid. To specify which columns should be displayed on the grid, use Columns tab. You can also configure and select various grid display modes in the View tab.
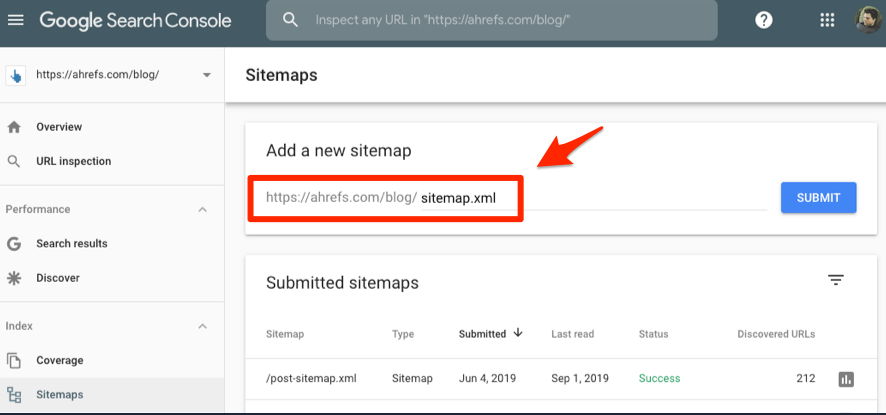
Add the links to XML sitemaps to your Google Search Console Account. This way, the Google bot will have a list of pages that need to be opened and indexed.
XML Sitemaps Configuration
General Settings
When you add a new sitemap or start editing an already existing one, there is a set of specific configurations.
In the General Settings tab, you can specify the following values:
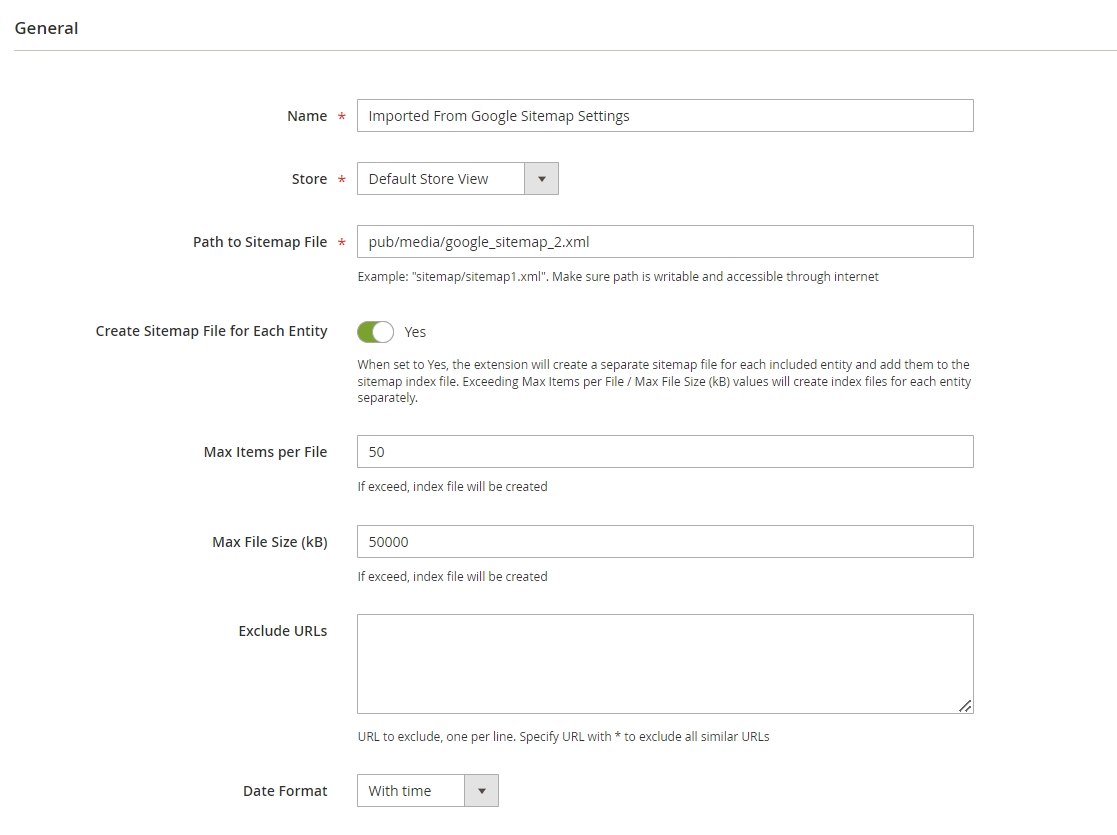
Indicate the name for your sitemap in the Name field.
In the Stores field, please choose which store a sitemap should be applied for.
Specify Path to sitemap file.
Create Sitemap File for Each Entity - set to ‘Yes’ to create a separate sitemap file for each included entity and add them to the sitemap index file
Google has some restrictions, concerning the size and quantity of items per file. It is recommended that Max Items Per File is less than 50,000 URLs. And Max File Size is not larger than 50MB (52,428,800 bytes). If these parameters are exceeded, an index file will be created.
In Exclude URLs field, specify URLs that should be excluded from your XML Google sitemap.
You can exclude URLs using wildcards, e.g. https://example.com/category/*. Thus, all similar URLs will be excluded as well.
Date Format - Here you can specify the date format for your XML sitemap: with time or without time.
Product Links Settings
In the Products tab, you can configure settings for the product links.

Decide whether to Include products links in the sitemap or not.
Add Hreflang Tags - If the page has several variants in other languages, the references will be automatically added to the main link. So Google will know that there are pages with the appropriate language for site visitors from different countries.
Add Images - enable to include the links to product images in your sitemap.
Add Images Titles - enable to automatically add images titles.
Priority - Since the XML sitemap may contain several elements, you can set a priority for each type of elements. You can range the value from 0.01-0.99. It is recommended to set higher values (e.g. 0.08 - 1.00) for homepages, product info, main features, etc.
Specify Frequency of updates. Range from never-yearly-monthly-weekly-daily-hourly-always, judging on how often the product pages you add to the sitemap are being updated. It is recommended to set at least weekly for the product pages.
In the Include Last Modified field, choose Yes to include the date when the page was last modified.
Exclude out of Stock Products - set to 'Yes' to exclude the products from the sitemap that are currently out of stock.
Exclude Product Types - here you can specify the particular product types that should be excluded from the sitemap.
Category Links Settings
In the Category tab, you can configure settings for the category pages links.
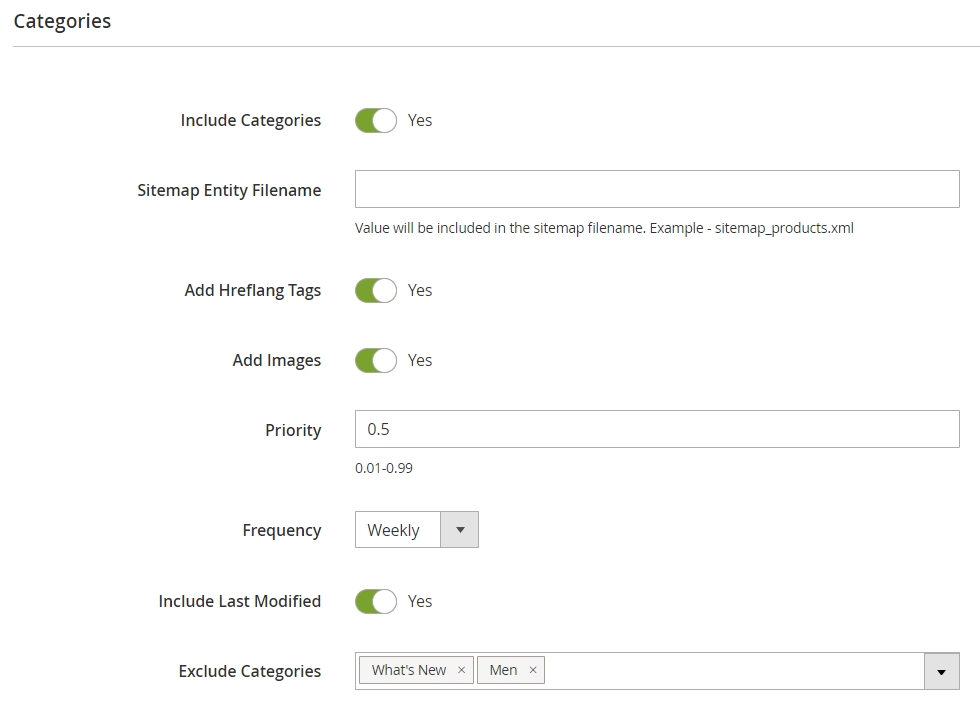
Include categories - enable to include category links in the sitemap.
Add Hreflang Tags - If the page has several variants in other languages, the references will be automatically added to the main link. So Google will know that there are pages with the appropriate language for site visitors from different countries.
Add Images - enable to include the links to product images in your sitemap.
Add Images Titles - enable to automatically add images titles.
Priority - Since the XML sitemap may contain several elements, you can set a priority for each type of elements. You can range the value from 0.01-0.99. It is recommended to set higher values (e.g. 0.08 - 1.00) for homepages, product info, main features, etc.
Specify Frequency of updates. Range from never-yearly-monthly-weekly-daily-hourly-always, judging on how often the product pages you add to the sitemap are being updated. It is recommended to set at least weekly for the product pages.
In the Include Last Modified field, choose Yes to include the date when the page was last modified.
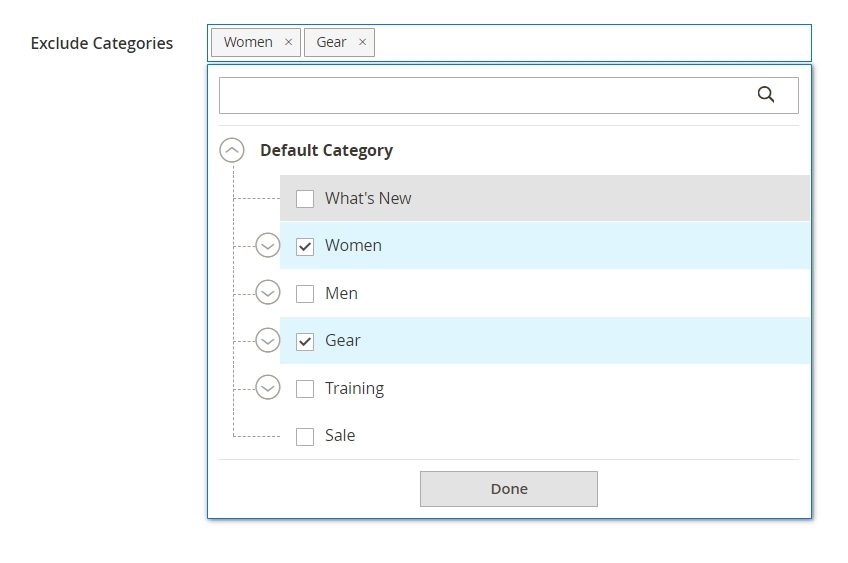
Exclude Categories - check categories that will be excluded from the sitemap
CMS Links Settings
In the CMS Pages tab, you can configure settings for any CMS pages links.

Decide whether to Include pages links in the sitemap or not.
Add Hreflang Tags - If the page has several variants in other languages, the references will be automatically added to the main link. So Google will know that there are pages with the appropriate language for site visitors from different countries.
Specify Priority of importance. You can range the value from 0.01-0.99. It is recommended to set middle values (e.g. 0.04 - 0.07) for CMS pages.
Specify Frequency of updates. Range from never-yearly-monthly-weekly-daily-hourly-always, judging on how often the CMS pages you add to the sitemap are being updated. It is recommended to set at least monthly or weekly for the CMS pages.
In the Include Last Modified field, choose Yes to include the date when the page was last modified.
Custom Items Settings
Create custom sitemap files for each entity to simplify your website sitemap structure.

Include Custom Items - set to ‘Yes’ to add custom items when a sitemap is generated
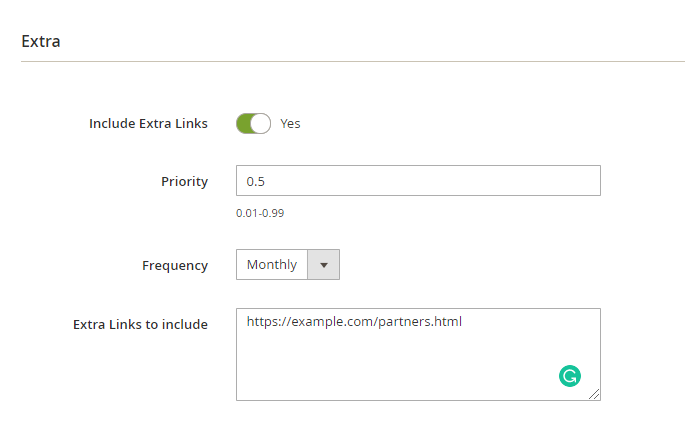
Extra Links Settings
In this section, you can add extra links to your XML sitemap. Configure the settings for this tab the same way, as was described in the previous sections.
Add Items From Any Extensions
XML Sitemap extension provides functionality to add custom pages generated by Amasty and other extensions to the sitemap.
For now, the list of supported Amasty extensions is the following:
- Amasty Improved Layered Navigation (Pages)
- Amasty Shop by Brand
- Amasty Blog Pro
- Amasty Landing Pages
- Amasty FAQ and Product Questions
To utilize this feature, you should have the appropriate extension installed. Then, to include the pages of a particular extension to the sitemap, you should do the following:
- Add the config of the required entity to the di.xml file (CompanyName/ModuleName/etc) in the way as it is shown in the example below:
<type name="Amasty\XmlSitemap\Model\Sitemap\XmlGenerator">

       <arguments>

           <argument name="sources" xsi:type="array">

               <item name="custom_item_unique_name" xsi:type="object">CompanyName\ModuleName\Model\XmlSitemap\DataProvider</item>

           </argument>
           <argument name="handlers" xsi:type="array">

               <item name="custom_item_unique_name" xsi:type="array">

                   <item name="wrapper" xsi:type="string">url</item>

                   <item name="loc" xsi:type="string">loc</item>

                   <item name="frequency" xsi:type="string">changefreq</item>

                   <item name="priority" xsi:type="string">priority</item>

               </item>

           </argument>

       </arguments>

   </type>


   <type name="Amasty\XmlSitemap\Model\Sitemap">

       <arguments>

           <argument name="entities" xsi:type="array">

               <item name="custom_item_unique_name" xsi:type="string">custom_item_unique_name</item>

           </argument>

       </arguments>

   </type>


   <type name="Amasty\XmlSitemap\Model\Sitemap\SourceProvider">

       <arguments>

           <argument name="sources" xsi:type="array">

               <item name="custom_item_unique_name" xsi:type="string">CompanyName\ModuleName\Model\XmlSitemap\DataProvider</item>

           </argument>

       </arguments>

   </type>
- Now you should create a class CompanyName\ModuleName\Model\XmlSitemap\DataProvider in the way as it is shown in the example below:
<?php

declare(strict_types=1);

namespace CompanyName\ModuleName\Model\XmlSitemap;

use Amasty\XmlSitemap\Api\SitemapInterface;
use Magento\Framework\Phrase;
use Magento\Framework\UrlInterface;
use Magento\Store\Model\StoreManagerInterface;

/**
 * Amasty_XmlSitemap entity provider
 */
class DataProvider
{
    private const ENTITY_CODE = custom_item_unique_name;

    /**
     * @var PageFactory
     */
    private $pageFactory;

    /**
     * @var string
     */
    private $baseUrl;

    /**
     * @var StoreManagerInterface
     */
    private $storeManager;

    public function __construct(
        PageFactory $pageFactory,
        StoreManagerInterface $storeManager
    ) {
        $this->pageFactory = $pageFactory;
        $this->storeManager = $storeManager;
    }

    public function getData(SitemapInterface $sitemap): \Generator
    {
        $sitemapEntityData = $sitemap->getEntityData($this->getEntityCode());

        foreach ($this->getCollection($sitemap->getStoreId()) as $item) {

            yield [
                [
                    'loc'       => $item->getUrl(),
                    'frequency' => $sitemapEntityData->getFrequency(),
                    'priority'  => $sitemapEntityData->getPriority()
                ]
            ];
        }
    }

    private function getCollection(int $storeId): array
    {
                return [];//create your custom item collection
    }

    public function getEntityCode(): string
    {
        return self::ENTITY_CODE;
    }

    public function getEntityLabel(): Phrase
    {
        return __('Your Label');
    }
}
- The required entity will appear in the Custom Items tab in the sitemap configuration window and will be available for adding to the XML sitemap.
Click Add New Item to add a new entity to your XML sitemap.
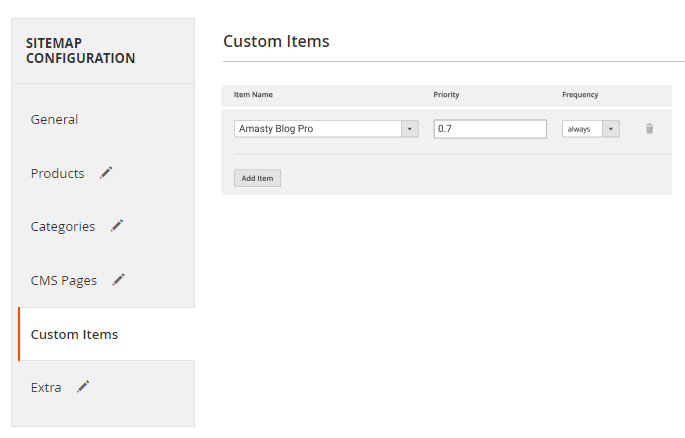
Item Name - here you can see the list of available entities from other Amasty extensions and choose the needed one from the dropdown.
Priority - here you can specify the priority of the entity pages the same way you did for other pages. You can range the value from 0.01-0.99.
Frequency - the same setting as for other pages. Here you can specify the frequency of updates: never-yearly-monthly-weekly-daily-hourly-always.
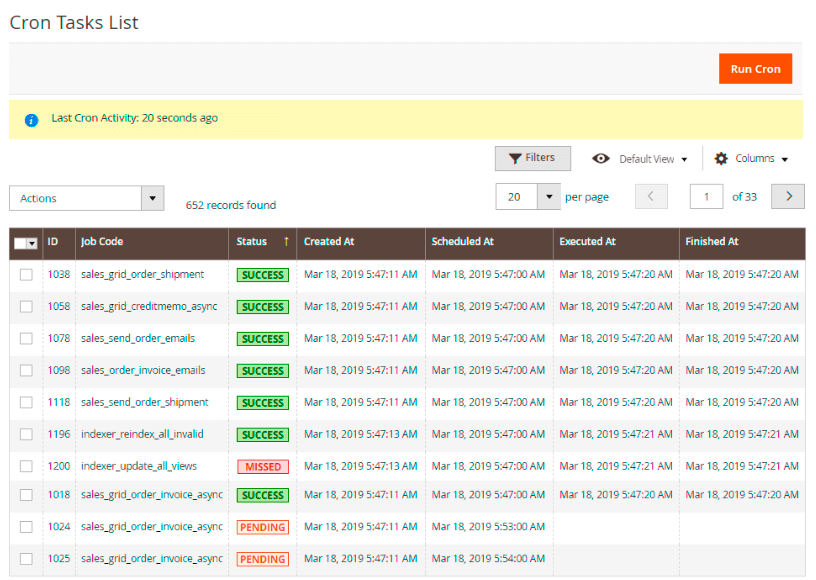
Cron Settings
Set frequency for cron job. Cron is responsible for indexing and sitemap generation.

Cron Tasks List
Magento 2 XML Google Sitemap extension is preintegrated with Cron Tasks List to provide store owners with an opportunity to track and manage all cron tasks running in the website background.
To view all scheduled and executed cron tasks, go to System → Cron Tasks List
Run all cron tasks and generate their schedule by clicking the ‘Run Cron’ button. Also you can delete separate tasks in bulk, apply filtering and sorting options when it is needed.
Hreflang URLs
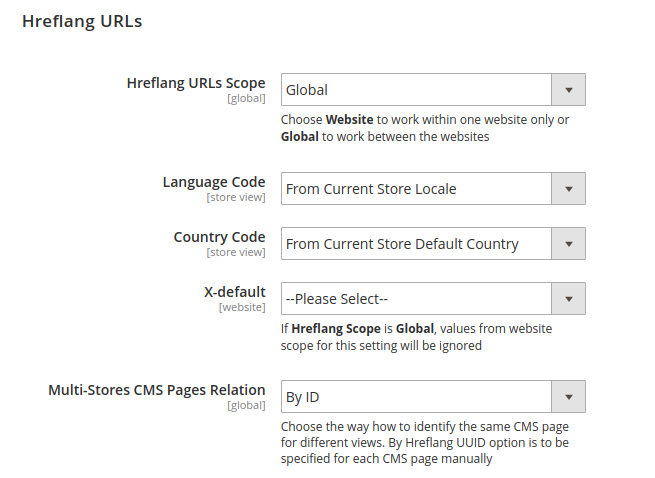
Hreflang URLs Scope:
- Website - select to work within one website
- Global - select to work between the websites
Language Code - Specify the language of the audience you want your content introduce to. The option From Current Store Locale is available.
Country Code - Specify the region you want your content introduce to (optional). The options From Current Store Default Country and Don't add are available.
X-default - Specify which store in the XML sitemap will be tagged as a default.
Multi-Stores CMS Pages Relation - The option allows to look for alternative links within various websites with different language and region codes.
- By ID - Relates the pages (from different stores) that have the same ID's;
- Hreflang UUID - Relates the pages (from different stores) that have the same UUID's;
- Hreflang URL Key - Relates the pages (from different stores) that have the same URL Keys;
You can use an XML sitemap to tell Google all of the language and region variants for each URL. Therefore if you have 3 versions of a page, your sitemap will have entries for the URLs of each version, and each entry will have 3 identical child entries. See the detailed example here.
For more information on hreflang functionality, check Google article.
With the hreflang enabled the sitemap can be incorrectly displayed in a browser. However, Google will still receive the correct XML sitemap data.
XML Sitemap Generation via SSH
Please, execute the following command to manually generate the XML sitemap via SSH:
php bin/magento amasty:xmlsitemap:generate
To generate a specific sitemap, please, use the following command and substitute the sitemap_id with the required name:
php bin/magento amasty:xmlsitemap:generate sitemap_id
XML Sitemap Sample

magento_2/xml-google-sitemap.txt · Last modified: 2025/02/07 14:04 by asemenova