User Tools
Site Tools
Trace: • Guide for RMA for Magento 2 • Guide for Magento 2 Custom Button • Composer User Guide • Guide for Custom Order Number for Magento 2 • Guide for Store Pickup with Locator for Magento 2 • Guide for Shipping Table Rates • Guide for Full-Cycle Checkout for Magento 2 • Guide for Abandoned Cart Email for Magento 2
Sidebar
magento_2:abandoned-cart-email
Table of Contents
For more details see how the Abandoned Cart Email for Magento 2 extension works.
Guide for Abandoned Cart Email for Magento 2
Augment sales revenue by the increased number of completed orders. Automatically send catchy reminders. Enhance customer loyalty by offering discount coupons.
- One-step cart recovery
- Precise email targeting
- Flexible dispatch schedule
- Personalize email templates
- Built-in discount coupon generator
- Analyze email campaigns performance
The solution has 3 package variations:
- Basic: includes Abandoned Cart Email
- Pro: includes Standard, Follow Up Email, Push Notifications, Exit Intent Popup, Customer Segmentation
- Premium: includes Standard, Pro and SMTP
Explore our internal Knowledge Base to gain even more valuable insights and uncover answers to popular questions about the configuration and features of the Magento 2 Abandoned Cart Email extension.
General extension settings
Extension configuration is located at Stores → Configuration → Amasty Extensions → Abandoned Cart Email
General
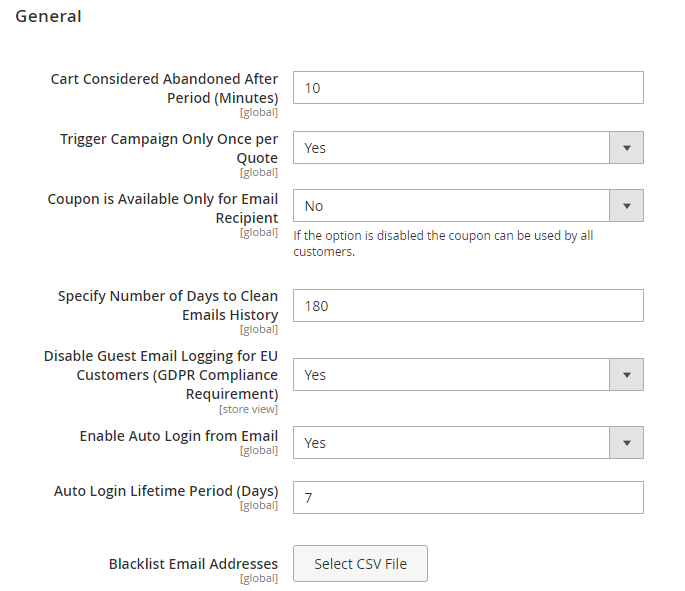
Cart Considered Abandoned After Period (Minutes) - specify the time period in minutes after which a cart will be considered abandoned.
Trigger Campaign Only Once per Quote - when this option is enabled, a customer will receive abandoned cart email (or email if you created a set) only once even if the cart conditions suit more than 1 campaign. The campaign that triggers email sending is determined by the priority setting.
Coupon is Available Only for Email Recipient - when this option is enabled, only the customer who received the email will be able to apply the coupon on the cart.
Specify Number of Days to Clean Emails History - set the number of days, after which sent emails should be removed from History.
Disable Guest Email Logging for EU Customers (GDPR Compliance Requirement) - when enabled, the EU customers' emails won't be saved by the system to avoid sending emails, to which the EU customers didn't give consent.
Enable Auto Login from Email - set Yes to let shoppers log in automatically after clicking the link in the email and, thus, reduce the number of steps to purchase.
Auto Login Lifetime Period (Days) - specify the number of days the auto-login via a link feature will remain active after email sending. This feature enhances security by allowing customers to auto-login by clicking the link only during the specified period.
Additionally, the abandoned cart email template now includes a forwarding warning: “Be aware and avoid forwarding this email, as it could potentially grant unauthorized access to your account”. This warning is placed below the checkout button.
Blacklist Email Addresses - import a list of addresses using a CSV file to exclude them from emailing.
Email Templates
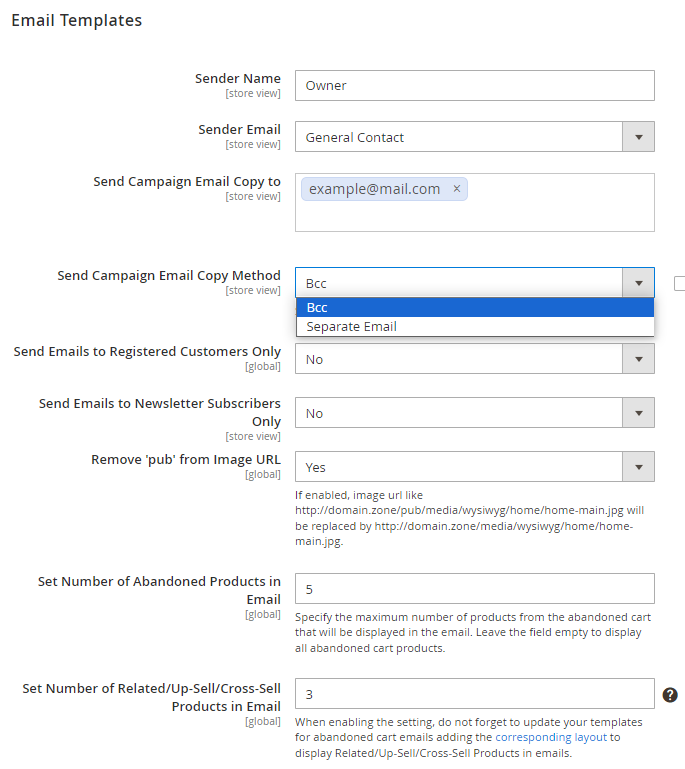
Sender Name - specify the From - Name field in the abandoned cart email.
Sender Email - specify the From - Email field in your emails.
Send Campaign Email Copy to - you can specify the address to which the copies of every abandoned cart email will be sent.
Send Campaign Email Copy Method - select 'Bcc' if you want to add CHECK OUT url in copy of email.
Add Customer Contact Details to Email Copy - when enabled, customer contact information (block title, customer name, phone, and email) will appear in copies of abandoned cart emails sent to the admin.
This setting can be configured if the Separate Email option is selected in the Send Campaign Email Copy Method setting.
Example (basic email template design):


Please note that after enabling the Add Customer Contact Details to Email Copy setting, customer contact information will be automatically added to admin copies of newly created email templates (Basic, Light, Dark, Modern 1, and Modern 2). To display this information in already created templates, you will need to manually insert the following code snippet in the Template Content field:
{{if isCustomerDetailsEnabled}}
{{layout
handle="amasty_acart_customer_info"
customer_firstname=$ruleQuote.getCustomerFirstname()
customer_lastname=$ruleQuote.getCustomerLastname()
customer_email=$ruleQuote.getCustomerEmail()
customer_phone=$ruleQuote.getCustomerPhone()
}}
{{/if}}
Send Emails to Registered Customers Only - with this setting guest customers won't receive any abandoned cart emails.
Send to Newsletter Subscribers Only - set to 'Yes' if you want to restrict sending emails to those customers, who have not subscribed to the newsletter.
Remove 'pub' from image URL - if enabled, image url like
http://domain.zone/pub/media/wysiwyg/home/home-main.jpg
will be replaced by
http://domain.zone/media/wysiwyg/home/home-main.jpg
Set Number of Abandoned Products in Email - specify the maximum number of products from the abandoned cart to be shown in the email. If left empty, all abandoned cart products will be displayed.
Set Number of Related/Up-Sell/Cross-Sell Products in Email - specify the number of cross-sell products that should be displayed in an email template. Leave the field empty to display all available products.
When enabling the setting, do not forget to update your templates for abandoned cart emails adding the corresponding layout to display Related/Up-Sell/Cross-Sell Products in emails.
When you use this setting related/up-sell/cross-sell products are generated in email by the default Magento functionality.
See possible examples of abandoned cart emails below:
- Basic template design
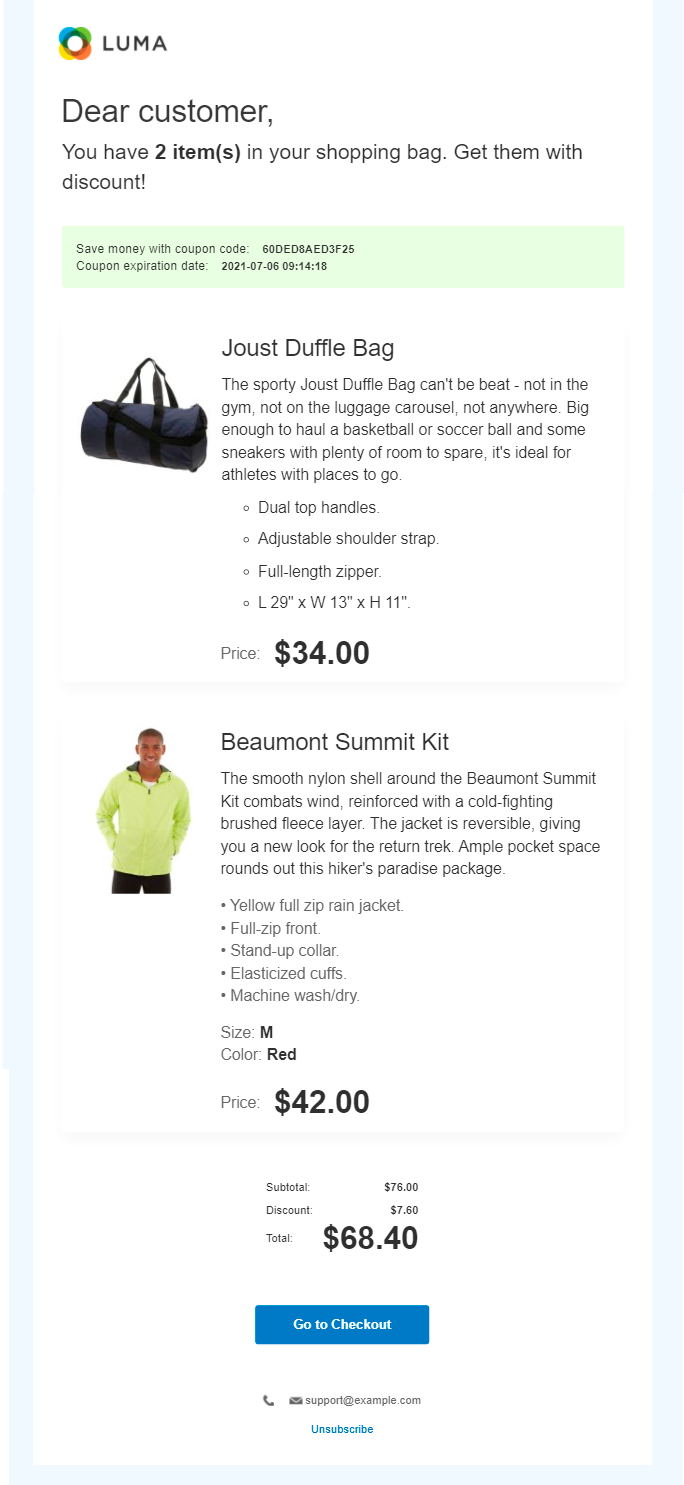
- Templates with new designs (Light, Dark, Modern 1, and Modern 2)
These four new template designs are available only as a part of an active support subscription or product subscription. You can find the amasty/module-abandoned-cart-email-subscription-functionality package for installing in composer suggest.


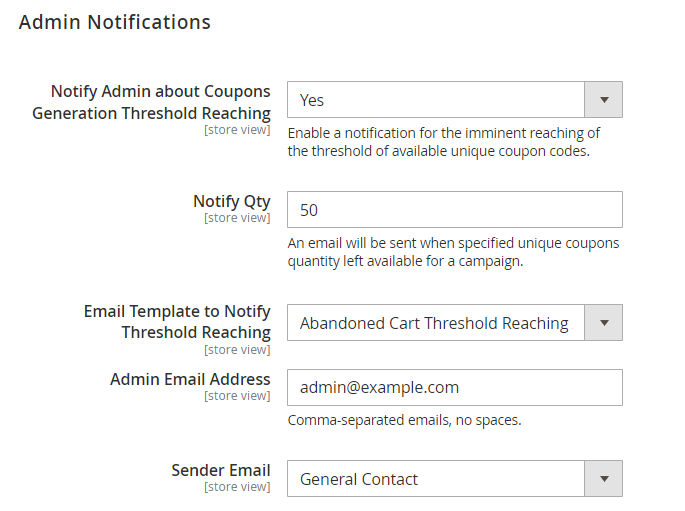
Admin Notifications
Configure the settings in this tab if you want to send notifications to the admin's email when the threshold for available custom coupon codes is reached. It refers to coupons with custom names generated with the help of the Custom Coupon Name setting in the general configuration tab of a specific campaign.
Please note that this functionality is available as a part of an active product subscription or support subscription.
Notify Admin about Coupons Generation Threshold Reaching - enable this setting to notify the admin of the imminent reaching of the threshold of available unique coupon codes.
Notify Qty - specify the number of custom coupon codes remaining available for a campaign (threshold) that will trigger the notification dispatch to the admin’s email.
Email Template to Notify Threshold Reaching - choose the email template for the threshold reaching notification.
Admin Email Address - specify the admin’s email address or even several addresses (comma-separated, with no spaces) where the notifications should be sent.
Sender Email - select an email sender.
Testing
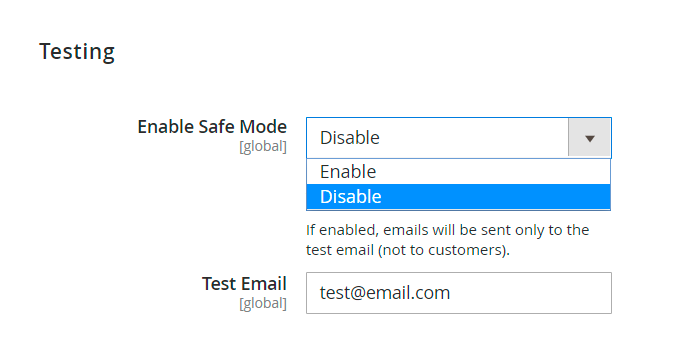
- Enable Safe Mode - choose 'Yes' to take the extension into the testing mode. In this case, all abandoned cart emails are sent only to the recipient's email address.
- Test Email - the recipient address for the testing mode and test emails.
Debug
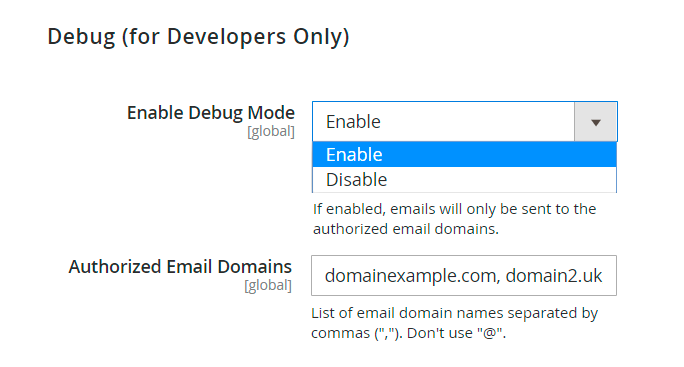
- Enable Debug Mode - this option is useful when you need to check the process of abandoned cart email sending. In this case, the carts will be considered abandoned right after the product is added.
- Authorized Email Domains - specify the email domains like “example.com” or “amasty.com”. In this case, all carts associated with emails from one of the listed domains will trigger the Debug Mode.
Cronjob Information
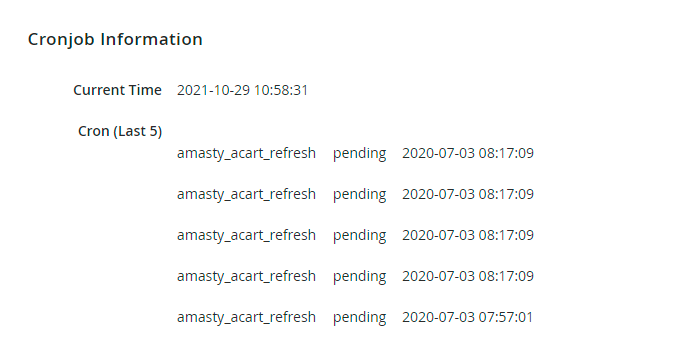
In this tab you can cronjobs and their statuses with the relevant dates.
Abandoned Cart Campaign settings
Campaigns can be created at Marketing → Abandoned Cart Email → Campaigns → Create new campaign
General
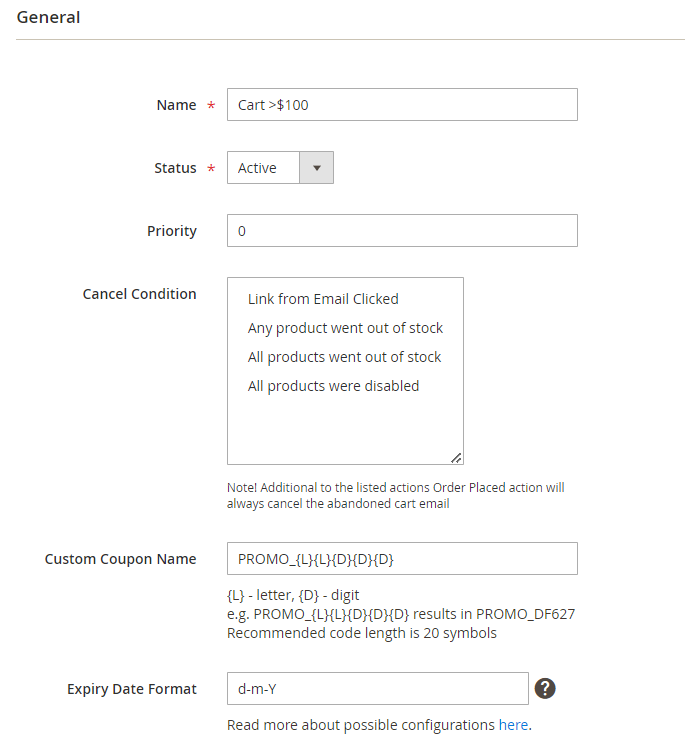
Name - specify the name of the rule.
Status - enable and disable the rule.
Priority - set the priority to specify the triggering rules' order processing.
Cancel Condition - here you can set the event which will cancel the further emails. For example, if the products in a shopping cart become disabled, a customer won't get an email.
Cancel conditions available:
- Link from Email Clicked
- Any product went out of stock
- All products went out of stock
- All products were disabled
If you choose the Link from the email clicked as a сancel condition, the customer stops the emails sending after he\she clicks the link in the first email so that two other emails won't be sent to a customer anymore.
In line with the module's default logic, if a scheduled abandoned cart email contains only one product and the customer removes that product from the cart before the scheduled sending date, the email will be automatically deleted from the queue and will not be sent.
Custom Coupon Name - set a custom format for coupon names which will replace the standard coupon name format.
E.g. PROMO_{L}{L}{D}{D}{D} results in PROMO_DF627. Recommended code length is 20 symbols.
Please note that this feature is available as a part of an active product subscription or support subscription.
You can receive notifications when the threshold of available unique coupon codes is reached by configuring settings in the Admin Notifications tab.
If the threshold is reached, a warning notice will also appear in the admin panel. If the unique code quantity reaches 0 and you haven't changed the custom coupon name parameters, the mailing will proceed with the standard (default) system coupon codes.
Expiry Date Format - specify the coupon expiry date format according to your local requirements.
E.g. d-m-Y results in 19-09-2023. Click the link to learn more about possible configuration options.
Stores & Customer Groups
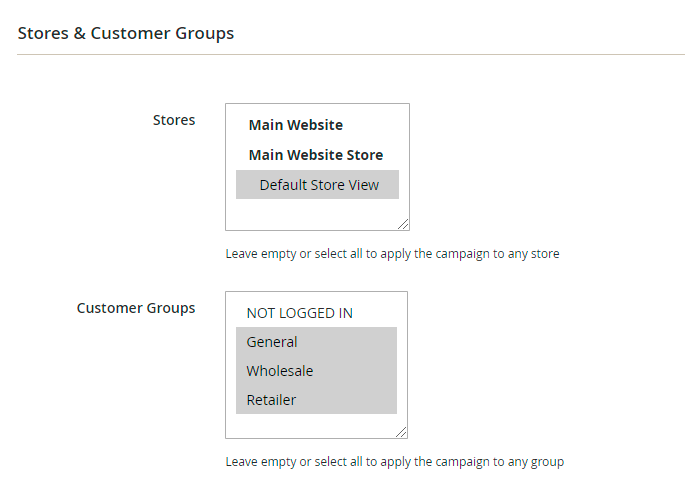
- Stores - you can limit the stores to which the rule will be applied. If you select nothing, the rule will be applied to all stores.
- Customer Groups - you can control which customer groups the rule will be applied. If you select nothing, the rule will be applied to all groups.
Conditions
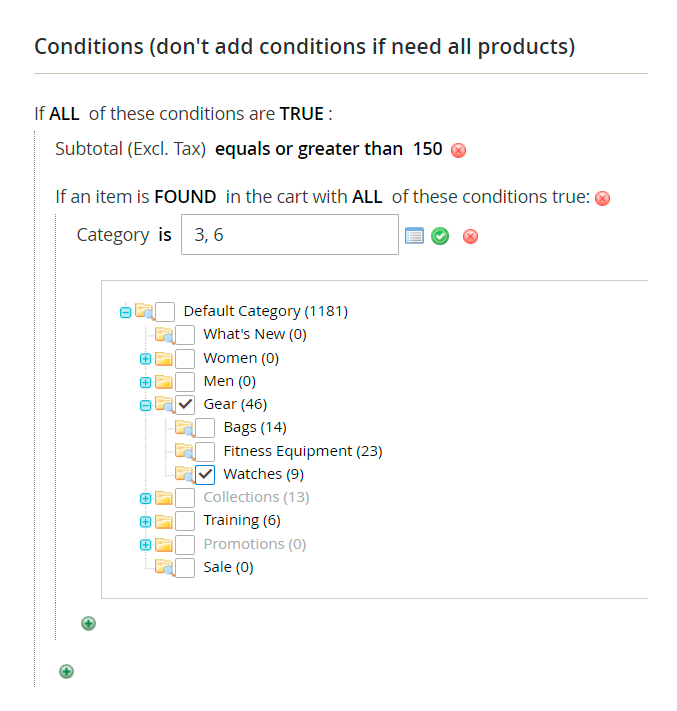
- Condition tree - specify conditions to activate the rule only when the conditions are met. If you leave the tree empty, the campaign works all the time.
Schedule
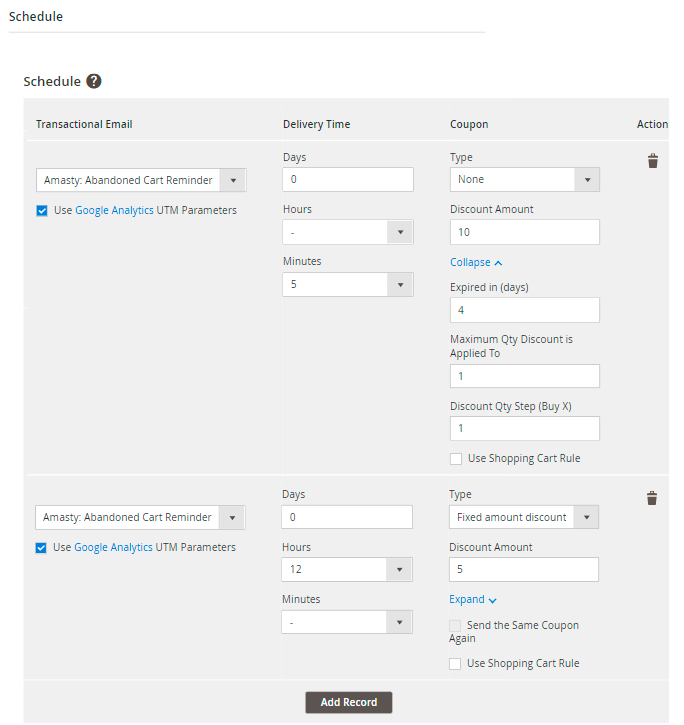
- Transactional Email - see what the email template is used.
- Delivery Time - set a time-lag between the cart abandonment and the email sending.
- Coupon - here you can configure a discount for abandoned carts. In Type filed select the type of the discount, you would like to create (percent, fixed amount or a fixed amount for the whole cart). In the Discount Amount field you need to specify the amount of the discount.
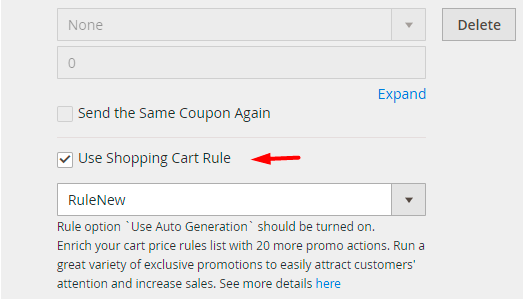
- Use Shopping Cart Rule - choose this option and you will be able to select the already existing cart price rule to use for abandoned cart promotions.
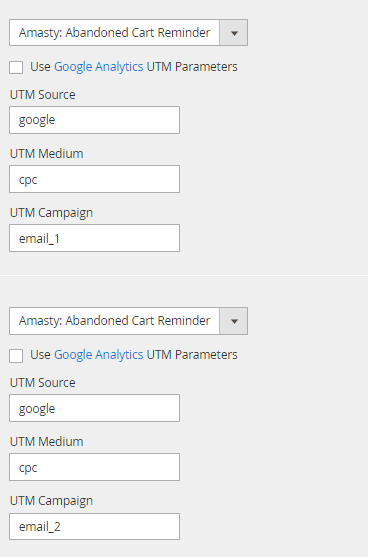
- Use Google Analytics UTM Parameters - tick the checkbox to use UTM on a campaign level in the links.
You can configure UTM tags for each letter separately to find out which email performs better.
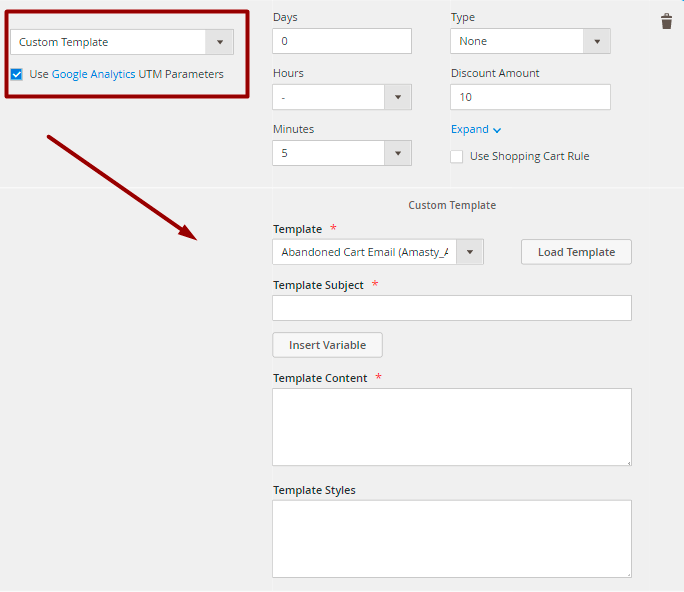
You can also create a custom email template right during the rule configuration.
Please note that 'Use Auto Generation' option in the promotion rule have to be enabled for this rule to appear in the list.
Analytics
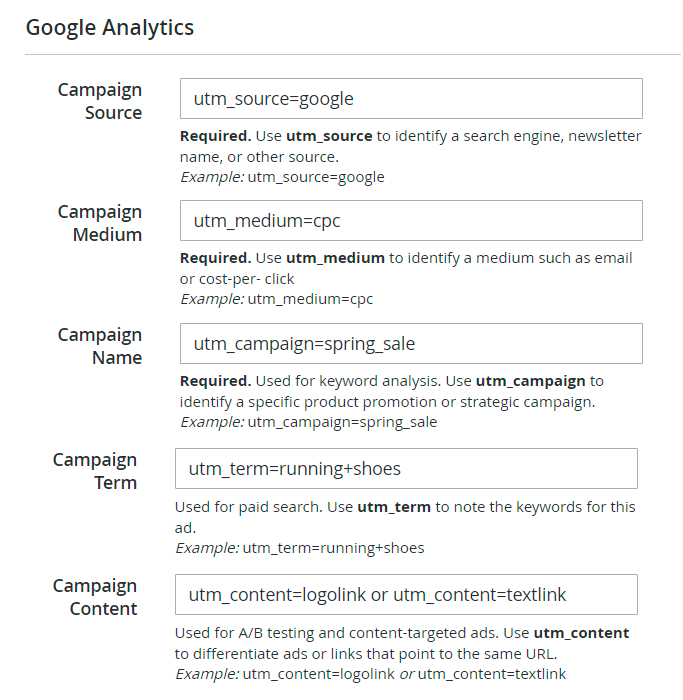
Here you can set Google Analytics parameters which will be added to the links in Abandoned Cart emails.
Please check the Google Analytics help articles for more details.
Test Emails
 Here you can send a test email to see how the email looks.
Please note that in this list you will see all quotes from your Magento. No filtering by conditions or event store view is applied there. This tab is for testing purposes only.
History
To view the log of all sent emails, navigate to Amasty → Abandoned Cart Email → History.
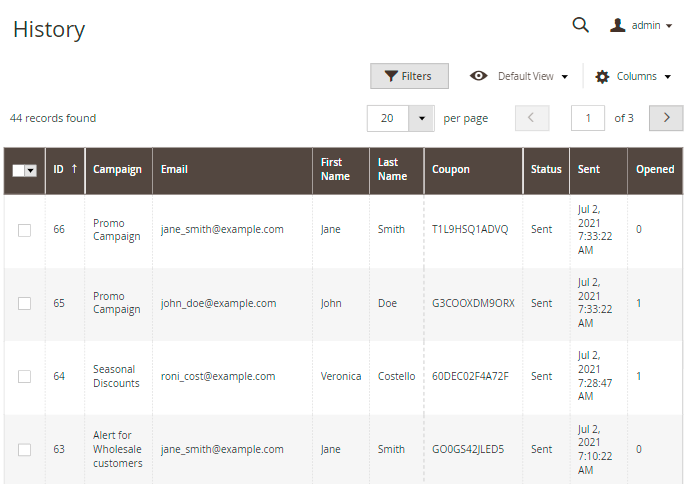
You can also add product info to the grid. Additionally, enable the Opened column to see how many times an email was opened.
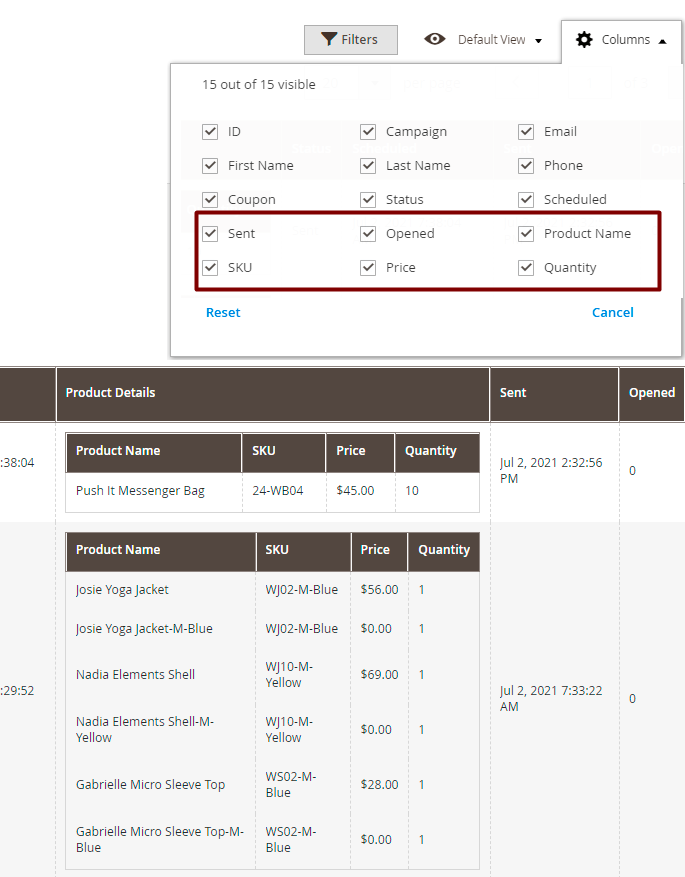
Additionally, enable a Phone column to find customer contacts faster and run marketing campaigns in messengers easier.
Abandoned Cart Reports
Make data-driven decisions by analyzing the efficiency of your Abandoned Cart Email campaigns.
To check out your campaign reports, please navigate to Reports → Abandoned Cart Reports
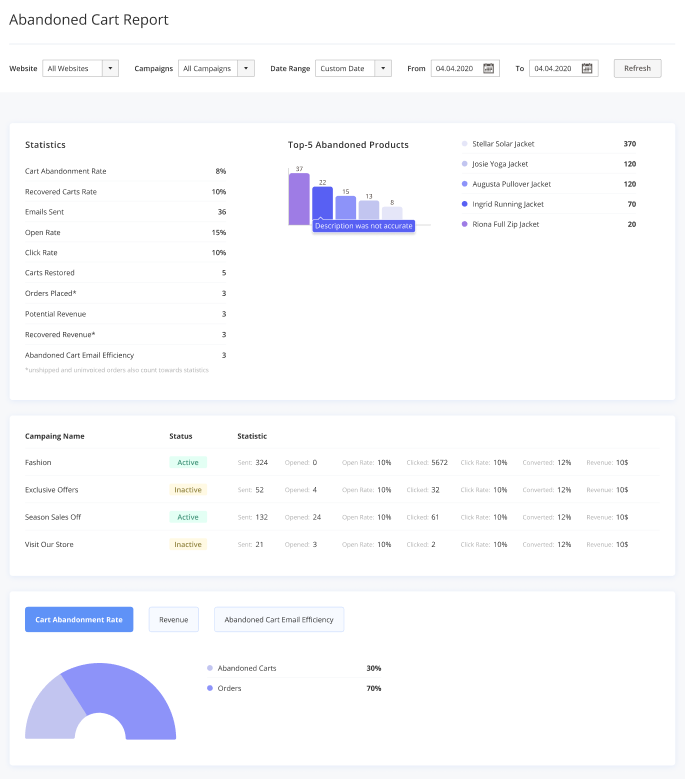
Here, you get valuable insights on your cart abandonment rate and abandoned cart emails efficiency, displayed on visual reports:
- Cart Abandonment Rate (is calculated as the number of abandoned quotas divided by their total amount * 100%);
- Potential Revenue in abandoned carts;
- Recovered Revenue (money made of recovered carts);
- The number of Emails Sent;
- The number of Recovered Carts;
- The number of Orders Placed thanks to abandoned cart emails;
- Abandoned Cart Email Efficiency (is calculated as the number of orders placed divided by the emails sent * 100%).
Also, you can filter the results: choose the necessary website and date range, then click the “Refresh” button.
Geo IP Data
This product includes GeoLite2 Data created by MaxMind, available from 24.10.2023 (last update date).
To use the Geo IP Location option please go to Stores → Configuration → Amasty Extensions → Geo IP Data.
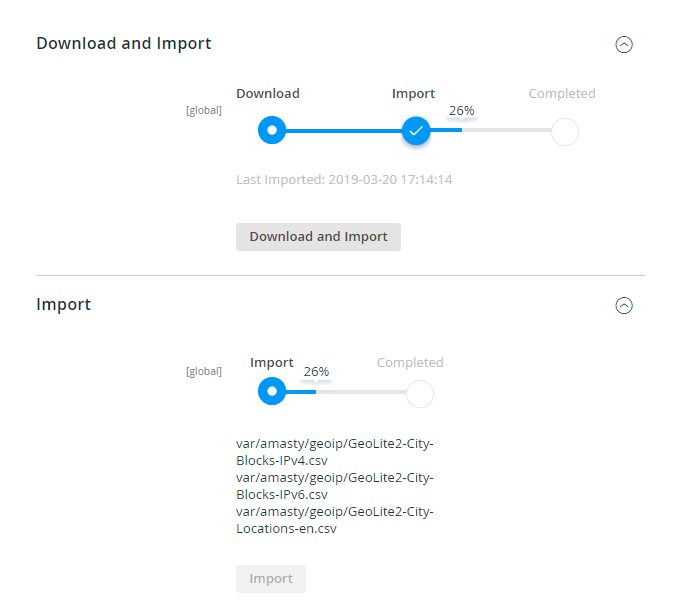
Databases are required for the correct work of the module. Also, you need to install php bcmath or gmp extension on your server.
You can get the databases automatically or import your own data.
Hit the Download and Import button to make the extension download the updated CSV dump file and import it into your database automatically.
To import the files from your own source, use the Import option. Path to the files should look like this (the part 'var/amasty' should be replaced with your folders’ names):
var/amasty/geoip/GeoLite2-City-Blocks-IPv4.csv
var/amasty/geoip/GeoLite2-City-Blocks-IPv6.csv
var/amasty/geoip/GeoLite2-City-Locations-en.csv
In the Import section, the Import button is grayed out by default. It will be available right after you upload the CSV files. The red error notification will switch to green success notification when the import is completed.
IP Database Update Settings
The database included in the extension was last updated on October 24, 2023. To keep the IP database current, you can update it using one of two methods.
Please note that regardless of the updating method chosen, you need to import the IP database first.

Refresh IP Database - select the appropriate method for refreshing the IP database:
- Manually - to manually upload the updated database files;
- Update via Amasty Service - to update the database automatically and regularly via Amasty Service, which is complimentary for you until August 2024.
Debug Mode
You can enable IP forcing, which makes it possible to set a specific IP address that will be used instead of the visitor's real IP address when determining geolocation. The feature is useful while configuring or testing the extension.

Enable Force IP - set to Yes to replace the real IP address.
Force IP Address - specify the address to use instead of a real one.
Cron Tasks List
To manage all existing cron tasks, please, go to System → Cron Tasks List.
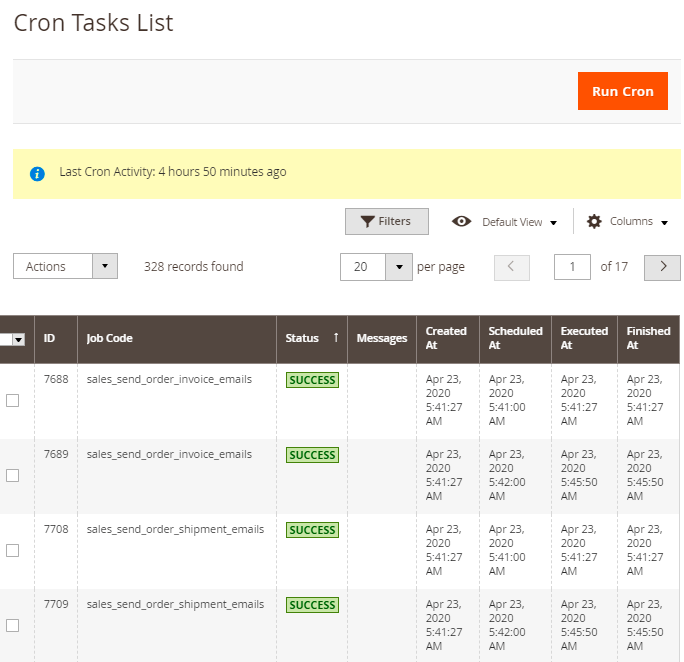
Here, you can see all the existing cron tasks and their statuses. Run cron tasks and generate their schedule by clicking the ‘Run Cron’ button. Also, delete tasks in bulk, apply filtering and sorting options when it is needed.
Troubleshooting checklist
Emails are not being sent automatically
The extension works with Magento cron jobs to schedule and send emails. If Magento cron is not configured or configured incorrectly the extension won't send any emails.
To solve this, please check this article to see how Magento cron is configured.
I can't use the email template in the rule
All available templates in the Schedule can be filtered by the type. In the list of templates, you can see only the emails that were created based on the ready-made (default) Abandoned Cart templates.
To create a new email template please navigate to Marketing → Communications → Email Templates → Click 'Add New Template'
- In Load default template → Template find the pre-styled templates Abandoned Cart Email: Basic, Light, Dark, Modern 1, and Modern 2, select the needed one and hit Load Template
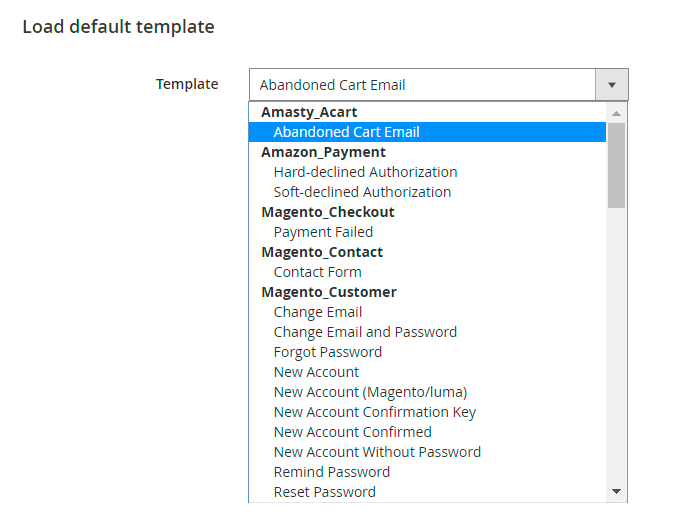
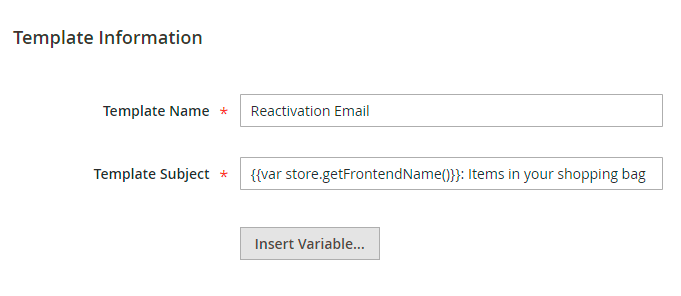
- Name your new template and make all the changes you need.
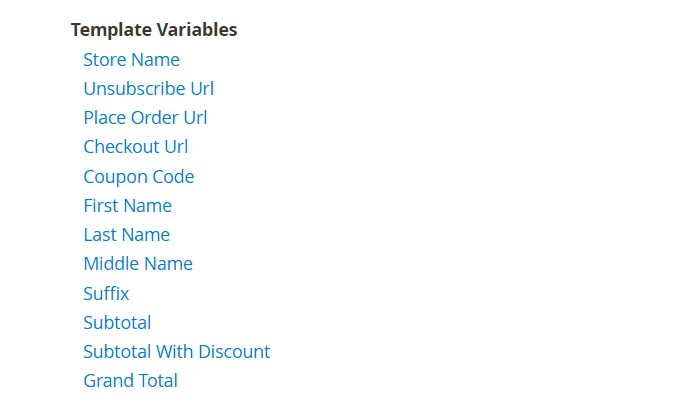
- You can also add different variables to your template from the box. It will pull up the necessary information. To do this, press the Insert Variable button and choose the necessary one from the list. Each template has a different set of variables.
In the Template Content field, you can make adjustments to the text and the structure of the email template. Find the code starting with “layout”.
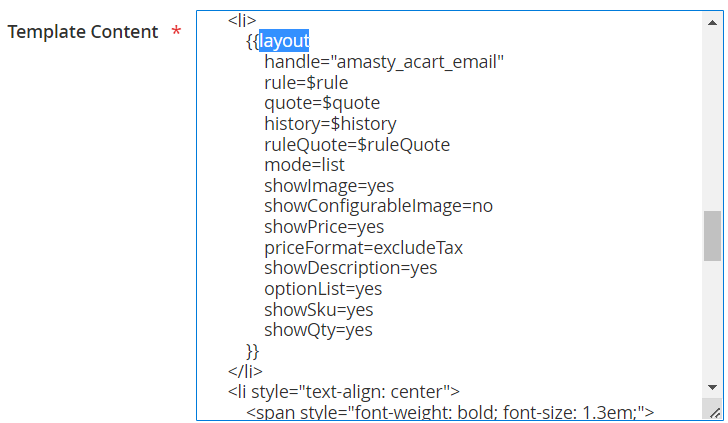
In the layout settings, you can configure the content and the basic composition of the product list that is included in the email.
The mode defines the appearance of the product list. This setting has 2 possible configurations:
- table;
- list.
The showImage in its turn adds pictures to products. Choose:
- yes to include images;
- no to omit them.
The priceFormat is used to show either prices with taxes (=includeTax) or excluding taxes (=exculdeTax).
The showDescription is responsible for the product description display. Type in:
- yes to show a full Description;
- no to provide no description at all.
Use showPrice to enable or disable price display in the email body.
The showQty is used to show the quantity of a particular product. Choose:
- yes to show the qty;
- no to hide it.
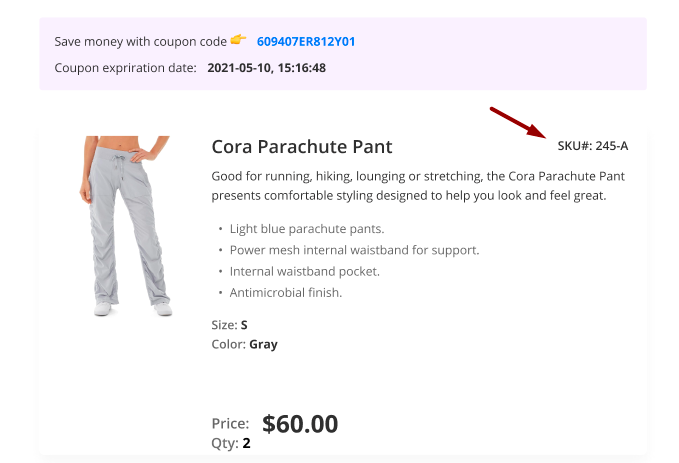
Enable showSKU to let customers easily find the desired products in your store. Fill in:
- yes to add a SKU to an email;
- no to hide it.
See a sample below:
- Save it. Now you can use a newly created template in Abandoned Cart rules!
If you enable the Related/Up-Sell/Cross-Sell Products to Display in Email option, you also need to update the email template.
To do this, load the template and proceed to the layout → handle section.
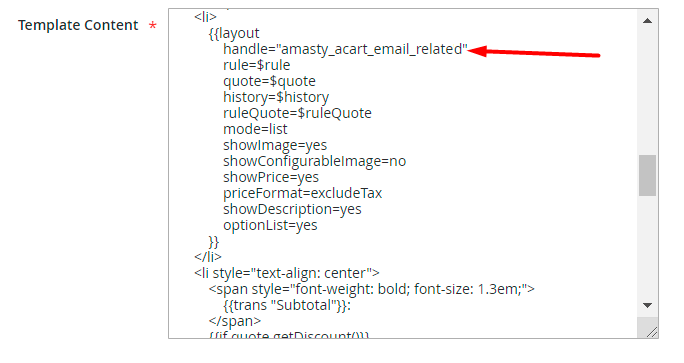
Add the value in a handle section according to the information you need:
- “amasty_acart_email_related” - to add related products to the email template;
- “amasty_acart_email_crosssel” - for cross-sells;
- “amasty_acart_email_upsell” - for upsells.
Save the template. Now related products will be added to the email template. You can adjust the number of the products to show in the general settings.
Moreover, you can include social network icons with links (Facebook, LinkedIn, X, and Instagram) in abandoned cart emails.
In the abandoned cart templates with new designs (Light, Dark, Modern 1, Modern 2), social network icons are embedded by default. You simply need to find all # in the Template Content field and replace them with your specific links to social networks.
To include social network icons in the Basic abandoned cart email template, you need to embed the piece of code provided below first (you can copy it from the code of the templates with the new designs) and then also replace # with your specific links to social networks.


Please note that this functionality, as well as four new template designs (Light, Dark, Modern 1, Modern 2), is available only as a part of an active support subscription or product subscription. You can find the amasty/module-abandoned-cart-email-subscription-functionality package for installing in composer suggest.
Abandoned Cart Email Pro
The Pro version includes additional extensions for the complex notification approach.
Customer Segmentation
Target email campaigns on particular audiences using Customer Segmentation extension. Create multiple rules for the segments to rearrange users automatically.
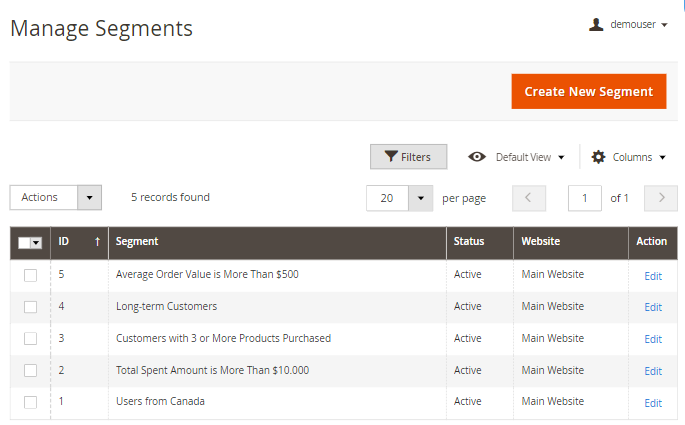
During campaigns configuration, you can select a particular segment to tailor your emails.
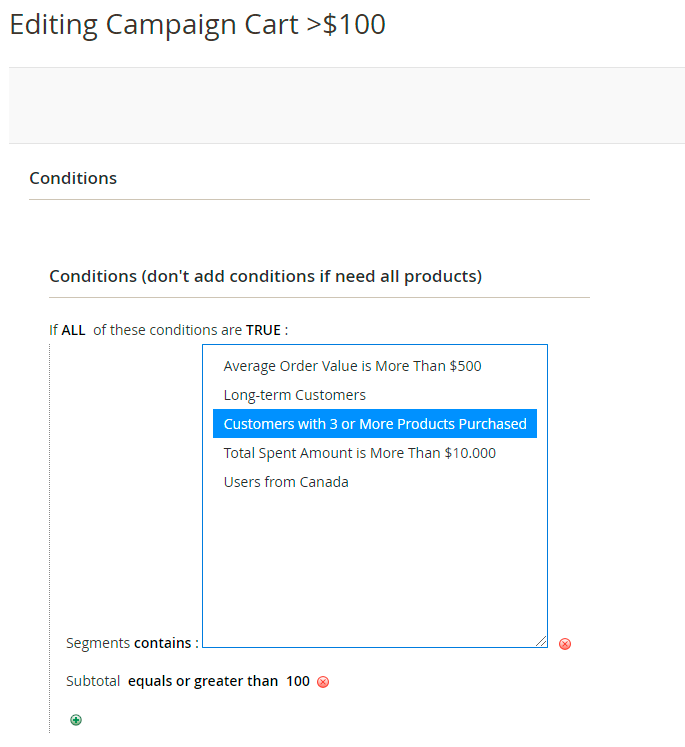
Find out more about configuring segments here.
Follow Up Emails
This part of the solution lets you build an effective email strategy. Trigger emails dispatch according to customer activity and keep in touch with your audience.
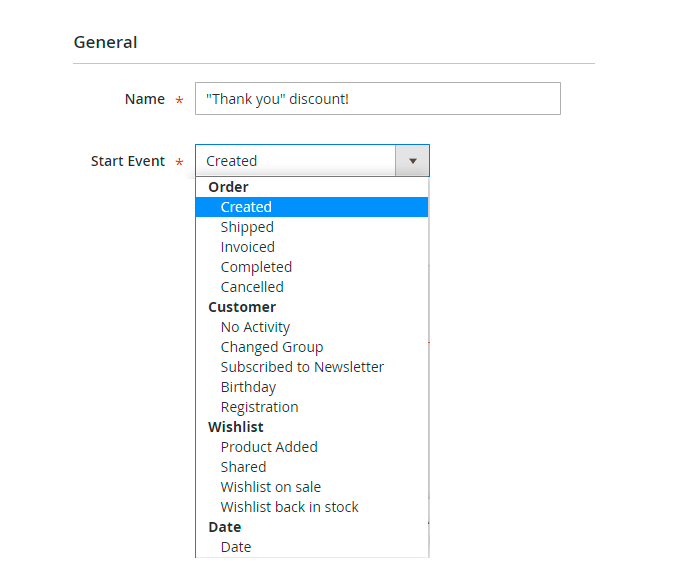
Use the ready-made templates or customize them according to your needs.
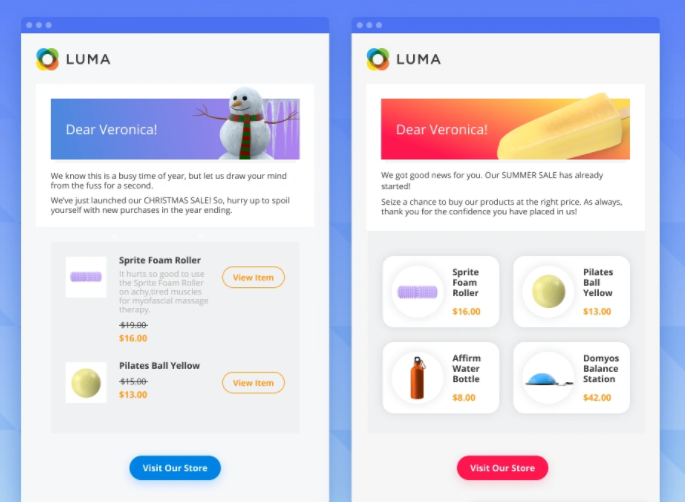
Explore how to create the rules for Follow Up Emails in this guide.
Push Notifications
Notify visitors about your special deals while they're shopping. Collect customers' consents for notifications and display catchy reminders on the frontend.
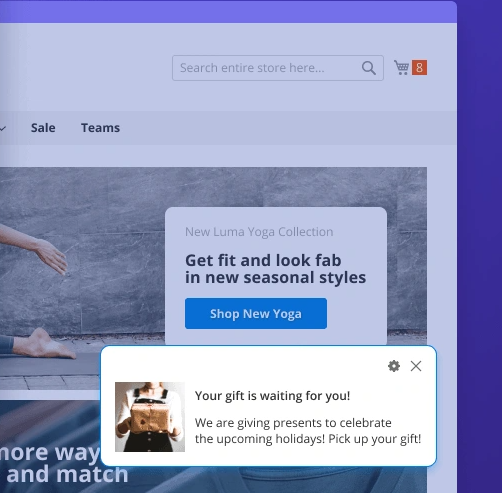
You can create various campaigns based on schedule or events.
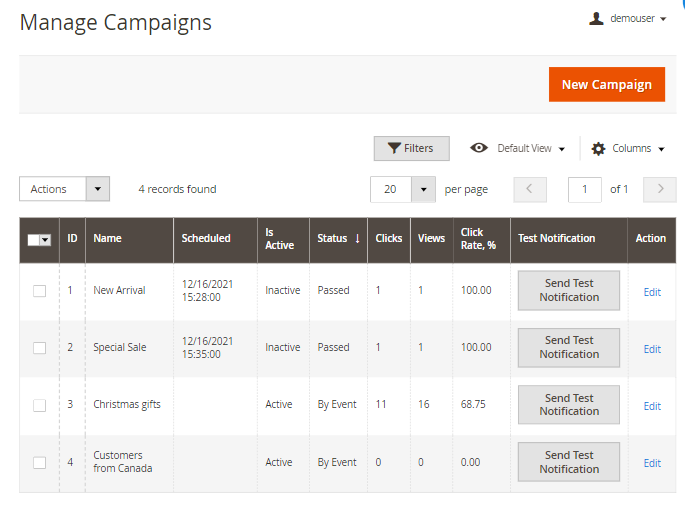
See how to configure the rules here.
Exit Intent Popup
The solution also includes a tool to prevent shoppers from abandoning. The exit intent popup appears when a customer wants to leave a store. Customize the popup to catch shoppers' attention and motivate them to finish purchases.
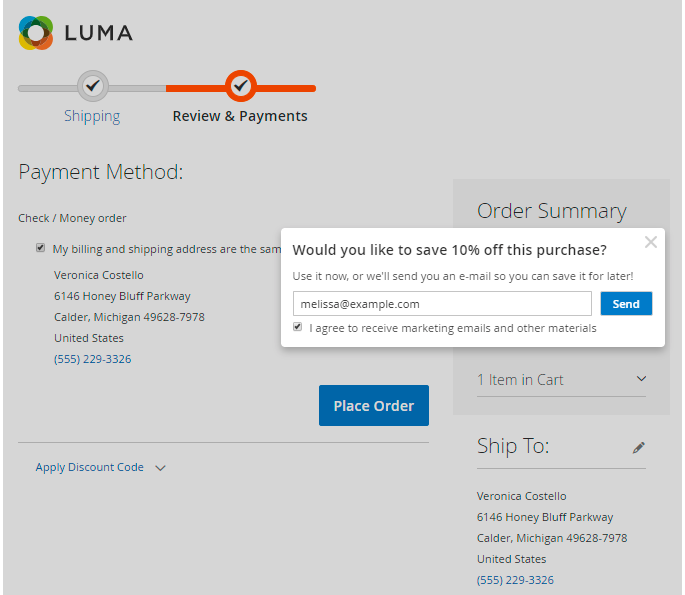
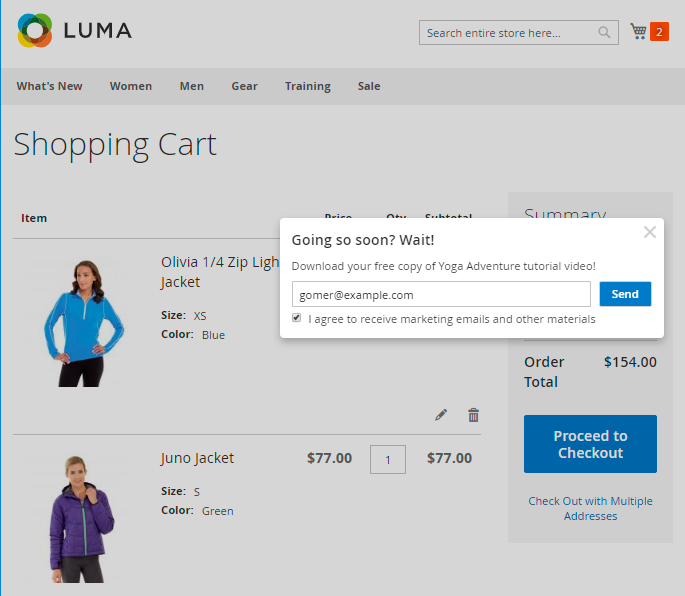
Check the available customization settings in this guide.
Abandoned Cart Email Premium
The Premium package includes all Lite and Pro features, plus SMTP.
SMTP
Configure SMTP to make sure your emails will be delivered successfully without getting into a spam folder. Use preconfigured providers or adjust your own connection.
Navigate to Stores → Configuration → Amasty Extensions → SMTP.
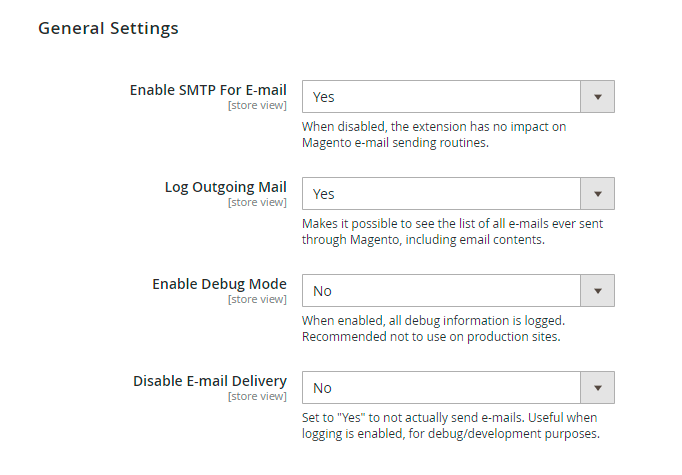
Find out how to configure the connection using this tutorial.
Additional packages (provided in composer suggestions)
To make additional functionality available, please install the suggested packages you may need.
Available as a part of an active product subscription or support subscription:
For Basic, Pro, and Premium versions:
amasty/module-abandoned-cart-email-subscription-functionality- Install this package to:
1. customize Abandoned Cart coupon names;
2. access four new template designs (Light, Dark, Modern 1, and Modern 2);
3. enable the ability to add social network icons with links in abandoned cart emails.
FAQ
* I installed the Abandoned Cart Email extension but emails are not sent.
* How can I make my email templates look like the example on the Abandoned Cart Email extension page?
* How to change styles of the product layout for the abandoned cart email template?
* How to change the type and the size of the product image for the abandoned cart email template?
* When is the cart considered abandoned?
magento_2/abandoned-cart-email.txt · Last modified: 2025/01/21 10:55 by kkondrateva

