User Tools
Site Tools
Sidebar
magento_2:full_page_cache_warmer
Table of Contents
For more details see how Full Page Cache Warmer for Magento 2 extension works.
Guide for Full Page Cache Warmer for Magento 2
With Cache Warmer for Magento 2 you'll be able to timely warm page cache according to your custom schedule to ensure fast page load and improve customer shopping experience.
- Use 5 algorithms to prioritize pages for cache warming
- Warm-up pages separately for mobile theme
- Exclude particular blocks from caching with Hole Punch
- Auto-update your cache after any catalog change
- Analyze cache warmer efficiency with detailed reports
Magento 2 Full Page Cache Warmer extension is compatible with Hyvä themes. You can find the amasty/module-fpc-hyva-compatibility package for installing in composer suggest (Note: the compatibility is available as part of an active product subscription or Support Subscription).
In Full Page Cache Warmer FAQ you can also find answers to the most popular questions about the extension functionality. For example, you can see how the extension works with Varnish in this article.
When updating the extension to the latest version, you may face the following issue:


To solve this problem, clean the Generated folder by running the command below in the Magento root:
rm -rf generated
General Settings
To configure general extension settings please go to Stores → Configuration → Full Page Cache Warmer.
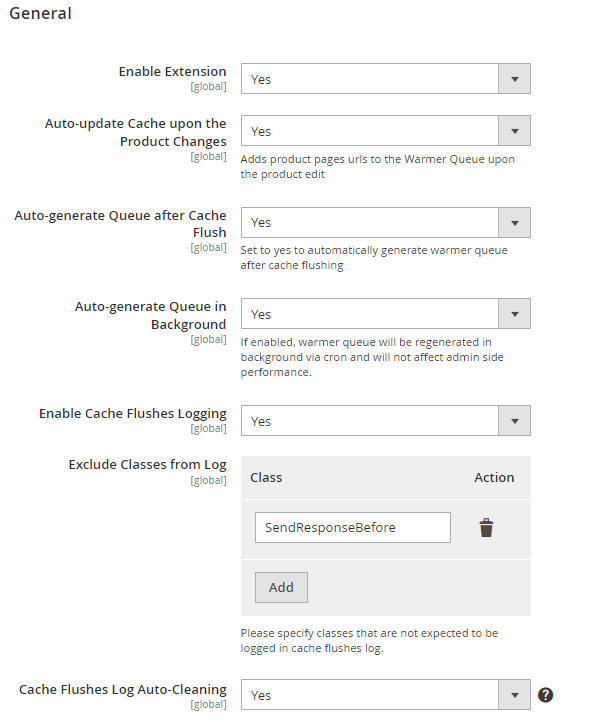
Enable the extension - Set the option to 'yes' to activate the Cache Warmer. The option has a 'Global' scope so it is not possible to run the warmer on a certain web store/store view.
Auto-update Cache upon the Product Changes - Due to this option, URLs of updated pages will be automatically added to the warmer queue.
Auto-generate Queue after Cache Flush - Set to 'yes' to automatically generate warmer queue after cache flushing. That's a useful option, as the cache will be warmed up right away and there's no need to wait until this moment comes on schedule.
Please note that the setting works properly with Built-in Cache only.
Auto-generate Queue in Background - if enabled, warmer queue will be regenerated in background via cron and will not affect admin side performance.
Enable Cache Flushes Logging - with this option, the extension will set the record of any cache flushes attempts in your Magento 2 instance. Learn more how to work with the log in the Cache Flushes Log part of the user manual.
Exclude Classes from Log - This setting is only available when Enable Cache Flushes Logging is set to Yes. You can specify the cache classes to exclude from the cache flushes log.
Keep in mind, that if Auto-generate Queue after Cache Flush option is enabled and any product is changed, the cache is flushed by default. When the cache is flushed, the queue is automatically regenerated, which can cause a longer product saving in case there are a lot of URLs. To avoid this issue, enable the Auto-generate Queue in Background option.
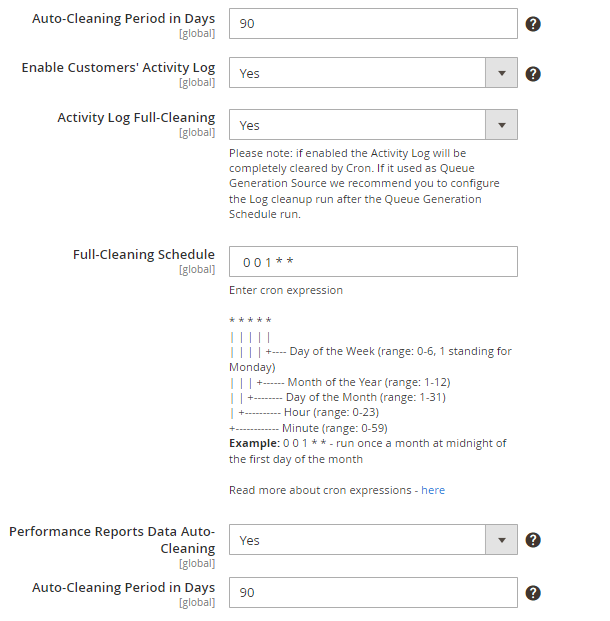
Cache Flushes Log Auto-Cleaning - Enable this option to clean the log automatically after a specified period.
Auto-Cleaning Period in Days - Provide a period after which the log should be cleaned.
Enable Customers' Activity Log - Set 'Yes' to let such features as FPC Warmer Reports and “Queue Generation Source” use the data from the log.
Activity Log Full-Cleaning - Select ‘Yes’ if you want to automatically clean all the records that are available at the time of cleaning by Cron.
Please note: if the Activity Log Full-cleaning feature is enabled, the Activity Log will be completely cleared by Cron. If it is used as Queue Generation Source we recommend you configure the Log cleanup run after the Queue Generation Schedule run.
Full-Cleaning Schedule - Enter the cron expression to set the schedule for automatic Activity log cleaning. Example: 0 0 1 * * - run once a month at midnight on the first day of the month. Read more about cron expressions here.
Performance Reports Data Auto-Cleaning - Activate the feature to clean reports data automatically after a particular period.
Auto-Cleaning Period in Days - Specify a period after which reports should be cleaned.
Source and Priority
In the warmer settings tab you can configure warmer queue settings as well as specify a log size and exclude specific pages from cache warming.
It's possible to generate queues and warm cache via the command line. Use commands:
php bin/magento fpc:warmer:process
php bin/magento fpc:warmer:generate
Queue Generation Source Settings
Queue Generation Source - allows selecting any of 5 available generation sources:
- Pages Type
- Text file with one link per line
- Sitemap XML
- Sitemap XML and Text File together
- Customers Activity analysis
- Page Types and Text File Together
1. Page types
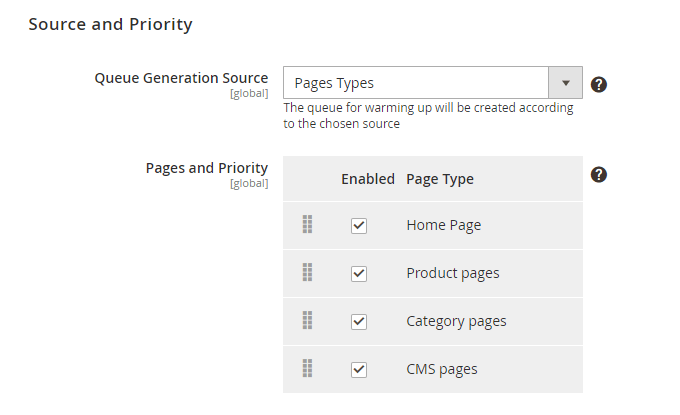
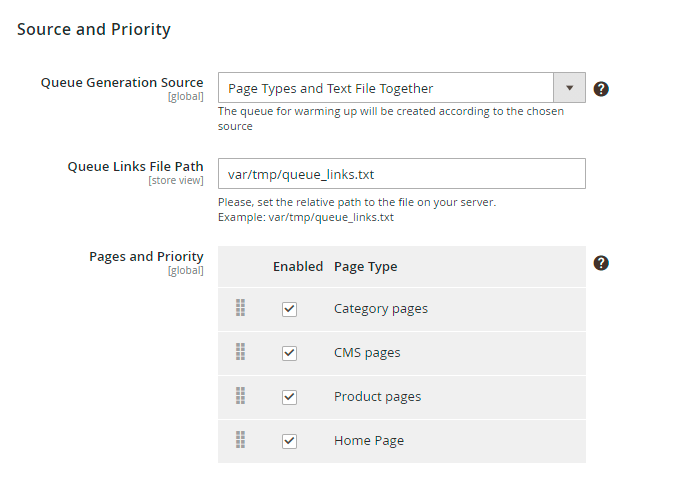
Page Types - If you select 'Page Types' as a queue generation source, you can choose which pages should be warmed. Drag and drop pages to prioritize them for the warming depending on their importance.
2. Sitemap XML
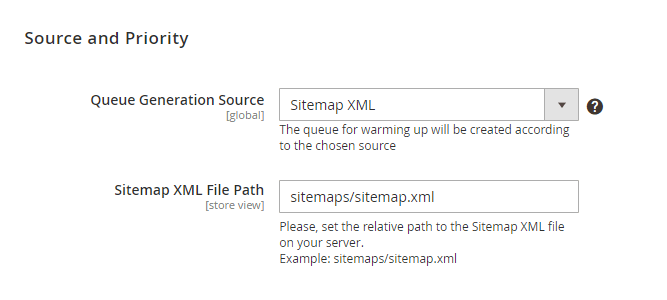
Sitemap XML- The option requires a valid XML sitemap located in your Magento 2 root folder. Also, set the relative path to the Sitemap XML file on your server.
Automatically create XML sitemap with the XML Google® Sitemap extension with no efforts. Such XML sitemap will perfectly suite for creating the URL queue by Magento 2 Full Page Cache Warmer.
3. TXT file with one link per line
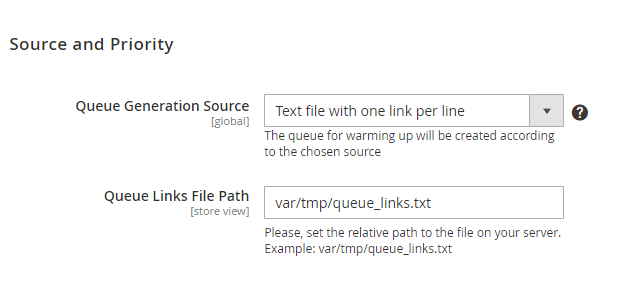
Text file with one link per line - You can use a custom text file with a list of links to be crawled (one link per line). Specify the file path on your server.
4. Sitemap XML and Text File together
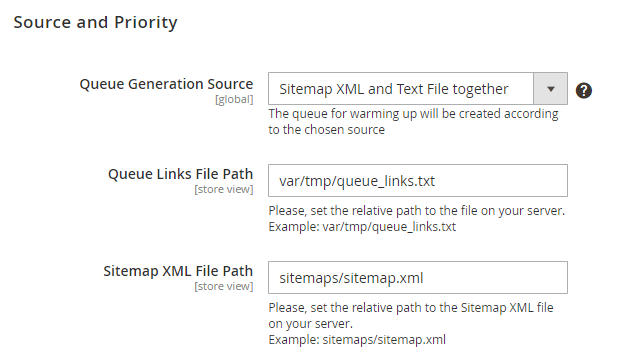
Sitemap XML and Text File together - Both the sitemap and the text file will be used for creating the URL queue for FPC warming. Specify the Queue links file path and the Sitemap XML file path.
5. Customer Activity Source - Create a warming queue based on the most popular pages of your website. Pages are ranked according to the number of visits. The most popular pages URLs will be at the beginning of the queue and will be warmed first, the least – at the end.

5. Page Types and Text File Together - Using this option, you can create a file with the most valuable pages to warm first and then warm other pages according to their type and priority. Specify the Queue Links File Path and configure pages priority as in the settings above.
Performance Settings
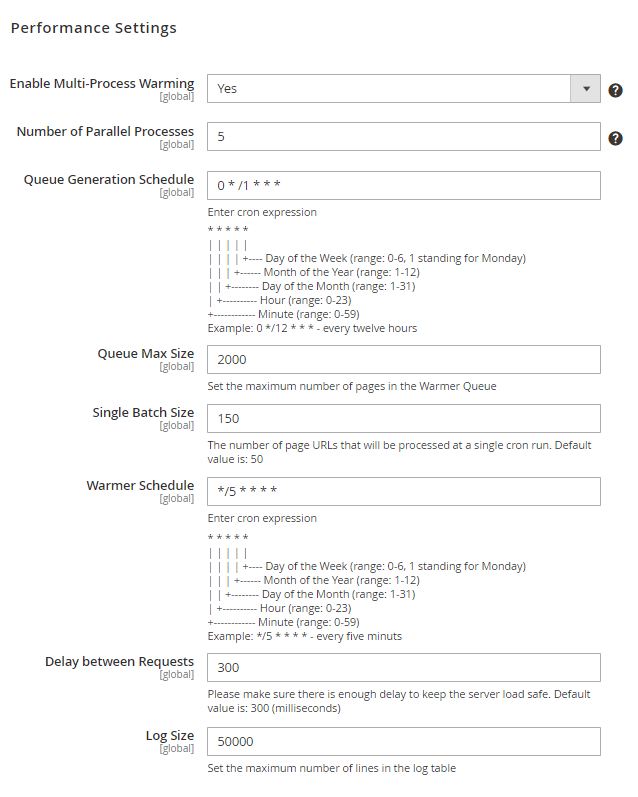
Enable Multi-Process Warming - Enable multi-process warming to include several URLs per one crawling request. Multi-process warming significantly boosts the warming process speed. But it generates the extra load to the server as well. We recommend running the test warming while monitoring the server load first.
Number of Parallel Processes - Adjust the number of parallel processes for multi-process warming.
Queue Generation Schedule - It's possible to schedule warming queue generation according to any specific needs. Use the cron expression to schedule queue generation jobs, e.g. 0 */12 * * to run cron every twelve hours. Read more about cron expressions here.
Queue Max Size - Set the maximum number of page URLs for the warming queue.
Single Batch Size - The module processes pages in batches. Specify the maximum number of pages that can be processed by cron within a single run.
Warmer Schedule -Schedule warmer jobs. For example, */5 * * * * to run cron every five minutes.
Delay between requests - Please make sure there is enough delay to keep the server load safe. The default value is: 300 (milliseconds)
Log Size - Set the maximum number of lines in the log grid.

Page Combinations
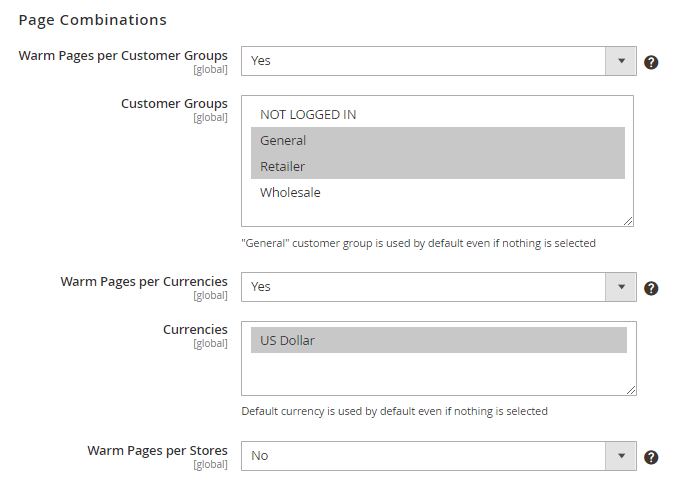
Choose page combinations for cache warming based on Customer groups, Currencies, Stores.
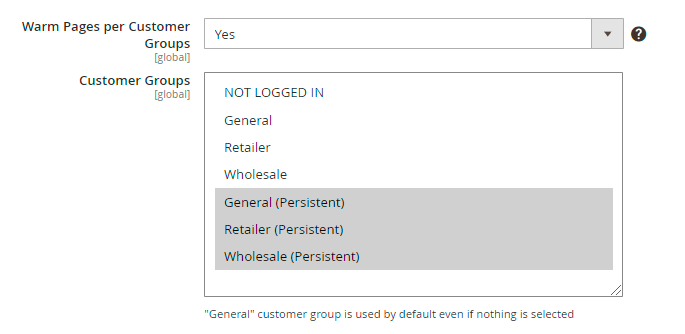
You can also warm pages based on customer groups with the Persistent Shopping Cart enabled.
Each link from the queue will be checked with all possible settings combinations based on the selected Queue Source and with Default settings (when none of the chosen settings are taken for the request).
Take a look at the example below:
Let's say you’ve chosen the following settings:
«Customer Groups» = General
«Stores» = English, French
«Currency» = USD
There are 3 settings selected: one for a customer group, two for stores, one for currency. Besides, each of these
settings will not be specified for the request (e.g. set as Default).
Thus, here’s the number of combinations for two links:
2 links * 2 customer groups * 3 stores * 2 currencies = 24 request variants
As a result, each link will be checked in the following 12 combinations:
1. Default + Default + Default : the page is requested with no parameters whatsoever.
2. General + English + USD : switched to General group + English is on + currency changed to USD
3. General + English + Default : switched to General group + English is on + no currency is set
4. General + French + USD : switched to General group + French is on + currency changed to USD
5. General + French +Default : switched to General group + French is on + no currency is set
6. General + Default + USD : switched to General group + English is on + currency changed to USD
7. General + Default + Default : switched to General group + English is on + no currency is set
8. Default + English + USD : no group is set + English is on + currency changed to USD
9. Default + English + Default : no group is set + English is on + no currency is set
10. Etc.
Warm-up mobile pages
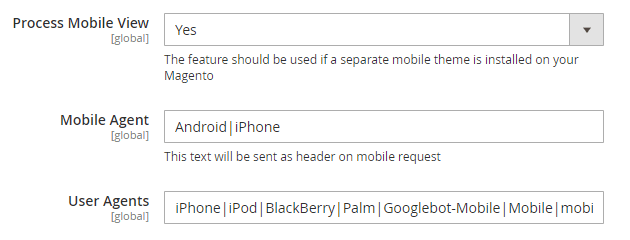
Process Mobile View - Enable this option to warm-up mobile pages. Note, that the feature should be used if a separate mobile theme is installed on your Magento.
Mobile Agent - Specify mobile agents. The text, you'll enter in this field will be sent as a header on mobile requests.
User Agents - List user agents.
Exclude Pages
Exclude Blocks
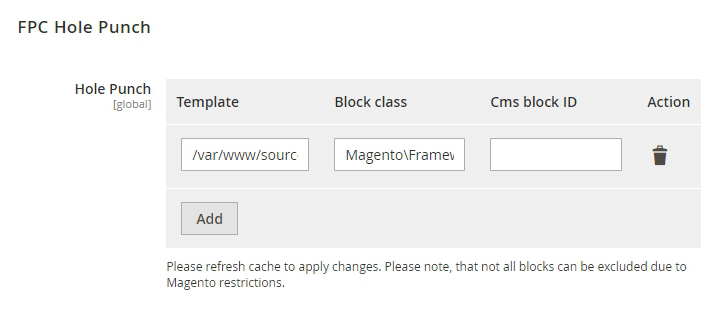
Hole Punch - the feature allows you to exclude certain page blocks from cache warning. It's not always possible to cache the whole page, as certain sections are dynamic and unique to each customer. With the Hole Punch feature, you can mark certain blocks of a page to be loaded each time and never cached while still caching the rest of the page. You can exclude static or dynamic blocks.
1. Static Blocks
To find the info on Template and Block's class, you'll need to complete few steps. First, go to the Stores→Settings→Configuration→Advanced→Developer.
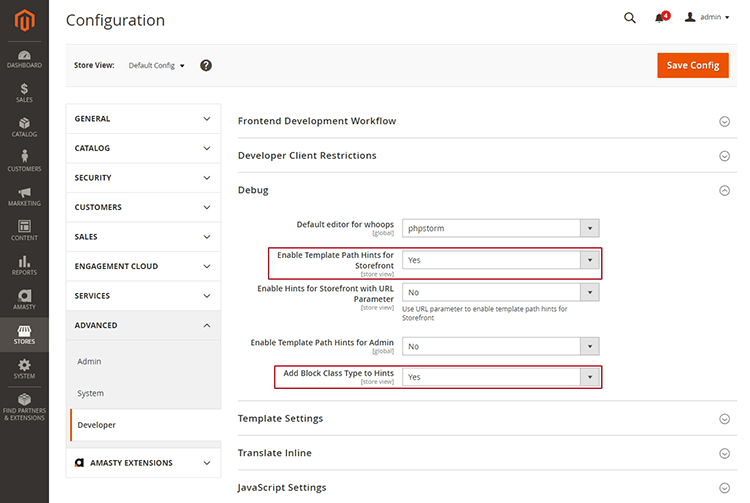
In Debug, set both the Enable Path Hints for Storefront and Add Block Type to Hints as Yes. When you go on the storefront, the pages will look like in the example below. The Template data will be displayed on the left, and Block class — on the right correspondingly.

2. Dynamic Blocks
To exclude the dynamic Magento 2 block from the cache lifetime, you'll need to insert the Template and the Block's ID.
First, configure the Debug as it was described in the Static Blocks Configuration above and copy the Template info.
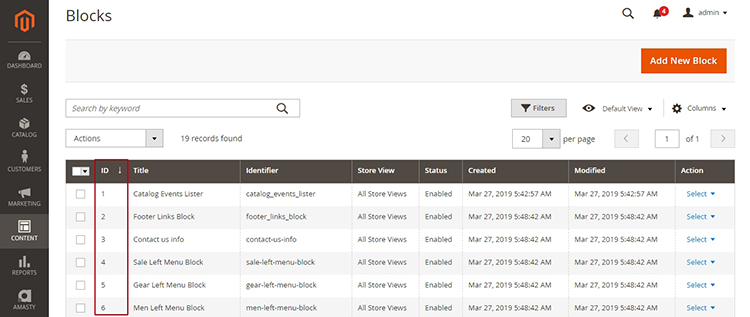
To obtain the Block's ID, simply insert the ID from the Content→Blocks.
Connection Settings
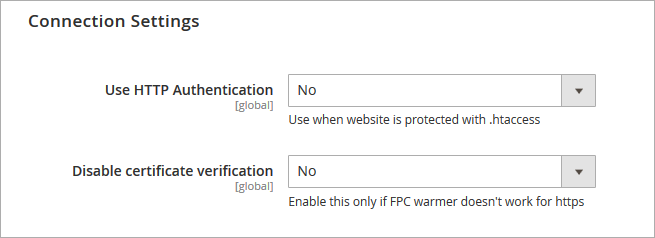
Use HTTP Authentication - Use this option only if your website is protected with .htaccess
Disable certificate verification - Enable this feature only in case the FPC warmer doesn't work for https.
Debug Mode
IMPORTANT: The debug option works on the staging environment with native Magento cache. On the production environment with the activated Varnish Cache, the extension can't gather and process necessary data. Therefore, the Status & Hints are not available.
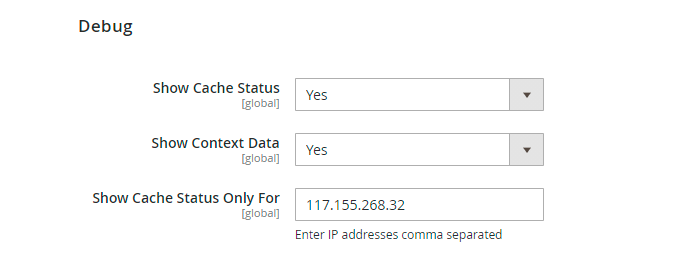
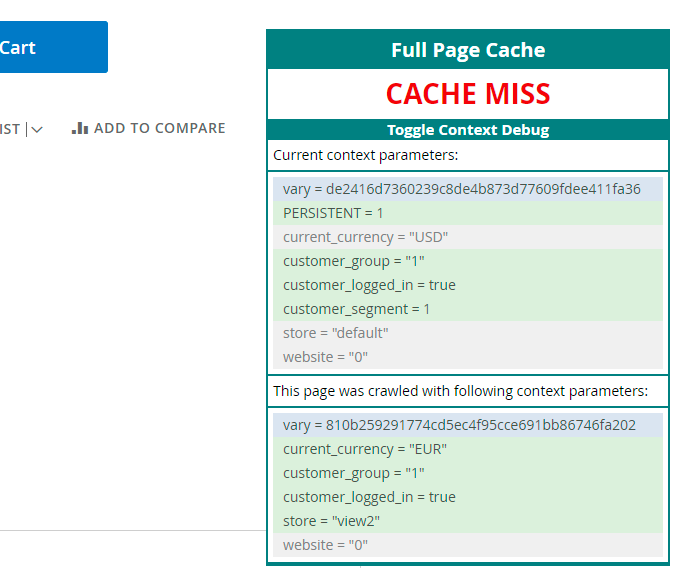
Show Context Data - if enabled, you can click the Toggle Context Debug in a status bar to see the current context parameters and those parameters with which the page is warmed up.
See the example:
Show Cache Status Only For - Specify particular IP addresses fro which cache statuses will be displayed. Leave the field blank if you don't want to limit cache status display.
Lazy Load Compatibility Settings
If you have Lazy Load or Google Page Speed Optimizer installed, you can warm pages according to user agents with or without WebP support.
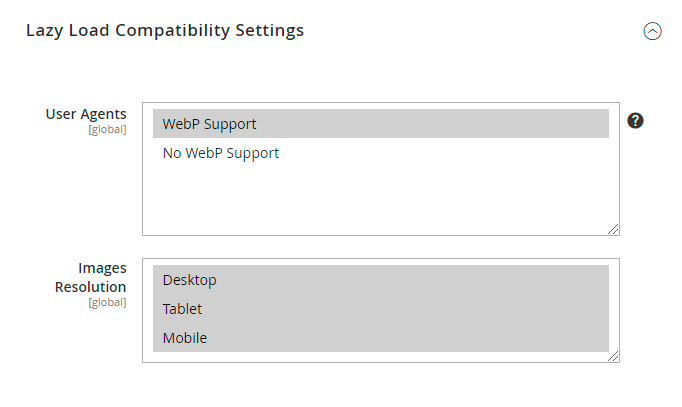
User Agents - Select the required user agents for warming.
WebP is a modern method of lossy and lossless compression that can be used on a large variety of photographic, translucent and graphical images found on the web. Webmasters interested in improving site performance can easily create optimized WebP alternatives for their current images, and serve them on a targeted basis to browsers that support WebP (for example, Google Chrome). The sample of the browser that doesn’t support WebP now is Internet Explorer.
Images Resolution - Choose the resultions to warm.
Warmer Queue
To open the Warmer Queue grid please go to System → Warmer Queue
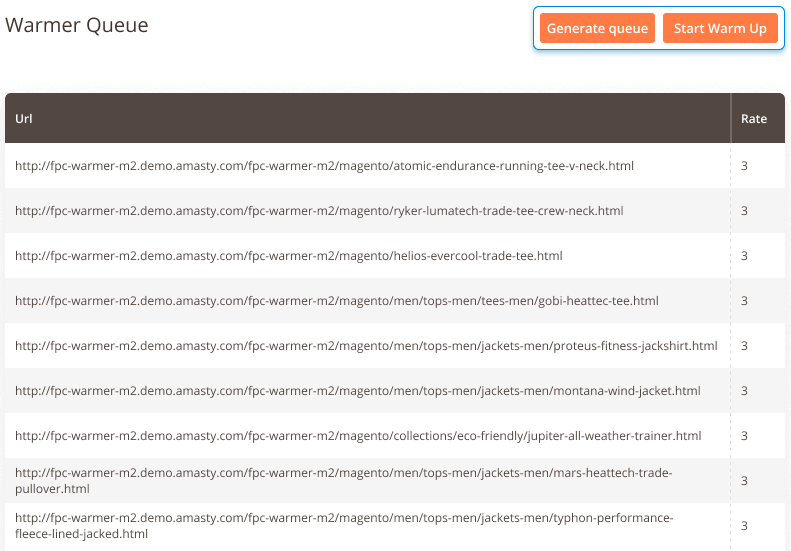
Here is the list of page URLs waiting to be processed.
You can generate a warmer queue manually at any time you need by clicking the 'Generate Queue' button. It's also possible to manually trigger queue processing. To start processing URLs click the 'Start Warm Up' button'.
Warmer Log
The log grid shows already warmed URLs. The log contains all crawled page combinations specified in 'Page Combinations' tab. Easily filter log data by any parameter you need.
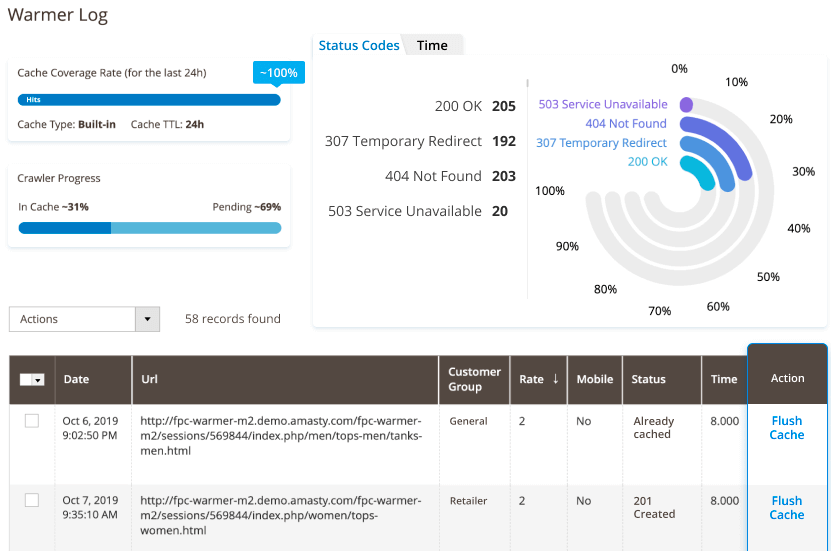
Flush Cache for particular URLs – If you change some product info, it's possible to flush cache for its product page only. It's useful as you won't need to warm cache from scratch for all the other URLs. You can do it by clicking the 'Flush Cache' button for each URL, or for the selected URLs via mass actions.
Also, the extension is compatible with Varnish. You can monitor and Cache Coverage Rate in Warmer Log when using Varnish cache and see the Performance Reports.
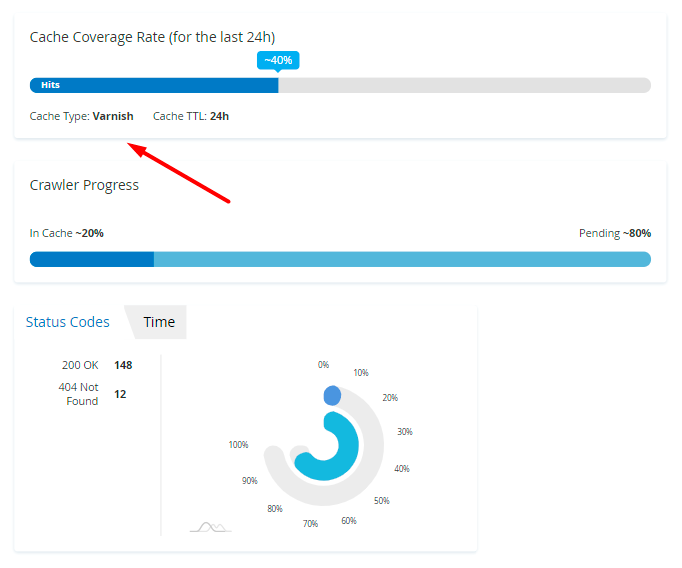
Keep in mind, that on the storefront Varnish cache status is always displayed as 'Miss'.
Warmer Activity Log
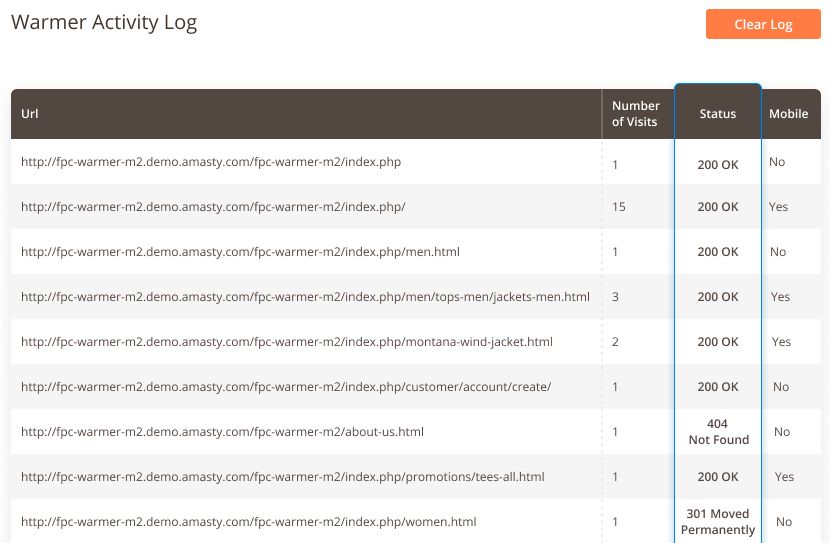
Here you can see the number of visits for each URL of the store. Each URL gets status based on the number of visits. It's used for 'Customer Activity Source' of queue generation.
Cache Flushes Log
When working with Magento 2 in your store, you may sometimes notice that the FPC cache is flushed due to some unknown event. It can be very challenging and resources-consuming to find the exact reason that causes the cache flushes.
If you have faced such an issue, start by setting the Enable Cache Flushes Logging to Yes. This config is located in Stores → Configuration → Full Page Cache Warmer → General Settings. Then, all actions that cause cache flushes will be logged.
Also, if you know that some methods are secure and work without causing cache flush issues, you can exclude such methods from the log. This way, the cache flushes log will be shorter, which makes it easier to identify the reason for unusual cache flushes.
You can access the log with details on cache flushes attempts by going to System → Amasty FPC Warmer → Cache Flushes Log.
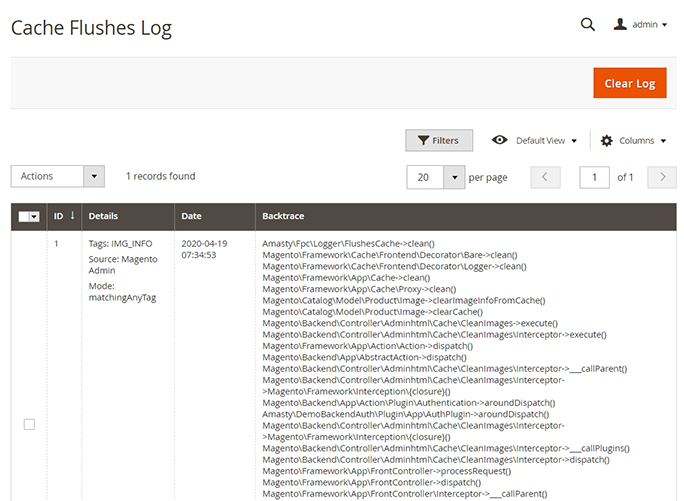
The grid has the following data:
- ID - identification number of specific flush attempt;
- Source - cache flush source. It can be: CLI, Magento Admin, Storefront, Cron;
- Details - the extended information on what action caused the cache flush;
- Tags and Mode - the info on associated tags and mode. (For example, Tags: IMG_INFO, Mode: matchingAnyTag).
- Subject - the info on who or what initiated the cache flush. For Magento Admin source the value in the column will be 'Admin Test';
- Date - the date and time of cache flush event;
- Backtrace - it prints the function calls.
Cron Tasks List
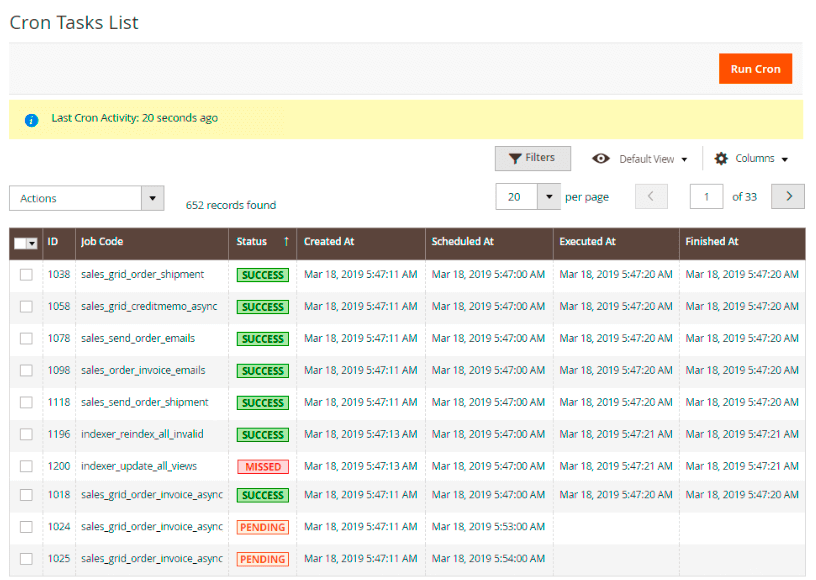
Magento 2 Full Page Cache Warmer extension is preintegrated with Cron Tasks List to provide store owners with an opportunity to track and manage all cron tasks running in the website background.
To view all scheduled and executed cron tasks, go to System → Cron Tasks List
Run all cron tasks and generate their schedule by clicking the ‘Run Cron’ button. Also you can delete separate tasks in bulk, apply filtering and sorting options when it is needed.
Performance Reports
Status Codes
To take a look at visual reports go to System → Amasty FPC → Performance Reports .
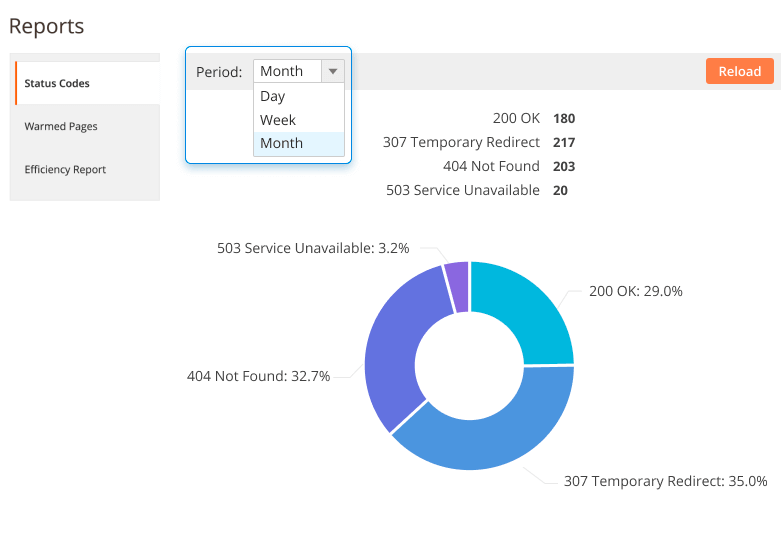
Status Codes - The stats report shows page statuses, as well as the number of pages with each particular status for all processed pages. It's highly useful for showing the percentage of errors and success loads.
Warmed Pages
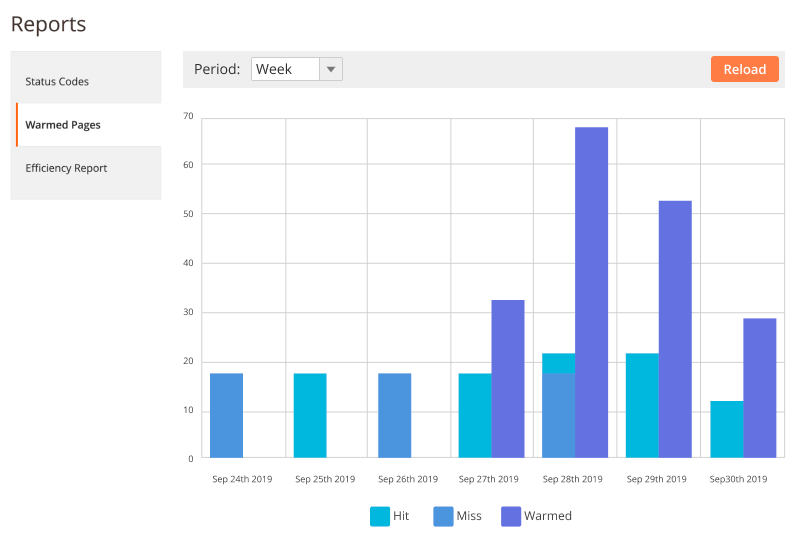
Warmed Pages - View Warmed Pages report to get the summary stats for requested pages for previous time periods. This way you can also understand when the crawler was most active.
Efficiency Report
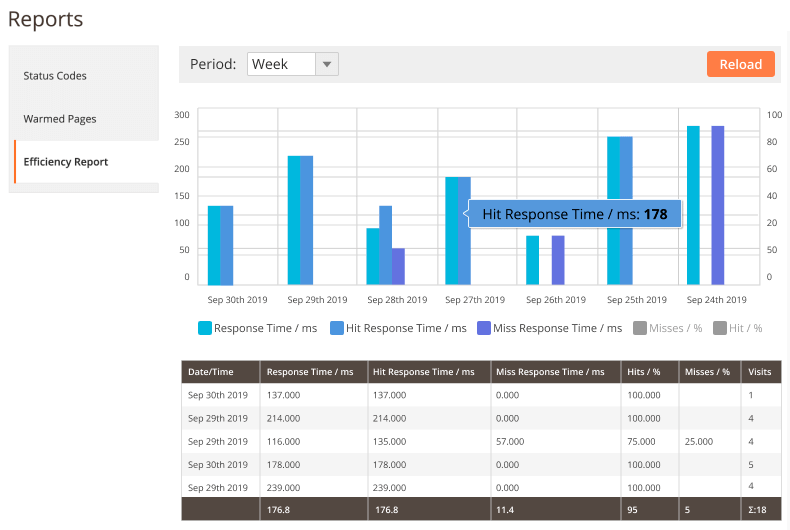
Efficiency Report - The cache extension allows you to get a full picture of cache warmer efficiency. Choose the time period and see the percentage of hits and misses, track the performance by the crawler response time, etc.
Frontend Statuses
Check page statuses on the frontend.
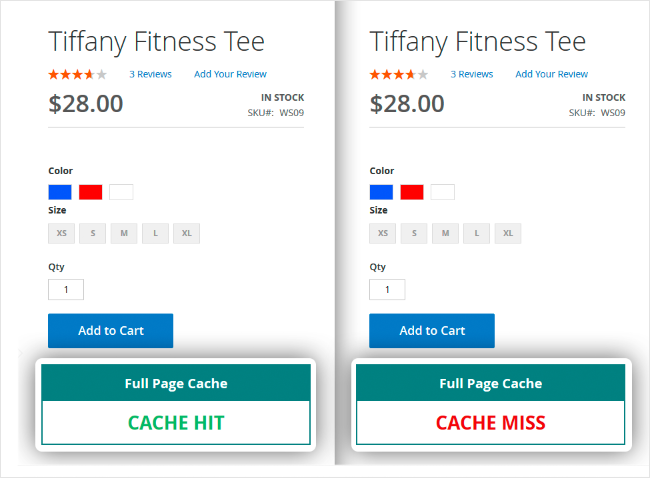
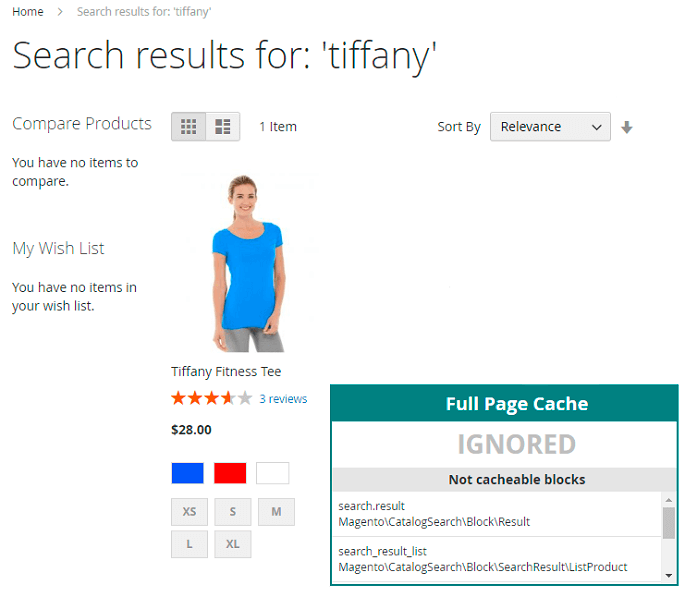
The module displayed detailed information about not cacheable blocks.
Find out how to install the Full Page Cache Warmer extension for Magento 2 via Composer.
magento_2/full_page_cache_warmer.txt · Last modified: 2025/01/10 12:45 by skudrov

