User Tools
Site Tools
Sidebar
magento_2:google_analytics_4_with_gtm_support
Table of Contents
For more details, see how the Google Analytics 4 with GTM Support for Magento 2 extension works.
Guide for Google Analytics 4 with GTM Support for Magento 2
Smoothly integrate your store with Google Analytics 4. Get access to a variety of built-in events and extended performance reports. Gain valuable insights into every stage of customer journey to make informed business decisions.
- Track product impressions & clicks
- Observe shopping cart & checkout events
- Monitor customer account events
- Discover promotions performance
- Generate JSON file with a single click
- Server-Side and Client-Side tracking
- Track Google AdWords conversions
- Cookie Consent (GDPR) compliant, including Google Consent Mode V2
- Multi-store & Multi-currency ready
- Hyvä-ready storefront and Hyvä Checkout ready
- Compliance with Hyvä and Hyvä Checkout Content Security Policies
- Compatibility with Breeze Theme
The extension is compatible with Hyvä Theme. You can find the 'amasty/module-ga4-hyva' package for installing in composer suggest. The compatibility is available as a part of an active product subscription or support subscription.
The extension is compatible with Hyvä Checkout. You can find the 'amasty/module-ga4-hyva-checkout' package for installing in composer suggest. The compatibility is available as a part of an active product subscription or support subscription.
The extension is fully compliant with Hyvä and Hyvä Checkout Content Security Policies. The compliance is available as part of an active product or support subscription, within the 'amasty/module-ga4-hyva' and 'amasty/module-ga4-hyva-checkout' packages.
GTM API Configuration
Before starting to work with the extension you should connect your store with Tag Manager and Google Analytics. You can do it by filing in the appropriate credentials in the following fields in the Stores → Configuration → Amasty Extensions → Google Analytics 4 with GTM:
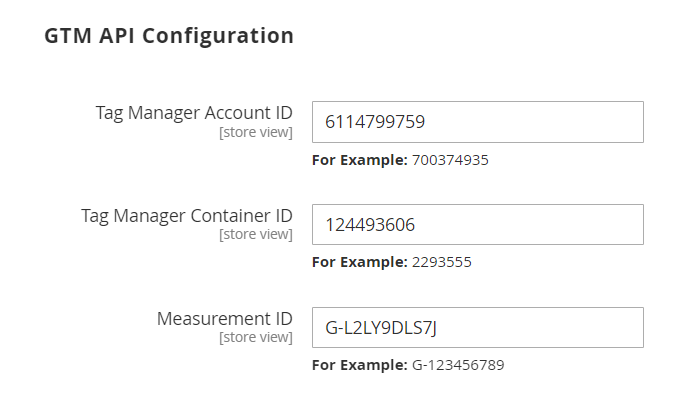
Tag Manager Account ID - paste Account ID from your GTM account. Refer this documentation to explore how to create the account in GTM if you don’t have one.
To find the Account ID, please open the list of created accounts on this page: https://tagmanager.google.com/#/home. Choose the account you need and go to its settings.
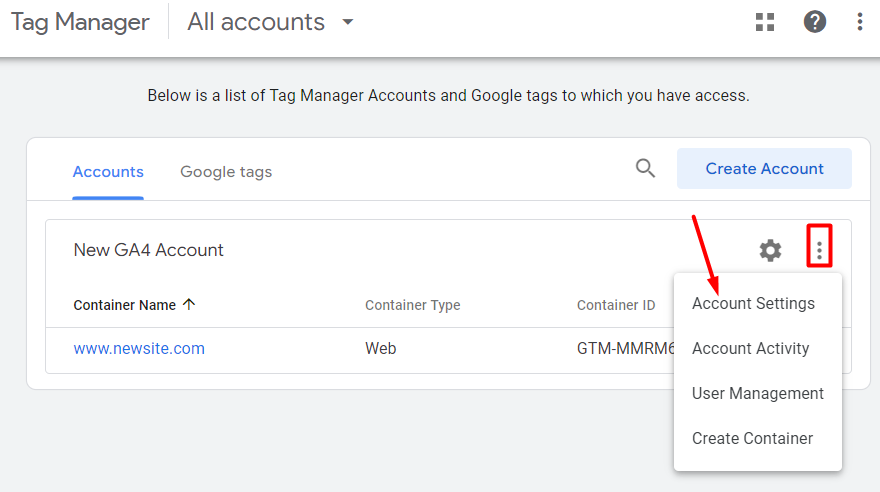
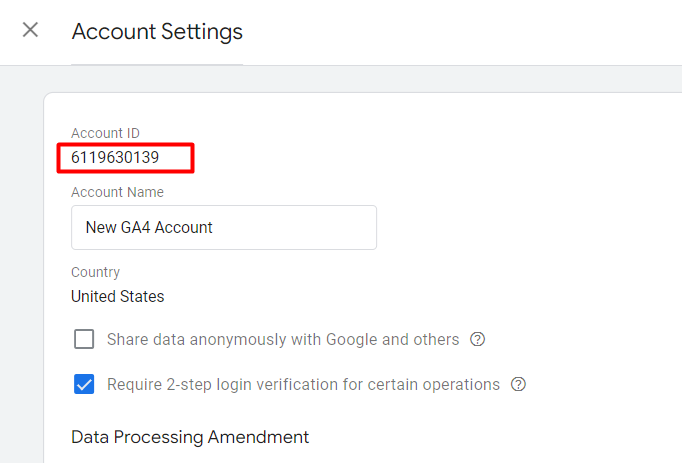
In the window that opens you can see the Account ID in the top:
Tag Manager Container ID - paste Container ID from your GTM account. To do this, please find 8 digits of Container ID in the browser URL of Google Tag Manager, which looks like:

Measurement ID - paste Measurement ID from your GTM account. You can find it under your Google Analytics account: GA account > Admin > Data Streams > Select needed stream > Measurement ID.

You can refer this documentation to explore more about the Data Streams in Google Analytics 4.
GTM Tags require some time for activation. Typically it takes 24-48 hours before the GTM tag will start sending data to your Google Analytics account.
General Configuration
Before starting with the extension, make sure that Adobe Commerce Google Analytics feature is disabled.
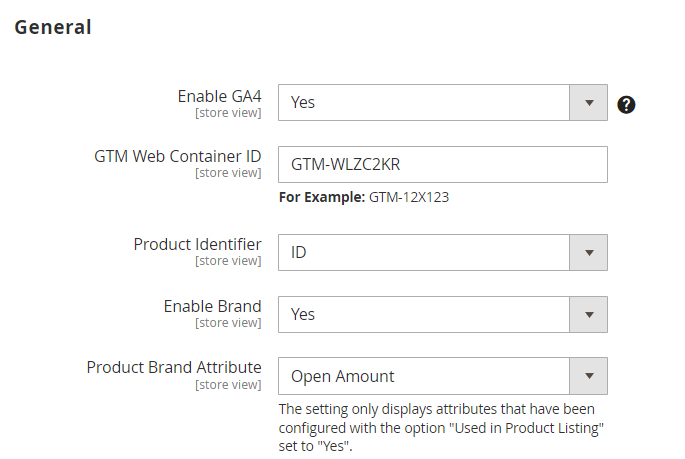
Enable GA4 - select 'Yes' to enable the extension.
GTM Web Container ID - here you should paste the Public ID from your GTM account in order to start generating tags, triggers, and variables for GA4. You can copy your Public ID from here:

Product Identifier - specify how to identify products in GA4 and GTM either by SKU or by product ID from your Magento catalog
Enable Brand - set to ‘Yes’ to enable brand tracking.
Product Brand Attribute - select the corresponding brand attribute or leave it empty to disable brand tracking. This setting includes all product attributes and allows the store owner to choose identified attributes for the product’s brand.
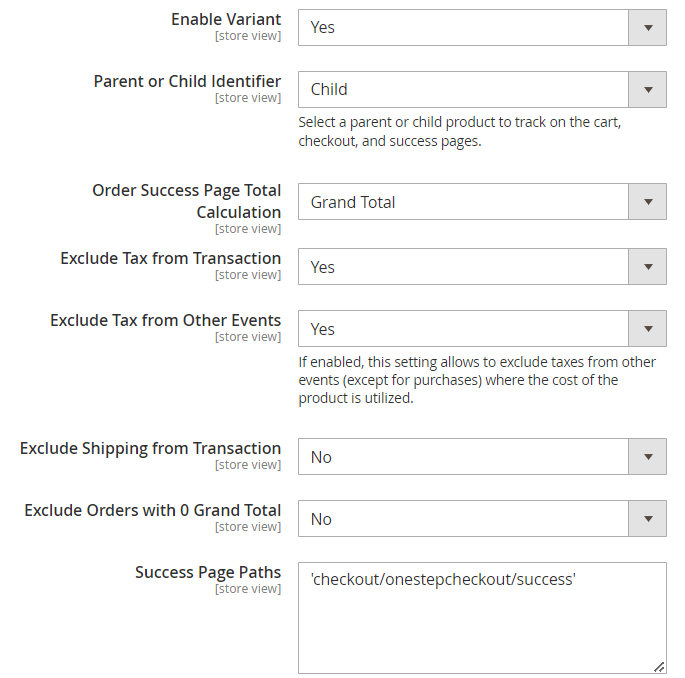
Enable Variant - set to ‘Yes’ to activate product variants tracking.
Parent or Child Identifier - select a child / parent product to track on the cart, checkout, and success pages.
Order Success Page Total Calculation - calculates total amount on success page based on Subtotal or Grand Total.
Exclude Tax From Transaction - specify whether to exclude or not the tax amount from transactions.
Exclude Tax from Other Events - if enabled, this setting allows to exclude taxes from other events (except for purchases) where the cost of the product is utilized:
- add_to_cart
- add_to_wishlist
- begin_checkout
- remove_from_cart
- select_item
- select_promotion
- view_cart
- view_item
- view_item_list
- view_promotion
Exclude Shipping From Transaction - specify whether to exclude or not the shipping amount from transactions.
Exclude Orders with 0 Grand Total - set to ‘Yes’ to exclude orders with 0.00 value from purchase transactions.
Success Page Paths - in case you have a custom checkout and the path of the success page differs from the default Magento path of 'checkout/onepage/success', you can mention the custom path here to ensure that the transaction data is sent to GTM.
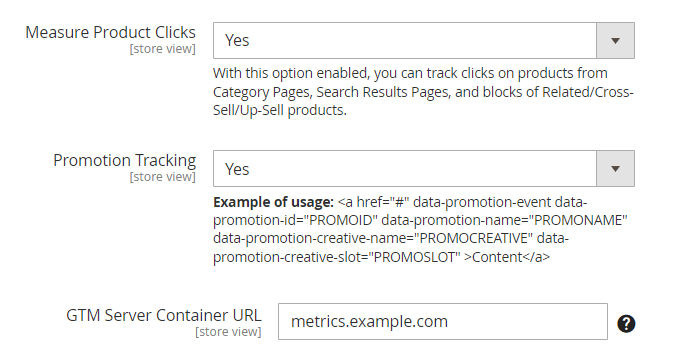
Measure Product Clicks - enable this option to track clicks on products from Category Pages, Search Results Pages, and blocks of Related/Cross-Sell/Up-Sell products.
Promotion Tracking - set to ‘Yes’ to enable promotion tracking.
Promotion Tracking code example:
<a href="#" data-promotion-event data-promotion-id="PROMOID"
data-promotion-name="PROMONAME"
data-promotion-creative-name="PROMOCREATIVE"
data-promotion-creative-slot="PROMOSLOT" >Content</a>
To track the promotion events for the particular block, add the promotion tracking code to the main/root tag of this block.
GTM Server Container URL - the extension supports both Client-side tagging and Server-side tagging. Client-site tagging is used by default. Therefore if you want to continue using this type of tagging, just leave this field empty. But if you want to use server-site tagging, you should enter a subdomain for your server container in this field. Please follow the link to configure this possibility.
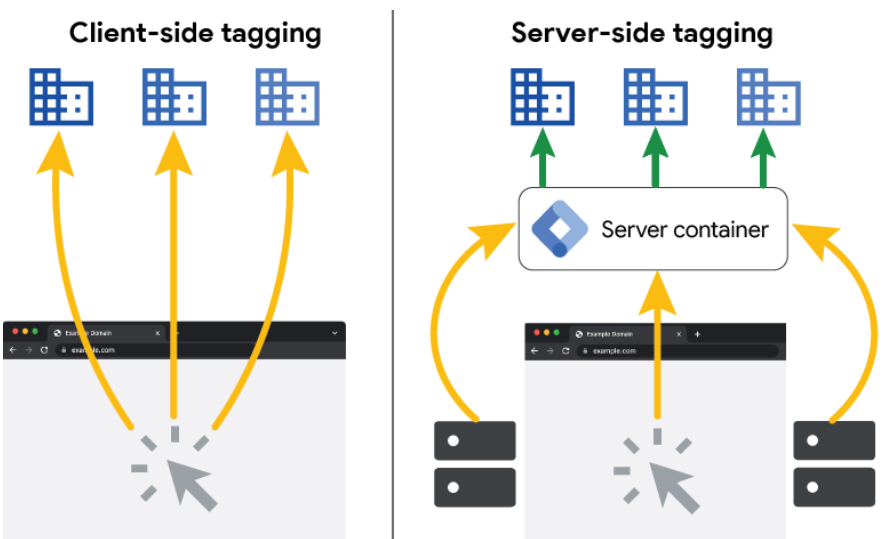
What is the difference between Client-side tagging and Server-side tagging?
In client-side tagging, a single container resides on the website or app. The container holds all tags, triggers, variables, and related code used to measure user interactions. When a user visits a page, the container is activated and loads the related tags. When the user performs an action that triggers a tag, the event data gets dispatched into one or more HTTP requests from the browser or device to your Google products or advertising partners.
Server-side tagging uses two containers: Web container that resides on the website or app and server container that resides in a cloud environment. The web container hosts only the tags necessary to monitor and dispatch information about user interactions and generate events as HTTP requests. The server container accepts all HTTP requests from the web container. In the server container, you can set up processing rules before sending data to your Google products or third-party endpoints.
Refer this documentation for more information.
The extension also tracks events associated with customer groups. The information regarding customer groups is collected and transmitted to Google Analytics 4 automatically.
Custom Dimension
The extension provides you with the possibility to track custom dimensions thus enabling you to analyze and advertise using the custom data you've gathered from your website. A custom dimension or metric goes beyond the standard data automatically collected and surfaced by Google Analytics, allowing for more detailed and relevant analysis.
Item-Scoped Dimensions
The GA4 Item scoped dimensions are used to capture detailed information about individual products or services within e-commerce events.

Custom Item-Scoped Dimensions - here you can select the custom attributes that will be transmitted to Google Analytics. The Code value must match the Item Parameter set in GA4 under 'Custom Definitions' to ensure data is correctly processed and displayed in reports. Please find more information here.
Please note, that due to Google limitations, only 10 item-scoped parameters can be sent to Google Analytics 4. Please consider this when selecting attributes, as the “Tracking Reviews Count” and “Tracking Reviews Score” settings will also be included in this scope if they are enabled.
Tracking Reviews Count - set to 'Yes' to enable the reviews count tracking. But first, for correct functioning, please create item-scoped custom dimensions in your Google Analytics account. Use the item parameter 'reviews_count' for this dimension.
Tracking Reviews Score - set to 'Yes' to enable the reviews score tracking. But first, for correct functioning, please create item-scoped custom dimensions in your Google Analytics account. Use the item parameter 'reviews_score' for this dimension.
Item-Scoped Dimensions are not tracked when using 'Tracking via Measurement Protocol'.
Event-Scoped Dimensions
Event-scoped dimensions provide insights into the context surrounding a specific user event (e.g., purchase, video play). They capture details specific to user actions (events) on your website.

Tracking Order ID - set to 'Yes' to enable the tracking of Order ID. But first, for correct functioning, please create event-scoped custom dimensions in your Google Analytics account. Use the event parameter 'order_internal_id' for this dimension.
The module automatically tracks the Order ID as the transaction_id, but this setting 'Tracking Order ID' within custom event-scoped dimensions enables tracking of the Order ID from the pref_sales_order database table.
While the Order ID from Magento's orders table is tracked as the transaction_id parameter, the Order ID from the pref_sales_order table is specifically tied to the custom Tracking Order ID setting.
Tracking Page Name - set to 'Yes' to enable the tracking of Page Name. But first, for correct functioning, please create event-scoped custom dimensions in your Google Analytics account. Use the event parameter 'page_name' for this dimension.
Tracking Page Type - set to 'Yes' to enable the tracking of Page Type. But first, for correct functioning, please create event-scoped custom dimensions in your Google Analytics account. Use the event parameter 'page_type' for this dimension.
Tracking via Measurement Protocol
With the Google Analytics 4 with GTM Support extension you can send events directly to Google Analytics servers via HTTP requests, allowing you to more effectively utilize web streams and gain a more comprehensive understanding of your customers' behavior on the website and in applications. To enable this functionality, please adjust the settings below.

GA4 API Secret - fill in the GA4 API Secret, generated on the Admin page in your Google Analytics Account. More information on how to generate API secrets here.
Track Events - select the events you want to track via Measurement Protocol. The current list of events is as follows:
- Purchase
- Refunds
- Sign Up
- Login
- View Item
- View Item List
- Select Item
- Add To Wishlist
- Add To Cart
- Remove From Cart
- View Cart
- Begin Checkout
- Add Shipping Info
- Add Payment Info
Enable Events Delayed Dispatch - Select 'Yes' to create a queue for event dispatch (the events will be sent via the MessageQueue consumer “amasty_google_analytics4.track”). Select 'No' to send events immediately as soon as they are triggered.
Google AdWords Conversion
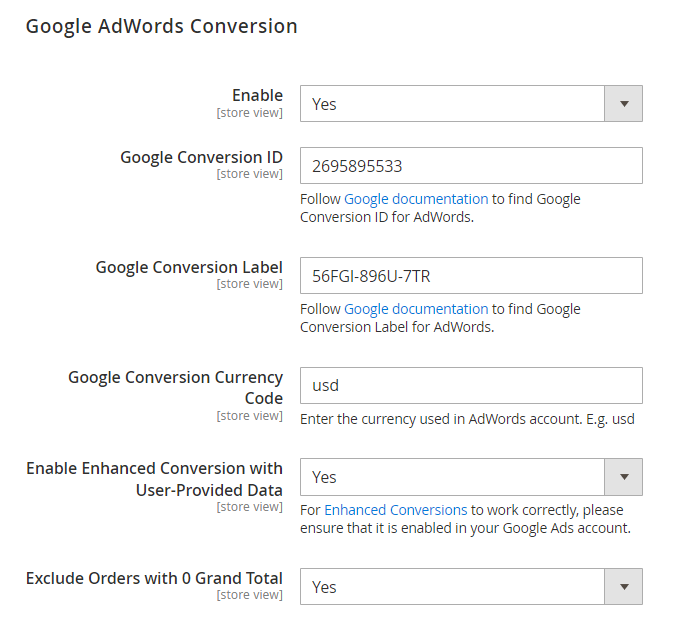
Enable - set to 'Yes' to enable functionality of Google Adwords conversions tracking.
Google Conversion ID - paste the Google Conversion ID from your Google Ads account.
Google Conversion Label - paste the Google Conversion Label from your Google Ads account.
How to find Conversion ID and Conversion Label?
- Sign in to your Google Ads account
- In your Google Ads account, click the Goals menu.
- Select Summary, which opens the Conversion Actions table.
- Select the name of the conversion that you want to use from the Conversion action column.
- Expand the tab for Tag setup to view the tag details.
- Select Use Google Tag Manager.
- Copy the Conversion ID and Conversion Label.
Find more information in Google documentation.
Google Conversion Currency Code - enter the currency used in AdWords account. For example: USD, EUR, etc.
Enable Enhanced Conversion with User-Provided Data - set to 'Yes' to enable the functionality. Enhanced conversions is a feature that can improve the accuracy of your conversion measurement and unlock more powerful bidding. It supplements your existing conversion tags by sending hashed first-party conversion data from your website to Google in a privacy-safe way. The feature uses a secure one-way hashing algorithm called SHA256 on your first-party customer data, such as email addresses, before sending to Google.
For Enhanced Conversions to work correctly, please ensure that it is enabled in your Google Ads account.
This functionality will become available after the admin performs an export-import of the JSON file into GTM.
Exclude Orders with 0 Grand Total - set to 'Yes' to exclude orders with 0 Grand Total so that they don't affect the conversion.
Google AdWords Remarketing
Make use of this functionality to collect in-depth analytics for your contextual advertising across search engines and websites.

Enable - set to 'Yes' to enable Google AdWords Remarketing tracking.
Google Conversion ID - input your Google Conversion ID here. Follow Google documentation to find Google Conversion ID for AdWords Remarketing.
Enable Dynamic Remarketing - set 'Yes' to enable dynamic remarketing. For Dynamic Remarketing to work correctly, please ensure that it is enabled in your Google Ads account. The events that trigger data sending are:
- view_item_list
- view_item
- add_to_cart
- purchase
Json Export Options
To transfer data from GTM to the analytics suite, you need to create GTM tags. You can do this manually in GTM service or use the Json Export Options section in your Magento store. This provides configuration for GA4.
Firsty you need to generate and export the file.

Click the button Generate and Download Json for Variables, Triggers and Tags in the extension configuration settings. After that, you can upload that file to Google Tag Manager to create and import Tags, Triggers, Variables.
Make sure your settings changes are saved to download the updated data file.
Import Container
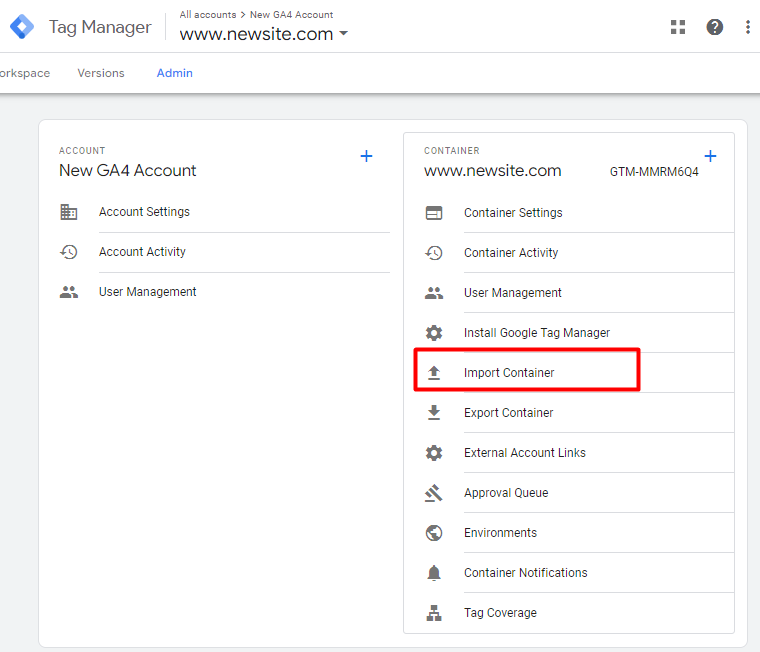
To import the container, navigate to your Google Tag Manager Dashboard, access the Admin section and choose the Import Container section.
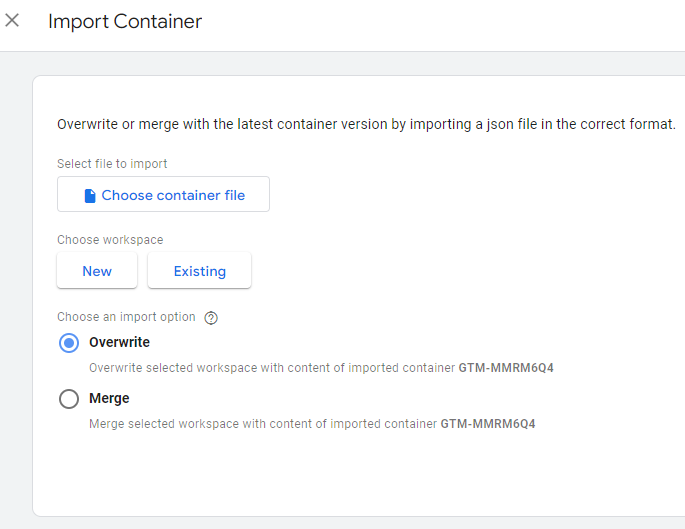
Click on the Choose container file button and upload your previously generated and downloaded JSON file here. Then, choose a workspace (you can choose an existing workspace or create a new one) and an import option.
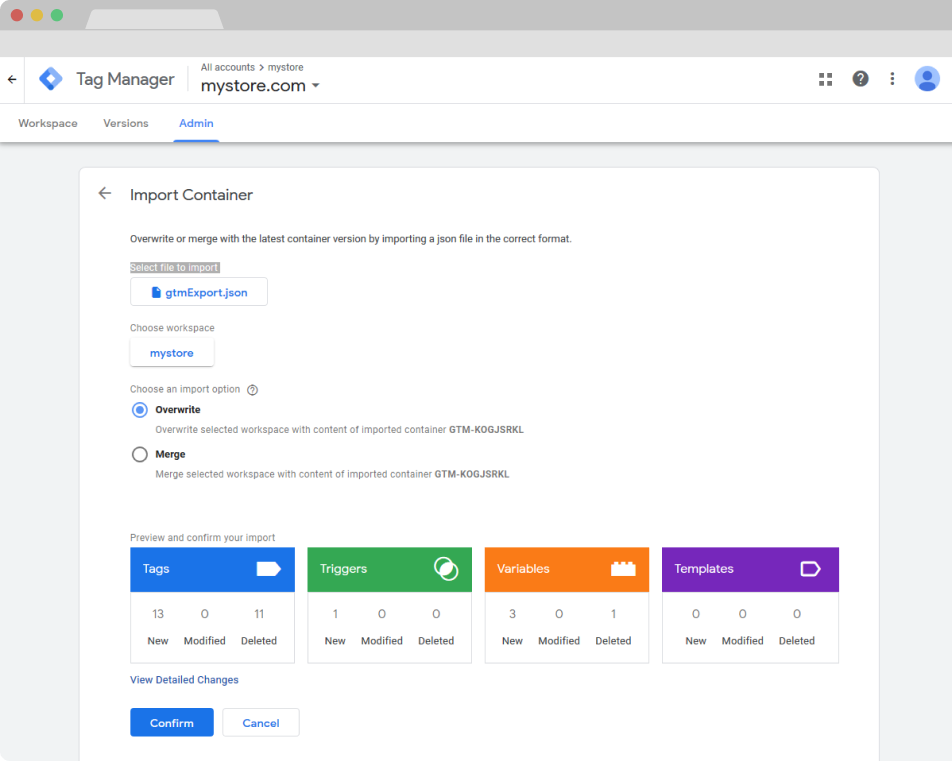
After importing the generated JSON, a preview will show up letting you know the number of changes made to the container. There should be Tags, Triggers and Variables created or updated in various amounts depending on your Magento Admin settings. Click Confirm and the settings import is complete.
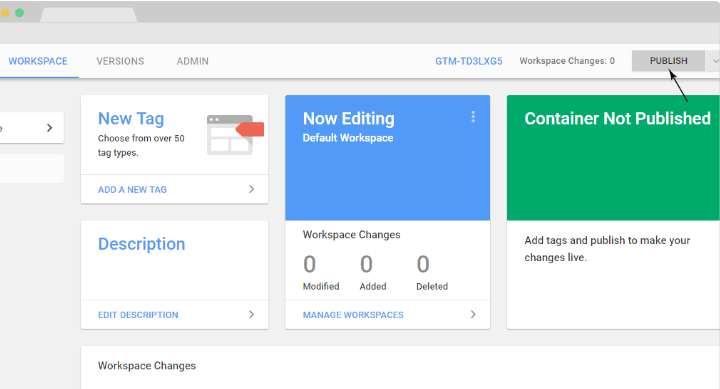
Once all your tags have been imported into Google Tag Manager, return to your GTM account and click Publish/Submit at the top of the page. If the container is not published or submitted in your GTM account, no tracking will be available.
You can also refer to this documentation to explore more about Container Import in Google Tag Manager.
To check if all needed events were imported successfully, go to your Google Analytics account and see available events in Engagement reports or Real Time reports. But please consider that it may take 30 minutes to 48 hours for statistics to appear in your Google Analytics account based on the tracked data, according to the GTM documentation. However, real-time data should be visible right away if your account is set up correctly.

List of tracking events:
- login - is triggered when a user logs into their account.
- sign_up - is triggered when a user creates an account.
- add_payment_info - is triggered whenever a user adds their payment information.
- add_shipping_info - is triggered whenever a user adds their address information on the Checkout Page.
- add_to_cart - is triggered whenever a user adds a product to their cart, or when they add to the quantity of a product that's already within their cart.
- add_to_wishlist - is triggered whenever a user adds a product into their wishlist.
- begin_checkout - is triggered whenever a user proceeds to the Checkout Page.
- purchase - is triggered when a user has placed an order and is redirected to the Success Page.
- remove_from_cart - is triggered whenever a user removes a product from their cart, or when they subtract from the quantity of a product that's already within their cart.
- select_item - is triggered when a user clicks on a product contained within a list, such as on your Category Page or a Product Carousel.
- select_promotion - is triggered when a user clicks on a link contained within a block, banner or piece of content tagged as a Promotion.
- view_cart - is triggered when a user navigates to the Cart Page.
- view_item - is triggered when users open up and view one of your Product Pages.
- view_item_list - is triggered when a user views a list of items, such as your Category Page, or a Product Carousel.
- view_promotion - is triggered when a user views a block, banner or piece of content tagged as a Promotion.
According to Google recommendations we added parameter 'value' and 'currency' to the following events: 'add_to_cart', 'add_to_wishlist' and 'remove_from_cart'.
Compatibility with Amasty Cookie Consent (GDPR)
The extension is compatible with Amasty Cookie Consent extension, which means that it is possible to send data to GA4 using conversion modeling and behavior modeling if the user declined cookies. The compatibility works both on Luma Theme and Hyvä Theme including Hyvä checkout.
Note: access to this functionality will be enabled once you update the module Cookie Consent (GDPR) to the version, 2.10.1 or newer.
The Magento 2 Google Analytics 4 extension now provides compatibility with Google Consent Mode V2 (essential for accurate data tracking in advertising and remarketing) when paired with the Magento 2 Cookie Consent (GDPR) extension.
You can adjust the Consent types for Google analytics in the Consent Mode section of the Magento 2 Cookie Consent (GDPR) extension configuration:
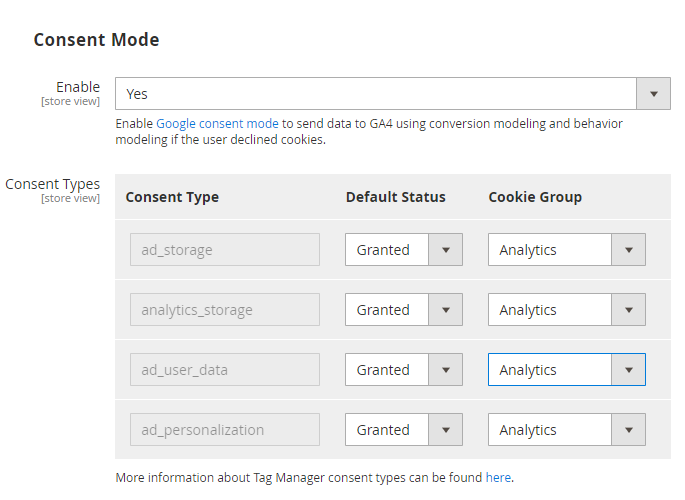
Enable - select 'Yes' to enable Google consent mode to send data to GA4 using conversion modeling and behavior modeling if the user declined cookies.
Consent Types - specify the needed consent types and their settings. You can find more information about Tag Manager consent types here.
- ad_storage - Enables storage (such as cookies) related to advertising.
- analytics_storage - Enables storage (such as cookies) related to analytics e.g. visit duration.
- ad_user_data - Sets consent for sending user data related to advertising to Google.
- ad_personalization - Sets consent for personalized advertising.
Compatibility with Amasty Custom Form
The Google Analytics 4 extension is compatible with our Custom Form extension (you can find the compatibility package for installing in composer suggest). This means that if you have both modules installed, you will be also able to track your website visitors' interactions with custom forms in your GA4 account.
Navigate to Google Analytics 4 extension general settings to enable the compatibility.
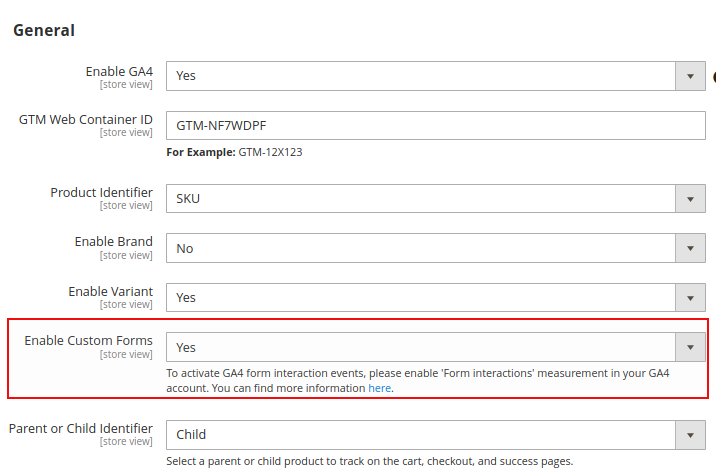
Enable Custom Forms - set to 'Yes' to enable the compatibility with Amasty Custom Form.
With this functionality, you can track the events added by Amasty:
- amasty_customform_open - is triggered when a user opens form
- amasty_customform_close - is triggered when a user closes form
- amasty_customform_ajax_submit - is triggered when a user submits form with Ajax.
Also you can track the inbuilt GA4 form interaction events:
- form_submit - is triggered when a user submits a form
- form_start - is triggered the first time a user interacts with a form in a session
To activate GA4 form interaction events, please enable Form Interactions Measurement in your GA4 Account. Find more information on how to do this here.
Please note, that if the form is submitted with Ajax, the submission will be tracked with the extension 'amasty_customform_ajax_submit' event.
If the form is submitted without Ajax, its submission will be tracked with Google Analytics 4 'form_submit' event.
To ensure proper tracking of Custom Form interaction events - after enabling this feature, you should re-export the JSON file and then import it into Google Tag Manager.
Compatibility with Amasty Promo Banners
The Google Analytics 4 extension is compatible with our Promo Banners extension (you can find the compatibility package for installing in composer suggest). This means that if you have both modules installed, you will be also able to track your customers' interaction with banners .
To configure the tracking, please navigate to Marketing → Promo Banners → Add Banner (or Edit the existing one) → switch to Google Analytics 4 tab.

Enable the compatibility and complete all the required fields (Promotion ID, Promotion Name, Promotion Creative, Promotion Position). The code containing these values will be added to the tag, allowing the interaction with the banner to be tracked accurately.
Additional packages (provided in composer suggestions)
To make additional functionality available, please install the suggested packages you may need.
Available as a part of an active product subscription or support subscription:
amasty/module-ga4-hyva- Install this package to ensure Google Analytics extension works with Hyva Theme.
amasty/module-ga4-hyva-checkout- Install this package to ensure Google Analytics extension works with Hyva Checkout.
amasty/module-google-consent-mode- Install this package for Google Consent Mode compatibility.
amasty/module-promo-banners-ga4- Install this package for Google Analytics 4 events integration with promo banner interactions.
Find out how to install the Google Analytics 4 with GTM Support extension for Magento 2 via Composer.
magento_2/google_analytics_4_with_gtm_support.txt · Last modified: 2025/05/23 08:13 by asemenova
