
Sidebar
magento_1:customer_attributes
Table of Contents
For more details see the Customer Attributes extension page.
Guide for Customer Attributes
Customer Attributes Magento extension enables you to get extra information from your customers. Provide additional field on the registration page and collect valuable customers' information like age, preferences, interests, and more. Receive documents and other information that you may need.
- Equip registration page with unlimited number of additional fields
- Manage collected data from the admin panel
- Support for multiple field types and dependent attributes
- Activate new customers' accounts
- Implement an effective customers' segmentation
Creating New Customer Attributes
To create a new attribute please go to Customers → Manage Attributes in the admin panel and click the Add New Attribute button to create an attribute.
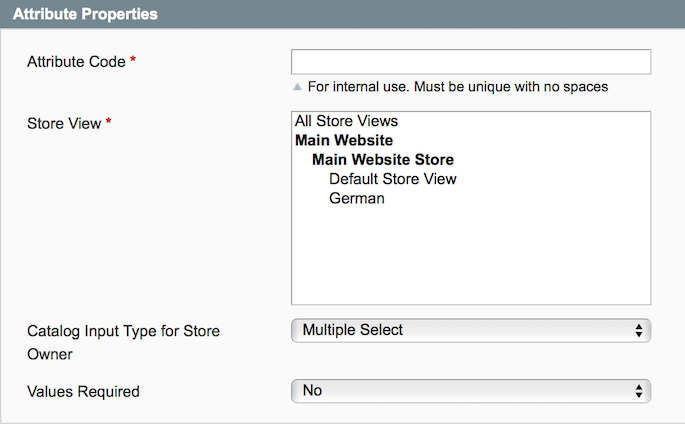
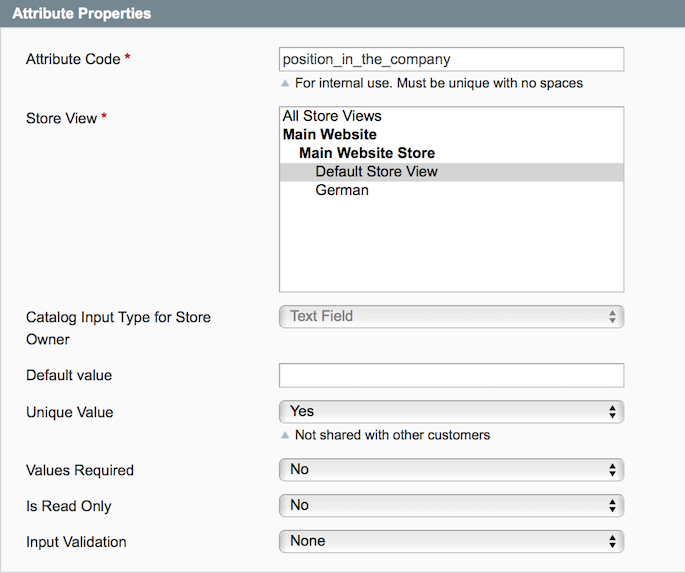
First, specify the Attribute Properties:
Attribute Code — fill in the unique attribute code with no spaces;
Store View — define the store view to apply the attribute to;
Catalog Input Type for Store Owner — choose the input type and configure it settings. See extra settings for various attribute types below;
Values Required — set the value as required for customers.

Then, define the Attribute Configuration:
Show on the Customers Grid — add the attribute column to the customers grid;
Show on the Orders Grid — add the attribute column to the orders grid;
Show on the Order View page — add the attribute to the order view page;
Show on the Account Information page — add the attribute to the account information page;
Show on the Billing page — add the attribute to the billing page;
Show on the Registration page — add the attribute to the registration page;
Sorting Order — define the attribute's sorting order.
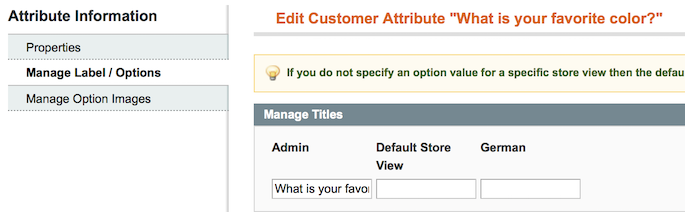
Then, switch to the Manage Label / Options tab. Here, you can indicate the attribute's title for the admin panel and different store views.
Attributes with Images
For Multiple Checkbox Select with Images and Single Radio Select with Images field types you can also upload images for each option (this is not mandatory).

When you’ve indicated all the necessary options for Multiple Checkbox Select with Images (or Single Radio Select with Images) field type attribute, please press the Save and Continue Edit button. Manage Option Images tab should appear.
If you would like to create checkbox attribute or radio button attribute without images, just press Save Attribute without uploading the images.
Switch to the Manage Option Images tab to upload images for the options. Select images to upload from your computer. After you’ve chosen images for all the options, please press the Update Images button, otherwise images will not get uploaded.
When the images are uploaded, press the Save Attribute button to save the attribute.
Static Text Attributes
Use the Default Value to fill in the text. You can display text to customers on registration or customer account page.
Single File Upload Attribute

For the Single File Upload attribute you can specify the Max File Size, Image Dimensions and File Types that will be supported.
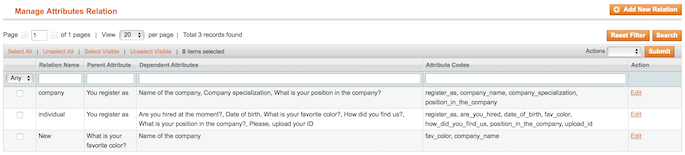
Customer Attributes Grid
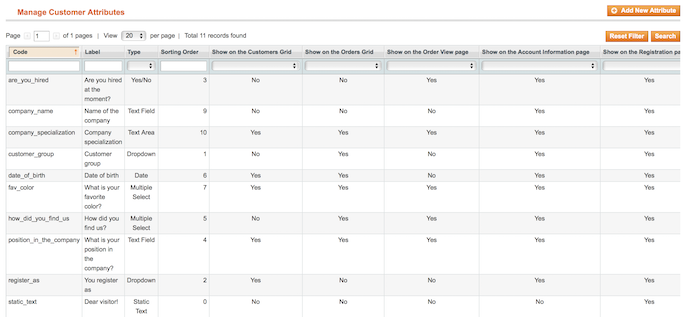
All created customer attributes are available on the attributes grid. Navigate to Customers → Manage Attributes to see the grid. Here, you can find attributes and their values.
Creating a New Dependent Attribute
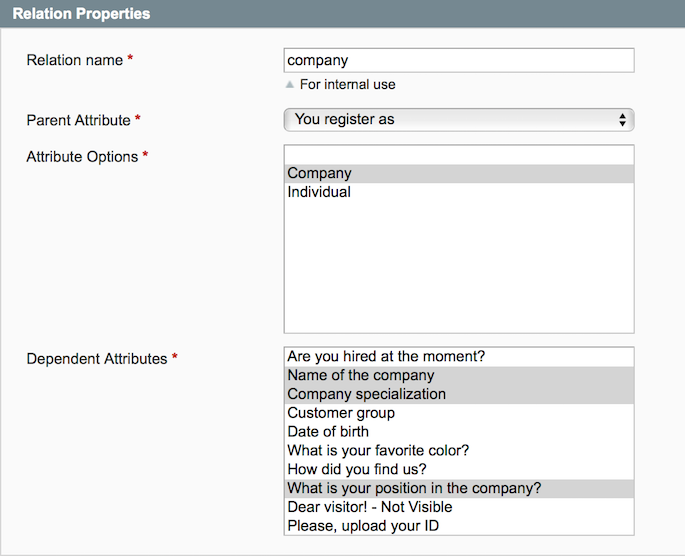
To create dependencies between attributes please go to Customers → Manage Attributes → Manage relations. To add a new relation please click the Add New Relation button.
Relation Name — fill in the relation title;
Parent Attribute — select the parent attribute;
Attribute Options — choose to which attribute value the dependent attributes should be assigned;
Dependent Attributes — choose the dependent attributes. The fields selected here will be displayed only when a customer selects the specific attribute option that we set above.
Customer Attributes Reports
To see Customer Attributes Reports please go to Customers → Customer Attributes → Reports. Click on one of the attributes from the grid to see the report.
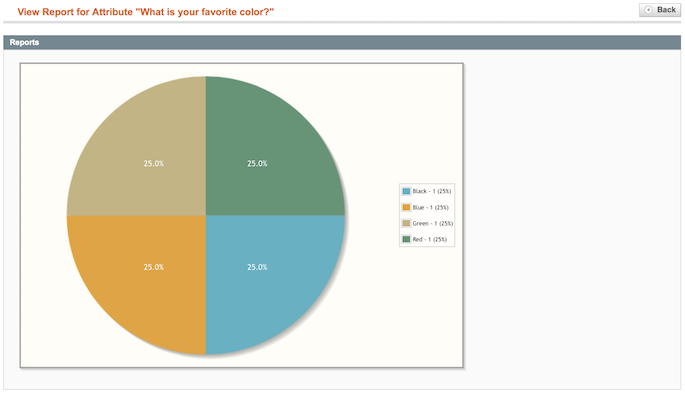
Reports are created only for selectable attributes such as checkboxes, multiple selects, drop- downs and radio buttons.
Customer Attributes for Backend Orders
You can specify customer attributes when creating a customer for orders placed from the admin panel. It’s also possible to add/edit customer attributes for already created orders.
General Extension Settings
To configure the extension please go to System → Configuration –> Customer Attributes.
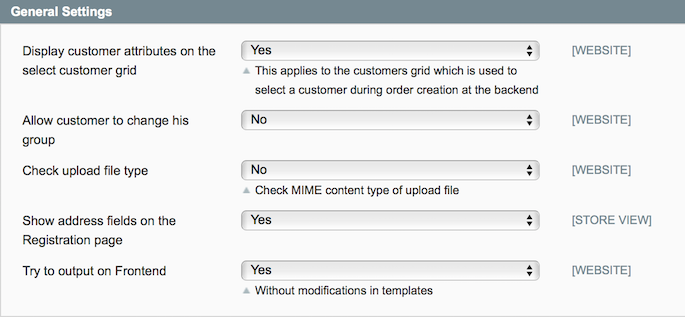
Display customer attributes on the select customer grid — set this option to Yes to see the attributes when you select a customer during order creation from the backend;
Allow customer to change his group — set to No to forbid customers to change the group they belong to;
Check upload file type — enable MIME verification for uploaded files;
Show address fields on the Registration page — enable address fields right on the registration page;
Try to output on Frontend — enable this option to try showing address fields on the registration page without modifying the template.
If you would like to let your customers use a custom attribute for login instead or together with email, please go to System → Configuration –> Customer Attributes and make sure that the Unique Value option for the custom attribute is set to Yes.
Expand the Login Settings section.
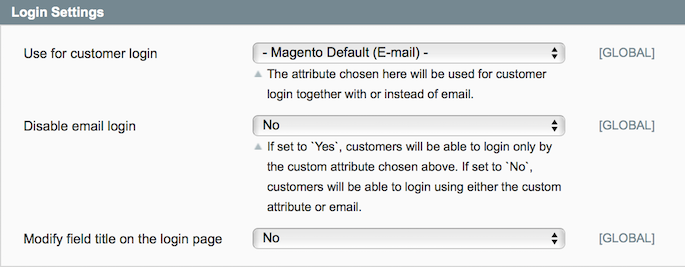
Use for customer login — choose which attribute to use for login;
Disable email login — if you would like to use only the custom attribute for login (not in parallel with email), please set this option to Yes. If you set it to No customers will be able to login using either email or the custom attribute value (in combination with password);
Modify field title on the login page — when set to Yes, label of the login field would say Email Address/Label of the attribute you choose, otherwise the label of the login field would be Email Address.
Expand the Forgot Password Settings section.
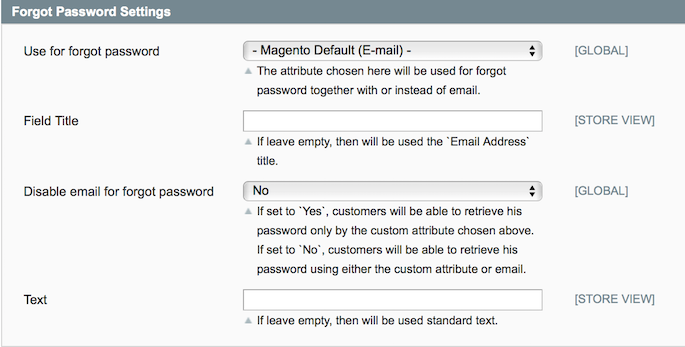
Use for forgot password — choose the attribute that will be used by customers together with or instead of email;
Field Title — fill in the title of the field;
Disable email for forgot password — set this option to Yes and customers will be able to recover the password only with the specified attribute;
Text — fill in the extra text to display.
Expand the Customer Account Activation Settings section.
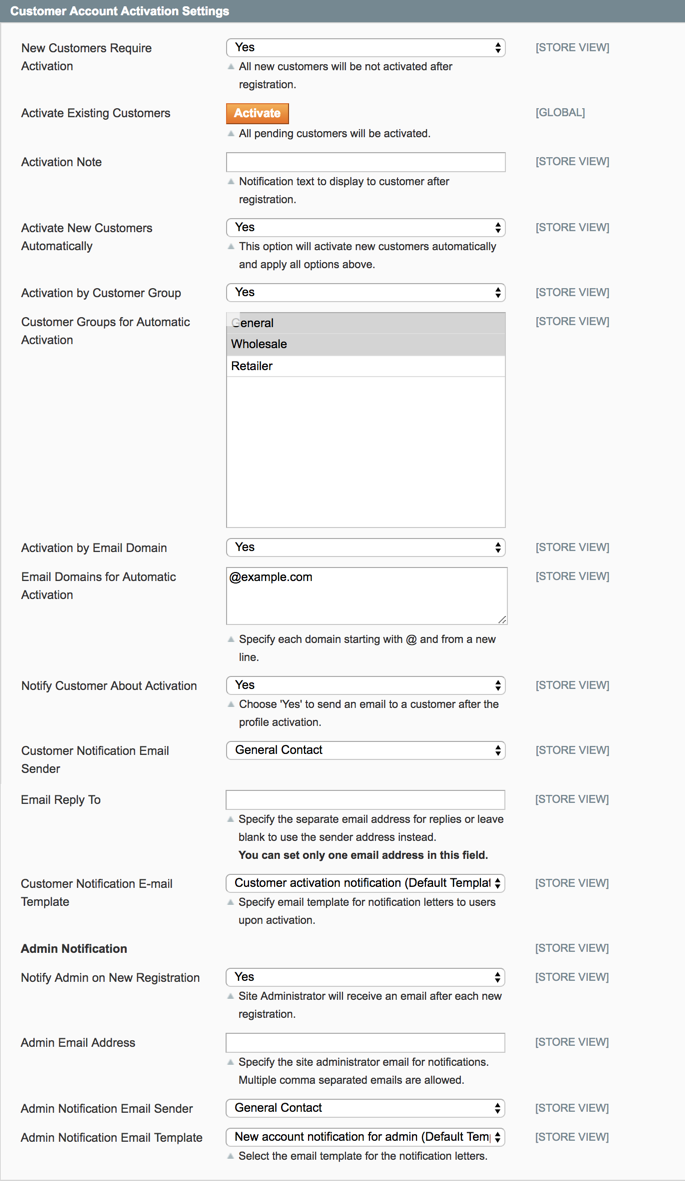
New Customers Require Activation — set this option to 'Yes' to manually activate the accounts of newly registered customers;
Activate Existing Customers — hit the 'Activate' button to immediately activate all registered customers with the 'Pending' status;
Activation Note — specify text that will be displayed to customers after registration;
Activate New Customers Automatically — enable this option to activate new customers automatically using two available conditions;
Activation by Customer Group — enable this option to automatically activate customers that are assigned to particular groups;
Customer Groups for Automatic Activation — select the required customer groups;
Activation by Email Domain — enable this option to automatically activate customers by the email domain;
Email Domains for Automatic Activation — specify email domains here;
Notify Customer About Activation — enable this option to notify customers about activation;
Customer Notification Email Sender — specify the email sender for activation emails;
Email Reply To — specify the address for replies or leave this field blank to use the sender address;
Customer Notification E-mail Template — choose the email template for notifications;
Notify Admin on New Registration — set this option to 'Yes' to get email notifications on every new customer registration;
Admin Email Address — specify the admin email address for notifications;
Admin Notification Email Sender — specify the sender address;
Admin Notification Email Template — choose the template for admin email notifications.
Setting Up Activation Templates
When you‘ve set up email notifications for admin and customers, go to System → Transactional Emails and click the Add New Template button.
Select the appropriate template for each kind of notifications: New account notification for admin or Customer activation notification. Once you’ve chosen the required template, please click the Load Template button.
You can add customer attributes to email templates using variables like:
{{var customer.custom('some_attribute_code')}}
For example, if you have an attribute called username, use the following variable should be added to an email template:
{{var customer.custom('username')}}
To add attributes for guests, the following variable should be added to the email template:
{{var guest.custom('some_attribute_code')}}
Manual Account Activation
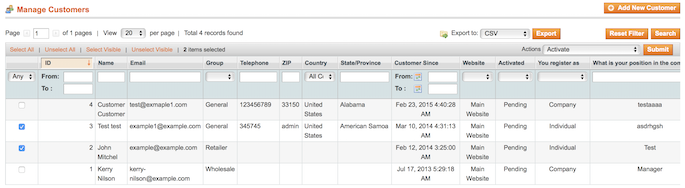
To manually activate customers’ accounts please go to Customers → Manage Customers.
Tick off the customers which need to be activated and select the Activate option from the Action dropdown menu and then click the Submit button.
magento_1/customer_attributes.txt · Last modified: 2020/08/18 06:49 by arhipenko