
Sidebar
magento_2:full_cycle_checkout
Table of Contents
For more details see how the Full-Cycle Checkout for Magento 2 extension works.
Guide for Full-Cycle Checkout for Magento 2
Ultimate checkout solution to enhance every step of the customer lifecycle. A rich set of features desinged to transform complex checkout into a one simple step. See a detailed guide on how to configure a custom checkout page that will increase order completion rate.
- Ensure a smooth and simple checkout process on any device
- Convert guests into registered customers using social login
- Gain valuable information about shoppers by adding extra checkout fields
- Prevent bot traffic to the checkout page with invisible reCaptcha
- Set smart reminders for abandoned carts to return lost customers
- Boost repeat purchases with a custom success page
Full-Cycle Checkout for Magento 2 is fully compatible with GDPR for Magento 2
The extension is read and write GraphQL compatible. Now you can expose and mutate the datasets in Full-Cycle Checkout for Magento 2 via GraphQL queries.
As for now, the following 5 extensions below are included in the Full-Cycle Checkout solution:
- Google Invisible reCaptcha M2 - See user guide →
- Social Login M2 - See user guide →
- Order Attributes M2 - See user guide →
- Abandoned Cart Email M2 - See user guide →
- Thank You Page M2 - See user guide →
The original functionality of these extensions by Amasty is fully available out-of-the-box with the Full-Cycle Checkout. See a guide for each extension for detailed configuration instructions.
>> See how the extensions work together on the Full-Cycle Checkout demo <<
General settings
To start configuring Full-Cycle Checkout, please go to Stores → Configuration Amasty Extensions → One Step Checkout.
Expand the General tab.
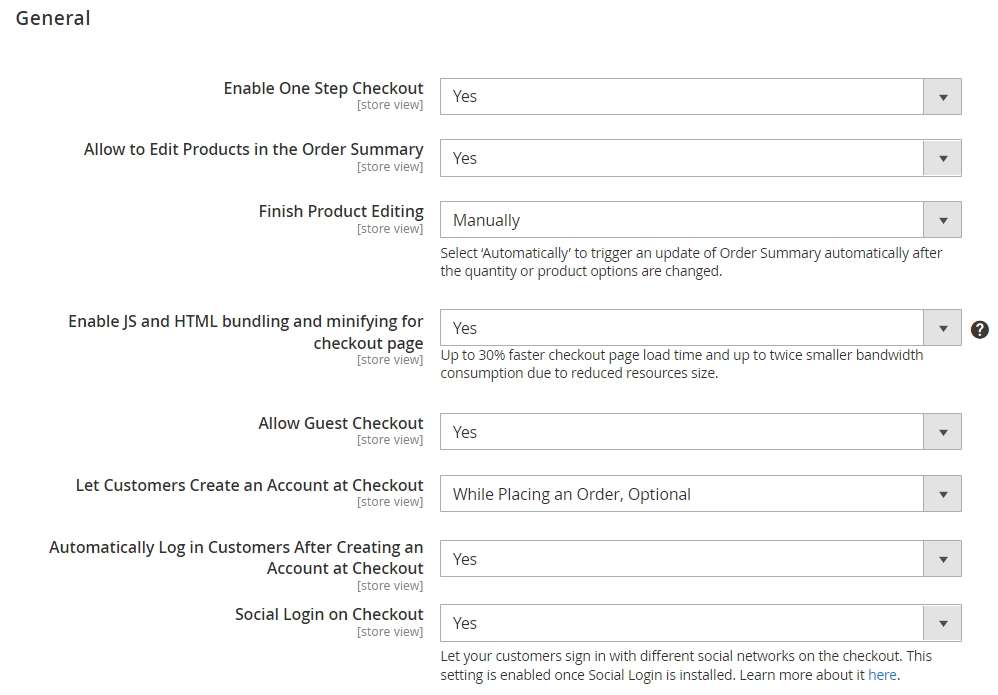
Enable One Step Checkout - set to Yes to activate the extension.
Allow to Edit Products in the Order Summary - choose Yes to allow customers to delete products and change their quantity on the checkout page.
Finish Product Editing - Select ‘Automatically’ to trigger an update of Order Summary automatically after the quantity or product options are changed, or just leave this option in the position 'Manually'.
Enable JavaScript and HTML bundling and minifying for checkout page - set to Yes if you want to allow the extension speed up the checkout loading by minifying JavaScript and HTML code files. This way, when a customer refreshes the page, it will load noticeably faster.
To ensure the Enable JavaScript and HTML bundling and minifying for checkout page works seamlessly, make sure the One Step Checkout Cache is enabled. You can learn more on how to do that in the Cache Management section of the User Guide.
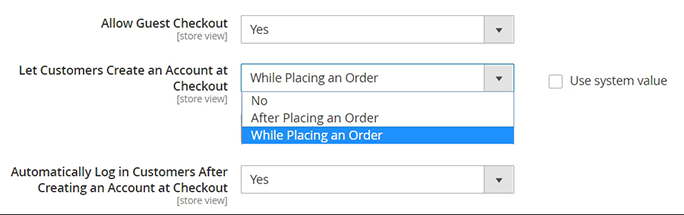
Allow Guest Checkout - enable this option to let your customers fill in the checkout form and create accounts right on the checkout page.
Let Customers Create an Account at Checkout - three options are available:
- No - Select 'No' to forbid the creation of accounts on the checkout page for your guest customers.
- After Placing an Order - If you select 'After Placing an Order', you will also need to enable or disable the 'Create an Account' Checkbox is Checked by Default' option.
- While Placing an Order (optional or required) - To let your guest customers create accounts right on the checkout page, choose the 'After Placing an Order' or 'While Placing an Order' variant. If 'While Placing an Order' is chosen, set 'Yes' in the next field to allow the extension 'Automatically Log in Customers After Creating an Account at Checkout'.
Customers will be presented with the option to check the 'Create an Account' checkbox. If checked, your customer will get an email with account activation instructions after placing the order.
Social Login on Checkout - set to 'Yes' to let your customers sign in with different social networks and other options.
Design
In the Design tab, you can configure all aspects of a one-page-checkout appearance at the frontend.
Text and Default Values
Expand the Text and Default Values tab to adjust Full-Cycle Checkout page title and description, select font and enter default field values if necessary.

Checkout Page Title - specify a custom title for the checkout page.
Checkout Page Description - provide customers with important info, including taxes (e.g. VAT), shipping or any other payment specifics.
Include main keywords for better SEO rankings and use <html> to highlight the important points.
Checkout Text Font - specify the name of a necessary font. Use Google Fonts to pick the one you need quickly.
Then, in the fields below you can specify values that will be preselected on the checkout page by default to speed up the checkout process. The Default Values settings are optional. Therefore, you can display only those values that meet your specific requirements.
With the Full-Cycle Checkout extension you can set default values for the following fields:
- Shipping method - choose Fixed or Table Rate method according to your website needs;
- Payment method - specify the necessary method to be chosen by default.
You can also set the necessary default values for the Country, Region/State, Zip/Postal Code and the City. Use the handy dropdown menu.
To prevent issues with displaying outdated payment information when a customer changed their payment method on checkout, please do the following. First, set to ON the Display Billing Address setting on Payment Page. Second, set to ON the Tax Calculation Based setting in Billing.
This way, payment total information will be updated right away as a customer changed billing details.
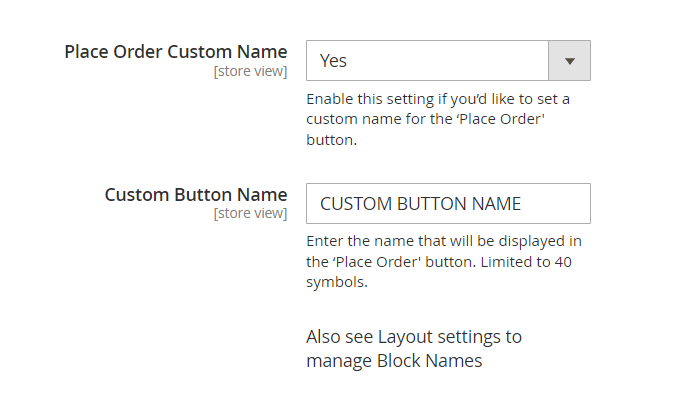
Place Order Custom Name - Enable this setting if you’d like to set a custom name for the ‘Place Order' button.
Custom Button Name - Enter the name that will be displayed in the ‘Place Order' button. Limited to 40 symbols.
Layout
The Layout tab includes options regarding the style of the checkout page. Select the checkout design and layout and re-order blocks as you want to customize the checkout flow for your business.
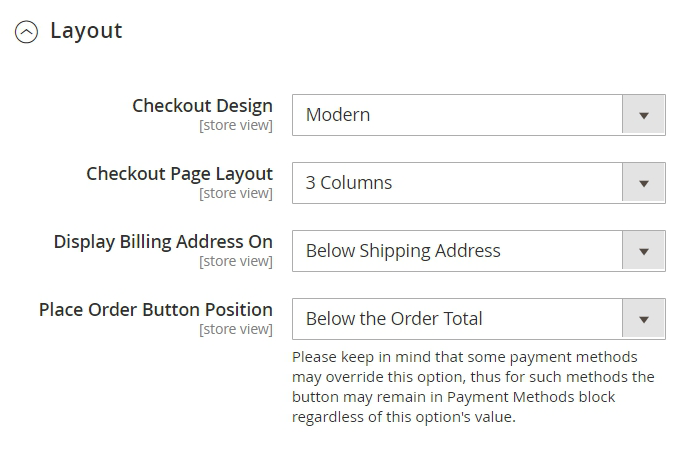
Checkout Design - select either the Modern or Classic design. Depending on which design you choose, the offered Checkout Page Layout will differ.
Checkout Page Layout - define the checkout page blocks that will be displayed. Possible options:
- Classic Theme - 2 columns, 3 columns.
- Modern Theme - 1 column, 2 columns, 3 columns.
Please keep in mind that, for 3 Columns layout, the third column will be displayed only if Customer's Order may require shipping (contains non-Virtual products, in most cases).
Display Billing Address On - choose where to display the billing address: either on Payment Method or on Payment Page or Below Shipping Address.
Place Order Button Position - place the button either below the order total or below the selected payment method.
When selecting 'Below the Order Total' option, beware that, besides re-positioning, Place Order button behavior may slightly change. Because of that, it may impact your customers' checkout experience, especially in case you use any third-party payment integrations. If you experience any unexpected issues, please switch to 'Below the Selected Payment Method' option.
To set the order for the checkout blocks and customize their names to improve the checkout flow, adjust the Re-order blocks via drag and drop section. In this section, you can easily rename and reorder the blocks according to your needs via drag and drop function.
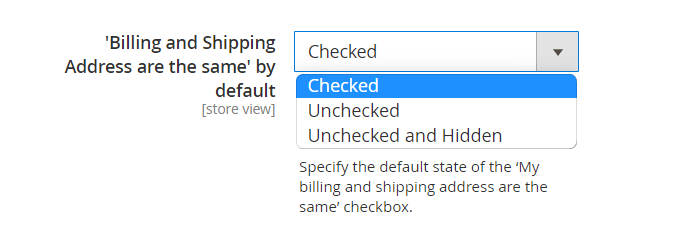
'Billing and Shipping Address are the same' by default - Specify the default state of the ‘My billing and shipping address are the same’ checkbox. Three options are available:
- Checked;
- Unchecked;
- Unchecked and Hidden.
Re-order blocks via drag and drop - To set the order for the checkout blocks and customize their names to improve the checkout flow, adjust the Re-order blocks via drag and drop section. In this section, you can easily rename and reorder the blocks according to your needs via drag and drop function.

See how to specify the order and names of checkout fields here.
Address Formatting
Configure the way address information will be formatted and shown at the frontend.
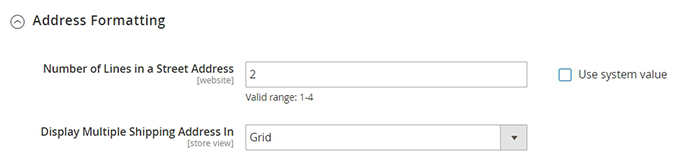
Number of Lines in a Street Address - specify the number of lines for a 'Street Address' field. The max number to specify is 4. If you use system value, 2 lines will be set by default.
Display Multiple Shipping Address In - allows displaying billing address form in the customer information block below shipping address (if it differs from the shipping address).
If this option is grayed, please update your Magento to version 2.2 or newer to make this setting available.
Color Scheme
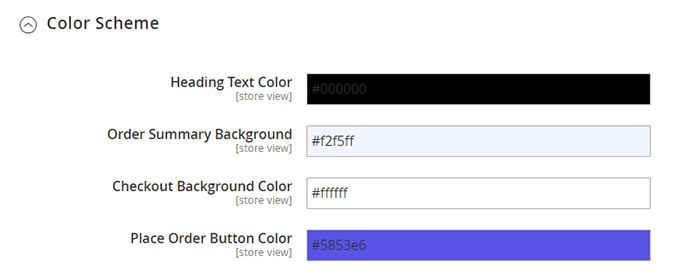
Customize your checkout page style. With a handy color picker tool you can select colors for:
- Heading Text;
- Order Summary Background;
- Checkout Background Color;
- Place Order Button Color.
To select a color for a particular field click on the field and the color picker tool will appear.
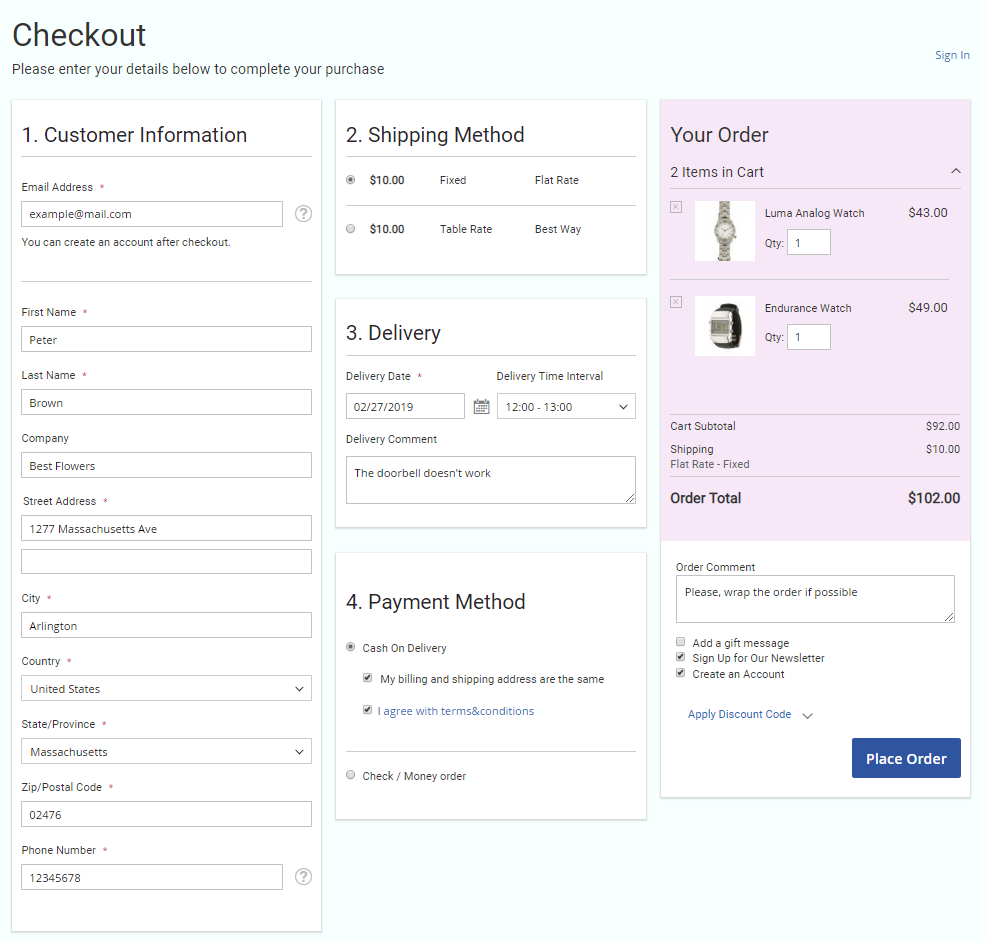
Here is an example of a custom checkout page design.
Additional Fields and Other Extras
To show extra care to your customers with order comments, newsletter subscription and other additional fields, expand the Additional Options tab.
All additional options will be displayed in the Order Summary Block on a checkout page.

Discount Field - let customers apply promo codes at the checkout.
The module updates the types of available shipping methods automatically after a coupon code is added. For example, you might want to allow free shipping if the user applies FREESHIPPING coupon. Now, the extension automatically re-calculates the available shipping options without additional page reloading.
Newsletter Checkbox - display the newsletter subscription checkbox.
Newsletter is Checked by Default - set the option to Yes to make the Newsletter Subscription option ticked by default.
Enable Terms and Conditions - set to Yes if you want to display Terms and Conditions checkbox.
Terms and Conditions Checkbox Positioning - if Yes, specify the position of the checkbox: Below the selected payment method or Below the Order Total.
Before you choose the position of the Terms&Conditions, check that:
- Your Terms&Conditions settings are enabled. (Stores > Settings > Terms and Conditions, select the condition you've created previously and change the status to Enabled).
- Select 'Manually' in the 'Applied' field if you want to display Terms&Conditions with a checkbox. If you choose the option 'Automatically', customers could only read the conditions.

- Your Terms&Conditions can be displayed at the checkout.(Stores > Configuration > Sales > Checkout)

This is how the additional options are displayed on the checkout page:
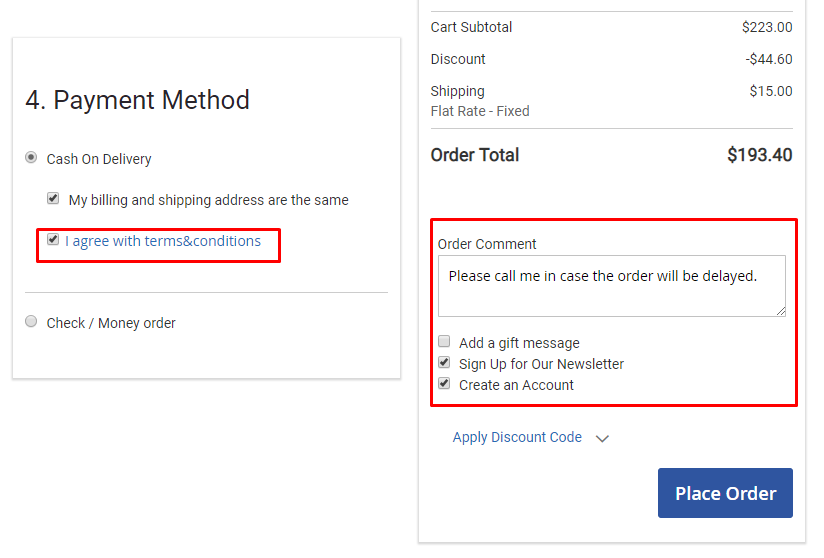
Order Comment - enable the option to let customers add comments to their orders right on the checkout page.
If you want to perform a more complex configuration and need to have advanced control over your order attributes, go to the settings page of Amasty Order Attributes module.
Optional UI Elements
To configure the display settings for the CMS block, go to Optional UI Elements in the Design tab.

Display Header and Footer - select Yes to display the header and footer blocks on the checkout page.
It may be necessary to flush your Magento Cache for the changes to take effect.
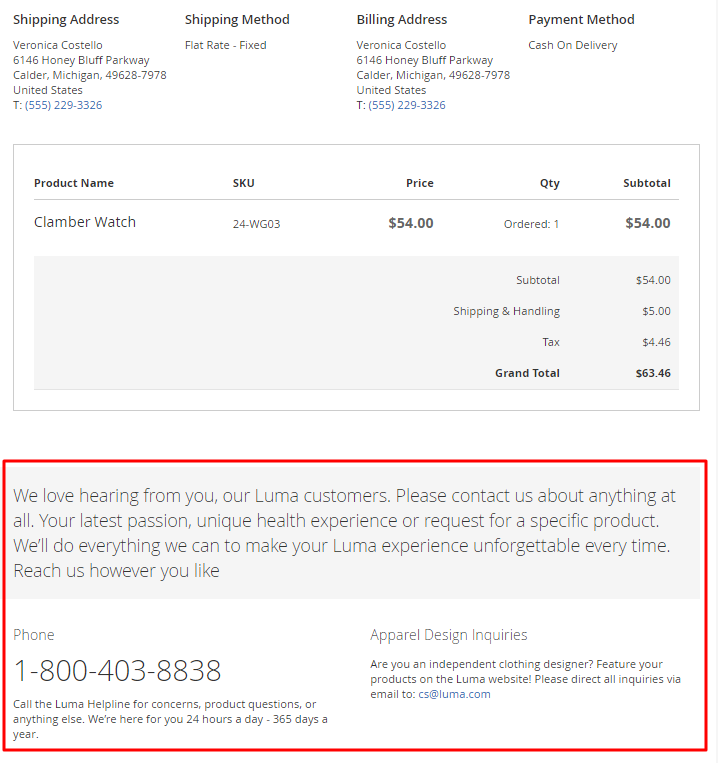
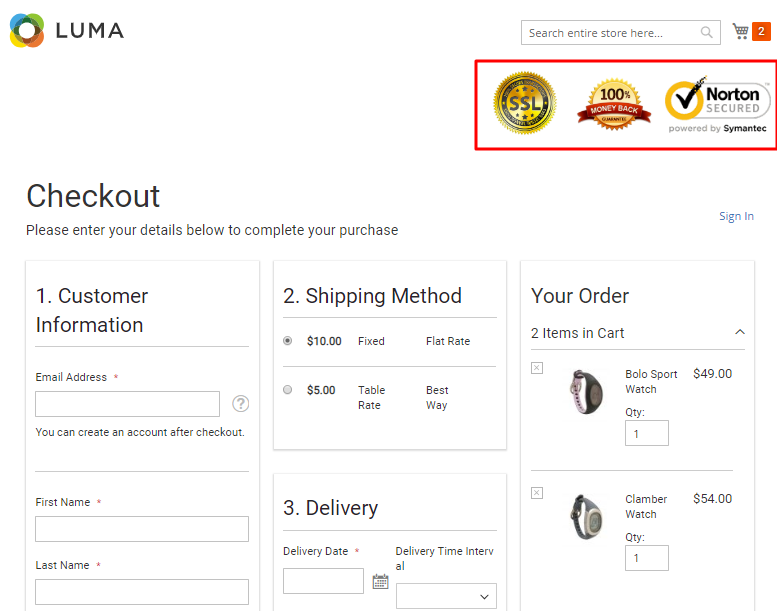
You can choose a CMS block, that you would like to be displayed at the top or bottom of the checkout. With this feature, you can add any additional information on the checkout page: trust seals, phone numbers, delivery conditions, etc.
To create a custom block, log in as an admin and go to Content → Blocks.
Top Block - select a CMS block that will be displayed above the checkout.
Bottom Block - select CMS block that will be displayed below the checkout.
Success Page Custom Block - specify the CMS block you want to display on the checkout success page.
Here is the example of Contact Us Info CMS Block on the Success Page:
And this is how the Top Block on the checkout page is displayed:
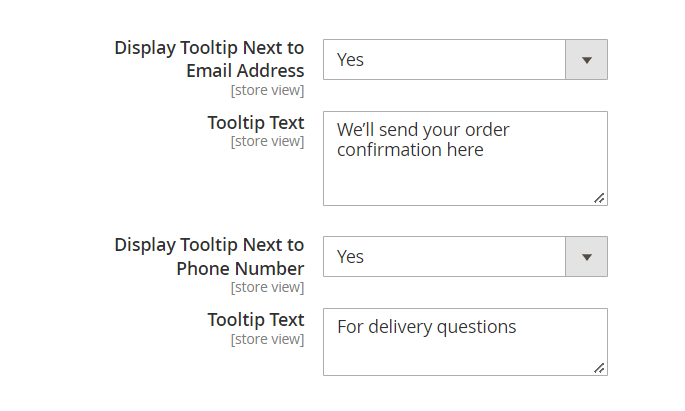
Display Tooltip Next to Email Address - Set this setting to 'Yes' to display custom tooltip text next to the email address area.
Tooltip Text - Use this field to specify the tooltip text for the 'Display Tooltip Next to Email Address' setting.
Display Tooltip Next to Phone Number - Set this setting to 'Yes' to display custom tooltip text next to the phone number area.
Tooltip Text - Use this field to specify the tooltip text for the 'Display Tooltip Next to Phone Number' setting.
Delivery Date
Let your clients indicate the most convenient day and time interval for the order delivery.
You can enter or edit the delivery information from the backend. To do so, click on the Edit Order button or create a new order. If you are editing the existing order, it will be canceled and a new order with the same data will be created. Then, fill in the required fields with relevant information.
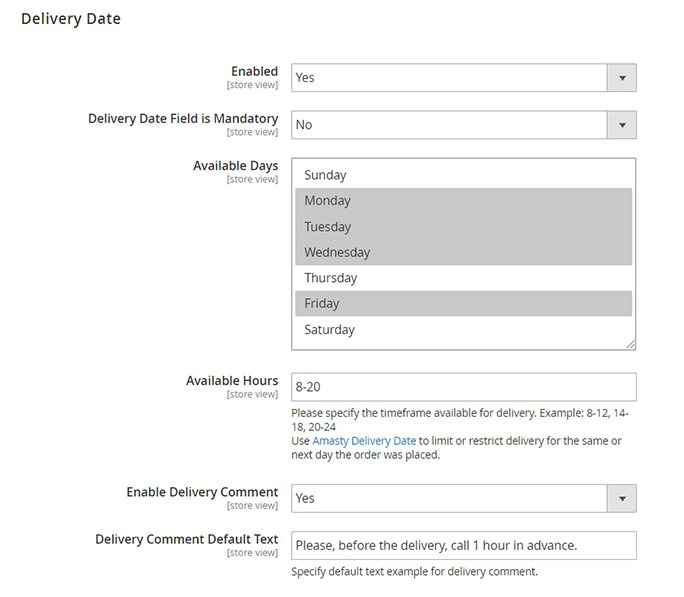
Enabled - set Yes to show Delivery Block to customers.
Delivery Date Field is Mandatory - set 'Yes' to make the delivery date field obligatory.
Available Days - specify days available for delivery. In the example, only Monday, Tuesday, Wednesday and Friday are available for delivery.
Available Hours - specify time intervals available for delivery. You can list them and separate them by a comma.
Use Amasty Delivery Date to limit or restrict delivery for the same or next day the order was placed.
Enable Delivery Comment - set 'Yes' to display the delivery comment field right below the delivery date and time information.
Delivery Comment Default Text - here you can specify the placeholder text that will be shown as an example in the delivery comment field.
See the example of the Delivery block on the frontend.
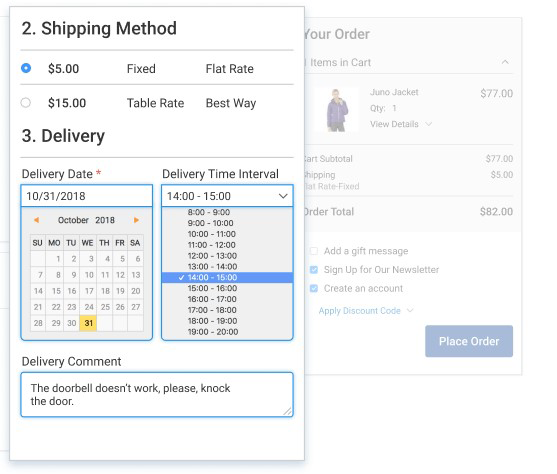
Customers will be able to select delivery days and time intervals and also leave a delivery comment.
Geolocaion
To configure automatic location detection for your customers, expand the Geolocation tab.

Geo IP Location - enable this option if you want to detect the user country automatically based on the IP address.
Google Address Autocomplete
To use the Google Address Autocomplete option please go to Stores → Configuration → Amasty Extensions → Google Address Autocomplete.
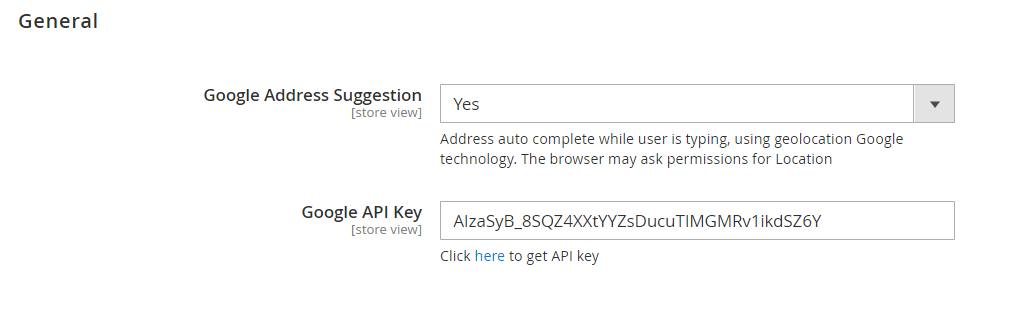
Google Address Suggestion - use this option to show automatic address suggestions once a customer starts typing in the address field.
Google API Key - to enable the Address Autosuggestion option you need to specify your your API key in this field.
How to get API key?
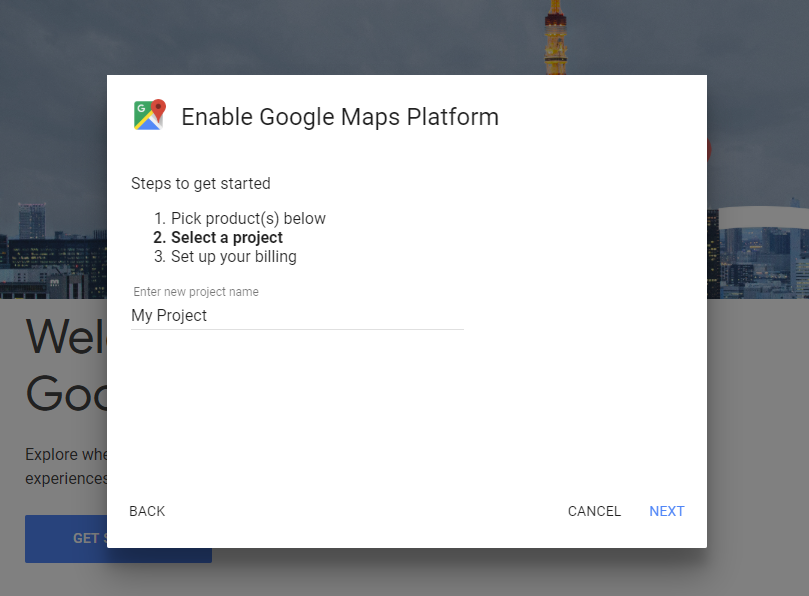
The API key is required to use Address Auto Suggest. To get an API key, you need your Google account. Create Google App here.
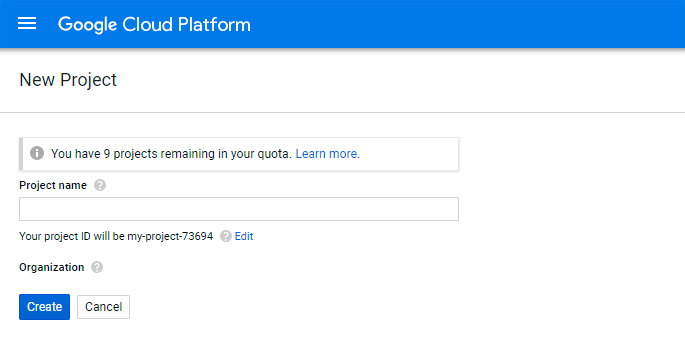
Click on the CREATE PROJECT button and configure your app settings.
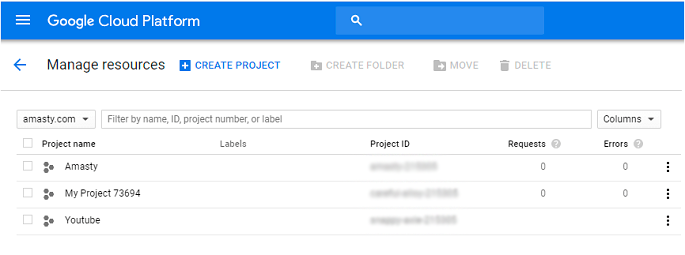
Specify your project name. The project ID will be generated automatically.
Then, please proceed to this page to create a new API key. ('Maps API' should be selected at first step). Choose the necessary project.
Go to Credentials → API key.
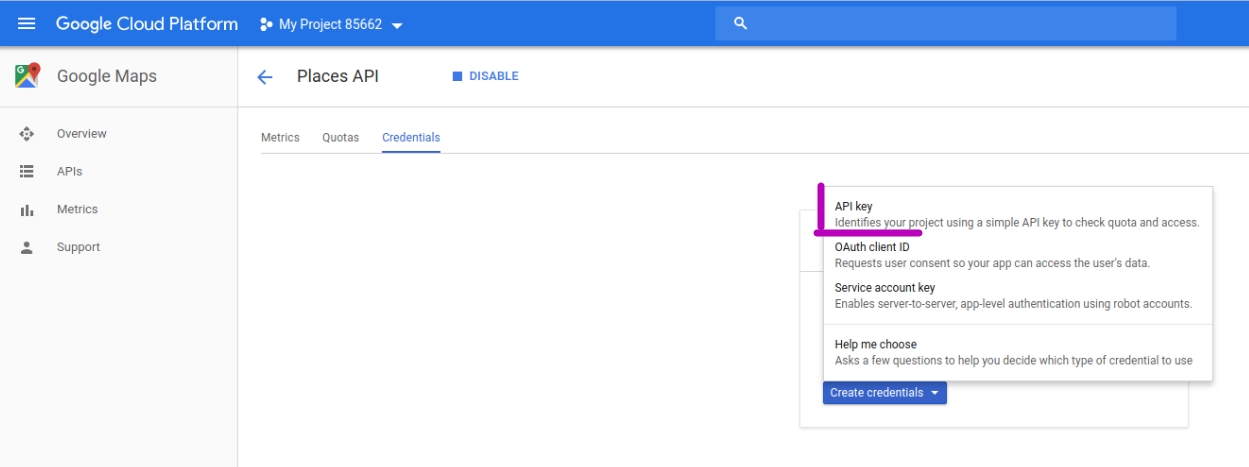
Copy the key and fill it in the Google API Key tab on the backend of the extension.
Geo IP Data
To use the Geo IP Location option please go to Stores → Configuration → Amasty Extensions → Geo IP Data.
Databases are required for the correct work of the module. Also, you need to install php bcmath or gmp extension on your server.
You can get the databases automatically or import your own data.
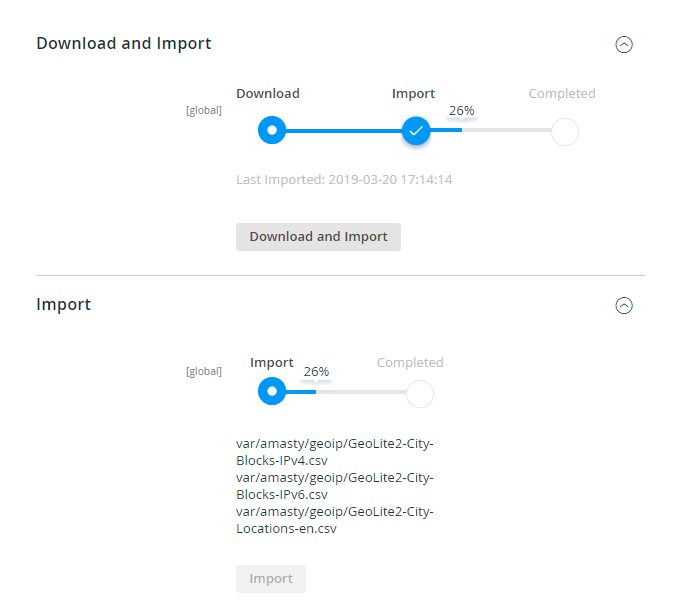
Hit the Download and Import button to make the extension download the updated CSV dump file and import it into your database automatically.
To import the files from your own source, use the Import option. Path to the files should look like this (the part 'var/amasty' should be replaced with your folders’ names):
var/amasty/geoip/GeoLite2-City-Blocks-IPv4.csv
var/amasty/geoip/GeoLite2-City-Blocks-IPv6.csv
var/amasty/geoip/GeoLite2-City-Locations-en.csv
In the Import section, the Import button is grayed out by default. It will be available right after you upload the CSV files. The red error notification will switch to green success notification when the import is completed.
Debug Mode
You can enable IP forcing, which makes it possible to set a specific IP address that will be used instead of the visitor's real IP address when determining geolocation. The feature is useful while configuring or testing the extension.
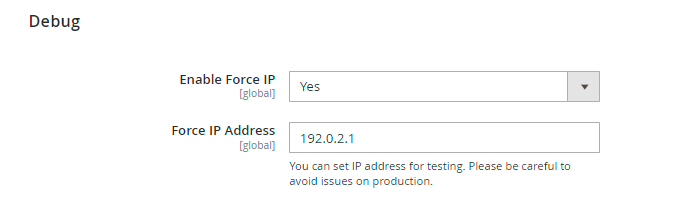
Enable Force IP - set to Yes to replace the real IP address.
Force IP Address - specify the address to use instead of a real one.
Gift Wrap
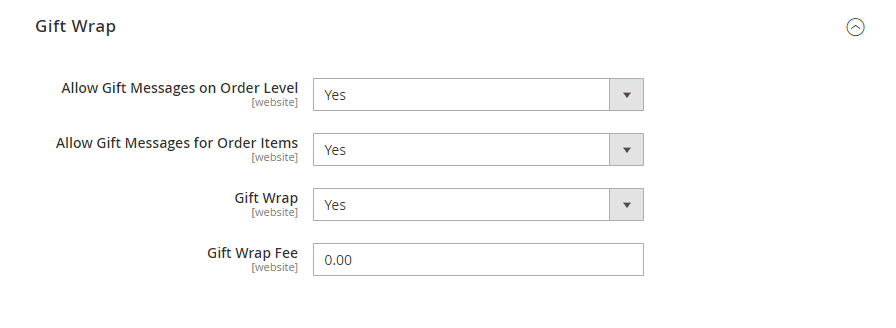
Allow Gift Messages on Order Level - If the option is enabled, the ‘Add gift message’ checkbox appears in the Order Summary block and the buyer can add a custom message to the whole order by clicking on it.
Gift Messages for Order Items - If the option is enabled, the customer can add a gift message to each product specifically in the cart.
Both options can be enabled. In this case, the customer can add a message both for each product and for the whole order.
Gift Wrap - If the option is enabled, the customer can add gift wrapping to the order.
Gift Wrap Fee - In this setting, the admin can set a custom fee for ‘Gift Wrap’ service.
Thus, if the customer selects ‘Gift Wrap’ option while placing an order the cost of the service is displayed in the ‘Order Total’ checkout block: 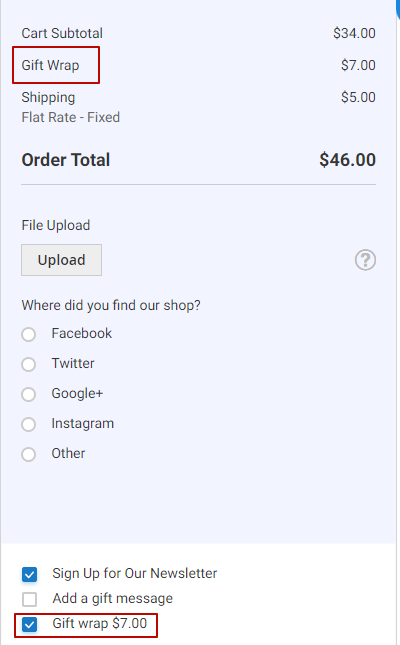
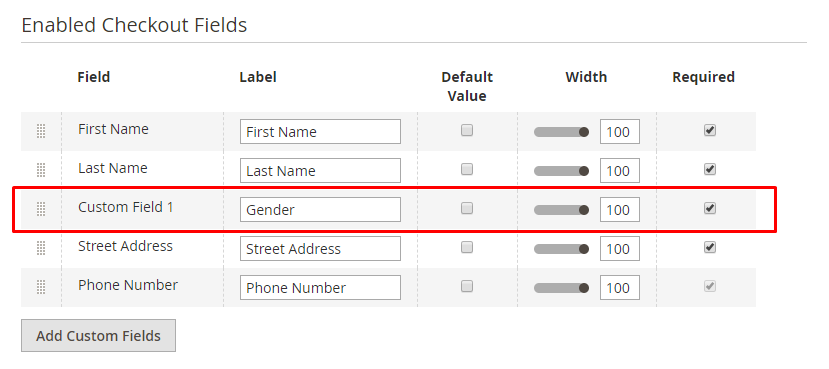
Manage Checkout Fields
To manage checkout fields display, go to System → Mange Checkout Fields.

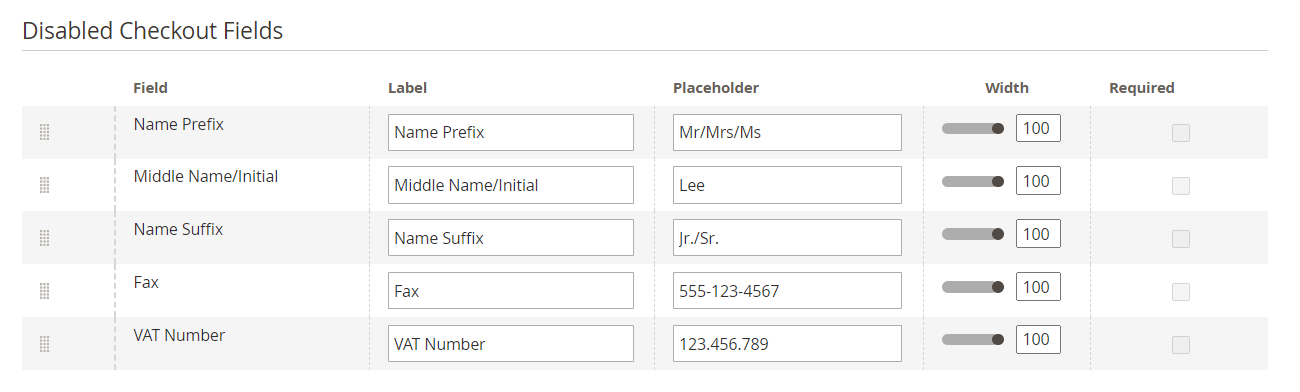
On the fields management page you can:
- Specify a custom field label (field name);
- Specify a field placeholder;
- Set field width to fit your website style;
- Specify which of the fields should be required;
- Enable/disable checkout fields;
- Reorder fields position for checkout display using drag and drop function;
- Set fields' order for checkout display.
When disabling City, Country, State/Province, Zip/Postal Code, please keep in mind that shopping cart will also be affected since those attributes are used in estimations and calculations.
To create additional fields to get more valuable info at the checkout, click Add Custom Fields. You can create up to 3 custom fields.
NEW | We implemented straight-through management between Manage Checkout Fields and their analogs in Magento general settings, Amasty Order Attributes, and Amasty Customer Attributes. Now, for example, you can update the configuration in MCF and the changes will be reflected in Magento settings and vice versa.

Easily rename and reorder the fields according to your needs.
Checkout Analytics
To view checkout analytics insights, go to Reports → Checkout Analytics.
The extension allows analyzing customers' behavior by looking at the checkout fields completion rate and use this information to optimize your page.
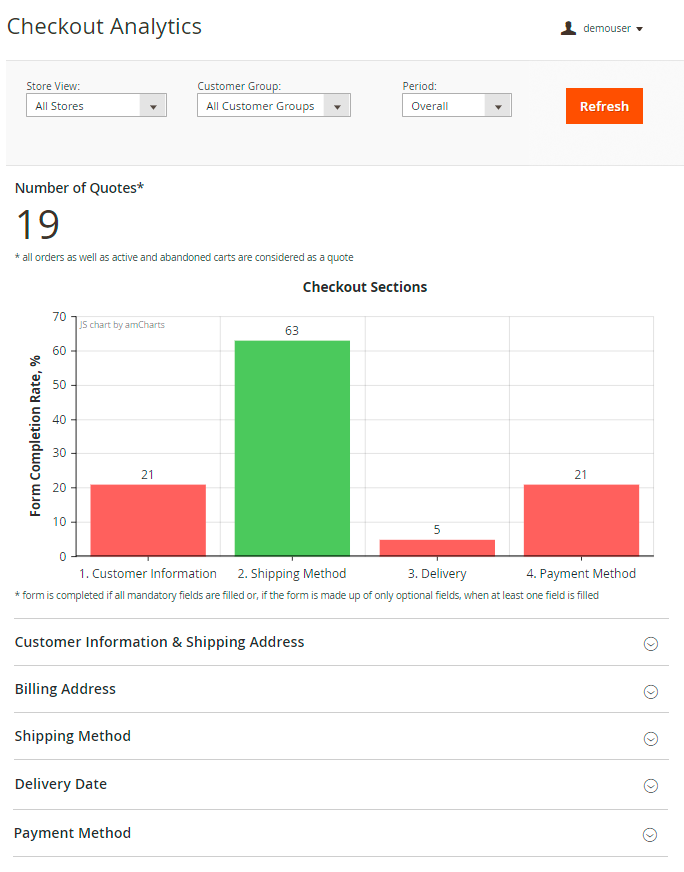
To view the detailed statistics based on Store Views, Customers Groups and Periods, use smart filters above the chart.
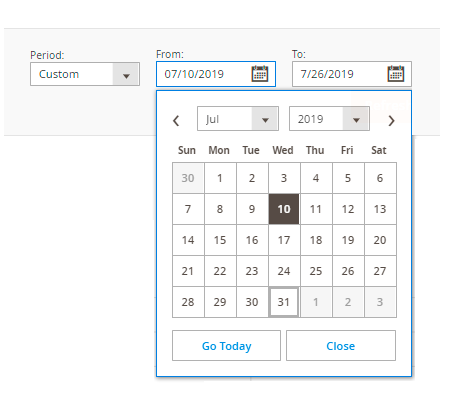
There are 5 time filters available:
- Today;
- Last 7 days;
- Last 30 days;
- Overall;
- Custom.
If you want to check the analytics for a custom period, specify the particular dates.
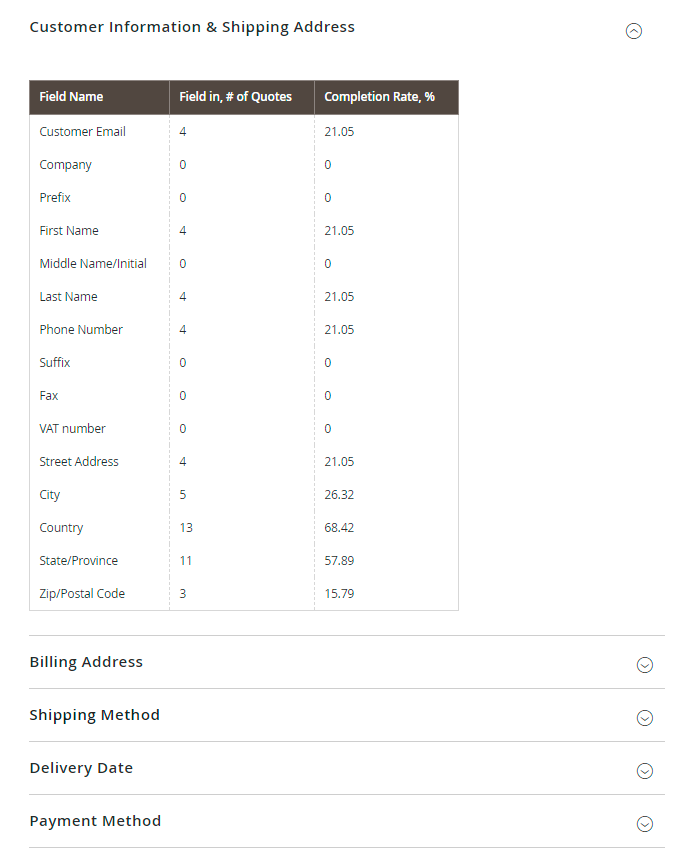
Below the diagram you see the data for each checkout section separately.
Gain more valuable information from Full-Cycle Checkout to make data-driven decisions. Upgrade marketing strategy via integration of your Magento Full-Cycle Checkout with Google Analytics.
Configure Google Analytics features of Enhanced Ecommerce to gather more insights about your checkout performance. How to View Enhanced Google Analytics Ecommerce Report of Magento One Page Checkout?
To get started with Enhanced Ecommerce reports, follow these steps:
- Sign in to your Analytics account.
- Select the desired view.
- Click Reports.
- Select Conversions > Ecommerce.
Moreover, in the Checkout Behavior Analysis Report, you can track user behavior throughout the checkout process. The informative visualization of the checkout flow allows you to see how many users move from one step to another or leave the site at one stage or another.
Cache Management
To access the Cache Management grid, please go to the Configurations → System → Cache Management. Amongst all caches that are available for your website, please look for One Step Checkout cache type, with tags AMASTY_CHECKOUT.
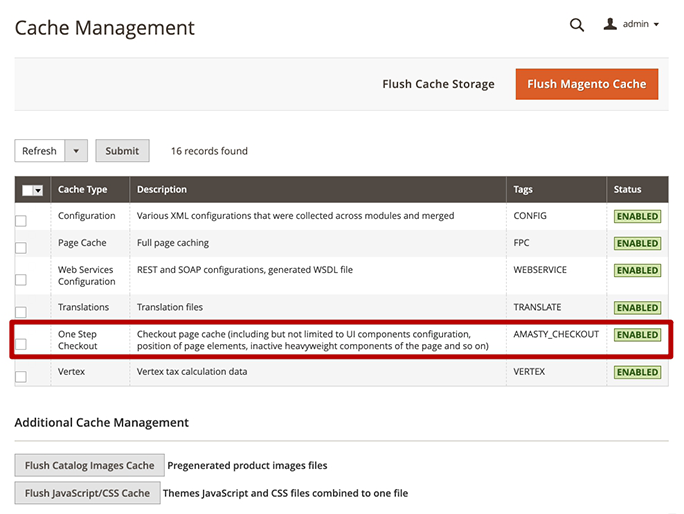
By default, the AMASTY_CHECKOUT cache is disabled. Please note that for a proper extension functioning, it highly recommended to enable it.
Frontend: Checkout Page for Registered Customers
Save personal info for registered customers for extra convenience.
If a customer has already registered in your store, his/her shipping address will be automatically saved for future checkouts
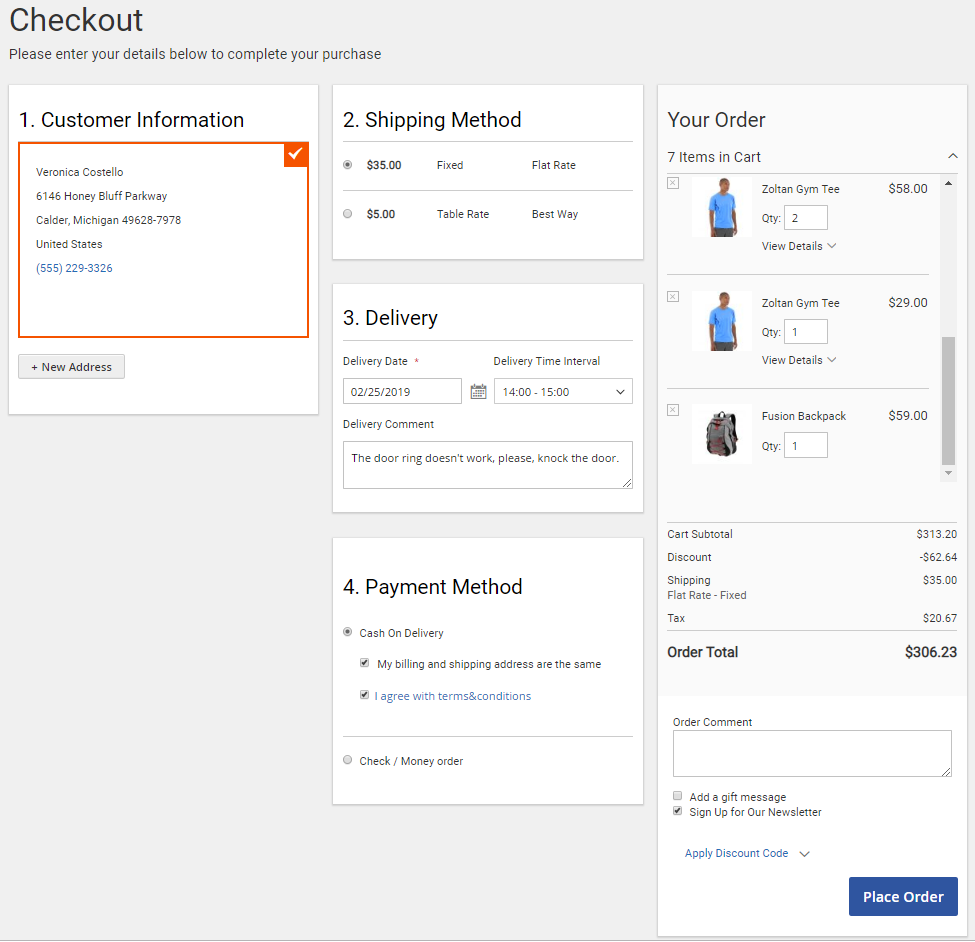
- Customers can edit options of configurable products (color, size, etc.) on the checkout page.
- It's also possible to delete products from the cart right on the checkout page in case there are 2 or more products without leaving the page.
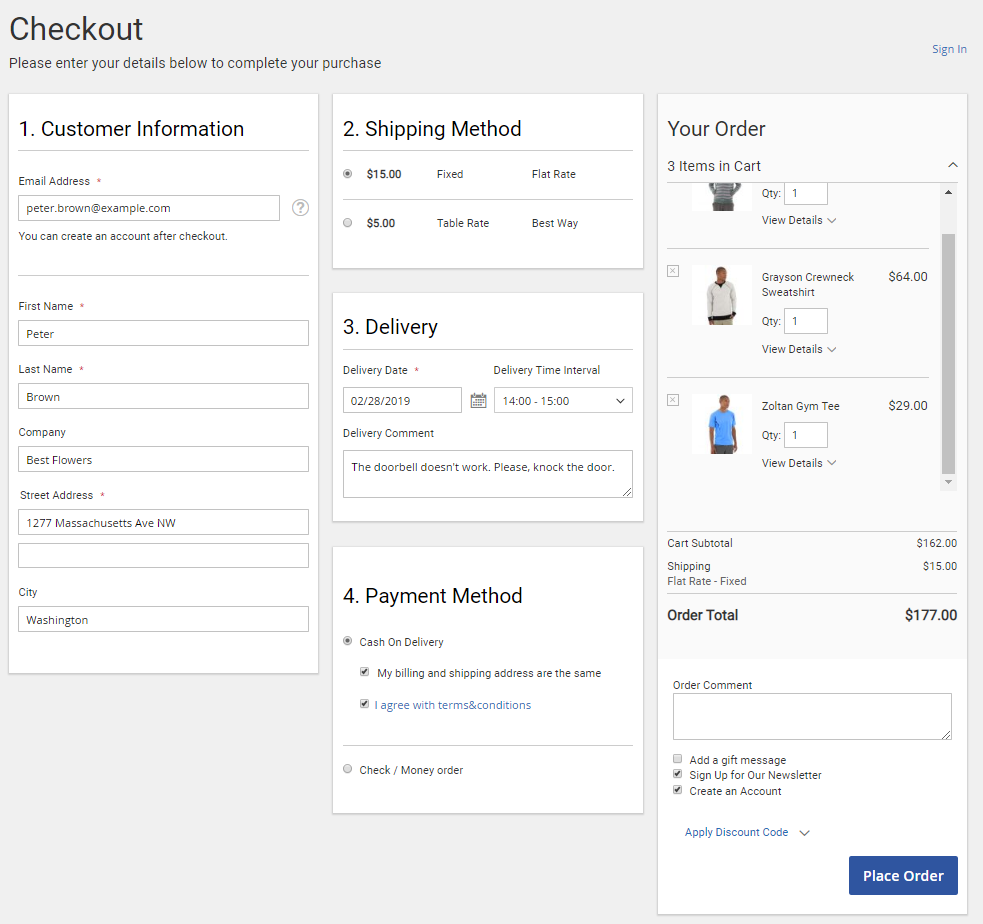
Frontend: Checkout Page for Guests
Let visitors create their accounts at checkout and automatically log in to them after they place an order. As an alternative, you can offer your clients to create a profile after the order placing.
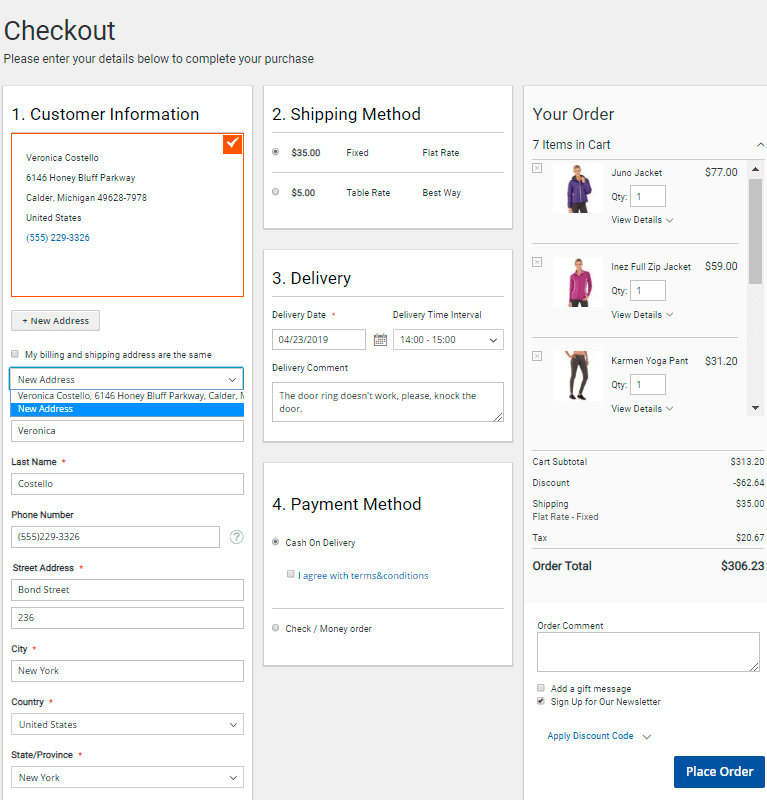
Frontend: Checkout Page With Additional Address
Let visitors add a new billing address if it differs from the shipping address.
Find out how merchants increase the Average Cart Value by featuring Cross-Sell products on Magento 2 cart and checkout pages.
FAQ
magento_2/full_cycle_checkout.txt · Last modified: 2022/04/18 11:07 by hshevtsova