Sidebar
magento_2:advanced_reports
Table of Contents
For more details see how the Advanced Reports for Magento 2 extension works.
Guide for Advanced Reports for Magento 2
Using advanced reports, you can significantly widen your analytical opportunities. Gather and process important statistical data to produce an efficient marketing strategy.
- Get 20+ ready-made essential e-commerce reports
- Have all key metrics at hand on the informative dashboard
- Analyze sales dynamics comparing different periods
- Track your sales performance in real time
- Build an unlimited number of custom reports
- Use multiple filters for each report type
- Multi-currencies support
- Check solution options (Pro and Premium versions)
Dashboard
Have key metrics at hand, placing widgets with the most significant stats in the reports dashboard. You can find the Advanced Reports Dashboard by going to Reports → Advanced Reports in the Magento 2 admin panel.
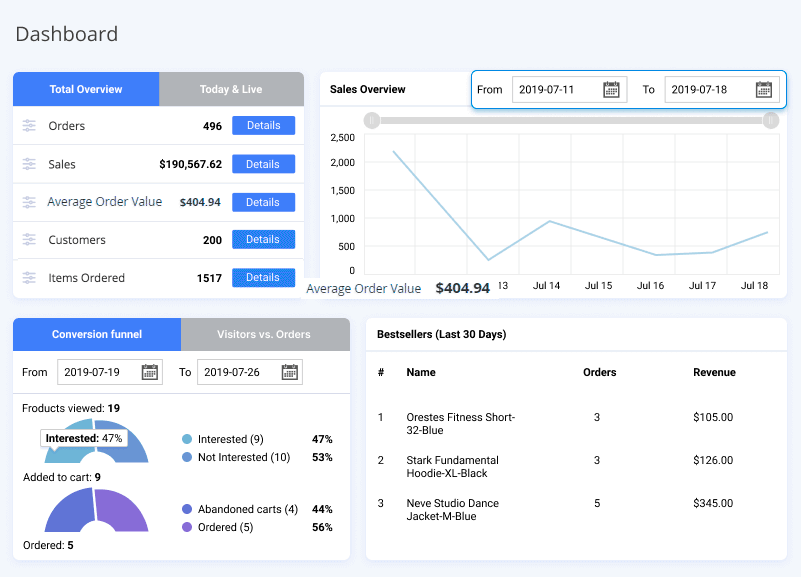
To configure the Reports Dashboard, please, do the following:
- Select the most important report parameters that will be displayed on the top bar. Press the Settings icon to see a popup dropdown with all the available parameters. Choose the parameters you want to be displayed right from the dashboard start. For now you can choose one of the following parameters: Orders, Sales, Average Order Value, Average Order Number of Items, Customers, Items Ordered, Refunded, Abandoned Cart.
- Press Details to see more specific data for each particular parameter.
- Check Today & Live block on the dashboard to see what is going on in your store right now.

Note that the 'Sales' value you see in the Advanced Reports dashboard is the sum of all orders except for canceled orders as these are sales.
- Specify the time interval for a Sales overview graph. Select a particular month and year from dropdowns, pick a day from the grid and the data will be updated automatically. Otherwise, input a date manually in the From and To fields and press Enter.
- Use slider to have more detailed view on particular data.
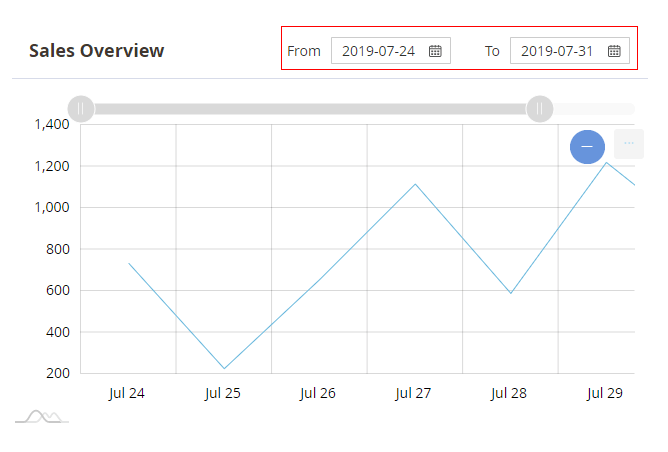
You can easily save any of your charts as images in PNG, JPG, SVG and PDF format. Also, you can print it if needed.
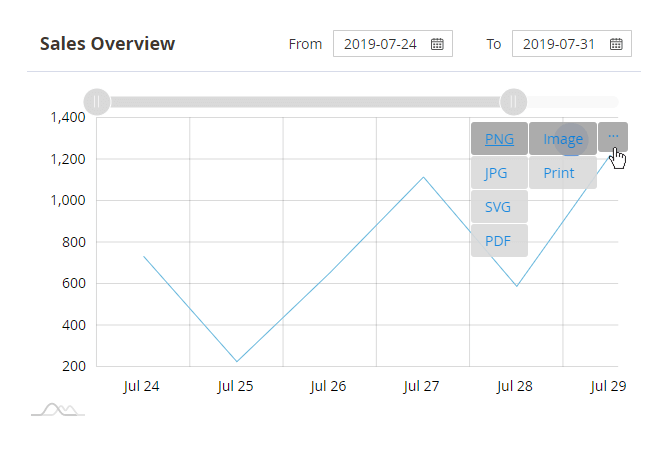

- Set the time period for a Conversion funnel and a Visitors vs. Orders.
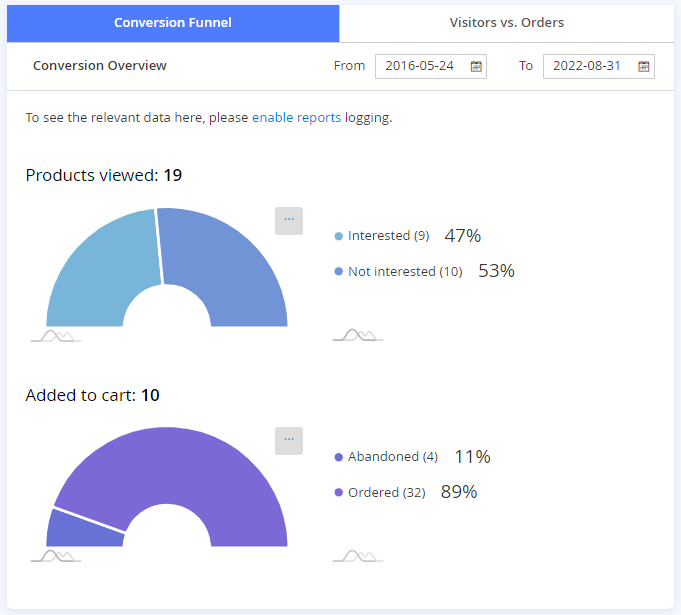
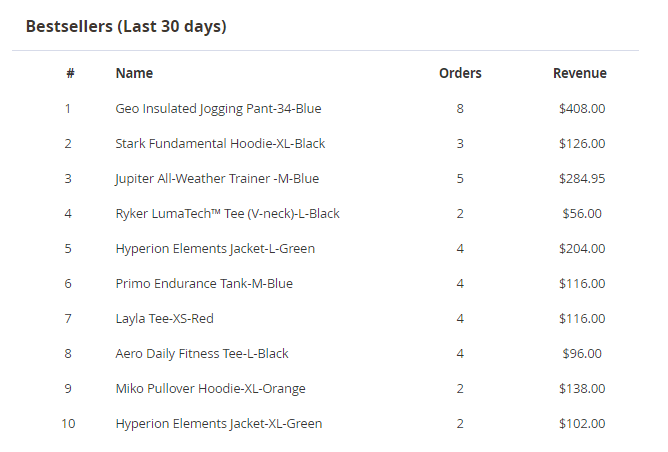
- See the Bestsellers list.
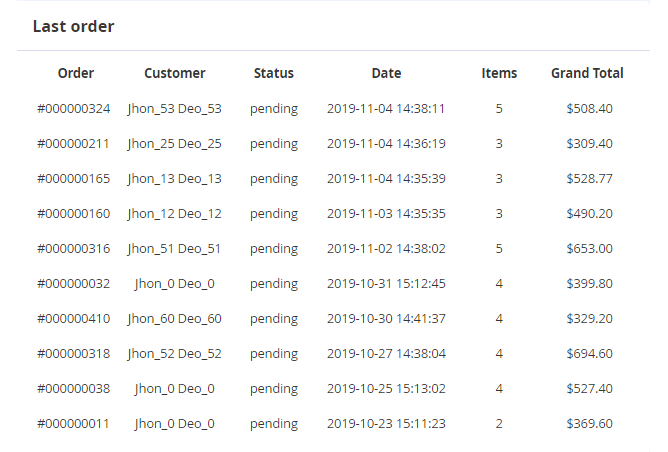
- View Last order's details on a grid.
If you are using Redis and have encountered a problem with data display on the Dashboard, change the value of the “max_concurrency” setting to 15 or higher in <magento_root>app/etc/env.php
Configuration
To choose order statuses you want to be used in all Sales Reports, please, go to Amasty → Advanced Reports → Configuration.

Order Status used in Sales Reports - here you can select an Order Status to be used in Sales Reports and the New vs Returning Customers report.
If you configure the extension to take into account all order statuses, except for the 'Canceled' status, the exported report will have the same amount as in the reports dashboard.
Please note that the 'Order Status used in Sales Reports' setting does not affect the value on the dashboard, it is applied for reports on orders.
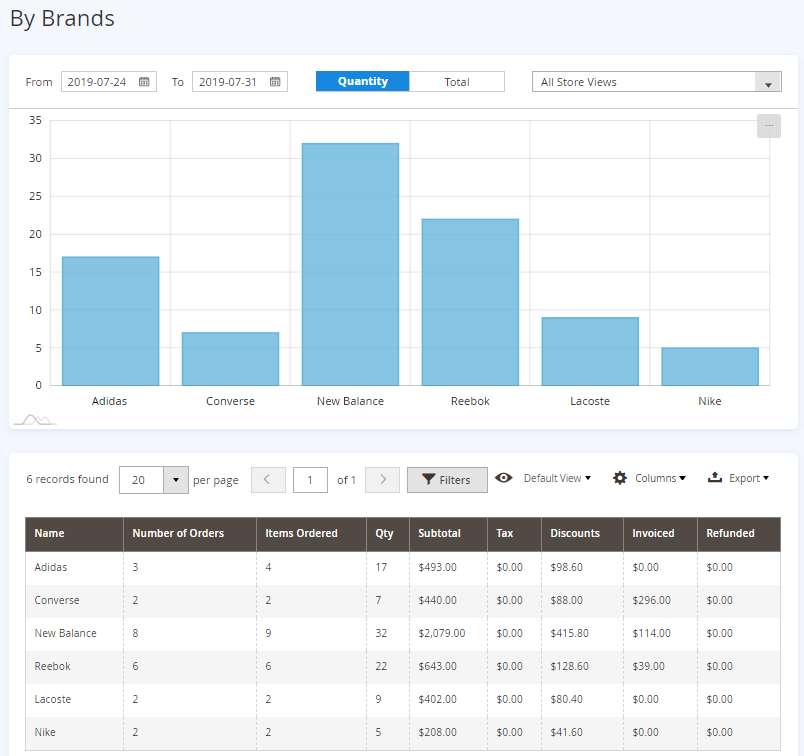
Product Attribute used in Brands Report - choose an attribute to be used as Brand in Brands Report.
Also, specify the Email Sender and Email Template for reports sending.
From the left navigation menu you can switch between different stats. Let's check them.
Sales and Orders
Overview
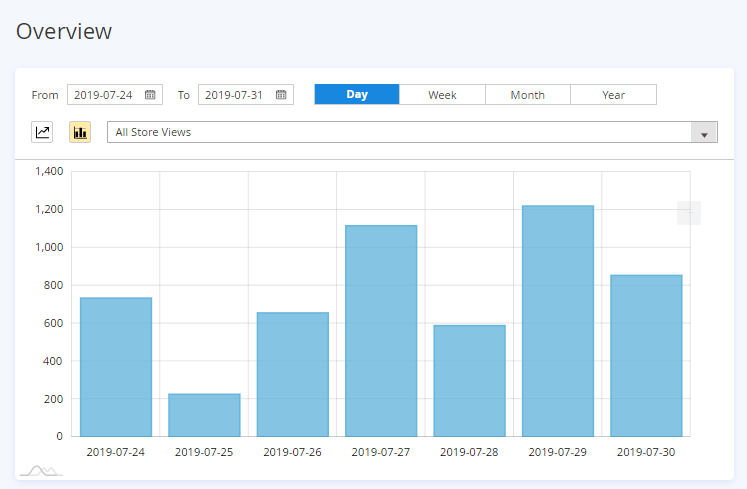
Select the time interval to view reports data.
The module displays information for the last 7 days by default.
Choose the step interval for data generation (day, week, month). Choose the way of visualization of the report: line chart or bar graph.
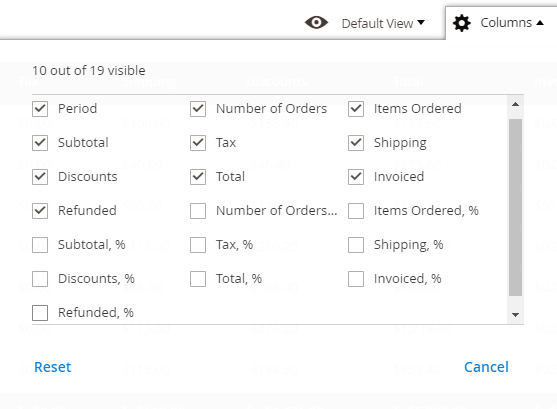
Columns. Manage columns for the report grid. Choose which of them should be shown in the report.
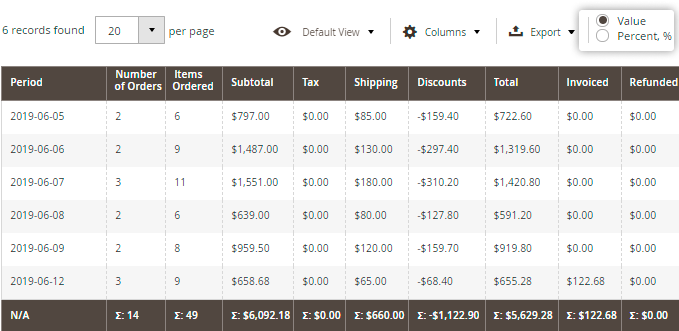
See the total value of each column in a percentage or numeric format. Export the necessary information to a CSV or XML file.
Within the Premium version of Advanced Reports extension, you can also edit the Overview report with Custom Reports Builder, by adding or removing columns, applying various types of filtering, sorting and data aggregation, etc.


Sales Comparison
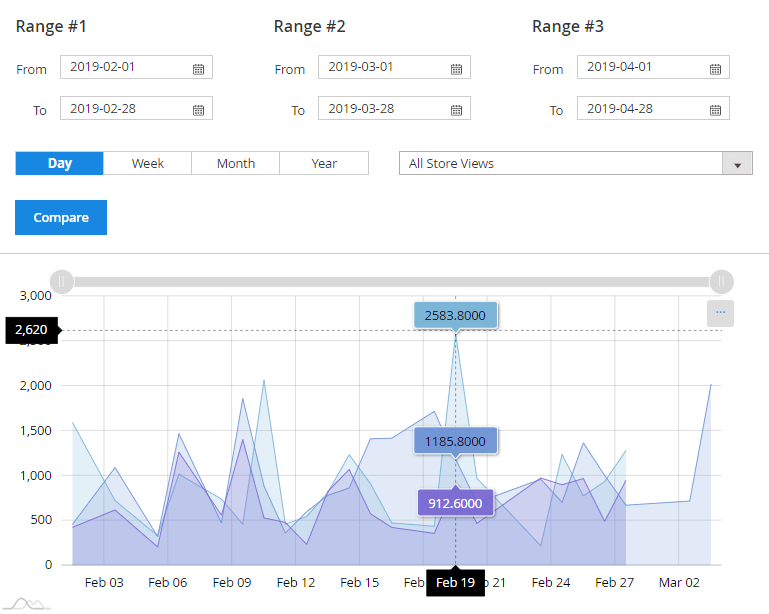
Compare sales data by custom periods with the 'Sales Comparison' report. Set several time ranges you want to compare and click the Compare button. You can set to compare specified periods by days, weeks, months and years. Also, you can choose a store view you want to compare sales of different periods within.
Orders Report
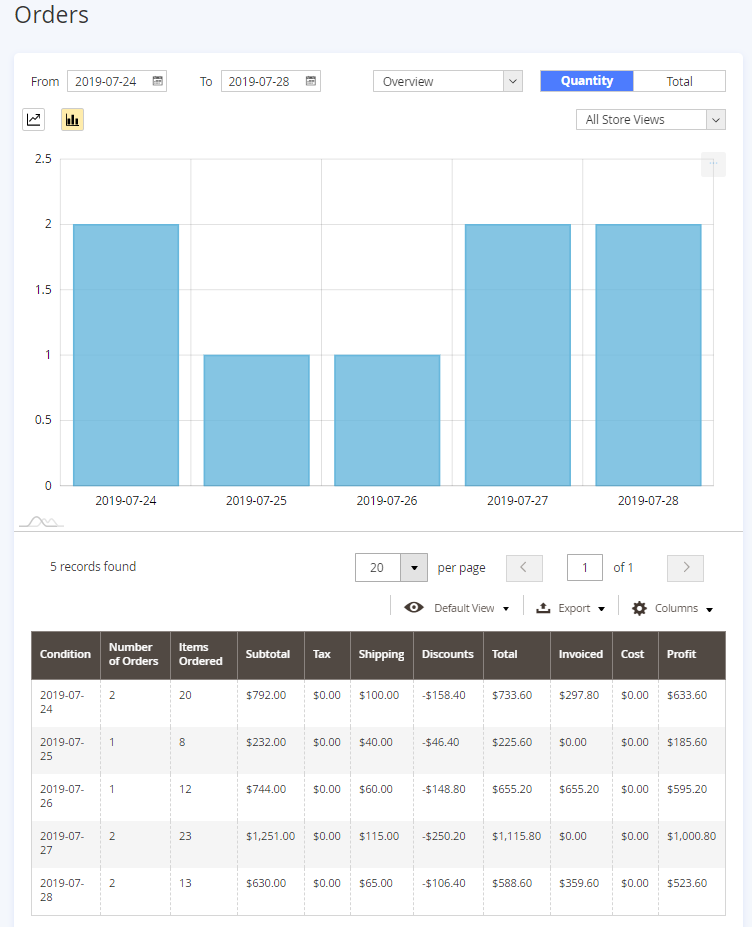
Get a full list of orders during a specified period. The extension updates order statuses in real-time so you’ll see your revenue accurately calculated. Filter stats data by the number of sold products or by the total sum paid by customers within a specific time period (Quantity/Total). You can filter the orders By Status. Also, you can evaluate your orders' Profit on the Orders report (the default Cost attribute is used for calculations, so please make sure it’s filled on products edit pages). Choose the way of visualization of the report: line chart or bar graph.
Within the Premium version of Advanced Reports extension, you can also edit the Orders report with Custom Reports Builder, by adding or removing columns, applying various types of filtering, sorting and data aggregation, etc.

Order Items Report
View the report By Order Items, to see the orders split per separate products.
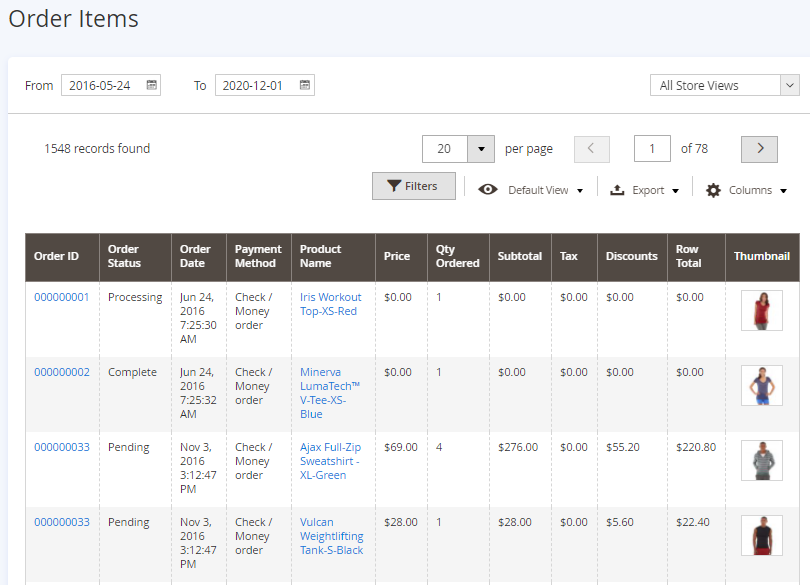
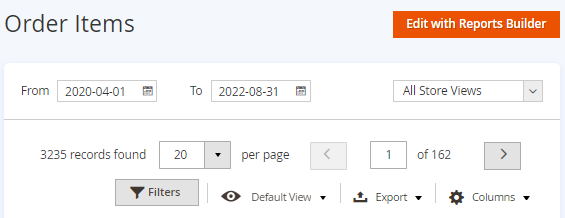
Within the Premium version of Advanced Reports extension, you can also edit the Order items report with Custom Reports Builder, by adding or removing columns, applying various types of filtering, sorting and data aggregation, etc.
Quotes Report
We implemented integration with our Request a Quote extension and added a new report type, which allows you to monitor quotes overview by their status.
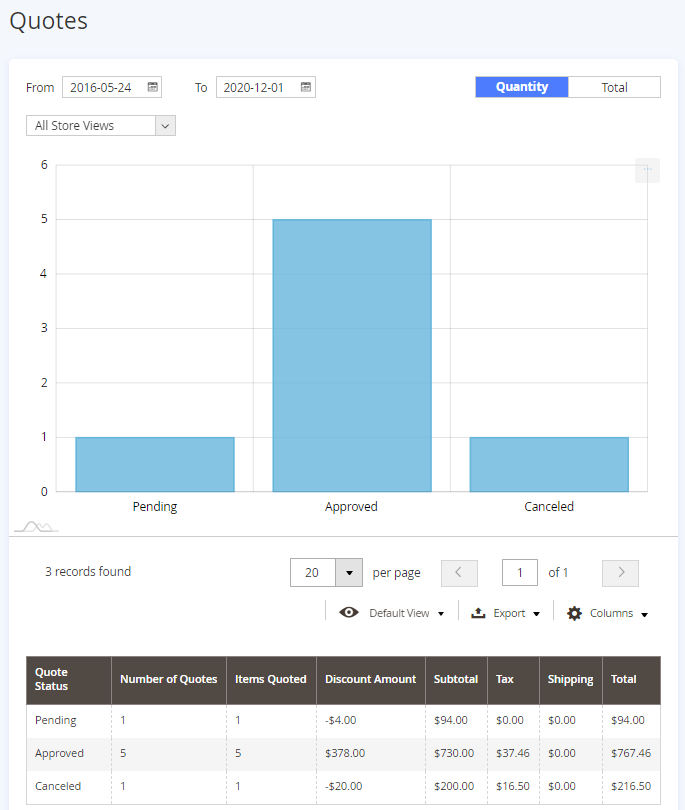
Please note, that for the Quotes Report display, the Magento 2 Request a Quote extension should be installed at your store.
Sales By
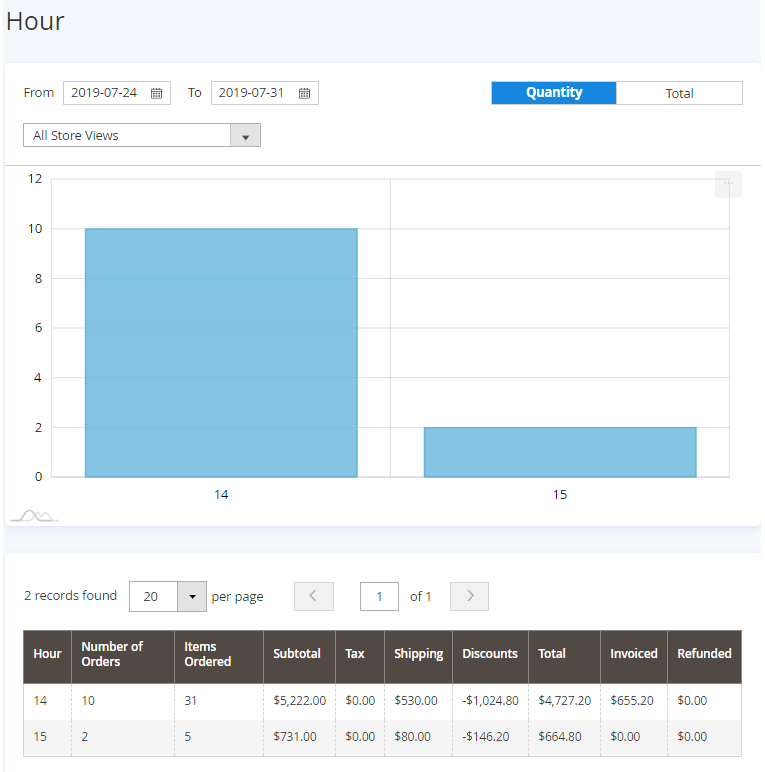
Sales by Hour/ Week Reports
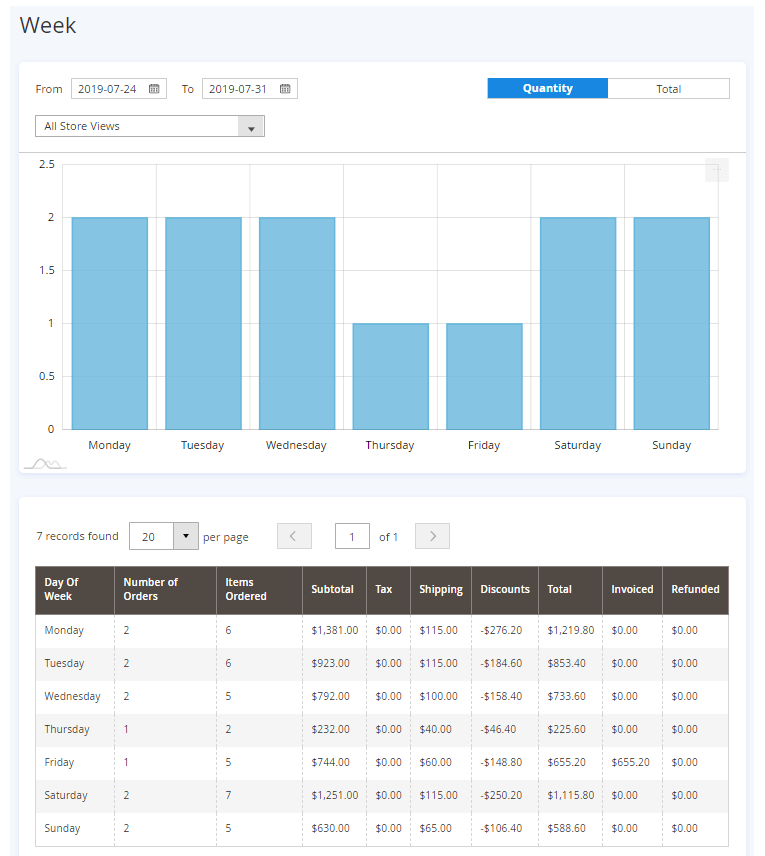
Use time-based reports to figure out which time periods (days of the week, hours) bring you more sales. You can filter by Quantity and Total or specify the particular Store.
Two reports have identical settings and can be configured in a few clicks.
Sales by Country Report
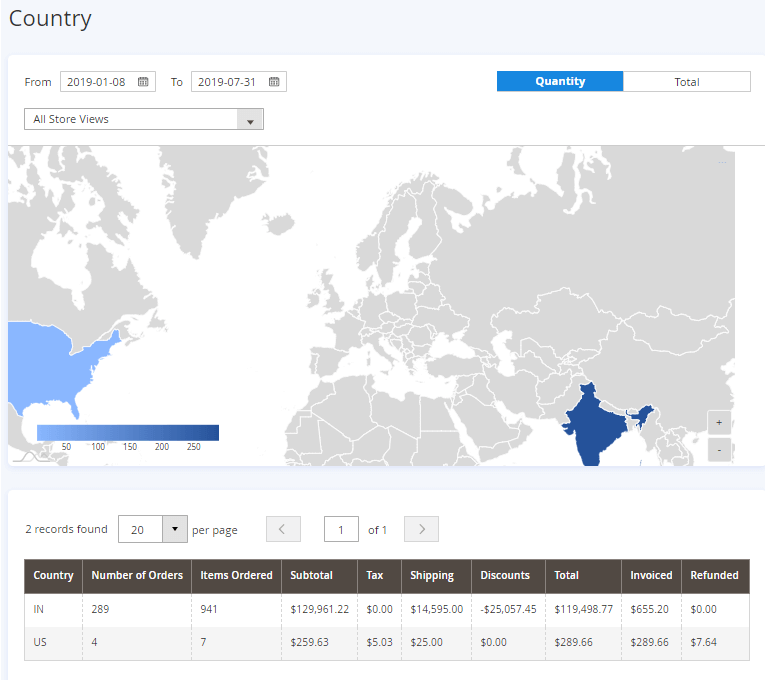
Easily study your customers' geolocation and get access to the sales data by countries.
The report shows stats data based either on the number of sold products (Quantity) or on the Total sum paid by customers within a specific time period. Use a map for better info perception.
Sales by State Report
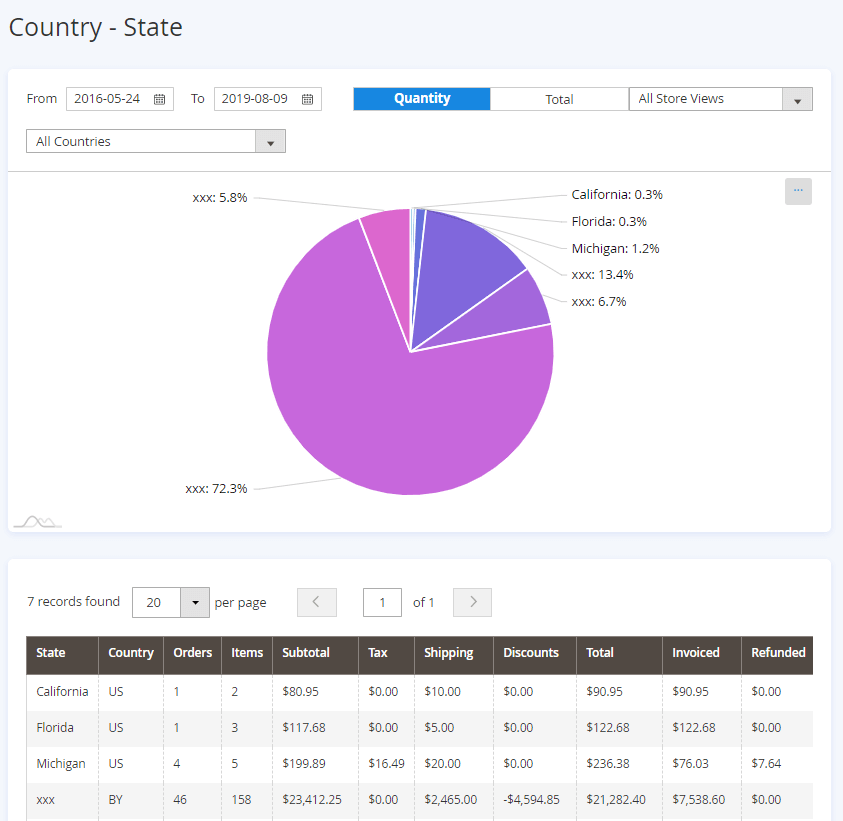
View Country-State report to analyze sales data per state.
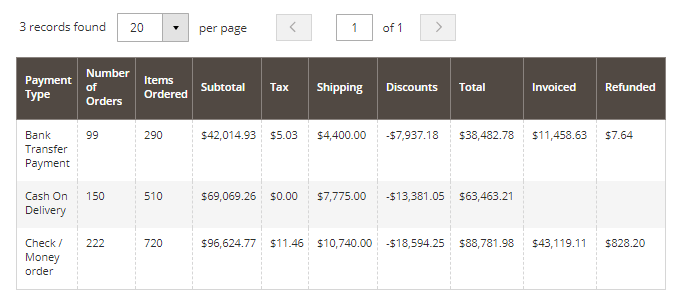
Payment Type Report
Due to the report you'll get detailed information on the most popular payment types utilized by your customers.
Use these data to organize your order management.
(Fields available: Payment Type, Number of Orders, Items Ordered, Subtotal, Tax, Shipping, Discounts, Total, Invoiced, Refunded)
Customer Groups Report
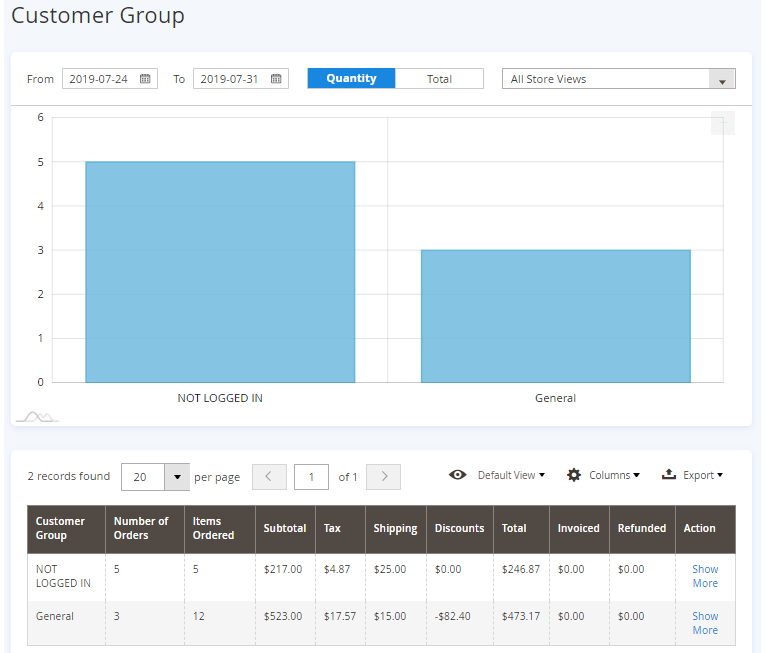
The report clearly shows which customer groups bring you more sales. You can filter stats data by the number of sold products or by the total sum paid by customers within a specific time period (Quantity/Total).
(Fields available: Customer Group, Number of Orders, Items Ordered, Subtotal, Tax, Shipping, Discounts, Total, Invoiced, Refunded, Action)
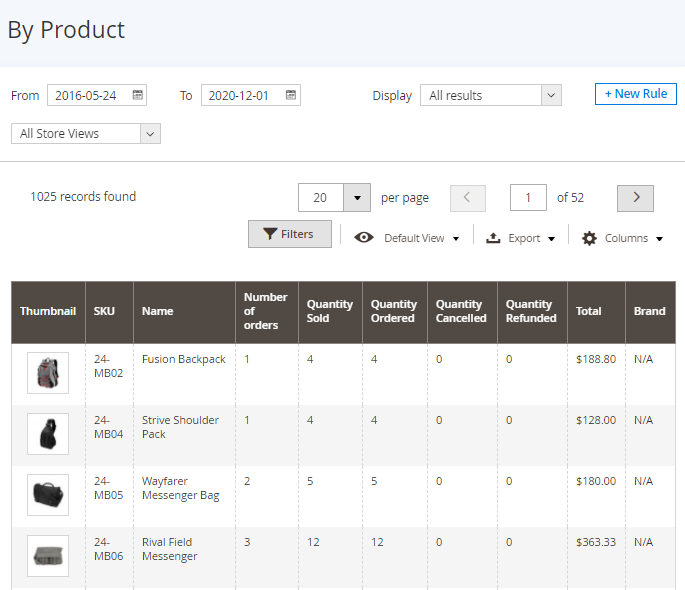
In the Action column you can click the Show More link to instantly see the 'Sales by Product' report filtered by the chosen customer group:
Sales by Coupons Report
If you run promo campaigns on your web store, you need to keep track of conversions generated by the coupons you offer. Learn which promo codes appeared to be more effective.
(Fields available: Coupon Code, Number of Orders, Items Ordered, Subtotal, Tax, Shipping, Discounts, Total, Invoiced, Refunded)


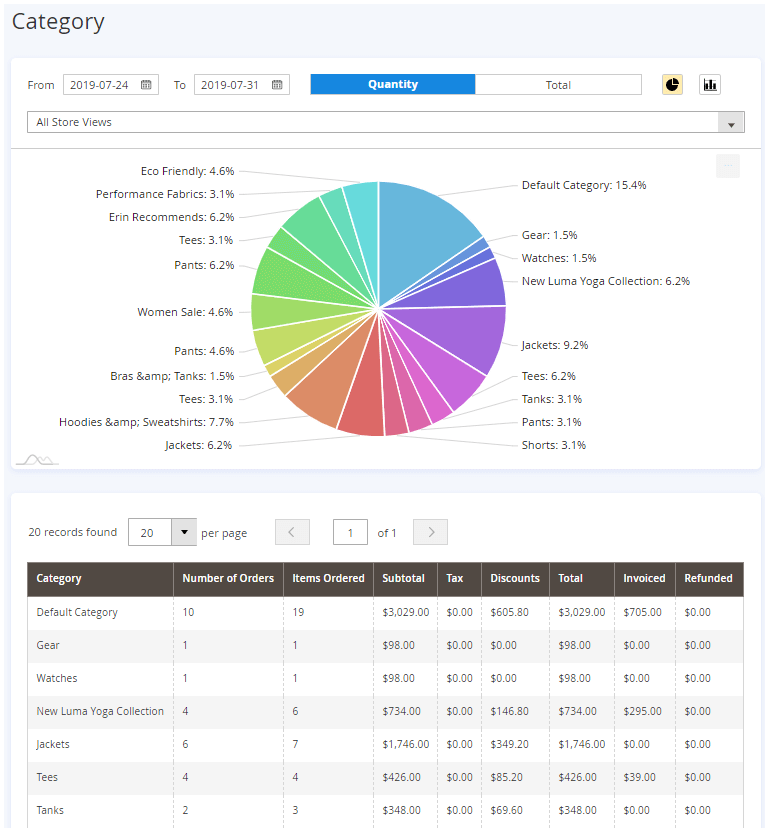
Sales by Category Report
Use convenient graphs to study customers' demands. Find out which product groups enjoy greater popularity and restock accordingly.
(Fields available: Category, Number of Orders, Items Ordered, Subtotal, Tax, Shipping, Discounts, Total, Invoiced, Refunded)
Choose the way of visualization of the report: pie chart or bar graph.
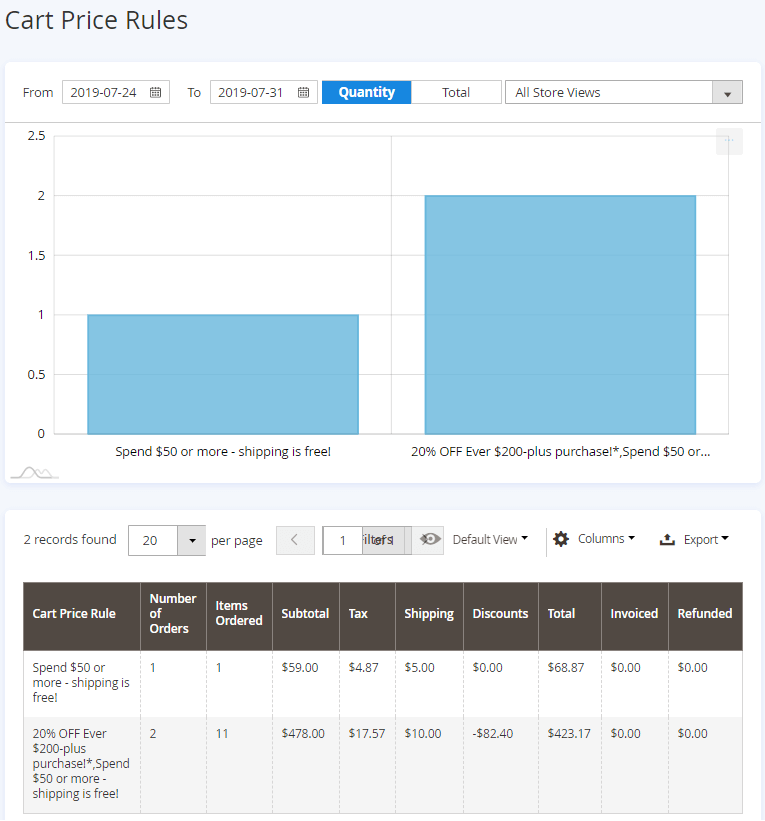
Sales by Cart Price Rules report
In this tab, you can check your cart price rules' effectiveness.
Catalog
Product Report
Set the necessary time period to get a detailed product sales report. The report includes:
- Product Thumbnail
- Product SKU
- Product Name
- Product Quantity
- Quantity Sold (is calculated as “qty sold = qty ordered - qty cancelled - qty refunded”)
- Quantity Ordered
- Quantity Cancelled
- Quantity Refunded
- Product Total
- Brand

You can filter By Product stats data by customer group, SKU or a product name.
When closing order with a bundle product, the “bundle” value won't be marked in the Quantity Cancelled column.
In this section, you may also generate custom rule-based product reports. Please, refer to 'Custom Reports' section to know more.
Within the Premium version of Advanced Reports extension, you can also edit the Product report with Custom Reports Builder, by adding or removing columns, applying various types of filtering, sorting and data aggregation, etc.

Reports Based on Product Attributes
The report allows you to learn which product configurations generate more conversions. Set the time period and select the necessary product attribute or attribute set in a dropdown to get detailed stats data.
You can also choose to show reports based on product attribute set.
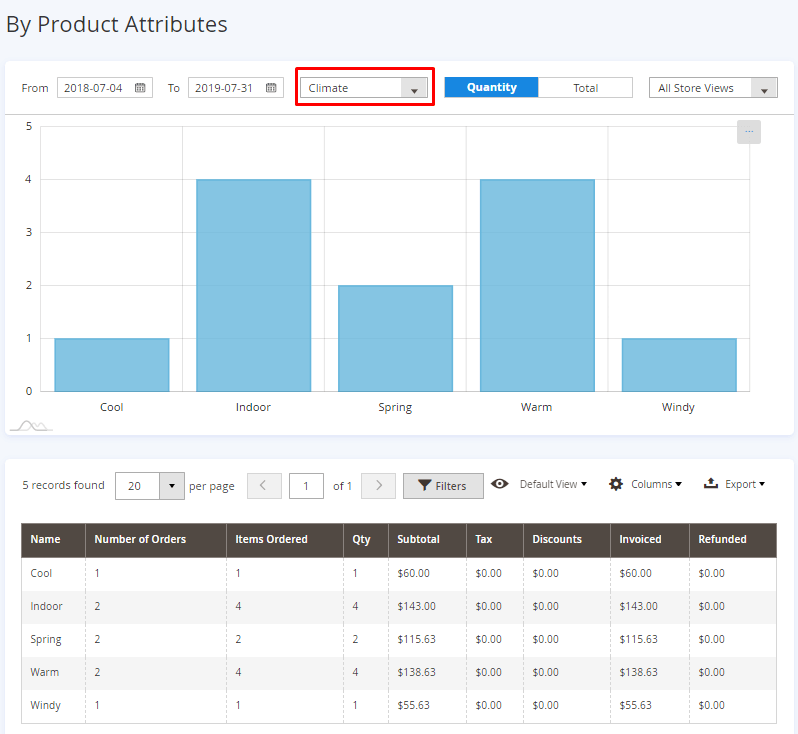
In the Discounts column only the discounts from cart price rules are counted.
You may use default attributes for your report or create custom ones.
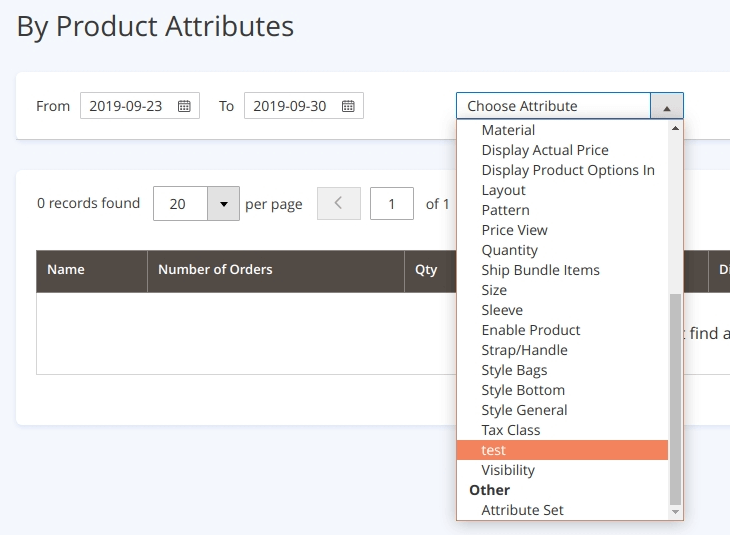
To create a new attribute, please go to Stores → Product → Add New Attribute.
To create a new attribute set, please go to Stores → Attribute Set → Add Attribute Set.
Brands Report
The extension also allows seeing the statistics based on brands. This feature will be useful for the owner of a multi-brand store.
Product Performance Report
Find out which products generate more revenue with Product Performance report. Just fill in the SKU of the particular product and click 'Show Report'.
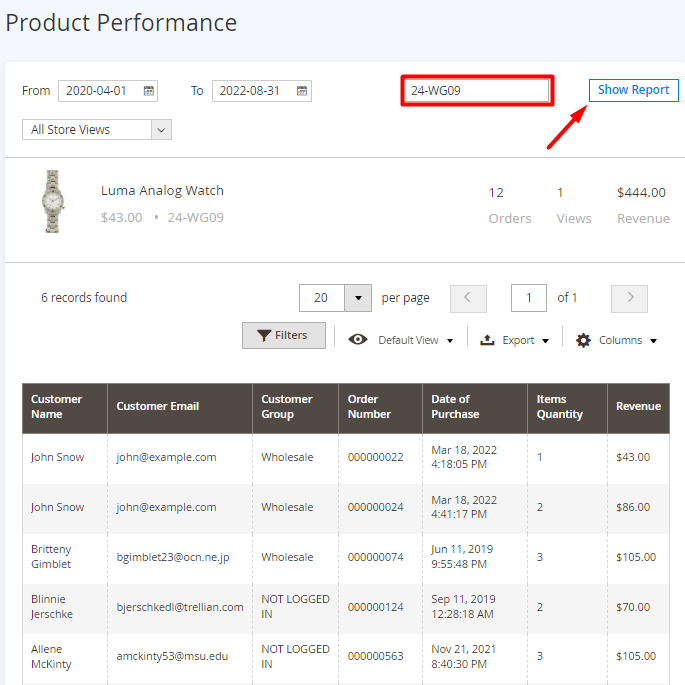
The report displays up-to-date customer name and email data for orders placed by both registered customers and non-registered customers.
Bestsellers Report
Find out which products enjoy greater popularity depending on a specific time period (month, year etc.) Set the time interval to get a detailed bestsellers report. The report includes:
- Product Thumbnail
- Product SKU
- Product Name
- Product Quantity
- Product Total
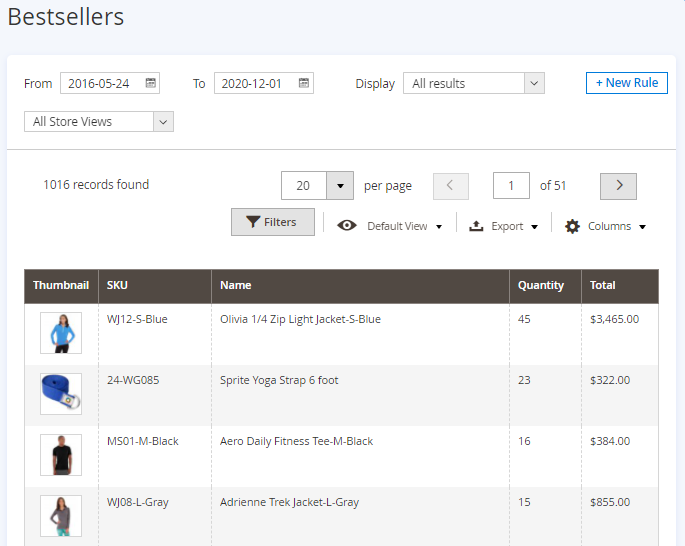
You can filter Bestsellers stats data by SKU or a product name.
Bought Together Report [Pro and Premium]
The “Bought Together” report is available in the Advanced Reports Pro and Premium versions, included with an active product or support subscription.
This report provides insights into which products are frequently purchased together, enabling you to plan targeted marketing and promotional campaigns based on this data. The report includes product SKUs, names, and the number of times they have been purchased together.

Please note that this report will also include records of sales for grouped products if multiple items within a single grouped product are purchased.
For instance, if a customer buys two belts from a 'Belt Set' grouped product, the Bought Together report will record these two belts as being bought together. This occurs because Magento treats each item in a grouped product as an individual simple product. Even when added to the cart, each item is counted separately, not as a single product configuration.
Customers
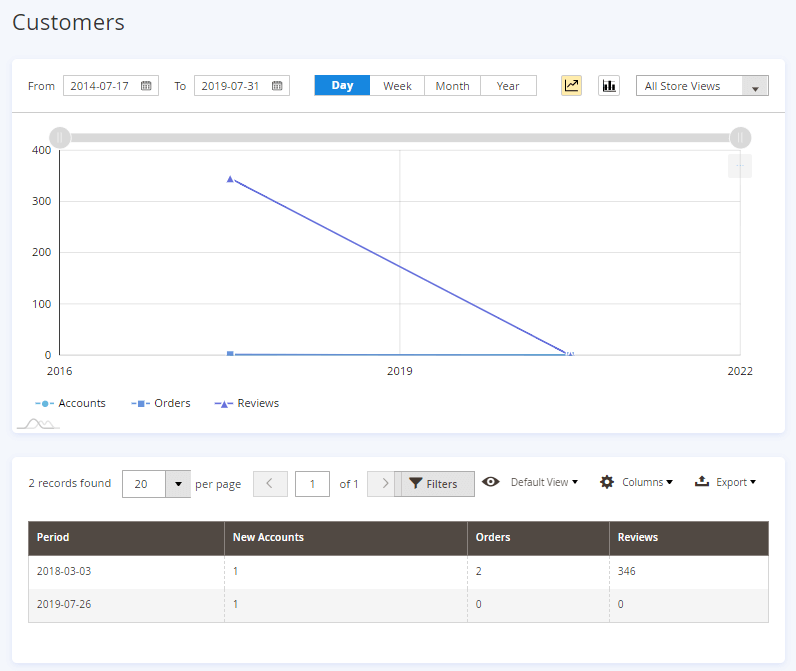
Customer Report
Generate customer report based on a specific time period. Select the necessary time step (Day, Week, Month, Year) to tailor the report to your needs.
Manage data display on the graph by enabling/disabling such parameters as:
- New Accounts;
- Orders;
- Reviews.
New vs. Returning Customers Report
Easily study your audience to analyze your sales strategy. See the results for New and Returning Customers.
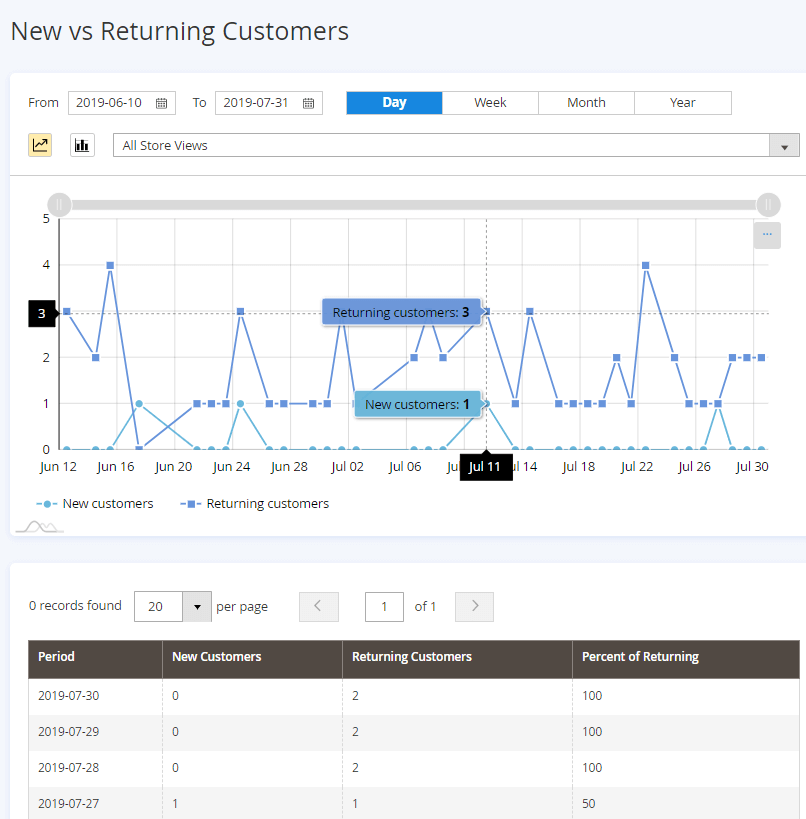
In the Pro and Premium versions of the extension two more columns are added to the report grid: New Customers Orders and Returning Customers Orders. (Note: this functionality is available as part of an active product subscription or support subscription).

Abandoned Carts Report
Use this report to identify customers who left your website without checking out. Easily view the cart abandonment rate over time. Track the data by customer’s name email address, the number of products in the cart, subtotal, the date, etc.
Add Request A Quote extension to check the abandoned products and instantly offer better deals to your customers right from Abandoned Carts Report page
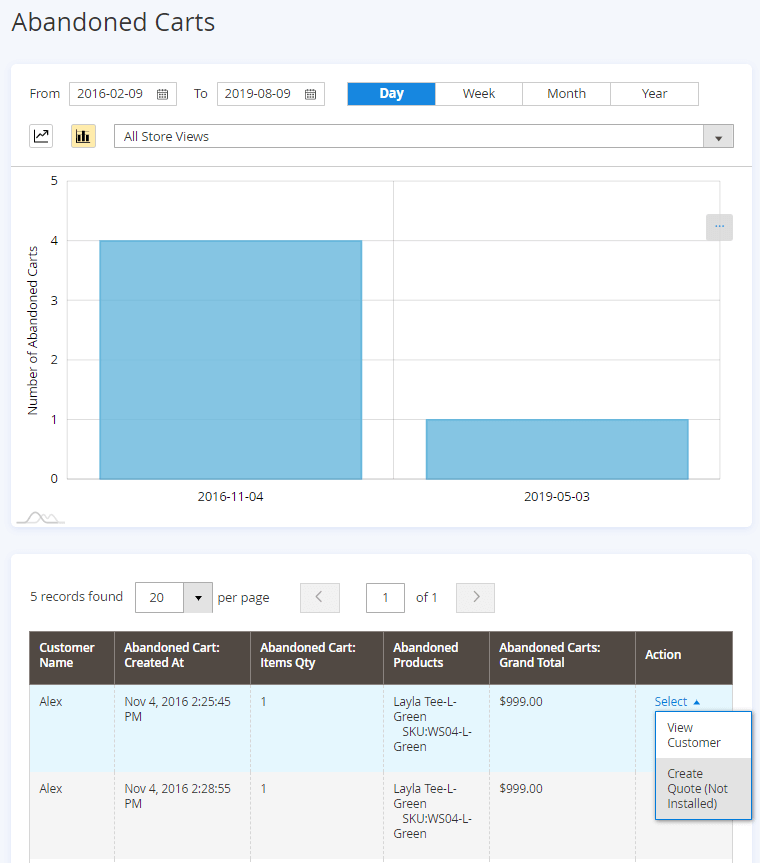
In the Pro and Premium versions of the module, the 'Customer Email' column is also displayed in the report (Note: this functionality is available as part of an active product subscription or support subscription), allowing you to download customer emails and reach out to them through marketing campaigns or other communication channels.

Conversion Rate Report
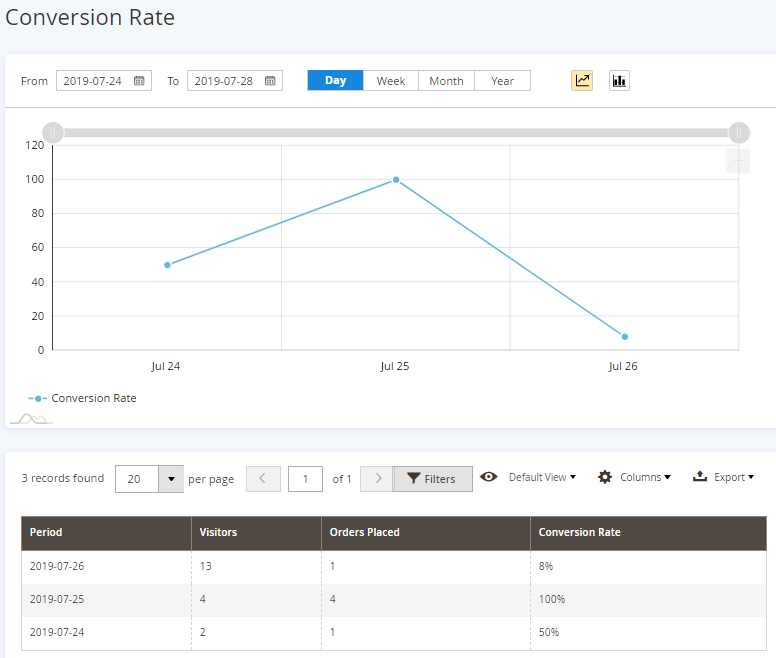
The extension includes a new report option which lets you check the conversion rate of the store, or, in other words, the percentage of customers who find the store suitable enough to place the order. Break the data by custom sales ranges for more details.
Custom Rule-Based Reports
Advanced Reports Rules
With the extension, you can easily create custom reports based on Magento 2 rules. For example, create unique reports for products with special attributes or a combination of attributes. To do this, please, go to Reports → Advanced Reports Rules or Reports → Advanced Reports → Custom Reports → New Rule.
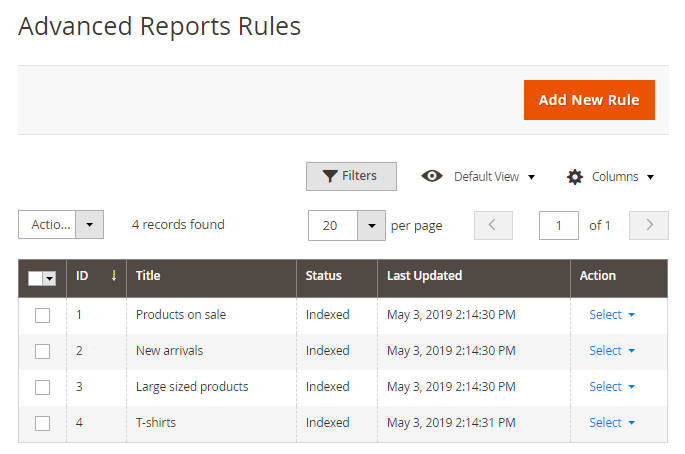
On the grid, you can track and manage all existing reports rules. To create a new rule, please, click the Add New Rule button.
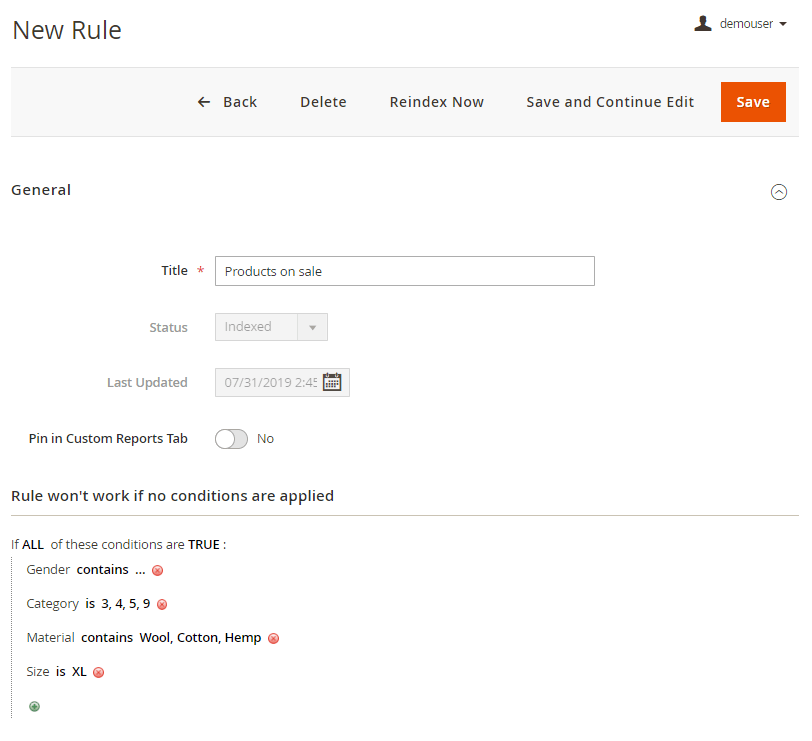
To configure the reports rule, give it a title, and specify the necessary conditions. Then, you can create custom reports by applying the rule in the 'By Product' report in the Display dropdown:
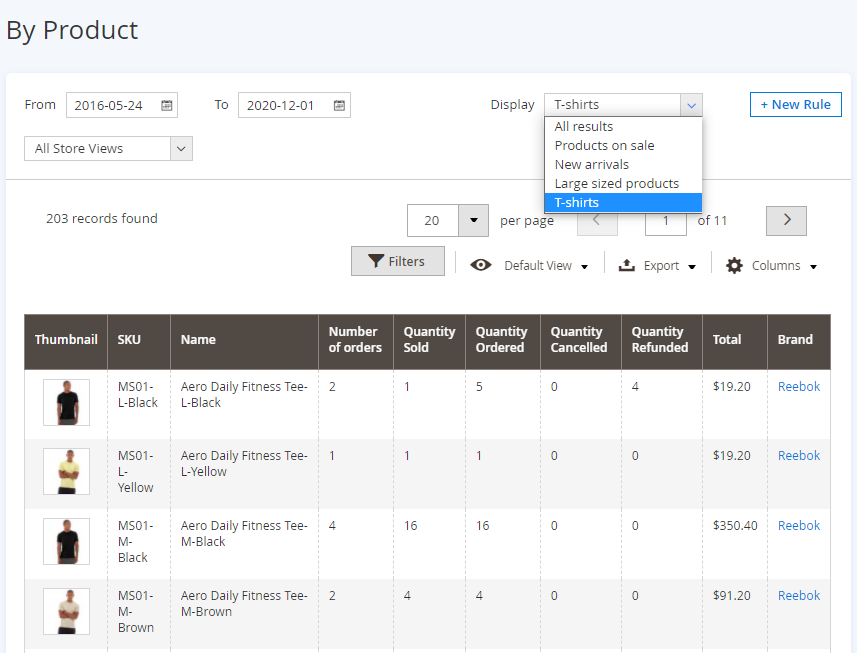
You can also create new rules by simply clicking the + New Rule button on the 'By Product' report panel.
Configure Scheduled Reports
With the scheduled reports functionality you can create and receive notifications with chosen reports for a particular time interval by Cron.
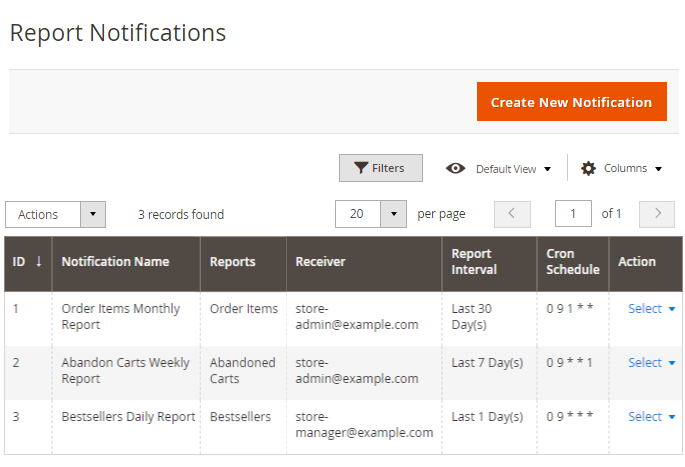
To manage the notifications please go to Reports - > Schedule Report Notifications. To create a new scheduled report, hit the button Create New Notification.
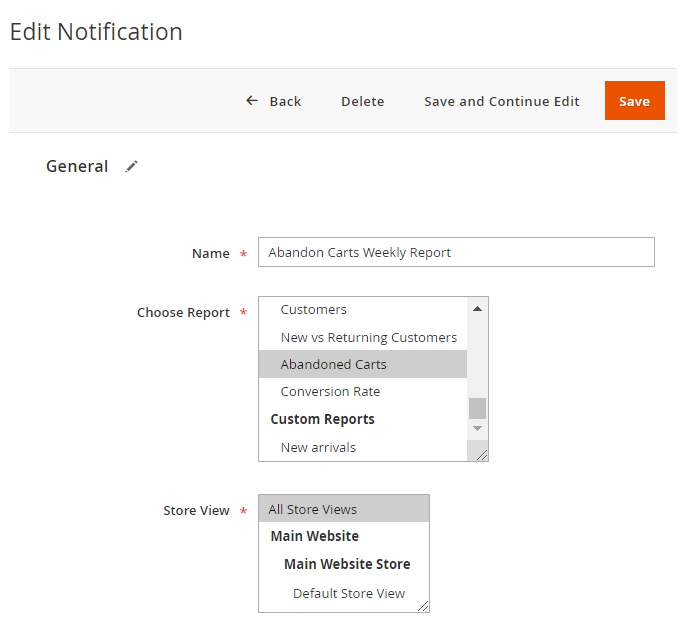
Name - specify the name for your report.
Choose Report - specify the type of report you need to be scheduled. Within Advanced Reports Pro and Premium versions, you can also select any custom report that you've created (the functionality is available as a part of an active product subscription or support subscription).
Store View - select the appropriate store view.
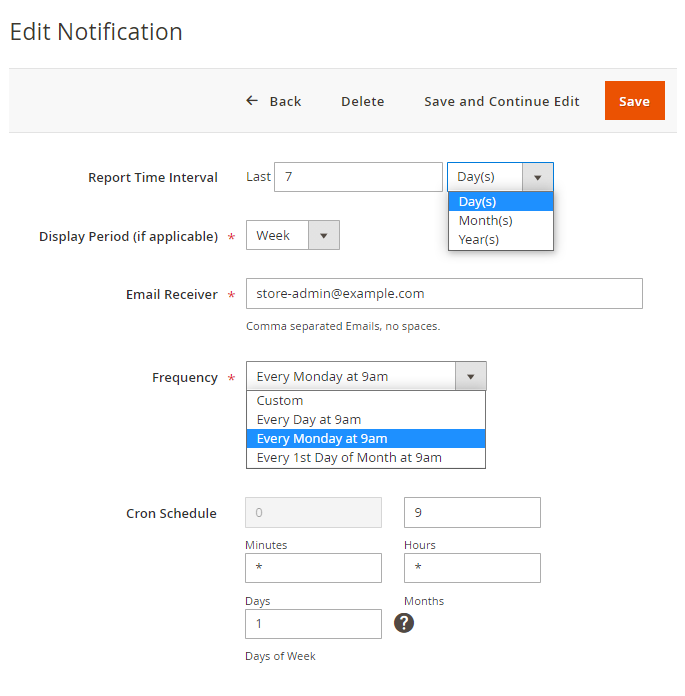
Report Time Interval - specify the time interval for which you would like to receive data. Fill in the number and choose the units (day, month, year).
Display period (if applicable) - set the display period for your report (day, week, month, year).
Email Receiver - type in the email, where the scheduled report will be sent.
Frequency - specify the frequency of sending the report. Choose one of the options in the dropdown window and Cron Schedule for your report will be filled in automatically. You can also set a Custom frequency for your report sending. Check this guide to know more about configuring custom frequencies with Cron.
Refresh Statistics
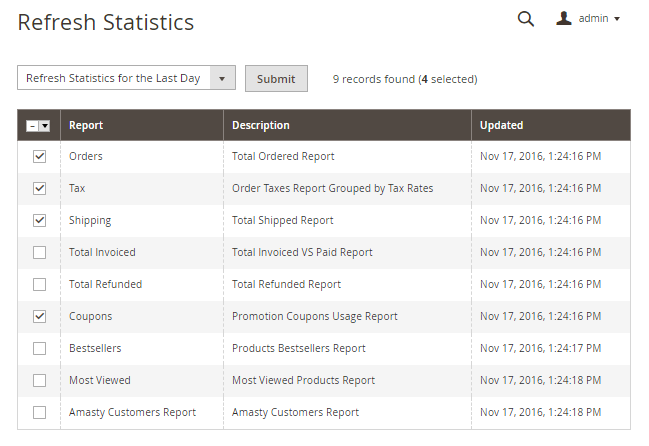
To refresh the statistics, go to Reports → Refresh Statistics. To get the reports timely updated and see the latest data, select necessary elements in the list and apply the Refresh Lifetime statistics or Refresh the Statistics for the Last Day action.
Advanced Reports Pro and Premium
The Advanced Reports solution also has Pro and Premium versions, within which, in addition to the functionalities described above, the following Custom Report Builder features could be added to your reporting solution:
Advanced Reports Pro
- Build your own new custom reports
- Use prebuilt templates for custom reports
- Use search field to quickly find columns for adding to your custom reports
- Adjust custom reports data display with smart filtering and sorting
- Choose various types of data aggregation
Advanced Reports Premium
- Advanced Reports Pro features included
- Modify 4 main reports from Advanced Reports module with Reports Builder
- Add custom columns to your custom reports
- Calculate and combine data of existing entities in custom columns
- Use 5 chart types to visualize data in custom reports
- Set out-of-stock/sales estimates
Please check this guide to get the full configuration instructions on Custom Reports Builder functionality.
Compatibility with other Amasty extensions
With Advanced Reports Pro and Premium, you can also analyze the data from other modules installed on your Magento store. This means the more modules you have, the more entities you can include in your reports.
We are constantly working on adding new integrations. For now, the following integrations with Amasty modules are available:
- Pre Order for Magento 2: add Amasty Pre Order extension to use the pre-orders and backorders data in your reports to better understand customer demands and needs. Timely discover which products are most popular and take this information into account when forming your store assortment. To use the data from the module, please run the following command in composer: composer require amasty/module-preorder-to-builder
- B2B Company Account: build extended reports based on company accounts data. Analyze the activities per each company (such as volume of sales, average check, preferred products, etc.) and form an efficient sales strategy using this information. To use the data from the module, please run the following command in composer: composer require amasty/module-company-account-to-builder
- Custom Form for Magento 2: explore the data gathered from the forms filled out by customers on your website. Find out which forms are more popular and bring more sales. See the number of submitted forms per each customer, etc. To use the data from the module, please run the following command in composer: composer require amasty/module-custom-form-to-builder
- Blog Pro for Magento 2: create comprehensive reports based on various blog data. Discover which categories or blog posts are most interesting to readers and find out which articles bring more conversions. To use the data from the module, please run the following command in composer: composer require amasty/module-blog-pro-to-builder
- Social Login for Magento 2: add Amasty Social Login extension to gather more detailed information about your customers and to explore what social networks really bring you the profit. To use the data from the module, please run the following command in composer: composer require amasty/module-social-to-builder
- Order Attributes for Magento 2: generate detailed reports based on custom order attributes to gain valuable insights from additional order data. Use this information to optimize marketing, sales, and customer experience strategies. To enable the integration, please run the following command in composer: composer require amasty/module-orderattr-builder
- Affiliate for Magento 2: analyze a wide range of affiliate data, and get comprehensive insights into your affiliate marketing performance. With this integration, you can easily track and evaluate which affiliates are driving the most traffic and which affiliate programs are delivering the best results. To enable the integration, please run the following command in composer: composer require amasty/module-affiliate-to-builder-by-amasty
💡Check the demo to view the additional reports that become available with the integrations.
Additional packages (provided in composer suggestions)
To make additional functionality available, please install the suggested packages you may need.
Available as a part of an active product subscription or support subscription:
For Pro and Premium versions:
amasty/module-advanced-reports-subscription-functionality- Install this package to use the 'Bought Together' report and to display the 'Customer Email' column in 'Abandoned Carts' report.
amasty/report-builder-scheduler- Install this package to schedule Custom Report Builder report notifications.
amasty/module-reports-pro-subscription-functionality- Install this package to display order numbers for new and returning customers in the ‘New vs Returning Customers’ report.
amasty/module-advanced-reports-total-row- Install this package to display a total row at the end of the reports to sum the values in each column.
Find out how to install the Advanced Reports extension for Magento 2 via Composer.
magento_2/advanced_reports.txt · Last modified: 2025/05/07 08:39 by asemenova

