Sidebar
magento_2:cookie_consent
Table of Contents
See the way the Cookie Consent (GDPR) for Magento 2 extension works.
Guide for Cookie Consent (GDPR) for Magento 2
Increase customer retention by giving them the opportunity to regulate their cookie usage. Implement a GDPR compliant cookie policy to your store with Cookie Consent extension for Magento 2.
- Arrange cookies into essential and optional categories
- Let customers choose which cookies they allow to process
- Efficiently manage categories and cookies they include
- Monitor all cookie consents and customers' data in one grid
- Use flexible design customization for your cookie policy bar
- WCAG compliance (for Luma and Hyvä Themes)
- Compatibility with Google Consent Mode V2
- Compliance with Hyvä and Hyvä Checkout Content Security Policies
![]() NEW: The module content is available in the German language! Backend and frontend settings are translated according to the selected locale. The sample file with the content of cookie descriptions can be found below:
NEW: The module content is available in the German language! Backend and frontend settings are translated according to the selected locale. The sample file with the content of cookie descriptions can be found below:
Magento 2 Cookie Consent (GDPR) extension is compatible with Hyvä themes. You can find the amasty/module-gdpr-cookie-hyva package for installing in composer suggest (Note: the compatibility is available as part of an active product subscription or Support Subscription).
The Cookie Consent (GDPR) extension is read and write compatible with GraphQL. You can find package for installing in composer suggest: amasty/module-gdpr-cookie-graphql (Note: the compatibility is available as a part of an active product subscription or Support Subscription).
The extension is compatible with GraphQL Application Server. You can find the amasty/module-graphql-application-server-compatibility package for installing in composer suggest.
Visit our FAQ section to get even more valuable information and find out answers to popular questions about the configuration and features of the Magento 2 Cookie Consent (GDPR) extension.
Geo IP Data Configuration
This product includes GeoLite2 Data created by MaxMind, available from 24.10.2023 (last update date).
The extension uses Geo IP Database to detect site visitors' location. Please, go to Stores → Configuration → Amasty Extensions → Geo IP Data.
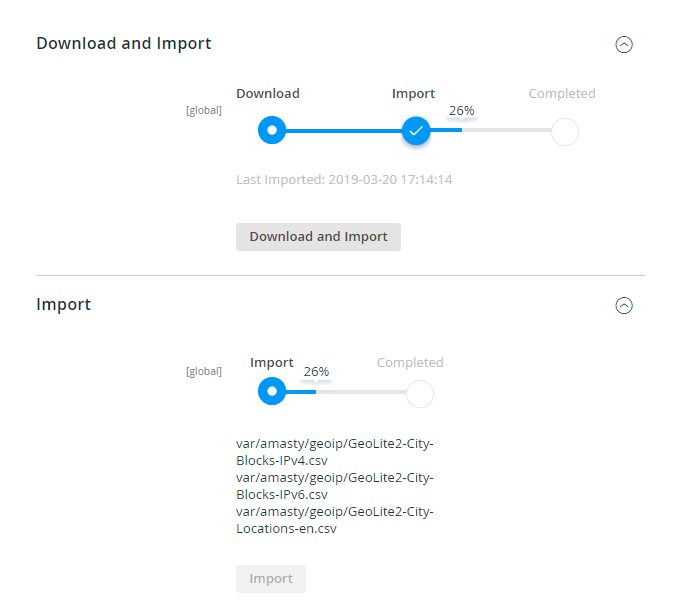
Databases are required for the correct work of the GDPR module. Also you need to install php bcmath or gmp extension on your server.
You can get the databases automatically or import your own data.
Hit the Download and Import button to make the extension download the updated CSV dump file and import it into your database automatically.
To import the files from your own source, use the Import option. Path to the files should look like this (the part 'var/amasty' should be replaced with your folders’ names):
var/amasty/geoip/GeoLite2-City-Blocks-IPv4.csv
var/amasty/geoip/GeoLite2-City-Blocks-IPv6.csv
var/amasty/geoip/GeoLite2-City-Locations-en.csv
In the Import section, the Import button is grayed out by default. It will be available right after you upload the CSV files. The red error notification will switch to green success notification when the import is completed.
IP Database Update Settings
The database included in the extension was last updated on October 24, 2023. To keep the IP database current, you can update it using one of two methods.
Please note that regardless of the updating method chosen, you need to import the IP database first.

Refresh IP Database - select the appropriate method for refreshing the IP database:
- Manually - to manually upload the updated database files;
- Update via Amasty Service - to update the database automatically and regularly via Amasty Service, which is complimentary for you until August 2024.
Debug Mode
You can enable IP forcing, which makes it possible to set a specific IP address that will be used instead of the visitor's real IP address when determining geolocation. The feature is useful while configuring or testing the extension.

Enable Force IP - set to Yes to replace the real IP address.
Force IP Address - specify the address to use instead of a real one.
General Settings
To adjust cookie policy settings, go to Stores → Configuration → Amasty Extensions → Cookie Consent.
Cookie Policy Tab
Expand this tab to configure the basic settings of the Magento 2 Cookie Consent extension.
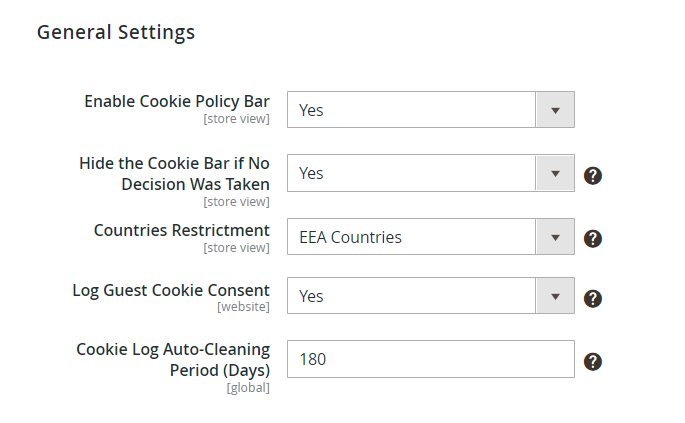
Enable Cookie Policy Bar - set to Yes to enable Cookie Notice Bar on Magento 2 frontend.
Allow Customers to Close Cookie Bar - when set to Yes, customers can close the cookie bar even if they haven't decided regarding cookies. When set to No, the cookie bar cannot be closed, and customers will be unable to interact with the website until they decide about cookies.
Please note: Before disabling this setting (selecting No), consult your local regulations, as the cookie wall functionality may not comply with specific legal requirements.
The Allow Customers to Close Cookie Bar setting is available only as a part of an active support subscription or product subscription. You can find the amasty/module-gdpr-subscription-functionality package for installing in composer suggest.
Hide the Cookie Bar if No Decision Was Taken - if Yes, the cookie bar will not be displayed to a customer on new pages if he doesn't accept or decline cookies. Thus, the customer will be less distracted from purchasing.
Please note: The Hide the Cookie Bar if No Decision Was Taken setting is available only if Yes is selected for the Allow Customers to Close Cookie Bar setting.
Countries Restrictment - enable this option to adjust the visibility of the Cookie Policy Bar on the frontend according to customer location.
You can display the Cookie Policy Bar for All Countries, EEA Countries or specific Countries selected in the list below.
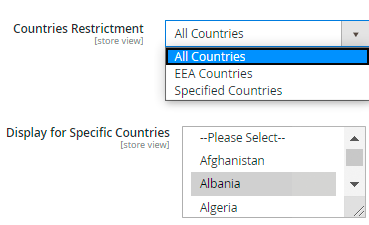
Other customers won't see the popup and a Cookie CMS Page. Consent logs are disabled for them as well.
Log Guest Cookie Consent - if enabled, guest users who give the consent will be logged and displayed in Consent Log.
Cookie Log Auto-Cleaning Period (Days) - set the period after which the records that were stored will be automatically cleaned.
Cookie Bar Types
Cookie Bar Style - choose the cookie bar type suitable for your store:
- Classic bar. It can be displayed either on top or in the footer of the page. It contains cookie policy text and buttons.

- Side Bar. Pop Up with Toggles contains additional info about each cookie group and a customer can easily adjust the consent within the first interaction.
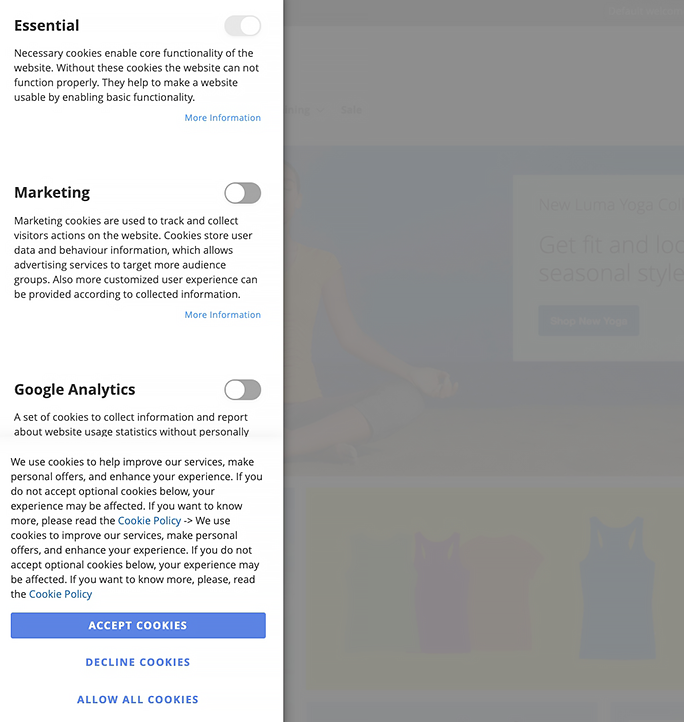
The new ability to control the sidebar using the keyboard guarantees all users the same experience of interacting with the cookie bar.
This means that people with disabilities will be able to use all the functions of the module in full according to the WCAG requirements.
To control the sidebar using the keyboard:
Press tab to switch between elements;
Press enter to select an item;
Press esc to close the sidebar.
- Pop Up. It is displayed in the center of a page.
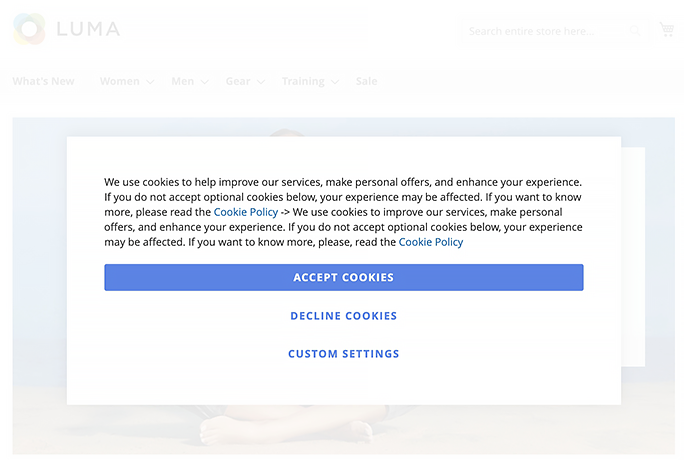
If customers accept all cookies regardless of a bar type, the cookie bar automatically disappears.
In case customers decide to reject all cookies at once, they can simply press the Decline Cookies button (button name is customizable). Please note that Decline Cookies button can be disabled in Admin panel if needed.
If they want to find extra information or allow specific cookies by clicking Custom Cookies (button name is customizable), they will see the following popup:
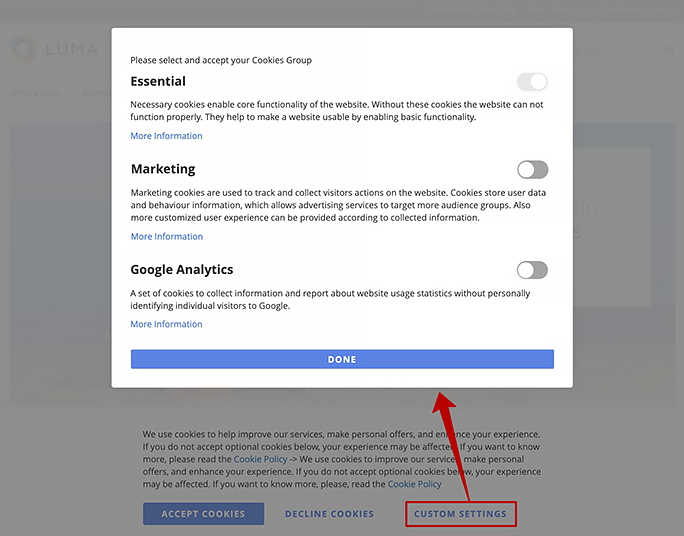
Thus, they can click the toggles and accept the particular cookies only.
From this popup, they can also find extra details about each cookie type by clicking More Information in the popup and see the info:
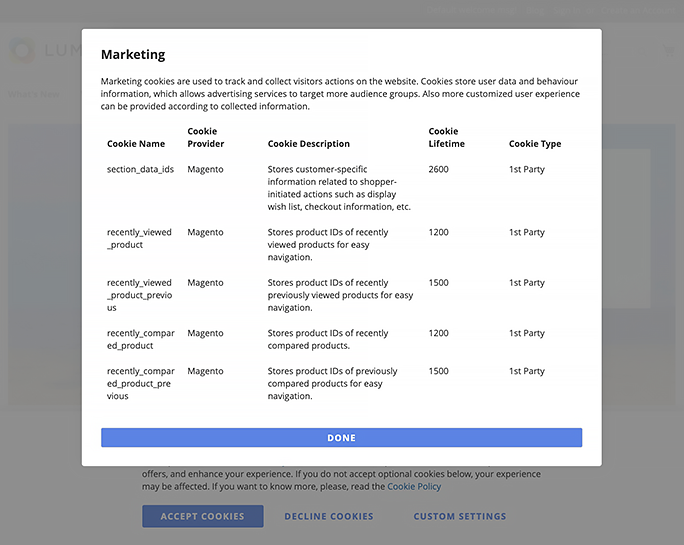
Keep in mind, that when you update cookies or cookie groups, a cookie banner reappears with actual information. Customers will see a cookie bar again in the following cases:
- cookie group info or cookie info (including description, lifetime, provider, etc .) has been changed;
- the statuses of particular cookies and cookie groups have been changed;
- cookies have been reassigned between groups.
Extra Frontend Option
The extension also adds a special link to the store footer so that customers could find information about cookies and revoke previously given consents at any time. The data is also displayed in the pop-up.
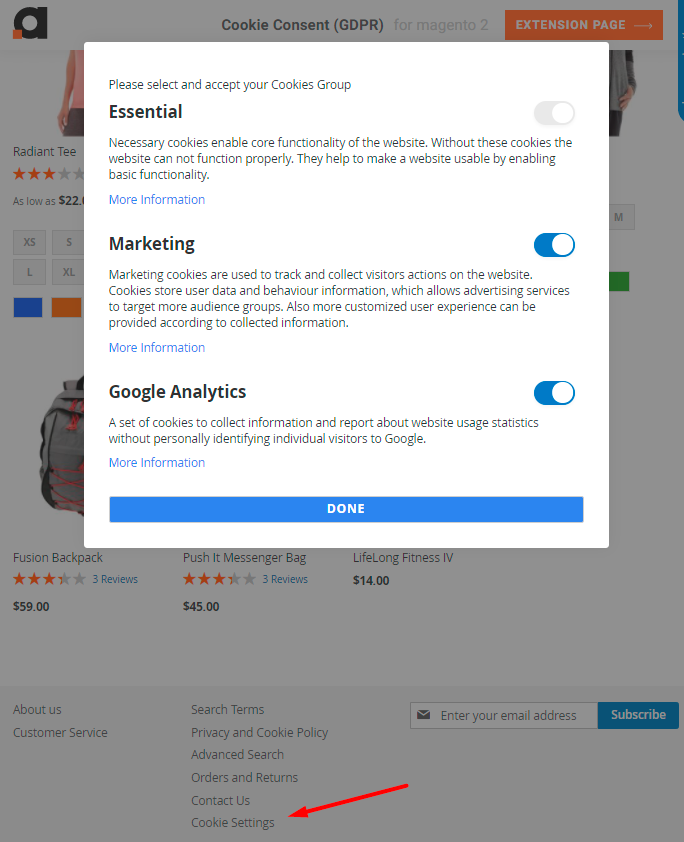
Classic Bar Design
Each bar type has multiple customization options.
For Classic bar you can specify the following settings:
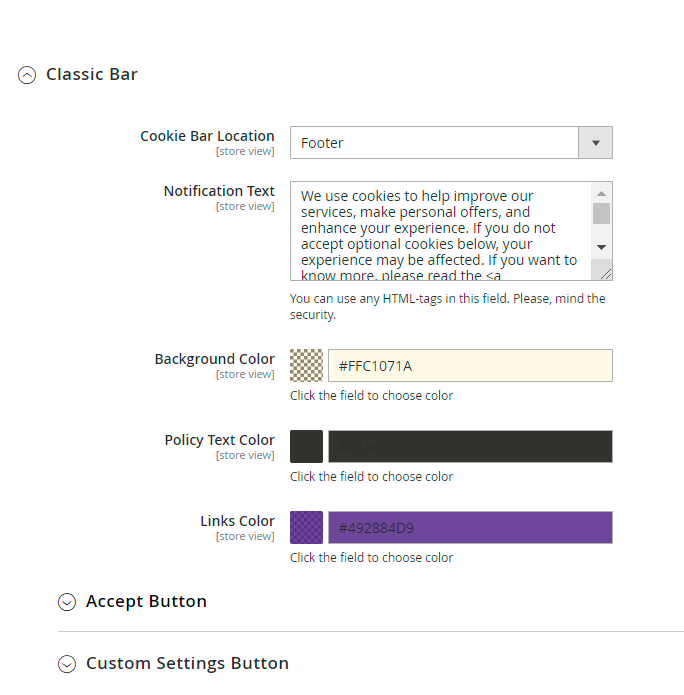
Cookie Bar Location - place a bar either at the top or in the footer.
Notification Text - provide the text to display in a popup. You can use any HTML-tags in this field. Please, mind the security.
With a handy color picker toolset the colors for the:
- popup background
- text of the bar
- links.
Also, you can customize the buttons.
For each button, you can customize:
- button name
- sort order
- button color
- color on hover
- text color
- text color on hover.
Save configuration and Flush Magento Cache to see the changes. An example of design customization:

Side Bar Design
For the side bar type there are the following settings:
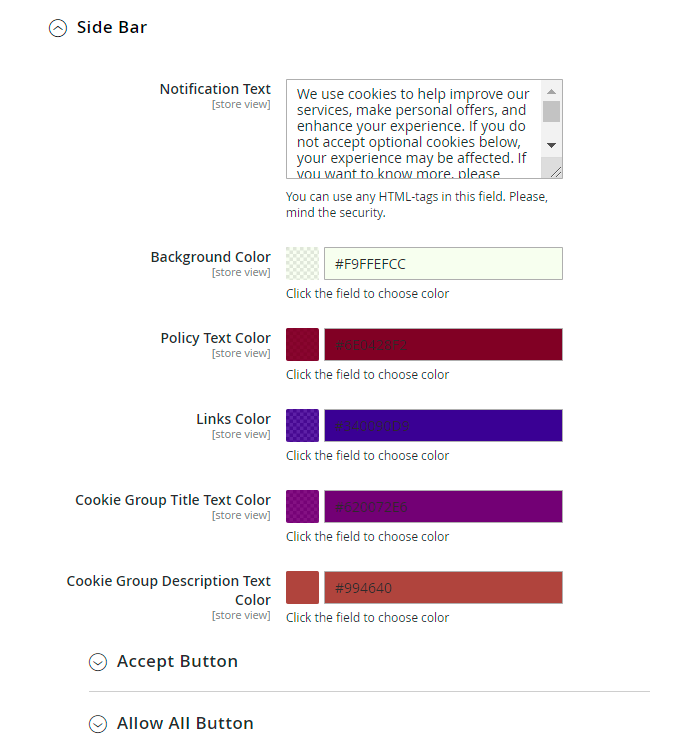
Here you can customize:
- Notification Text
- Background Color
- Policy Text Color
- Links Color
- Cookie Group Title Text Color
- Cookie Group Description Text Color
- Toggle Active State Color
- Toggle Inactive State Color (Please note that the colors of the essential cookie group toggle are not customizable)
For buttons, the settings are the same as for the Classic bar type.
The sample of customization:

Pop Up Design
For a pop-up style, manage the following settings:
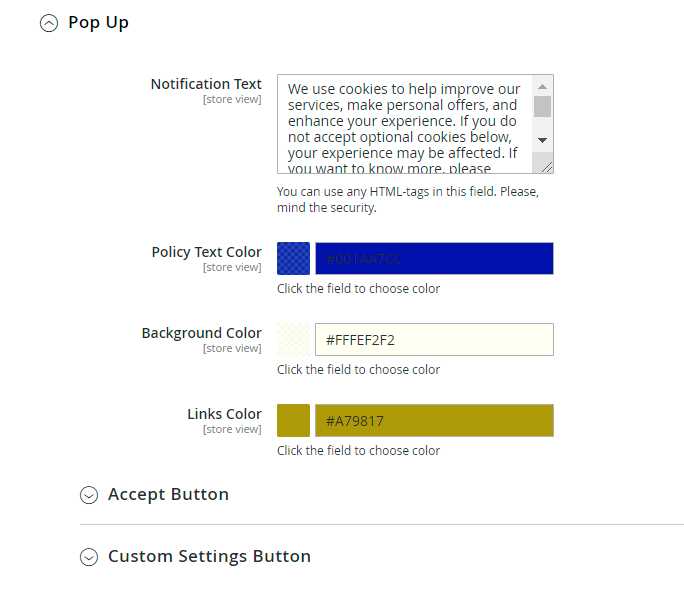
Adjust the:
- Notification Text
- Policy Text Color
- Background Color
- Links Color
- Buttons Design (as for the other styles).
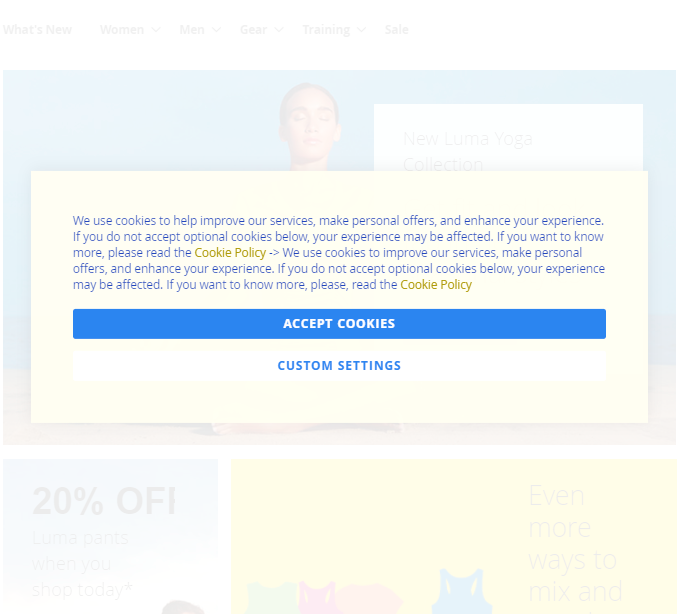
Check the result of customization:
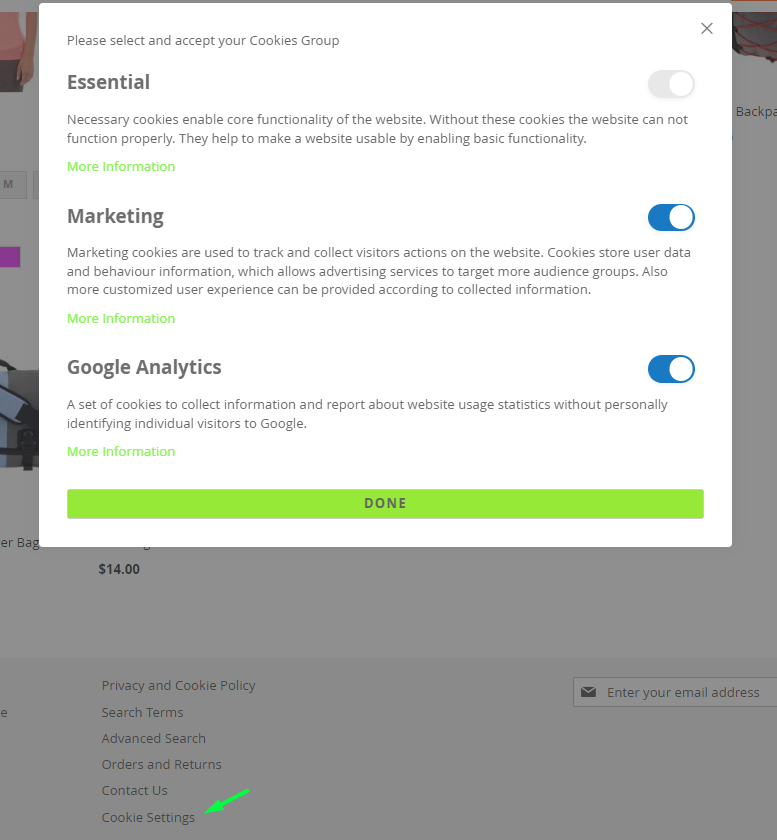
Cookie Settings Popup Design
This popup has been updated to comply with WCAG standards.
For Cookie Settings Popup, you can customize the following settings:
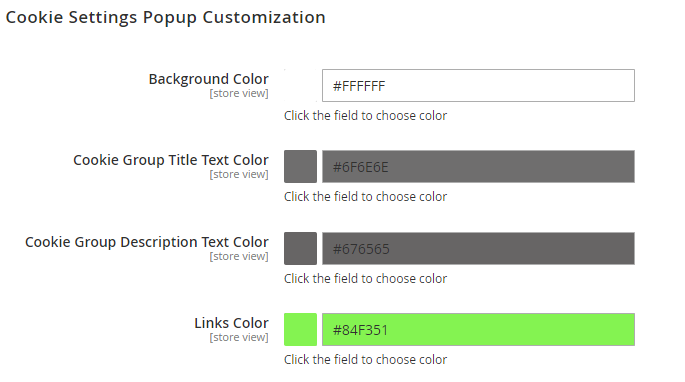
Please specify the colors:
- Background Color
- Cookie Group Title Text Color
- Cookie Group Description Text Color
- Links Color
- Toggle Active State Color
- Toggle Inactive State Color (Please note that the colors of the essential cookie group toggle are not customizable)
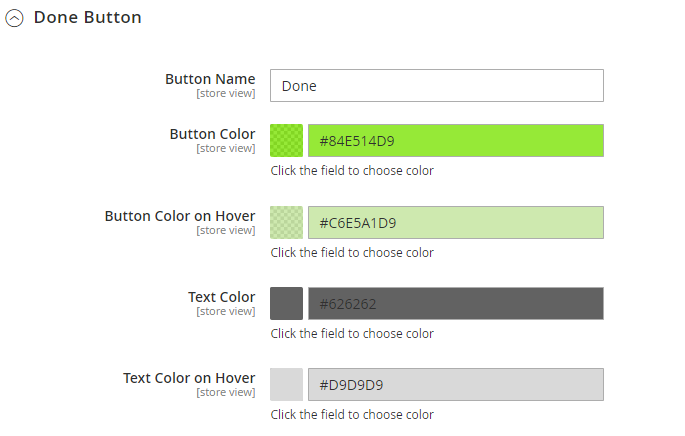
For the button, you can specify:
- Button Name
- Button Color
- Button Color on Hover
- Text Color
- Text Color on Hover
Here is the possible result of customization:

Cookie Information Popup Design
For Cookie Information Popup, you can customize the following settings:

Check the possible result of customization:

Consent Mode
The Cookie Consent (GDPR) extension is compatible with Consent Mode V2 (Note: the compatibility is available as a part of an active product subscription or support subscription). You can find the amasty/module-google-consent-mode package for installation in Composer suggest.
To ensure the Google Consent Mode functionality works with the Hyvä Theme, it is necessary to additionally install the amasty/module-google-consent-mode-hyva package.
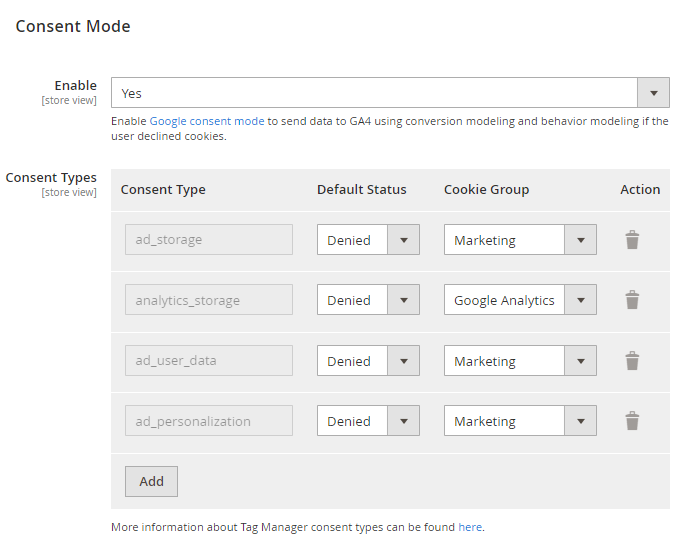
Enable - set to Yes to activate Google Consent Mode V2 and send data to GA4 using conversion modeling and behavior modeling if the user declined cookies.
Consent Mode V2 can be activated on your Magento 2 website if GTM is set up there by the following methods:
- using the built-in Magento EE (Enterprise) GTM functionality;
- manually adding the GTM script, for example, in the Scripts and Style Sheets setting.
- installing the Google Analytics 4 with GTM support extension from Amasty.
Consent Types - specify the needed consent types and their Default Status and Cookie Group settings. Access more detailed information about Tag Manager consent types here.
- ad_storage - Enables storage (such as cookies) related to advertising.
- analytics_storage - Enables storage (such as cookies) related to analytics e.g. visit duration.
- ad_user_data - Sets consent for sending user data related to advertising to Google.
- ad_personalization - Sets consent for personalized advertising.
- or click the Add button to add a custom consent type.
Please note that selecting the Granted option in the Default Status setting for specified consent types will result in data being sent to GA4 to the maximum extent as usual. Conversely, choosing the Denied option for specified consent types will only send a minimum of anonymized data about user activity to GA4. This ensures respect for user choices and compliance with the latest GDPR requirements.
Cookie Categories
To arrange cookies into essential and optional categories, go to Customers → Cookie Groups.
With the extension, you can manage all your cookie categories in a handy grid.
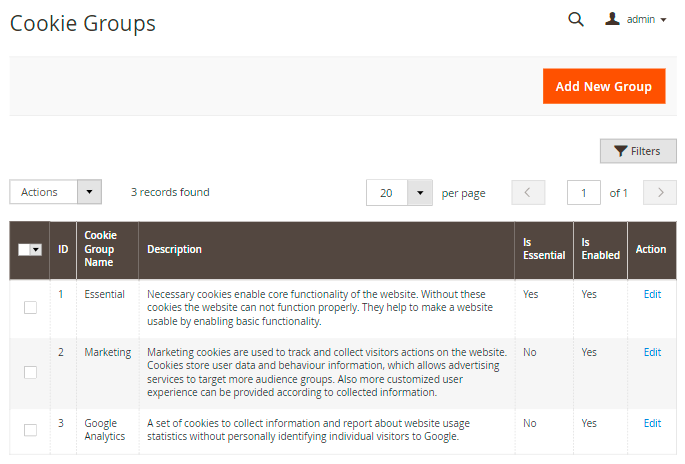
On the grid the ID, Cookie Group Name and Description are displayed. Also, you can see if each group Is Essential and Is Enabled.
To configure any group, click Edit in the Action column.
To delete several groups in one click, tick them and choose the Delete option in the Actions dropdown menu.
To create a new category, click Add New Group.
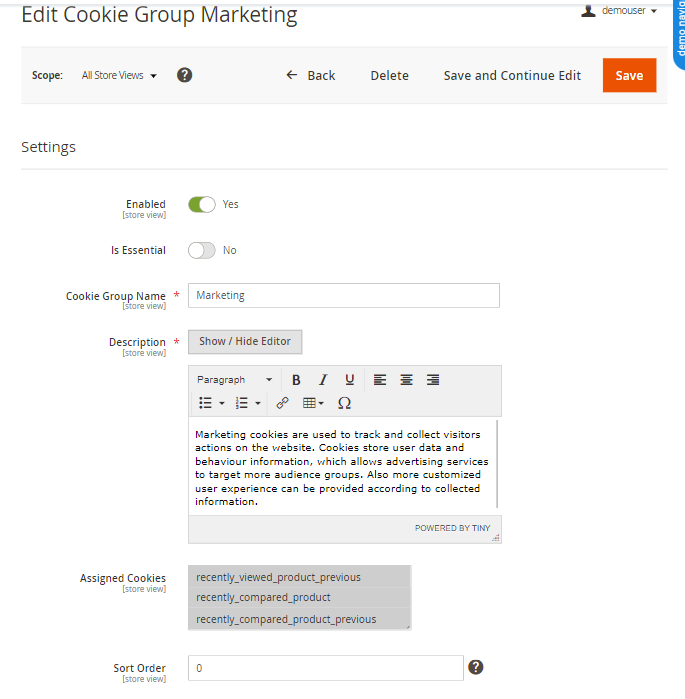
Enabled - choose Yes to activate the group.
Is Essential - set to Yes to make the group obligatory. In this case, the customers will have to allow this cookie group to get access to the website.
Cookie Group Name - specify the title of the cookie group that will be displayed to the customers on the frontend and on the grid in the admin panel.
Description - fill in the information about the usage of the group so that the customers could decide whether to allow this group or not.
Tip: use WYSIWYG editor to highlight specific information or make the description more structured.
Assigned Cookies - select the cookies to include in the group. See how to assign cookies to a particular category in this section.
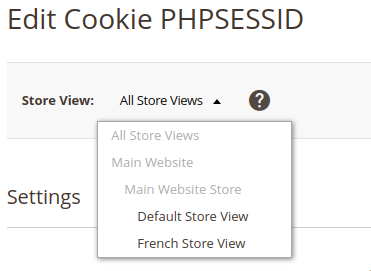
Keep in mind that you can customize cookies and cookie groups on a store view level. Just select the necessary store view on the Edit Group/Cookie page.
Save the configuration.
Cookie Grid
To manage cookies, go to Customers → Cookies.
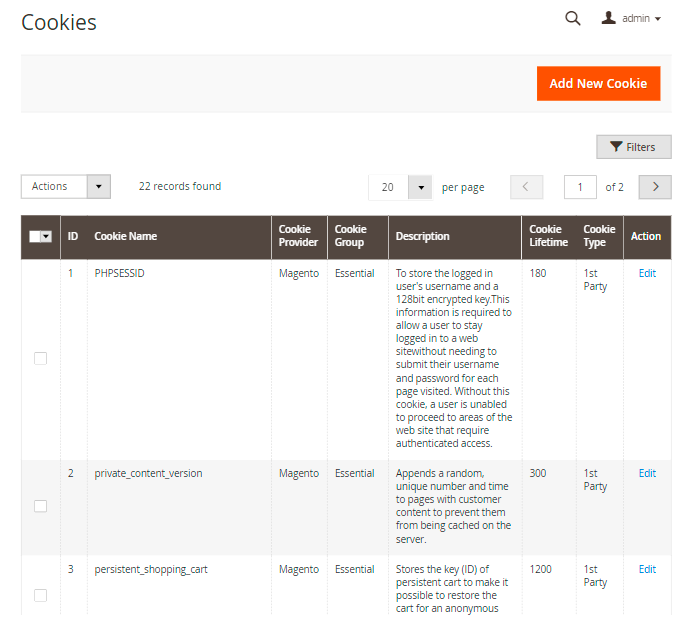
With the extension, you can track and filter cookies on a separate grid by its ID, Cookie Group and Cookie Name
To view or change the configuration of a cookie, click Edit in the Action column.
To delete cookies, tick them and choose the Delete option in the Actions dropdown menu.
To create a new cookie, hit the Add New Cookie button. All the information you provide about a cookie will be displayed to customers on the frontend in the appropriate section.
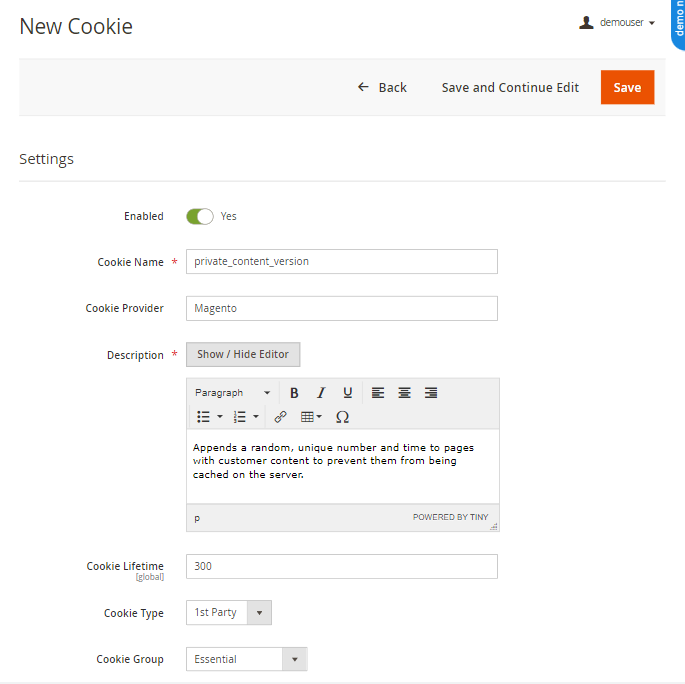
Cookie Name - specify the title of the cookie.
Cookie Provider - specify the company that uses and analyzes a particular cookie.
Description - fill in some information about the usage of the cookie.
Cookie Lifetime - set the lifetime of a cookie that will be displayed to customers on the Cookie CMS page.
Cookie Type - choose the type of the request in which a cookie is sent: 1st Party or 3rd Party.
Cookie Group - assign the cookie to a particular group.
Make sure that a section_data_ids cookie is placed in the Essential group to avoid issues with the shopping cart updating.
Tip: use WYSIWYG editor to highlight specific information or make the description more structured.
Cookie Consents Log
To find the list of all consents and customers data, go to Customers → Cookie Consents Log.
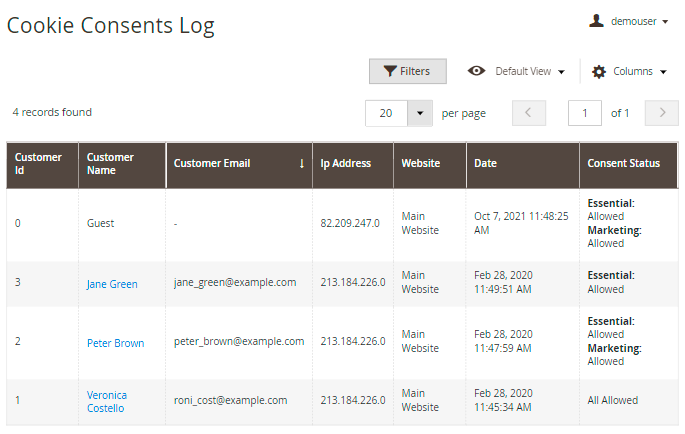
You can find all needed info in one place. The grid allows to track consents by customer Name, Email, IP Address, Website, Consent Type, Date and Consent Status. This data can be useful for different consents analysis.
For guests, the extension gets all possible data. If, for example, email is not specified, on the grid it will be displayed as '-'. Also, guests can change the cookie settings using the link in the footer.
JavaScript APIs for 3rd-party Cookies Block
Now the extension includes JavaScript APIs to let you block cookies added on your frontend by JS component.
To implement the compatibility, do the following:
- create a 3rd-party cookie on the Cookies grid (similar to cookies added by the extension)
- assign a cookie to the required cookie group
- change particular files as described below
For example, you have the JS component or simple script that adds some cookie on your frontend:
define([
    'jquery',
    'uiCollection',
        // Some other dependencies
], function ($) {
    'use strict';

    return Collection.extend({
        initialize: function () {
            this._super();
            this.yourCustomMethodToAddCookie();
            return this;
        },
        /**
		 * Method to initialize custom cookie
     	 */
        yourCustomMethodToAddCookie: function () {
        	$.mage.cookies.set('my-awesome-cookie', 'cookie-data-value');
        }
    });
});
With our module, you can make this cookie GDPR-compliant. Use one of the approaches below (or even both if you wish).
Synchronous approach
Pros: Your custom JS code will be executed on demand without any delays
Cons: It's impossible to check essential cookies. Thus, you should avoid using this approach when you have different essential cookies on your stores.
Let's modify the component to make it GDRP-compilant via Synchronous approach:
define([
    'jquery',
    'uiCollection'
], function ($) {
    'use strict';

    return Collection.extend({
        initialize: function () {
            this._super();
            this.yourCustomMethodToAddCookie();
            return this;
        },
        /**
		 * Method to initialize custom cookie
     	 */
        yourCustomMethodToAddCookie: function () {
        	var disallowedCookies = document.cookie.match(new RegExp('(^| )amcookie_disallowed=([^;]+)')) || [];
        	var allowedCookies = document.cookie.match(new RegExp('(^| )amcookie_allowed=([^;]+)')) || [];
        	var isAllowedToRunScript = !!allowedCookies.length && (!disallowedCookies[2] || disallowedCookies[2].split('%2C').indexOf('my-awesome-cookie') === -1)
        	if (isAllowedToRunScript) {
        	    $.mage.cookies.set('my-awesome-cookie', 'cookie-data-value');
        	}
        }
    });
});
Asynchronous approach
Pros: All GDRP Cookie JS logic and your custom JS logic is fully compliant. You will have full control over cookies added via custom JS code and run a custom code after cookie acceptance
Cons: Your JS code will be executed after some GDRP Cookie JS logic with delay.
Let's modify the component to make it compliant via Asynchronous approach:
define([
    'jquery',
    'uiCollection'
], function ($, Collection) {
    'use strict';

    return Collection.extend({
        initialize: function () {
            this._super();
            this.cookieCompilantMethodWrapper(this.yourCustomMethodToAddCookie.bind(this)); // Wrap your method with error resistant wrapper
            this.initCookieEventListeners(); // Add event listener to run custom code immediately after the client accepts the cookies.
            return this;
        },
        /**
		 * Cookie Allow and Save actions event listener
     	 */
        initCookieEventListeners: function () {
        	$('body').on('amcookie_save amcookie_allow', function () {
                this.cookieCompilantMethodWrapper(this.yourCustomMethodToAddCookie.bind(this));
            }.bind(this));
        },
        /**
		 * Cookie compilant wrapper for your method
     	 */
        cookieCompilantMethodWrapper: function (cookieSetterCallback) {
        	require(['Amasty_GdprCookie/js/model/cookie'], function (cookieModel) {
        	    if (cookieModel.isCookieAllowed('my-awesome-cookie')) {
        	        cookieSetterCallback();
        	    }
        	}, function(errorMessage) {
`              cookieSetterCallback(); // In case if not existing of Amasty component we MUST run the callback
        	});
        },
        /**
		 * Method to initialize custom cookie
     	 */
        yourCustomMethodToAddCookie: function () {
        	$.mage.cookies.set('my-awesome-cookie', 'cookie-data-value');
        }
    });
});
Troubleshooting
For correct custom cookie tracking and interaction with Google Analytics 4, please navigate to Content → Design → Configuration → Choose the needed store view → HTML Head → Scripts and Style Sheets field and add the following script:
<!-- Google Tag Manager -->
<script>
require(['jquery', 'mage/cookies'], function ($) {
    const callGTM = () => {
        const gtmId = 'YOUR GTM ID'; // Insert your gtm id here

        (function(w,d,s,l,i){w[l]=w[l]||[];w[l].push({'gtm.start':
        new Date().getTime(),event:'gtm.js'});var f=d.getElementsByTagName(s)[0],
        j=d.createElement(s),dl=l!='dataLayer'?'&l='+l:'';j.async=true;j.src=
        'https://www.googletagmanager.com/' + 'gtm.js?id='+i+dl;f.parentNode.insertBefore(j,f);
        })(window,document,'script','dataLayer', gtmId);
    }

    const isGoogleAnalyticsCookieAllowed = () => {
        const disallowedCookieAmasty = $.mage.cookies.get('amcookie_disallowed') || '',
            allowedCookiesAmasty = $.mage.cookies.get('amcookie_allowed') || '',
            googleAnalyticsCookieName = '_ga';

        return !((disallowedCookieAmasty.split(',').includes(googleAnalyticsCookieName) ||
            !allowedCookiesAmasty) && window.isGdprCookieEnabled);
    }

    $('body').on('amcookie_save amcookie_allow', () => {
        if (!isGoogleAnalyticsCookieAllowed()) {
            return;
        }

        callGTM();
    });

    if (!isGoogleAnalyticsCookieAllowed()) {
        return;
    }

    callGTM();
});
</script>
<!-- End Google Tag Manager -->
Please don’t forget to insert the unique GTM ID (copied from your Google Tag Manager account) into the specified place in the script (“YOUR GTM ID”).
Additional packages (provided in composer suggestions)
To make additional functionality available, please install the suggested packages you may need.
Available for all tariff plans with no additional fees:
amasty/gdpr-cookie-facebook-pixel-sample-data- Please install Gdpr Cookie Facebook Pixel sample data module to add sample data.
amasty/module-graphql-application-server-compatibility- Install this package to ensure compatibility with GraphQL Application Server.
Available as a part of an active product subscription or support subscription:
For Basic, Pro and Premium versions:
amasty/module-gdpr-cookie-hyva- Install module-gdpr-cookie-hyva module to activate the integration GDPR module with Hyva Theme.
amasty/module-gdpr-cookie-graphql- Install this package to ensure Amasty Cookie Consent extension works with GraphQL.
amasty/module-google-consent-mode- Install this package for Google Consent Mode compatibility.
amasty/module-google-consent-mode-hyva- Install this additional package to ensure the Google Consent Mode functionality works with the Hyvä Theme.
amasty/module-gdpr-subscription-functionality- Install this package to allow customers to close the cookie bar.
FAQ
* How to edit the text colour and fonts for the Cookie Consent bar?
* Will the module block cookies added by 3rd-party GTMs or Javascipt?
* How can we force the cookie bar to reappear if one just clicks outside of it and continues browsing?
* How to add the Cookie Setting link to a website's footer?
* How to add a Decline All button?
Find out how to install the Cookie Consent for Magento 2 via Composer.
magento_2/cookie_consent.txt · Last modified: 2025/06/09 11:52 by kkondrateva


