
Sidebar
magento_2:blog_pro
Table of Contents
For more details, see how the Blog Pro for Magento 2 extension works.
Guide for Blog Pro for Magento 2
Make blogging an effective part of your marketing strategy with Blog Pro for Magento 2. Take advantage of the responsive design and customizable layout settings. Add meta information to the posts, categories, and tags and explore the power of SEO.
- Use responsive layout design
- Customize blog posts display
- Display blog menu as a dropdown with categories
- Use AMP to make pages work fast
- Add multi-level category tree and 3D tags for enhanced navigation
- Manage comments effectively
- Make your blog user- and SEO-friendly
- Import and Export Blog entities
- Allow users to share your content on social networks
- Share with readers the information about authors
- Flexibly customize Rich Snippets for blog posts
- Amasty ChatGPT AI Content Generator included
- Compatibility with Amasty XML Google® Sitemap
- WCAG compliance (for Luma and Hyvä Theme)
- REST API support
- Support for Tailwind CSS JIT mode
The extension is read compatible with GraphQL. Expose the data like post page, recent posts, posts grid, recent comments, comments, categories tree, tags, author page, category page, etc. in order to build PWA/JS-based frontend
The extension is compatible with Hyvä Theme. You can find the 'amasty/module-blog-hyva' package for installing in composer suggest.
The compatibility is available as a part of an active product subscription or support subscription.
The extension is compatible with Amasty Custom Reports Builder. This means that if you have both extensions installed, you can automatically create comprehensive reports based on various blog data. Read more about Report Builder here.
See a detalied use-guide to learn how to properly configure your Magento 2 Blog extension. After reading this step-by-step tutorial you will be able to easily set up your Magento blog.
Magento 2 Blog Extension is a powerful tool for creating an informative blog. Make the posts noticeable by adding images and thumbnails; optimize your posts for search engines, use share buttons to attract new readers and visitors. The Magento 2 Blog module is very flexible and has an intuitive interface.
Configure the extension
Blog Pro has many options in the configuration section. Don't worry about such a large number of settings, once the main options are set, posting blog articles becomes a matter of several minutes. To access the settings of 'Blog Pro for Magento 2' please go to Stores → Configuration → Blog Pro

How to apply filters on Desktop/Mobile with Varnish
If you need different types of cache for mobile and desktop devices, please, insert this code (line 2-8) into the section vcl_hash in the varnish configuration file (vcl).
sub vcl_hash {
    if (req.http.X-UA-Device ~ "^mobile"
        || req.http.X-UA-device ~ "^tablet"
    ) {
        hash_data("mobile");
    } else {
        hash_data("desktop");
    }
}
For the correct work of this code, please make sure that you have this library installed.
Display Settings
Configure the blog link position on your webstore pages.

Blog Link Title - give a title that will be displayed in the link to the blog.
Display Blog Link in Footer - enable if you want to display the link to the blog on the footer.
Display Blog Link in Header - set to Yes to display the link to the blog in the header.
Display Blog Link in Top Menu - switch to Yes to display the link to the blog in the categories menu.
Enable Blog Categories Menu - If enabled, the Blog link in the top menu will display a dropdown with a submenu containing a list of categories for better navigation. (Note: the functionality is available as a part of an active product subscription or support subscription). To ensure this feature functions correctly, you must enable the 'Include in Blog Categories Menu' setting on the editing pages of the specific categories you want to display in the Blog top menu.
Currently, in the native Hyva menu, only first-level nesting is displayed. However, when using Hyva UI templates, the C | Vertical dropdown 4 column and D | Shop dropdown 4 column menus support deeper nesting. We are also actively working on overcoming this limitation.
Display Amasty Blog Pro Extension Link - set to Yes to display the link to Amasty Blog Pro Extension at the bottom of blog post pages.
Here is an example of how the footer link looks on the frontend.

Check the examples of the links located in the Header and in the Top Menu.

Example of a dropdown with Blog categories in top menu:

Explore our internal Knowledge Base to gain even more valuable insights and uncover answers to popular questions about the configuration and features of the Magento 2 Blog Pro extension.
Search Engine Optimization Section
Optimize the blog for search engines by adding well-thought meta titles, keywords, and description. Your blog will appear higher in search results and thus attract more visitors.

Route - Specify the URL title, which will redirect visitors to your blog page.
Blog Home Page Title - Specify the blog title, which will be displayed on the blog home page.
Blog Home Page Breadcrumb Label - Specify the label for breadcrumb navigation.
Blog Home Page Meta Title - Define the meta title for the main blog page in a browser tab.
Blog Home Page Meta Description - Add the meta description for the blog home page. It will be displayed in the search engine results page.
Blog Home Page Meta Keywords - Determine the keywords by which customers can find your blog.
Blog Pages Meta Title Prefix - Set the default prefix that will be displayed in a browser tab in front of the page title for all blog pages.
Blog Pages Meta Title Suffix - The meta title suffix is a permanent text that will be added to the meta title of all post pages. This text will be separated from the meta titles with “ | ”. You can use your brand name as a meta title suffix. This will contribute to your brand awareness.
Meta Robots - Select the option of the Meta Robots setting from the dropdown to give search engines instructions on how to index and check blog pages.
INDEX, FOLLOW - the option allows the indexing and allows the search crawlers from going through links on the blog pages.
NOINDEX, FOLLOW - the option allows to block the indexing but allows the search crawlers from going through links on the blog pages.
INDEX, NOFOLLOW - the option allows the indexing but prevents the search crawlers from going through links on the blog pages.
NOINDEX, NOFOLLOW - the option allows to block the indexing and prevent the search crawlers from going through links on the blog pages.
By default, the option of the Meta Robots setting selected in this tab will be applied to all types of blog pages. But if in the configuration of separate entities (Post, Category, Author, or Tag pages) the Meta Robots setting is set to another option, it will be given a priority.
This is how the settings look on the frontend.

Organization Name - Your company name will be used for the creation of post microdata.

The best Magento 2 Blog extension is designed to increase your blog visibility with microdata: breadcrumb, author, name, description, image. Fill in the appropriate fields while creating a post to better index the articles and make your blog more SEO friendly.
Layout
Here you can arrange blocks with different blog information and specify how they will look on the frontend. Four layout types are available: desktop layouts for the main blog page and for a post page and the same layouts for mobile devices. The blocks are visualized; you can change the order using drag and drop option.
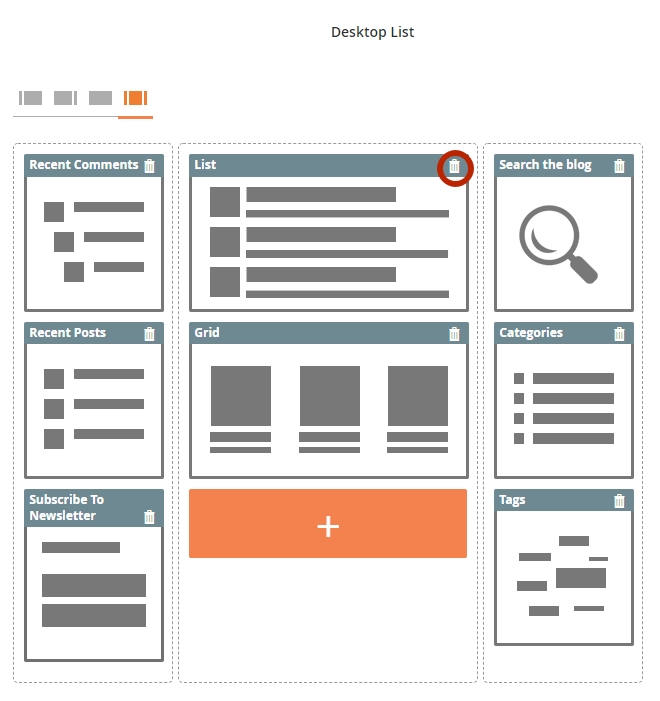
Desktop - It's possible to group the blocks in one, two, or three columns. To add a block, click the
'Plus' button; to delete a block click the basket in its upper-right corner. This is an example of the main blog page; the post page has the same options.
This is the frontend example of the main blog page.

And here is an example of a particular post page.

Mobile - On mobile devices, such as tablets and smartphones, your blog will have a 2-column layout, the other options of the layout constructor are equivalent to Desktop. The screenshots below show how a mobile post looks on the frontend. To see the tab with categories and other blocks, a customer should swipe it from the left or right side.

URLs and Redirects

URL Postfix - The .html postfix shows search engines that the page is static and is reliable. Also, you can use slash( “/“) as a value. The addition of a slash at the end of a URL instructs the webserver to search for a directory. This speeds the web page loading because the server will retrieve the content of the web page without wasting time searching for the file.
Redirect to SEO formatted URL - If you set the option to 'Yes', customers and search robots will be redirected to the SEO-friendly post page by 301 redirects.
List

List - Define the number of posts displayed on one blog page.
Display Blog Summary - Set to ‘Yes’ whether you’d like to show a blog summary and provide customers with a brief overview of the topics covered in the blog.
Select CMS Summary Block - Choose the CMS block to be displayed as a blog summary below the blog title on the main blog page.

If there are more articles in your blog, visitors can browse content with Older/Newer Entries links.
Post

Display Author Name - Choose 'Yes' if you want to display the name of the post author on the frontend.
Display Number of Views - Set to 'Yes' to display the number of views for each blog post.
Display Read Time - Set ‘Yes’ to automatically add estimated reading time to each blog post. It can help to motivate blog visitors to read posts through to the end.
Display Tags - Tags help readers find all posts on the same topic.
Created Date Format - Choose how to display the publishing date. It can be either in the standard format or as the number of days passed since posting.
Display the date when blog post was edited - Choose ‘Yes’ to display the date when a blog post was last edited.
Edited Date Format - Specify how to show the date of the post's last editing. It can be displayed in the standard format or as the number of days passed since posting.
Width of image on Blog page - Define the images' width to use on the blog pages.
Height of image on Blog page - Define the images' height to use on the blog pages.
Preserve Image Ratio - When enabled, images will maintain their aspect ratio. If the dimensions don't match the size specified in the configuration, white borders will be added to preserve the ratio. When disabled, images will stretch to fit the dimensions set in the configuration (according to the values set in the 'Width of image on Blog page' and 'Height of image on Blog page'). Please note that to apply these changes, you need to clear the cached blog images in the ‘pub/media/amasty/blog/cache’ folder and refresh the page in your browser. (This functionality is available as a part of an active product subscription or support subscription).
Enable 'Like' control - Set 'Yes' to enable blog visitors to vote for posts on the frontend via likes or dislikes. It will help you to indicate which topics are more helpful and interesting for your readers.
Enable Previous-Next Navigation - Set ‘Yes’ to enable prev-next navigation between posts based on their published date. The navigation is located at the bottom of the blog post on the frontend.
Post Rich Data

Show Title - here you can specify which option should be displayed in Rich Snippets as a title of post (‘Title’ or ‘Meta Title’) if a post has both values. If the post has only one of these parameters specified, so it will be displayed in the Rich Snippets. Leave ‘None’ not to display any title information.
Show Author Name - set to 'Yes' to display the posts author name.
Show Author Url - set to 'Yes' to display the link to the author page.
Show Author Type - here you can choose the option 'Person' or 'Organization.' However, please note that this setting only selects the snippet type (Type: Person or Type: Organization) for the author. The data for displaying other information in the author field (name, URL) will be taken from the respective settings on the posts in both cases.
Show Publication Date - set to 'Yes' to display the posts publication date.
Show Image - here you can specify which option should be displayed in Rich Snippets as a post image(‘Post Image’ or ‘List Image’) if a post has both values. If the post has only one of these parameters specified, so it will be displayed in the Rich Snippets. Leave ‘None’ not to display any image.
For further information on field mapping in snippets, please refer to this resource.
Categories

Show Categories the Post Belongs to - Set to 'Yes' to display the categories block on post view and listings pages.
Limit of Categories to Show on Post - Here you can limit the number of categories that should be displayed on post view. If you leave this field empty or fill in 0, all categories assigned to a blog post will be displayed.
Limit of Categories in Layout Widget - This setting defines the number of categories per each level to be shown in the categories tree.
Comments

Use Comments - Enable or disable comments on the frontend.
Automatic Approving - You can allow publishing comments immediately without approval or moderate them first.
Allow Guest Comments - Enable or disable guest comments.
Quantity of Recent Comments in Block - Define the number of comments that will be displayed in the 'Recent Comments' block.
Display Short Content for Recent Comments - If you enable this option, customers will see the beginning of recent comments in the block.
Display Date for Recent Comments - Set this option to 'Yes' if you'd like to show the date when a comment was left in the 'Recent Comments' block.
Ask Email for Comment - Make the Email field mandatory for new comments.
Ask Name for Comment - Make the Name field mandatory for new comments.
Notify Customers about Replies to Comments — Choose 'Yes' to notify customers about new comments to the thread they participate in. If you enable this setting, the two additional fields will be displayed, where you can specify the Email Sender and the Email Template for customers' notifications.
To let customers Unsubscribe from such notifications please install the EmailUnsubscribe system module which is supplied with the extension.
Enable GDPR Consent - Enable or disable the GDPR consent for comments.
GDPR Consent Text - Specify the consent text with a link to the privacy policy page.
The module doesn't provide your store with a privacy policy. It should be created as a CMS page in the admin panel.
Notification of Added Comment
Keep your store administrators timely informed of every added comment.

Enabled - Choose 'Yes' to enable notifications of added comments.
Receiver - Specify the email addresses, to send the notifications. Several emails should be written on a separate line.
Sender - Define the sender.
Notification Template - Choose the email template to send the notifications of a newly submitted comments.
Recent Posts Block

Recent Posts Quantity in Block - Set how many posts will be displayed in the block.
Display Short Content - Select 'Yes' to allow your customers to read the beginning of posts.
Display Date - Choose whether you want to show the publication date in the Recent Posts Block.
Display Image - Specify whether you want to show images in the recent posts block.
Image Width and Image Height - Specify an image size.
Posts & Products Relation
In this tab, you can configure the general settings of the relations between posts and products.

Show Related Posts Tab on Product Page - Choose 'Yes' if you want to display the related blog posts on product pages.
Related Posts Tab Title - Indicate the title for the related posts tab.
Show Related Products Block on Post Page - Set to 'Yes' if you want to display the related products block on the blog posts pages.
Related Products Block Title - Specify the title for the related products block.
You can adjust the connections between particular posts and products on each post editing page.
Tags
Tags are more specific than categories. They help visitors find posts on the topic they are interested in quicker.

Minimal Posts Number per Tag - Define the minimal quantity of posts that a tag should have.
Tags Display Limit - Specify how many tags can be displayed in the tags block on the frontend. If empty or 0, all enabled tags will be displayed.
RSS Feed
RSS feed integration with a Blog extension allows for automatic distribution of your content, keeping subscribers updated and driving more traffic to your site. It also enhances SEO by regularly delivering fresh content to search engines. (Note: the compatibility is available as part of an active product subscription or Support Subscription)

Enable - Set to 'Yes' to enable functionality.
For the configuration to work correctly, please enable the Magento RSS functionality in the RSS Config.
RSS Feed Title - Enter a title that will be displayed as a blog title in the RSS feed.
RSS Feed Description - Enter a description that will be displayed as a blog description in the RSS feed.
RSS Feed Limit - Specify the number of blog posts to be included in the RSS feed.
Social Buttons

Enabled - The option turns on/off social networks share buttons.
Networks - Choose networks where your customers will be able to share posts. The following networks are available: Twitter, Facebook, Vkontakte, Odnoklassniki, Blogger, Pinterest, Tumblr, Digg, Slashdot, Reddit, LinkedIn, Whatsapp, Telegram and Snapchat
Please note, that Snapchat works only via mobile application.
Frontend example. As you can see, the sharing buttons are displayed right under the article on each post page of the blog.

Look and Feel

Include - Select a color scheme for the icons displayed at the top of a blog post (the author, number of views, the Print button, etc.).
Accelerated Mobile Pages
Enable this option to make mobile pages work fast. AMP pages load nearly instantly and offer smooth experience on any mobile screen.

Image - Choose a logo image to display on accelerated mobile pages. Allowed file types: jpeg, gif, png. Maximum file size: 2MB
Width/Hight - Specify logo width and height. Note, that it shouldn't exceed 180 х 60px.
Design - Configure color settings for tags, links, buttons, and footer displayed on accelerated mobile pages.
How does it work?
AMP is a feature that optimizes website pages and makes them fast-loading on mobile devices. It is possible due to the special algorithm that replaces any code with HTML. It allows to remove and replace tags in order to make the page as fast as possible.
Key features:
- Pages are rendering extremely fast.
- The extension applies AMP on mobile devices only. It doesn’t affect the desktop version.
- The position in Google ranking is improved due to the better score in Google PageSpeed Insights.
- It works properly on the Magento cloud as well.
Blog Search

Min Characters - Specify the number of characters that customers should type in to trigger the search process. The recommended value is 3 or higher.
Number of items displayed in live search per entity - Here you can set the number of items that will be displayed under each entity (Post, Author, Category, Tag) search tab in a popup. The recommended value is 3 or higher.

Fonts

Font Type - Here you can choose a font type for usage in the blog that is more suitable for your needs (Default or Google).
Google Font - Specify the name of the Google font that you want to be applied to the Title, Short & Full Content of all blog pages. Click here to choose the Google font name.

Posts
Reach features of the extension allow you to create blog posts adding images, thumbnails and author details. Besides, you can optimize posts for search engines and thus increase leads traffic to the store.
To view, edit and create posts, please go to Content → Posts. A convenient grid displays all your articles. Discover mass actions to manage blog content faster. To submit a new entry, please click the 'Add Post' button in the upper right corner of the page.

Every post has three options: Edit and Duplicate.
Edit - If you want to make some changes in the post content, select this option or just click the post line.
Preview - Select this option to preview the post look and feel.
Duplicate - Create copies of the posts if needed.
For this example, we will edit one of the existing posts.
Edit and create posts
Create posts with an all-in-one intuitive live design editor. Create texts and complement them with advanced formatting, various fonts, images, lists, and tables. Preview the post look and feel, add tags, categories, and metadata.

Title - Specify the title of the post.
URL Key - Define an SEO-friendly URL for the post.
Post Image - Choose an image that will be displayed in the post.
Post Image Alt - Specify an alternate text for a post image to be shown when a user for some reason cannot view it.
List Image - Choose an image that will be displayed on the main blog page.
If you add only one image, it will be displayed for both list and post.
List Image Alt - Specify an alternate text for a list image. A title of the post will be used if this field is empty.
Image Link - You can insert a link to an internal page in your store or to another website.
Full Content - Write the actual post in this field.
The type of editor (WYSIWYG or Page Builder) depends on the version of Magento installed on your website. Check out the FAQ article for more information.
Short Content - Write a short description or summary of the post. It will be displayed on the main page as a preview for the post.
Tags - Specify the tags that are related to the post topic. If you used a tag once in the past, it will be autocompleted. Find out how to create a tag in this section.
Preview - Preview the post look and feel before publishing.

Add Related Posts - Choose this option to add posts related to the article. Readers will be able to see them right on the post page they are currently viewing.

Add Related Products - With this option, you can display related products on the post page as well as show related posts on linked products' pages.

Choose the necessary products, which you want to display on a particular post page and click the Add Selected Products button.

Now you can see the list of products, related to the post. You can change the order of the products via drag and drop.

After you have added the products to the post, this post also will be displayed on the linked products pages in the Related Posts tab.

Status - Select the status of the post.
- Published - The post is displayed on the frontend.
- Disabled - The post is not displayed on the frontend.
- Hidden - The post is not enabled but you can see how it will look in the frontend. For this, click the link above the post that will appear after saving. We recommend you to set this status until the post is ready for publishing.
- Scheduled - The post will automatically be published at the time that you define in Publish Date field.

Categories - Select a category or categories the post will be published in.
Author - Choose the author from the list.
Allow Comments - Select 'Yes' if you want to allow customers to leave comments to the post.
Mark as Featured - Select 'Yes' if you want to pin a post at the top of the blog page and to draw more readers' attention to it.
Here you can also see the post’s views counter. It shows the number of times each post was viewed on the frontend. Also, you can see the number of likes.

Meta Data - Metadata, which includes meta title, meta description, and meta tags, helps search engines to correctly analyze what your post is about.
Meta Title - Specify the meta title of the post.
Meta Tags - Write keywords and phrases by which visitors can find the post in search engines.
Meta Description - Add a brief description of the topics, which are covered in the post.
Meta Robots - Select the option of the Meta Robots setting from the dropdown to give search engines instructions on how to index and check the particular blog post page.
INDEX, FOLLOW - the option allows the indexing and allows the search crawlers from going through the link of the particular blog post page.
NOINDEX, FOLLOW - the option allows to block the indexing but allows the search crawlers from going through the link of the particular blog post page.
INDEX, NOFOLLOW - the option allows the indexing but prevents the search crawlers from going through the link of the particular blog post page.
NOINDEX, NOFOLLOW - the option allows to block the indexing and prevent the search crawlers from going through the link of the particular blog post page.
Canonical Url - Here you can specify the preferred Url to be considered as the ‘master’ version for search engine indexation. This setting helps to prevent duplicate content issues.

Add Open Graph Metadata - Set the toggle to the “Yes” position to adjust the blog post preview for sharing on social media.
Open Graph Type - Select ‘Article’ to enable Open Graph for the blog post page.
Open Graph Title - Specify the title, which you would like to display when sharing the link of the post on social media.
Open Graph Description - Add a brief post description, which you would like to display when sharing the link of the post on social media.
When you finished editing a post please, save the changes.
Please note that the content of each single blog post (Title, Short/Full content, Meta Data) can be provided in different languages for different store views without post duplicating. For this, please go to the editing page of the particular saved post and choose the store view you want to change the language of this post for.

Then uncheck the ‘Use default value’ setting below the Title, Short/Full content, Meta Data blocks and fill them with content in a new language.

Save the changes and check them on the frontend by switching between store views.
Manage blog categories
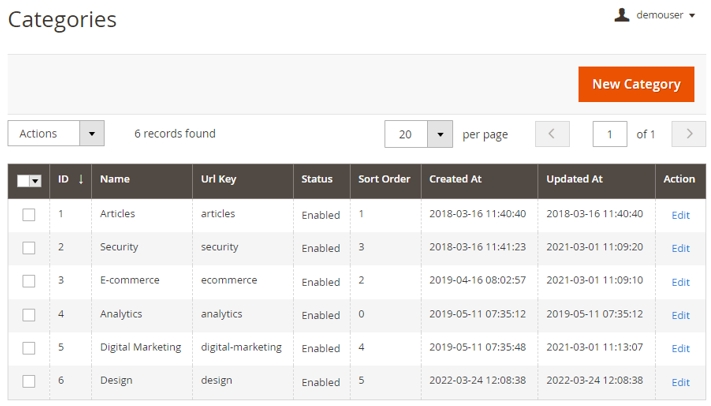
Categories are aimed to help readers easier navigate in your blog and find the necessary posts faster. To access the existing categories, please go to Content → Categories. You can view the current blog categories with their main parameters on the grid. You can create a multi-level category tree and assign blog posts in the subcategory. Use the 'Edit' action to make the needed changes or click the 'New Category' button to create a category.
For this example we will edit the existing category; you would go through the same steps to create a new one.

Name - Specify the category title.
Url Key - Specify the category URL.
Description - Fill in the category description.
Sort Order - The sort order of a category is defined automatically. If necessary, you can change it.
Status - enable or disable the category.
Include in Blog Categories Menu - Enable to include the category in Blog Top Menu. Please note that for a category to be displayed in the Blog link in the top menu, the 'Enable Blog Categories Menu' setting must be enabled in the module's general configuration. (Note: the functionality is available as a part of an active product subscription or support subscription).
Parent Category - Choose the parent category if any or select 'Root Category'.
In the Meta Data tab, you can specify a meta title, tags, and description. They will allow search engines to index the category better.

Meta Title - Specify the meta title of the category.
Meta Tags - Write keywords and phrases by which visitors can find the category in search engines.
Meta Description - Add a brief description of the topics, which are covered in all posts of the category.
Meta Robots - Select the option of the Meta Robots setting from the dropdown to give search engines instructions on how to index and check the particular category page.
INDEX, FOLLOW - the option allows the indexing and allows the search crawlers from going through the link of the particular category page.
NOINDEX, FOLLOW - the option allows to block the indexing but allows the search crawlers from going through the link of the particular category page.
INDEX, NOFOLLOW - the option allows the indexing but prevents the search crawlers from going through the link of the particular category page.
NOINDEX, NOFOLLOW - the option allows to block the indexing and prevent the search crawlers from going through the link of the particular category page.

In the Post From Category tab you can see the list of posts that were published in this category.
Remember to click the 'Save' button when you are done.
See how the list of categories will look on the frontend.

Manage blog tags
To view all the tags that are used in your blog, please go to Content → Tags. There you can view all the tags you have with their main parameters on a convenient grid. Click on the tag to edit it and use the 'Add Tag' button to create a new tag.

For this example we will edit the existing tag; you would go through the same steps to create a new one.

Name - Specify the name of the tag.
Url Key - Define the URL key for the tag.
In the Meta Data tab, you can specify a meta title, tags, and description. They will allow search engines to index the tag better.
Meta Title - Specify the meta title of the tag.
Meta Tags - Write keywords and phrases by which visitors can find the tag in search engines.
Meta Description - Add a brief description of the topics, which are covered in all tagged posts.
Meta Robots - Select the option of the Meta Robots setting from the dropdown to give search engines instructions on how to index and check the particular tag page.
INDEX, FOLLOW - the option allows the indexing and allows the search crawlers from going through the link of the particular tag page.
NOINDEX, FOLLOW - the option allows to block the indexing but allows the search crawlers from going through the link of the particular tag page.
INDEX, NOFOLLOW - the option allows the indexing but prevents the search crawlers from going through the link of the particular tag page.
NOINDEX, NOFOLLOW - the option allows to block the indexing and prevent the search crawlers from going through the link of the particular tag page.
Tagged Posts - In this tab, you can view all the posts that are marked with the chosen tag.
When you finished editing a tag, please, save the changes.
Comments
Comments are a necessary part of every blog. With their help, you can communicate with your visitors and learn their opinion on the topics you cover.
All blog comments are displayed on the backend. To view, approve or edit them, please go to Stores → Configuration → Amasty Blog Pro → Comments.

To edit a comment or change its status, select the Edit option in the Action dropdown or just click the comment line. You can also approve, reject, reply or delete a comment right from the grid.

On the comment page, you can change the customer name, email, comment content, status, and store view.
This is how comments are displayed on the frontend:

Authors
Share the joy of creating interesting content with other users. Let them publish posts alongside you and provide visitors with the author's introduction by adding social media links to their individual Facebook, Twitter, and LinkedIn pages.
Manage all authors in a special grid.

Easily add new authors and edit their information.

Name - Specify the author's name.
URL Key - Specify the author's URL.
Job Title - Fill in the author's job title.
Facebook Profile - Add social media link to the author's individual Facebook page.
Twitter Profile - Add social media link to the author's individual Twitter page.
LinkedIn Profile - Add social media link to the author's individual LinkedIn page.
Youtube Profile - Add social media link to the author's individual Youtube page.
Instagram Profile - Add social media link to the author's individual Instagram page.
TikTok Profile - Add social media link to the author's individual TikTok page.
Short Description - Type in few words to briefly describe the author.
Description - Add more detailed information about the author. For example, you may tell something about the author's sphere of interests, career, etc.
Image - Here you can attach the author's photo. Note, that the maximum file size is 2 MB. Allowed file types are JPG, GIF, PNG, ICO, APNG.

In the Meta Data tab, you can specify a meta title, tags, and description. They will allow search engines to index the author (and hence your posts) better.
Meta Title - Specify the meta title.
Meta Tags - Write keywords and phrases by which visitors can find the blog posts of the author in search engines.
Meta Description - Add a brief description of the topics, which are covered in the blog posts of the author.
Meta Robots - Select the option of the Meta Robots setting from the dropdown to give search engines instructions on how to index and check the particular author page.
INDEX, FOLLOW - the option allows the indexing and allows the search crawlers from going through the link of the particular author page.
NOINDEX, FOLLOW - the option allows to block the indexing but allows the search crawlers from going through the link of the particular author page.
INDEX, NOFOLLOW - the option allows the indexing but prevents the search crawlers from going through the link of the particular author page.
NOINDEX, NOFOLLOW - the option allows to block the indexing and prevent the search crawlers from going through the link of the particular author page.
In the Posts of Author section, you can find all the posts of this author.
When you finished editing a piece of author information please, save the changes.
Customers can view the author's information by clicking on the author's name on the post pages or blog category pages.

In this section, besides the additional info, your blog visitors will also find other posts of this author.

Blog Activity in Customer Account
With the extension, customers can conveniently keep track of the posts they liked or commented on in the Blog Posts tab of their accounts.

Widgets
Do you want more visitors to know about your blog? Spread the necessary information via widgets. With the extension, you can add the Blog Categories, Blog Recent Posts, Blog Featured Posts, Recent Comments, and other widgets to any page of your website.
Please, go to Content → Widgets → Add Widget button to create a new widget.

Blog Category Widget
Choose this type of widget to display the posts categories in your blog.
On the Settings tab, select the Amasty Blog Category Widget in the Type field. Then, choose the desired design theme in the corresponding field and press the button Continue.

On the Storefront Properties tab, give a title to your widget in a Widget Title field at first. Then, choose the stores in which the widget should be available in the Assign to Store Views field. You can also specify the Sort Order when needed (when you have several widgets in the same container).

After these steps are completed, hit the Add Layout Update button. In the Display on dropdown, choose the pages or products type to place the widget on.

If you want to place a widget on your blog pages, just choose Amasty Blog → Post Listing Page or Amasty Blog → Post Page from this dropdown list. Please note, that if you choose All Pages, the widget will be displayed both on the pages of your web store and on the pages of the blog.
Then specify the required additional information below, such as particular pages or products and also the container (the place on the page) for the widget.

Proceed to the Widget Options tab. Here, you can specify the header text, define the categories limit in the same name field. All these fields are optional.

When everything is completed, hit the Save button.
Blog Recent Posts
Use the widget to display the recent blog posts.
To do this, on the Settings tab:
- choose the Amasty Blog Recent Posts in the Type field;
- define the Design Theme you want to use;
- click the Continue button.
On the Storefront Properties tab:
- specify the widget title (the Widget Title field);
- define the store views, to which you want to assign the widget (the Assign to Store Views field);
- determine the sort order in case of need (the Sort Order field);
- press the Add Layout Update button. Now, choose where you want to display the widget.

Switch to the Widget Options tab, where:
- specify the header text and the posts limit in the same name fields (if needed);
- enable/disable the Show post images in the widget view;
- determine, whether to show the dates of the recent posts and choose the date format (the Show Date for Recent Post and the Date Format fields);
- enable the Show Short Content for Recent Posts field if you want to display the short content for posts in the widget;
- choose the needed post categories and post tags in the Post Categories for the Widget and the Post Tags for the Widget fields accordingly.

When completed, press the Save button.
Blog Recent Comments Widget
With the widget, you can show to visitors the recent comments to your posts.
To create the widget, first, select Amasty Recent Comments Widget in the Type field and specify the Design Theme. Click Continue.
On the Storefront Properties tab, fill in the Widget Title, the Assign to Store views and the Sort Order fields. Then, hit the Add Layout Update button and customize the widget placement settings.
Open the Widget Options tab. Specify the Header Text and define the maximal number of comments in the widget in the Comments Limit field (optional). Then, choose whether to show date for recent comments, in the corresponding field.

Blog Recent Posts Slider
With this widget, you can place the slider with recent posts to various pages of your website. (Note: the functionality is available as a part of an active product subscription or support subscription)
To create the widget, first, select Amasty Blog Recent Posts Slider in the Type field and specify the Design Theme. Click Continue.

On the Storefront Properties tab, fill in the Widget Title, the Assign to Store views and the Sort Order fields. Then, hit the Add Layout Update button and customize the widget placement settings.

Open the Widget Options tab. And adjust the following settings:
- Header Text
- Posts Limit
- Show Date for Recent Posts
- Date Format
- Show Short Content for Recent Posts
- Short Content Limit
- Post Categories for the Widget
- Post Tags for the Widget
Add Widgets to Pages and Blocks
To add widgets to pages or blocks, please, go to Content → Pages or Content → Blocks.
Choose the required page or block and click to edit it (or create the new one).

Here, on the Content tab in the Show Editor mode, click the Insert Widget button. Then you will need to configure the settings the same way as for the new widget.
Import and Export
With the extension you can import and export such Blog Pro entities as Posts, Categories, Tags, Authors and Post Helpful data. This functionality is available as a part of an active product subscription or support subscription.
To import blog data, please navigate to System → Amasty Import → Import → Select Entity → Amasty Blog → choose the needed subentity:

Then adjust other settings for the import according to your needs.
To export blog data, please navigate to System → Amasty Export → Export → Select Entity → Amasty Blog → choose the needed subentity:

Then adjust other settings for the export according to your needs.
Import from WordPress
With Magento 2 Blog extension you can easily transfer all the posts, comments, tags, authors and media files from WordPress to your Magento installation and comfortably manage your store and your blog in one place. To do this, go to Content → Import:

Fill in the following fields: Database Name, Database User Name, Database Password, Database Host, Table Prefix.
Allow Update Content on Existing URL-key - Set 'Yes' to allow content updates on posts with existing URL-key. Choose 'No' to add a new post.
Assign related products to your blog articles in cross-promotional purposes. Add Magento 2 Automatic Related Products and easily choose products to be displayed in a catchy widget on each post page.
ChatGPT AI Content Generator Functionality
The extension fully includes Amasty's AI Content Generator (the functionality is available as a part of an active product subscription or support subscription), providing you with built-in functionality to effortlessly generate Blog Posts content using AI technology.
With the ChatGPT AI Content Generator for Magento 2 you can automatically generate the following types of content for Blog Post pages:
- Title

- Short Content
- Tags

- Full Content
- Meta Title
- Meta Keywords
- Meta Description

Check this user guide to learn more about ChatGPT AI Content Generator.
Compatibility with XML Google Sitemap
The extension is compatible with Amasty XML Google® Sitemap. This means that if you have both extensions installed (Blog Pro and XML Google Sitemap), you you can add blog pages to the XML sitemap and adjust their frequency and priority.
Having these both modules installed you can also add Hreflang Tags for Amasty Blog Post Pages, Category Pages and Authors (this functionality is available as a part of an active Blog Pro product subscription or support subscription). You can do this in the general configuration of Amasty XML Google Sitemap extension (Stores → Configuration → XML Google Sitemap → Hreflang URLs):

Our Blog Pro extension is compatible with the default Magento 2 XML sitemap functionality for Blog Posts (the compatibility is available as a part of an active product subscription or support subscription).
Blog post pages will be added to the XML map of your Magento website with predefined values for Frequency and Priority, which cannot be modified or adjusted. If you require flexible customization options, please consider our module XML Google® Sitemap.
Compatibility with Tailwind CSS JIT Mode
The Blog Pro extension is compatible with the Tailwind CSS JIT compiler for Hyvä Theme, ensuring that CSS styles for blog category descriptions and post long descriptions display correctly on the storefront. This compatibility is included as part of an active product or support subscription. To enable it, please install the amasty/module-blog-hyva-tailwind-jit package via Composer suggest.
After installing the package, the Generate Hyvä Styles setting becomes available on the blog category and blog post editing pages. When this toggle is enabled, styles are applied to the text; if disabled, styles are not applied.
See how it looks on Blog Category pages:
With the CSS styles added to the category description and 'Generate Hyvä Styles' toggle disabled:

With the CSS styles added and the 'Generate Hyvä Styles' toggle enabled:

And the storefront view:

The same way this functionality works for the Blog Post pages.
With the CSS styles added to the post full content and the 'Generate Hyvä Styles' toggle disabled:

With the CSS styles added and the 'Generate Hyvä Styles' toggle enabled:

Cron Tasks List
To check if cron generates and processes tasks and detect all cron execution errors in one place, please go to System → Cron Tasks List.

On a separate grid, you can see a job code, its status, the date each job was created, scheduled, executed and finished.
Run all cron tasks and generate their schedule by clicking the Run Cron button. Also, Delete separate tasks in bulk via Actions dropdown menu. Apply filtering and sorting options if needed.
Magento 2 Blog Pro extension is compatible with Porto theme.
Magento 2.3 Page Builder
If you have Magento 2.3 Page Builder module, use the Composer to make it compatible with Magento 2.3 Blog Pro. The necessary package can be installed with composer require amasty/blog-page-builder command.
API Methods
It is possible to perform CRUD actions on Blog Pro entities via REST API. The following API methods are available:
- “/V1/amasty_blog/author/:authorId” method=“GET” - Get one author
- “/V1/amasty_blog/author/all” method=“GET” - Get list with conditions (Search)
- “/V1/amasty_blog/author” method=“POST” - Create author
- “/V1/amasty_blog/author/:authorId” method=“PUT” - Update author
- “/V1/amasty_blog/author/:authorId” method=“DELETE” - Delete author
- “/V1/amasty_blog/tag/:tagId” method=“GET” - Get one tag
- “/V1/amasty_blog/tag/all” method=“GET” - Get list with conditions (Search)
- “/V1/amasty_blog/tag” method=“POST” - Create tag
- “/V1/amasty_blog/tag/:tagId” method=“PUT” - Update tag
- “/V1/amasty_blog/tag/:tagId” method=“DELETE” - Delete tag
- “/V1/amasty_blog/comment/:commentId” method=“GET” - Get one comment
- “/V1/amasty_blog/admin/comment/:commentId” method=“GET” - Get one comment (for website administrator)
- “/V1/amasty_blog/comment/all” method=“GET” - Get list with conditions (Search)
- “/V1/amasty_blog/admin/comment/all” method=“GET” - Get list with conditions (Search) (for website administrator)
- “/V1/amasty_blog/comment” method=“POST” - Create comment
- “/V1/amasty_blog/mine/comment/” method=“POST” - Create comment
- “/V1/amasty_blog/guest/comment/” method=“POST” - Create comment
- “/V1/amasty_blog/comment/:commentId” method=“PUT” - Update comment
- “/V1/amasty_blog/comment/:commentId” method=“DELETE” - Delete comment
- “/V1/amasty_blog/category/:categoryId” method=“GET” - Get one category
- “/V1/amasty_blog/admin/category/:categoryId” method=“GET” - Get one category (for website administrator)
- “/V1/amasty_blog/admin/category/all” method=“GET” - Get list with conditions (Search) (for website administrator)
- “/V1/amasty_blog/category/all” method=“GET” - Get list with conditions (Search)
- “/V1/amasty_blog/category/” method=“POST” - Create category
- “/V1/amasty_blog/category/:categoryId” method=“PUT” - Update category
- “/V1/amasty_blog/category/:categoryId” method=“DELETE” - Delete category
- “/V1/amasty_blog/post/:postid” method=“GET” - Get one post
- “/V1/amasty_blog/admin/post/:postId” method=“GET” - Get one post (for website administrator)
- “/V1/amasty_blog/post/all” method=“GET” - Get list with conditions (Search)
- “/V1/amasty_blog/admin/post/all” method=“GET” - Get list with conditions (Search) (for website administrator)
- “/V1/amasty_blog/post/” method=“POST” - Create post
- “/V1/amasty_blog/post/:postid” method=“PUT” - Update post
- “/V1/amasty_blog/post/:postid” method=“DELETE” - Delete post
PWA for Blog Pro (Add-On)
The extension also works smoothly on mobile devices due to a ready-made PWA solution, due to which store admin can significantly improve mobile shopping experience.
The feature can be enabled only after purchasing the PWA for Blog Pro Add-On. Also, you need to install PWA Studio first.
In order to correctly install a PWA add-on, please install the corresponding GraphQL system package first. For the correct name of it, please check the composer.json file of the main module. For example, the GraphQL system package name of the PWA add-on for the Blog Pro extension would be the following: amasty/blog-graphql

Please, keep in mind that widgets are applicable on blog pages only.
If the add-on is installed, Venia theme will display mobile blog section in the following way:

The add-on supports any devices including tablets. The navigation menu will look like this:

PWA component supports all Blog Pro extension features for category pages:

Shoppers will be also available to leave comments to posts:

Find out more about Magento PWA integration here.
Additional packages (provided in composer suggestions)
To make additional functionality available, please install the suggested packages you may need.
amasty/blog-page-builder- Install blog-page-builder module to activate PageBuilder and Blog Pro integration.
amasty/blog-graphql- Install blog-graphql module to activate Graphql and Blog Pro integration.
amasty/module-blog-pro-to-builder- Install this package for compatibility with Custom Reports Builder and create valuable reports about your blog posts. To ensure successful installation and integration, the Blog Pro and Custom Reports Builder modules are required.
amasty/module-mage-2.4.7-fix- Install this module to fix bugs related to UI elements that were added in the release version 2.4.7.
Available as a part of an active product subscription or support subscription:
amasty/module-blog-hyva- Install module-blog-hyva module to activate the integration Blog Pro module with Hyva Theme.
amasty/module-ai-blog-pro-content-generator- Install this package for ChatGPT AI Content Generator compatibility.
amasty/blog-sitemap- Install this package to add the compatibility with the default Magento 2 XML sitemap functionality for Blog Posts.
amasty/module-blog-xml-sitemap- Install this package to get the possibility of adding hreflang tags to the Blog posts, categories and author pages.
amasty/module-blog-export-entity- Install this package for compatibility with Blog Export Entity subscription features.
amasty/module-blog-import-entity- Install this package for compatibility with Blog Import Entity subscription features.
amasty/module-blog-pro-subscription-functionality- Install this package for compatibility with subscription features.
amasty/module-blog-top-menu- Install this package to enable the ability to display the Blog menu as a dropdown with categories in the Top Menu.
amasty/module-blog-recent-posts-slider- Install this package to enable the ability to place recent blog posts slider to your store pages.
amasty/module-blog-api- Install this package for REST API compatibility.
amasty/module-blog-hyva-tailwind-jit- Install this package to enable the compatibility with the Tailwind CSS JIT compiler for Hyva Theme.
FAQ
* How does the extension work with the built-in Magento search for finding blog content?
* Are the primary keys required for all the Blog Pro database tables?
* Does the Blog Pro module support the Page Builder functionality?
* How to add a Youtube video to a blog post?
* How can the size of images for the blog be adjusted?
* How to hide the “Blog Posts” link from the “My Account” area for logged in customers?
Find out how to install the Blog Pro extension for Magento 2 via Composer.
magento_2/blog_pro.txt · Last modified: 2025/06/06 08:41 by asemenova