
Sidebar
magento_2:reward_points
Table of Contents
For more details see how the Reward Points extension works.
Guide for Reward Points for Magento 2
Thank customers for shopping at your store and performing advantageous actions by giving them reward points. Encourage users' activity to let them feel that making purchases is beneficial.
- Reward customers for purchases, referral links, sharing on Facebook, registration, etc.
- Add or deduct points from customer’s balance
- Notify customers about the points expiration date
- Analyze customers’ purchasing behavior with reports
- Let users track the reward points history in accounts
- ADA & WCAG compliant
- Hyva-ready storefront
- Hyvä Checkout ready
- Compliance with Hyvä Checkout CSP
The extension follows the WCAG (Web Content Accessibility Guidelines) standards, which makes it more accessible to people with disabilities. For the most correct work of this feature, please install the Screen Reader extension to your browser.
This extension is compatible with GraphQL Application Server. You can find the amasty/module-graphql-application-server-compatibility package for installing in composer suggest.
Magento 2 Reward Points extension is compatible with Hyvä theme. You can find the amasty/module-rewards-hyva-compatibility package for installing in composer suggest (Note: the compatibility is available as part of an active Product Subscription or Support Subscription).
The extension is compatible with Hyvä Checkout. You can find the amasty/module-rewards-hyva-checkout package for installing in composer suggest (Note: the compatibility is available as a part of an active product subscription or support subscription).
The extension is fully compatible with GraphQL. Expose data like reward points balance for registered users; reward points history log with the date, actions and expiry date; information about highlight points available by product or category; etc. You can also modify information about the reward points usage, etc.
Please note, that Reward Points are deducted from customer's account when the “checkout_submit_all_after” event is triggered. In other words, if you're using a third-party payment gateway, please make sure that it uses “checkout_submit_all_after” event. Otherwise, the Reward Points might not be deducted from the balances. The exception is Paypal - since it is a default Magento payment method, the special event for it was added.
Please note, that the Reward Points module was tested for compatibility with following Magento's default payment methods:
- PayPal Express Checkout
- Braintree Payments (by GENE Commerce)
- Amazon Payment
- Klarna Payment
- Check / money order
- Bank Transfer
- Cash on delivery
- Purchase Order
- Zero Subtotal Checkout
If you use other payment methods and have some problems with the module, please contact our support center
In Reward Points FAQ you can find answers to the most popular questions about the extension functionality.
![]() Any concerns about module configuration and implementation?
Any concerns about module configuration and implementation?
Book an individual training session to explore how the extension works and what practices to implement to achieve the desired result. Save time spent searching for the right settings - discuss configuration cases suitable for your business with the experts and work out the flow that your team needs.
General settings
To configure general settings, please, go to Stores – Configuration – Amasty Extensions – Reward Points
 Set Enable Reward Points to 'Yes'
Award Reward Points on Order Status - the specified status will be used for accrual of reward points. Only statuses assigned to the following states will be displayed: Complete, Payment Review, Pending, Pending Payment, and Processing. States such as Canceled, Close, and On Hold will not be displayed on the front end.
The possibility of Awarding Reward Points based on order status was added to the Pro version of the module (Note: this functionality is available as part of an active product subscription or support subscription).
Please, note that if the status for crediting reward points is deleted, the admin must reset it manually. If the status is not selected after deletion, rewards will not be accrued as the system cannot assign the status automatically.
Points Earning and Spending Calculation
Point Spending Rate - set the number of points equal to 1 unit of store's currency. In our case, we set 1 point to be $1.
Points Rounding Rule - specify the rounding, that will be applied when the rewards value exceeds cart subtotal.
Please note that Points Rounding Rule setting will determine rounding for all reward points, both for those used to cover the product and for those used to cover shipping.
This setting does not aggregate the values because rounding will be applied separately to the reward points used for the product cost and the shipping. The results obtained will be summed up in totals
Birthday Offset - Set the number of days when a Birthday bonus is available. Specify:
- a negative number - the bonus will be available before the Birthday. For example, if the birthday is on May 5, and you set -3, a customer will get a bonus on May 2.
- 0 - you will give the bonus right on the birthday.
- a positive number - bonus will be available after the Birthday has passed. For example, if the birthday is on May 5, and you set 3, a customer will get a bonus on May 8.
Points earning calculation - Choose the way Reward Points will be calculated: set the option to Before Tax if the base for their calculation should be the order amount without taxes. When set to After Taxes, the order amount, including taxes, will be the base for the points' calculation.
How to Apply Reward Points for Taxes
To apply Reward Points for Taxes, you'll need to make a few adjustments in your store's default Magento settings. Please navigate to Stores → Configurations → Sales → Tax.
Apply the following configuration to the Calculation Settings:
1.
- Catalog Prices - Excluding Tax
- Apply Customer Tax - Before Discount
- Apply Discount On Prices - Including Tax

2.
- Catalog Prices - Including Tax
- Apply Customer Tax - After Discount
- Apply Discount On Prices - Including Tax
- Enable Cross Border Trade - Yes

Order Limitations

Minimum Points Requirement - Specify the required min number of points a customer should acquire on the account to start paying with rewards. Here we allow using rewards if a customer collected at least 100 points.
Disable Reward Points for orders that were paid with Reward Points - if a customer pays for the order with points you can set not to reward him for this purchase.
Apply Redemption Limit - Specify the percent of cart subtotal which can be paid by redeeming points, so that it will be impossible to pay for the order with reward points only
If you select Yes (percent of checkout sum) or Yes (amount in reward points), a text field Redemption limit per order for inputting redemption limit itself is rendered.
If Yes (amount in reward points) is selected, the value of the field Redemption limit per order should be a positive floating point number.
If Yes (percent of checkout sum) is selected, the value of the field Redemption limit per order should be a positive integer number and should not exceed 100.
A customer attempting to redeem too many reward points per order will be warned on the frontend (Checkout page, Cart page) by displaying the message.


Redemption Limit per Order – Set the maximum number of reward points that a customer can spend for one order. Only positive integer numbers allowed.
Include Tax in Redemption Limit Based On Subtotal - if 'Yes' you can apply percent redemption limit on subtotal after tax.
Expiration Settings and Other Settings

Points Expiration Behavior - Specify the reward points expiration behavior. You can either set reward points expiration period to encourage customers to spend points faster or make points not expiring.
Read-only Fields - Select 'Yes' to make 'Refund to Reward Points' and 'Deduct Reward Points from Customer' fields non-editable during Credit Memo.
Admin Action Text - Specify a comment, which will be displayed when an admin user adds or deducts points manually.
Customers will see important information concerning the expiration of their reward points under the Reward Points and Reward Points History tabs of their Account pages. Learn more about these tabs ->


Spending Configuration

Spend Points on Specific Products - Enable this setting if you’d like to restrict spending points on specific products.
Action - Use this setting to include or exclude certain products by SKU or categories to which the reward points will be or won't be applied.
Enter the details in either SKU or Category ID field below to make this feature work. Otherwise, it'll be ignored and reward points will be applied to all products.
SKU - Specify a comma-separated list of SKUs customers can spend the reward points on.
Category ID - Specify a comma-separated list of category IDs customers can spend the reward points on.
Add Tooltip in Reward Point Block - If set to 'Yes', then the extra setting 'Tooltip Text' becomes visible. Use it to add a tooltip in the Reward Point block that will notify customers about details of your spending configuration.
Tooltip Text - Please set the setting 'Add Tooltip in Reward Point Block' to 'Yes' first to see and configure this option. Use this field to specify the message of the tooltip in this block. Limited to 500 symbols.
Include Shipping - If set to “Yes”, then the Reward Points can be applied to cover Shipping costs.
See the example of the tooltip on the frontend below:

Display Options
Use this section to adjust the reward points display option on the frontend for your shoppers.
Highlight Point on Storefront

Show in Cart - Show rewards that customers can get for completing an order in the shopping cart. Reward Points will be promoted in the cart only if at least one reward rule of the type “for every $X spent” or “order completed” is active and properly configured.
Show on Checkout Page - Show rewards that customers can get for completing an order at the checkout page. Reward Points will be promoted on the checkout page only if at least one reward rule of the type “for every $X spent” or “order completed” is active and properly configured.
Show on Product Pages - Show rewards that customers can get for buying certain products on product pages. Reward Points will be promoted on product pages only if at least one reward rule of the type “for every $X spent” is active and properly configured.
Show on Categories Pages - Show rewards that customers can get for buying certain products on category pages. Reward Points will be promoted on categories pages only if at least one reward rule of the type “for every $X spent” is active and properly configured.
Show Highlight for Guests – Set the option to 'Yes' to give bonuses for registration with reward points. The rule with the action 'Get X Points for Registration' must be active.
Show Link for Registration - Set 'Yes' to display registration link for guests.
See the frontend example of the Show Link for Registration setting:

Color Text - Choose the color for the advertising text.
Customer Account

Show Reward Points Description In Customer Account – set the option to 'Yes' to create an additional tab with your Reward Program description.
Reward Points Description
Reward Points Description – create your Reward Points Program description via the WYSIWYG editor.
Show Actual Reward Points Balance on Storefront – set the option to 'Yes' to show logged-in customers their actual balance of reward points. The balance label will always be displayed in the top menu before Customer Account.
Customer Account Balance Label – set the balance label name.
Reward Program Restriction

Enable Restriction Message - Disable this setting if you don’t want to show the note to the customers explaining that they have been excluded from the Reward Program.
See an example of the restriction message on the frontend:

Restriction Message Text - Specify your custom text for the restriction message here.
Order

Show Detailed Info - Enable this setting to show details about earned, refunded, and subtracted points in the Order Information.
See how this info will be displayed in order info on the admin backend:

Email Notification

Email Sender - Choose the email sender in the dropdown.
Send Email When Customer Earns Reward Points - Enable if you want to notify customers when they earn reward points.
Please enable the Send Email When Customer Earns Reward Points setting first to see the two more configuration options below.
Reward Points Earned Template - Choose the email template you want to use to inform customers upon the points they earned.
Subscribe Customers by Default - If set to 'Yes', make sure you notified customers about subscription in the Privacy Policy or GDPR.
Please note that if you want to use the Subscribe Customers by Default setting, you have to enable the Send Email When Customer Earns Reward Points setting first.

Send Email When Customer's Reward Points Are About to Expire - Enable the option if you want to warn customers when their points are about to expire.
Please note that if the option 'Send Email When Customer's Reward Points Are About to Expire' is set to 'No', the three more settings below won't be available.
Reward Points Expiring Template - Choose the email template that will be used to warn customers about the expiration of their reward points.
Email Will Be Sent When Reward Points Expire In, Number of Days - Specify the number of N days before point expiration the notifying email will be sent to customers.
Enter up to ten N days with a comma if you’d like to send more than one email. For example: 10, 5, 3.
Subscribe Customers by Default - If set to 'Yes', make sure you notified customers about subscription in the Privacy Policy or GDPR.
Please note that if you want to use the Subscribe Customers by Default setting, you have to enable the Send Email When Customer's Reward Points Are About to Expire setting first.
Admin control of reward points
Reward Points tab
To explore this section, please navigate to Customers → All customers → Edit a customer → Reward Points

Notification Options
In this section, you can see what notification preferences a customer has chosen for him/herself.
Current Balance
Explore the stats on reward points of the specific customer with the help of the three counters:
- Total Earned;
- Total Spent;
- Expired.
Status
Enable Reward Program - Disable it if you’d like to exclude this customer from earning the reward points.
Note! It won’t affect manual balance adjustments.
Customers can spend a part of their points or all of them per order. They can also see the exchange rate before applying the rewards.
Applied rewards are displayed as a discount in the order summary.

Status History and Expiring Points Breakdown
Use this tab and the grid to track the customers' current status within your reward program and also the previous status records. The grid is visible for the admin users only.
Here you can also track the expiring reward points on the separate grid.

Add or Deduct Points - Here you can add or deduct points manually. Specify the points amount and a reason you apply them in the comment. To deduct points use the symbol '-', e.g. -100. Also, specify the expiration period of these points.

Use the 'Visible For Customer' setting to make the granted reward points visible or not visible for your customers.
Reward Points History tab
On the Reward Points History tab, you can track the activity of each particular customer. To check this grid, please navigate to Customers → All Customers → Customer → Reward Points History tab.

Reward rules creation
Go to Marketing –> Reward Points Earning Rules to set up the rules.

See all the rules you've created on the Rewards grid.
Actions - apply mass actions to the rules.
Add rule - create as many rules as you need.
General

Name - Indicate a clear rule name.
Status - Activate or deactivate the rule.
You can also specify the websites and customer groups for which the rule will be applied within this section.
Actions

Select 1 of 7 available actions. Specify the points amount that will be added to a customer's account after the action is completed. Also, specify the points expiration behaviour for each rule individually.
Get X Points for Completing Order - with this action a customer will get reward points after he or she completes the order. For example, you want to reward customers with 10 points if they spent more than $50. You select the action 'Order complete', set '10' in the 'Amount' field and in the conditions tab you specify the settings like this:
Get X Points for Newsletter subscription - with this action a customer will get reward points if he or she has subscribed to your newsletter.
Get X Points as a Birthday Gift - with this action a customer will get reward points if he or she has a birthday. Go to the General Settings to configure the day when birthday points will be added.
Get X Points for Registration - with this action a customer will get reward points if he or she has registered in your store.
Get X Points for each $Y spent action requires indicating how many points you’d like to give for each spent amount in order. In our example, a customer gets 10 points for each $50 spent.
NEW Now you can configure 'Get X Points for Completing Order' and 'Get X Points for Each $Y Spent' rules for unregistered customers. Please note, that these feature is available for the Luma theme only.
Get X points after Y days of inactivity - Give reward points to customers inactive for a long time: those, who didn't enter their accounts and didn't make purchases for a long time. The action is aimed at motivating customers to return to your store and buy from you again.

To configure the rule based on this action, additionally, specify the number of days a customer should be inactive to get reward points (the Days Since Last Login (Y) option) and choose either this reward should be recurring or not.
Get X Points for Approved Product Review - Grant reward points to customers for leaving products reviews to stimulate better customers engagement with your store website.
NEW We added the compatibility with Amasty Advanced Product Reviews so now reward points are awarded when reviews are approved via a mass action.
Get X Points for a Referral - gives an opportunity for customers to share a referral link and earn reward points for registering and making a purchase by another user. When configuring this action, block with a referral link is displayed in the Customer account, available for copying and sharing.
This action is available only for registered customers.
Plaese note that the functionality of Get X Points for a Referral and Get X Points for Sharing Purchase on Facebook is available as a part of an active product subscription or support subscription.

Annotation Text for Recipient - in this field you can customize the text that will come with a referral link, directing the recipient to the website registration.
In order to earn reward points through the referral program, users need to click on the link provided, sign up, and finalize their order. When the order is in the Completed status, the reward points will be credited to the customer's account.
Get X Points for Sharing Purchase on Facebook - allows customers to share their orders on Facebook and earn reward points.
Please, note that:
- A product from the order can be shared only once (after which the Share button will be hidden for that product);
- Reward points are granted when the Share button is clicked;
- Sharing is available only for orders created after Get X Points for Sharing Purchase on Facebookwas activated;
- The rule must be active both at the time of order placement and at the time of sharing to award rewards.
Conditions
Choose conditions to limit the rule. Use cart and products attributes, products subselection or create complex combined conditions.

Earning Configuration
Please note that this section is only available if you choose the Get X Points for each $Y spent action type.
Use the Earning Configuration section to exclude or include specific products and product categories to your reward program.

Skip Discounted Products - set this setting to 'Yes' to exclude the discounted products from your reward program, i.e. restrict granting the reward points for products that have been discounted.
Grant Points For Specific Products - Enable this setting if you’d like the customers to get reward points for purchasing specific products.
Set the setting 'Grant Points For Specific Products' to 'Yes' to see three more configuration options below.
Action - use this dropdown to choose whether you'll exclude or include certain products or product categories by configuring two more settings below.
Enter the details in either SKU or category field to make this feature work. Otherwise, it'll be ignored and reward points will be granted for all products.
SKU - Specify a comma-separated list of SKUs customers can get the reward points for.
Category - Select categories of products customers can get the reward points for.
To provide the correct displaying of reward points for unregistered customers you should create a new rule in your store with 'Get X Points for Completing Order' or 'Get X Points for Each $Y Spent' actions and select ‘NOT LOGGED IN’ in ‘Customer Group’ setting.
Please note, if you create several rules with 'Get X Points for Completing Order' and 'Get X Points for Each $Y Spent' actions be sure that ‘NOT LOGGED IN’ customer group is selected only in one active rule to avoid issues with reward points earning. The extension sums up all reward points for all active rules for unregistered customers on the front. After the registration process, a new customer will be assigned to one of the customer groups and will receive rewards only for this group.
Example
Create two rules with 'Get X Points for Completing Order’ action.
Choose two customers groups, for example, ‘NOT LOGGED IN’ and ‘General’ in the first rule settings.

Configure the rule as you want

Then define any other customer group in the second rule

Set all required rule’s values

The first rule will be displayed for unregistered customers in the following way:

The second created rule will be displayed only for chosen customer group.
Pay attention, that reward points will display for unregistered customers correctly only if you choose a different customer group for all other rules with that action. If not, all created rules and rewards will be displayed to unregistered customers at once while they make an order.
Comments for Action in a Customer Account
In the Comments for Action in a Customer Account section, specify the default and specific store view comments, which are shown in customers' accounts.

If you have multilingual websites views, you can also set comments in different languages.
Refunding with Reward Points
To refund with Reward Points open the order (Sales → Orders) you would like to refund and click on the Credit Memo link at the top panel. Then, there opens a New Memo page with the Refund Totals block at the bottom.

Refund to Reward Points - there you can set the number of reward points to refund with the order. By online refunding the customer will receive only points that are less than the order. Through the offline refunding you can add extra reward points or even cover all orders by reward points, without money back.
Deduct Reward Points from Customer - here you can manage reward points that were granted for the refunded order placement. By default the customer will lose only points that were credited as a part of this order placement, but you can remove more or less points, up to customer's current balance.
Reward Points on Customers Grid
With the extension, you can track each customer's reward points balance right in the Customers grid.
Go to Customers → All Customers section and view the balance info in the Reward Points column.

It is also possible to sort customers according to the amount of the points collected by them.
Reward points reports
To see reports with the statistics on the reward points, please, go to Reports → Marketing → Reward Points Report.

The extension allows collecting statistical data on customers' activity connected with reward points and provides you with the next valuable insights:
- The total amount of points awarded to customers associated with the specific customer group(s) within the specified period for the selected store view(s);
- The total amount of points redeemed by customers associated with the specific customer group(s) within the specified period for the selected store view(s);
- The average reward points per customer (filtered by period, customer group and store view);
- The average redeemed points per order (filtered by period, customer group and store view);
- The total amount of expired reward points (based on the selected period, customer group and store view).
Click the Refresh button to refresh the displaying data when you change filters values.
Rewards points tabs in customer account
See how the Reward Points and Reward Points History tabs display in a customer account.
Reward Points History
Here, you can see all types of reward actions and balance control options.
To explore this section, please navigate to Customers → All customers → Edit a customer → Reward Points History
On the backend:
On the frontend:
Reward Points Pro
Reward Points Import
First, to use the import functionality, please navigate to Stores → Configuration → Amasty Extensions → Import → Multi-Process Import.

Enable Multi-Process Import - Set this setting to 'Yes' for making further configurations.
Please note that the 'Multi-Process Import' feature needs the PHP extension 'pcntl' to be installed on the server. If you enable the feature and no performance boost happens, please ask your hoster/system administrator to check if the 'pcntl' extension installed.
Number of Parallel Processes - Specify here the number of parallel import processes. The more parallel processes are set, the faster is the import process, as well as the higher is the server load.
To import reward points, please navigate to System → Amasty Import → Import.
Import Settings
To import data, please navigate to System → Amasty Import → Import → Select Entity → choose the needed subentity:

Select entity - Choose the 'Amasty Reward Points' entity and select the subentity 'Amasty Reward Point Transactions' or 'Customer Balance Data'.
Amasty Reward Point Transactions is necessary to view the history of rewards, but it has no impact on the balance.
We also added the possibility to Import “amasty_rewards_customer_balance” table via Customer Balance Data. Please note that the balance will only be updated if you import data from this table.
Then adjust other settings for the import according to your needs.
Import Behavior
Specify import behavior, including the validation strategy: choose whether to stop on errors or skip them and continue the import process.

If the Skip Error Entries option is chosen, then you can specify the maximum number of errors allowed to skip in the 'Allowed Errors Count' setting.

Import Source
Import File Type - CSV or XML.
Import File

Import Source - Upload an external file or choose file from the local directory.
File Path - Use relative path to Magento installation, e.g. var/import/export.csv.
Fields Configuration
In this tab, you need to choose the required entities and map fields.
Please, attentively check all the fields before importing. Otherwise, the extension won't be able to match the columns and will display an error.
Click Map Fields button and choose the relevant data to add to the export file. Use a search window right in the popup to find the required fields faster. Click Map Selected Fields.

Filter
Please note that only those fields that are included into mapping can be used for filtering.
Amasty Reward Point Transactions

Click Add filter to create custom filtering formula from the three components: 'Field For Filtering', 'Filter Condition' and 'Value'. For example, filter data by certain expiration date.
Reward Points Export
First, to use the export functionality, please navigate to Stores → Configuration → Amasty Extensions → Export → Multi-Process Export.

Enable Multi-Process Export - Set this setting to 'Yes' for making further configurations.
Please note that the 'Multi-Process Export' feature needs the PHP extension 'pcntl' to be installed on the server. If you enable the feature and no performance boost happens, please ask your hoster/system administrator to check if the 'pcntl' extension installed.
Number of Parallel Processes - Specify here the number of parallel export processes. The more parallel processes are set, the faster is the export process goes, but the higher is the server load.
To export reward points, please navigate to System → Amasty Export → Export.
Export Settings
To export data, please navigate to System → Amasty Export → Export → Select Entity → Choose the needed subentity:

Select entity - Choose the 'Amasty Reward Points' entity and select the subentity 'Amasty Reward Point Transactions' or 'Customer Balance Data'.
Then adjust other settings for the import according to your needs.
Export Template
Configure the export template.
File Type - Choose the format type - CSV or XML.
Add Header Row - Toggle to 'Yes' to add a header row to your export file.
Merge Rows into One - Data from multiple rows will be merged into one cell, if enabled.
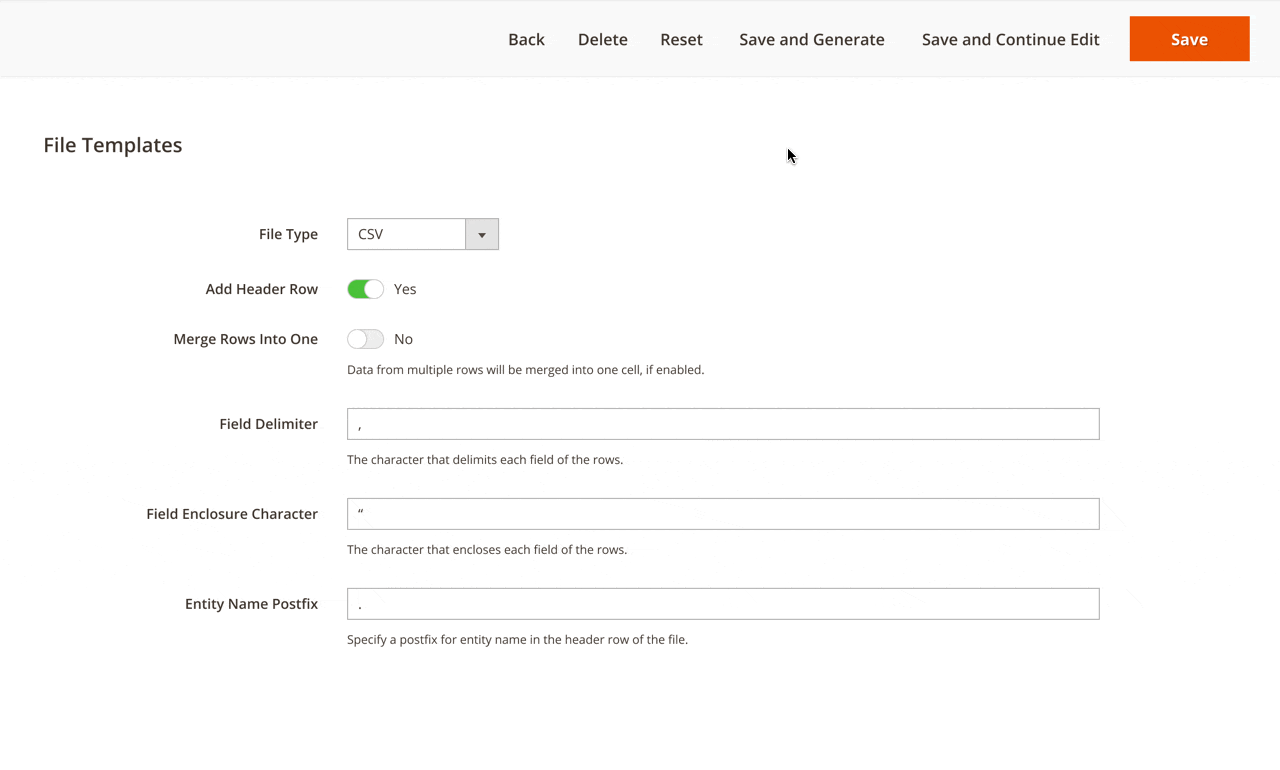
Merged Rows Data Delimiter - If the setting 'Merge Rows into One' is set to 'Yes', then the 'Merged Rows Data Delimiter' setting becomes available. The character that delimits each field of the child rows.
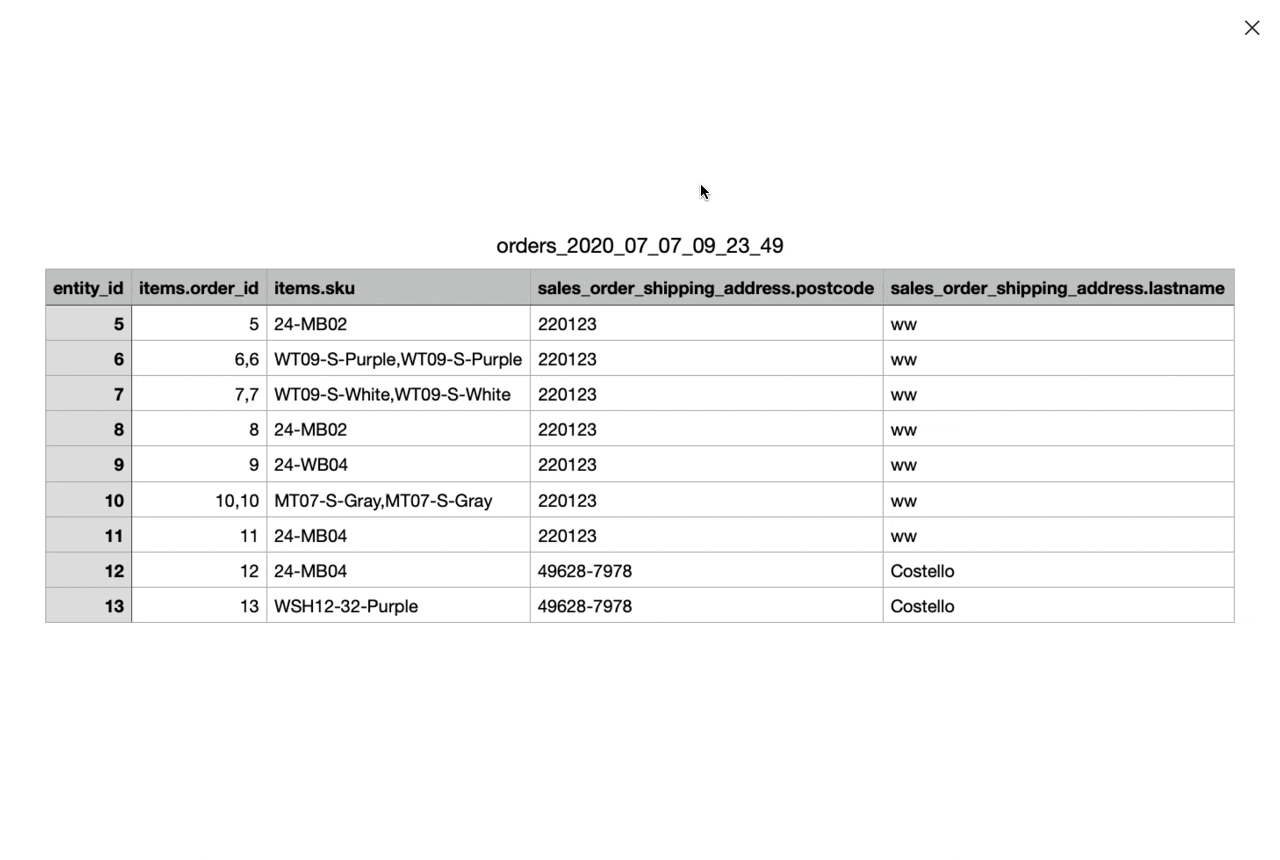
Duplicate Parent Entity Data - Please use the setting while exporting one sequence of subentity, e.g. Order - Order Item - Product - Product Attribute, to avoid duplicating independent data. If enabled, parent entity data will be duplicated in each row when exporting the second and subsequent rows of child entity data.
See how it works
If disabled, child values are empty:

If enabled, the values are duplicated:

Field Delimiter - The setting determines the character that delimits each field of the rows.
Field Enclosure Character - The setting determines the character that encloses each field of the rows.
Entity Key Delimiter - The setting determines the character that separates the entity key from the column name.
File Name
File Name - Use this field to specify the pattern how your export files will be named. Example: Filename - { { date|Y_m_d_h_i_s } }.
Export File
Store Exported File On Server - Toggle the setting to 'Yes' to keep exported files on the server.
File Path - The file will be saved in Magento 'var' directory relative to this path.
File Name on Server - With this setting you can specify custom name of the file for the server. Example: Filename- { { date|Y_m_d_h_i_s } }.
Fields Configuration
Amasty Reward Point Transactions
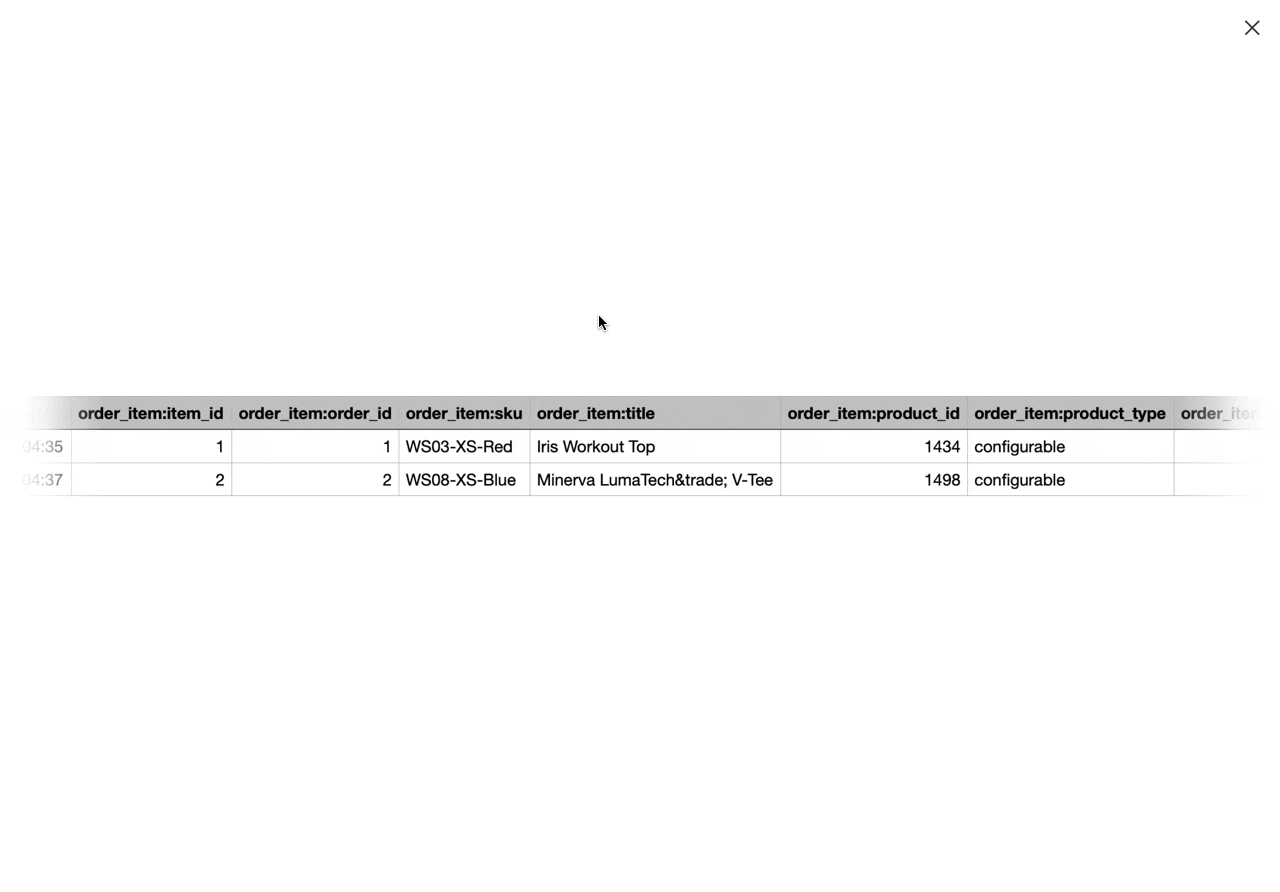
Click Add Fields button and choose the relevant data to add to the export file. Use a search window right in the popup to find the required fields faster. Click Add Selected Fields.

When a field is added, you can customize a column title that will be displayed in the exported file. Moreover, use the Add Static Filed button to create columns that will remain unchanged in the file.
Also, for each file level, you can set a custom entity key, delimiter and a field name. Check how it works:
Then you can go down the entity list and enable any you need. Just hit the Enabled toggle and Add Fileds button. As it was described above, a popup will appear and you will be able to add all required fields concerning a particular entity.

Filter
Amasty Reward Point Transactions

To add custom filtering options to your file, click Add Filter, then create a filter formula, by specifying Field For Filtering, Filter Condition and the Value. For example, export Amasty Reward Point Transactions, that have certain action date or certain comment.
PWA for Reward Points (Add-On)
Build a crossed device reward program and get the most of the Reward Points extension by installing the PWA add-on. The software provides a faster, enhanced experience for the clients shopping from phones and tablets.
The feature can be enabled only after purchasing the PWA for Reward Points Add-On. Also, you need to install PWA Studio first.
In order to correctly install a PWA add-on, please install the corresponding GraphQL system package first. For the correct name of it, please check the composer.json file of the main module. For example, the GraphQL system package name of the PWA add-on for the Blog Pro extension would be the following: amasty/blog-graphql

The add-on adapts interaction with the website to various screen resolutions to improve responsiveness and the overall client experience. Once the software is added, reward points will be displayed as follows:
Reward Points at Customer Account:

Reward Points at the Checkout:

Reward Points at the Category Page:

Reward Points at the Product Page:

Please, note limitations when purchasing PWA for Reward Points Add-On:
- Get X Points for Approved Product Review Rule
Additional packages (provided in composer suggestions)
To make additional functionality available, please install the suggested packages you may need.
Available for all tariff plans with no additional fees:
amasty/rewards-graph-ql- Install this module to be able to use Reward Points GraphQL queries.
amasty/module-graphql-application-server-compatibility- Install this package to enable compatibility with GraphQL Application Server.
Available as a part of an active product subscription or support subscription:
For Basic and Pro versions:
amasty/module-rewards-hyva-compatibility- Install this package to ensure the Reward Points extension works with the Hyvä Theme.
amasty/module-rewards-hyva-checkout- Install this package to ensure the Reward Points extension works with Hyvä Checkout.
amasty/module-rewards-referral- Install this package to award reward points for new customer invitations (their signup through a referral link).
amasty/module-rewards-referral-hyva- Install this package to use the customer signup referral action functionality (see the description of the package above) with the Hyvä Theme.
amasty/module-reward-points-shipping- This package provides the possibility of covering shipping with reward points.
amasty/module-rewards-facebook- This package allows customers to share their orders on Facebook and earn reward points.
For Pro tariff plan only:
amasty/module-rewards-pro-functionality- This package provides the possibility of awarding reward points based on order status.
FAQ
magento_2/reward_points.txt · Last modified: 2025/06/16 14:31 by avronskaya