
Sidebar
magento_2:google_page_speed_optimizer
Table of Contents
For more details see how Google Page Speed Optimizer extension works.
Guide for Google Page Speed Optimizer for Magento 2
Improve your store performance with the Google Page Speed Optimizer for Magento 2. Minify code and optimize images without quality loss.
- Automatically reduce images size
- Optimize your database performance
- Minify website code structure
- Improve your webstore pages performance
- Raise your store score in Google PageSpeed Insights up to 99
NEW! Now the extension is compatible with Varnish. You can also add compatibility with 3-rd party extensions which use AJAX.
Find out the general info on how to improve each Google PageSpeed value in our FAQ section.
![]() Any concerns about module configuration and usage?
Any concerns about module configuration and usage?
Get an individual training session to explore how the extension works and what practices to implement to achieve the desired result. Save time spent searching for the right settings - discuss configuration cases suitable for your business with the experts and work out the flow that your team needs.
Magento 2 Google Page Speed Optimizer Pro and Premium extensions are compatible with Hyvä themes. You can find the amasty/module-page-speed-optimizer-hyva package for installing in composer suggest (Note: the compatibility is available as part of an active product subscription or Support Subscription).
The Pro and Premium versions of the extension are also compatible with Hyvä Checkout by default.
However, please note that if the 'Hyvä Default (for mobile devices)' option is selected in the general mobile Hyvä Checkout configuration, the image optimization and WebP conversion features will not work for mobile checkout.
Explore our internal Knowledge Base to gain even more valuable insights and uncover answers to popular questions about the configuration and features of the Magento 2 Google Page Speed Optimizer extension.


Solution Structure
The solution has 3 feature sets, which are based on the required optimization level.
- Google Page Speed Optimizer Lite: includes lazy load options only
- Google Page Speed Optimizer Pro: includes lazy load, image optimization, code optimization and AMP extension
- Google Page Speed Optimizer Premium: includes all Lite and Pro features + AJAX Shopping Cart and Infinite Scroll extensions
As mentioned above, the PRO version consists of 3 modules: code optimization, image optimization and lazy load. All these extensions should be configured separately. To do this, go to Stores → Configuration → Amasty Extensions. Start with the Google Page Speed Optimizer tab.
Magento 2 Speed Optimization Tips
Before starting the optimization, check your website’s current Google score right from the admin panel using the Diagnostic option. This built-in testing tool helps you to measure the result after enabling each option. Diagnostics include the tips for Magento optimization based on the current score and the metrics that should be improved. Follow the recommendations to get the most out of the extension. Moreover, for your convenience, Magento performance optimization tips display a precise way for the feature that should be enabled to improve a specific metric.

Please, mind that the extension automatically gets the URL of a real webstore to check. But if you install the module on a test instance, specify the required URL here:

You may see the desktop and mobile page speed scores separately. The informative block also contains Google recommendations.

Note that Google has a limit for checking. If you face the issue below, please wait for some time and restart diagnostics.

Follow the recommendations and check the result once more. You will see the result in the After tab.

Before starting configuration, please, set Magento Production mode instead of Developer or Default. The Production mode is required to get the best performance of this extension.
Google Page Speed Optimizer
This part of the extension contains code optimization and some other settings to make your webstore load faster.
The Google Page Speed Optimizer extension also works on Magento Cloud, except for the image optimization functionality.
Using the settings, you can reduce HTML, CSS and JS code size. The extension removes all unnecessary line breaks, tabs, comments and spaces. Also, it includes some advanced settings, such as server push.

HTML Minification

Minify HTML - set the option to Yes to enable HTML minification.
Prioritize Resource Loading - when enabled (Yes), the extension sorts the resources in the <head> tag, prioritizing the most important ones to ensure faster loading. The order of priority is as follows:
- Meta tags and page title
- Critical resources (inline CSS in <style> and inline scripts)
- External CSS files
- Fonts
- JavaScript
The Prioritize Resource Loading feature is available in the Pro and Premium extension versions, as a part of an active support or product subscription. You can find the amasty/module-optimizer-subscription-functionality package for installation in composer suggest.
When any of the settings in the field have been changed, execute the following command:
bin/magento setup:static-content:depl oy
JavaScript
In this tab you can create an advanced bundle of JS using Advanced JS Bundling feature and JS Minification that will significantly reduce the page size in kilobytes and increase the page load speed. Google rank for both mobile and desktop will be improved.
You will need to use CLI commands to run through the optimization. Please make sure that you have access to the console and know how to do it.
Please create a full backup of your Magento instance and follow the instructions that are displayed in the Run Optimization section.

To run the optimization, set the Amasty JS Optimization option to Enabled.
Is Magento Cloud - set to Yes if you use Magento Cloud hosting platform.
Click Start.
Easily Clear Bundle if needed.
Automatic Optimization
Step 1. After clicking the Start button, the extension starts preparing all the links for optimization.

Step 2. Links processing progress is displayed on the bar.

When all the links from the bundle are successfully processed, you can add specific pages to JavaScript bundle. Keep in mind that each link should be placed on a new line.

If any errors are found, the processing will be stopped and the error message will appear. You may check the particular link that caused a failure. For example, 3/5 links has been successfully processed and then the message appears. It means that the 4th link contains some problems. Easily click on it to check if it is valid or not and correct the link or page itself if needed.

Step 3. When optimization is finished, you will see the appropriate message and a list of commands that should be executed.

'Is Magento Cloud' Usage
Previously, the setting 'Is Magento Cloud' was created for Magento Cloud usage. But, to avoid manual deployment, you can also use this setting even if you don't use the Cloud. Follow the steps below to set up an automatic deploy:
1. Set 'Is Magento Cloud' option to 'Yes'
2. Find the app/etc/config.php file. There you will see the list of installed modules. To create an optimization file, you will need the following massive:
'system' => [
         'default' => [
		     'dev' => [
			     'template' => [
				     'minify_html' => 1
				  ],
				  'js' => [
				       'merge_files' => 1,
					   'enable_js_bundling' => 1,
					   'minify_files' =>1
				  ]
			  ]
		  ]
	]
3. Go back to your admin panel and click Run Optimization → Start.
4. The extension will generate the code that should be put into cloud repository:

You can see the detailed instructions for generating in the Advanced Javascript Optimization.
5. Copy the generated code and paste it after ‘default’ arrow in app/etc/config.php:

6. Save the config.php file.
Additional JS Options

Include JS of the Admin Area Pages into Merged JS File - enable this option if you want to optimize the admin area as well.
Optimizing the admin area pages sometimes lead to malfunctions and doesn't affect the Google rating.
Exclude URLs from JS Bundling and Merge - specify particular URLs that shouldn't be merged or minified. Start each URL or part of the URL from new line.
Don’t forget to run the command
bin/magento setup:static-content:deploy
in the console after any changes in this block of settings have been made.
Move JavaScript To Page Bottom option helps to load all the important content before loading JS. The functionality improves pages loading time.
Ignore URL List - provide URLs of the pages on which JS shouldn't be moved to bottom.
Ignore Scripts that Contain - you may also specify particular scripts and their parts if you want them to exclude from moving.
The sample of Moving to Footer feature:

JavaScript Optimization Strategy
Please note that the the ability to choose a strategy for JavaScript optimization is available only as a part of an active support or product subscription. You can find the amasty/module-optimizer-subscription-functionality package for installation in composer suggest.
Scripts that Contain - add the scripts you want to optimize according to the chosen strategy.
Example: <script data-template=“bundle-option” type=“text/x-magento-template”><div><%- data._quantity_ %> x <%- data._label_ %></div></script>
Strategy - choose the strategy for JavaScript optimization.
- Defer - for delayed JS files loading.
- Async - to load JS files asynchronously.
If Amasty JS Optimization is Disabled, you can customize the way of code optimization. Besides Moving JS To Page Bottom, there are 4 additional options to reduce your JS code. You can also exclude particular URLs and scripts.


Merge JavaScript Files - select Yes to put all JS files into one. As a result, the number of queries will be reduced.
Enable JavaScript Bundling - enable this option to combine all JS files into few bundles and download them for each page. This helps to save time by reducing the number of server requests.
Notice that as browsers download the bundles synchronously, page rendering is blocked until all bundles finish downloading.
Minify JavaScript Files - set to Yes to enable JS minification.
Minify JavaScript in PHTML Files - enable this option to reduce the load time of non-cacheable pages by minifying JS in PHTML files when deploying statics.
The setting will be not performed if the deployment of statics runs with –no-html-minify flag. Also, this setting is recommended to be run on testing environment first.
Specify Path to Templates to be Ignored - exclude particular templates from minifying if needed.
Include JS of the Admin Area Pages into Merged JS File - enable this option if you want to optimize the admin area as well.
Optimizing the admin area pages sometimes lead to malfunctions and doesn't affect the Google rating.
Exclude URLs from JS Bundling and Merge - specify particular URLs that shouldn't be merged or minified. Start each URL or part of the URL from new line.
Don’t forget to run the command
bin/magento setup:static-content:deploy
in the console after any changes in this block of settings have been made.
This is how the bundling feature works:

CSS

Merging CSS Files works the same way as merging JS files.
Merge CSS Files in Admin Area - set No to forbid CSS files merging in the admin area. It won't affect your Goggle rating.
Exclude URLs from CSS Merge if needed.
Minifying CSS Files works the same way as minifying JS and HTML.

If you set Defer Fonts Loading to Yes, the browser will load the page with system fonts and replace them with your fonts when they are loaded. It makes store pages load faster.
The following command must be run in the console when any of the settings in the field been changed:
bin/magento setup:static-content:deploy
Defer Fonts for - choose the particular devices for which the fonts should be deferred.
You may exclude some fonts from deffering in the Do Not Defer Fonts That Contain option.
As in the JS tab, you can also Move Print CSS Files to Page Bottom to make your page render faster.
Flat Tables
Flat Tables allow storing all the information about a category or a product. Such tables help to shorten the query in the database.

Keep in mind that flat catalog usage is not recommended by Magento documentation. See more details here.
Server Push/Preload
A powerful feature of HTTP/2 represents the ability of the server to send multiple responses for a single client request. That is, in addition to the response to the original request, the server can push additional resources to the client, without the client having to request each one explicitly.

Please note that in Chrome version up to 106 and other Chromium-based browsers will have Preload functionality in their next releases. Server Push will work in Chrome version up to 105 and all other browsers as usual.
Before enabling the option, the server needs to be configured correspondingly for the proper work of the functionality. Please, follow the steps below to configure the server you’re using.
Nginx Server
Please, add the following changes to the configuration file which is responsible for Magento:
1. Specify http2 flag for listen parameters
2. Add http2_push_preload on; to enable pushes (it should be under server scope)
3. Specify max pushes per request in http2_max_concurrent_pushes 50
server {
    listen 80;
    listen [::]:80;
    listen 443 ssl http2; <-- Add http2 flag
    listen [::]:443;

    http2_push_preload on; <-- Enable preload
    http2_max_concurrent_pushes 25; <-- Setup max pushes per request

    ...
Apache Server
1. First, you need to enable the HTTP/2 module.
sudo a2enmod http2
2. Then edit your Apache virtual host file. If you enabled HTTPS with Let’s Encrypt, then the SSL virtual host is created as a separate file ending with le-ssl.conf.
sudo nano /etc/apache2/sites-enabled/your-site-le-ssl.conf
3. Put the following directive after the opening <VirtualHost *:443> tag.
Protocols h2 http/1.1
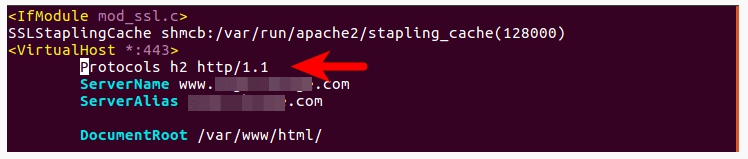
4. Save and close the file. Then restart Apache for the changes to take effect.
sudo systemctl restart apache2
To make the feature work with Varnish, proceed to the Varnish configuration file and remove the following line from it:
unset resp.http.Link
Module Configuration
Now we can proceed to extension settings.
Enable Server Push/Preload - enable the Basic option to activate server push or Advanced to preload critical resources & assets.
Asset Types to Server Push - specify the files that will be used for the push.
Exclude URLs from Server Push - provide particular URLs to exclude from the push.
Server Push/Preload: Advanced
Please note that the advanced preload functionality is available only as a part of an active support or product subscription. You can find the amasty/module-optimizer-subscription-functionality package for installation in composer suggest.

1. Type
2. Resource URL - specify the URL of the asset to preload (Image, JS File, CSS File, Font File).
3. Priority
- Browser Priority (Recommended) - refer to this documentation for more information.
- High
- Low
4. Preload as
- Image
- JS File
- CSS File
- Font File
5. Enable CORS support (for Fonts Only) - set to Yes to activate CORS support for fonts.
Other Settings
In this tab you can enable some additional settings to make your webstore perform better.

Sign Static Files - activate the option to make the browser automatically update cached values once they are changed.
Asynchronous indexing - enable to distinguish traffic patterns on the database level to avoid conflicts between read and write operations. Order data is placed in a temporary storage and moved to the Order Management grid with no accidents.
Image Optimizer
Switch to this tab to configure the automatic image optimization using various flexible settings. The extension allows you to optimize JPEG, PNG and GIF images.
The correct functioning of the extension (Community and Enterprise editions) requires some special software to be installed: JPEG optimization tool / PNG optimization tool / GIF optimization tool / WEBp tool. If you are not sure how to install the necessary software on the server correctly, please contact your administrator or Amasty support team.
NOTE: Since the required third-party libraries cannot be installed on Magento Cloud, the image optimization functionality of the Google Page Speed Optimizer extension is not available for this edition. To enable image optimization on Magento Cloud, we recommend opting for the integration with SpeedSize™.
SpeedSize Settings
In this tab, you can activate the integration with the SpeedSize™ functionality for neuroscience media optimization. To learn more about SpeedSize™, please check here.

Public Key - insert the key generated on the SpeedSize side.
CDN - specify CDN.
General Settings
Expand the General Settings tab to configure the main settings.

Enable Multi-Process Generation - select Yes to speed up images optimization.
Multi-Process Optimization significantly boosts the image optimization speed. But it generates extra load to the server as well. We recommend first to run the test image optimization process with the 'multi-process' ON and monitor your server performance.
The 'Multi-Process Generation' feature needs the php extension 'pcntl' to be installed on the server. If you enable the feature and no performance boost happens, please ask your hoster/system administrator to check if the 'pcntl' extension installed.
Number of Parallels Processes - specify the number of processes to be performed at once. The more parallel processes are set, the faster the image optimization process is, as well as the higher is the server load.
Image Resolutions Library – Choose the library to use for creating image resolutions during Smart Optimization. The choice of library affects the speed of image optimization. GD2 is the default library, while using the Imagick library can speed up the optimization process, especially for large product catalogs.
For the Imagick option to work, the corresponding library must be installed.
You can download it using the following link.
Process Images per Request - enter the number of images you want to be shown instantly, per one request.
You may also optimize images in bulk using a console command (here 4 is the number of threads):
bin/magento amasty:optimizer:optimize -j 4
Moreover, you can specify the particular pattern ( i is the id of the pattern):
bin/magento amasty:optimizer:optimize -j 4 -i 2
To optimize a specific image, run the following command (-i is the ID of the pattern, wysiwyg/image.jpg is the image path):
bin/magento amasty:optimizer:optimize-img -i 2 wysiwyg/image.jpg
Please note that the the last command is available only as a part of an active support or product subscription. You can find the amasty/module-optimizer-subscription-functionality package for installation in composer suggest.
Optimize Images for Enabled Products Only - enable this option if you want to create smaller copies for the images of enabled products only. It helps to save extra space on your server and speed up optimization.
WebP Compression Quality - set the required compression quality for WebP images (from 50 to 99).
AVIF Compression Quality - specify the desired compression quality for AVIF images. The quality level can be adjusted on a scale from 0 (worst quality, smaller file) to 100 (best quality, larger file).
AVIF Encoding Speed - configure the speed of the AVIF encoding process. The speed can be adjusted on a scale from 0 (slow, smaller file) to 10 (fast, larger file).
To learn more, click the following link.
User Agent
Expand the User Agent tab to adjust settings for image loading according to the customer's browser user agent.
Please note that the User Agent functionality works only with Smart Optimization strategy.

Set the Use User Agent for Loading Images to Yes to enable fetching appropriate image sizes based on the user agent data, obtained from the browser.
In the Ignore Images that Contain you can specify certain images to be excluded from the loading based on the user agent info. Such images will be delivered on the users' devices in the original size.
Use EOL separator for your images ignore list. Several records should be written on a new line.
Replace Images
Choose the strategy of image optimization. Here you can implement the options selected in the New Pattern for Image Optimization settings section.

Image Replace Strategy - select the suitable strategy for image optimization:
* Choose None if you don’t need to optimize images;
* Choose the Smart Optimization strategy to automatically replace all existing images with lighter alternatives in either AVIF or WebP format. When this strategy is enabled, images will be replaced with AVIF format versions. If the user's browser doesn't support the AVIF format, images will be replaced with WebP format alternatives (WebP and Image Resolutions strategy). You can access a list of browsers that support the AVIF format here;
AVIF is a modern image format based on the AV1 video format, known for its superior compression compared to WebP, JPEG, PNG, and GIF. It is designed to replace them as the preferred image format.
Please be informed that the Smart Optimization strategy (AVIF format) is available only as part of an active product subscription or support subscription for Pro and Premium extension versions.
* Choose SpeedSize to optimize all existing images with the SpeedSize™ functionality. Please note that this strategy will work only if the correct CDN and Public Key in the SpeedSize Settings section are specified.
SpeedSize - a solution based on neurobiological optimization of multimedia that allows you to maintain high quality and speed of loading images.
Video support: if SpeedSize is enabled (CDN and Public Key are filled out), the original video links on the pages will be replaced with the SpeedSize links without additional configuration regardless of whether the SpeedSize strategy is selected or not.
Ignore Images that Contain - specify particular images that should be skipped.
Use EOL separator for your images ignore list. Several records should be written on a new line.
Support Third-party Image Attributes - you can replace images generated by third-party lazy load extensions by specifying the required attribute. Example: <img src=“placeholder-image.png data-src=“original-image.png”/> In this case 'data-src' - it's a third-party attribute, so you need to prescribe it in the field if you want images with this attribute to be replaced with WebP format.
Additionally, you can adjust the optimization for particular store pages separately. The settings are the same as above.

Automatic Image Optimization
In this tab, you can allow automatic image optimization.

Automatically Optimize Newly Uploaded Images - set to Yes to automatically optimize all newly uploaded images in folders where the Automatically Optimize Newly Uploaded Images setting in the pattern settings is also set to Yes.
Please note that when you install the extension, you have to optimize all previously uploaded images. It can be done from the Content → Image Optimizer → Image Folder Optimization Settings page. But if you upload new images after the optimization (e.g. a new product has been created), use this option to optimize the newly uploaded images on the fly before saving it.
Upgrade to Premium and subscribe to access automatic optimization for existing images in folders and delayed optimization by cron based on a schedule.
Delete Previously Generated & Resized Images

Clear Images Folder - the Clear WebP Images Folder / Clear Avif Images Folder/ Clear Mobile Images Folder / Clear Tablet Images Folder buttons delete the optimized files from the pub / media / amasty / folder_name folders, depending on which button is pressed. It is used if the previously selected optimization settings were inconvenient to use and there is a need to re-generate the queue and re-optimize the images.
Lazy Load
This extension is used to load images only when they become visible, which makes pages load faster. Proceed to the Lazy load tab to enable the fucntionality.

To deliver the media correctly, the srcset attribute will be deleted from Lazy Load images.
General
Enable Module - set to Yes to activate lazy load functionality.
User Agent
If you have Image Optimizer installed, you will be able to configure the user agent for lazy load functionality. Expand the User Agent tab to adjust settings for image loading according to the customer's browser user agent.
Please note that the User Agent functionality does not work when SpeedSize is enabled.

Set the Use User Agent for Loading Images to Yes to enable fetching appropriate image sizes based on the user agent data, obtained from the browser.
In the Ignore Images that Contain you can specify certain images to be excluded from the loading based on the user agent info. Such images will be delivered on the users' devices in the original size.
Lazy Load is fully compatible with the Full Page Cache Warmer extension. If you have both modules installed, you can warm pages according to the user agents.

Lazy Load

Use Lazy Loading Images - set to Yes to make off-screen images load only when a customer scrolls to them. It prevents pages full of images from lagging.
Lazy Load Script - you can choose between 4 lazy load scripts: jQuery Lazy Script, Native JS Lazy Script, Vanilla Lazy Script, and Lozad Lazy Script. We recommend trying all of them to choose one that fits your system best.
Please note, that for the correct work of Lazy Load functionality on Hyva Theme, the option Native JavaScript Lazy Script must be chosen.
If you have the Pro or Premium version of the extension along with an active product subscription or support subscription, you can utilize the lazy load functionality for images with the <source> tag within <picture> and images with the <srcset> tag within <img>. However, it's important to note that optimization and lazy loading for images with the <source> tag in <picture> will only work if one of the following scripts is selected: Vanilla, jQuery, or Lozad Lazy script.
You can decide whether to request the preload of Magento 2 key images or load them from scratch when they happen on screen. Decide how many images to load by setting Preload Images Number.
Enable SpeedSize - set Yes if you want to enable SpeedSize for lazy load (for all pages at once).
Desktop Preload Images Number - set the number of images to be pre-loaded on the page from the start. You can also assign a specific number of images for tablet devices with the Tablet Preload Images Number and for phones with the Mobile Preload Images Number fields.
Ignore Preload Images that Contain - specify the images (their classes) that should be excluded from preloading.
Ignore Images That Contain - specify the images that should not be optimized.
Use EOL separator for your images ignore list. Several records should be written on a new line.
For better compatibility with other extensions, the img tag which includes empty src will be ignored.
Add Aspect Ratio Styles to Image Tags - if enabled, the aspect-ratio styles will be added to lazy loaded images based on their dimensions. It helps you to display images correctly even when only image width or height is specified.
Add to Images that Contain - specify particular images or the pattern to which the aspect ratio style should be added.
How it works: if you specify myimage in this field, “Aspect-ratio” style will be added to images that contain myimage in its path or class. For example:
<img class="testImage myimage" src="http://site.com/1.png"/>
OR
<img src="http://site.com/myimage.png"/>
.
Please note that when the Use User Agent for Loading Images setting is set to No and the Preload Images setting is set to Yes, the following features will be available:

To learn more about Image Strategies, navigate here.
All other tabs of this block have the same structure, but you can specify the settings for particular site pages. Thus, you can select the most suitable type of optimization for each store page.

Save the configuration.
AMP
Pro and Premium extension versions include AMP extension. The collaboration of these modules lets you create accelerated mobile pages and use Webp image format for them, which significantly improves mobile score.
To configure the AMP component, proceed to Stores → Configuration → Amasty Extensions → AMP.
Expand the General tab.

Choose the types of pages for which the AMP versions will be generated.
Open Accelerated Mobile Pages - if Always option is chosen, users on mobile devices will be invariably redirected to AMP version of the page. If you select From AMP Google results only, AMPs will be available only via links on Google search results pages (in that case the user will stay on AMPs until he/she reaches non-AMP page).
You can also enable AMP for CMS pages and configure design options. Check this user guide to see the details.
Image Folder Optimization Settings
These settings will allow to precisely configure the optimization pattern for folders.
Navigate to Content → Image Optimizer → Image Folder Optimization Settings. To create new set of rules, please click on the Add New Pattern button.

All configured patterns will be displayed in one handy grid. You can manage them any time you need just in a few clicks.
Run Optimization - click this button to optimize selected folders images.
To run optimization manually, execute the following command:
php bin/magento amasty:optimizer:optimize
Please mind that running optimization will make an additional load to the server.
New Pattern for Image Optimization settings
As you click the Add New Pattern button, a new Image Optimization Settings page will expand.

To optimize a specific image instead of an entire folder, according to a pattern settings, run the following command (-i is the ID of the pattern, wysiwyg/image.jpg is the image path):
bin/magento amasty:optimizer:optimize-img -i 2 wysiwyg/image.jpg
With this command, you can also optimize multiple images at once by specifying their space-separated paths:
bin/magento amasty:optimizer:optimize-img -i 2 wysiwyg/image.jpg wysiwyg/image2.jpg wysiwyg/image3.jpg
Please note that this command is available only as a part of an active support or product subscription. You can find the amasty/module-optimizer-subscription-functionality package for installation in composer suggest.

Set the Enabled switch to Yes to allow this set of configurations.
Title - enter the title of the configuration set to easily distinguish numerous configs in the grid.
Folders for Optimization - click on the folder name to include it in the list of folders that will be optimized.
NEW: Magento 2 Google Page Speed Optimizer extension is compatible with AWS Remote Storage (AWS S3). That allows optimizing images from folders that are located in AWS Remote Storage. The names of the mentioned folders must be chosen in the Folders for Optimization field. After this, the images will be optimized according to the configuration of the specific pattern.

Automatically Optimize Newly Uploaded Images in Folder - set to Yes to automatically optimize all images newly uploaded in the folders selected for optimization.
For correct work, please make sure that the Automatically Optimize Newly Uploaded Images setting is enabled in the general configuration (Image Optimizer → the Automatic Image Optimization tab).
Upgrade to Premium and subscribe to unlock automatic optimization for existing images in folders and the ability to log image optimization after each cron job run.
Create Image for Mobile/Tablet - set the corresponding switch to Yes to automatically create appropriately sized images for various displays. All newly created copies will be saved on your website server, so check in advance if you have enough disc space.
Resize Algorithm - select the algorithm according to which the images will be compressed:
- Crop - cuts pictures by size according to the device used, but not proportional to the size of the picture itself. While the height of the image would be the same, in the result the cropped image will look like the part of the original picture.
- Resize - compresses the images in proportion to the picture itself according to the size of the field viewed. Simply it will be the same picture, but smaller in pixels.
Create AVIF Copy - select Cavif to generate an AVIF format copy for every image.
Please make sure that you have PHP version 8.1 or higher and you have enough disc space on your server.
Create Webp Copy - choose Cwebp to create a copy for every image in the WebP format.
Please make sure that you have enough disc space on your server. It is also necessary to install the Webp tool package on your server using the command
sudo apt-get install webp
For a specific setup with versioning, use this guide.
Create Image Dump - set to Yes to to store original images in the pub/media/amasty/amoptimizer_dump folder. It allows collect all the original files in one place and easily update them in case the settings are changed.

JPEG optimization tool - set the way to optimize JPEG images:
- Do not Optimize - select this option to forbid optimization;
- jpegoptim 100% quality / jpegoptim 90% quality / jpegoptim 80% quality - choose the quality level you want to get after compression. See the examples of optimized images right below the setting.
PNG optimization tool - select optipng to optimize PNG images.
GIF optimization tool - choose gifscale to compress GIF files.
Click on the Save button to preserve the settings.
PREMIUM: Advanced Features
The Premium version includes some unique features to improve store speed.
Premium JS Options
Since JS merging creates one huge file, for particular stores it may affect some pages on specific devices. The Premium version provides more flexibility - you can adjust merging for any device to achieve maximal effect.
To adjust the option, navigate to Google Page Speed Optimizer → JavaScript and enable the Merge JavaScript Files feature.

Please, note that the feature behaves differently for different stores and needs testing. Try to disable merging for particular devices on your testing environment to find the combination that suits your website best.
Automatic Optimization for Existing Images in Folders
Please note that this functionality is available only as a part of an active support or product subscription. You can find the amasty/module-optimizer-premium-subscription-functionality package for installation in composer suggest.
In addition to optimizing newly uploaded images automatically, the Premium extension version also enables automatic optimization of existing images in folders. To configure this:
1. First, go to Stores → Configuration → Google Page Speed Optimizer (Premium) → Image Optimizer → Automatic Image Optimization and enable the Automatically Optimize Existing Images setting:

2. Then, navigate to Content → Image Optimizer → Image Folder Optimization Settings and activate the Automatically Optimize Existing Images in Folder feature:

Existing images in selected folders will be optimized by cron on a scheduled basis. See the next user guide section for more details.
The number of existing images that can be optimized in a single cron run is controlled by the Process Images per Request setting in the general configuration (Image Optimizer → the General Settings tab).
Image Optimization by Cron
The Pro version has an option for automatic image optimization - all new images are optimized as soon as they are uploaded. But for some stores it is necessary to delay this process, e.g. run optimization at night, when the number of visitors is minimal. The Premium version offers Cron image compression so that the optimization could suit your personal working flow.
To set up an optimization schedule, proceed to Image Optimizer → Automatic Image Optimization and choose the required option in the Automatically Optimize Images dropdown.

Please, mind that when you switch the Cron optimization to the Immediately after Uploading mechanism, some images may still remain in the queue. To optimize images left in the queue, run the following command:
bin/magento amasty:optimizer:optimize
Image Optimization Log
The Enable Image Optimization Log feature exclusively available in the Premium extension version and located in the General Settings tab of the Image Optimizer general configuration, helps track the image optimization process in the background, ensuring all operations are properly documented.
Please note that the feature is available only as a part of an active support or product subscription. You can find the amasty/module-optimizer-premium-subscription-functionality package for installation in composer suggest.

Enable Image Optimization Log – If set to Yes, a log file containing details of automatic image optimization (e.g., 'var/log/amoptimization_cron_%timestamp-Y-M-D%.log') will be created after each cron run. You can find these files in the 'var/log' folder.
The log file includes the following details:
- File (image) name
- Error message (if any)
- Time taken for generation
- Status (success or failure)
Log file example (click to zoom):

AJAX Shopping Cart
To provide customers with the extra fast and handy shopping flow, the Premium version includes AJAX Shopping Cart extension. If enabled, shoppers are able to add and manage products in a shopping cart without redirects and page reloads.
Navigate to Stores → Configuration → Amasty Extensions → AJAX Shopping Cart.

Enable or disable the extension in Enable Ajax Shopping Cart.
Enable flying image effect: With this setting, you can activate and deactivate nice looking visual effect.
You can get an idea of how the effect works here.
Show the Product Qty Added to the Cart on the Product Listing: Enable the option to highlight the products that have already been added to the shopping cart. With mouse hover over the product, the number of items added to the cart appears.
Add Products to Compare with AJAX: Enable the option to let customers add products to Compare without page reloading. This will fasten the process and make it more convenient.
Add Products to Wish List with AJAX: Set the option to Yes to eliminate page reloading when customers add products to Wish List.
Show a Mini Cart once Item is Added: Enable the option to Show a Mini Cart instead of a Confirmation Pop-up after an item is added to the cart.
The extension includes a wide range of cart customization settings. See this user guide to configure them properly.
Infinite Scroll
You can also find this functionality in the Premium version only. Infinite scroll lets your visitors browse the catalogs without page reloads, as the content is loaded and displayed as soon as a customer reaches the end of the catalog page.
To get access to the infinite scroll settings please go to Stores → Configuration → Amasty Extensions → Infinite Scroll

Loading Type - choose from the available loading styles.
See the full list and each type specifics below:
- Select None - module is disabled if you want to deactivate the functionality of the Infinite Scroll extension.
- Select Automatic - on page scroll to activate the autoloading of the previous and next pages. The next and previous pages will be displayed as soon as you reach the end of the current page. The AJAX plugin provides the progressive enhancement of the next and previous pages to the existing page without a complete page refresh.
- If you select Button - on button click you'll have the next and previous pages loaded automatically but they will be displayed only after you click the button.
- In case you choose the Combined - automatic + button, the first 'X number' of pages will be loaded automatically. After X pages, the user will have to load pages manually by pressing the button.
- For Combined - button + automatic, the first 'Y number' of pages will be loaded automatically. Then, to load the next page, the user will need to click a button once. After that, all other pages will be loaded automatically.
Number of Automatically Loaded Pages - Enter the number of pages a user needs to scroll before 'Auto mode' applies. This setting is only available for Combined loading types: Combined - automatic + button and Combined - button + automatic.
What is the difference between automatic + button vs button + automatic?
Let's say, you set the number of automatically loaded pages as 4.
In the case of the Combined - automatic + button scenario, a user will see the first 4 pages similarly to a long one-pager. Then, to load the 5th, 6th, 7th, etc. pages, the user will need to press a 'Load More' button every time to load the page.
However, with the Combined - button + automatic user will be asked to press a 'Load More' button only once - between the 4th and 5th page.
Display Page Numbers - Choose 'Yes' to display the pages separator with numbers. While scrolling down the list of products you will see the line separator with the page number. Select 'No' to deactivate the separator and have the plain catalog list.
Page Numbers Style - Choose the style of page numbers from the list.
These are the available page number styles:
- Button;

- Text with divider;

- Text with background.

AJAX Progress Image Path - Insert the path to your own loading theme to customize your website. Choose what kind of loading wheels fits your web store layout.
Follow this detailed guide to customize the button and match it with the general webstore design.
AJAX Compatibility
You are able to add the compatibility with 3-rd party extensions which use AJAX. It can be done with the usage of the following sample:
<?php

class Test
{
    /**
     * @var \Magento\Framework\DataObjectFactory
     */
    private $dataObjectFactory;

    /**
     * @var \Magento\Framework\Event\ManagerInterface
     */
    private $eventManager;

    public function __construct(
        \Magento\Framework\DataObjectFactory $dataObjectFactory,
        \Magento\Framework\Event\ManagerInterface $eventManager
    ) {
        $this->dataObjectFactory = $dataObjectFactory;
        $this->eventManager = $eventManager;
    }

    public function execute()
    {
        $someHtml = '<div><img src="test.jpg">...</div>';
        $data = $this->dataObjectFactory->create(
            [
                'page' => $someHtml,
                // \Amasty\PageSpeedOptimizer\Model\Output\LazyLoadProcessor::PAGE_CONFIG keys
                'pageType' => 'catalog_category_view',
                // optional. Example of configs
                // \Amasty\PageSpeedOptimizer\Model\Output\LazyLoadProcessor::prepareLazyConfig
                'lazyConfig' => [

                ]
            ]
        );
        //if Amasty PageSpeedOptimizer is not installed output page will be the same
        $this->eventManager->dispatch('amoptimizer_process_ajax_page', ['data' => $data]);
        $someHtml = $data->getData('page');

        return $someHtml;
    }
}
When using AJAX scroll extensions, you can also convert images to WebP format without using Lazy Load. Please use the code below to achieve this:
$objectManager = \Magento\Framework\App\ObjectManager::getInstance();
$dataObjectFactory = $objectManager->create(\Magento\Framework\DataObjectFactory::class);
$eventManager = $objectManager->create(\Magento\Framework\Event\ManagerInterface::class);
$data = $dataObjectFactory->create()->setData(
    [
        'page' => $resultHtml,
        'lazyConfig' => [
            'is_lazy' => false
        ]
    ]
);
$eventManager->dispatch('amoptimizer_process_ajax_page', ['data' => $data]);
Varnish Compatibility
To make Varnish compatible with the WebP functionality, you need to customize the Varnish configuration. Also, now the extension supports WebP for Safari 14.
To add WebP images support for users who have never visited the site using Varnish, you need to change the Varnish defaul.vcl configuration file.
Follow the steps below:
1. Find the vcl_hash subroutine
2. Add the code:
# Amasty Google Page Speed Optimizer device detection and cache separation mechanism
    if (req.http.cookie !~ "X-Magento-Vary=") {
        call device_detect;

        if ((req.http.X-Amasty-Accept-Avif || req.http.X-Amasty-Accept-Webp) && req.http.X-Amasty-Device) {
            hash_data(req.http.X-Amasty-Accept-Avif);
            hash_data(req.http.X-Amasty-Accept-Webp);
            hash_data(req.http.X-Amasty-Device);
        }
    }
3. Add a new subroutine using this code:
sub device_detect {
    unset req.http.X-Amasty-Accept-Webp;
    unset req.http.X-Amasty-Accept-Avif;
    unset req.http.X-Amasty-Device;

    if (req.http.Accept ~ "image\/webp" ||
        req.http.User-Agent ~ "(?i)(\biPhone|\biPod|\biPad|\bMacintosh).*Version\/(1[4-9]|[2-9][0-9])" ||
        req.http.User-Agent ~ "(?i)Edg|Firefox|Chrome|Opera"
    ) {
        set req.http.X-Amasty-Accept-Webp = "true";
    }

    if (req.http.Accept ~ "image\/avif" ||
    	req.http.User-Agent ~ "(?i)(?!.*Edg)(Firefox|Chrome|Opera)" ||
    	req.http.User-Agent ~ "(?i)(\bMacintosh).*Version\/(1[6-9].[4-9]|1[7-9]|[2-9][0-9])" ||
    	req.http.User-Agent ~ "(?i)(\biPhone|\biPod|\biPad).*Version\/(1[6-9]|[2-9][0-9])"
    ) {
        set req.http.X-Amasty-Accept-Avif = "true";
    }

    if (req.http.User-Agent ~ "(?i)Mobile") {
        set req.http.X-Amasty-Device = "mobile";
    } elsif (req.http.User-Agent ~ "(?i)Tablet") {
        set req.http.X-Amasty-Device = "tablet";
    } else {
        set req.http.X-Amasty-Device = "desktop";
    }
}
4. Reload Varnish.
Additional packages (provided in composer suggestions)
To make additional functionality available, please install the suggested packages you may need.
Available in Pro and Premium tariff plans with no additional fees:
amasty/page-speed-optimizer-with-speed-size- Install this module if you want to have the compatibility with the SpeedSize™ image optimization service.
Available as a part of an active product subscription or support subscription:
For Pro and Premium versions:
amasty/module-page-speed-optimizer-hyva- Install this package to ensure the Page Speed Optimizer extension works with the Hyvä Theme.
amasty/module-avif-image-optimizer- Install this package to enable AVIF optimization support.
amasty/module-optimizer-pro-functionality- Install this package to enable Pro package features.
amasty/module-imagick-library-image-optimizer- Install this package for Imagick library compatibility.
amasty/module-optimizer-subscription-functionality- Install this package:
1. to enable the advanced preload functionality;
2. to choose a strategy for JavaScript optimization (defer/async);
3. to run the command for specific image(s) optimization;
4. to prioritize resource loading.
For Premium tariff plan only:
amasty/module-ajax-cart-hyva- Install this package to ensure Ajax Shopping Cart extension works with Hyvä Theme.
amasty/module-optimizer-premium-subscription-functionality- Install this package to access automatic optimization for existing images in folders and logging for the automatic image optimization process.
FAQ
* Is your extension compatible with Varnish?
* Can I create WebP copies for theme images?
* How to optimize JS with the Google Page Speed Optimizer extension?
* Why Webp images don't appear on the frontend?
Find out how to install the Google Page Speed Optimizer via Composer
magento_2/google_page_speed_optimizer.txt · Last modified: 2025/06/19 12:28 by kkondrateva