
Sidebar
magento_1:blog_pro
Table of Contents
For more details see the Blog Pro extension page.
Guide for Blog Pro
Create responsive blog posts with a handy WYSIWYG editor, easily customize posts display with a layout constructor and make them user and SEO-friendly.
- Take advantage of responsive layout design
- Use numerous handy widgets
- Customize blog posts display
- Make blog posts SEO-friendly
- Send admin and customer notifications
Blogging has become an essential part of any successful online business. Today it’s one of the best ways to draw massive targeted traffic to your website. Therefore, due to a properly run blog you can easily keep your customers informed about company products, promotions and sales as well as to receive customers’ feedback in the comments.
Configure the extension
Blog Pro has many options and settings that will be useful to you while creating blog posts.To configure the extension, go to System → Configuration → Blog Pro or CMS → Blog Pro → Configuration.
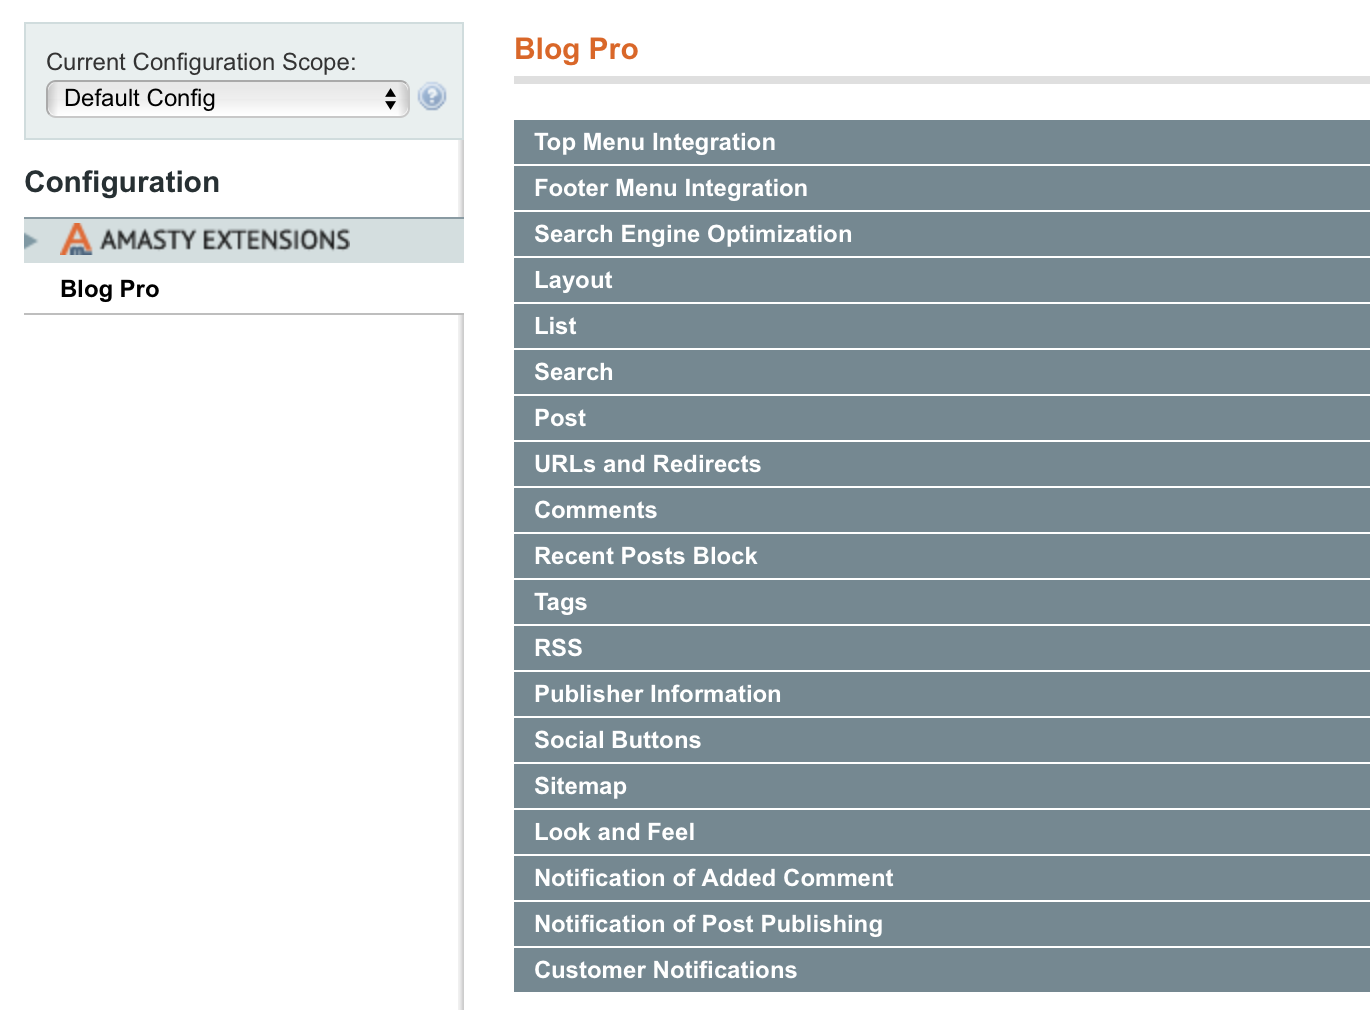
The page contains 18 sections, which are described below; the interface is very intuitive to make the configuration process easier for you.
The module requires the Magpleasure_Searchcore and Magpleasure_Common components.
Top/Footer Menu Integration
It's possible to add the blog link to the top menu of your store.
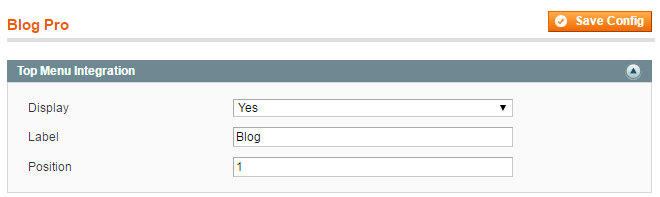
Display - Display or hide the blog link in the top menu.
Label - Specify the label of the link.
Position - Define the sequence of the link among other links.
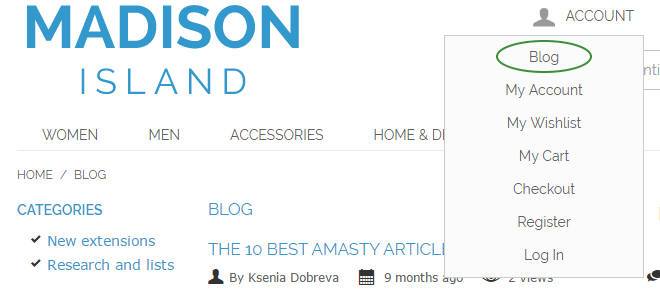
This is how it looks on the frontend.
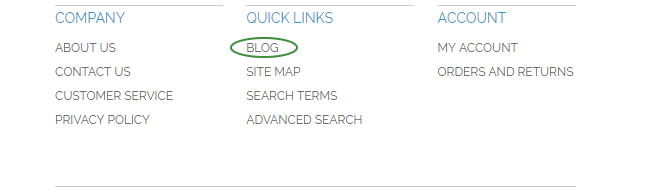
With an identical set of settings you can add a quick link to your blog to the footer menu.
Search Engine Optimization
Blog Pro allows you to optimize the blog for Google and other search engines. Carefully picked meta title, keywords, and description will boost your blog in search results and attract more potential customers to the store.
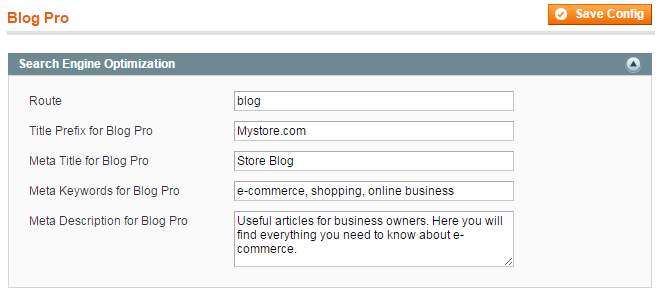
Route - Define the URL title, which will redirect visitors to your blog page.
Title Prefix for Blog Pro - Indicate the default prefix that would be displayed in a browser tab when you open a blog category or search for a tag.
Meta Title for Blog Pro - This is the title of the main blog page in a browser tab.
Meta Keywords for Blog Pro - Add the keywords by which customers can find your blog. Try to find words and phrases, which are relevant to the topics that are covered in your blog.
Meta Description for Blog Pro - This description is displayed in search engines results.
Layout
With the help of this layout constructor you can define how blocks with different blog information would be displayed on the frontend. There are four layout types: desktop layouts for the main blog page and for a post page, and the same layouts for mobile devices.
The configuration is easy and convenient since all the layout blocks are visualized.You can drag, add, delete, and interchange the position of the blocks as you need.
To add a block, click the 'Plus' button and select one of the available variants. If you want to delete a block, please click the basket icon in its upper right corner.
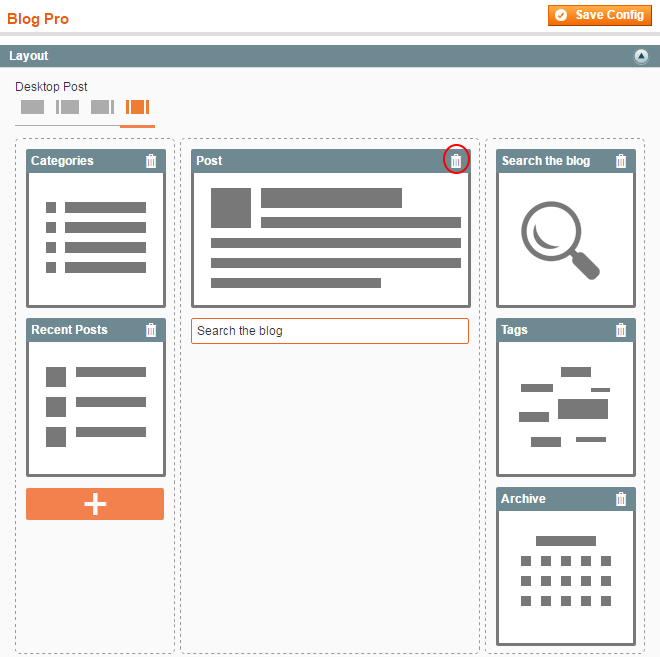
Notice, that on mobile devices your blog would have a 2-column layout. You can choose whether to place the blocks on the left or on the right side.
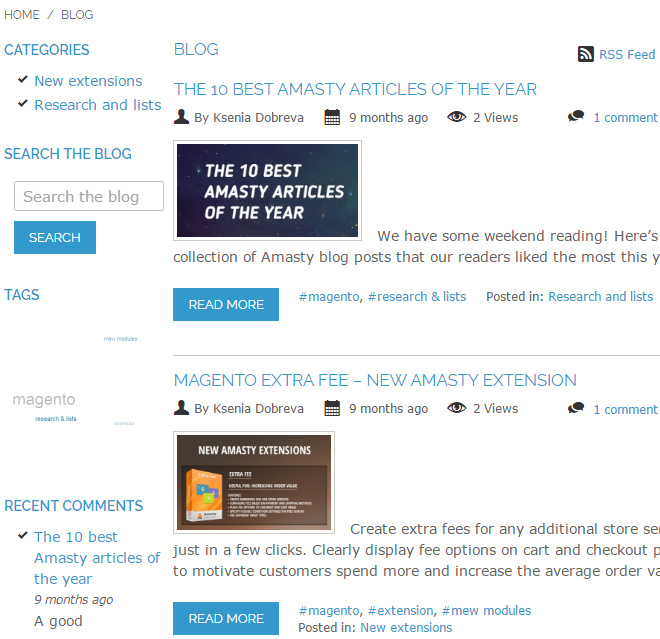
Here is an example of the main blog page in the desktop layout.
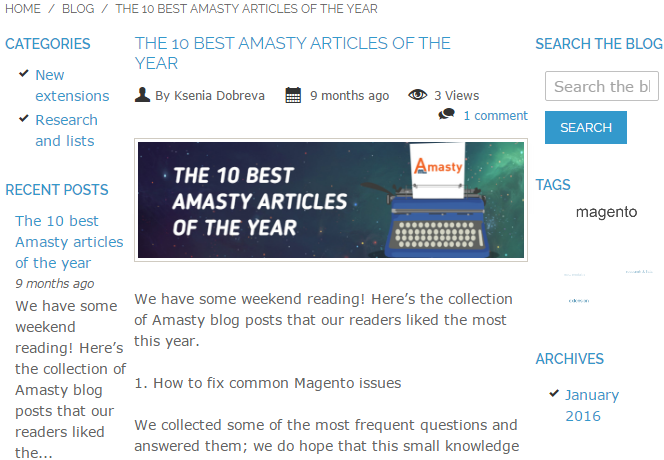
And this is a sample of a particular post page.
List of Posts and Search Options
Define the quantity of posts displayed on one blog page and specify the type of search, that should be used for the blog.
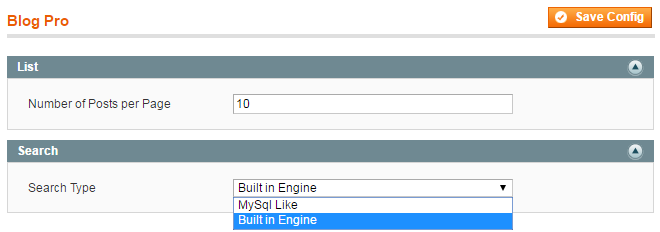
Number of Posts per Page - Set how many posts should be displayed on the main blog page.
If there are more posts in your blog, customers can switch the pages with the Older Entries link
Search Type - Define the type of search that should be used in your store. Three different options are available:
- Built-in search engine is preselected by default. It’s a resourceful but powerful solution; offers synonyms to the customer’s search request;
- MySQL LIKE Search is the fastest type of search that works with the exact matches. If visitors are mostly searching your store for particular models, this type of search would be the most suitable;
- Full text Search uses MYSQL algorithms; corrects typos automatically (available only with MySQL 5.6.2 and higher).
Post Options
Specify the general settings that would be applied to all articles in the blog.
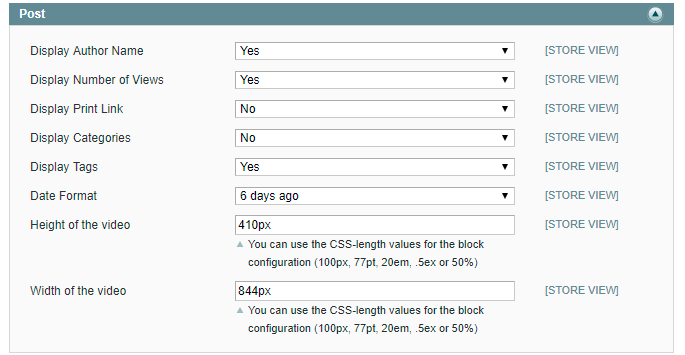
Display Author Name - Select 'Yes' if you want to display the name of the post author on the frontend.
Display Number of Views - Enable this option to display a number of visitors who have already viewed a post.
Display Print Link - Set to 'Yes' to allow customers print a post.
Display Categories - Enable the option to display categories a post belongs to.
Display Tags - Enable this option to display the tags related to a post topic. Due to tags, customers will be able to find all articles with the same topic.
Date Format - Decide how to display the publishing date: in the standard format or as the number of days passed from publishing.
Height/Width of the video - Adjust height and width for a youtube video block.
URLs and Redirects
Define how blog URLs and redirect links should be formed.
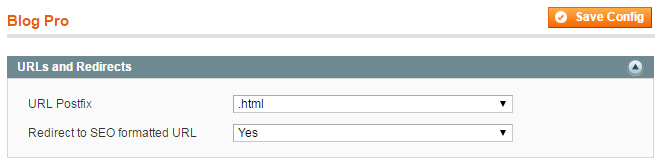
URL Postfix - The .HTML postfix shows search engines that the page is static, and, therefore, is reliable.
Redirect to SEO formatted URL - If you enable this option, customers and search robots will be redirected to a SEO-friendly post page by 301 redirect.
Comments
Visitors' comments and discussions are a very important part of a successful blog. In this section you can define how they should be managed by default.

Use Comments - Enable or disable readers' comments on the frontend.
Automatic Approving - Select 'Yes' if you want to publish comments without admin approval; they will appear on the post page immediately.
Allow Guest Comments - Enable the option to allow non-registered customers to comment your posts.
Quantity of Recent Comments in Block - Define the quantity of comments that will be displayed in the 'Recent Comments' block.
Display Date for Recent Comments - Select 'Yes' to show the date when a comment was left in the 'Recent Comments' block.
Display Short Content for Recent Comments - Due to this option, visitors will see the beginning of recent comments in the block.
Attribute rel=”no follow” for Links in Comments - If you select 'Yes', search engines will not follow links in comments. It is useful if someone posts spam comments with links to other sites.
Ask Name for Comment — enable this option to add a name field for new comments;
Ask Email for Comment — enable this option to add an email field for new comments;
Enable GDPR — choose Yes to enable GDPR consent for the comments section;
Consent Text — specify the consent text and a link to the privacy policy page.
Please notice that the extension doesn't add a privacy policy page. It should be created manually as a new CMS page.
Recent Posts
Choose how the latest posts should appear in the block.
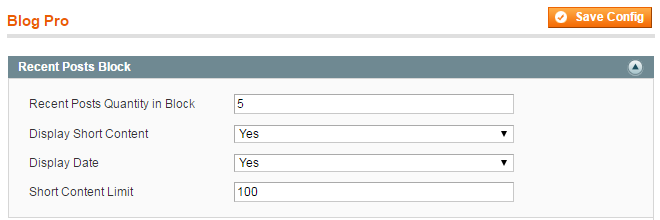 Recent Posts Quantity in Block - Define the quantity of posts that will be displayed in the block.
Display Short Content - Select 'Yes' to allow your customers to read the beginning of posts.
Display Date - Select 'Yes' to show the date when a post was published.
Short Content Limit - Define the number of symbols that will be displayed in the block for each post.
Tags
Tags are more specific than categories and help merchants to describe their posts in more detail. Due to tags, customers are able to find posts with the topic they are interested in quicker.
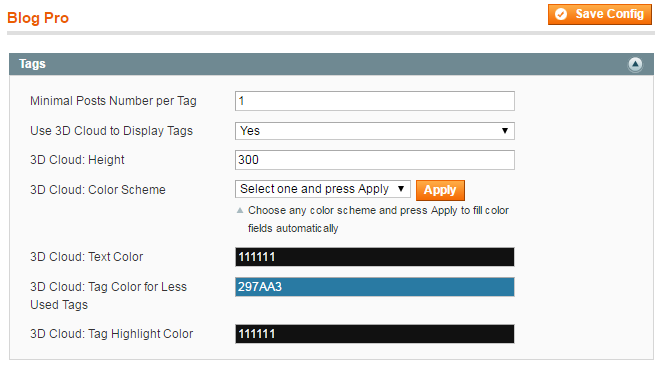
Minimal Posts Number per Tag - Define the minimal quantity of posts that a tag should have.
Use 3D Cloud to Display Tags - To make tags more noticeable to customers, you can add a block with a 3D tag cloud to the main blog page and all post pages.
3D Cloud: Height - Define the height of the 3D cloud block.
3D Cloud: Color Scheme - Choose the color scheme of the cloud that will suit your store design.
3D Cloud: Text Color - Input the HEX code of the color that will be applied to most popular tags (they have bigger size than other tags).
3D Cloud: Tag Color for Less Used Tags - Input the HEX code of the color that will be applied to minor tags (they are smaller than the popular ones).
3D Cloud: Tag Highlight Color - Input the HEX code of the tag highlight color.
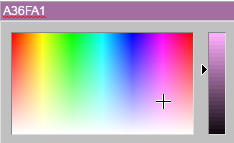
You can use a handy palette instead of the HEX codes to get the exact colors you need. The palette will appear as a dropdown for every field that requires a particular color
RSS
Due to this option, you and your customers will be able to parse an RSS feed from your blog and insert it into a Magento RSS feed page. It will allow customers to get the latest posts, comments and other content from the blog without visiting the store.
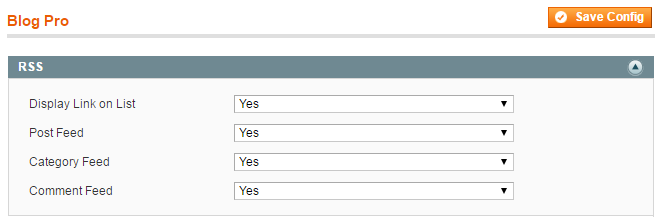
Display Link on List - Select 'Yes' to display the link to the RSS feed on the main blog page.
Post Feed - Select 'Yes' to allow customers to insert posts into an RSS feed page.
Category Feed - Chose 'Yes' to allow customers to insert categories into an RSS feed page.
Comment Feed - Select 'Yes' to allow customers to insert comments into an RSS feed page.
Publisher Information
A publisher is the website which publishes posts. You can have several authors but the publisher is only one. The information about the company that publishes a post is important when sharing content on social media. If a person finds your post on Facebook, he/she will see that it belongs to your site.
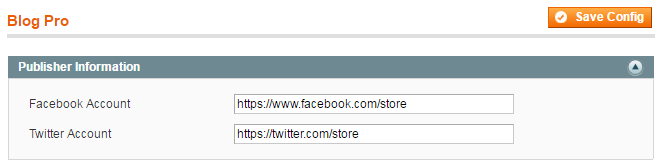
Facebook Account - Specify official store page on Facebook.
Twitter Account - Specify official store account on Twitter.
Social buttons
Allow customers to share your articles in social networks. Remember that social sharing brings popularity and drives more traffic.
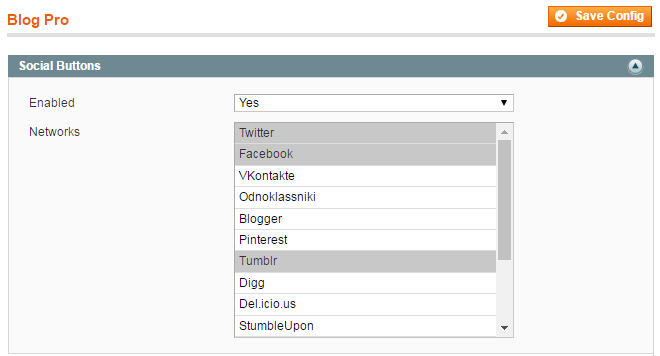
Enabled - Select 'Yes' to display social sharing buttons on a post page.
Networks - Choose networks where your customers will be able to share posts.
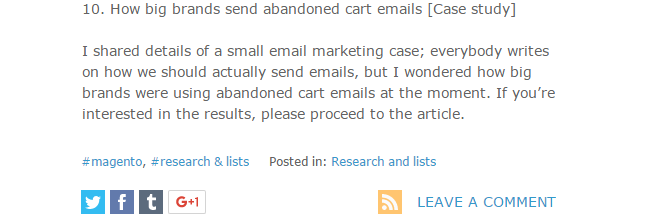
This is how social sharing buttons look on the frontend.
Sitemap
Sitemap helps Google and other search engines to understand your store structure better.
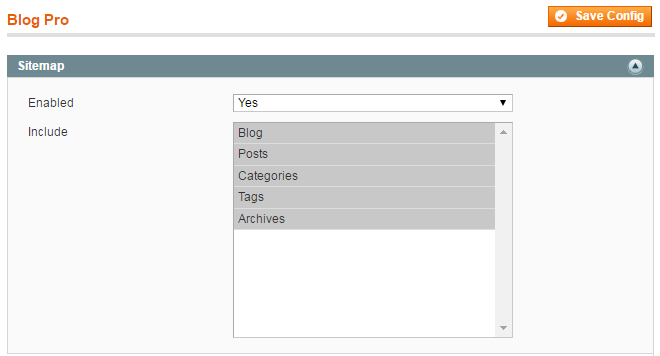
Enabled - Select 'Yes' to enable the sitemap in your store.
Include - Select the blog parts that will be included into the sitemap.
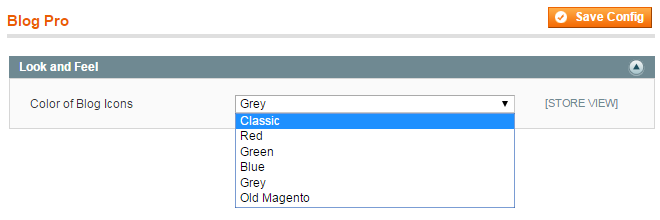
Look and Feel
Select a color for the icons displayed at the top of a blog post (the author, number of views, the Print button, etc.).
Notification of Added Comment/Post Publishing
You can receive notifications of new comments even if they are approved automatically. It will help you control what visitors leave in comments and delete spam messages timely. The post publishing notification will be sent when a scheduled post is distributed.
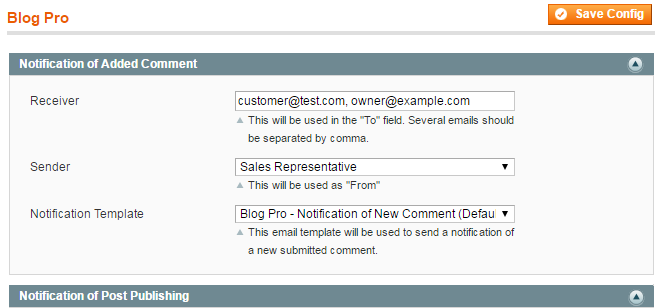
Receiver - Specify an email or several emails where notifications of publishing will be sent.
Sender - Choose the email from which notifications will be sent.
Notification Template - Select a notification template. You can use your own template or the Blog Pro one.
Customer Notification
Notify customers when someone replied to their comments or added a new comment to the post.
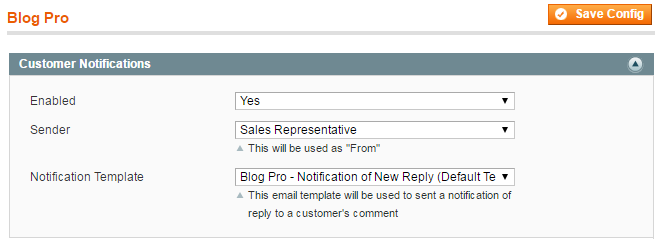
Enabled - Turn the option on/off.
Sender - Choose an email from which notifications will be sent.
Notification Template - Select a notification template. You can use your own template or the Blog Pro one.
Manage Blog Posts
To create a new post or view the existing entries on the grid, please go to CMS → Blog Pro → Add Post or CMS → Blog Pro → Posts
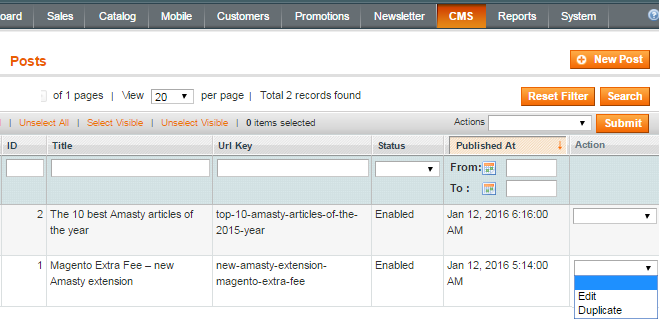
You can edit or duplicate entries right from the grid.
Post Creation
To create a new post, please press the 'New Post' button in the upper right corner of the Posts grid. Lets edit a post for this example.

Title - Specify the title of the post.
URL Key - The URL key is created automatically after specifying the title. If necessary, you can update it or write manually.
Short Content - In this field, you can write a short description or summary of the post to draw customers’ attention to its content. This text will appear on the main blog page. You can disable short content if needed.
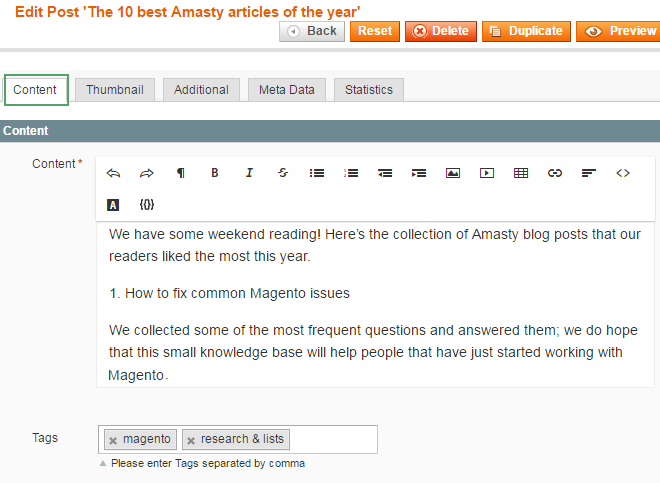
Content - Insert the full text of the article in this field. With the help of the convenient WYSIWYG editor you can quickly format text, change fonts, add images, videos, create lists, tables, etc.
Tags - Specify the tags that are related to the post topic.
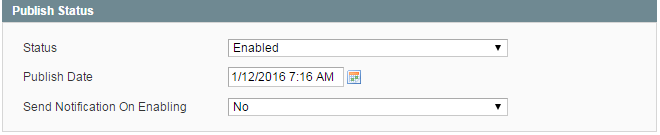
It's possible to select the status of the post.
- Enabled - The post is displayed on the frontend.
- Disabled - The post is not displayed on the frontend.
- Hidden - The post is not enabled but you can see how it will look on the frontend. For this, click the link above the post that will appear after saving. It's better to set this status until the post is ready for publishing.
- Scheduled - The post will automatically be published at the time that you define in the Additional tab.
Publish Date - Define the date when the post will be published.
Send Notification on Enabling - Select 'Yes' if you want to receive a notification of post publishing. It is convenient when a post is scheduled.
Thumbnails Tab
A thumbnail is an image, which is displayed at the beginning of a post. It serves for catching customer’s attention and encouraging him/her to read the article.
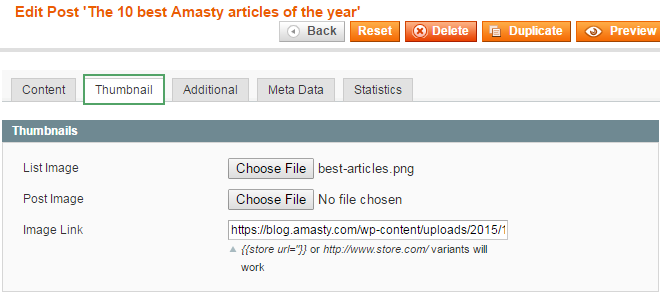
List Image - Choose an image that will be displayed on the main blog page.
Post Image - Choose an image that will be displayed in the post.
Image Link - You can insert a link to an internal page in your store or to another website.
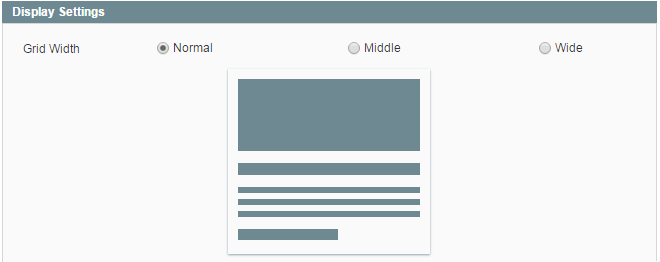
Specify grid width for the post. It is the width of the thumbnail when posts are arranged in a grid on the main blog page. The responsive template shows how the post would look with different types of the grid.
Additional Tab
Here you can you can specify the author’s name, categories and store views where the post will be published.
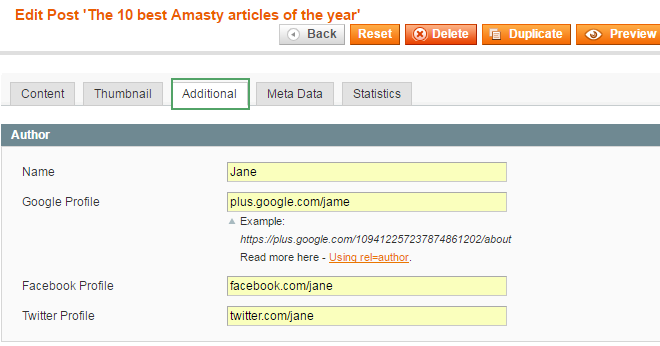
Name - Specify the author’s name.
Google Profile - Paste here the link to the author’s Google profile. The link is clickable on the frontend.
Facebook Profile - Provide the link to the author’s profile on Facebook.
Twitter Profile - Provide the link to the author’s profile on Twitter.
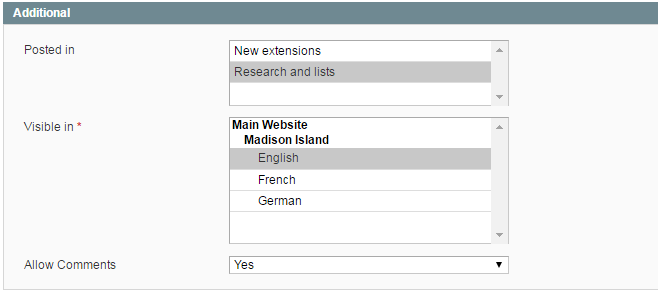
Posted in - Select a category or categories the post will be published in.
Visible in - Choose a store view where the post will be published.
Allow Comments - Select 'Yes' if you want to allow customers to leave comments to the post.
Meta Data Tab
Meta data, which includes meta title, description, and keywords, helps search engines to analyze what your post is about.
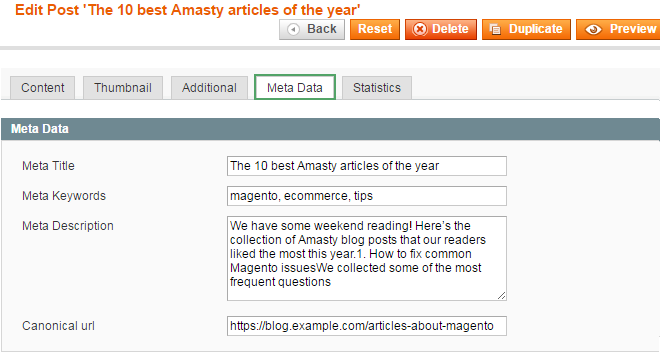
Meta Title - Specify the meta title of the post.
Meta Keywords - Specify keywords and phrases on which customers can find your post.
Meta Description - Write a short description of what your post is about.
Canonical URL - Specify a canonical URL address for the post.
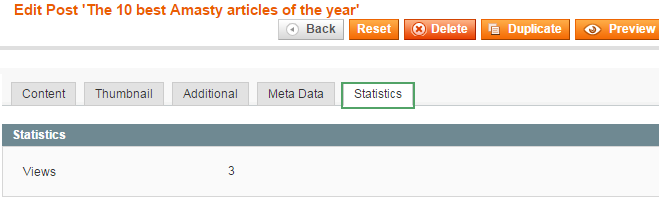
Statistics Tab
In this tab, you can see how many unique views a post has received so far.
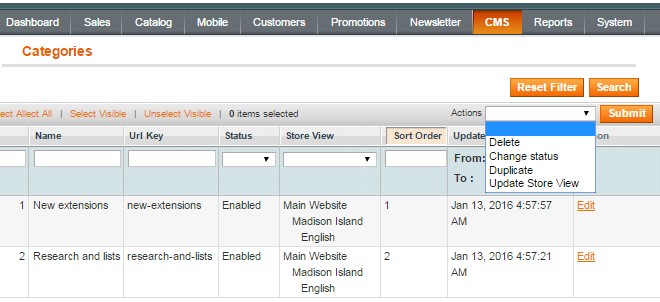
Manage Categories
Categories help customers to better navigate in your blog, and find the necessary posts faster. To create a new category or edit the existing ones, please go to CMS → Blog Pro → Categories. All blog categories are displayed on the grid. You can use a number of mass actions to maintain them faster.
Lets edit a category. You would go through the same steps, when creating a new category.
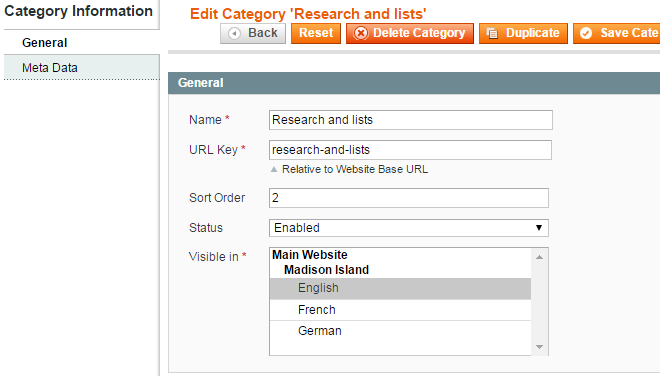
Name - Specify the category title.
URL Key - Specify the category URL.
Sort Order - The sort order of a category is defined automatically. If required, you can change it.
Status - Select the status of the category.
Visible in - Choose the store views where the category will be displayed.
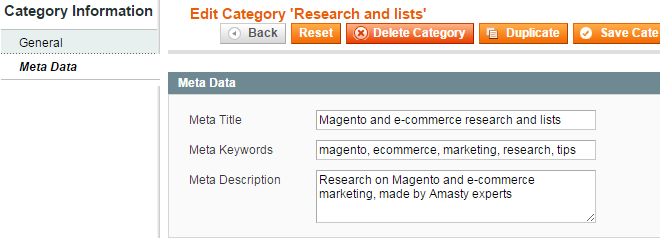
In the Meta Data tab, you can specify a meta title, keywords and description. They will allow search engines to index the category better. Please, go to Meta Data Tab section to read more about adding meta info. Remember to save the changes, when you are done.
While editing a particular category, you also can duplicate or delete it.
Manage Tags
To view all the tags that are used in your store blog, go to the CMS → Blog Pro → Tags backend page.
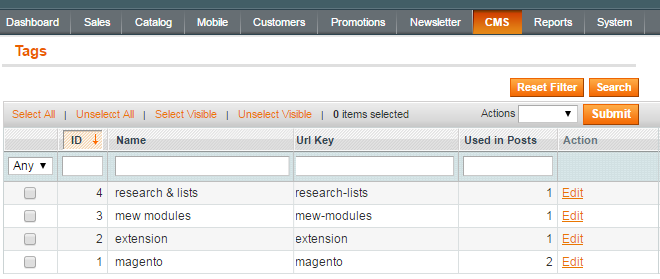
The extension allows you to edit each of your tags and add meta data to them. Open the tag you'd like to edit.
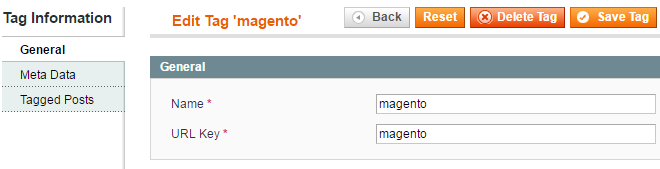
Define the Name and the URL Key for the tag.
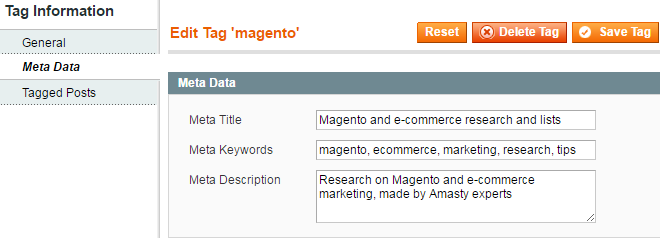
Add meta information for the tag. Please, turn to Meta Data Tab section of this user guide for more details about meta information.
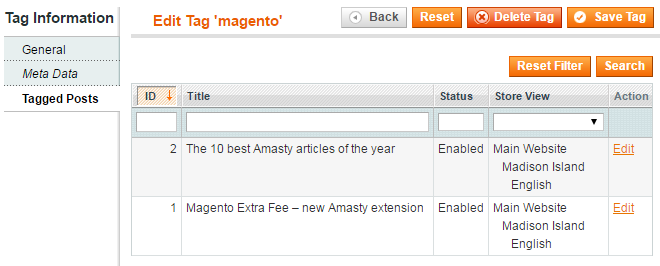
In the 'Tagged Posts' tab, you can view all the posts that are marked with the chosen tag. Moreover, you can pass to the post editing page by clicking the tag line or selecting the 'Edit' option.
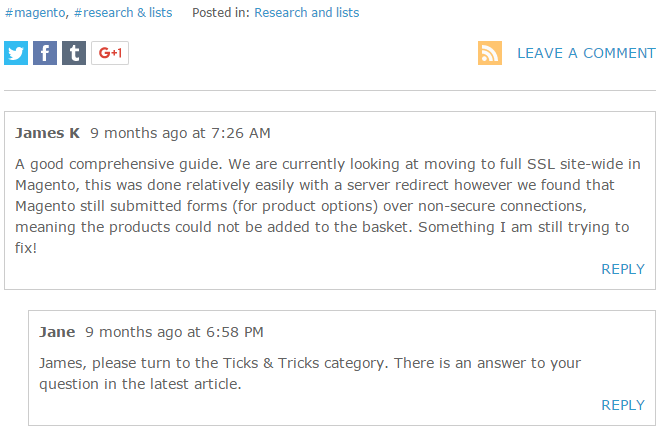
Comments Management
Comments are a necessary part of every blog. With their help, you can communicate with your customers and learn their opinion on the topics you cover.
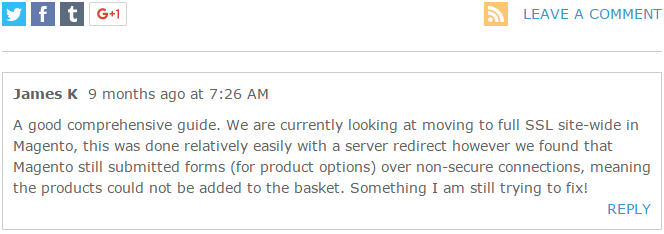
To manage the existing comments, go to the CMS → Blog Pro → Comments backend page.
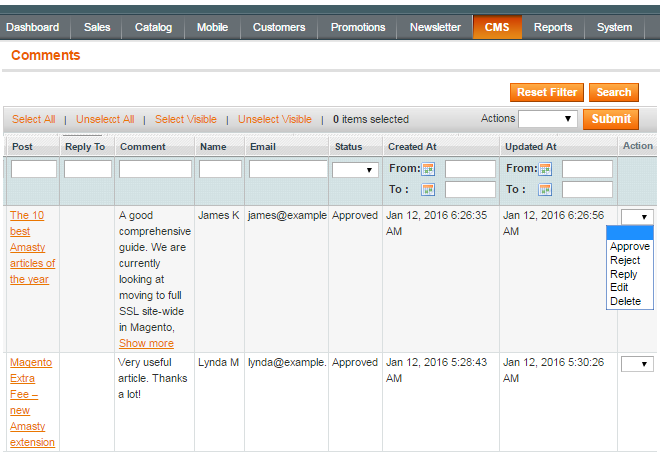
It's possible to approve, reject, reply, edit or delete comments right from the grid. To change the status, tick the necessary comments and click the 'Change Status' option. Then select the status which you want to set for these comments and click 'Submit'.
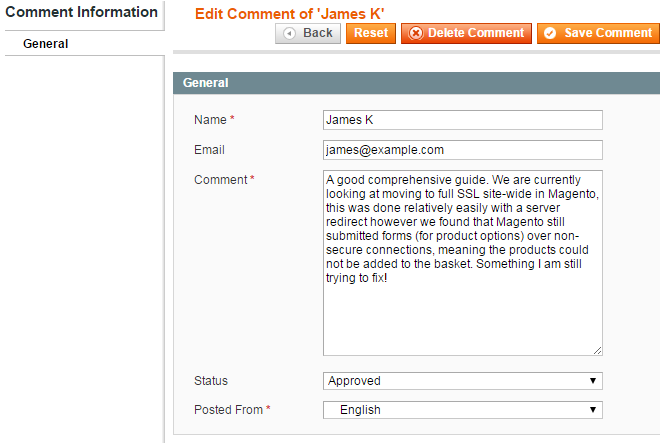
On the comment page, you can change the customer's name, email, comment text, status and store view.
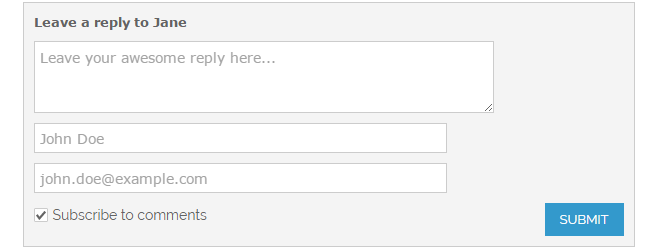
Reply to a Customer Comment
If you want to reply to a customer in comments, choose the 'Reply' option on the comments grid. A form for replying will appear immediately.
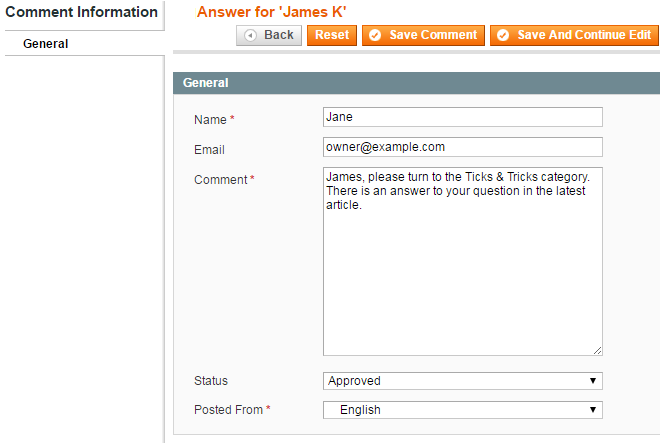
The reply is added to the comment:
Comment Subscription
When a customer leaves a comment to a post, he/she can subscribe to receiving notifications of replies or new comments to this post.
To manage subscribed customers, go to CMS → Blog Pro → Notifications → Comment Subscription backend page. Here you can view which customers are subscribed to notifications.
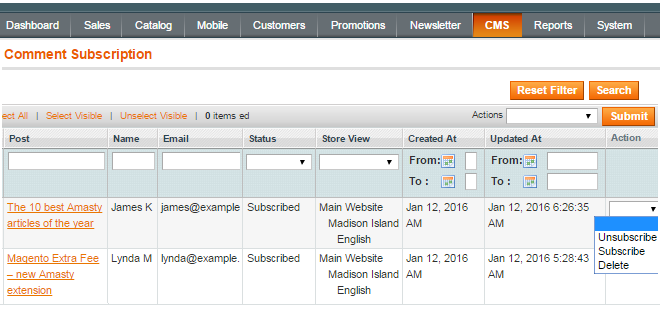
You can manually subscribe or unsubscribe customers from your newsletter.
Blog Widgets
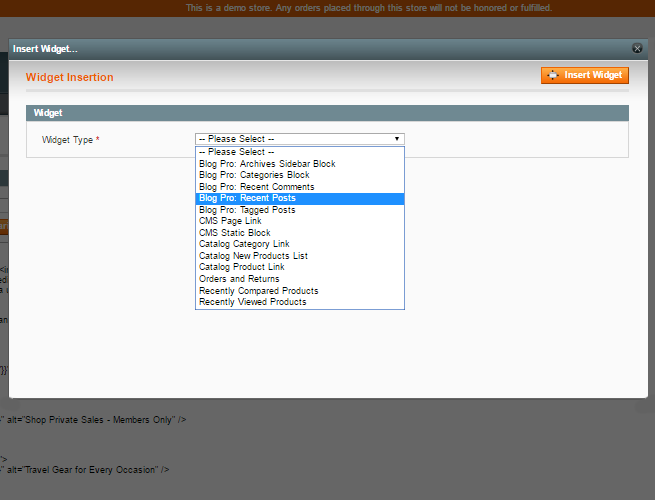
The Blog Pro extension allows you to insert five types of widgets with blog content into the pages of your store.
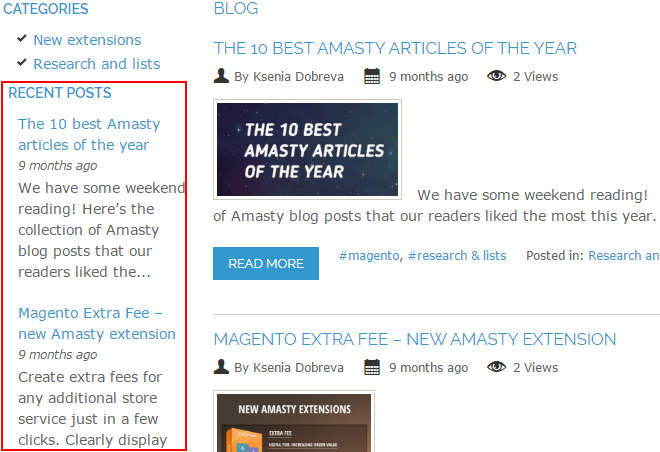
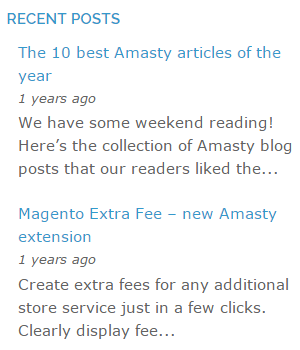
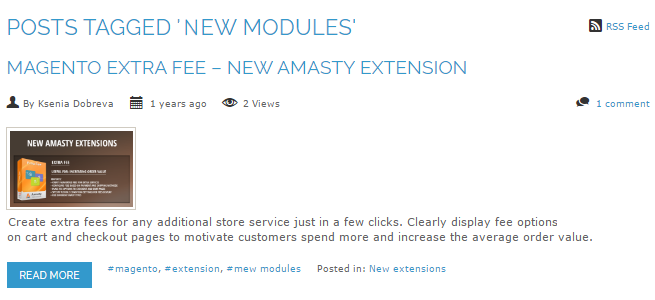
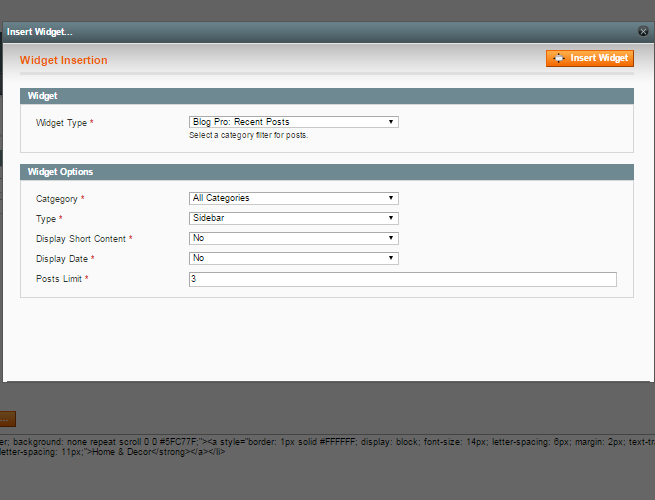
Recent Posts
The first widget is Recent Posts. It displays your recent posts with thumbnails and short content of posts (optional).
The widget frontend view:
 The backend options:
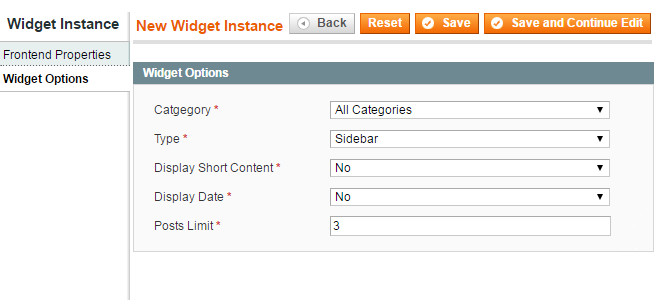
Here is the description of the widget options:
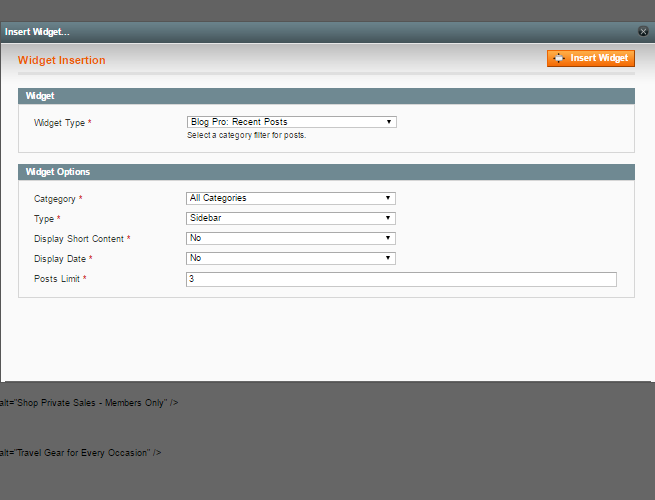
1) Category: Select a category which posts will be displayed in the widget. You can display posts from all categories as well.
2) Type: Choose if the widget will be integrated into a sidebar or into the content area.
3) Display Short Content: Select Yes if you want to show the beginning of posts in the block.
4) Display Date: Select Yes to display the date of post publishing.
5) Posts Limit: Define the number of posts that will be shown in the widget.
Tagged Posts
The Tagged Posts widget contains posts with tags which you can specify in the widget settings. This widget is especially useful for product and category pages (e.g. widget with the “hats” tag for the Hats category).
The frontend view:
The backend options:
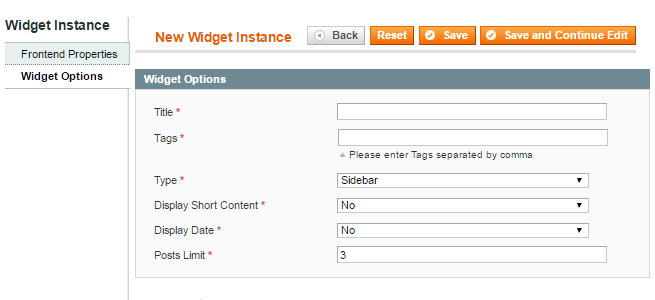
1)Title: Specify the title of the widget.
2)Tags: Type the tags of the posts that should be displayed in the widget.
3)Type: Select if the widget will be displayed in the sidebar or in the content area.
4)Display Short Content: Select Yes if you want to show the beginning of the posts in the widget.
5)Display Date: Select Yes to display the date of posts publishing.
6)Posts Limit: Define the number of posts that will be shown in the widget.
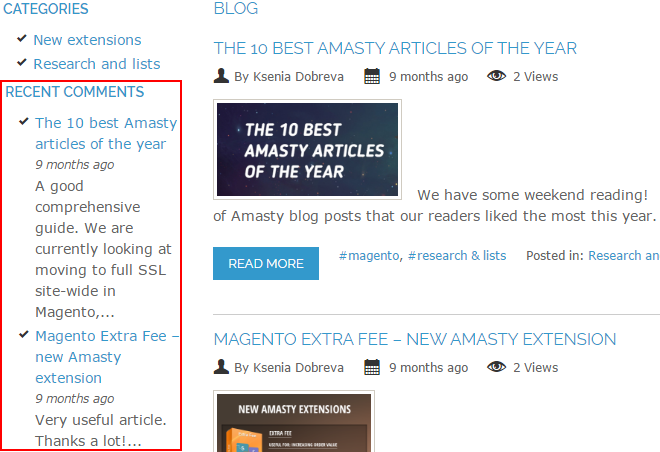
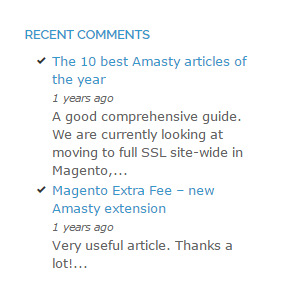
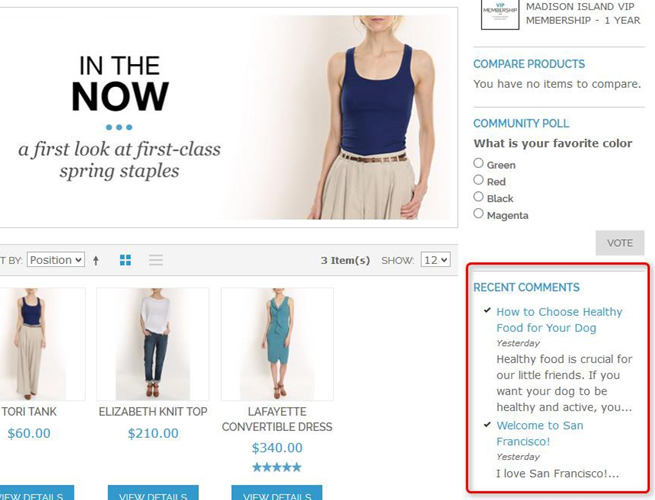
Recent Comments
In this widget, customers can read the latest comments that other people have written to your posts.
The frontend view:
The backend options:
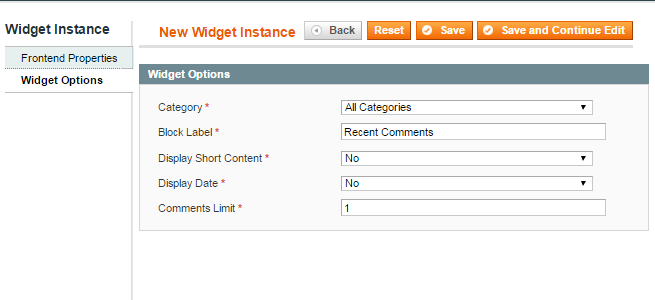
1)Category: Select a category which comments will be displayed in the widget. You can display comments from all posts categories as well.
2)Block Label: The title of the widget in the frontend is specified automatically. You can change it if necessary.
3)Display Short Content: Select Yes if you want to show the beginning of comments in the widget.
4)Display Date: Select Yes to display the date of comments publishing.
5)Comments Limit: Define the number of comments that will be shown in the widget.
Categories
This widget displays all the posts categories that you have in your blog.
The frontend view:
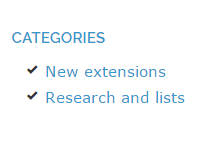
The backend view:
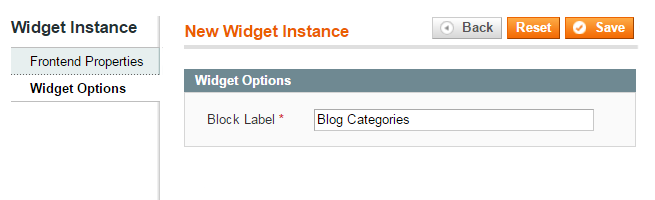
This widget doesn’t have options. The block label in the frontend is specified automatically, but you can change it.
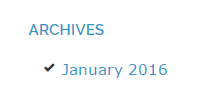
Archives Sidebar
In this widget, your customers can click a month name and read all the posts for this period.
The frontend view:
The backend options:

1)Blog Label: Specify the name of the widget in the frontend.
2)Archives Limit to Display: Define the number of the last months that will be displayed in the widget.
Widget Integration Examples
Below you can find four examples of how to insert a widget into a category page, a product page, a static page, and a static block.
Integration into a Product Page
If you want to integrate a Blog Pro widget into a category page, it is better to do by creating a new widget.
For instance, we will insert the Recent Comments widget into the New Arrivals category (into the right column). Head to the CMS → Widgets backend page and click the Create New Widget Instance button. Before setting the widget options in the backend, you should create a widget. To learn how to create a widget, read this Magento instruction: http://docs.magento.com/m1/ce/user_guide/cms/widget-create.html
After you created the widget, go to the Widget Options tab. The process of setting the widget options is described in the Recent Comments widget section.
When the widget is ready, click the Save button.
Note: Don’t forget to clear the cache to enable the changes in the frontend.
The widget is inserted into the New Arrivals category:
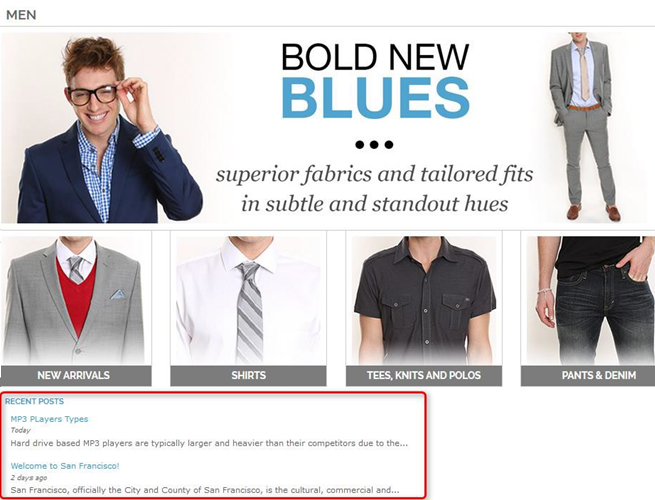
If necessary, you can insert a widget into a product page. For instance, you can integrate the Tagged Posts widget with the tag that is relevant to a product.
As an example, we will integrate the Tagged Posts widget into the MP3 Player page.
Go to the CMS → Widgets backend page. You can find the description of creating and setting the Tagged Posts widget in this section.
After the widget is created, click the Save button.
Note: Don’t forget to clear the cache to enable the changes in the frontend.
The widget is inserted into the product page:

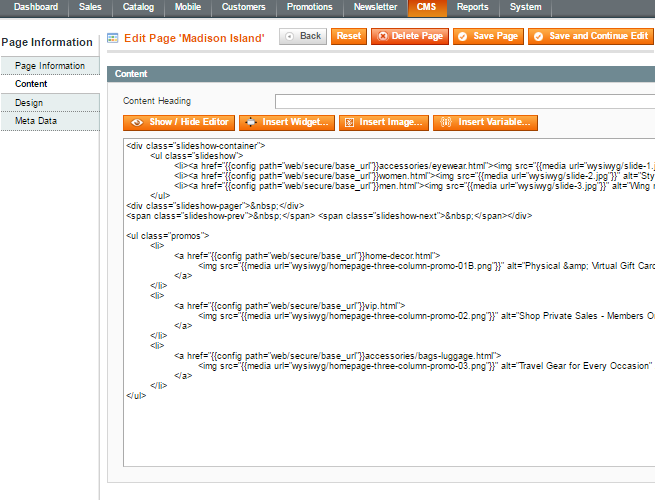
Integration into a CMS Page
You can display widgets not only on the product and category pages, but also on the Home Page, About Us, and other CMS pages in the store.
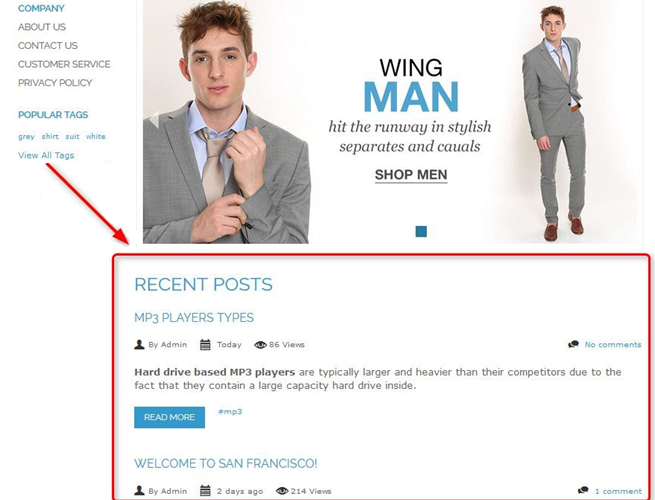
In our case, the Recent Posts widget will be inserted into the Home Page.
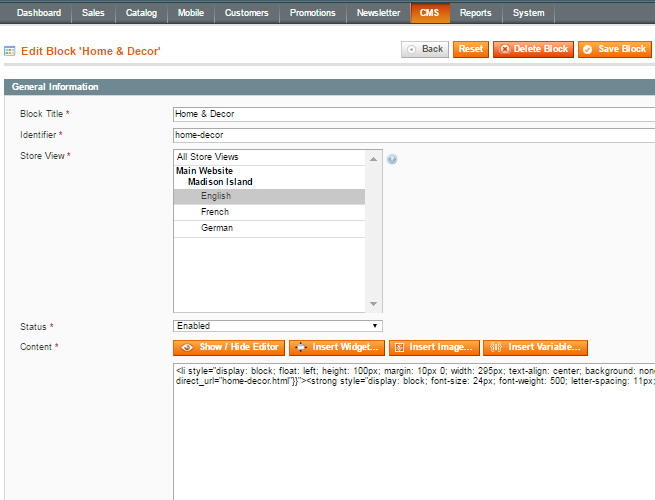
Navigate to the CMS → Pages backend page and choose the page where you want to integrate it. Then, navigate to the Content tab.
To insert the widget, choose the necessary place and click the Insert Widget button.
In the opened window, select the necessary widget type.
After that, a new Widget Options section appears and you need to set the Recent Posts widget options.
When all the options are set, click the Insert Widget button.
Then, click the Save button.
Note: Don’t forget to clear the cache to enable the changes in the frontend.
The Recent Posts widget is inserted into the Home Page:
Integration into a CMS Static Block
The extension allows inserting a widget into CMS static blocks, such as Footer Links, 404 page, etc.
To insert a widget into a CMS block, go to the CMS → Static Block backend page and choose a block where you want to insert your widget.
To insert the widget, choose the necessary place in the code and click the Insert Widget button.
Click the Insert widget button.
Then, click the Save button.
Note: Don’t forget to clear the cache to enable the changes in the frontend.
The widget is integrated into the static block:
magento_1/blog_pro.txt · Last modified: 2019/07/22 13:29 by skudrov