
Sidebar
magento_2:custom_reports
Table of Contents
For more details see how the Custom Reports Builder extension works.
Guide for Custom Reports Builder for Magento 2
Build an unlimited variety of custom reports based on any available store data. Analyze each aspect of your store performance and build an efficient sales strategy. Arrange all needed columns in the most convenient order. Apply filters, set the time intervals, and visualize the data with charts.
- Create an unlimited number of custom reports
- Use any available information for your reports
- Use prebuilt report templates
- Manage all reports in a convenient grid
- Visualize data with charts and apply filters
- Easily export reports according to applied filters
Custom Reports Builder extension is also included in Pro and Premium versions of Advanced Reports solution.
General settings
To adjust the Custom Reports Builder general settings, please navigate to Stores → Configuration → Amasty Extensions → Custom Reports Builder.
Here you can select some unnecessary entities, that you want to exclude from your reports. Disabling unused entities will speed up report edit page load.

Here you can also configure the options for updating stock data.

You can update the stock data manually by hitting the Update Stock Data button, or you can automate the process:
Update Stock Data Automatically - When set to Yes, the extension will update stock data on a set schedule. Otherwise, extension data should be updated manually using the button or console command: bin/magento ambuilder:stock:update.
Frequency - Here you can set the update frequency (daily, weekly, monthly).
Start Time - In this tab, you can set the exact start time for your regular stock data updates.
The updated product stock data will be used in the Product Stock entity in your reports.
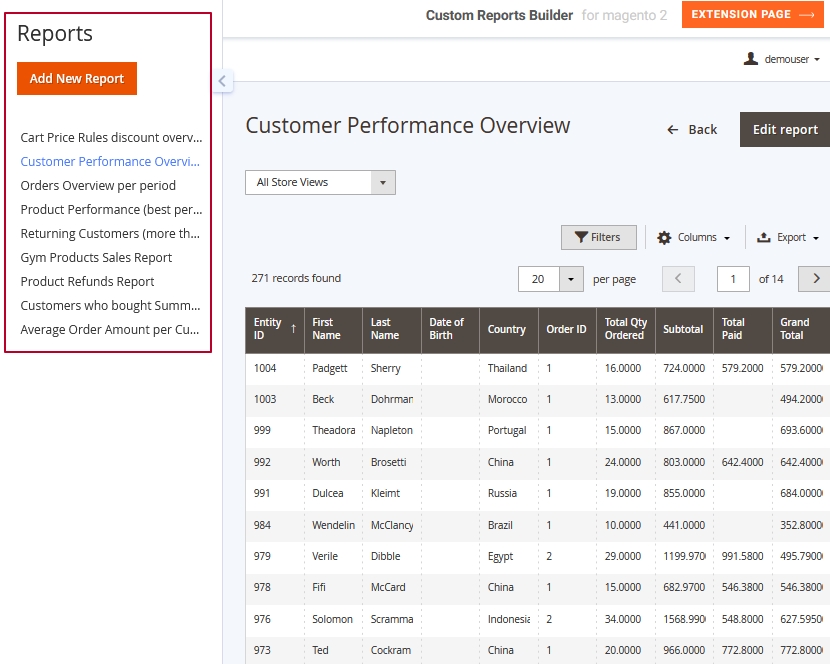
Conveniently view and manage reports
When the extension is installed, please navigate to Amasty → Custom Reports Builder → Amasty Custom Report Builder. Here you can see the Custom Reports grid with the 5 prebuilt reports that we have created for your convenience. Use these reports as they are, duplicate or flexibly modify any of them according to your needs. Also, here you can create and manage your new custom reports.

Also, each report view page is equipped with a Reports Menu. Here you can conveniently switch between various reports, edit them, and also create new ones.
You can also Export Reports in the CSV format from each report view page. Please, keep in mind, that the bigger a report is the longer the process will take.
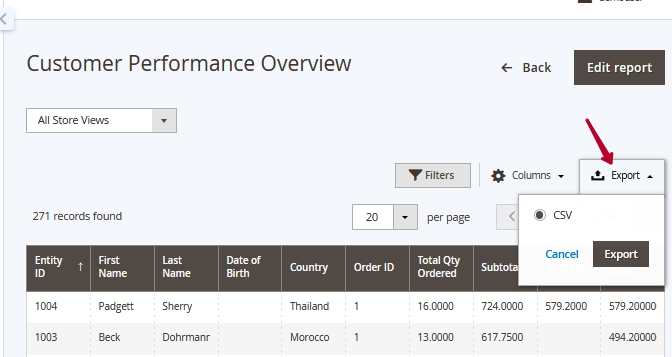
You can conveniently export data based on filters applied on both the Edit Report page and the View Report page.
How to build a report
To create a new report, please hit the Add New Report button.

1. Choose the main entity to start report formation
Name - Specify the name for your new report, that will be visible in the reports grid.
Main Entity - It is a core entity, on the basis of which the report data will be aggregated. For now, you may choose one of 6 main entities:
- Catalog Product
- Credit Memo
- Customer
- Invoice
- Order Entity
- Shipment
For Magento Enterprise Edition, RMA entity is also available. It provides store administrators with the functionality of building reports on various aspects of product return.
How to understand what main entity should be chosen?
Before choosing the main entity, think about the main objectives of your report. For example, if you need some product breakdown and their performance by specific criteria - you should choose the Catalog Product main entity thus building your report from the product. Or if you need to analyze particular sales aspects - you should choose the Order Entity thus building your report from the order.
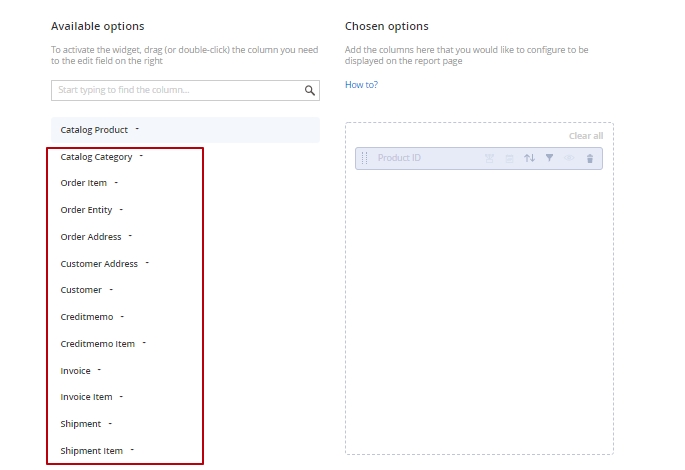
After you choose the main entity, you will see the option (column) block available for this entity. Each main entity has a specific block of options. For example, the Catalog Product entity has the following options block:

The logic of the Custom Reports Builder extension is that it adds entities to the report that have all the parameters specified in the report. If an order, for example, does not have a Country ID, then this order will not be displayed in the statistics and export file.
The main block of options (of the same name as the main entity) is highlighted. Also, each main entity has its own main option, which automatically appears in the right column, after you choose the main entity. The main option can't be removed from the report as it is the basic option relatively which the report is being built. But you can use time periods as the main column. Please, check the Use Periods section of this guide to know how to do it.
Also, when you choose the Main Entity, you can see that a list of Secondary Entities becomes available.
You can add the options (columns) to your report as from the Main Entity so from the Secondary ones.
The list of entities for the main entity is limited only by the fact that the requests for secondary entities are heavier. This means that the load on the server is greater, but this doesn't mean that secondary entities cannot be used as main ones. If the capacity of the server allows, or the store is not large, then the customer can make any entity he needs the main one in order to create a report on its basis.
To do this, you need to add the primary=“true” mark to the XML file of the corresponding entity in the entity name line. The path to the entity files is as follows: app/code/Amasty/ReportBuilder/etc/ambuilder_entity_scheme. Next, open the file of the entity that you want to make the main one and insert primary=“true” in the entity name line.

2. Add the required data to the report
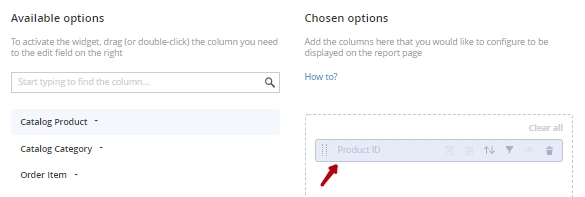
To add any of the Available options to the report, just expand the options blocks and drag and drop the options from the required blocks to the Chosen options tab. When you drop the option to the right column, it becomes disabled at the left one.
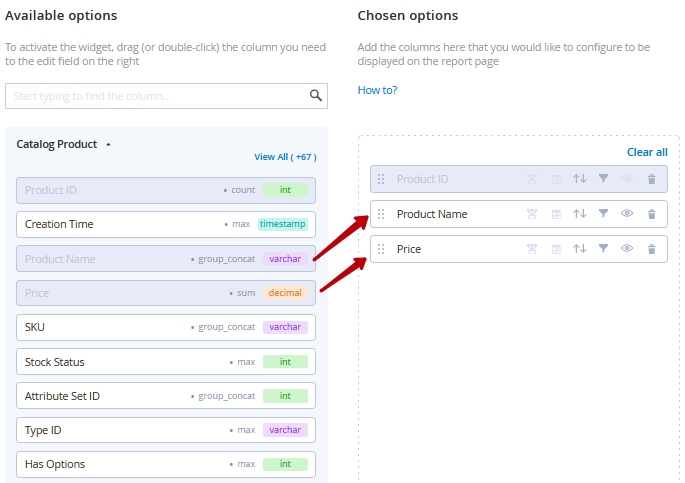
Also, you can place the needed columns to Chosen options section with a double click.
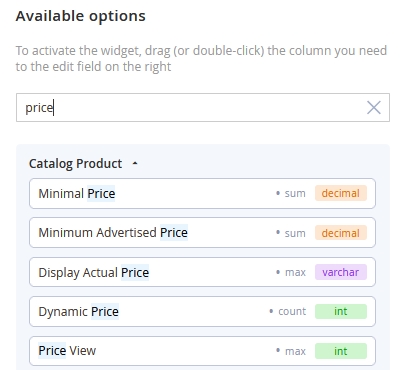
If you don't see the needed option, you can use the Search Field. Just start typing and the module will show you all the options that match your query:
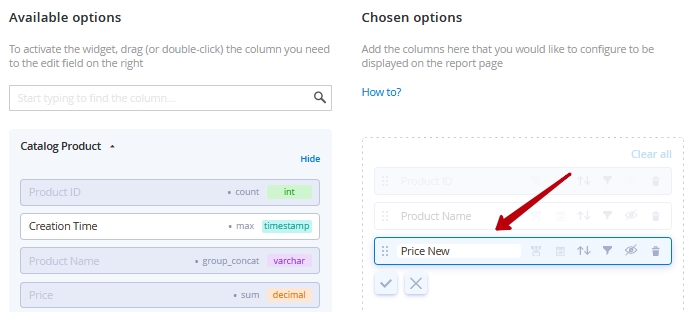
You can set custom titles to the chosen columns for more convenience or to avoid confusion on edit and view pages caused by the same names of entities' columns stored in the DB.
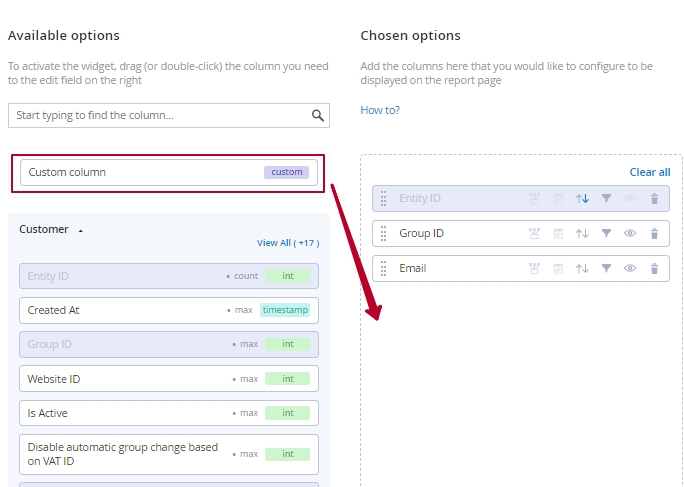
2.1 Add custom columns to the report (available only in Advanced Reports Premium)
With Advanced Reports Premium solution you get the additional reports customization functionalities for your Custom Reports Builder: add custom columns, within which you can calculate and combine the functions from other existing columns. This way, you can create complex columns that do not exist in the data: for example, merge the first and last names into one column, apply mathematical formulas to calculate profit, specific taxes and so on.
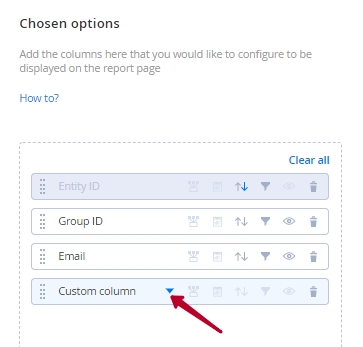
To add a custom column to your report just drag and drop the ‘Custom Column’ option from the top of Available options tab to the Chosen options tab.
Then, click to expand the custom column to configure it.
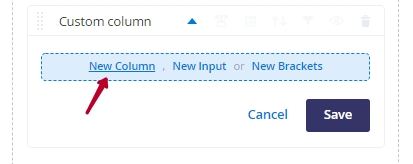
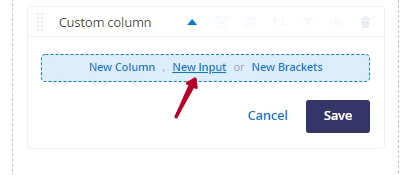
After expanding the column you can see the constructor, which proposes you to choose the elements for adding to your custom column: New Column, New Input or New Brackets.

New Column - allows you to add any existing entity to your custom column. When you choose this element, the special drag box opens, where you can move the needed column from the Available options tab.

New Input - allows you to add text or number to your custom column.

Operators - After you’ve selected the first element for your custom column expression, you should choose the operator to form your calculation or combination. Click the gear button to choose the operator you need:

After you choose the operator type, the constructor will propose you to choose the next element for your custom column expression, and so on.

New Brackets - choose this option if you need to build complex compound expressions with multiple columns and inputs. To add the brackets just click on the option title.
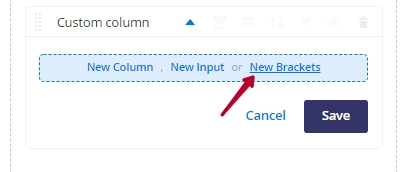

Add the needed expression inside the brackets, and the needed columns or inputs outside the brackets.
See our example:

In this example our custom column calculates the values of such existing entities as Row Total, Cost, Quantity Ordered and Tax Amount.
Click Save when your custom column is ready and it will be added to your report.
3. Use periods
Use periods setting lets you group several report lines into one, if this data relates to the same time period. If you turn on/off the setting, you will see the pop-up:
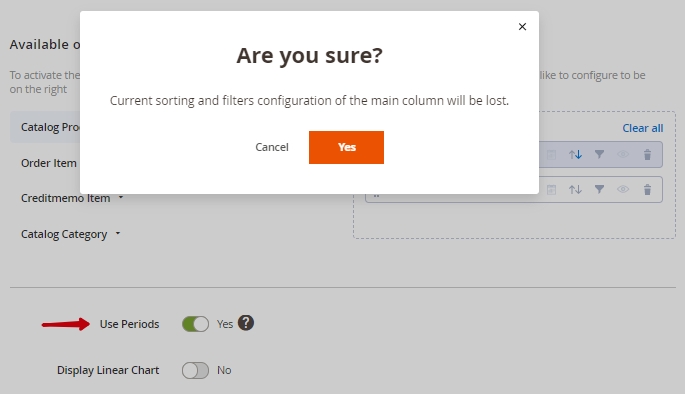
Please note, that after confirmation, the Date option type becomes the main option. The previously configured sorting and filtering setting of the main option will be reset.

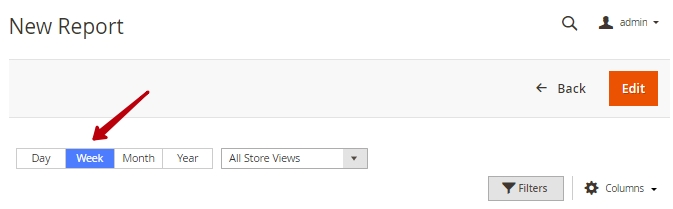
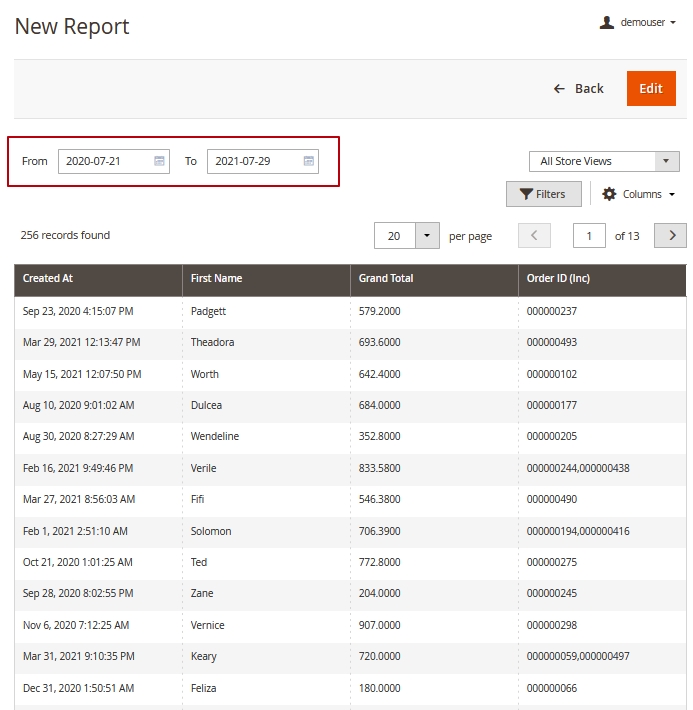
For example: We have several orders that were placed in different days/weeks/months. If we try to form a report based on periods, it will be displayed in the following way:

This way, we can see the list of orders and products by days/weeks/months/years. We can change the period using the options at the top of the grid.
A few words about the date display specifics for different intervals. Displaying the data grouped by periods, the extension shows the date of the beginning for each period.
For example, if you are grouping the data by months, in the Creation Time column you will see the values like:
- Jan 1, 2021
- Feb 1, 2021
- Mar 1, 2021
And if you are grouping the data by years, in the Creation Time column you will see the values like:
- Jan 1, 2020
- Jan 1, 2021
- Jan 1, 2022
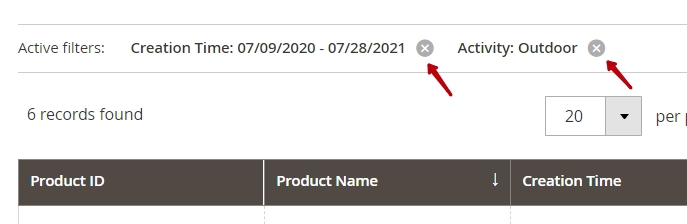
Also, you can adjust the time period for your report in the filters toolbar on the report view page.
If you don't want to use periods you may add options with the timestamp type to your report and then set filtering for them separately.
4. Build reports based on store views
This feature is available for the main entities with the store view scope.

Please note, that this option is not available for the Catalog Product main entity.
You can also switch between store views on the report view page.

5. Enable graphs
To visualize reports, you can enable the Display Linear Chart option. You will see 2 additional settings: X and Y axes, for which you can add the values from the report data.
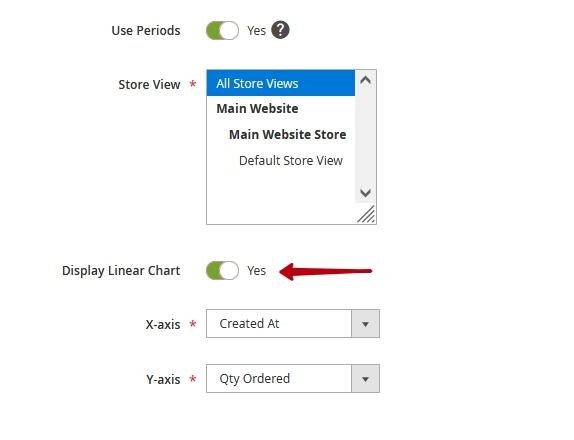
Then click Save and View and see how it looks on the report view page:

More chart types are available within Advanced Reports Premium solution.

Consider to use filters for the accurate data display in charts.
6. Actions with report columns
After adding several options to the report, you can apply various actions to options, like changing the type of aggregation, sorting, filtering, hiding, etc.
DATA AGGREGATION
Our Custom Reports Builder extension automatically aggregates data for more convenient and compact presentation in reports.
Please note, that you can choose the type of aggregation only for related entities. The columns of the main entity always use the default aggregation, and the columns of the remaining entities can be aggregated in relation to the main entity as it is required for a specific business case.
For example: if we build a report from Customer, and add the Grand Total column of the Order entity, the report can be displayed as the sum of the grand totals of customers orders, or as the average value of all customers orders, and so on - depending on the type of aggregation you choose.

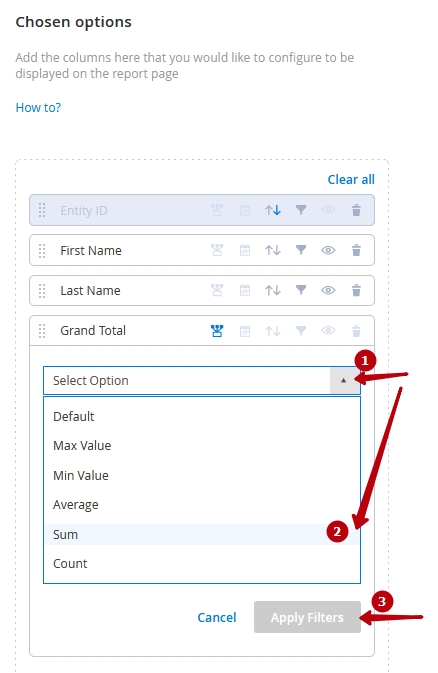
In this example, we applied the sum aggregation to the Grand Total column. Let's see how it looks on the report view page:
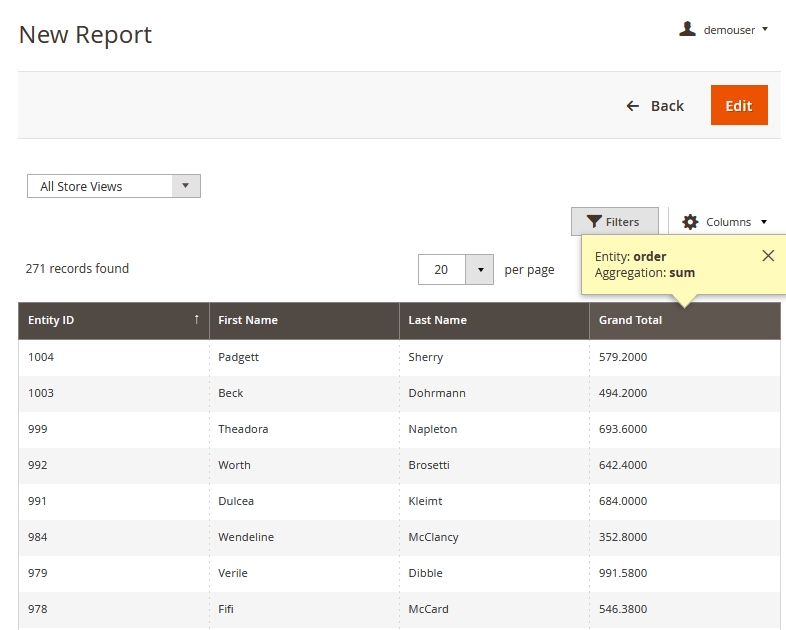
You can check the aggregation type for each column on the mouse hover. Here we can see, that the report displays the sum of the grand totals of customers' orders.
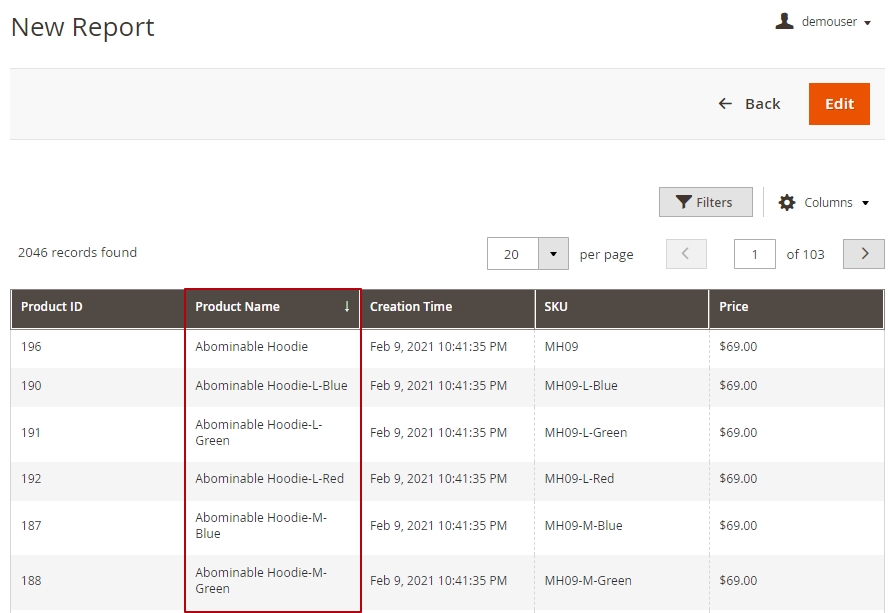
Or, as another example, let's add the Product Name column from the Catalog Product entity to our report and see how the group_concat aggregation works:
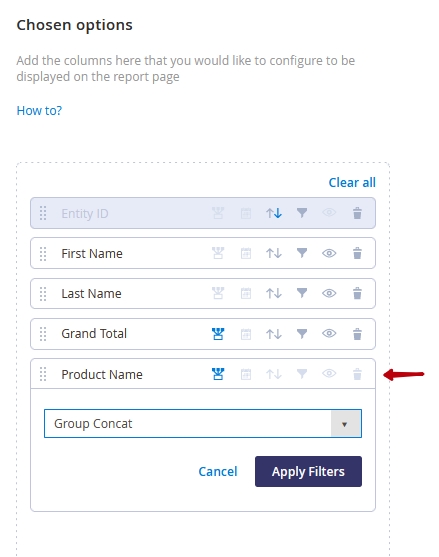
Let's see how it looks on the report view page:
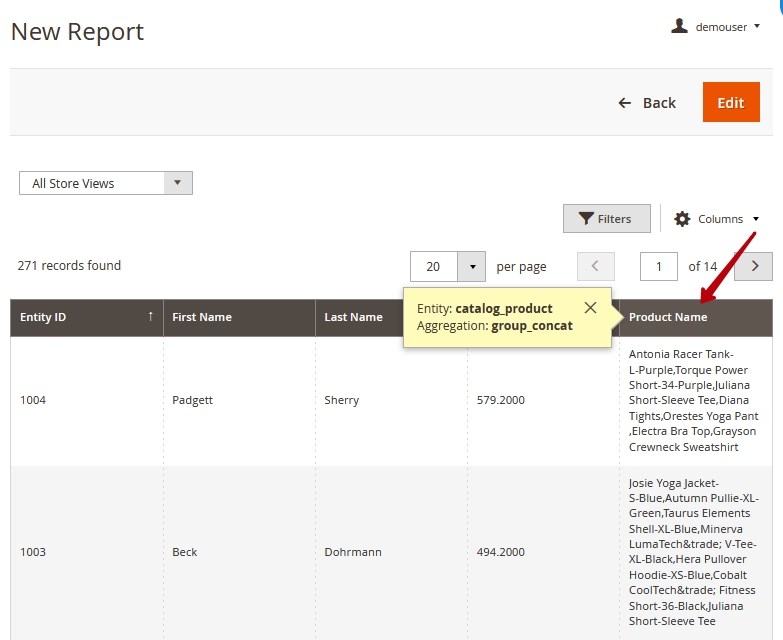
Here, in the Product Name column we can see the list of products ordered by each customer.
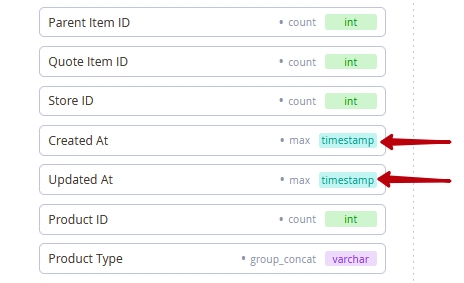
For now, you can use the following types of aggregation:
- default - uses default option aggregation
- count - displays the number of values of several rows
- group_concat - concatenates several values and lists them using a comma
- sum - sums up numeric values
- max - returns the maximum value among the numeric values
- min - returns the minimum value among the numeric values
- avg - returns the average value among the numeric values
Available types of aggregation per options (columns) types:
- int: default, sum, count, group_concat, min, max, avg
- varhar: default, sum, count, group_concat, min, max, avg
- decimal: default, sum, count, min, max, avg
- timestamp: default, min, max, avg
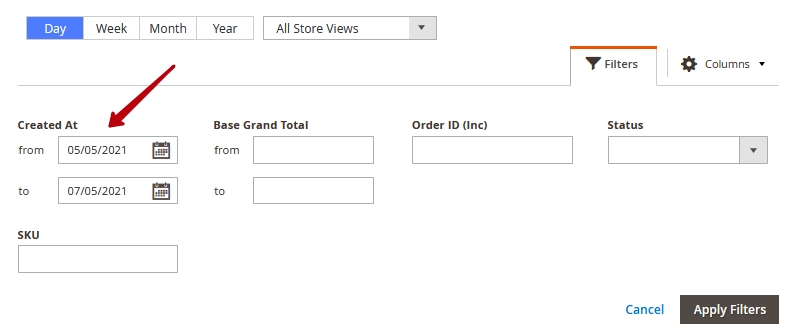
FILTERING BY PERIODS
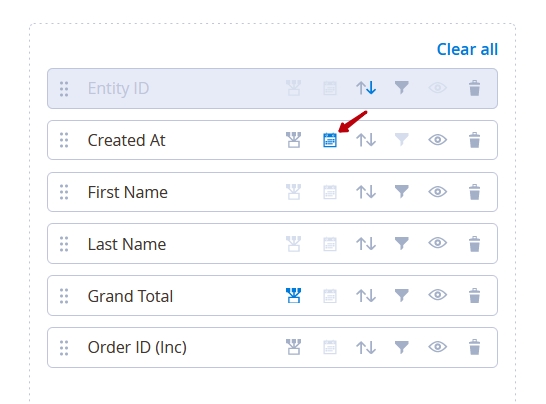
This feature is available for the options with the Date (timestamp) type.
After enabling, filtering by dates becomes available for the chosen column with the from/to fields, which are displayed above the report grid on the report view page.
SORTING
Sorting can be enabled for a single option only. The data can be sorted in ascending and descending order. By default, it is enabled for the main column, but you can activate it for any other column.
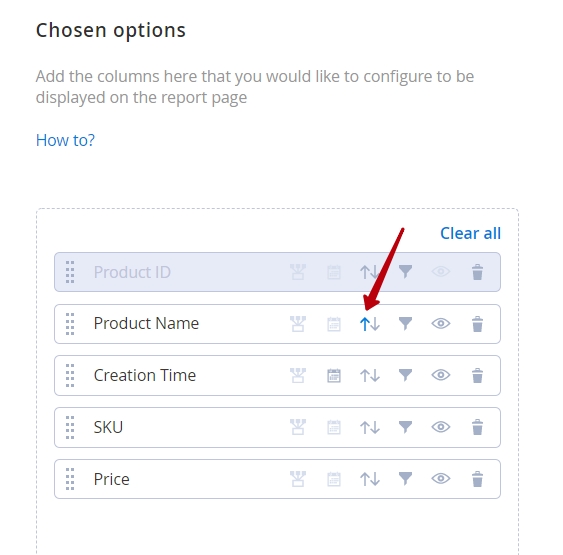
See how it looks on the report view page:
FILTERING OPTIONS
According to the types of chosen options, different filtering features become available for your report.
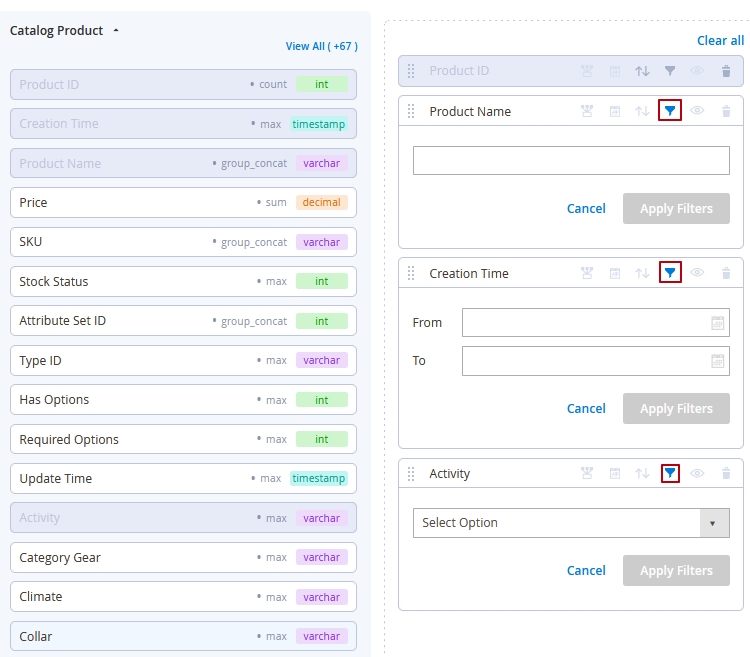
Enable the filtering for particular options by hitting the filter icon next to the option name. Then, specify the filtering parameters for these options and click the Apply Filters button. If you want to remove a filter from an option, just click the Cancel.
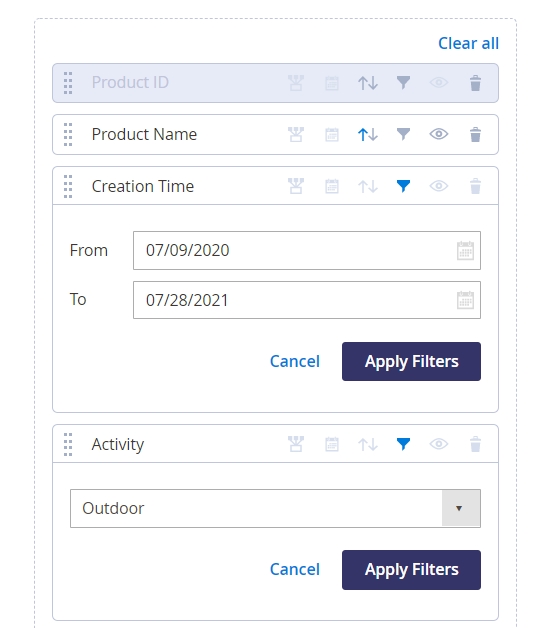
All applied filters will be displayed on the report view page.
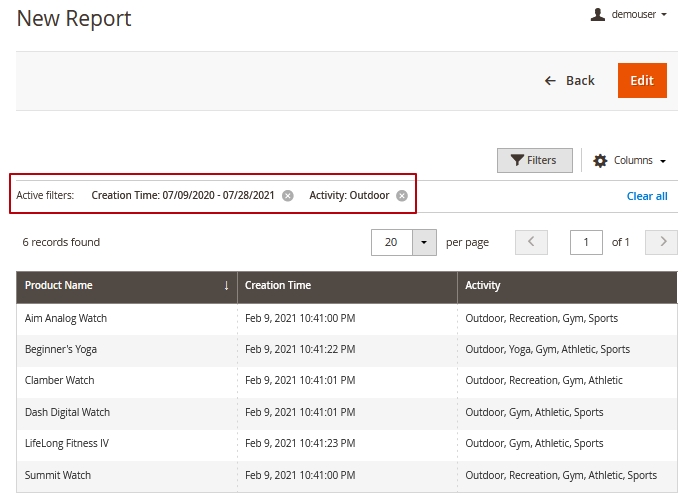
By the way, you can delete applied filters or add new ones on the report view page, but if you reopen the same report, it will be displayed again the way it was saved on the edit report page.
HIDING THE DATA
Please mind, that at least 2 options must be displayed in the report. That’s why the hiding icon becomes visible only when the third option is added.
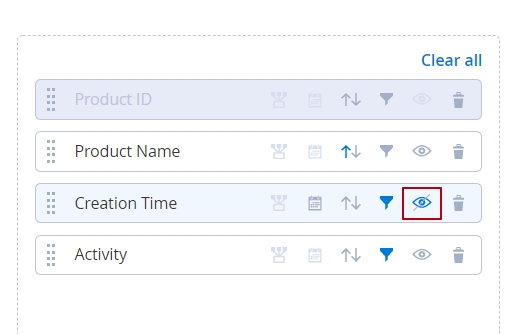
With this functionality, you can add various options to establish a connection between entities while not displaying these options in the report. To hide an option, just click an eye icon next to the option name. The option will not be displayed on the report view page, while the connection between entities will remain.
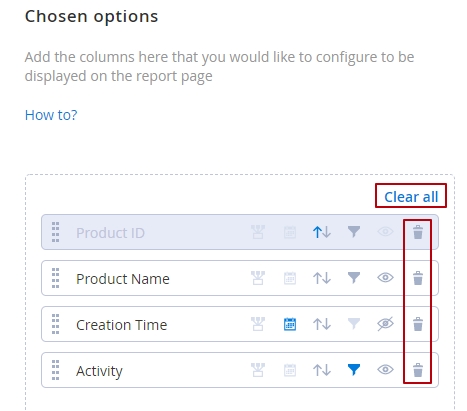
REMOVING OPTIONS
You can easily delete any option using the appropriate icon. Moreover, you can click Clear All to remove all the options except the main one.
Out-of-stock forecasting (available in Advanced Reports Premium)
Within the Advanced Reports Premium solution, you can enable out-of-stock estimates for the products in your store. This way, you can improve inventory management and replenish demanded items in a timely manner.
To set the estimation period, please go to Stores → Configuration → Amasty Extansions → Custom Reports Builder → General Settings.

Estimation Period (days) - here you can specify te estimation period in days. This period further will be used in the calculations in your reports.
For the correct calculation and display of out-of stock-estimate in your reports, perform the following command in the Magento concole: bin/magento ambuilder:stock:update
To start analyzing the out-of-stock forecasting data for the products, just add the Average Sales (qty) and Stock Threshold (days) columns in your reports. Both columns can be found within the Catalog Product main entity.
Average Sales (qty) = quantity of sales for the Estimation Period / days in the Estimation Period (Qty Sold/Period)
Stock Threshold (days) = Qty in Stock x Period / Qty Sold

Integrations
With the Amasty Custom Reports Builder, you can also analyze the data from other Amasty modules installed on your Magento store. We are constantly working on adding new integrations to the module to provide you with the ability to add more entities in your reports. For now, the list of available integrations is as follows:
- Pre Order for Magento 2: add Amasty Pre Order extension to use the pre-orders and backorders data in your reports to better understand customer demands and needs. Timely discover which products are most popular and take this information into account when forming your store assortment. To use the data from the module, please run the following command in composer: composer require amasty/module-preorder-to-builder
- B2B Company Account: build extended reports based on company accounts data. Analyze the activities per each company (such as volume of sales, average check, preferred products, etc.) and form an efficient sales strategy using this information. To use the data from the module, please run the following command in composer: composer require amasty/module-company-account-to-builder
- Custom Form for Magento 2: explore the data gathered from the forms filled out by customers on your website. Find out which forms are more popular and bring more sales. See the number of submitted forms per each customer, etc. To use the data from the module, please run the following command in composer: composer require amasty/module-custom-form-to-builder
- Blog Pro for Magento 2: create comprehensive reports based on various blog data. Discover which categories or blog posts are most interesting to readers and find out which articles bring more conversions. To use the data from the module, please run the following command in composer: composer require amasty/module-blog-pro-to-builder
- Social Login for Magento 2: add Amasty Social Login extension to gather more detailed information about your customers and to explore what social networks really bring you the profit. To use the data from the module, please run the following command in composer: composer require amasty/module-social-to-builder
- Order Attributes for Magento 2: generate detailed reports based on custom order attributes to gain valuable insights from additional order data. Use this information to optimize marketing, sales, and customer experience strategies. To enable the integration, please run the following command in composer: composer require amasty/module-orderattr-builder
- Affiliate for Magento 2: analyze a wide range of affiliate data, and get comprehensive insights into your affiliate marketing performance. With this integration, you can easily track and evaluate which affiliates are driving the most traffic and which affiliate programs are delivering the best results. To enable the integration, please run the following command in composer: composer require amasty/module-affiliate-to-builder-by-amasty
Check the demo to view the additional reports that become available with the integrations.
Adding a new entity (information for developers)
Please consider, that adding entitities from third-party extensions requires developer skills.
The Custom Reports Builder is capable of analyzing the data from third-party extensions. To use this functionality, you should add a new entity to the module. Let's walk through the process of adding a new entity.
Introduction
The use of entities in report generating is determined by special configuration files of entities. These files contain all information about entities. This way, the module perceives an entity as a container storing a set of data of the entity itself, its data, and its relationships with other entities.

A column is a data storage for an entity of a certain type. Later, this data can be visualized as a grid column on the view report page.
Relation - defines the linking rules for various entities with each other.
To add an entity, you need to create a configuration file in the module, the entity of which you want to add to the report.
You need to create an XML file in the following directory:<module_root>/etc/ambuilder_entity_scheme. The file name should match the name of the entity (e.g. catalog_product.xml).
The file should describe the entity (name, title, main table), the columns of the entity (name, title, data type, etc.), and its relations.
Please, keep in mind, that it is not necessary to describe all the columns in the XML file. It will be enough to describe only the control ones. Other entity columns will be formed by the Db and Eav adapters.
Configuration file description
ENTITY DESCRIPTION
The file is represented by the amasty_report_builder_entities section, which contains the configuration of one or more entities.
Entity section has a required string parameter “name”. This parameter defines the unique entity key by which the entity data object will be created. The section can also contain two optional boolean parameters “primary” and “eav”.
The “primary” parameter can be true or false. All entities described in XML are divided into two types:
- Primary
- Secondary
Primary entities can be used as the main report entity. Secondary ones serve for additional filling the report with data. If the primary parameter is not specified explicitly, the entity is considered secondary.
This division is intended to simplify the formation of a request for report data. If it is not needed to define an entity as primary for the report, it is better to define it as secondary.
The “eav” parameter can be true or false. This parameter is used to specify eav entities. For eav entities, the configuration object is additionally filled with data from eav tables.
The “entity” section should contain the following subsections: title, main_table (name of the main table without a prefix), columns, relations. For expandability purposes, finding these sections is not validated in the XML. However, the entity should have a title, its own table, and at least one column.
The “columns” section contains the description of the columns (entity data). The section should include at least one “column” subsection.
Section “relations” contains a description of the relations between entities. The links between entities can be of two types: simple (link through a column) and complex (link through a junction table). The section should have at least one “relation” subsection.
COLUMNS DESCRIPTION
Section “column” contains the required string parameter “name”, which is a unique column key in the entity configuration. Also, the section can have four optional parameters: primary, useForPeriod, frontendModel, eavAttribute.
The primary parameter for the column can be true or false. Defines the main column of the entity. The main column of an entity is always presented in the report. The entity must have the main column. If several columns are specified as main - the first one will be selected as the main one.
UseForPeriod parameter can be true or false. This parameter determines whether the column can be used to generate an entity report using grouping by date periods. This parameter should be specified only for columns of types: date, datetime, and timestamp
The frontendModel parameter accepts a string. This parameter determines the type of HTML element when adding a filter to a column. Possible options: text, select, multiselect, textRange, dateRange
The eavAttribute parameter can be true or false. This parameter indicates that the column is an attribute of the eav entity.
This section can have the following subsections: title, type, aggregation_type, source_model, hidden, options.
- title - defines the title of the column, which is displayed on the pages of editing and displaying the report
- type - defines the data type of the column. Available types: int, decimal, text, date
- aggregation_type - defines the type of aggregation of the column when grouping. If not specified, the type is determined automatically based on the data type of the column.
- source_model - can be set for a column with a frontendModel of select and multiselect types.
- options - can be set for columns with a frontendModel of select and multiselect types. For eav attributes they are filled automatically.
RELATIONS DESCRIPTION
“Relation” section should have two required attributes: name and type. The “name” parameter is a unique link key in the entity object. It is also a pointer to the name of the entity with which this entity is connected.
Parameter “type” defines the type of connection (column or table).
A “relation” section of the “column” type must include the following subsections:
- column - the column of the entity to be linked
- reference_column - the column of the current entity
- relationship_type - type of relations connection (one to one, one to many, many to one)
A “relation” section of the “table” type should include the following subsections:
- column - the column of the entity to be linked
- reference_column - the column of this entity
- relation_table - the name of the junction table
- relation_column - the name of the junction table column pointing to the name of the linked entity column
- relation_reference_column - the name of the junction table column pointing to the column name of this entity
- relationship_type - type of relations connection
EXTENSION
After determining the relationships of the new entity with other entities, it is also needed to determine the inverse relationship of these entities with the newly added one. Thus, it is required to add one more (or several) extension files of the existing entities and define the relations between them and the newly added entity. These files should contain the entity and relations sections and describe the connection with the newly added entity. See the example of such a file below.
Templates
Please mind, that the files in this section are just templates. Instead of (?) mark there should be the data from your entities. The parameters can be removed or added depending on your reporting requirements.
ENTITY FILE
<?xml version="1.0"?>

<config xmlns:xsi="http://www.w3.org/2001/XMLSchema-instance" xsi:noNamespaceSchemaLocation="urn:amasty:module:Amasty_ReportBuilder:etc/entity_scheme.xsd">
 <amasty_report_builder_entities>
  <entity name="(?)" primary="(?)" eav ="(?)">
    <title>(?)</title>
    <main_table>(?)</main_table>

    <columns>
      <column name="(?)" primary="(?)" />
      <column name="(?)" useForPeriod="(?)"/>
      <column name="(?)" frontendModel="(?)"/>
      <column name="(?)" eavAttribute="(?)"/>
      <column name="(?)">
          <hidden>(?)</hidden>
          <title>(?)</title>
          <type>(?)</type>
          <aggregation_type>(?)</aggregation_type>
          <source_model>(?)</source_model>
          <options>(?)</options>
       </column>
      </columns>

    <relations>
      <relation name="(?)" type="(?)">
          <column>(?)</column>
          <reference_column>(?)</reference_column>
          <relationship_type>(?)</relationship_type>
          <relation_column>(?)</relation_column>
          <relation_table>(?)</relation_table>
          <relation_reference_column>(?)</relation_reference_column>
      </relation>
   </relations>
  </entity>
 </amasty_report_builder_entities>
</config>
EXTENSION FILE
<?xml version="1.0"?>

<config xmlns:xsi="http://www.w3.org/2001/XMLSchema-instance" xsi:noNamespaceSchemaLocation="urn:amasty:module:Amasty_ReportBuilder:etc/entity_scheme.xsd">
    <amasty_report_builder_entities>
        <entity name="(?)" eav="(?)" primary="(?)">
            <relations>
                <relation name="(?)" type="(?)">
                    <column>(?)</column>
                    <reference_column>(?)</reference_column>
                    <relationship_type>(?)</relationship_type>
                </relation>
            </relations>
        </entity>
    </amasty_report_builder_entities>
</config>
Find out how to install the Custom Reports Builder extension for Magento 2 via Composer.
magento_2/custom_reports.txt · Last modified: 2025/05/07 08:28 by asemenova