
Sidebar
magento_2:company_account
Table of Contents
For more information, see the way the B2B Company Account for Magento 2 extension works.
Guide for B2B Company Account for Magento 2
Simplify purchases for your customers by introducing B2B Company Accounts to Magento 2 store. Let companies register multiple user accounts, allow special permissions to enhance the shopping, and get more orders.
- Create multiple company accounts as a store admin;
- Allow businesses to create and manage sub-accounts from the frontend;
- Allow enterprises to group related companies under a parent company;
- Transfer users between company accounts in the backend;
- Easily manage all company accounts in one place;
- Create additional fields for the companies registration form;
- Enable Order Approval functionality;
- Offer personalized marketing and pricing based on company membership.
- REST API Support
- Hyvä-ready storefront and Hyvä Checkout ready
- WCAG compliance (for Luma and Hyvä Theme)
The extension is compatible with Hyvä Theme. You can find the 'amasty/module-company-account-hyva' package for installing in composer suggest. The compatibility is available as a part of an active product subscription or support subscription.
The extension is compatible with Hyvä Checkout. You can find the 'amasty/module-company-account-hyva-checkout' and ‘amasty/module-company-account-approval-hyva-checkout’ packages for installing in composer suggest (Note: the compatibility is available as a part of an active product subscription or support subscription)
General Settings
To configure the B2B Company Account extension on your Magento 2 instance, start by adjusting the General Settings.
To access General Settings, please go to Stores → Configuration → Amasty Extensions → Company Account.

URL Key - add an URL key for company pages on the storefront.
Please note that the entered value for the 'URL Key' setting must be unique, otherwise it may conflict with the Magento B2B Company feature.
Allow Company Creation for Customer Group(s) - choose the customer groups that will see the Company Account tab in their customer account. It is especially handy if your store sells both to businesses and regular shoppers.
Allow Company Creation from the Registration Page - if enabled, the “Allow Company Creation for Customer Group(s)” setting will be hidden and the creation of a company account will be available to all users on the frontend along with the creation of a customer account. This functionality is available as a part of an active product subscription or support subscription.
See the example below to understand how the option for creating a company account from the registration page will appear.
On the Sign In page:

And on the Create New Customer Account page:

Approve Companies Automatically - set to Yes if you want all new company creation request automatically transfer to Active status without store admin approval. Set to No, if you want to approve each company request manually.
Inactivate Customer upon Removing from Company Account - set to Yes to inactivate user account upon removing from company account by the store admin.
Please note that, if the company administrator deleted a user from the company account management panel, the user will be permanently deleted from the system. In case the user will be deleted from store backend by store admin, the Inactivate Customer upon Removing from Company Account configuration in General Settings determines, what status (Active or Inactive) such user account would acquire.
Additional Company Registration Fields
In this section you can create additional fields for the Сompany Registration Form (Note: the functionality is available as a part of an active product subscription or support subscription).

You can add as many additional fields as needed and mark specific ones as required if necessary.
After you add additional fields in this section and save the configuration, these fields will be visible:
- In the company registration form
- On the company editing page in the backend in the Additional Information tab
- In the company profile on the frontend (if they contain values).
Here is an example of how this additional information can be displayed on the storefront:

Admin Notifications
In the Admin Notification section store admins can configure what email notifications will be sent to store admins upon a specified event. You can disable the notification sending upon particular events. Also, adjust the template that will be used for each notification type.
You can send automatic emails for events like:
- New company registration request;
- New company creation;
- Sales representative appointment.

Notifications will be sent based on where they are initiated. If triggered from the frontend, the store view settings from the general configuration will apply. When triggered from the admin panel, notifications will follow the store view selected in the 'Send Customer and Admin Notification Emails from' setting on the company configuration page.
To manage the email templates, please go to Marketing → Communications → Email templates. Then, load the template by clicking the Add New Template button. After that, choose the template you'd like to load and adjust to your needs.
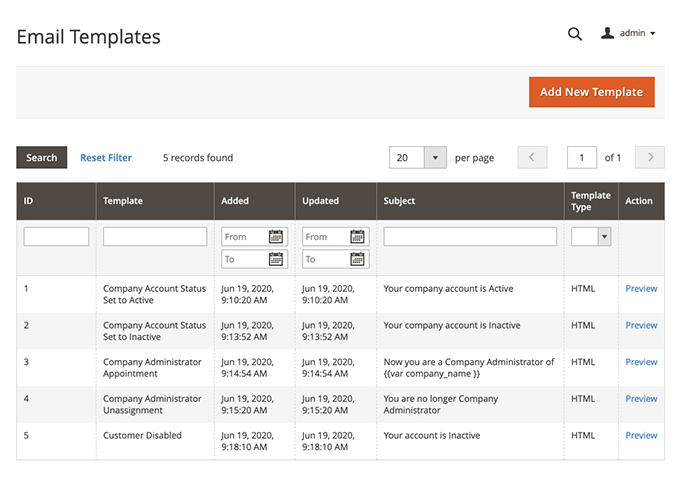
Customer Notifications
In the Customer Notifications section store admins can configure what email notifications will be sent to customers upon a specified event. You can disable the notification sending upon particular events. Also, you can adjust the template that will be used for each notification type.


Notifications will be sent based on where they are initiated. If triggered from the frontend, the store view settings from the general configuration will apply. When triggered from the admin panel, notifications will follow the store view selected in the 'Send Customer and Admin Notification Emails from' setting on the company configuration page.
You can send automatic emails for events like:
- Company account status is set to Active;
- Company account status is set to Inactive;
- Company account status is set to Rejected;
- Customer is linked to the company;
- Customer is deleted from the company;
- New company administrator appointment;
- Previous company administrator unassignment;
- Store Credit Changed by Admin;
- Changes Applied to Overdraft Configuration;
- Overdraft Used;
- Overdue Overdraft.
To manage the email templates, please go to Marketing → Communications → Email templates
Order Approval Notifications
In this tab, you can configure which order approval events will trigger notifications. Additionally, you can select the template to be used for each notification type.

You can send automatic notifucations for events like:
- Order is sent for Approval (notification for Admin) ;
- Order status is set to Approved (notification for Customer);
- Order status is set to Rejected (notification for Customer).
Company Store Ctredits Payment Method
To allow a new offline payment method in your store, first, you need to go to the Stores → Configuration → Sales → Payment Methods. Then, please kindly scroll down to the Other Payment Methods → Company Store Credit (Amasty) tab, and click on the Company Store Credit Tab.
Please kindly note that the B2B Company Account extension doesn't handle the payments similarly to the PayPal or Braintree integrations. It is intended to use as an offline payment method, where the extension covers transaction logging/tracking tool. And the money transfers itself are should be handled in any other convenient for the store way, e.g. wire transfers, credit cards payments using PayPal or any other payment methods that are available.

Enabled - set to Yes to allow Company Store Credits functionality in the store.
The Enabled setting allows using Company Store Credits as a payment method for ALL COMPANIES. In case you don't want to allow using Store Credits for certain companies, you need to proceed in the following order:
1. First, go to the Company Account settings for each CompanyName that you'd like to exclude from Store Credits payment method. To do that, please go to Customers → Amasty Company Accounts → Manage Companies → Select CompanyName on the grid → Click Edit
2. Scroll down to the Payment Restrictions tab and select Company Store Credits.
3. Hit the Save button.
4. Do the same action of restricting Company Store Credit for each company that you don't want to be using Store Credits.
5. Go back to Configuration → Sales → Payment Methods to finalize configuring new offline payment method.
Title - Customize the payment method name, so that an appropriate naming will be visible on the store frontend.
New Order Status - Set the Order Status that will be automatically assigned to all new orders that were placed using Store Credits as a payment option.
Payment from Applicable Countries - select the All Allowed Countries if the payment method has to be available for every eligible company no matter what country they set in the Address field. In case you want to restrict Store Credit availability, select the Payment from Specific Countries, and a new setting will appear.
Payment from Specific Countries - select all countries that will be allowed to pay with Store Credits.
Sort Order - set the display priority of this payment method on the checkout frontend. Enter a whole number, where the 0 is the highest position, and 3892 is much lower.
Order Approvals Payment Method
The Order Approvals Payment Method allows placed orders to be transferred to company administrators for review, approval, or rejection. Тhis functionality is available as a part of an active product subscription or support subscription. To enable this method in your store, please go to the Stores → Configuration → Sales → Payment Methods. Then, scroll down to the Other Payment Methods → Order Approvals (Amasty) Payment Method tab, and in the 'Enabled' setting choose 'Yes'.

New Order Status - Orders with the status selected in this setting will be displayed in the Approval Company Orders tab in the Customer Аccount. Note that only users with the Review & Approve role permission (for the Approval Payment Method) will be able to approve or reject them.
The remaining settings of this payment method are configured in the standard way.
The availability of this payment method for a customer does not restrict other payment options if they are enabled. This means the customer can still make purchases with their own funds. Additionally, if the payments with company store credit are not restricted, the customer can choose whether to send the order for approval or place it using store credits. The responsibility for configuring these settings lies with the administrator.
Company Accounts
To manage all company accounts from the backend as a store admin, kindly go to Customers → Amasty Company Accounts →Manage Companies. Then, a Company Accounts grid will open.

On the grid, you can see all company accounts that are created in your store, and track the status for each of them. The information like company phone number, customer group, company admin, country, and the city is also displayed by default. Also, in this grid you can see the company type of each account: Parent, Child or Unrelated.
To add a new company account manually from the backend, kindly click the Add New Company orange button in the top-right corner of the screen.
How to add new Company Account from the backend
To create a new company account from the backend as an admin, you need to complete 4 blocks with company information.
General Settings

Company Name - enter company name.
Status - choose the status of the company. When creating a company, only 3 statuses are available: Active, Inactive, Rejected.
However, if you are editing the company account based on company account registration request from the frontend, a Pending status will appear.
In case the store admin decides to assign the Rejected status to a company, several more fields will appear.
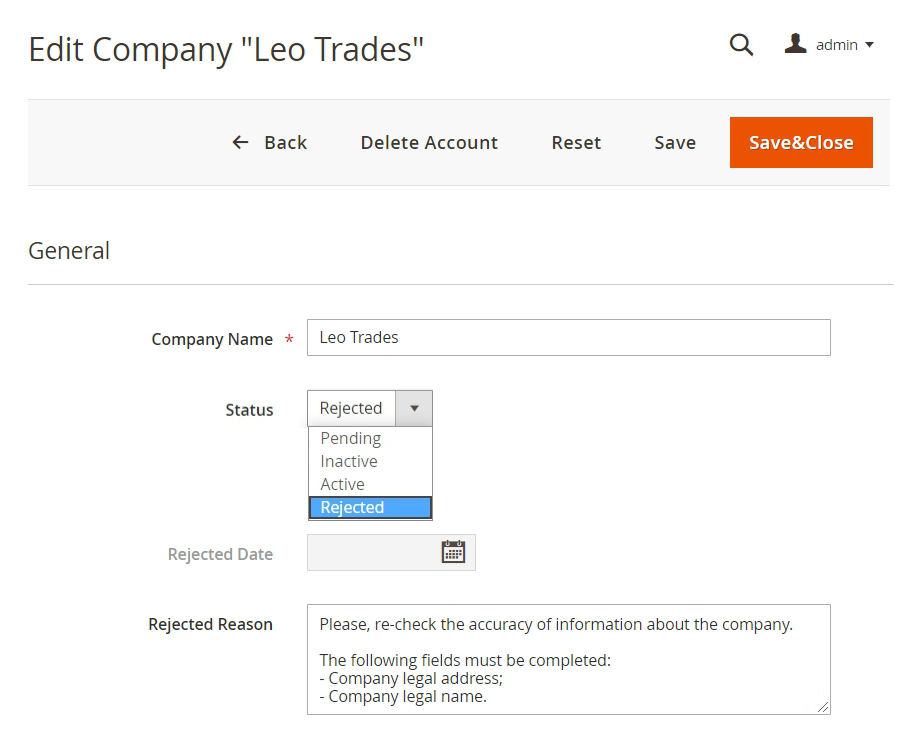
Rejected Date - this field will be completed automatically, based on the date when the Rejected status was assigned.
Rejected Reason - here you can specify the reason as to why the company was denied.
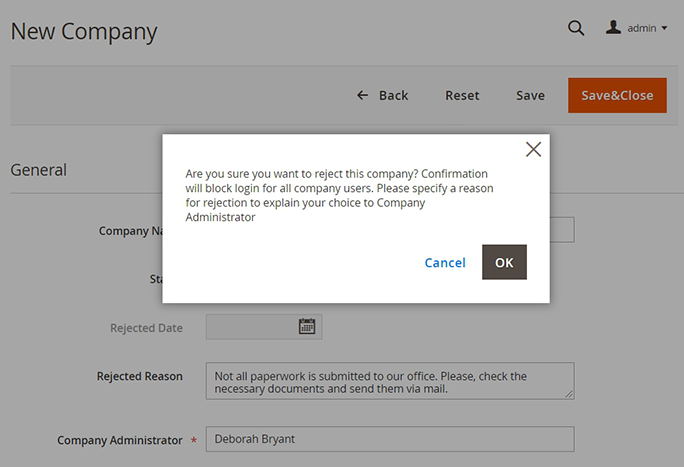
After the pressing the Save button with Rejected company status, the warning popup appears. It is designed to prevent any accidental rejects, and admins will be asked to fill in the Rejected Reason field to communicate the reasons for company disapproval.
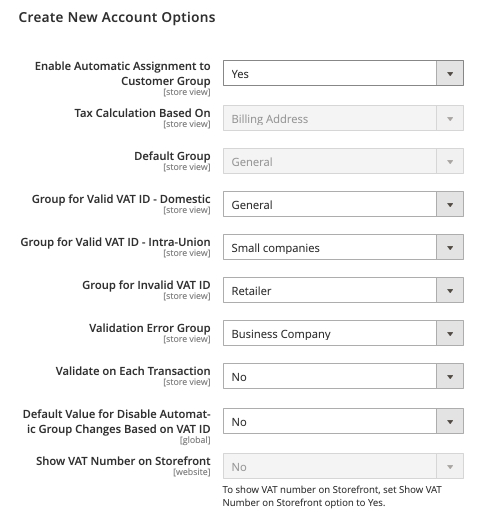
Assign the same Customer Group to all Users - set to Yes to automatically assign customer groups to all users that will belong to the chosen company.
If your business prefers to assign customer groups based on VAT ID's as specified in Store → Configuration → Customers → Customer Configuration → Create New Account Options. Then you might want to choose the Assign the same Customer Group to all Users set to No to disable automatic assign to one customer group based on the company.
You can try the way it works in your store on the B2B Company Account extension demo.
Company Administrator - choose a company administrator from the list of existing customers.
Customer Group - choose the customer group that will be assigned for all company members. Note that, you can also create custom customer groups for each specific company. It comes in especially handy if you want to restrict access to certain catalog pages or offer tier pricing based on user group.
Sales Representative - choose the Sales Representative for the company.
The Sales Representative users are configured in the System → Permissions → All users. You can assign special permissions for a users with Magento 2 User Roles functionality.
Send Customer and Admin Notification Emails from - this setting allows you to specify from which store view notifications will be sent that are initiated from the backend.
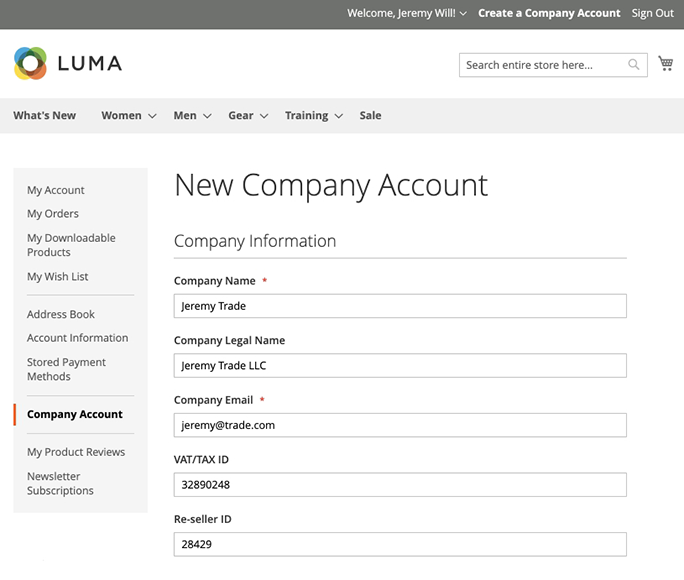
Company Information
In the Company Information block, you'll be asked to fill in the main info on the company.

Company Legal Name - enter the company legal name, as it is registered in official paperwork.
Company Email - enter the main email to contact the company.
VAT\TAX ID - enter the VAT/TAX ID number. It is the value-added tax number that is assigned to the company by some jurisdictions for tax reporting purposes. It is highly useful for EU businesses, and also in many other countries.
Reseller ID - enter the resale number that is assigned to the company for tax reporting purposes.
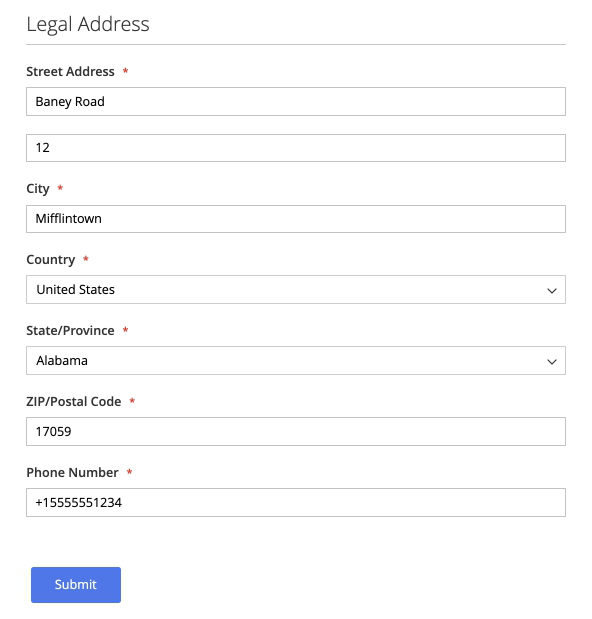
Company Legal Address
In the Company Legal Address block, you'll be asked to fill in the main info on the company registration address.
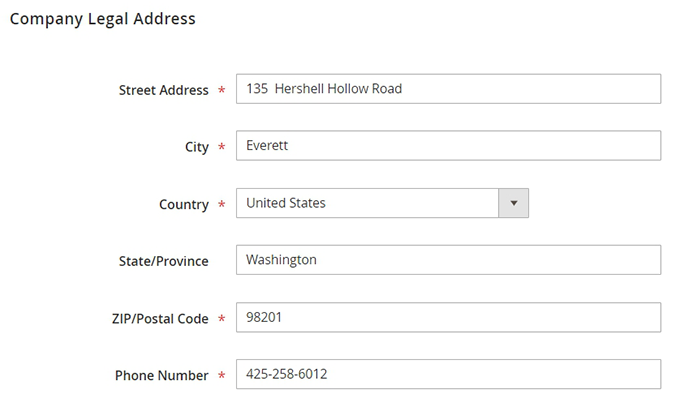
Street Address - add the street address where the company is registered to conduct business.
City - enter the city name where the company is registered to conduct business.
Country - choose the required country name from the dropdown list.
State/Province - enter the state or province, if applicable for a specific company.
ZIP/Postal Code - add the ZIP or postal code where the company is registered to conduct business.
Phone Number - enter the main phone number for the company.
Additional Information
This tab displays additional company information fields that were created in the extension's general configuration and filled in by the company during registration.

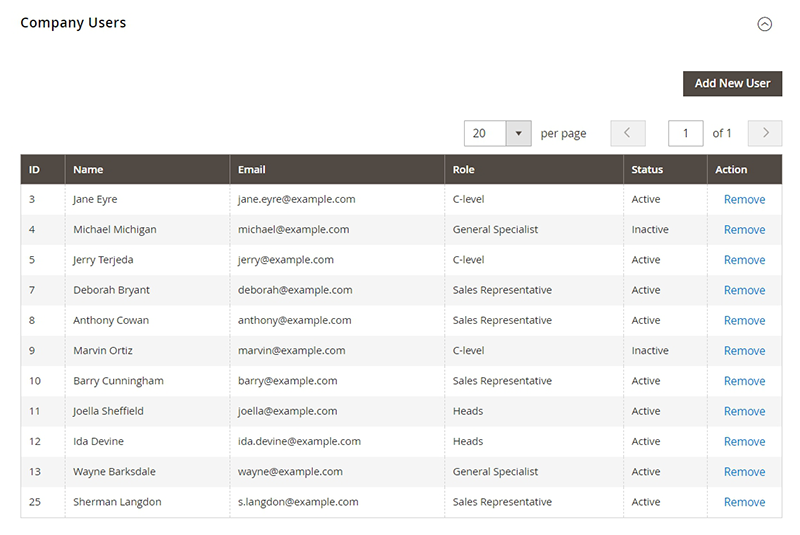
Company Users
In this block, store admin can assign or unassign existing users to a new company from the backend. To add users, click on the Add New User in the top-right corner of the block.
Assigned Companies
This functionality is available as part of an active product subscription or support subscription. To ensure proper operation, please install “amasty/module-company-account-subaccount” from composer suggest for Luma Theme and “amasty/module-company-account-subaccount-hyva” for Hyvä Theme.
In this block, store admin can assign or unassign related (child) companies to a designated parent company.

To add a related company, click the 'Assign Companies' button in the right top corner, and then choose the needed ones from the list of previously created companies.

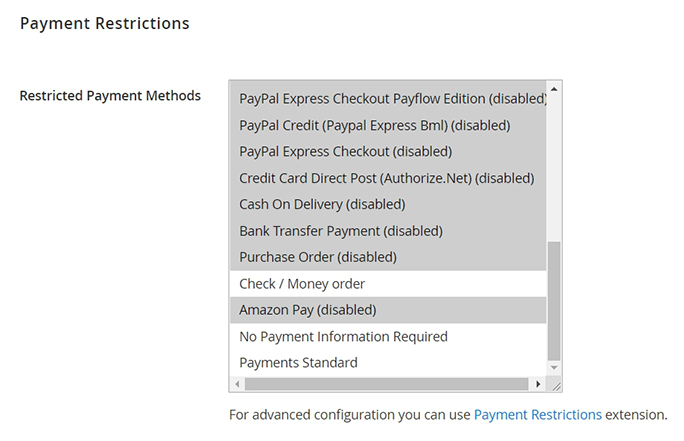
Payment Restrictions
In this block, store admin can adjust what payment methods are allowed for each specific company. For example, you might not want to allow Cash on Delivery for certain businesses — and the module allows you to adjust that.
Simply choose the methods you don't want to display on the company's checkout. The payment options that are left unchecked will be displayed on the frontend.
Store Credit
In this block, store admin can manage the Company Store Credits that are allowed for the company to use.
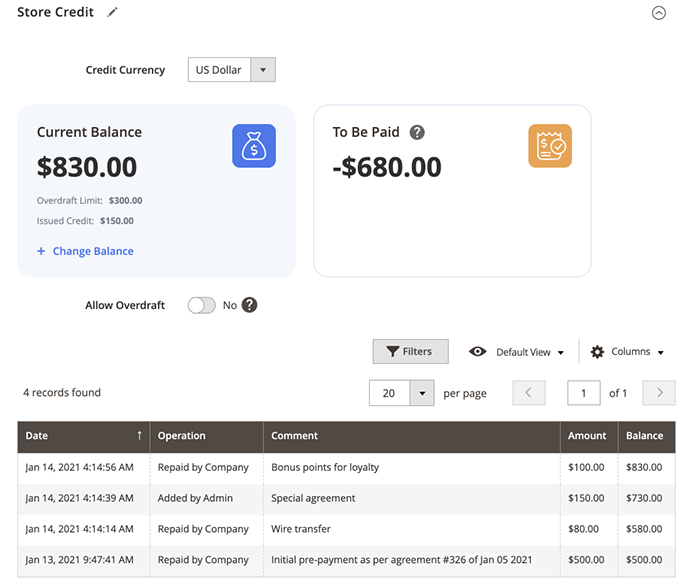
Credit Currency - set the currency in which Store Credits will be counted. Please note that in the dropdown, only Base Currencies will be shown.
Current Balance - displays the number of store credits that are available for the CompanyName to spend. This card has also an Issued Credit information, that provides the admin with data on how much credit admin has issued to this company for all the time. Issued Credit is calculated as a sum of Added and Substracted credits.
To Be Paid - shows the number of store credits that the CompanyName needs to pay back to your store. In case the To Be Paid amount is NEGATIVE, this means that the company pre-paid some money in advance. In this case, the Current Balance will be a positive number.
Manage Credits Balance
To add funds to the company's store credits, please click the + Change Balance button in the Current Balance block.
Then, a pop-up window will appear as shown on the example screenshot below.
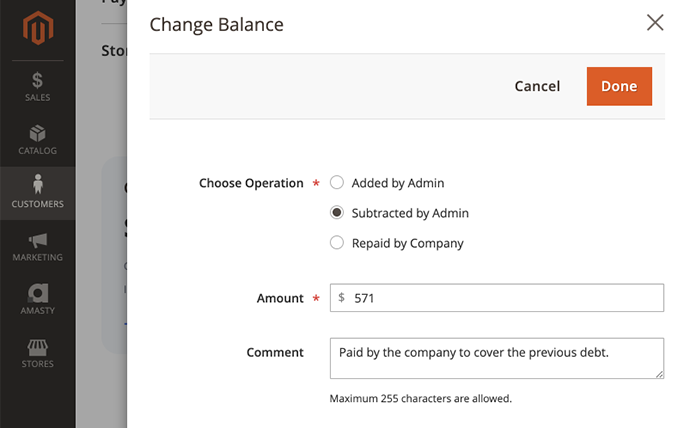
Choose Operation - select the operation type. It impacts the way how the store credit totals will be calculated.
- Added By Admin - will add credits to the Current Balance. For example, Added by Admin can be used in cases like 'Admin and Company agreed that Company is allowed to have $XX money of credits. Company will order goods using store credits and then later will transfer real money to the store.' Admin uses Added by Admin operation to set the initial store credits balance.
- Subtracted by Admin - will reduce the number of credits on the company's balance.
- Repaid by the Company - will add credits to company's balance, BUT the 'To be Paid' amount will be reduced. You can use it in cases when client-company transfers you actual money for orders that were paid via store credits. Also, it can be used in the scenarios when companies agreed to put money on the balance BEFORE buying any goods.
Amount - simply enter the number of store credits that need to be added/subtracted to the balance.
Comment - if needed, you can leave a short comment to mark the transactions' context and easily track them down in the future.
Overdraft for Store Credits
The extension allows to set up an overdraft of store credits. To do this, please set the switcher in the Allow Overdraft setting to Yes.
Then, more configuration options will appear.
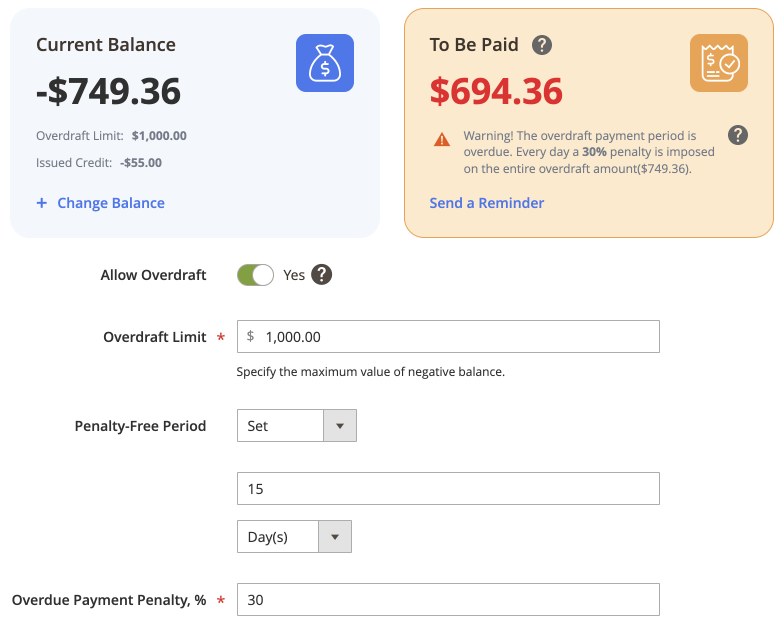
Overdraft Limit - enter the number of store credits a company is allowed to overspend.
Penalty-Free Period - the extension allows charging up a penalty for not paying back the debt in the set timeframe. Select the Unlimited to not impose any penalties for using an overdraft.
In case you want to charge penalties, select the Set option. Then, configure the time where if a company pays back, it won't be charged a penalty. You can set the period in Days, Weeks, Years.
Overdue Payment Penalty, % - enter the number of how many penalties to charge. This is a percentage of all overdraft amount used.
In case a company is on its Penalty period, the extension automatically changes the colour of To be Paid block to make it more noticeable and urge companies pay back money faster. Moreover, the extension also allows to send e-mail reminders on debt in the To be Paid block in one click — simply click the +Send a Reminder button.
Company Account on the frontend
With the B2B Company Account extension for Magento 2, company admins can set up different levels of access to company account information.
Check the demo to manage the company account as an admin user or to see the company as a regular employee.
The company administrator is the user that created a request for a company account or was assigned as a company admin from the backend by the store admin. The company admin has full access to the company account setting on the frontend.
Company Account
See the way Company Account appears on the frontend. A new section with additional tabs — Company Account, Manage Company Accounts, Users, Roles, Store Credit, Orders, Approval Company Orders — has been added to the left-side user account navigation.

Manage Company Accounts
This tab is accessible to the parent company admin and users with the appropriate role permissions. Here, they can view all subaccounts linked to the parent company, unassign specific companies, log in as a subaccount, and add new subaccounts as needed.

Company Users
This is the way Company Users page looks like. Here, company admin can add users by choosing them from the list of registered store customers. Alternatively, company admin can create new users to add to the company.
Please note that the new user registration is possible only if the new user email is not registered/associated with any other customer account.
Also, users can delete, activate, or inactivate other users from the company, if they have user role permissions for such actions.

To manage the user, click the Edit button next to the required user name.

Enter the First Name and Last Name.
Add personal Email of the employee.
User Role - choose the user role of an employee to limit access to certain areas of Company Account. To adjust user roles, please go to the Roles tab in the Company Account.
Job Title - enter the job title of the employee.
Phone Number - fill in the contact phone number for the user.
Status - set to Active to activate the user.
Company Roles
On the Company Roles page, you can adjust the access level for each role.

To add a new role, click the + New Role button.
After that, you'll be asked to specify the Role Title - the name of the role that will be visible for all users within the company account.
Also, set up the Role Permissions via the permission tree to allow or restrict access to certain areas or actions for all users that belong to this user role.

You can grant users permissions to view and manage subaccounts, view and edit users, use Company Store Credit as a payment method, place and view orders within a company, and more. Additionally, you can allow company employees to transfer orders to company administrators for review, approval, or rejection, and grant company administrators the authority to approve or reject orders. This way, B2B clients can efficiently assign appropriate user permissions, reducing time and effort spent on communication.
Company Store Credit
On this page, company users with the appropriate role permissions can view the current store credit balance, pending payments, and transaction history.

Orders
On this page, company users with the appropriate role permissions can view the orders that were placed by company users.

Approval Company Orders
Please note that this tab will be visible only to users with the Review & Approve role permission (for the Approval Payment Method).

On this tab, admin users (or users with the appropriate permissions) will be able to approve or reject orders that were sent for approval.
To review an order, click the View Order link in the row of the required order.

1. If you click the Reject Order button, a popup window will appear, allowing you to provide a reason for the order rejection.

2. If you click the Approve Order button, you will be redirected to the Checkout page, where you can review and modify the order details before submitting it for final approval by the company admin.

In this case, you will see a notification at the top of the page indicating that you are in Edit Mode for the particular order.

Once submitted, the customer will receive a notification confirming the order placement.
Please note that if the company admin was in Edit Mode and logged out of the account on the frontend, Edit Mode will end, and any changes made to the order will not be saved. After logging back in, you can return to the order and approve or reject it.
Request to create company account from the fronted
If the user belongs to the customer group that is allowed to create requests for a company account, this user will see the Company Account section in their customer account.
After pressing the Create button, the user will be asked to fill in some information on the company, similar to the backend company creation.
After all necessary fields are completed, please click the Submit button. Then, the company account request will be sent to the store admin for approval (if in General setting automatic company approval is disabled).
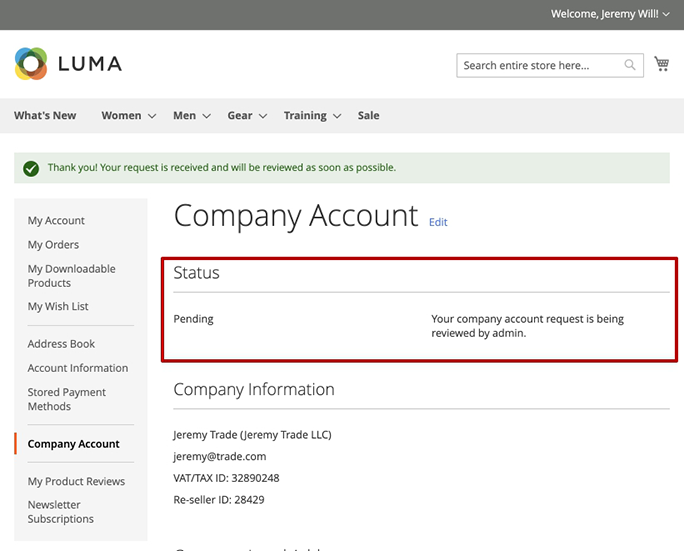
The user will see a success message, and company status will be Pending upon admin's approval or reject. Below, see an example of how it looks on the frontend:
Import and Export
With the B2B Company Account extension you can import and export Company Accounts data. This functionality is available as a part of an active product subscription or support subscription.
To Import the company accounts data, please navigate to System → Amasty Import → Import → Select Entity → Amasty Company Account → choose the needed entity:

Then, scroll down to the Fields Configuration tab and enable the needed subentities for import.

Adjust other settings for the import according to your needs.
To Export company accounts data, please navigate to System → Amasty Export → Export → Select Entity → Amasty Company Account → choose the needed entity:

Then, scroll down to the Fields Configuration tab and enable the needed subentities for export.

Adjust other settings for the export according to your needs.
Compatibility with REST API
B2B Company Account extension supports API.
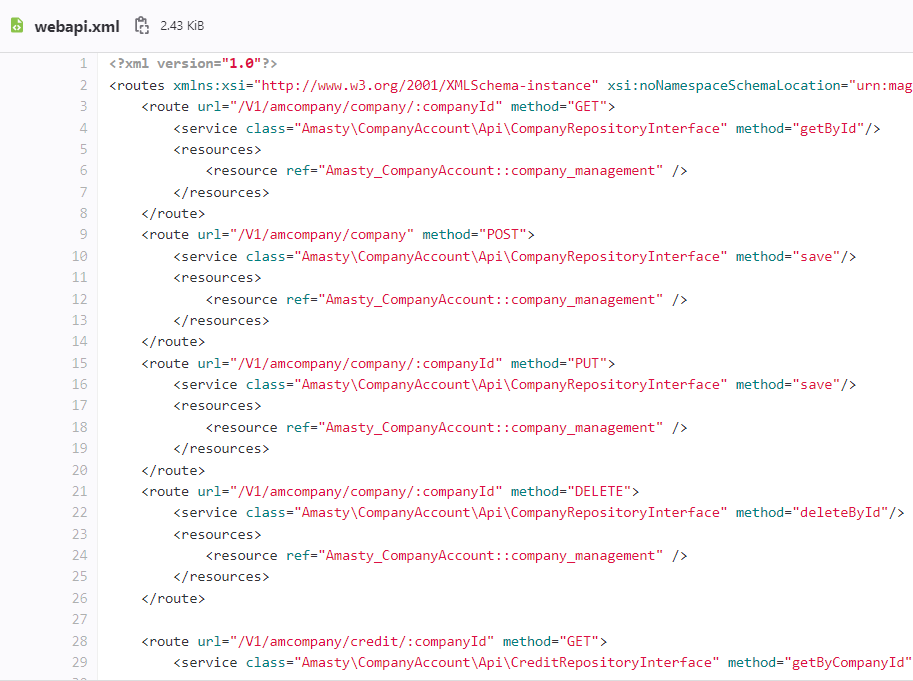
To get company accounts data you should be authorized as admin and have the API Authorization token. Use the API URLs specified in webapi.xml file:
Use the following methods to handle CRUD actions on Company Account via REST API:
- To create company account
method="POST"
endpoint: /V1/amcompany/company
- To update company account data
method="PUT"
endpoint: /V1/amcompany/company/:companyId
- To receive company account data
method="GET"
endpoint: /V1/amcompany/company/:companyId
- To delete company account
method="DELETE"
endpoint: /V1/amcompany/company/:companyId
- To assign customers to company account
method="POST"
endpoint: /V1/amcompany/customer/:companyId
- To delete customers from company account
method="DELETE"
endpoint: /V1/amcompany/customer/:customerId
- To update company account's store credits
method="PUT"
endpoint: /V1/amcompany/credit/:companyId
- To view company account's store credits
method="GET"
endpoint: /V1/amcompany/credit/:companyId
- To assign orders to company account
method="PUT"
endpoint: /V1/orders/create/:companyId
or
method="POST"
endpoint: /V1/orders:companyId
To correctly assign orders to a specific company, an additional parameter must be added to either of these two requests, and the corresponding company ID must be set.
 "entity": {
     "extension_attributes": {
        "amcompany_attributes": {
            "company_id": 1
        }
    }
}
If an incorrect company is specified (i.e., the customer is not associated with it), a fatal error will occur, indicating that the customer does not belong to the specified company.
- To view the list of companies
method="GET"
endpoint: /V1/amcompany/company/all
Additional packages (provided in composer suggestions)
To make additional functionality available, please install the suggested packages you may need.
Available with no additional fees:
amasty/module-company-account-to-builder- Install this module to activate the integration with the Custom Reports Builder extension and create valuable reports about your Company Accounts.
Available as a part of an active product subscription or support subscription:
amasty/module-company-account-hyva- Install this package to ensure the Company Account extension works with the Hyvä Theme.
amasty/module-company-account-export-entity- Install this package to export Company Accounts data.
amasty/module-company-account-import-entity- Install this package to import Company Accounts data.
amasty/module-company-account-register- This package allows users to create a Company Account from the 'Sign in' and 'Create an Account' pages on Luma Theme.
amasty/module-company-account-register-hyva- This package allows users to create a Company Account from the 'Sign in' and 'Create an Account' pages on Hyva Theme.
amasty/module-company-account-subaccount- Install this package to build a Company Hierarchy by creating and assigning related companies to a designated parent company on Luma Theme.
amasty/module-company-account-subaccount-hyva- Install this package to build a Company Hierarchy by creating and assigning related companies to a designated parent company on Hyva Theme.
amasty/module-company-account-subscription-functionality- This package provides the ability to flexibly turn off custom email notifications, and also to get the list of companies via REST API.
amasty/module-company-account-order-approval-functionality- This package provides the ability to use the Order Approval functionality on Luma Theme.
amasty/module-company-account-approval-hyva- This package provides the ability to use the Order Approval functionality on Hyva Theme.
amasty/module-company-account-custom-attributes- This package provides the ability to create additional fields for the Company Registration Form on Luma Theme.
amasty/module-company-account-custom-attributes-hyva- This package provides the ability to create additional fields for the Company Registration Form on Hyva Theme.
amasty/module-company-account-hyva-checkout- Install this package to ensure the compatibility between the B2B Company Account extension and Hyva Checkout.
amasty/module-company-account-approval-hyva-checkout- Install this package to ensure the compatibility of Order Approval feature with Hyva Checkout.
Find out how to install the B2B Company Account extension for Magento 2 via Composer.
magento_2/company_account.txt · Last modified: 2025/06/16 14:20 by asemenova