Sidebar
magento_2:custom_stock_status
Table of Contents
For more details see how the Custom Stock Status extension works.
Guide for Custom Stock Status for Magento 2
The extension allows you to inform your shoppers about the current stock statuses of your products. You can use variables and quantity ranges to provide clear and catchy statuses to engage your customers.
- Apply various custom stock statuses via rules
- Add statuses to multiple products and product groups
- Show out of stock notifications of configurable items
- Upload catchy icons for stock statuses
- Display stock statuses based on Magento 2 quantity
- Hyvä-ready storefront and Hyvä Checkout ready
- Compliance with Hyvä Checkout Content Security Policies
- WCAG compliance (for Hyvä Theme)
Custom Stock Status for Magento 2 is fully compatible with Hyvä themes. You can find the amasty/module-stockstatus-hyva-compatibility package for installing in composer suggest (Note: the compatibility is available as part of an active product subscription or Support Subscription).
The extension is compatible with Hyvä Checkout. You can find the 'amasty/module-stockstatus-hyva-checkout' package for installing in composer suggest. The compatibility is available as a part of an active product subscription or support subscription.
The extension is fully compliant with Hyvä Checkout Content Security Policies. The compliance is available as part of an active product or support subscription, within the amasty/module-stockstatus-hyva-checkout package.
General Settings
To configure the extension, go to Stores → Configuration → Amasty Extensions → Custom Stock Status.
General
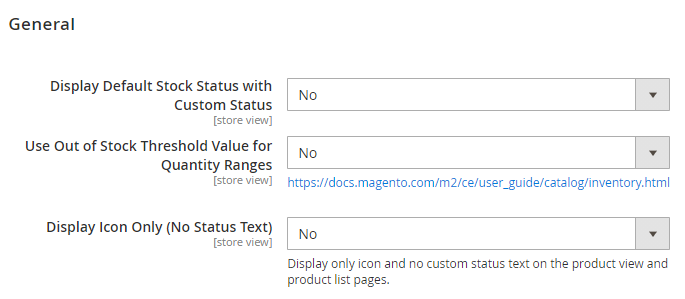
Display Default Stock Status with Custom Status - select Yes to display default stock status (in stock\out of stock) next to a custom stock status, set to No to display only custom stock status.
Use Out of Stock Threshold Value for Quantity Ranges - set to Yes to apply Out of Stock Threshold Value to the quality ranged statuses.
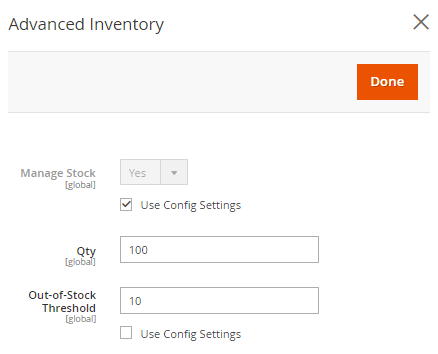
Out of stock threshold value indicates the quantity according to which a product is considered to be out of stock. If you use a variable qty_threshold to highlight the precise quantity of the product in your stock status, this number is calculated this way: the product quantity minus stock threshold (the quantity which triggers the out-of-stock status).
To specify out of stock threshold value, please go to Admin Panel → Catalog → Products and choose the product. In the Advanced Inventory tab set the necessary threshold value.

Display Icon Only (No Status Text) - set this option to Yes to display only icons for stock statuses (without a text).
Display Settings
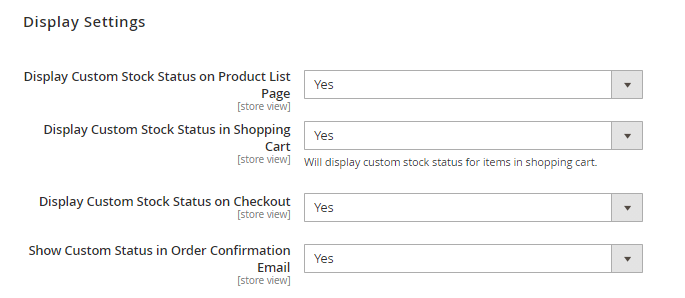
Expand this tab to choose whether to show custom stock statuses on:
- Product list page;
- Shopping cart;
- Checkout;
- Order Confirmation Email.
Info Link
In this tab, you can configure the placement of a custom stock status link.
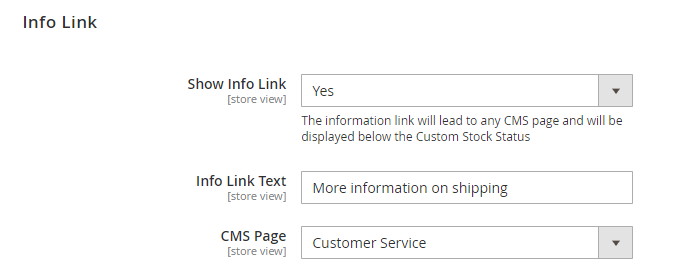
Show Info Link - enable the feature to display a link below the custom stock status.
Info Link Text - input an anchor text that will be shown to customers.
CMS Page - select the necessary CMS page to direct customers to. A drop-down contains all the CMS pages that you have in the web store.
Info link on the frontend:


Expected Date
The Expected Date section allows you to display the date on product pages when a product will be back in stock.
When the expected date functionality is enabled, the new corresponding attribute is created. Also, the attribute will be automatically added to products.
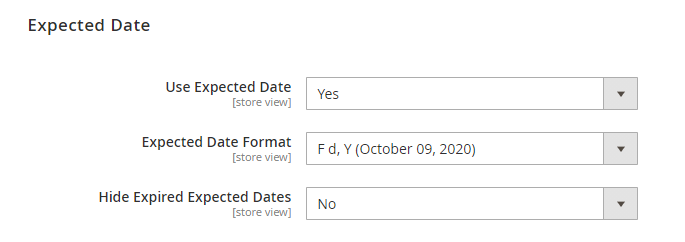
Use Expected Date — switch this option to 'Yes' to enable the expected date functionality.
Expected Date Format — choose the expected date format.
Hide Expired Expected Dates — enable this option to hide the expected dates when they expire.
For the correct display of the Expected Date on a product page please go to Stores → Product → Custom Stock Status → Manage Option → Add Option and fill the new option with the expected date variable.
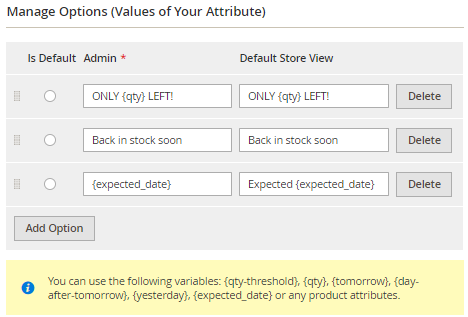
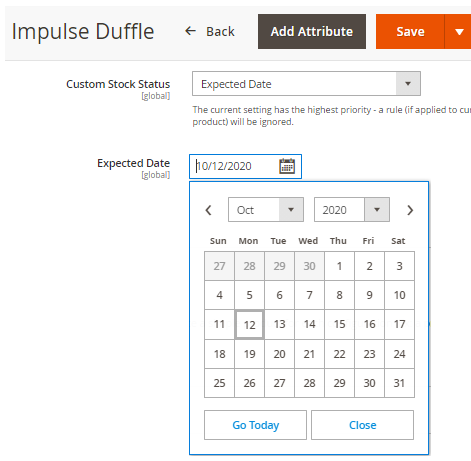
Then set the Expected date on product settings and choose the new custom status option from the Custom Stock Status dropdown.
Configurable Products
With the extension, you can use custom statuses for simple options of configurable products.
Please note that these settings switched on may degrade the performance of your store since the module is checking out the status/quantity of simple products before reflecting the status of a configurable product. For the same reason, a page with a higher number of simple products is loading longer.
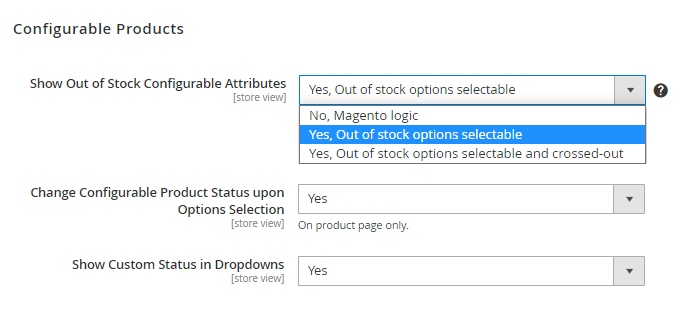
Show Out of Stock Configurable Attributes:
Set to 'No, Magento logic' to make disabled and out-of-stock products crossed-out and not selectable.
Set to 'Yes, Out of stock options selectable' to make out-of-stock options selectable (not crossed-out) and disabled products crossed-out and not selectable.
Set to 'Yes, Out of stock options selectable and crossed-out' to make out-of-stock options selectable and crossed-out while disabled products will stay not selectable and crossed out. Note, that this functionality is displayed only on product details pages.
If you are using the Amasty Out of Stock Notification module on your instance and want to enable subscription for the out-of-stock option of a configurable product, we recommend setting Show Out of Stock Configurable Attributes to either Yes, Out of stock options selectable and crossed-out or Yes, Out of stock options selectable.
Change Configurable Product Status upon Options Selection - enable this option to change product statuses for configurable products.
See how the feature is displayed on the frontend:


Show Custom Status in Dropdowns - select Yes to display custom stock status in the products options dropdowns.
Multi-Source Configuration
With the extension, you can configure and display an informative popup with the breakdown with separate custom stock statuses per sources.
To enable this functionality you should have more than one source created on your instance. To create and manage sources, please go to Stores → Inventory → Sources. Please check this guide to find more information about how to correctly configure your sources and stocks.
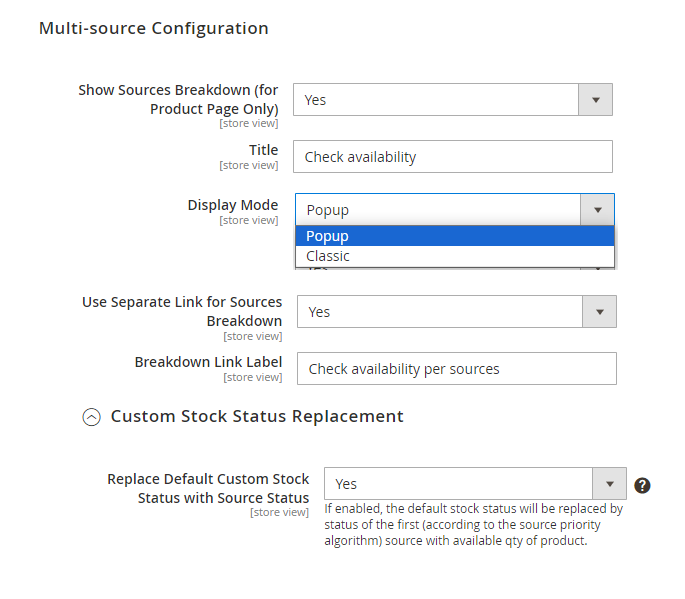
Show Sources Breakdown Popup (for Product Page Only) - specify whether to show or not the sources breakdown popup. Currently, this functionality is available only for product pages.
Title - add the popup window title.
Display Mode - select ‘Popup’ to show stock status information in a separate pop-up on a product page. If you select ‘Classic’, the sources breakdown will be displayed on the product page as a regular stock status.
Use Separate Link for Sources Breakdown - choose 'Yes' to display the breakdown popup by the click on a separate link. If you choose 'No' here, the popup will be displayed by the click on the main product status.
Breakdown Link Label - specify the label for the breakdown link.
Replace Default Custom Stock Status with Source Status - if enabled, the default stock status will be replaced by status of the first (according to the source priority algorithm) source with available qty of product.
Please, note that if a product is assigned to multiple sources, qty based statuses are displayed based on the highest priority source. For example, if a product has 0 quantity in two or more sources, select the highest priority source in the settings to display a custom stock status.
Create Custom Stock Statuses
To create custom stock statuses, please go to Stores → Attributes → Product and select the attribute custom_stock_status.
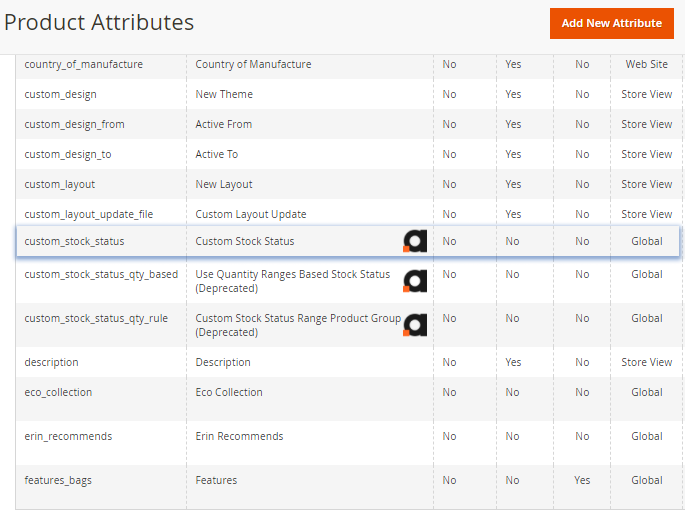
Add an Option
Navigate to the Properties tab → Manage Options (Values of Your Attribute) section.
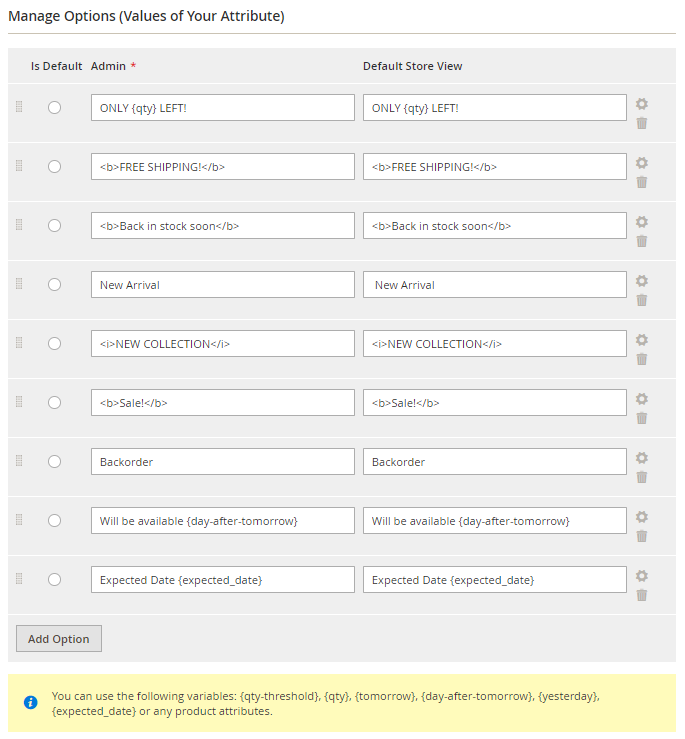
Here you can create the necessary options for the custom stock attributes. Easily sort them via drag and drop function or delete if necessary. Use the Add Option button to create a new status.
You can use different variables to generate stock statuses automatically and provide your customers with the necessary message. Also, HTML tags are allowed.
To display current product quantity in particular stock status, use {qty} variable, for example: Hurry up! Only {qty} left in stock!
Use {qty_threshold} variable to display the product quantity minus stock threshold (the number which triggers the out-of-stock status of a product).
You may specify days such as {tomorrow}, {day-after-tomorrow}, {yesterday} or prices, e.g. {special_price}.
If you want to display only an icon without a text for specific statuses, but don’t want to disable text messages for all of them, press Space button in the Default Store View field and leave it empty.
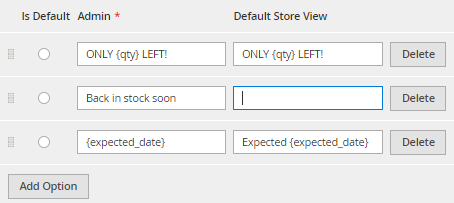
Configure Each Status Settings
Hit the gear icon next to each status to adjust its additional settings.
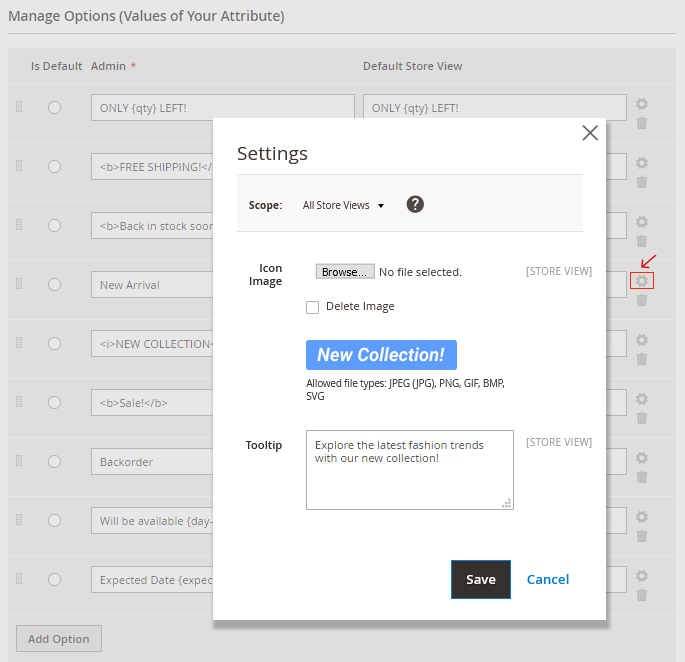
Here you can specify the Store Views and upload Icons for each custom status.
Also, you can add Tooltips to custom statuses. Thus you will be able to provide customers with additional information without visual overload.
The extension is designed with Multistore Support - you can upload various images and tooltips to the same custom stock status to match the peculiarities of different stores and/or languages.
Please, don't forget to save the attribute, otherwise, icons won’t be uploaded.
Please, don't forget to save the attribute, otherwise, icons won’t be uploaded.
Statuses Application
Create Custom Stock Status Rules
Starting from version 2.0.0 the extension provides store admins with the capability to apply statuses basing on Custom Stock Status Rules. In the previous versions, it was realized through additional attributes, such as the Quantity Ranges attribute and Product Groups attribute. Now you don't need to create additional attributes. Instead of this, you can assign custom statuses to particular products or product categories using various conditions and quantity ranges within the rule. Upon the upgrade process, the extension will automatically create rules for previously configured statuses and ranges.
To create or manage rules please go to Catalog → Amasty Custom Stock Status → Manage Custom Stock Status Rules
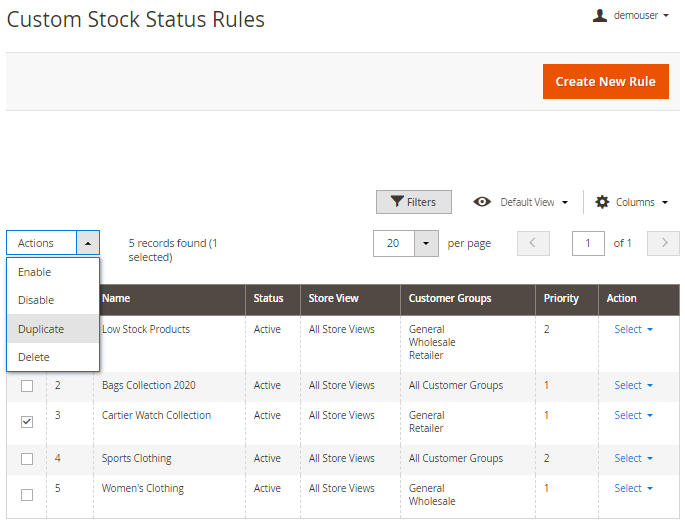
Here on the grid, you can see all the previously created rules. You can see their names, statuses, priority and their visibility by certain store views and customer groups. You may Enable, Disable, Duplicate, or Delete any of the rules right from the grid. Open the needed rule to view the details and to Edit. Create a new one via the button Create New Rule.
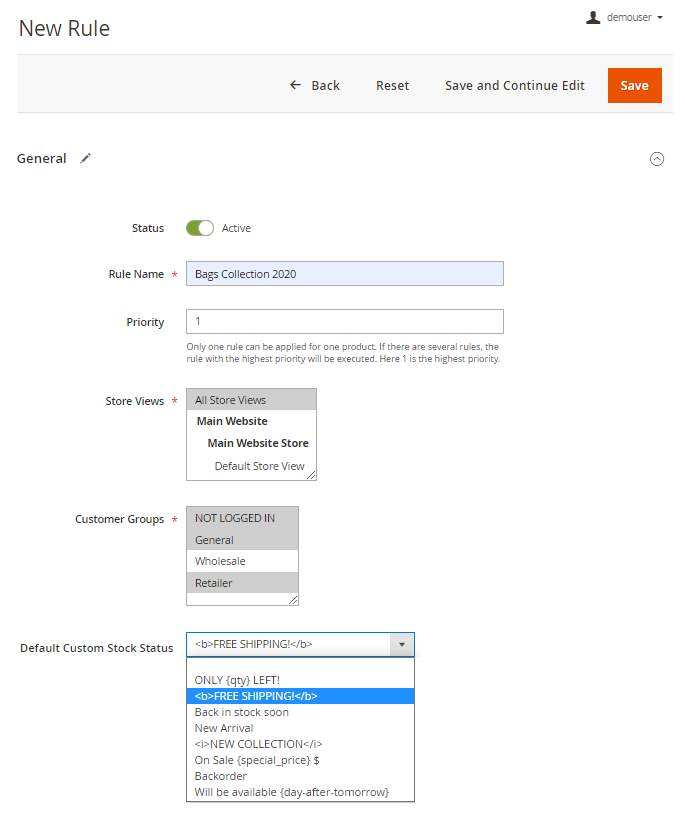
Status - enable the toggle to make the rule active.
Rule Name - specify the rule name (for internal use).
Priority - the setting defines the priority of the rule application. Note, that only one rule can be applied for one product. If there are several rules, the rule with the highest priority will be executed. Here 1 is the highest priority. In controversial cases, for example, when there are two or more rules with the same priority and the same customer groups, the preference is given to the rule with a lower ID.
Store Views - specify the stores for which the rule will be visible.
Customer Groups - with this setting you can make the rule visible for the particular customer groups.
Default Custom Stock Status - from a dropdown window choose the main stock status for the products that will be specified below in the rule. If you miss the needed stock status, please turn to the Create Custom Stock Status section of this guide and see how to add new statuses, which then will be visible in any rule.
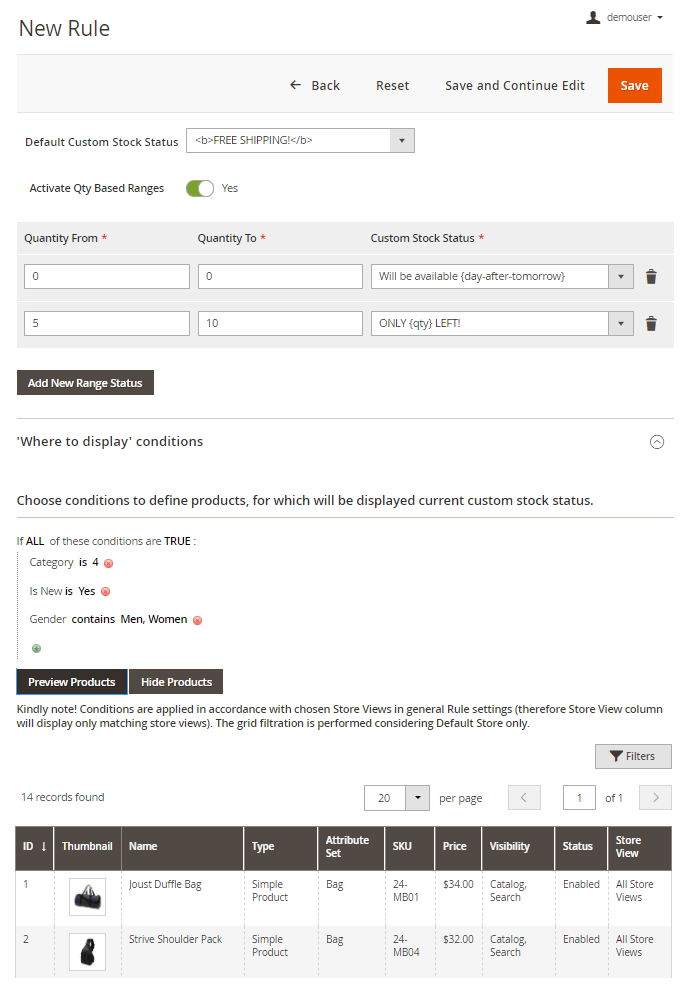
Activate Qty Based Ranges - enable the toggle to activate the quantity ranges. This means, that besides the default custom stock status, within the rule you can apply other custom stock statuses to the products, which fall under a certain quantity ranges. In such cases, the quantity range based status will replace the default custom stock status. But it will be applied for other products, which don't fall under the specified quantity ranges.
Tap the button Add New Range Status to create new quantity ranges and statuses. For the correct rule application, set the exact quantity in the fields Quantity From and Quantity To. Then, from a dropdown, choose the appropriate status in the tab Custom Stock Status. You may easily delete any of the statuses if it is not needed anymore.
'Where to display' conditions - here we can choose conditions to define the products, for which will be displayed the custom stock statuses according to our rule.
Hit the Preview Products button to view the products which match the conditions of the rule. Click Hide Products if you don't need the preview.
Due to the integration with Magento MSI now you can configure and display an informative popup containing the breakdown with separate custom stock statuses per source.
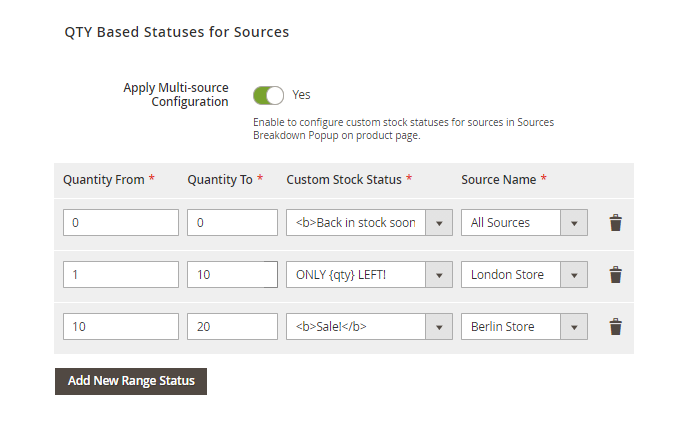
Apply Multi-source Configuration - enable this setting to configure custom stock statuses for sources in Sources Breakdown Popup on product page.
Hit the Add New Range Status button to add a specific custom stock status per particular source, basing on the range. You can apply quantity based statuses for a specific source, so for all the sources.
Integration With Amasty Countdown Timer Extension
We designed the integration with the Amasty Countdown Timer. So now, if you have this extension installed on your store, you can associate a specific countdown timer with a custom stock status rule and therefore display it on a particular product and cart pages. You can find more information on how to create and configure countdown timers in thisguide.
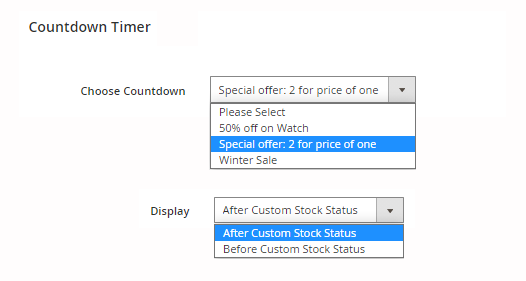
Within the rule, you can choose one of the previously created countdown timers, and specify its position relatively custom stock status of a product.
Please note, that for the correct integration of Countdown Timer with the Custom Stock Status extension you should also install the CustomStockStatusTimer system module.
Now, please Save the rule.
For Particular Products
If you need to add or change the status for a particular product, you can also do it from the product settings page. Please, go to Catalog → Products and select a product.
Navigate to the General tab and select the appropriate status for the product using Custom Stock Status dropdown, where all custom statuses are displayed.
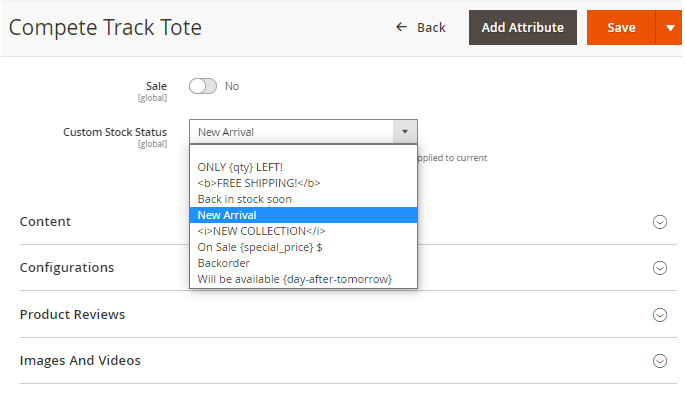
Save the configuration.
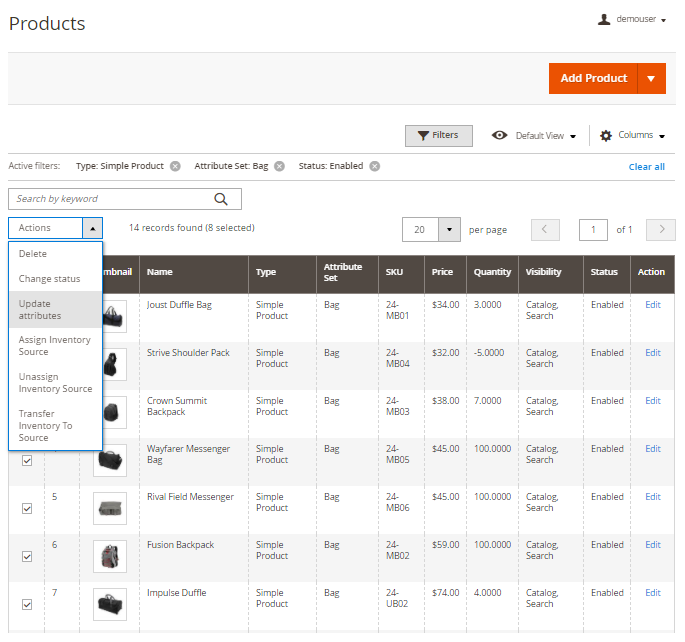
You can also add custom stock statuses for multiple products from the grid via Mass action. To do this, please go to Catalog → Products. Use the Filters button to find all the products you need.
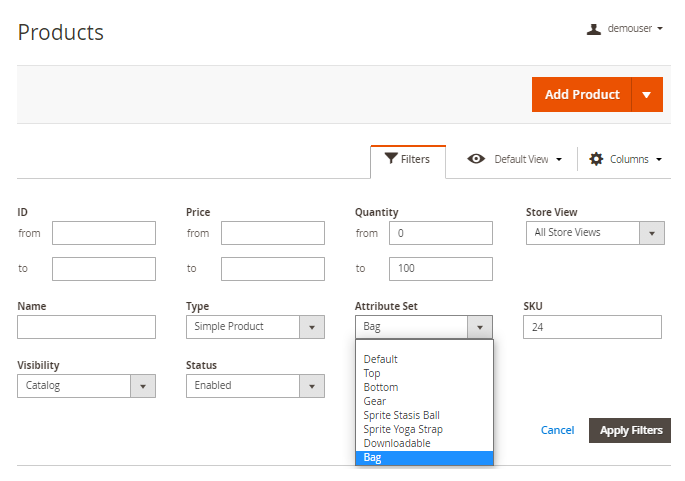
Tick all the products or the necessary ones you want to add the status to. Click the Update attributes option in the Actions dropdown menu.
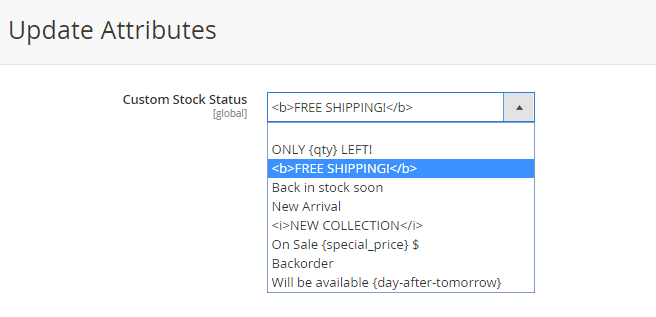
In the Attributes tab specify the necessary Custom Stock Status.
Hit the Save button.
Frontend Samples
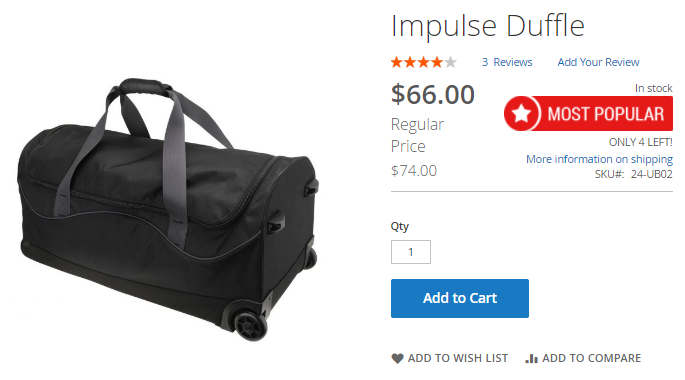
Display custom stock status on product pages either together with the default status or separately.
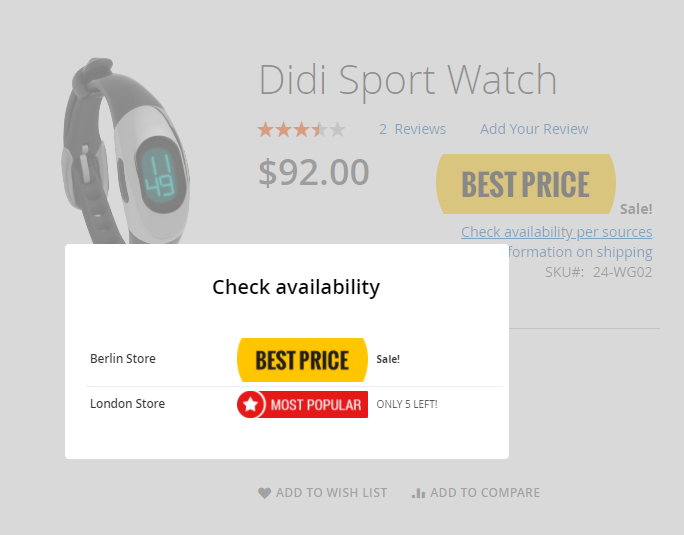
Display an informative popup containing the breakdown with separate custom stock statuses per sources.
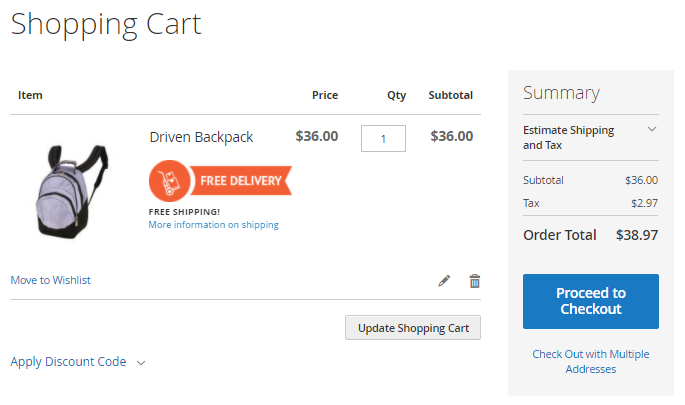
Show custom stock status on the shopping cart page.
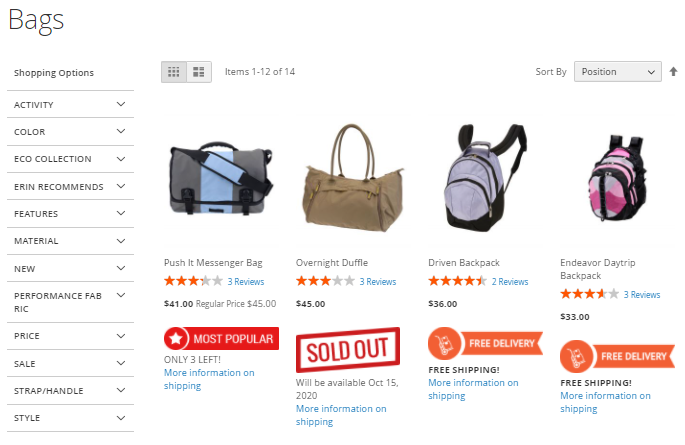
Add custom stock statuses to a category page and display info links on category pages and direct customers to any CMS page of your webstore.
Add countdown timers and tooltips to custom stock statuses.

Improve your shoppers experience adding Amasty One Step Checkout for Magento 2 to Custom Stock Status functionality.
PWA for Custom Stock Status (Add-On)
Use this PWA add-on if you already have a PWA-based storefront or you are just planning to transfer your website to PWA. The add-on adjusts the functionality of the original Custom Stock Status extension by Amasty to PWA themes like Venia. Let your shoppers be properly informed about the unique stock statuses you've set, on any device.
Please note that the custom stock status PWA functionality can be enabled only after purchasing the PWA for Custom Stock Status Add-On. Also, you need to install PWA Studio first.
In order to correctly install a PWA add-on, please install the corresponding GraphQL system package first. For the correct name of it, please check the composer.json file of the main module. For example, the GraphQL system package name of the PWA add-on for the Blog Pro extension would be the following: amasty/blog-graphql
Please note that by now, the PWA add-on for Custom Stock Status does not support the MSI-related functionality (manage stock status per stores).
We've also adjusted for PWA the out-of-stock functionality for the swatch display for the product options. How the adjusted logic works:
- If the setting 'Yes, Out of stock options selectable' is set to 'No', then the swatches will be clickable, the 'Add to cart' buttion will not be hided, and if the product option is added to cart, the user will see the corresponding notification that this action could not be performed;
- If you choose the setting 'Yes, Out of stock options selectable', then the 'Add to cart' button will be disabled;
- If you choose the setting 'Yes, Out of stock options selectable, and crossed-out', then the 'Add to cart' button will be disabled.
Find out more about Magento PWA integration here.
FAQ
Why the package for MSI compatibility doesn't work?
How to apply statuses only to products with specific quantity?
Check out the Custom Stock Status FAQ section to find answers to the most popular questions about the extension functionality.
Find out how to install the Custom Stock Status for Magento 2 via Composer.
magento_2/custom_stock_status.txt · Last modified: 2025/05/22 07:56 by asemenova


