
Sidebar
magento_2:store_switcher
Table of Contents
For more details see the Store Switcher extension page.
Guide for Store Switcher for Magento 2
Ease the shopping process for your international customers. Provide them with local store version including familiar language and currency. Store Switcher extension utilizes IP-addresses to detect location of your customers and switch them between store versions automatically.
- Switch customers between different store versions automatically
- Provide shoppers with familiar language and currency
- Detect visitors' location
- Exclude particular IP addresses and User Agents from redirection
- Let customers choose store version manually
Magento 2 Store Switcher extension is compatible with Hyvä themes. You can find the amasty/module-geoip-redirect-hyva package for installing in composer suggest (Note: the compatibility is available as part of an active product or support subscription).
Database Installation
This product includes GeoLite2 Data created by MaxMind, available from 24.10.2023 (last update date).
You will need to install GeoIP database to make sure that the module works correctly and detects visitor's location.
To install the GeoIP database, go to Stores → Configuration → Amasty Extensions → GeoIP Data.
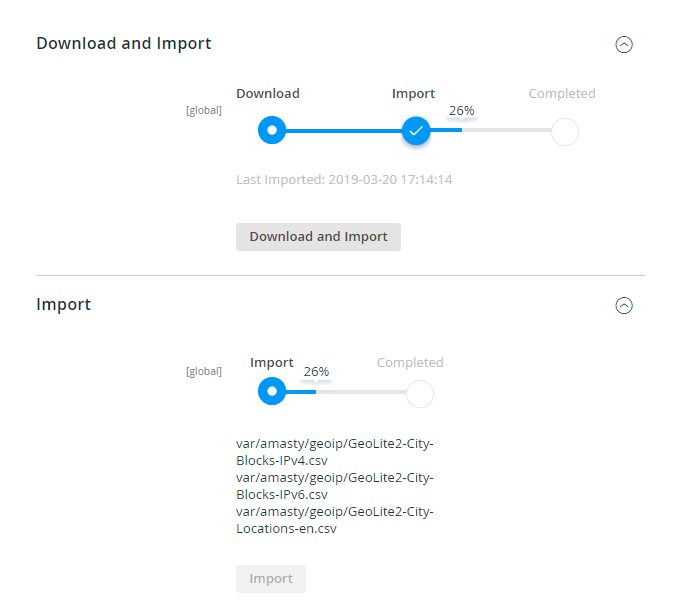
You can download and install the databases automatically or import your own data.
Hit the Download and Import button to make the extension download or update SQL dump file and import it into your database automatically.
In the Download and Import mode, don't be mislead by the error notification in the Import section, on the absence of CSV files: the CSV files are not needed, and the import will proceed.
To import files from your own source, use the Import option. Path to the files should look like this (the part 'var/amasty' should be replaced with your folders’ names):
var/amasty/geoip/GeoLite2-City-Blocks-IPv4.csv
var/amasty/geoip/GeoLite2-City-Locations-en.csv
In the Import section, the Import button is grayed out by default. It will be available right after you upload the CSV files. The red error notification will switch to green success notification when the import is completed.
If you face any difficulties when importing the location database, please see the following solution.
IP Database Update Settings
The database included in the extension was last updated on October 24, 2023. To keep the IP database current, you can update it using one of two methods.
Please note that regardless of the updating method chosen, you need to import the IP database first.

Refresh IP Database - select the appropriate method for refreshing the IP database:
- Manually - to manually upload the updated database files;
- Update via Amasty Service - to update the database automatically and regularly via Amasty Service, which is complimentary for you until August 2024.
Extension Configuration
To configure the Store Switcher extension, go to Stores → Configuration → Amasty Extensions → GeoIP Redirect.
First, expand the General section.
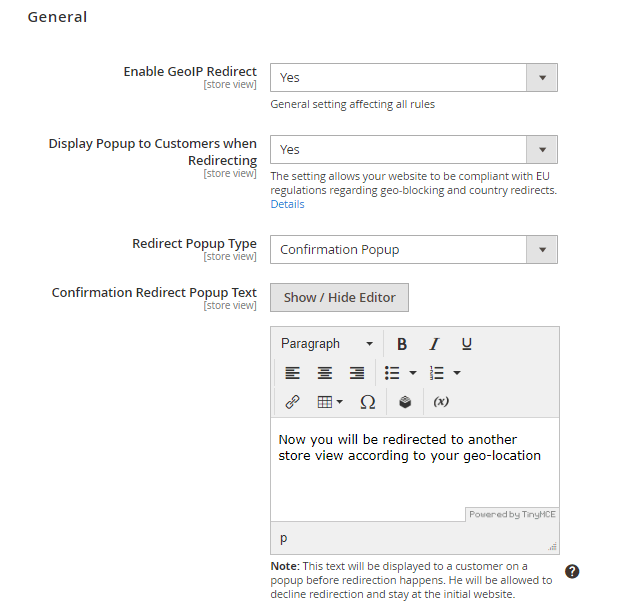
Enable GeoIP Redirect — enable or disable the Store Switcher module.
Display Popup to Customers when Redirecting - set to Yes to display confirmation redirect pop-up to customers. The setting allows your website to be compliant with EU regulations regarding geo-blocking and country redirects.
Redirect Popup Type - choose Notification Popup just to inform customers about the redirection or Confirmation Popup if you want them to be allowed to decline redirection and stay at the initial website.
Confirmation Redirect Popup Text - specify the text that will be displayed to a customer on a pop-up before redirection happens.
Exclude GET Parameters from Redirect URL - set to Yes to hide GET parameters in the URL after redirecting.
Please note that the Exclude GET Parameters from Redirect URL feature is available only as a part of an active product or support subscription. You can find the amasty/module-geoip-redirect-subscription-functionality package for installation in composer suggest.
Then, proceed to the Restriction section.
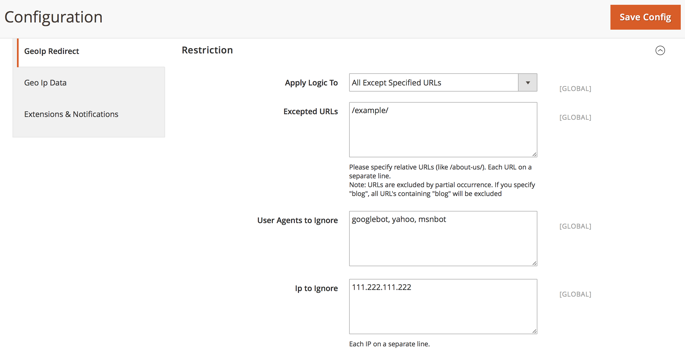
Apply Logic To — select the general logic of redirecting rules:
- All URLs
- Specified URLs
- All Except Specified URLs
- Redirect From Home Page Only
Excepted URLs — choose the Specified URLs or All Except Specified URLs options above to define the excepted URLs here.
User Agents to Ignore — ignore redirection rules for specified search engines.
Restriction by IP — restrict redirection for certain IP addresses.
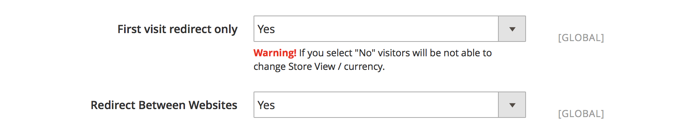
First Visit Redirect Only — activate to enable redirection only for the first visit.
Beware that if you set this option to No, customer wouldn’t be able to switch store view and currency at their desire.
Please note that the No option is not supported for websites using Varnish Cache or Fastly CDN. With these caching tools enabled, the module will redirect customers only on their first visit.
Redirect Between Websites — enable to redirect visitors between several websites.
Country to Store Redirect Configuration
Expand the Country to Store View Redirect section.
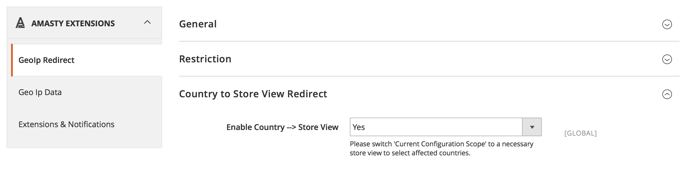
Enable Country –> Store View — enable to redirect visitors from certain countries to particular store views.
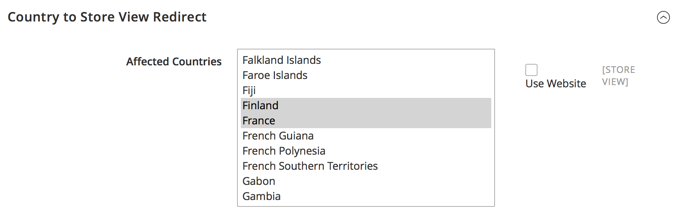
Switch the Store View dropdown menu to the required store version and define the list of countries that will be affected.
Now, visitors from the selected countries will see the defined store view version.
Countries and Currencies Mapping
Open the Country to Currency Switch section.
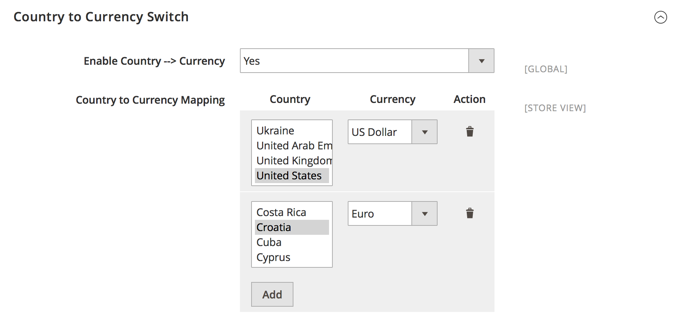
Enable Country –> Currency — set this option to Yes to automatically switch currency according to user’s location.
Country to Currency Mapping — define country — currency relation by selecting countries and the appropriate currencies. Hit the Add button to create a new relation.
Country to URL Redirect
Then, proceed to the Country to URL Redirect section.

Enable Country –> URL — enable to redirect visitors from certain locations to any other URL.
Country to URL Mapping — select locations and specify the URL that would be used to redirect visitors to. Use the Add button to create a new country — URL relation.
If you enable the Use Website checkboxes for the mapping options, the same set of rules would be applied to the Main Website and the selected Store View.
Compatibilities
Varnish Cache Compatibility
To ensure the redirect functionality works correctly when Varnish Cache is active on your instance, proceed with the steps below:
1. Insert the provided code into the vcl_recv section of your default.vcl file.
if (req.http.Cookie !~ "geoip_redirect_for_varnish"
        && req.url !~ "^/(pub/)?(media|static)/.*"
        && req.url !~ "/graphql"
        && !req.http.x-long-cache
        && req.http.X-Requested-With != "XMLHttpRequest"
    ) {
        return (pass);
    }
Make sure to place it after all existing instructions and before the final line.
2. Save the changes and restart the Varnich Cache service.
Fastly CDN Compatibility
When Fastly CDN is active on your instance, use the setup below to ensure the redirect functionality works properly:
1. Navigate to Stores → Settings → Configuration → Advanced → System → Full Page Cache → Custom vcl snippet;
2. Configure the snippet using the parameters below:
- Type: recv
- priority: 100 (default)
- vcl:
if (req.http.cookie !~ "geoip_redirect_for_varnish"
        && req.url !~ "^/(pub/)?(media|static)/.*"
        && req.url.path !~ "/graphql"
        && !req.http.x-long-cache
        && req.http.X-Requested-With != "XMLHttpRequest"
) {
        return (pass);
    }
3. Save the configuration. The changes will be automatically applied to Fastly CDN.
The No option for the First Visit Redirect Only setting (available in the general extension configuration) is not supported for websites using Varnish cache or Fastly CDN. With these caching tools enabled, the module will redirect customers only on their first visit, even if the First Visit Redirect Only is set to No.
Troubleshooting
GeoIP Data Import Failure
Sometimes, it is unable to complete the database import due to execution time limit of PHP scripts. You can avoid this error by increasing the maximum execution time for your PHP scripts.
You need to set the max_execution_time to the number of seconds that all your scripts are allowed to run in your PHP's configuration file. The file location may differ from system to system but in general you need to find the PHP.INI file and modify it.
We need to set the value to 18000.
For example:
; Maximum execution time of each script, in seconds
; http://php.net/max-execution-time
; Note: This directive is hardcoded to 0 for the CLI SAPI
max_execution_time = 18000
Setting the value to 0 means there's no time limit.
You'll have to restart your web server for this solution to work.
—-
Find out how to install the Store Switcher extension via Composer.
magento_2/store_switcher.txt · Last modified: 2025/07/09 13:05 by kkondrateva