
Sidebar
magento_2:rma
Table of Contents
For more details see how the RMA extension works.
Guide for RMA for Magento 2
Manage product returns and exchanges effectively with the powerful RMA for Magento 2 module. Make these processes simple and enhance your customer service.
- Use RMA for all or specific types of products
- Set unique return reasons, rules, and resolutions
- Customize RMA statuses
- Provide customers with understandable instructions
- Enable guest requests
- Activate notifications and use live chat to interact with customers
- Add custom fields
- Let users rate you return system
- WCAG compliance (for Luma and Hyvä Theme)
Important! Though we did our best to transfer all the data from the old version to the new one while updating, please keep in mind that 2.0.0 version is an absolutely new extension. Don't forget to make a full backup and test it on a staging site first.
Magento 2 RMA extension (standard version) is compatible with Hyvä themes. You can find the amasty/module-rma-hyva package for installing in composer suggest (Note: the compatibility is available as part of an active product subscription or Support Subscription). For the correct Hyvä compatibility work, the GraphQL module (amasty/rma-graphql) should also be installed.
Explore our internal Knowledge Base to gain even more valuable insights and uncover answers to popular questions about the configuration and features of the Magento 2 RMA extension.
Return Request Creation
Customers can create requests right from their accounts in 2 ways.
It can be done right in the My Orders tab.
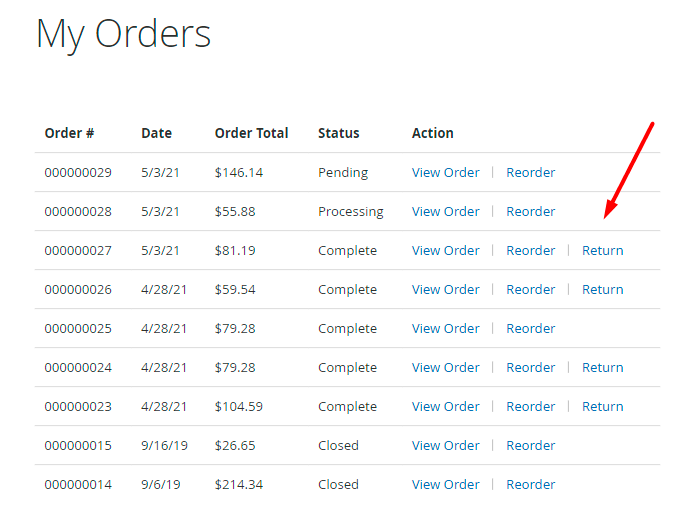
Also, they can view and manage all requests in the My Returns tab and select the order they want to return.
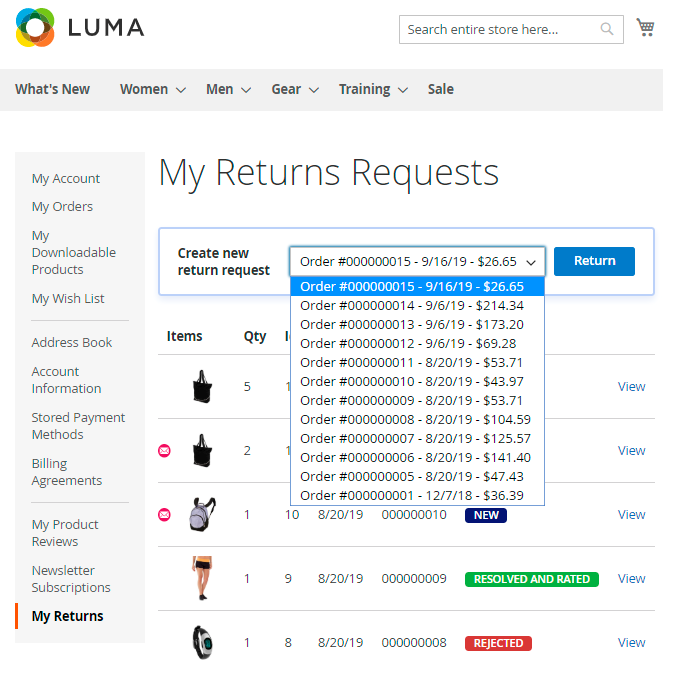
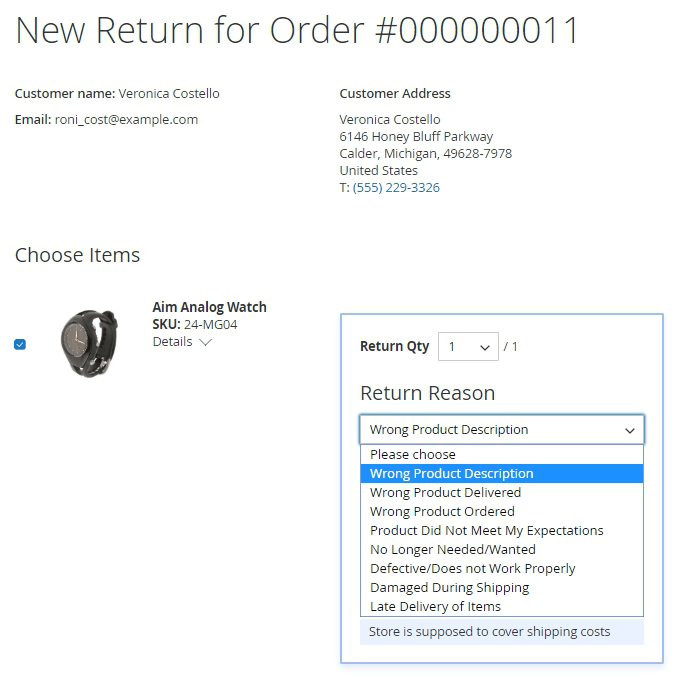
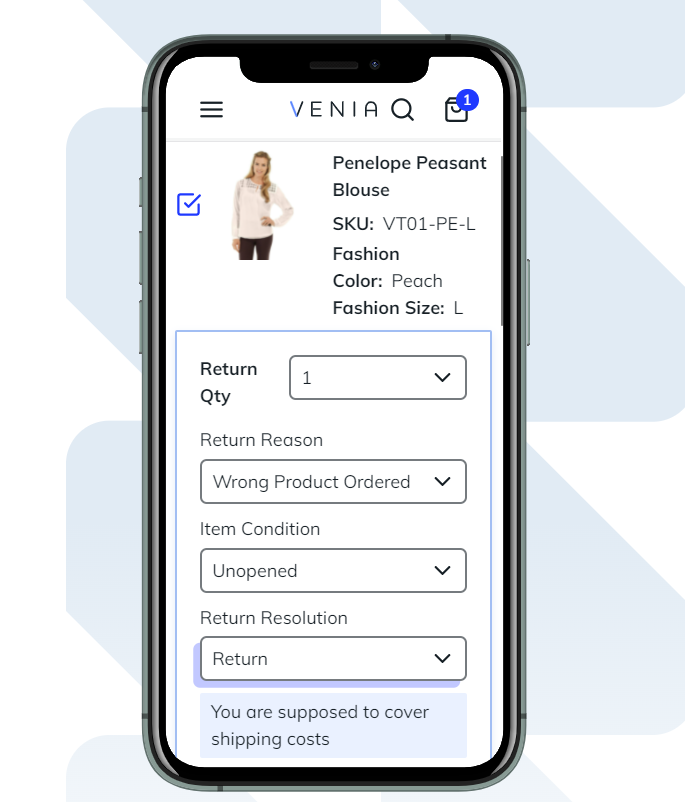
After choosing the order to return, a customer needs to specify the most important info about the request.
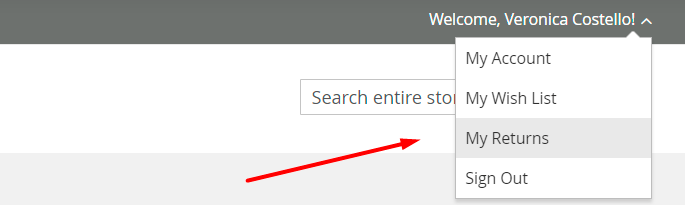
By the way, it is possible to open the 'My Returns' tab directly from the header block.
An admin can create return right from the backend. Just open the necessary order and click Create return.

Return Reasons
For customers, it is allowed to create requests according to return reasons store admins create in the backend settings.
To view and edit all reasons, please go to Admin Panel → Sales → RMA Settings → Return Reasons.
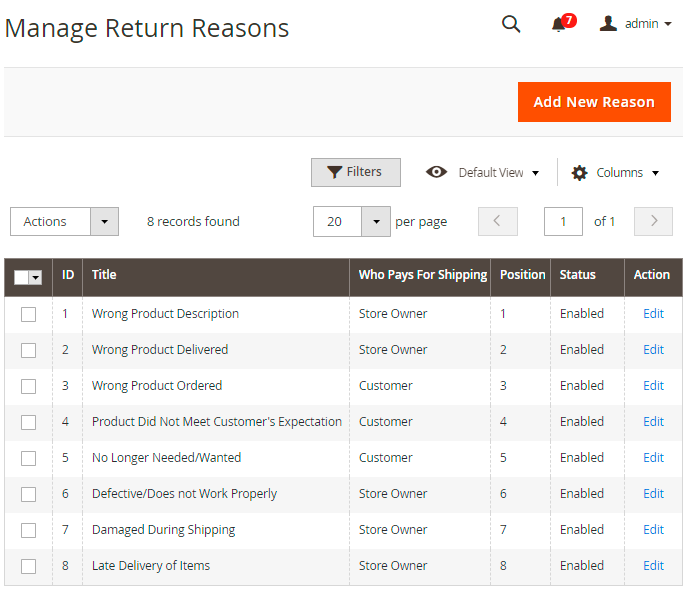
On a handy grid, you can see reasons’ Titles, Positions, Statuses and also check who is supposed to pay for shipping: a customer or the store owner.
To create a new one, hit the Add New Reason button.
New Reason
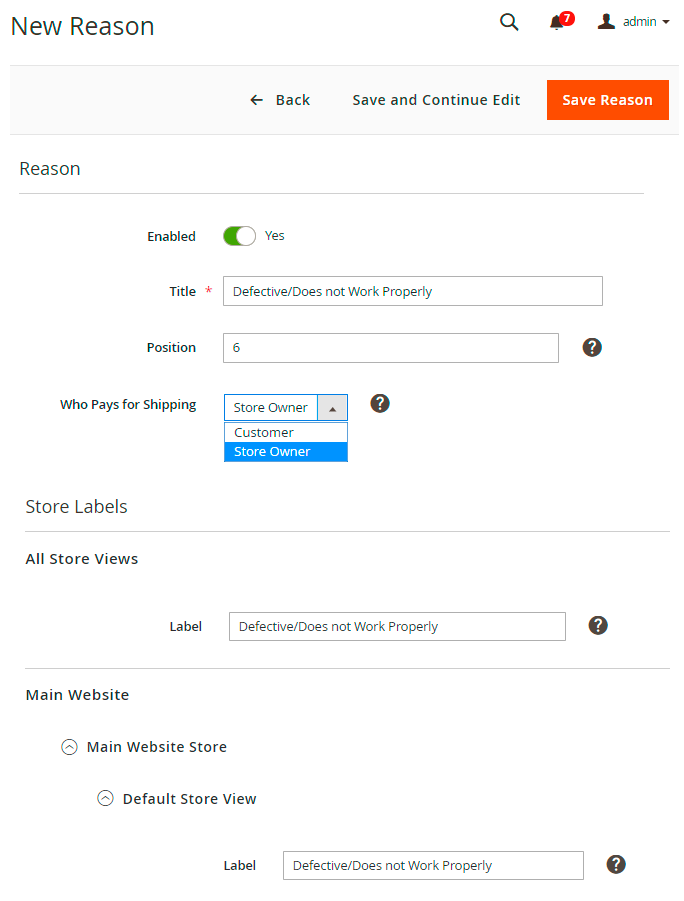
Enabled - set to Yes to activate the reason.
Title - specify the title that will be displayed on the grid to your store admins.
Position - set the position of a new reason among the other reasons displayed on the frontend.
Who Pays for Shipping - specify who is supposed to pay for shipping according to the reason for return request. The information will be displayed to a customer while creating a request.
Label - customize the title of the reason that will be displayed to your customers.
You may adjust the Label for each particular Store and Store View.
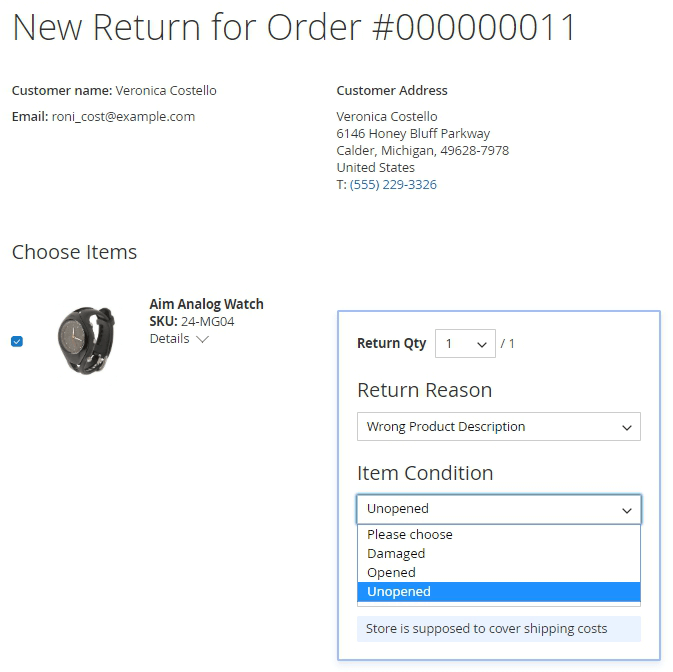
Item Conditions
To submit the request, a customer also needs to choose the condition of the product.
To adjust this step, go to Admin Panel → Sales → RMA Settings → Item Conditions.
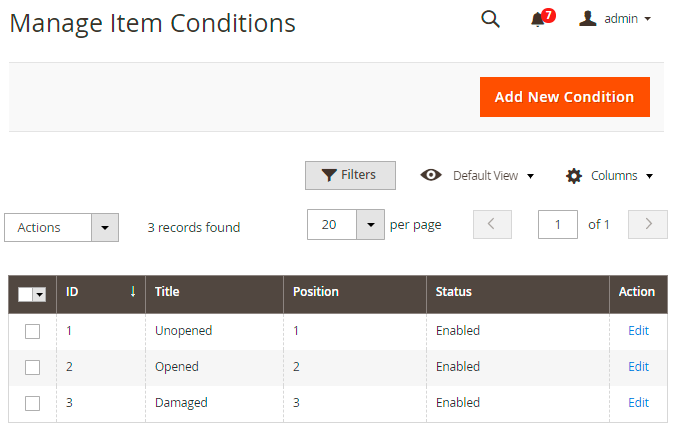
Conditions’ Titles, Positions and Statuses are displayed on the grid. Easily edit any of them via Action column or delete them in bulk using Actions dropdown menu.
To create a new one, click Add New Condition.
New Condition
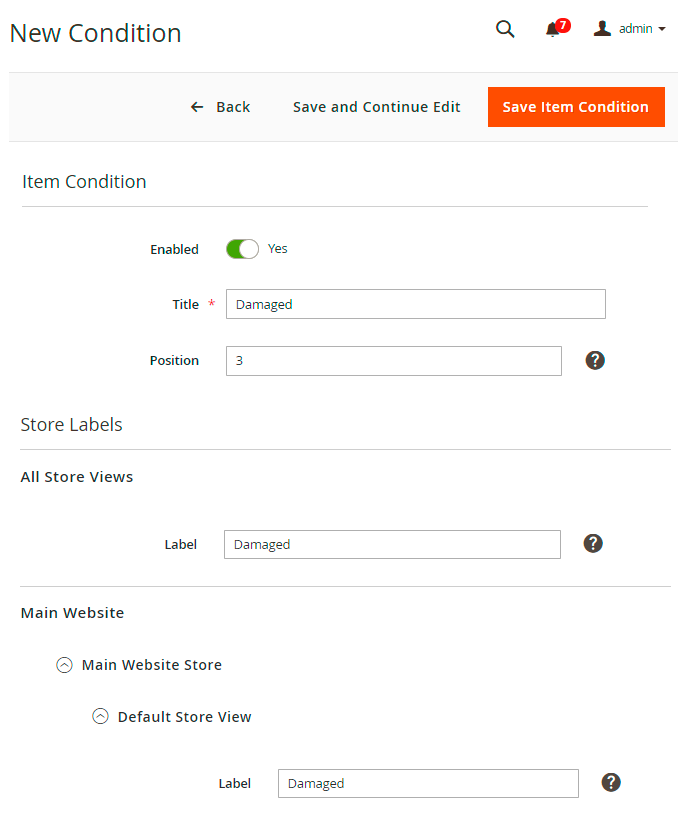
Here you also need to Enable the condition, specify its Title, Position and Labels.
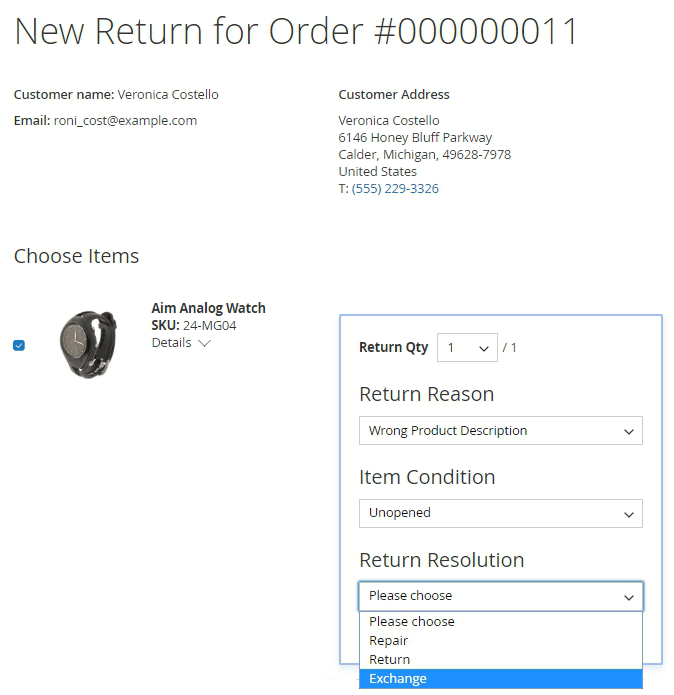
Return Resolutions
The next step for a customer is to choose one of the resolutions available in your store.
To configure the resolutions, navigate to Admin Panel → Sales → RMA Settings → Return Resolutions.
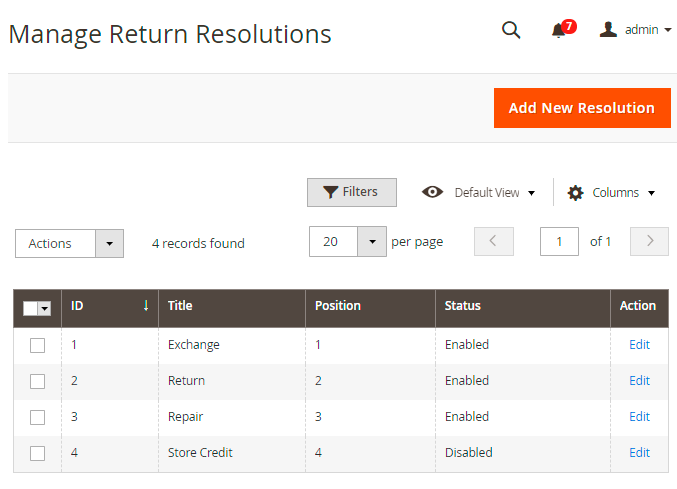
Click the Add New Resolution button.
New Resolution
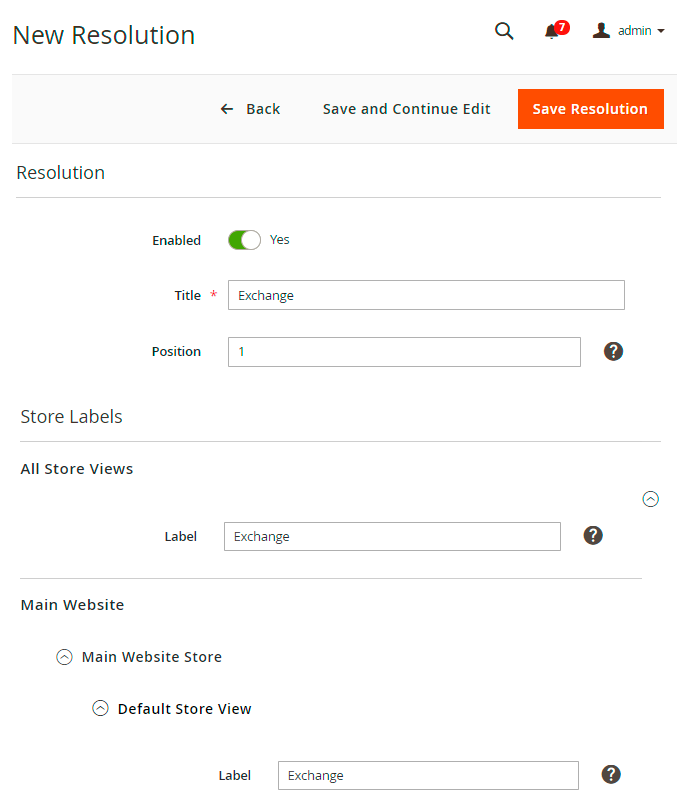
Enable the resolution, specify its Title, Position and Labels.
Return Rules
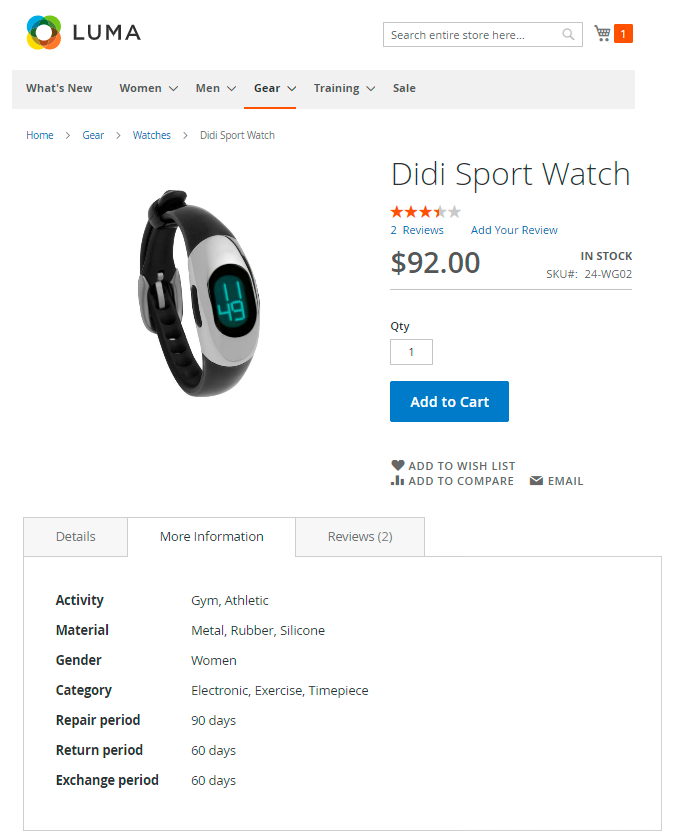
With the extension, you can set various return rules for all the products in your store. Customers will see it on product pages in the More Information tab and in their shopping carts (if these options are enabled in the general setting).
If some products are non-refundable in your store, customers will not be able to create return requests. Thus, you won’t have to handle these requests manually.
To view or edit all existing rules, go to Admin Panel → Sales → RMA Settings → Return Rules.

On a handy grid, you can see Rules’ Names, active Statuses, Priority and Resolution Periods.
Hit Add New Rule button to create a new return rule.
New Rule
Expand the General Settings tab.
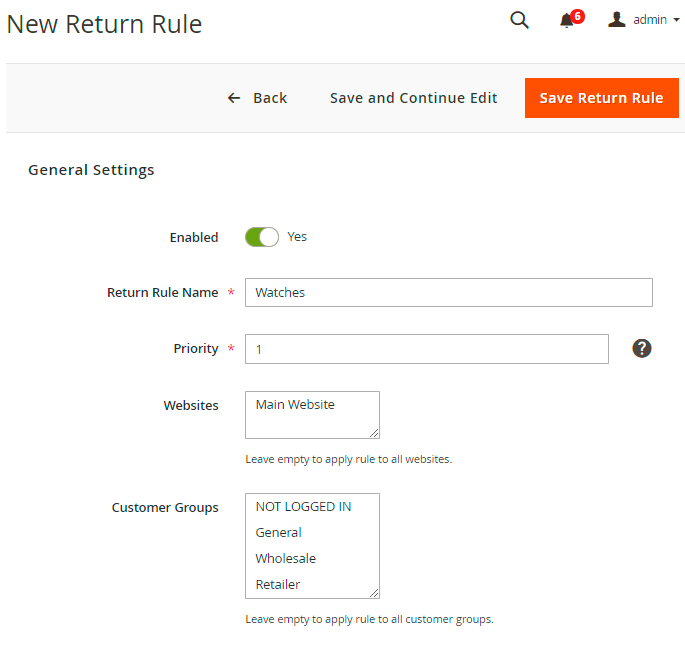
Enabled - set to Yes to activate the rule.
Return Rule Name - specify the name that will be displayed in the backend.
Priority - set the priority of the rule. It is useful in a situation when one particular product fits the conditions of several return rules. In such a case the rule with the highest priority will be applied to the product.
Websites - assign the rule to particular websites if needed.
Customer Groups - select customer groups to which the rule will be applied.
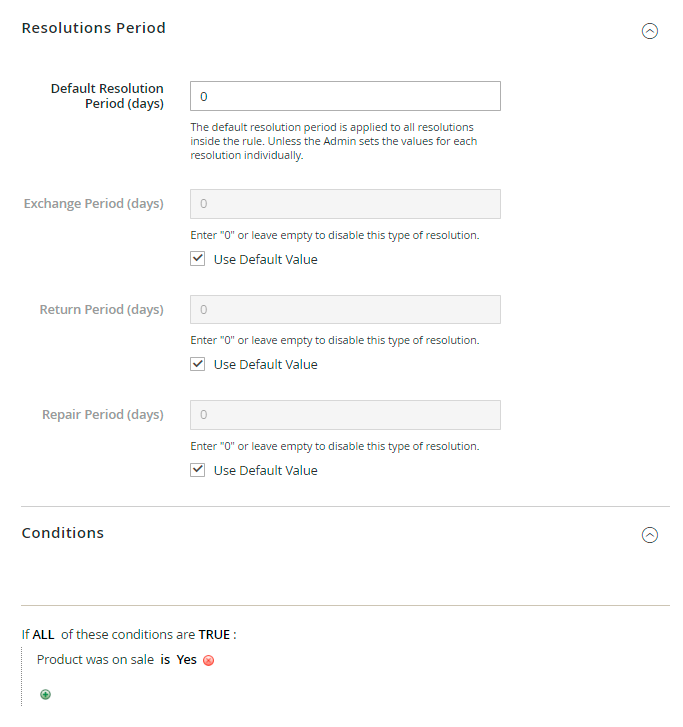
In the next tab specify the period for each resolution you’ve created. The default resolution period is applied to all resolutions inside the rule unless the admin sets the values for each resolution individually.
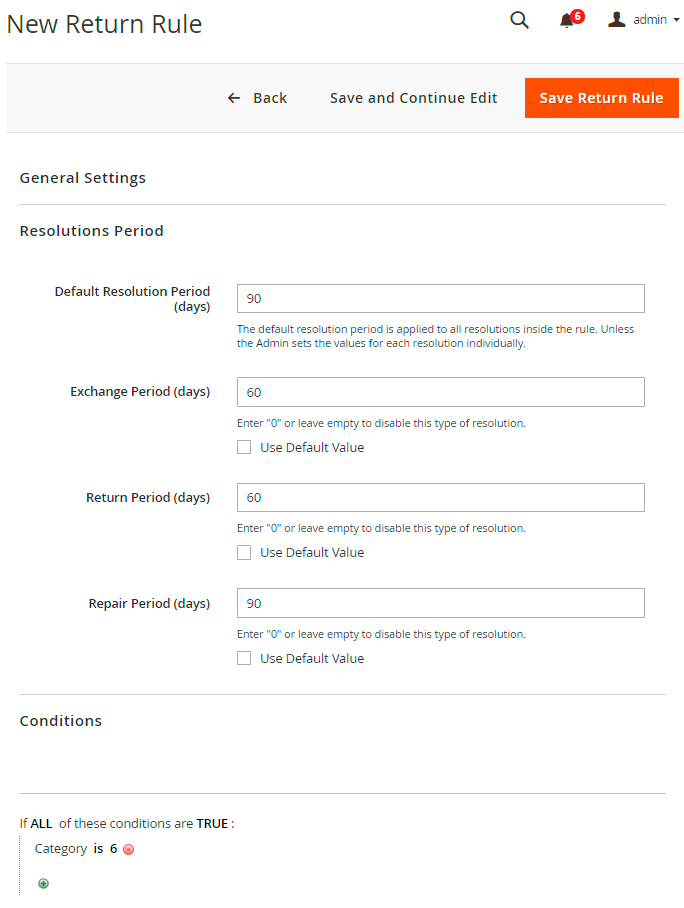
Choose the products to which the rule will be applied using flexible conditions.
To avoid common mistakes while setting the conditions, check this post.
You can also create rules according to which the particular items will be non-returnable. For example, you want to forbid returning products that were on sale. In this case, set the resolution periods to 0 and choose the appropriate condition.
RMA Statuses
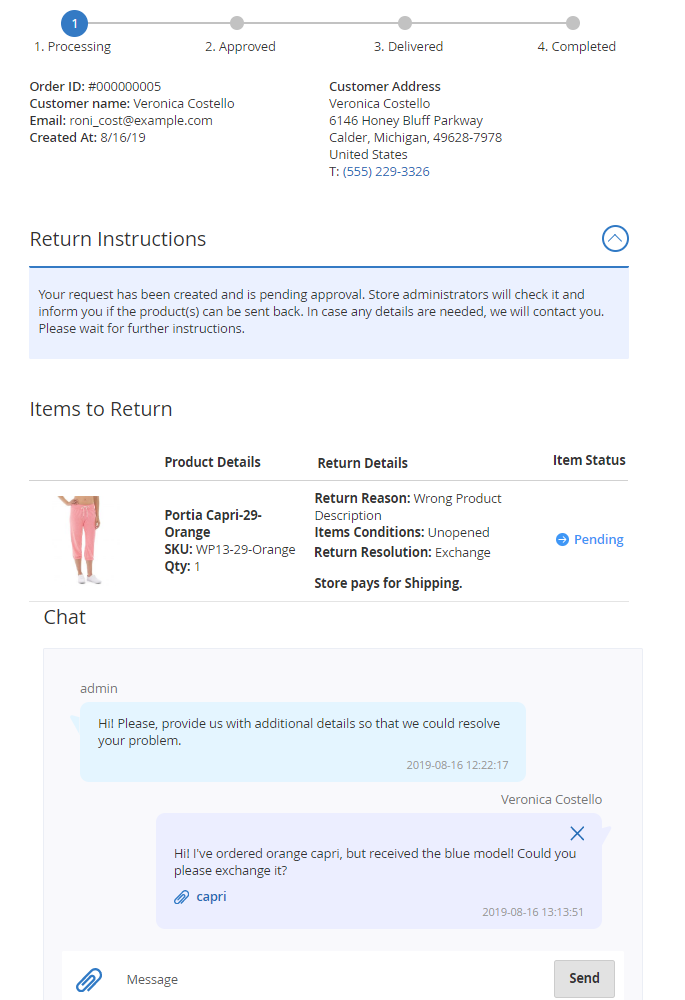
When a return request is created, a customer can easily track the state of the request in his account.
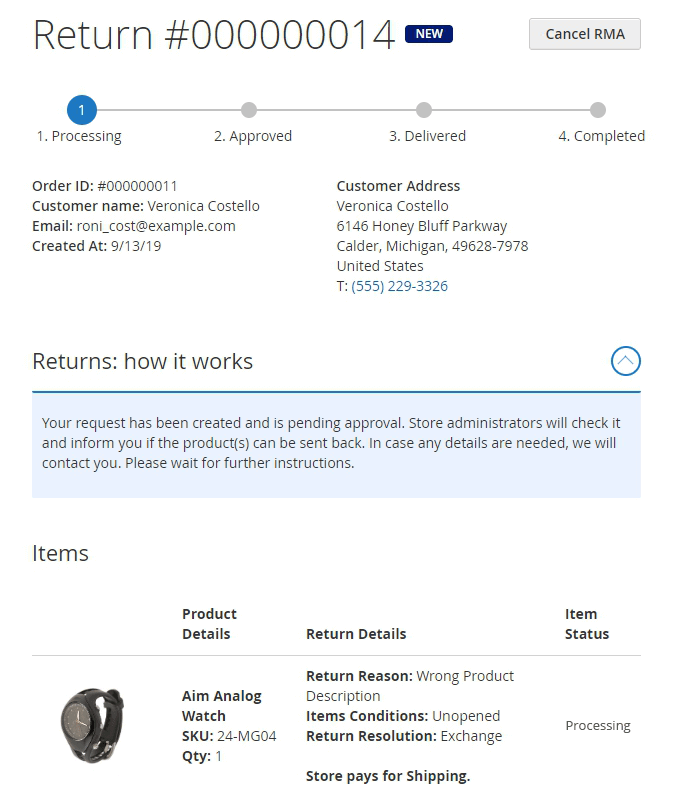
There are 5 possible states: Processing, Approved, Delivered, Completed (these states are displayed in a customer’s progress bar) and Canceled.
Every RMA request usually passes 4 basic statuses:
- Processing - a request is processed by an admin.
- Approved - an admin approves that a customer is allowed to send the item back to the store.
- Delivered - an admin receives the package and checks if everything is OK.
- Completed - an admin resolves the request.
In some cases, a request can be Rejected - an admin rejects the request or a customer cancel it if no longer needed.
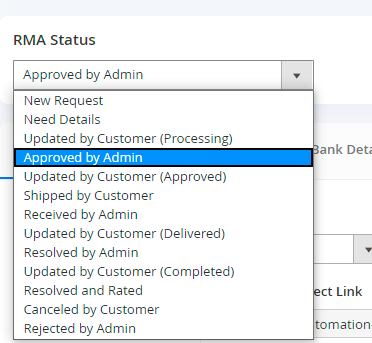
We display the current state of the request to the customer on the progress bar of the request page. But before the request reaches each particular state, it can have several statuses, e.g. ‘Need Details’. With the extension, you can create as many statuses as you need and customize the conditions according to which the request will get to the next state.
To manage all the statuses, please go to Admin Panel → Sales → RMA Settings → RMA Statuses.
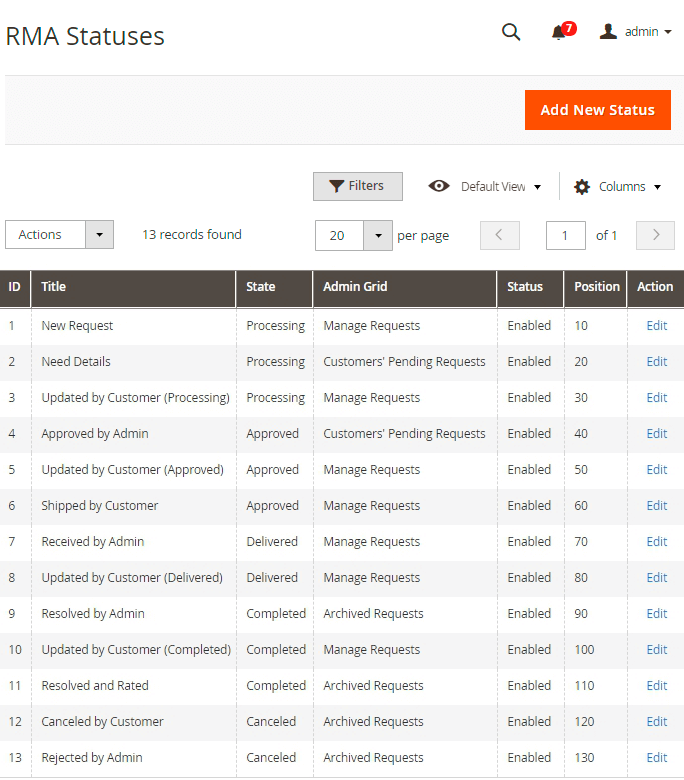
On the grid, all the statuses and their states are displayed. In the Admin Grid column, you can see the grid to which the requests will be moved if they reach the specified status.
Click Add New Status.
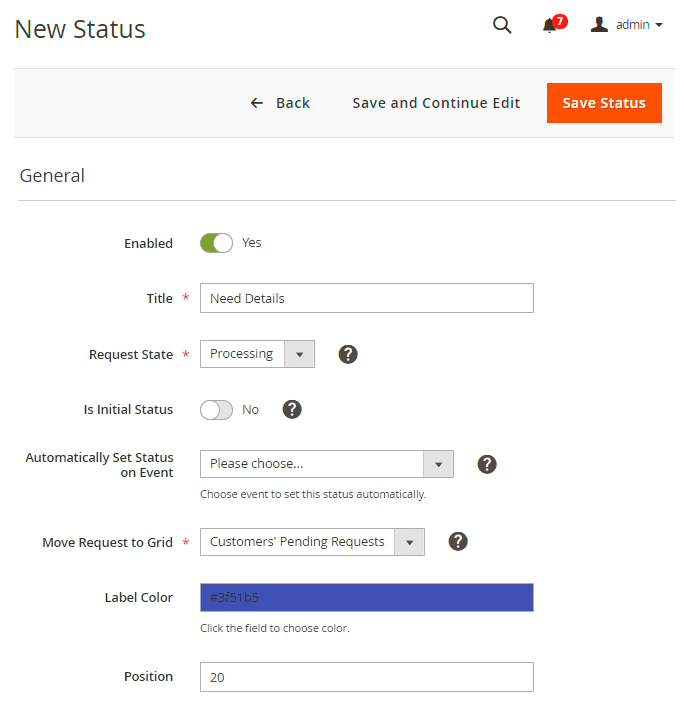
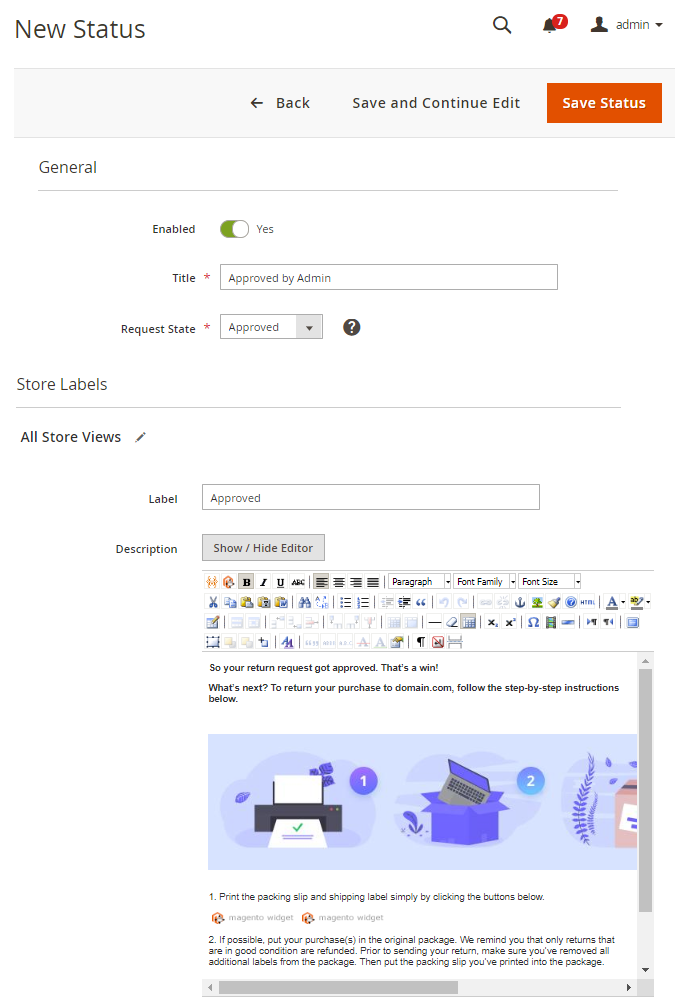
New Status
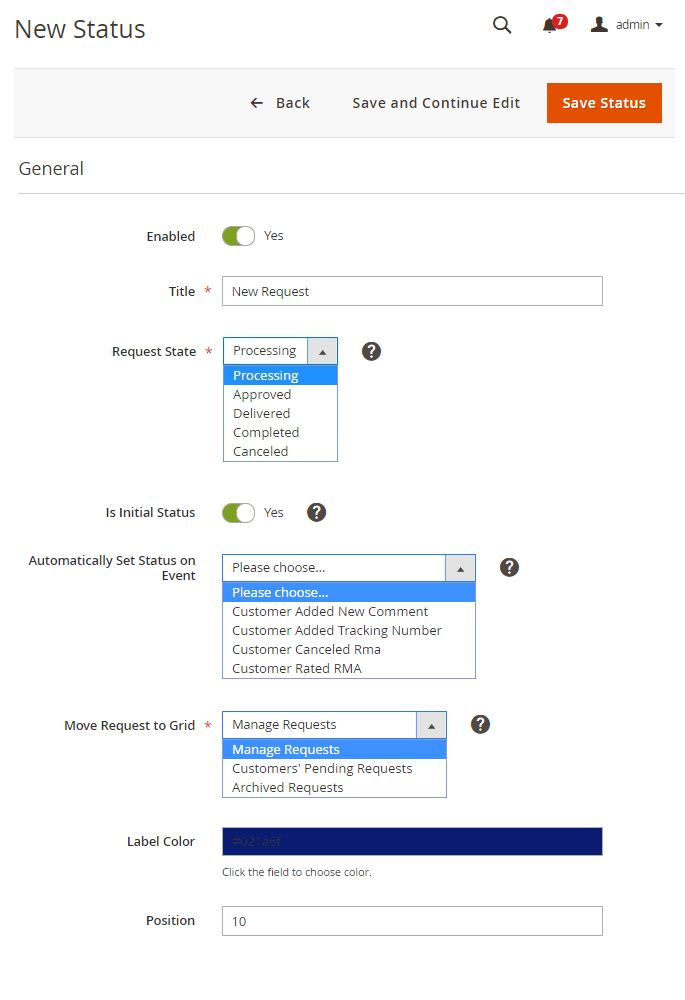
Enable the status.
Title - specify the title of the status that will be displayed in the backend settings.
Request State - assign the necessary request state to the status. An appropriate request state will be displayed on the progress bar on the frontend when the status is set for the request.
Is Initial Status - activate this option if you want to automatically assign all new requests to this status. Please mind that there can be only one initial status.
Automatically Set Status on Event - when a customer performs the selected action in his RMA request, the status of the request is automatically updated to the current one.
Move Request to Grid - when a request switches to the current status, it is moved to the grid selected in this option. Thus, an admin can create a comfortable for him workspace by removing all unnecessary requests from the particular grid or placing requests that need admin actions to the separate ‘Manage Requests’ grid. This kind of workflow allows to save admins’ time and effort since they can see all the requests they need to approve on a separate grid.
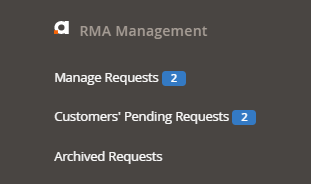
There are 3 available grids:
- Manage Requests grid - all the requests that need admin actions are placed here.
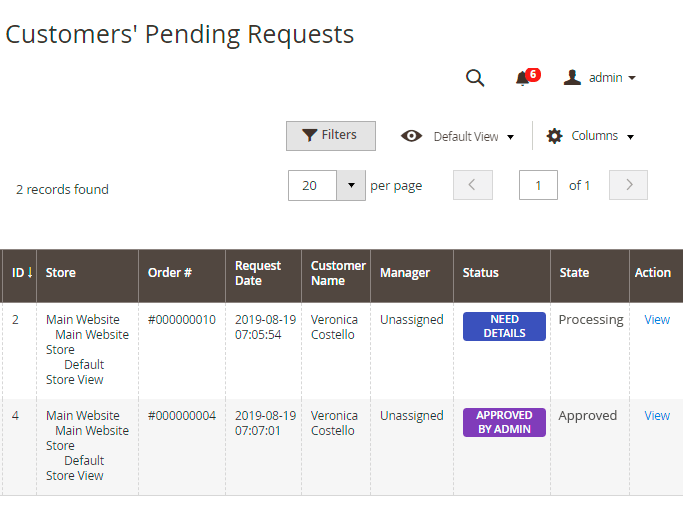
- Customers’ Pending Requests - the requests that need some details or action from a customer are moved to this grid.
- Archived Requests - the requests that are resolved or rejected and do not need any actions from both admins and users are placed here.
Label Color - choose the color for the state to simplify its processing. Click the field to use a handy color-picker tool.
Position - set the position of the status among the other statuses.
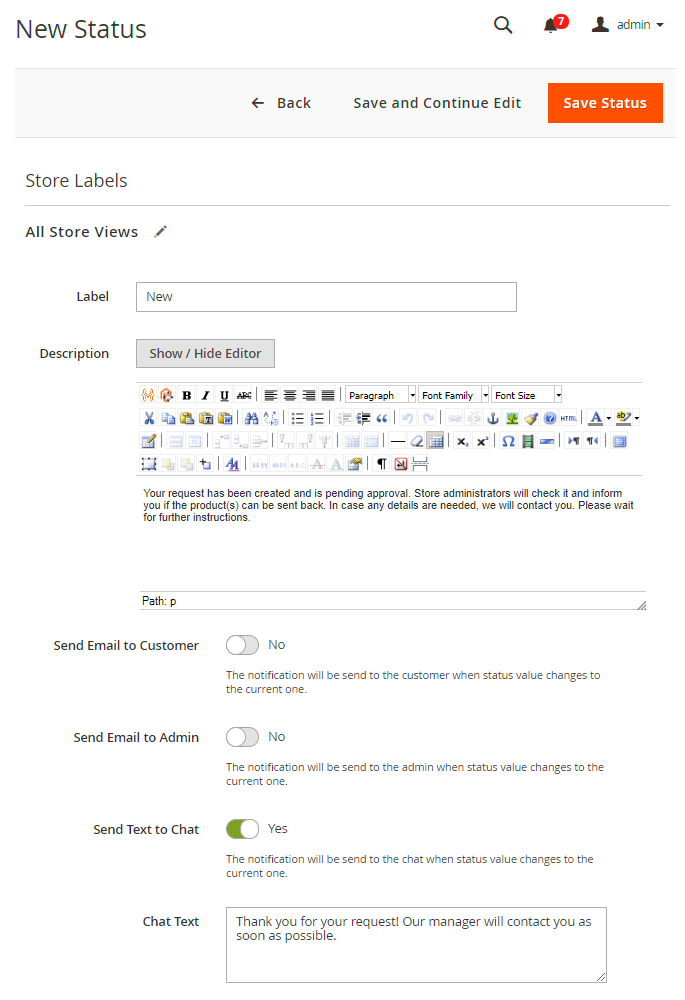
Label - customize the title of the status that will be shown to a customer in his account.
Description - in the description field you can specify the instructions for customers concerning the current state. These instructions will make each step of the RMA process extremely clear.
Send Email to Customer - enable this option if you want the notification to be sent to the customer when status value changes to the current one.
Send Email to Admin - activate this option if you want the notification to be sent to the admin when the status value changes to the current one.
Send Text to Chat - set to Yes if you want the notification to be sent to the chat when status value changes to the current one.
Chat Text - if enabled, fill in the text that will be sent.
Save the status.
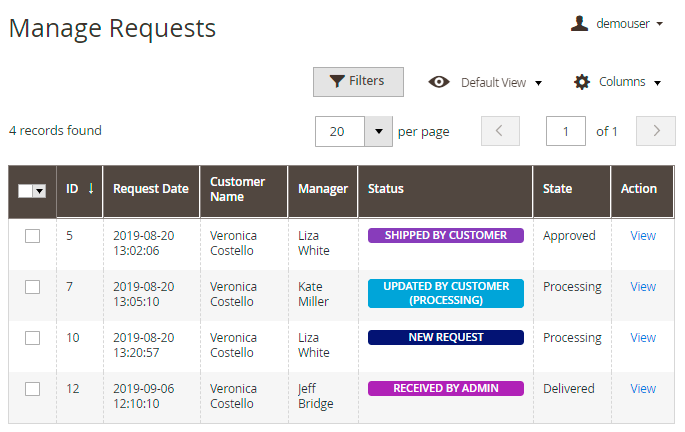
How do the statuses work?
Let’s see how statuses are changing during processing. According to our default settings, all new requests are displayed on the Manage Requests grid with a New Request status.
An admin clicks this new request to approve it.
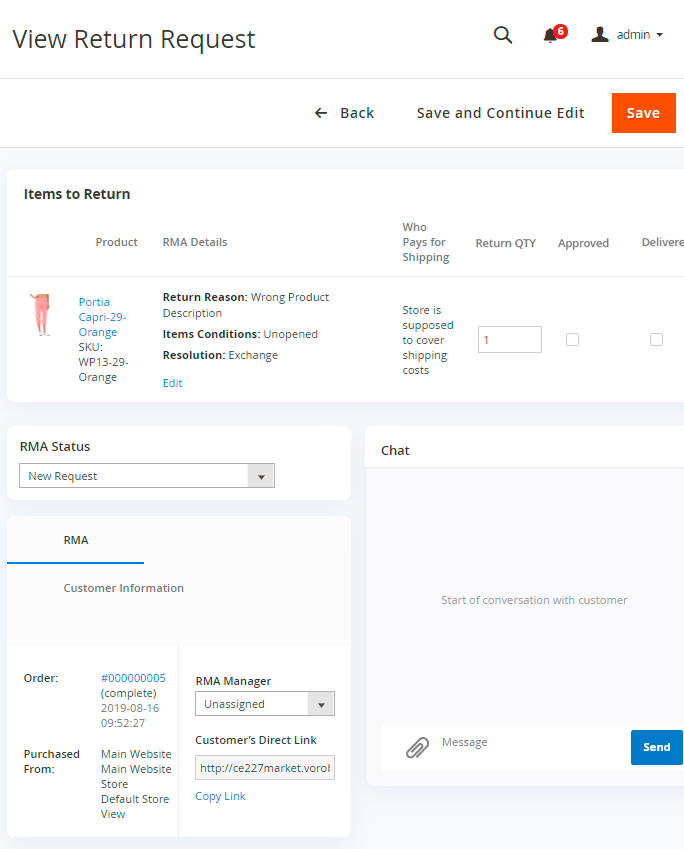
Here we see that a customer didn’t attach any files and did not specify the request details. So an admin changes the status to ‘Need Details’ and sends the message to a customer.
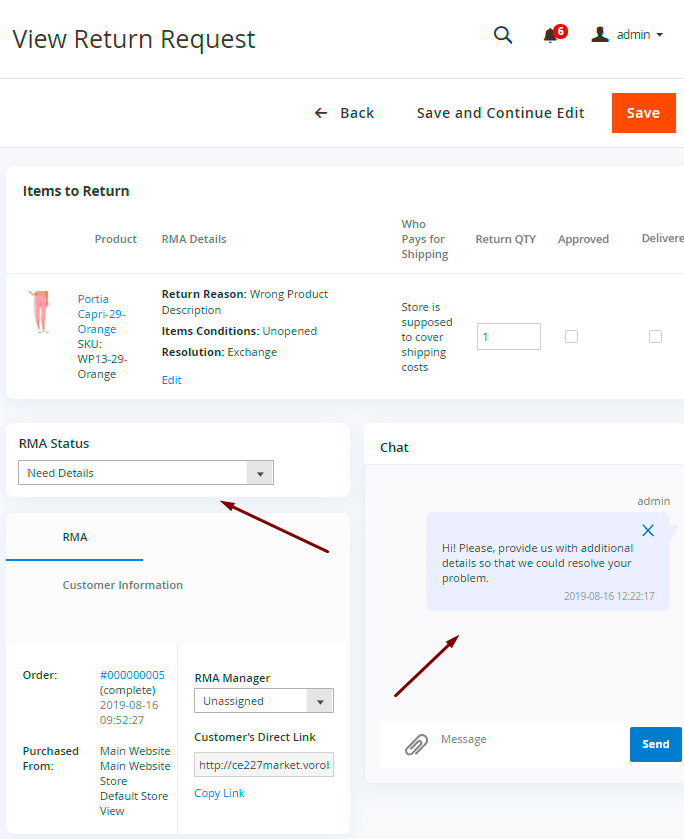
You may use the direct link if you want to share it.

According to the settings, the ‘Need Details’ status still remains in the Pending state, but the request is to be moved to the ‘Customers’ Pending Requests’ grid.
Thus, the request is moved to another grid with the specified status.
A customer sees that he needs to provide the details and updates the info using the chat.
An admin can also attach files to RMA request that were created from the admin panel.
The request automatically moves to the ‘Manage Requests’ grid with an updated status.
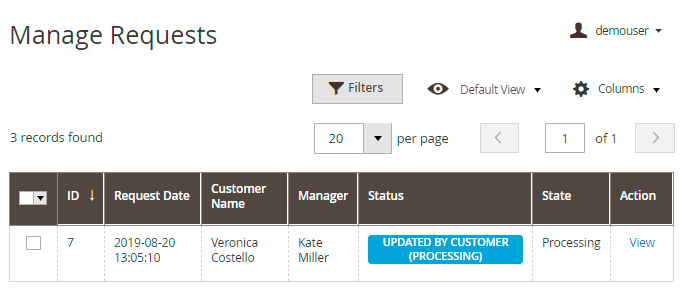
The status changes according to the action performed by a customer. In our case, if a customer adds a comment, the status is changed to ‘Updated by Customer’.

An admin again opens the request, sees the details and decides what to do further: approve it, reject or ask for other details.
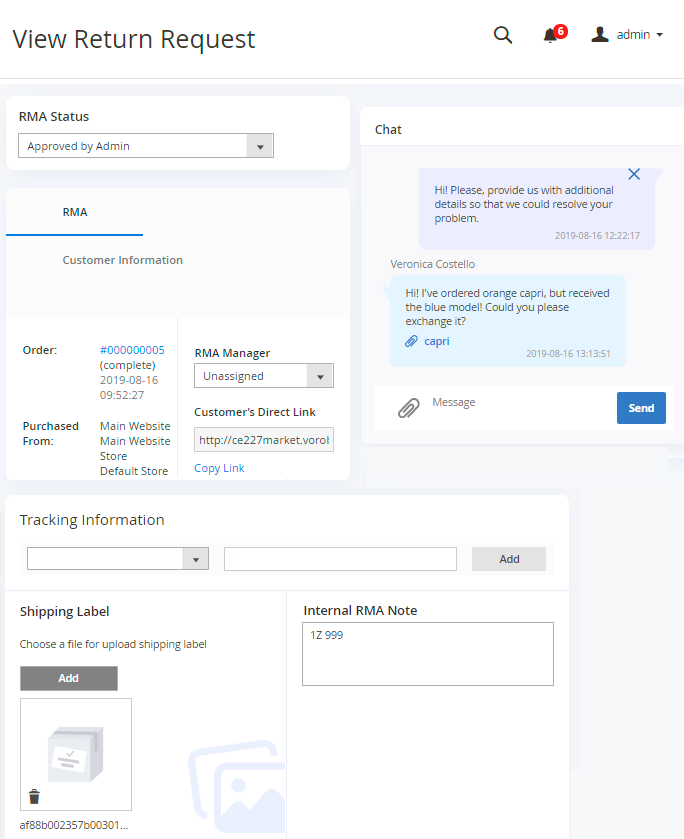
Here an admin approves the request. If the store is supposed to pay for shipping, an admin adds tracking information and attaches the shipping label. The state is changed in the progress bar and a customer can see further instructions.
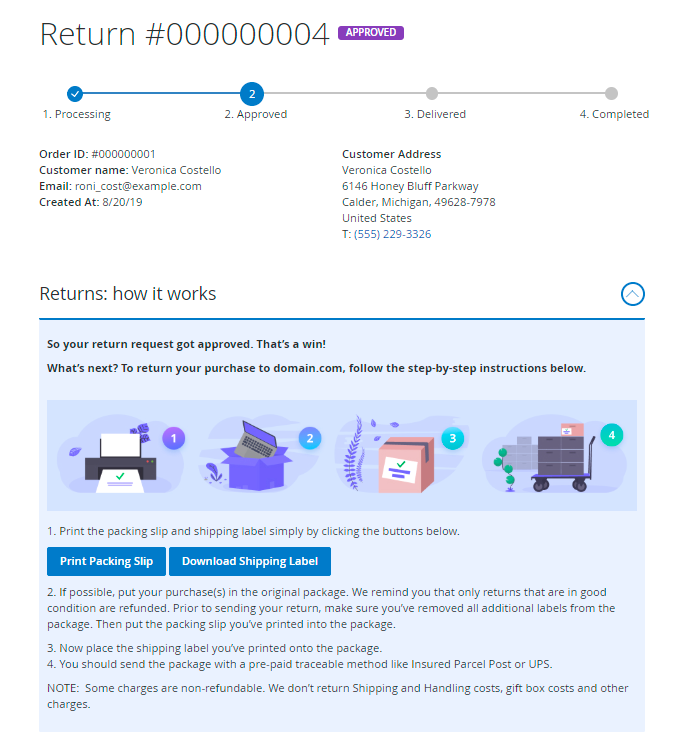
The instructions are added during a new status creation with the WYSIWYG editor.
In addition to this, you can add special widgets that are necessary for advanced RMA process: Shipping Label Button and Packing Slip Button.
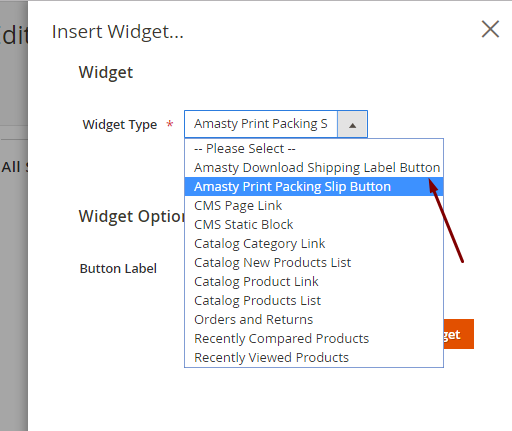
Shipping Label allows improving the customers shopping experience in cases when a store is supposed to pay for shipping. A user just needs to press the button and download a shipping label. Packing Slip is also generated automatically to make the shipping process even easier for a customer.
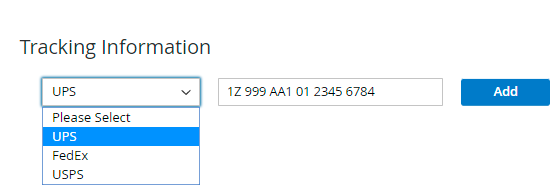
If a customer is supposed to pay for shipping, he should add tracking numbers by himself.
When a product is shipped, an admin sees the Received state and resolve the request according to return rules and chosen resolution.
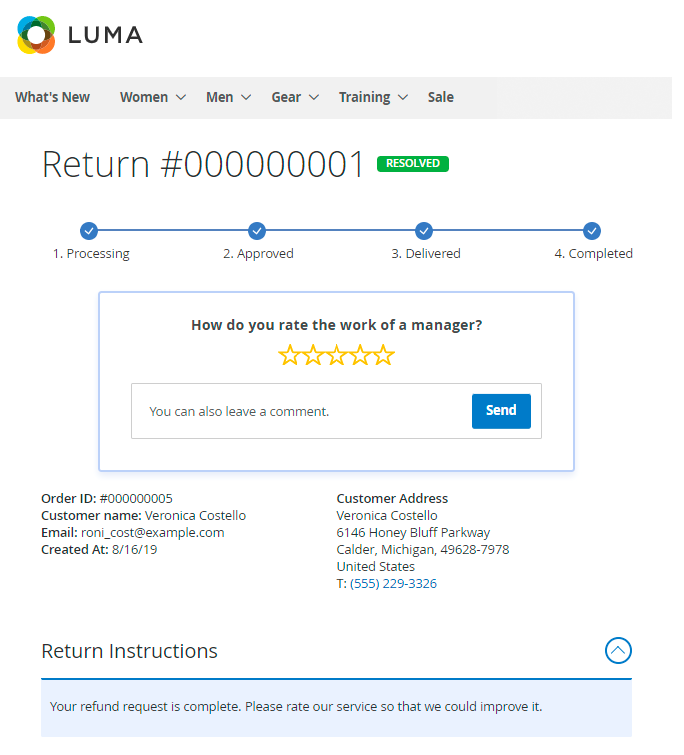
A customer checks the state in the account and rates the work of a manager so that an admin could analyze and improve RMA processing.
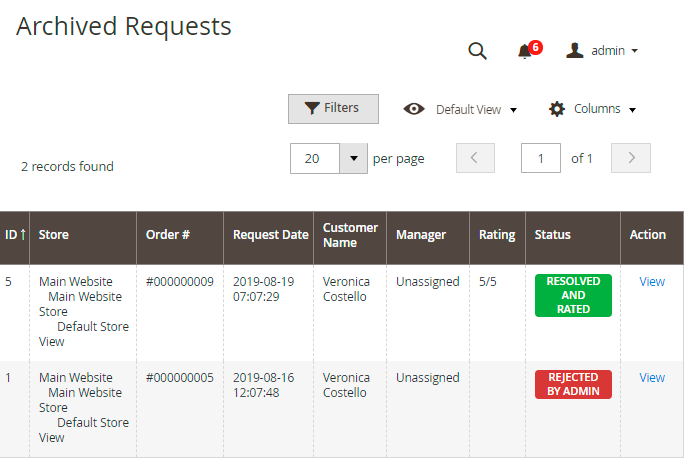
All completed requests are moved to the Archive Requests grid where you can see their Dates, Managers, Rating, and Statuses.
Creating a New Order
You can create a new order based on a return request right from the View Return Request page.
Just click the New Order button.

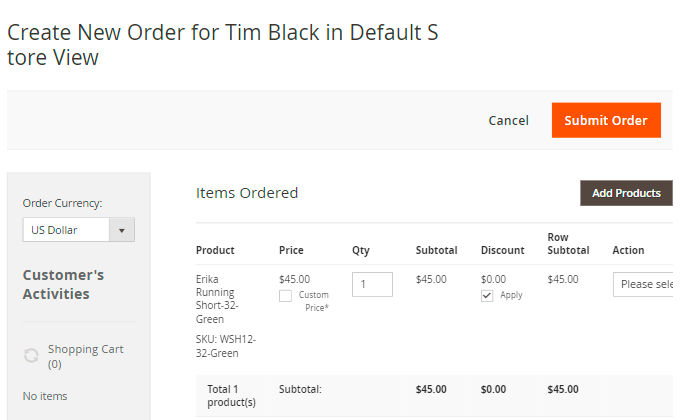
You will be redirected to the order creation page. All data provided in the return request will remain. Change the required parameters and hit the Submit Order button.
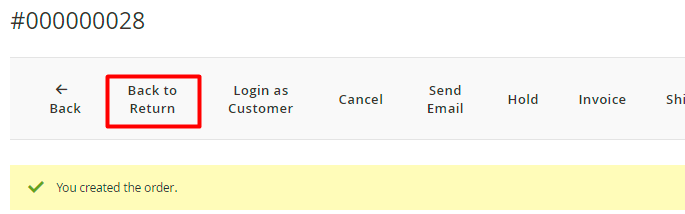
A new order is created. You can go back to return management from this page.
Configuration
To adjust the basic RMA setting, go to Admin Panel → Stores → Configuration → RMA.
Expand the General tab.
General Settings

Module Enabled - select Yes to enable the extension.
URL Prefix - specify the prefix that will be used for a route name.
Example for the registered customers:
{base_store_url}/{URL prefix}/account/view/request/
For guests:
{base_store_url}/{URL prefix}/guest/login/

Allow Guest RMA - choose Yes if you want to allow your guest visitors to submit return requests as well.
Confine Guest RMA to the Current Store View - when enabled, guests are only allowed to create RMA requests for orders made from the current store view. RMA for orders from other store views will not be available.
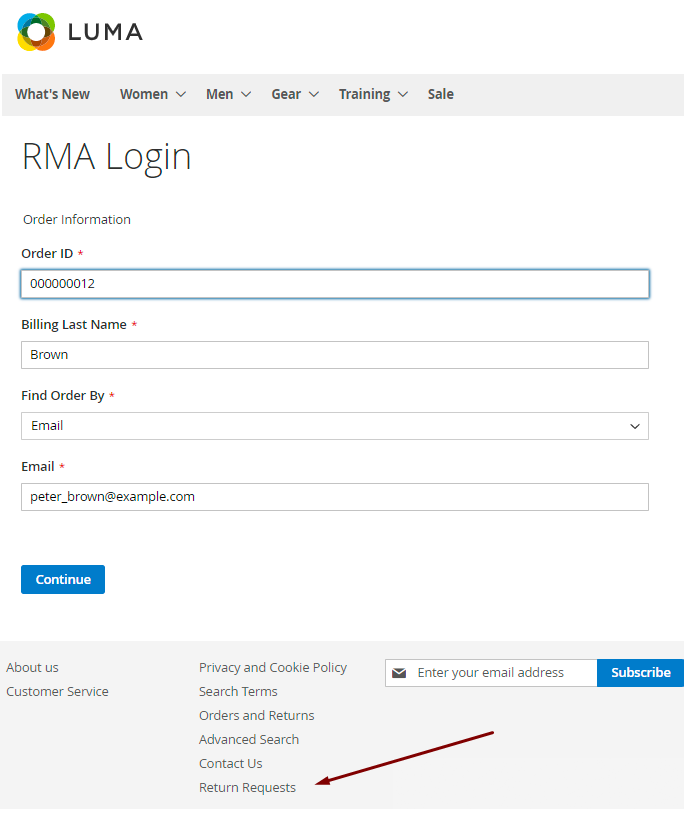
Hide Billing Last Name from Guest RMA Form – set to Yes if you want to hide the Billing Last Name field on the RMA form, allowing guests to submit RMA requests using only the order ID and customer email or zip code.
Allowed Order Statuses for RMA - select order statuses for which RMA will be allowed.
This is how RMA looks like for a guest visitor (with the Hide Billing Last Name from Guest RMA Form enabled):
Please, note that RMA request can not be created for orders without shipped item(s)

Display Return Information on Product Page - if Yes, resolution periods (in days) will be displayed on product details pages in the ‘More Information’ tab.
Display Return Information on Shopping Cart Page - if Yes, resolution periods (in days) will be displayed for each product in the shopping cart.
Ask Customers to Leave Feedback - set Yes to provide your customers with the ability to leave feedback, or just set No to disable 'How do you rate the work of a manager' pop-up.
If enabled customers will see the 'How do you rate the work of a manager' pop-up in the request after it changes its State to 'Completed'. The feedback consists of the rating stars and text. The rating can be later seen and used in the filter on the 'Archived Requests' grid. As well as it is used in the RMA Reports Add-on.
Max Message Attachment File Size (KB) - limit the size of allowed attachments if needed.
RMA Policy
With the extension, you can create your own return policy and display it to customers to make your RMA maximally clear.
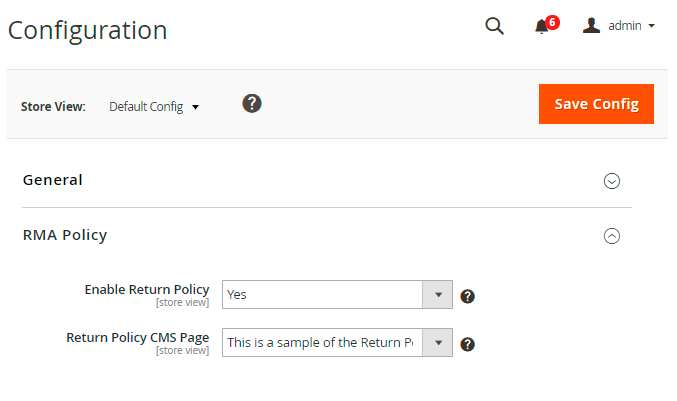
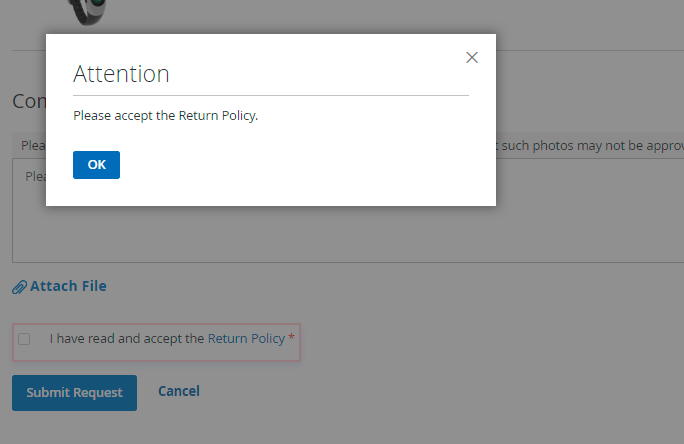
Enable Return Policy - if Yes, a customer will have to accept the Return Policy before submitting a Return Request.
Return Policy CMS Page - select the CMS magento orders and returns page to redirect your customers to.
The example of RMA Policy on the frontend:
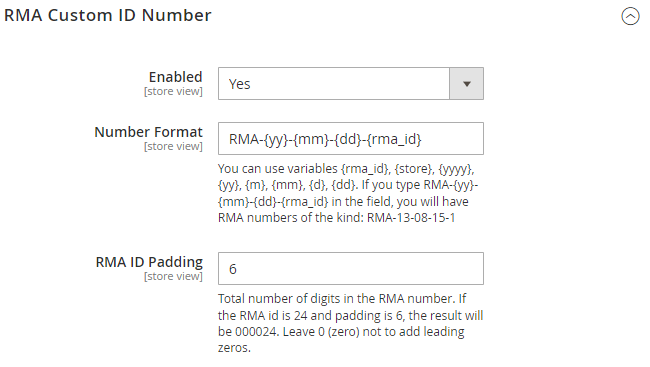
RMA Custom ID Number (PRO and PREMIUM)
In the RMA Custom ID Number tab, you can customize the display of RMA request numbers.
Please note that the RMA Custom ID Number functionality is available only as a part of an active product subscription or support subscription for RMA Pro and RMA Premium extension versions.
Enable - set to Yes to customize the RMA request numbers.
If enabled, the customized RMA request numbers will be displayed on the Manage Requests grid, Customers' Pending Requests grid, Archived Requests grid, in the customer account (My Returns tab), and in emails.
Number Format - specify the RMA number format to replace the default format.
To ensure the uniqueness of the RMA request numbers, consider using various variables. Please refer to this list to find the necessary ones:
- {rma_id} for RMA ID;
- {store} for store ID;
- {yyyy} for full year display;
- {yy} for shortened year display;
- {m} for short month display;
- {mm} for full month display;
- {d} for short day display;
- {dd} for full day display.
For instance, if RMA-{yy}-{mm}-{dd}-{rma_id} is specified in the Number Format field, you will have RMA numbers of the kind: RMA-13-08-15-1.
RMA ID Padding - specify the total number of digits in the RMA ID number. If you want all RMA ID numbers to have 6 digits, set the padding to 6. For example, if the RMA ID is 24 and the padding is 6, the result will be '000024.' Leave it as '0' (zero) to avoid adding leading zeros.
Shipping
Expand this tab to adjust the carriers that will be available for a customer to be selected while attaching a Tracking Number to the RMA Request.
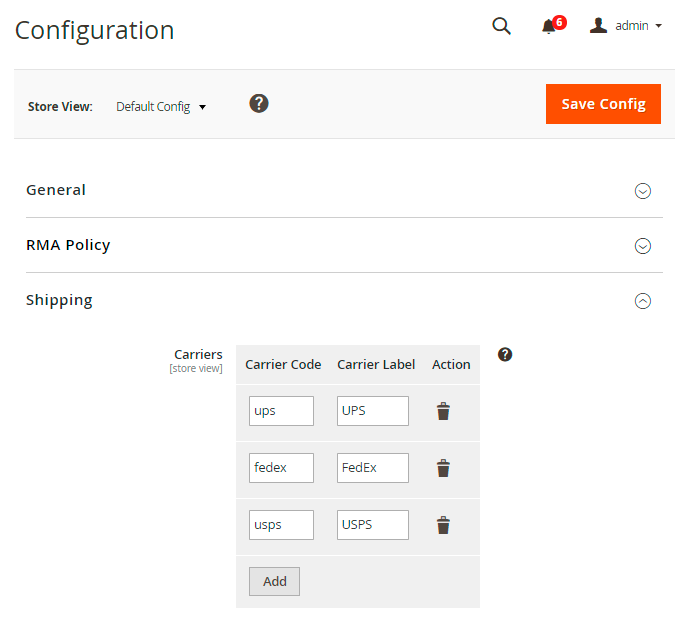
Specify a Carrier Code and a Carrier Label.
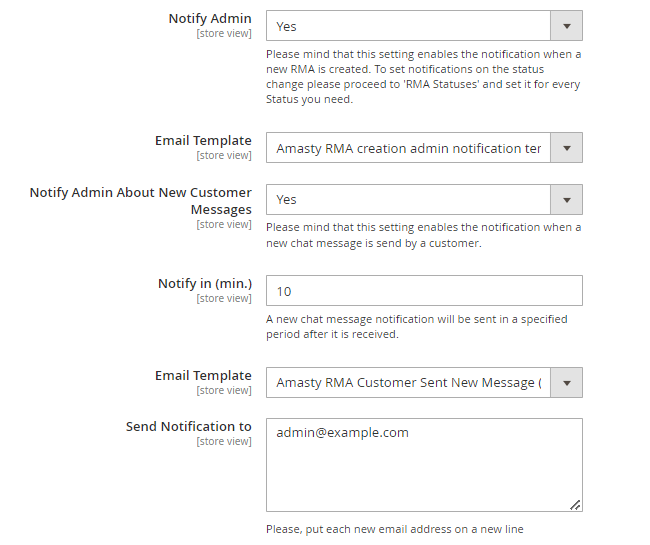
RMA Creation Email Notifications
Using this tab, you can notify both customers and your RMA managers about new requests. In addition to this, you may enable notifications for customers in cases when a manager created a new message without changing the status.

Registered customers will be automatically logged in if they follow the link specified in the email about the RMA request.
Specify Email Senders, and Receivers (for managers) and choose Email Templates according to which the emails will be generated.
Please, keep in mind that Notify Customer About New Manager Messages If Status Didn't Change email will be sent only after saving the return request.
When the Notify Admin About New Customer Messages setting is enabled, administrators will receive notifications if a new chat message is sent by a customer. Additionally, it is possible to specify a specific time period (in min.) after which a notification for a received new chat message will be sent.
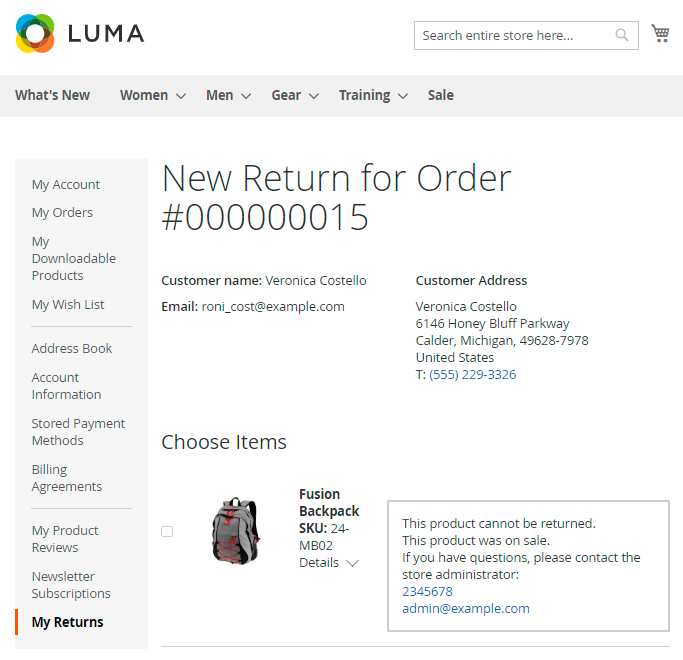
Administrator Contact Data
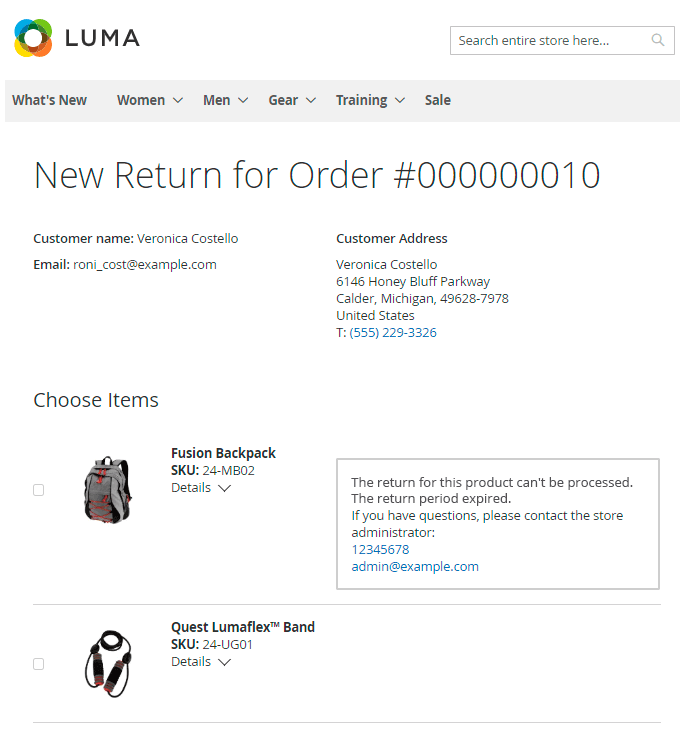
You can use this tab to display administrator contacts in case an item couldn’t be returned according to the return rules.

A customer will see the following message:
Custom Fields
It is also possible to create additional fields that a customer will have to fill in while creating a new request.
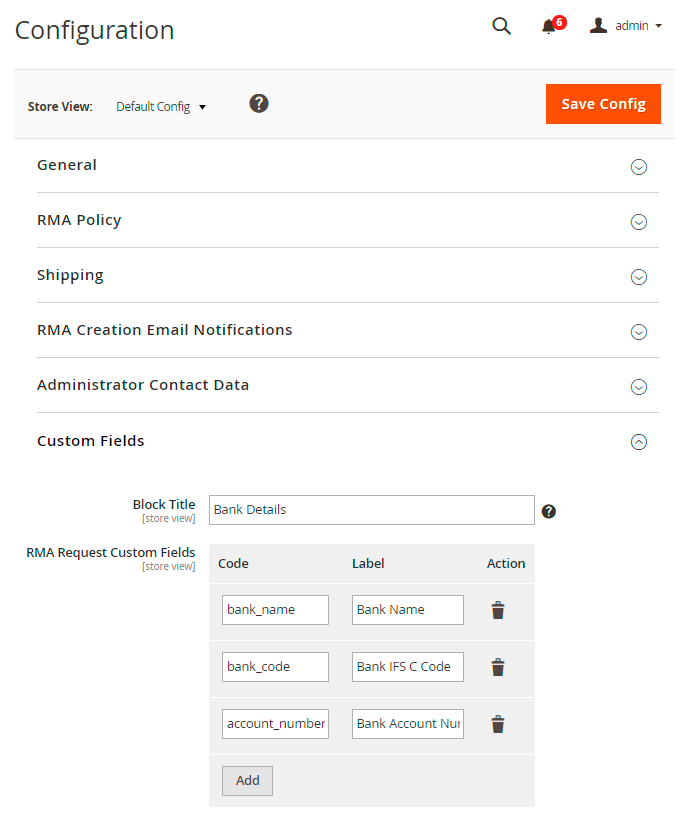
The Block Title field is responsible for the name of the block with the custom text fields. Also, specify fields’ codes and labels.
Chat Quick Replies
In this field, you can prepare quick replies and use them while managing return requests. It allows to save managers’ time and automate RMA processing even more.
Enable Chat on the Frontend - choose whether you want to enable or disable chat on the frontend.
Please note that even if you disable chat on the frontend in general settings, you'd be still able to see this chat on the backend. Thus, your customers won't be able to communicate with you until you enable the chat again.
In case your customers have their email notifications enabled, then they would get your comments from the chat on their email even though the chat is disabled on the frontend.

Hit the Save Config button.
RMA Export (PRO and PREMIUM)
The extension includes a part of Export Orders solution. It means that you can export any RMA requests using the simplified export UI.
Navigate to System → Amasty Export → Export.
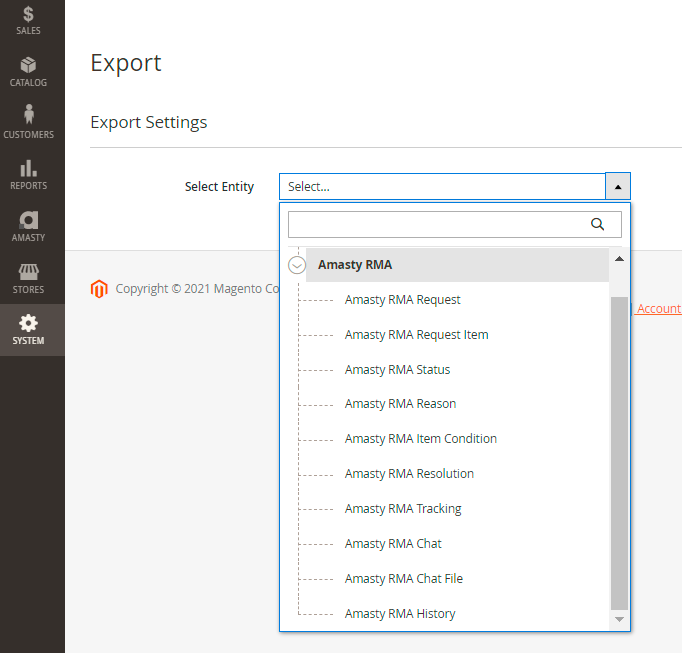
Choose the required entity and configure export settings.
Main features you can use:
- Choose 1 of 6 available file types (CSV, XML, ODS, XLSX, JSON, Template)
- Specify output option (Store Exported File On Server, Upload Exported File By FTP / SFTP, Send Exported File to E-mail, Send to Rest Api Endpoint)
- Configure export fields and their namings
- Filter requests by any parameter (managers, request statuses, rating, etc.)
Check the details of each tab configuration in this guide.
RMA Import (PRO and PREMIUM)
It is also possible to import any RMA entities using the convenient import UI.
Please note that compatibility with the Amasty Import Orders extension is available for RMA Pro and Premium versions as part of an active product subscription or support subscription.
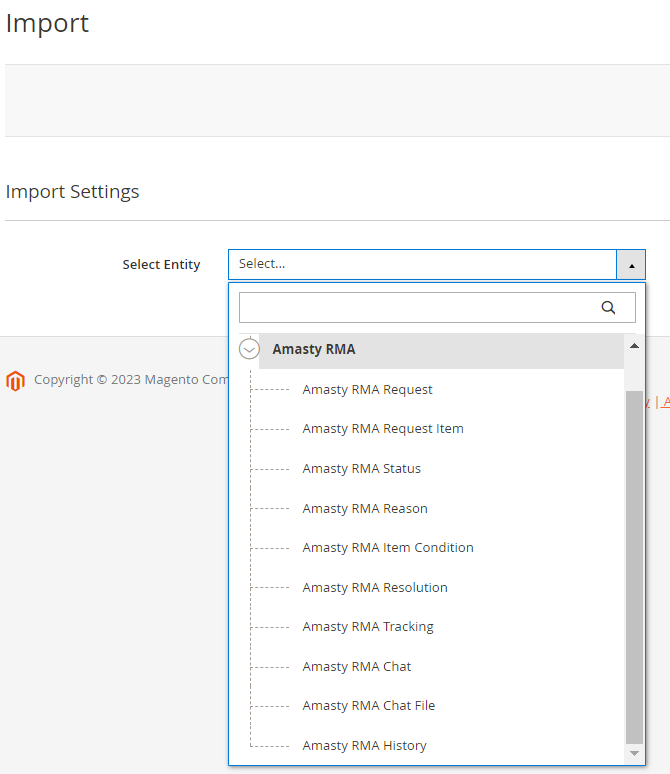
Go to System → Amasty Import → Import
Select the required entity and configure import settings (import behavior, import file type, import source, etc.).
Check the details of each tab configuration in this in this guide.
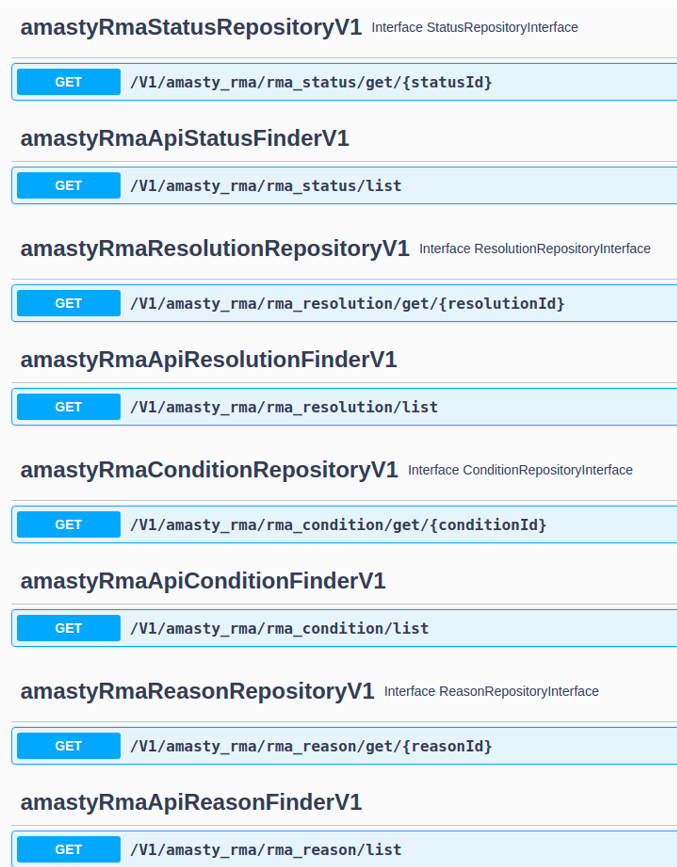
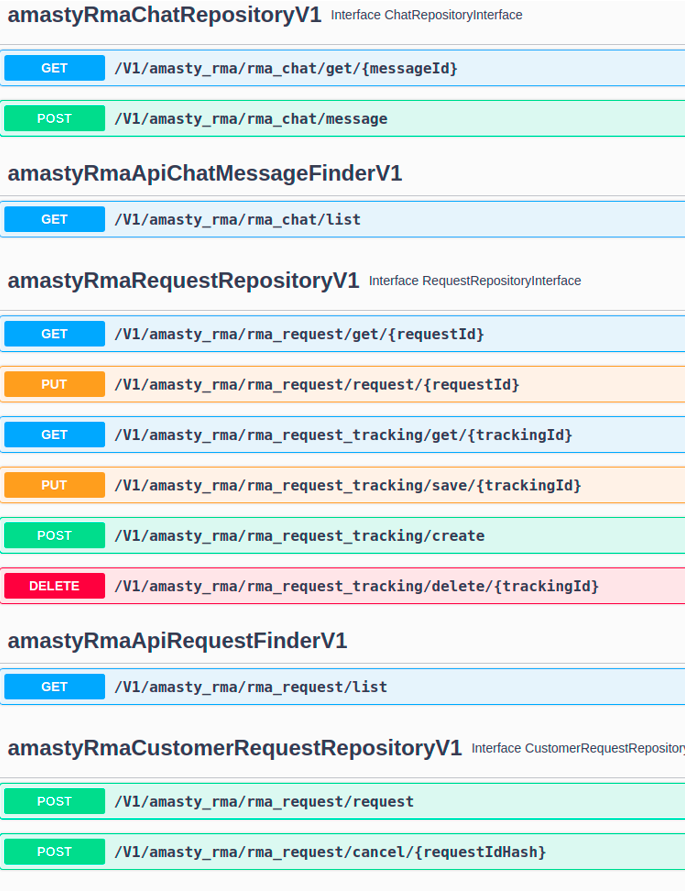
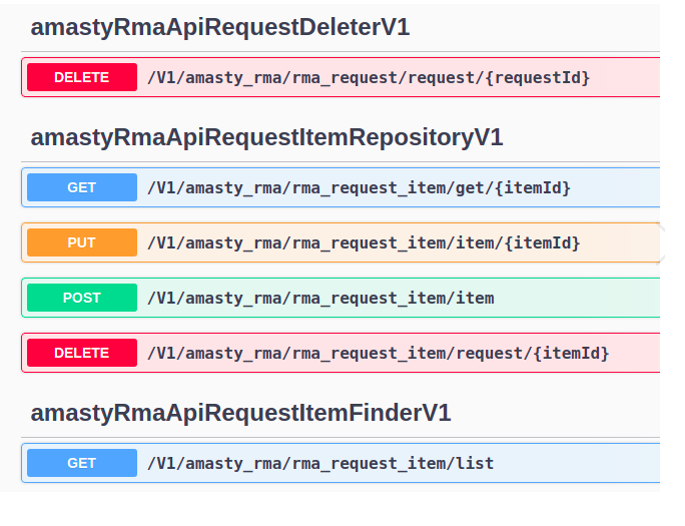
API Integration (PRO and PREMIUM)
The Pro and Premium extension versions include API support. Store admins may use the following methods:
GraphQL Compatibility
The extension is compatible with GraphQL (read + write). Here is an example of the implementation via Graphql. Follow the steps below:
1. Create return request
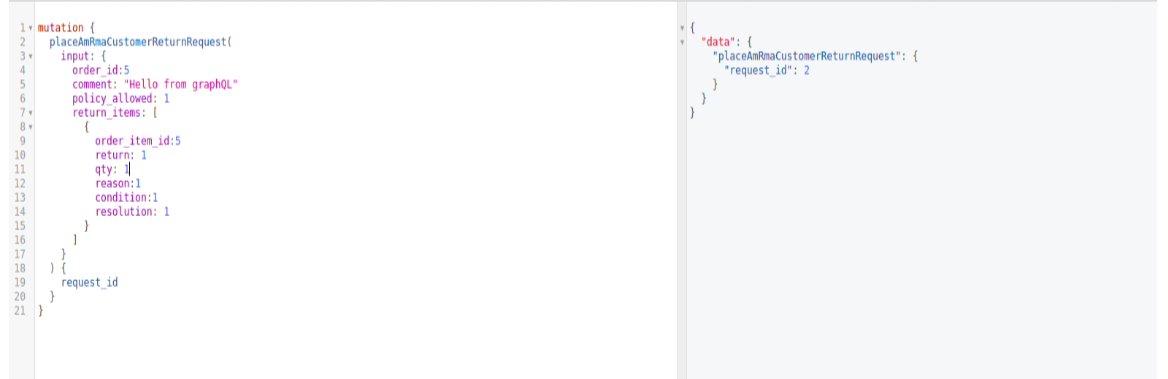
mutation {
  placeAmRmaCustomerReturnRequest(
    input: {
      order_id: “Your order ID”
      comment: "Rour return comment"
      policy_allowed: 1
      return_items: [
        {
          order_item_id:”Order item ID for return”
          return: 1
          qty: "Return qty"
          reason:"Return reason ID"
          condition:"Return condition ID"
          resolution: "Return resolution ID"
        }
      ]
    }
  ) {
    request_id
  }
}
2. See all return requests for customer

{
  customer {
    amrma_returns {
      items {
        request_id
        url_hash
	order_id
	store_id
	created_at
	modified_at
	status
	customer_id
	customer_name
	manager_id
	custom_fields
	rating
	rating_comment
	note
	tracking_numbers
	shipping_label
        status {
          color
          label
        }
        request_items {
	  request_item_id
	  request_id
	  reason_id
	  condition_id
	  resolution_id
          order_item_id
          qty
          item_status
          request_qty
        }
      }
      page_info {
        page_size
        current_page
        total_pages
      }
      total_count
    }
  }
}
3. See all reasons/conditions/resolutions

{
  getAmRmaSettings {
    isEnabled
    isChatEnabled,
    isReturnPolicyEnabled
    isShowRmaInfoProductPage
    isShowAdministratorContact
    administratorPhoneNumber
    administratorEmail
    policyUrl
    urlPrefix
    allReasons {
      reason_id
      label
      payer
      position
    }
    allConditions {
      condition_id
      label
      payer
      position
    }
    allResolutions {
      resolution_id
      label
      status
      position
    }
  }
}
4. Displaying the return status of the product on the product page
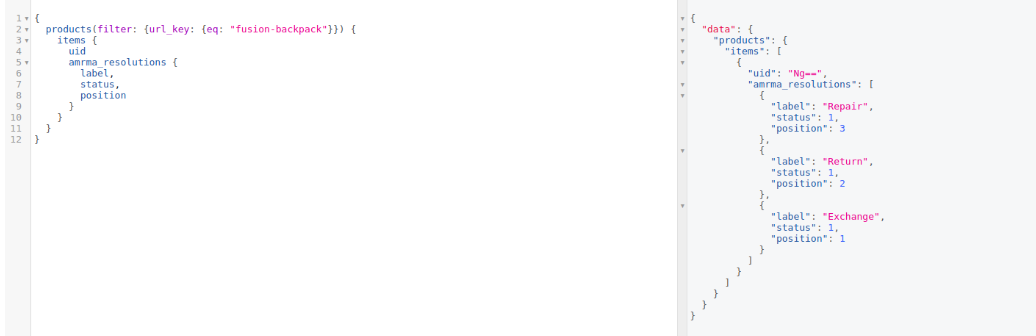
{
  products(filter: {url_key: {eq: "fusion-backpack"}}) {
    items {
      uid
      amrma_resolutions {
        label,
        status,
        position
      }
    }
  }
}
RMA Shipping Labels (Add-On)
If a store is supposed to cover shipping costs, an admin needs to pay for shipments beforehand. To simplify this process, you may generate shipping labels automatically and improve customer shopping experience with fast shipment processing.
The feature can be enabled only after purchasing the Shipping Labels for RMA Add-On and available for UPS, DHL and FedEx shipping carriers.
General Configuration
First of all, you need to set the address according to which shipping cost will be calculated by a carrier.
Navigate to Stores → Configuration → Amasty Extensions → RMA Automatic Shipping Label.

Here you can choose between:
- General store address
- Shipping origin address
- Custom address
If you choose Custom Address, specify the address details in the appropriate fields.
Shipping Carriers
On the next step, you need to enable labels generation for particular carriers.
Go to Stores → Configuration → Sales → Shipping Methods.
Expand the necessary carrier.
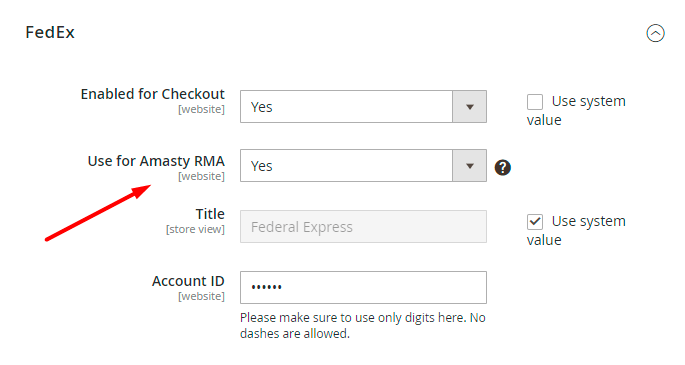
Use for Amasty RMA - if enabled, the current shipping method will be used for shipping label generation.
Labels Generation
To create a shipping label, navigate to a particular return request page. Scroll down to the Tracking Information section.
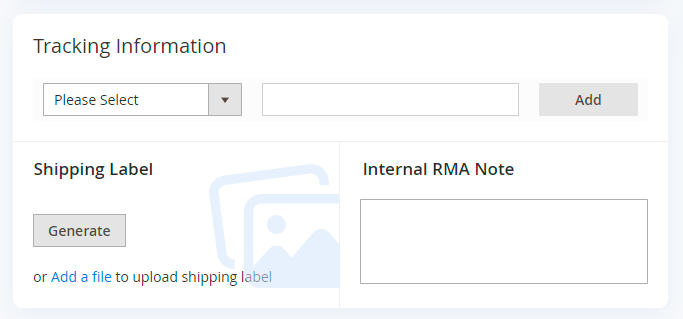
Keep in mind that automatic label generation is available for Approved return requests only:
Also, you can generate a label only for the Approved items as well:
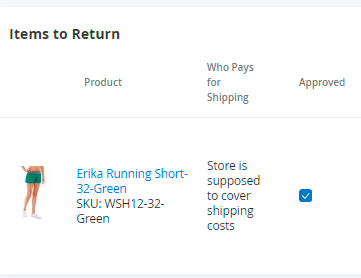
If an item is in a Rejected or Procesing status, you are not able to add this item to the package.
Click the Generate button.
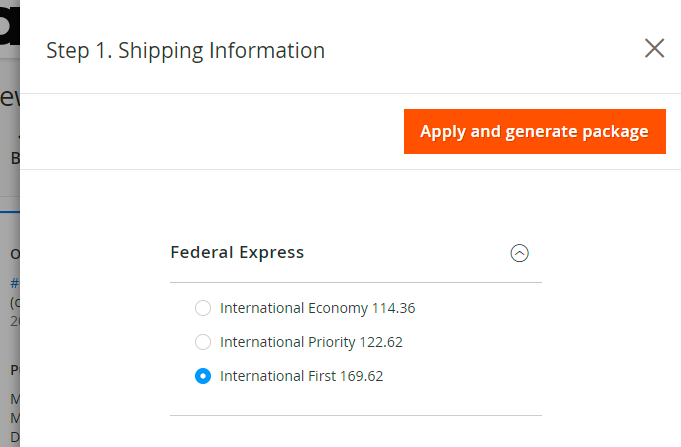
In the appeared popup select the necessary shipping carrier and its option. Click Apply and generate package.
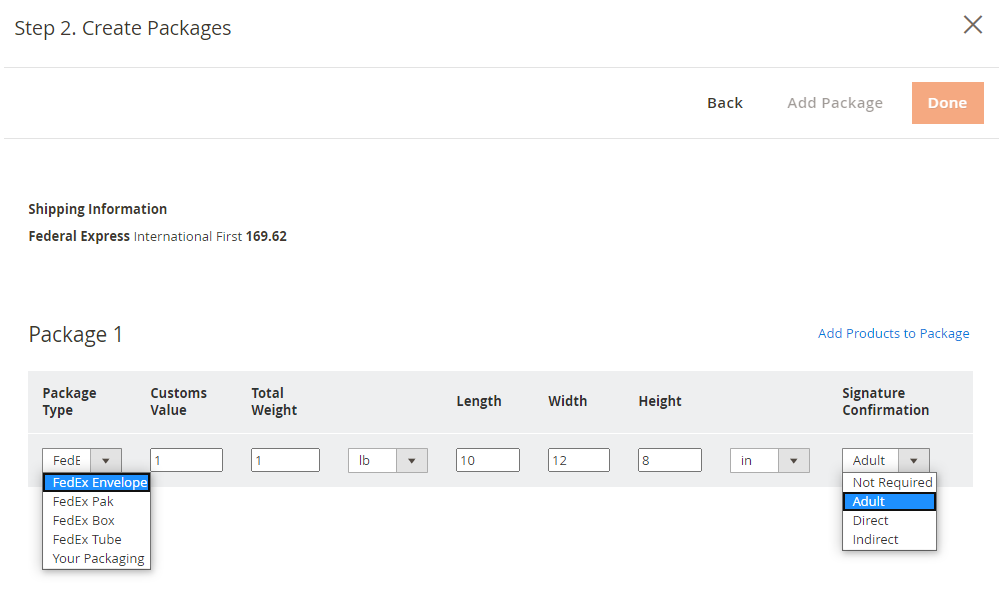
Here specify package options that are obligatory for a particular carrier and method.
Find out more about carriers and their requirements here.
Next, add the products that will be sent in the package by clicking Add Products to Package and ticking the necessary ones.
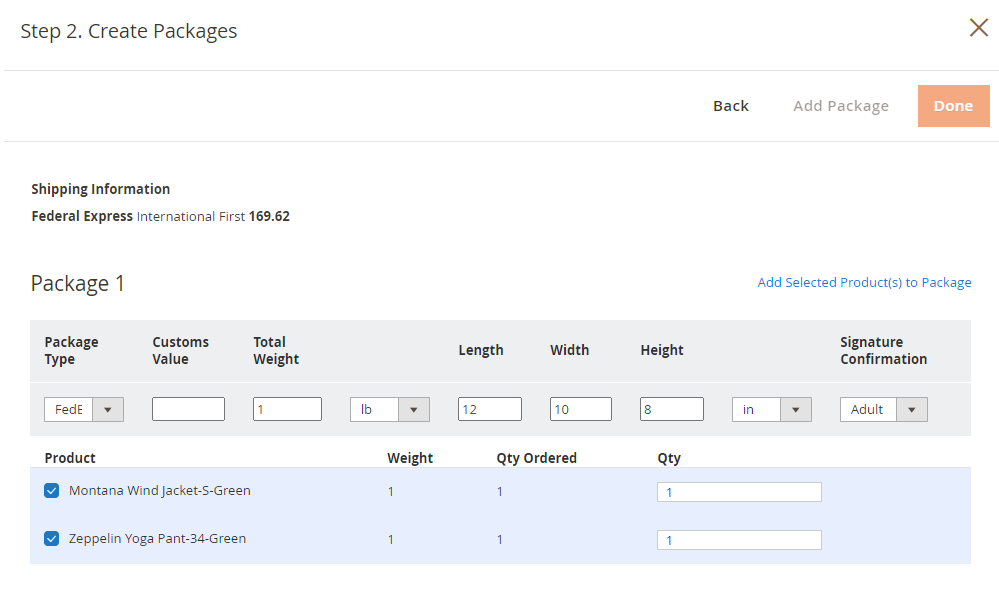
Click Add Selected Product(s) to Package and hit the Done button.
The add-on also supports a validation feature. Thus, if the package options are incorrect, you will be notified.

If everything is correct, the generated label and a tracking code will be added to the return request.
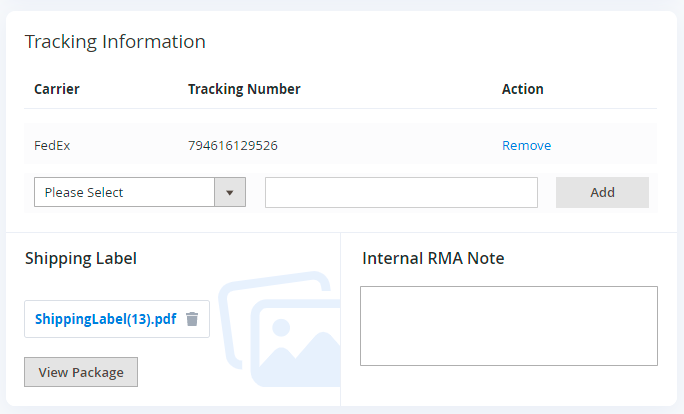
It is possible to View or Delete the package if it is incorrect.
Save the return request updates. After that, a webstore user will be able to download the generated label right in the customer account.
RMA Automation Rules (Add-On)
With the extension it is possible to process RMA requests automatically, without manager involvement.
The feature can be enabled only after purchasing the Automation Rules for RMA Add-On.
Configuration
To configure the add-on general settings, navigate to Stores → Configuration → Amasty Extensions → RMA Automation Rules.

Enabled - set to Yes to activate the add-on.
RMA Automation Rules Apply Schedule - enter cron expression to apply rules by schedule.
Read more about cron expressions here.
Automation Rules Grid
To view and manage all automatic rules, please go to Sales → RMA Automation Rules.
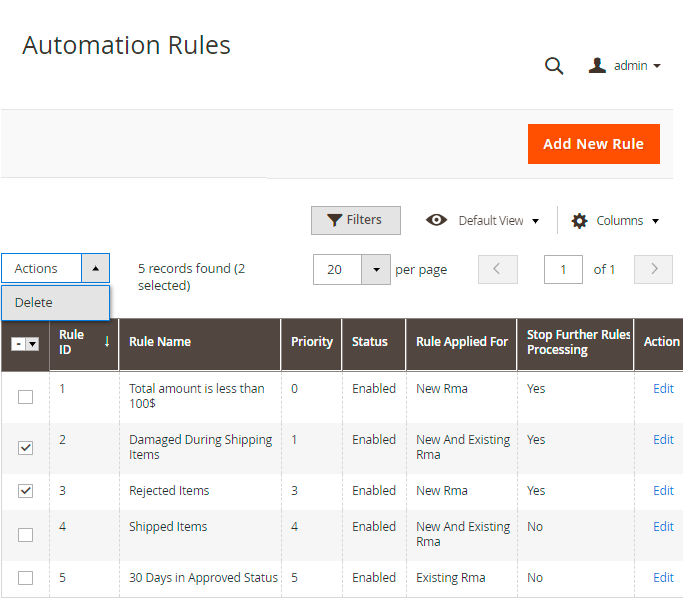
All the info about rule processing is displayed on a handy grid.
To manage a rule, click Edit in the Action column.
To delete rules in bulk, tick the necessary rules and select Delete in the Actions dropdown menu.
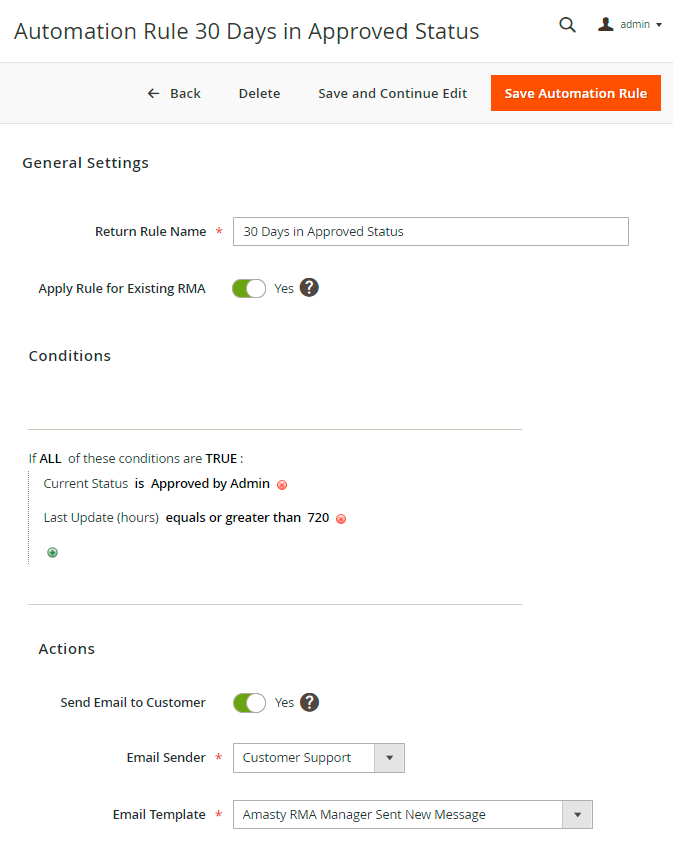
New Automation Rule
To create an automation rule, click the Add New Rule button.
General Settings
For example, you want to create a rule according to which all requests with the “Damage During Shipping” return reason will be automatically approved.
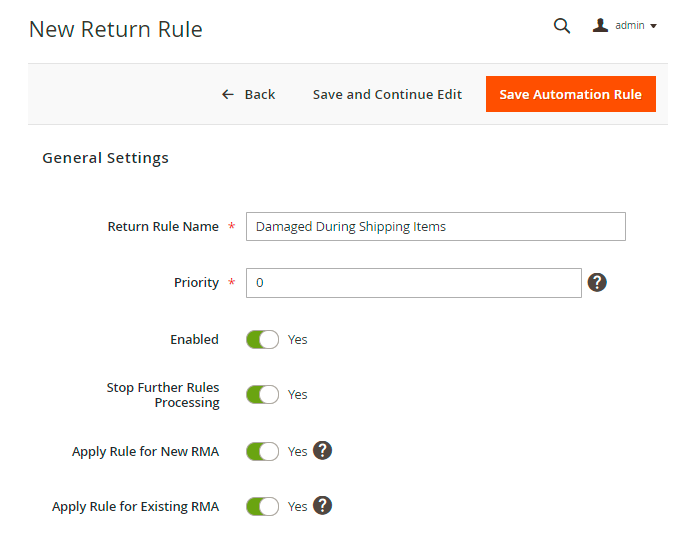
Return Rule Name - specify the name for internal rule usage. It will be displayed on the grid.
Priority - prioritize the rule, where 0 is the highest priority.
Enable - set to Yes to activate the rule.
Stop Further Rules Processing - enable this option if you do not want other rules to be applied to the same requests.
Apply Rule for New RMA - if Yes, the rule will be applied only for newly created RMA requests while the existing ones will be ignored.
Apply Rule for Existing RMA - if Yes, the rule will be applied only for existing RMA requests while the new ones will be ignored. The triggering events are requests amendments by a manager, automatic RMA status changes and the daily Cron job.
Conditions
In this tab you may specify the conditions according to which the rule will be applied. Here we set the particular return reason.
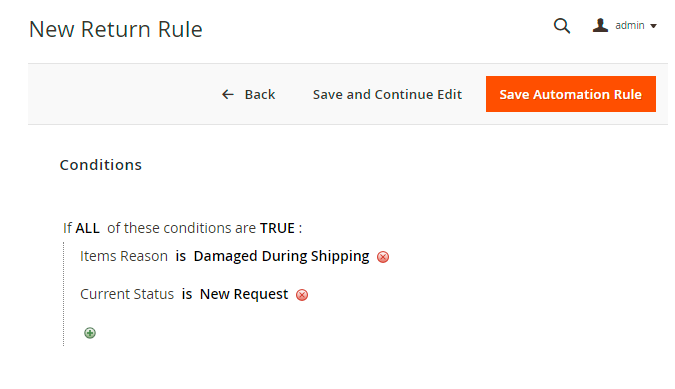
Besides product and customer attributes, the add-on includes request attributes as well. Thus, you may choose particular RMA reasons, statuses, conditions, resolutions, last updates and total request amount. See use cases here.

Actions
In this tab choose the actions that will be taken if a request falls under the specified conditions.
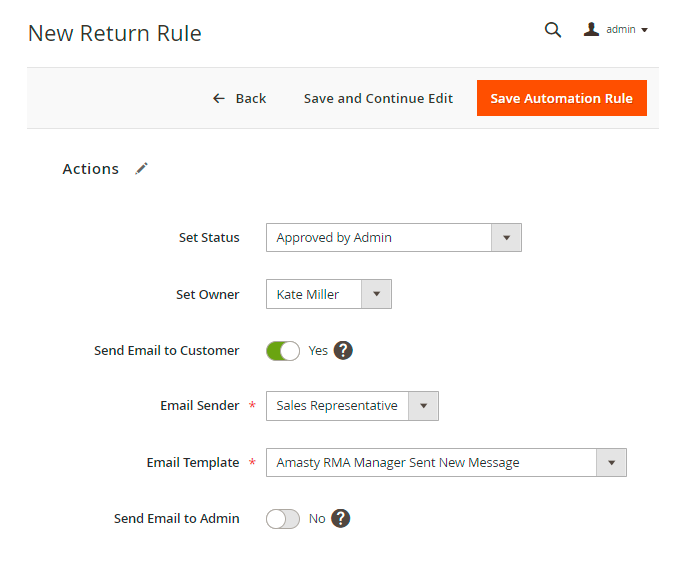
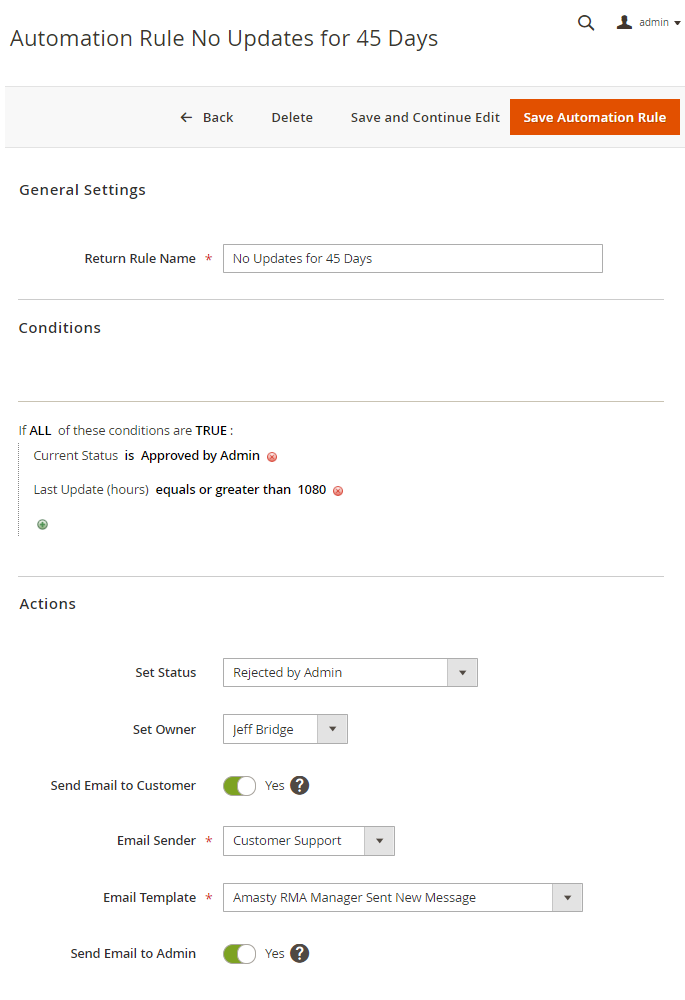
Set Status - select the status that will be assigned to the request.
Set Owner - choose a manager for further request processing.
Send Email to Customer - enable this option to notify a customer about the event.
You should also choose an Email Sender and Email Template.
Send Email to Admin - set to Yes to notify your admin as well.
Please mind, that if your action is 'Set Status' and email notifications are set in the Status settings, then it's better not to use these settings for email notifications. Otherwise, admin and customer will receive two notifications on the event.
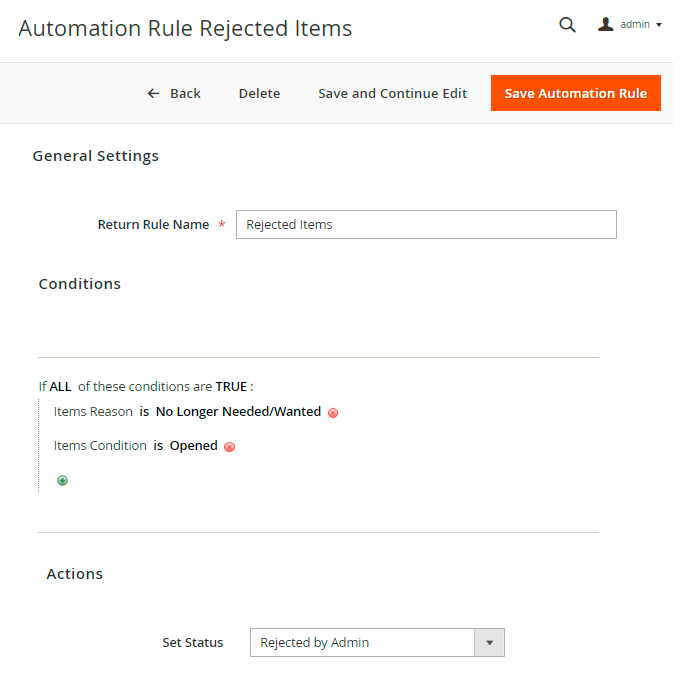
Automation Use Cases
Automated Rules allow admins to minimize the time spent on request processing. For example, you may automatically reject the requests which have the particular reason or condition.
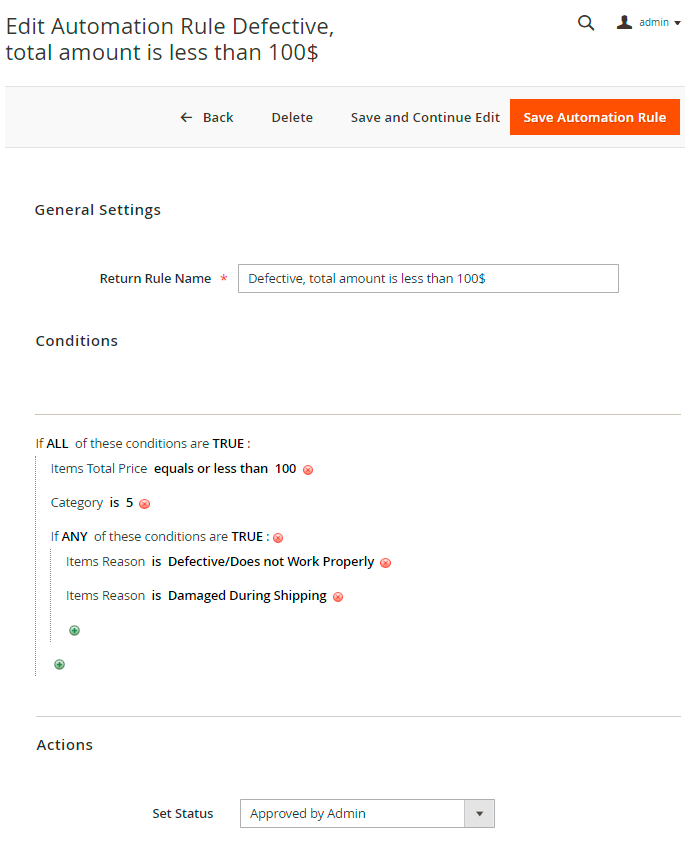
Also it is possible to change request status based on the total request amount and return reasons. Thus, you can automatically approve the requests with items from particular category with particular return reasons in case the total order amount is less than 100$.
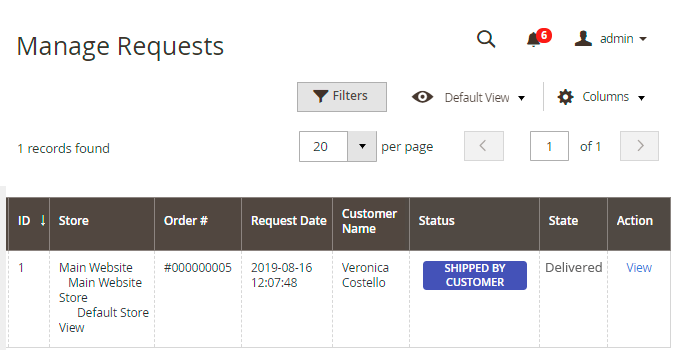
The extension is extremely useful if you assign requests to managers according to request status. In our case we assign all requests with “Shipped by Customer” status to a particular manager.

You may use automation rules to notify customers or admins in particular cases. For example, if a request has an Approved status, but a customer has not updated it for a long time (30 days in our case), you can send him a notification.
Or you may just send notifications and close the request automatically if a customer hasn't updated the request for more than 45 days.
Thus, you can create an unlimited number of flexible rules to speed up and simplify return requests processing.
Additional packages (provided in composer suggestions)
To make additional functionality available, please install the suggested packages you may need.
Available with no additional fees:
amasty/rma-graphql- Install amasty/rma-graphql to activate Graphql and RMA integration.
Available as a part of an active product subscription or support subscription:
For Lite, Pro and Premium versions:
amasty/module-rma-subscription-functionality- Install this package:
- For compatibility with automatic filling of Credit Memo data
- To restrict the creation of RMAs for site guests to only the store view where the order was placed
- Hide the 'Billing Last Name' field on the RMA Login form for site guests
amasty/module-rma-hyva- Install this package to ensure the RMA Base extension works with Hyvа Theme.
For Pro and Premium versions:
amasty/module-rma-import-entity- Install this package for Import Orders compatibility.
amasty/module-rma-custom-number- Install this package to use custom RMA ID number functionality.
RMA Reports (Add-On)
It is possible to track and analyze the completed requests statistics in a separate dashboard.
The feature can be enabled only after purchasing the Reports for RMA Add-On.
Reports Overview
To view the analytical charts, please go to Admin Panel → Amasty → RMA Reports → Reports.

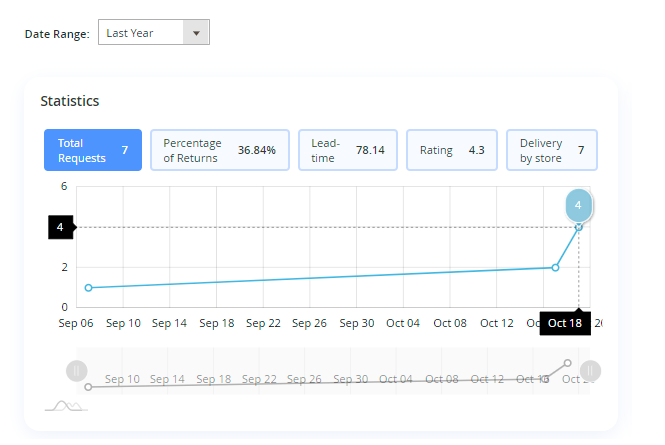
Set the period according to which the data will be displayed (7 Days, 30 Days, Last year or Custom Date) and view all the information in one place.
Statistics
On the Statistics chart you may see the overall data based on the specified period. It is possible to check the average indicator of:
- Total Requests
- Percentage of Returns
- Lead-time
- Rating
- Delivery by Store
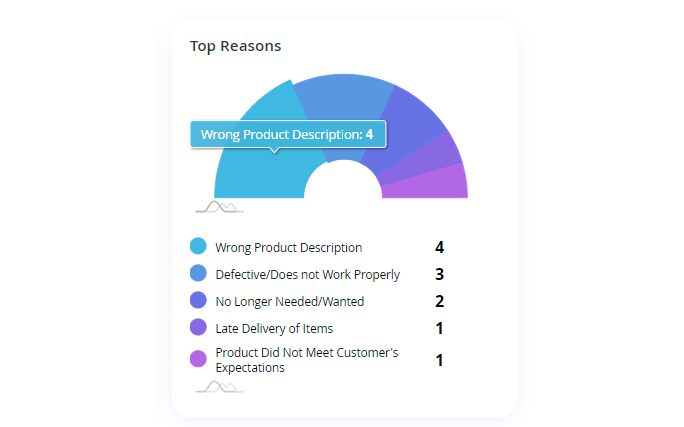
Top Reasons
Track the most frequent return reasons in a separate chart. The diagram shows the percentage of each return reason you've created.
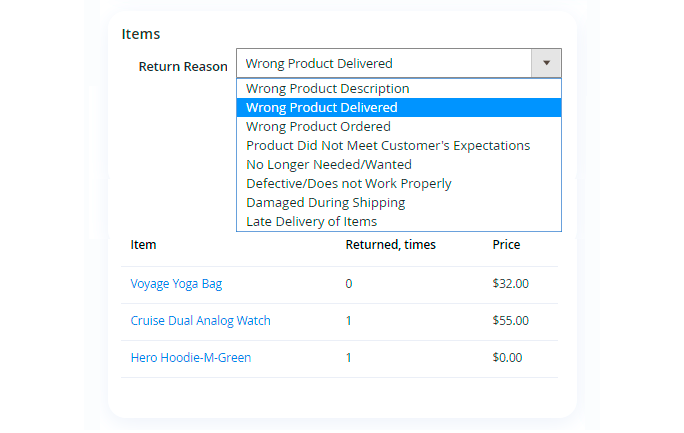
Items
In the Items chart you may see the return requests products according to their return reasons. For example, you can easily check what products are “defective” or which items have the “wrong description”.
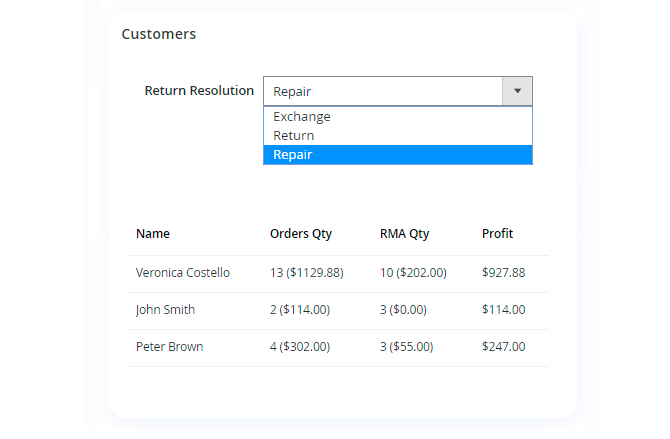
Customers
With the add-on, it is possible to check the customers who are returning more often and what profit do you get from them. Thus, you may easily see problematic customers and adjust you policy regarding them if you do not have enough profit from resolving their requests.
Detailed Reports
To get more specific info, switch to the Reports in Details tab.
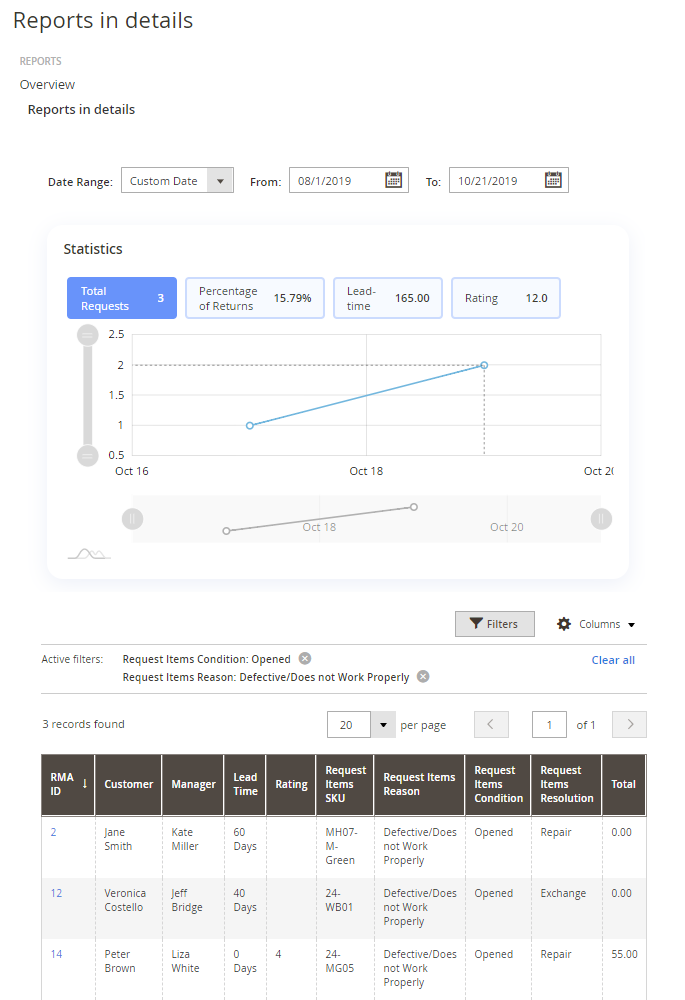
The dynamics is displayed on the chart, while the particular requests and their details are shown on the grid below.
Here you may apply various filters to see the statistics of particular cases based on:
- RMA ID
- Lead Time
- Rating
- Total
- Request Items Resolution
- Request Items Conditions
- Request Items Reason
- Customers
- Managers
- Request Items SKU
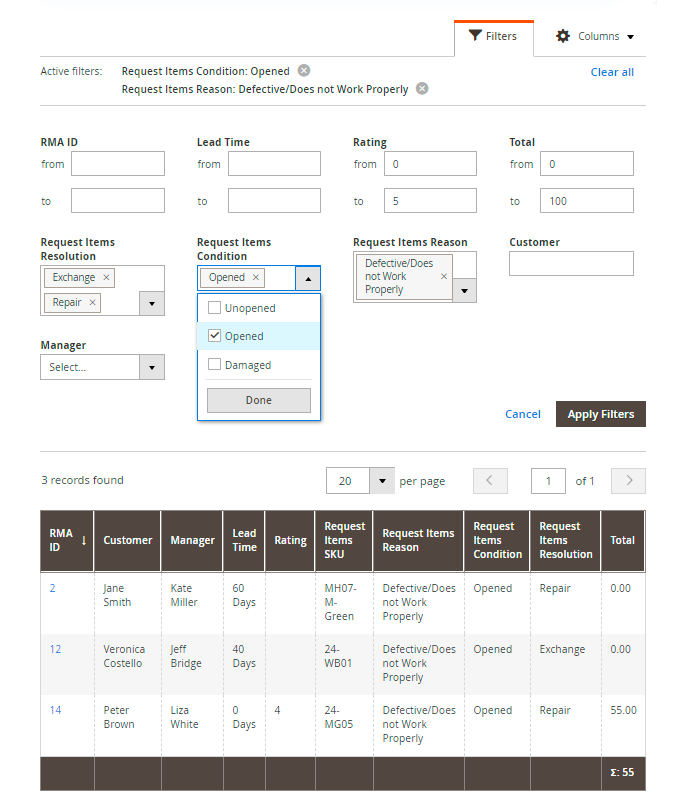
Thus, you may easily analyze the tendencies of your RMA system, find out the most problematic issues and find the resolutions.
RMA for PWA (Add-on)
The PWA add-on helps your customers manage their return requests from mobile devices.
Before purchasing the PWA for RMA Add-On, keep in mind that it requires
- the original RMA extension;
- PWA theme and PWA Studio installed.
In order to correctly install a PWA add-on, please install the corresponding GraphQL system package first. For the correct name of it, please check the composer.json file of the main module. For example, the GraphQL system package name of the PWA add-on for the Blog Pro extension would be the following: amasty/blog-graphql

This is how a customer account looks:
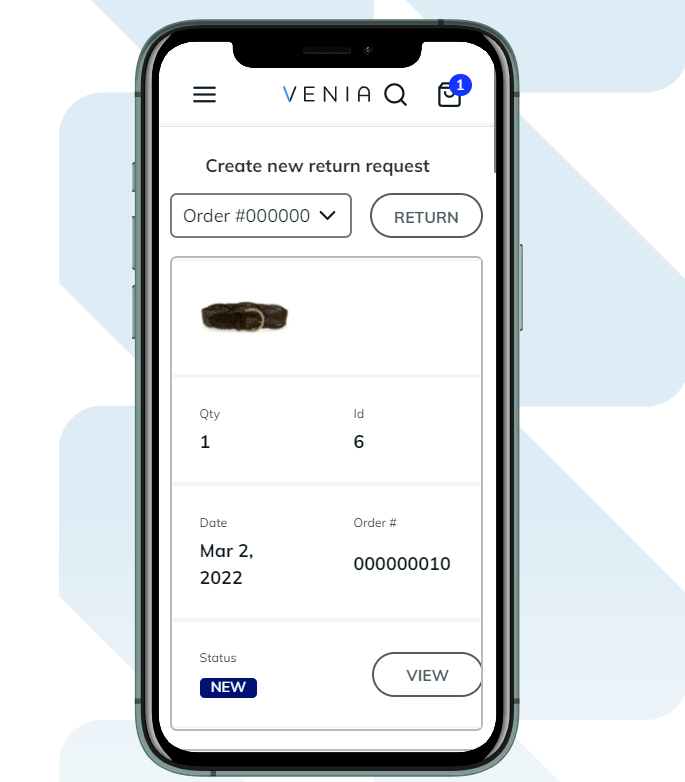
A sample of a new request:
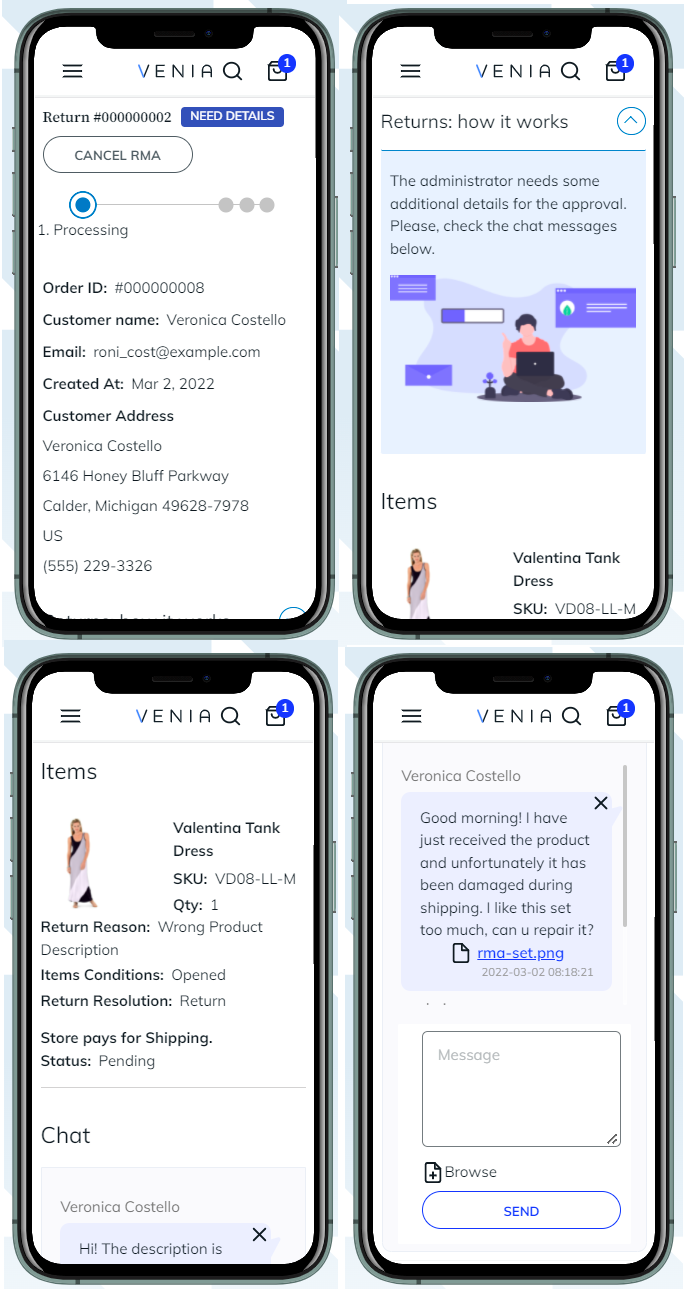
Customers can use all features of the original extension while managing RMA from mobiles, including chat:
Please, note a few limitations when purchasing PWA for RMA Add-On:
- Creating and managing RMA is unavailable for guests;
- Widgets can't be used in a customer account.
FAQ
* How to create an RMA request from the admin panel?
* How do I adjust the sum of money that should be refunded to a customer?
* How to export refund requests to a CSV file?
* What features are included in each tariff plan of RMA?
* How to allow guest customers to submit an RMA request?
* Can I refund orders with store credits?
Find out how to install the RMA extension via Composer.
magento_2/rma.txt · Last modified: 2025/06/09 12:36 by kkondrateva