
Sidebar
magento_1:efficient_order_export
Table of Contents
For more details see the Efficient Order Export extension page.
Guide for Efficient Order Export
Export all order data in the fast and efficient way. With the module, you can export order data including billing and shipping addresses, product information and data generated by third-party extensions.
- Export order data to CSV or XML
- Include billing, shipping addresses and product information
- Set schedule to automate order exporting
- Share exported files via email or FTP
- Efficiently export data created by third-party extensions
Creating Export Profiles
The module utilizes profile settings to export data. To create the export profile please go to System → Import/Export → Amasty Orders Export → Export Profiles and hit the Add New Profile button.
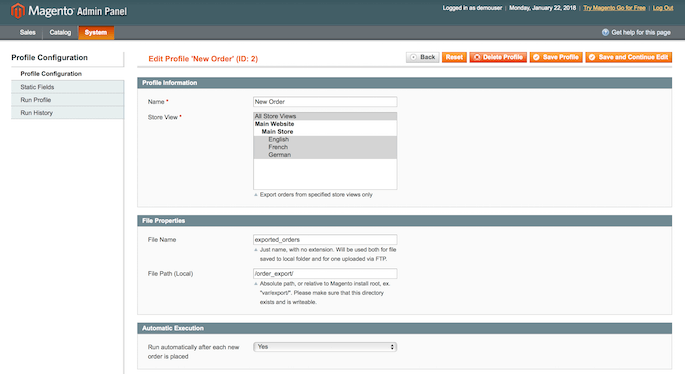
Name — fill in the name of the profile;
Store View — define the store view where the profile will applicable;
File Name — fill in the name of the exported file;
File Path — define the path where the file should be exported;
Run automatically after each new order is placed — enable to start the order exporting process automatically after each new order is placed.
You can save the file with the exported data either to the server where the Magento is installed or upload it via FTP to a different server location. Please proceed to the FTP configuration section.
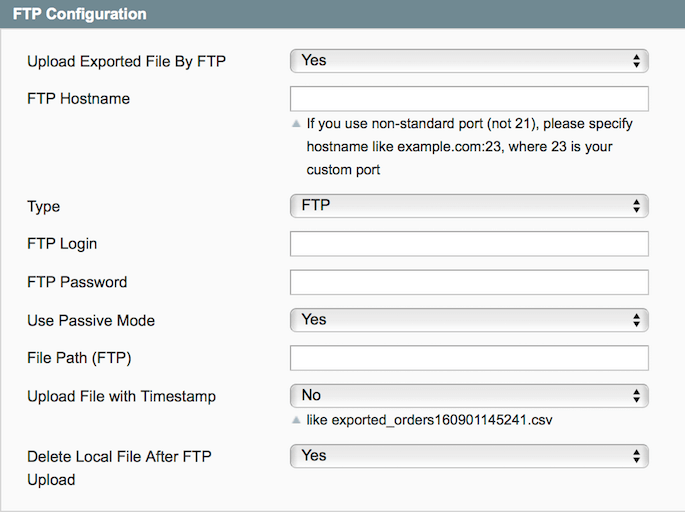
Upload Exported File By FTP — enable this option to upload the exported data to a different server;
FTP Hostname — fill in the FTP host name;
Type — choose FTP of SFTP;
FTP Login — fill in the FTP login;
FTP Password — fill in the FTP password;
Use Passive Mode — enable or disable the passive mode;
File Path (FTP) — define the file path for FTP;
Upload File with Timestamp — enable this option to upload the exported data file with timestamp;
Delete Local File After FTP Upload — enable this option to delete the local file after FTP upload.
If you need to send the exported data via email please configure the Email Settings section.
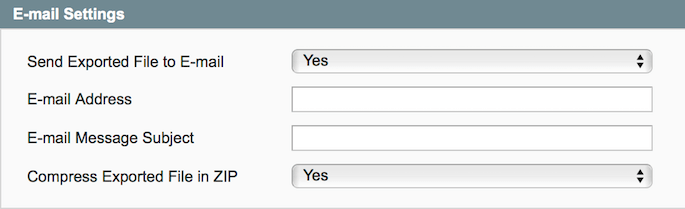
Send Exported File to E-mail — enable this option to automatically send the exported data to email;
E-mail Address — specify the email address;
E-mail Message Subject — specify the email message subject;
Compress Exported File in ZIP — enable this option to compress the file in ZIP.
Next, let's proceed with the export profile configuration.
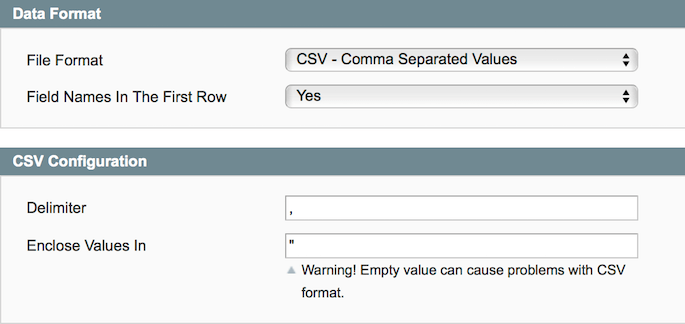
File Format — choose the format of the file you want to export orders to;
Field Names In The First Row — enable this option to place field names in the first row;
Delimiter — define the delimiter;
Enclose Values In — define how to enclose values.
Filters Configuration
To limit the amount of data that will be exported you can set filters for Order, Shipment, Invoice, Creditmemo and other numbers.
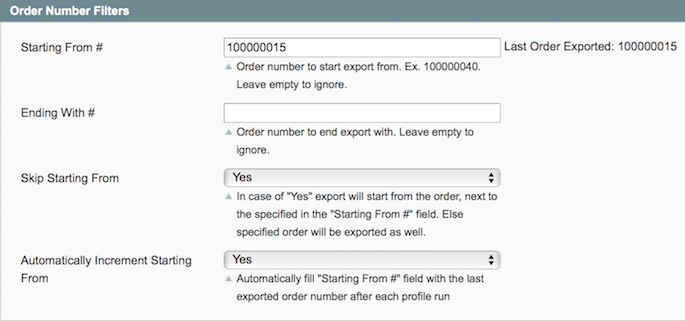
For Order Number Filters you can specify the following values:
Starting From # — indicate from which order to start the export. The extension displays the number of the last exported order and of the next one. First order is not exported, this is particularly useful for Magento with multiple store views;
Ending With # — indicate on which order to stop the export;
Skip Starting From — enable to start export from the order that comes next after the one indicated in the Starting From # field;
Automatically Increment Starting From — set this option to Yes to automatically populate the Starting From # field with the last exported order. In combination with the Skip Starting From option set to Yes this will let you export only new orders with each profile run.
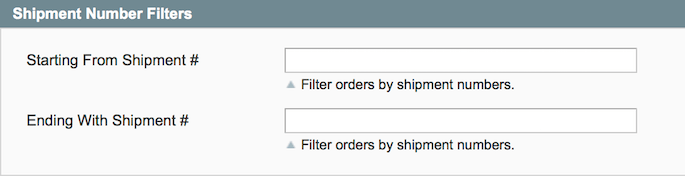
For Shipment Number Filters you can indicate from which order to start the export according to shipment numbers.
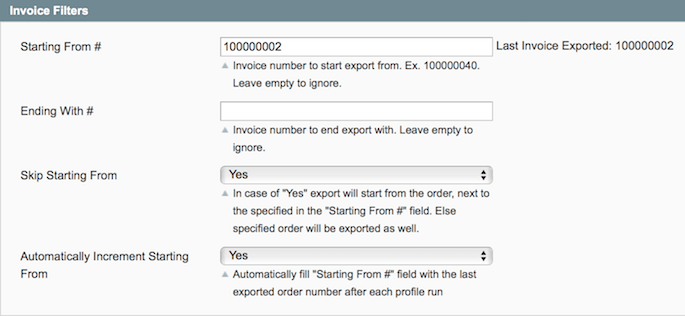
For Invoice Number Filters you can configure the following:
Starting From # — indicate from which order to start the export according to invoice numbers;
Ending With # — indicate on which order to stop the export according to invoice numbers;
Skip Starting From — start export from the order that comes next after the one indicated in the Starting From # field;
Automatically Increment Starting From — set this option to Yes to automatically populate Starting From # field with the last exported order. In combination with Skip Starting From option set to Yes this would let you export only new orders with each profile run.
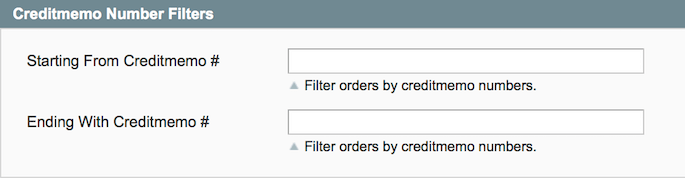
In the Creditmemo Number Filters section you can indicate from which order to start the export according to credit memo numbers.

Next, in the Other Export Filters section you can modify the following options:
Product SKU(s) — define SKU of the products to export only for the orders which contain listed products;
Include only lines with SKU found — disable this option and all products from the orders with the specified SKUs will be exported;
Order Status — select order statuses that should be exported (it is also possible to export orders with all statuses);
Customer Group — select customer groups which orders should be exported;
Skip items with zero price — enable to exclude items with zero price from export;
Skip child products — enable to exclude child products from export;
Placed From Date — define the date to export orders from;
Placed Until Date — define the date to export orders until.
Filed Mapping
With the module, you can export either all order related fields or indicate the specific ones.

Export each product custom option in a separate column — enable this option to export each product custom option selected by customers in a separate column;
Export each product attribute in a separate column — enable this option to export each product attribute selected by customers in a separate column;
Fields To Export — choose Export All Fields or Export Specified Fields Only to export product custom options in a separate column.
If you choose the Export Specified Fields Only option please hit the Add Filed Mapping button, select the field in the database, then specify its name in the exporting file and define its order. When done, click the Add field to column button to add another value.
You can combine several fields into a single value. To do that, please click Add field Mapping, name the field and specify the order. By clicking Add field to column you can add any number of fields.
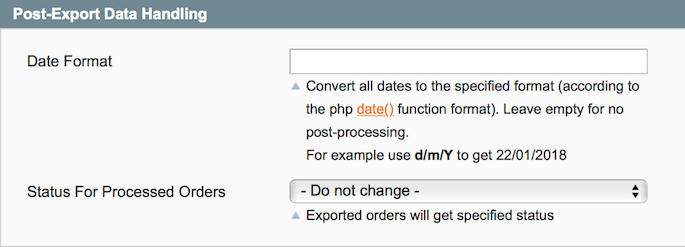
You can specify the date format for all the dates in the export file. Indicate m/d/Y for date of the kind: 08/25/2011
You can set the Status For Processed Orders. All processed orders will get a new status when the process is finished.
Next, switch to the Static Fields tab.
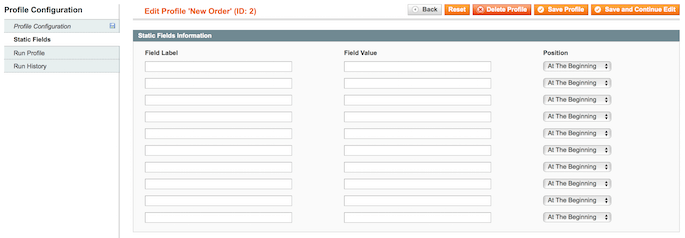
Here you can add extra columns to the report that will include the same info.
When done configuring the profile click the Save profile button.
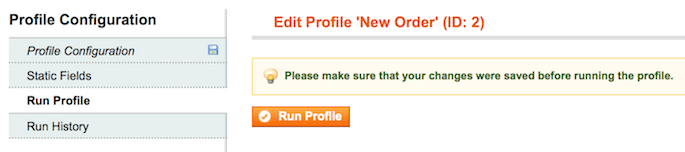
To run the profile, open it once again and switch to the Run Profile tab. Hit the Run Profile button.

In the Run History tab you can see the list of the export attempts, the exact time of these attempts. Moreover, you can download the exported file.
Export from the Orders Grid
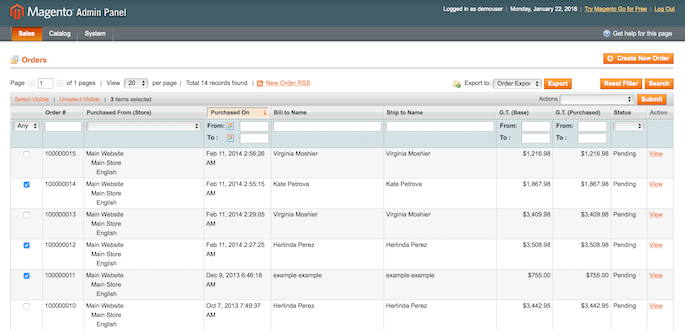
You can run the export profiles right from the order grid. Open the Order grid, select the orders you need to export, and select the appropriate export profile from the Export To dropdown menu. Click the Export button to start the process.
Export of 3rd Party Extensions Data
With the Efficient Order Export extension you can export data created by third-party modules. To add the extensions data to the export files, please navigate to System → Import/Export → Amasty Orders Export → 3-rd Party Data Export and hit the Add New Connection button.
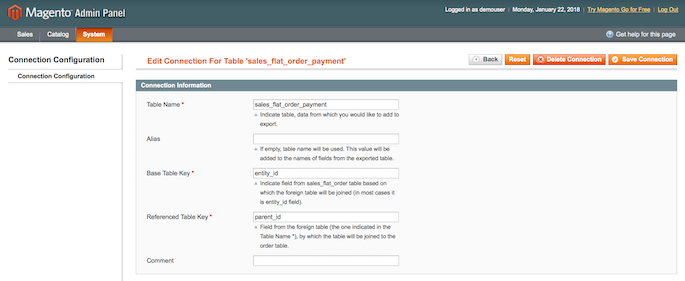
The example below is based on our Order Attributes extension. To add the output of the extension to the exported data, we connect the extension database table to the Magento order table sales_flat_order. You can do it on analogy with any other extension.
Table Name — indicate the db table of the third-party extension, from which the data should be taken;
Alias — specify the value that will be added to the names of fields from the exported table
Base Table Key — indicate to which field of the sales_flat_order table the third-party extension table should be joined (in most cases it is entity_id field);
Referenced Table Key — indicate the field of the third-party extension table by which the table will be joined to the Magento order table (usually it is the field that contains order id);
Comment — add a comment to the connection for internal use.
Extension Configuration
To configure the extension settings please go to System → Configuration → Amasty Extensions → Efficient Order Export.
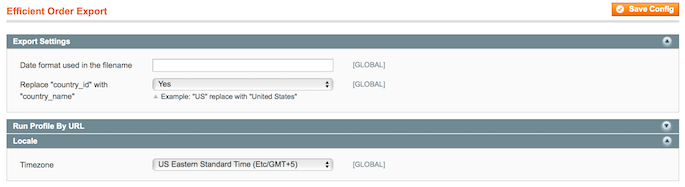
In the Export Settings section you can specify date and time format that will be used in the name of export files. Here are the symbol meanings:
- d – day
- m – month
- y – year
- H – hour
- i – minute
- s - second
Skip Profile's filters on the Order's Grid — when this option is enabled, the export profile filters (Store View, Order/Shipment/Invoice/Credit memo Number Filters, SKU, Order Status, Customer Group) will be ignored when the profile is launched from the order grid — all selected orders will be exported according to the profile mapping.
In the Locale section you can specify a Timezone that should be applied to the exported files.
Running Export Profile via URL
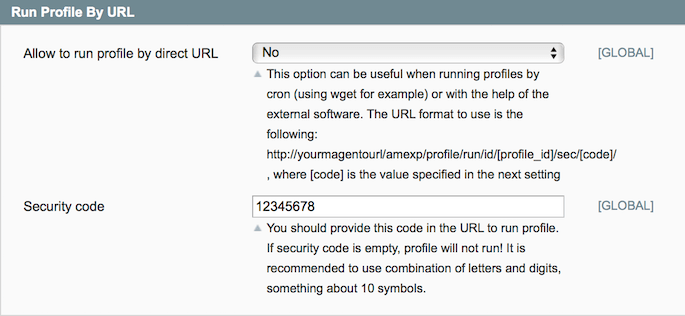
With the extension, you can run the export profile via URL. To do this please turn the Allow to run profile by direct URL option to Yes. Then enter a Security code for this operation (this is mandatory). It is recommended to use a combination of letters and digits, around 10 symbols.
After you complete the above, you can run the profile, using URL of the kind:
http://[yourmagentourl]/amexp/profile/run/id/[profile_id]/sec/[security_code]/
Replace [yourmagentourl] with the URL of your Magento store. Replace [profile_id] with ID of the profile you would like to run, to get a profile ID, please go to the profile page and look at the top of the page, e.g. Edit Profile ‘export' (ID: 19). Replace [security_code] with the security code you’ve entered at the configuration page.
You can also pull the export URL via cron by adding such line to the crontab (in the below example the profile will be run every 10 minutes):
*/10 * * * * wget -O /dev/null http://[yourmagentourl]/amexp/profile/run/id/[profile_id]/sec/[security_code]/
Please be aware that export is running not as a console script (via php), but via URL, therefore it is mandatory to pull the url using wget.
magento_1/efficient_order_export.txt · Last modified: 2019/07/22 13:40 by skudrov