
Sidebar
magento_1:store_locator
Table of Contents
For more details see the Store Locator extension page.
Guide for Store Locator
Help customers to find the nearest offline store location to purchase your products. Display all stores on the handy map using Google Maps technology and provide valuable additional information.
- Add the unlimited number of store locations
- Equip stores with images and extra information on the map
- Easily import Geo IP Data
- Customize Google Mark templates to your needs
- Provide user-friendly URL to the store locator page
Extension Configuration
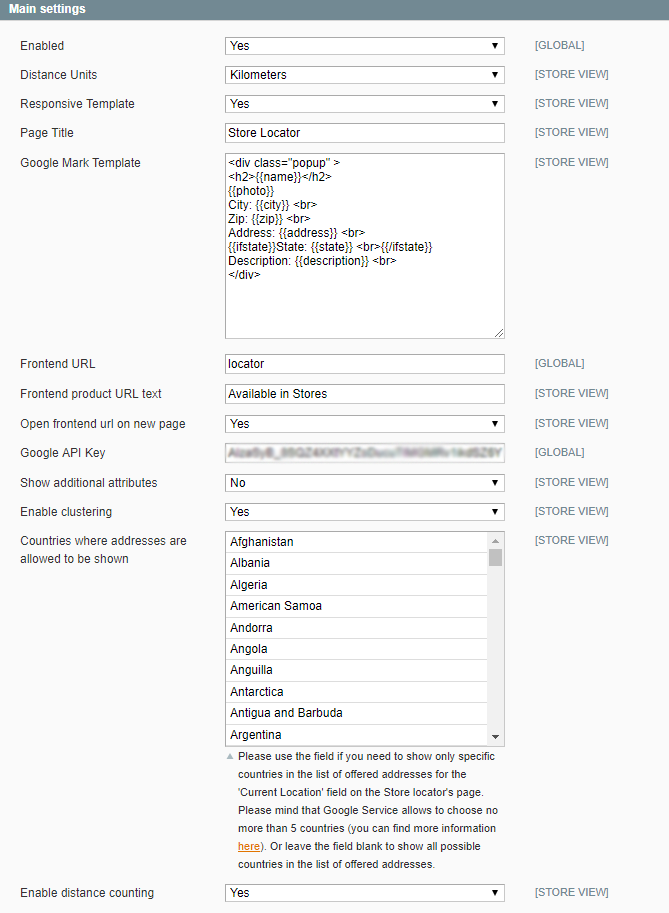
To configure general extension settings please go to System → Configuration → Amasty Extensions → Store Locator and expand the Main Settings section.
While shoppers are purchasing from you offline, you can always ease their lives with the convenient return/exchange opportunities and the guest Magento RMA option.
Enabled — enable or disable the module;
Distance Units — specify the distance units in kilometers, miles or let customers choose the units;
Responsive Template — enable or disable the usage of the responsive template;
Page Title — specify the Store Locator page title that will be displayed above the store locations list;
Google Mark Template — specify the template for the Google mark that will be displayed for each store location on the map;
Frontend URL — specify the part of the URL for the store locator page or use the default one;
Frontend product URL text — specify the text for URLs that will be displayed on product pages. The links will redirect customers to the map with offline stores that sell corresponding products;
Open frontend URL on new page — enable this option to open the store locator page on the new tab or page;
Google API Key — fill in the Google API key. You can learn more about this key here;
Show Additional Attributes — enable this option to display extra attributes like phone number and email on the store list.
Enable clustering — switch to Yes to enable clusterization of locations on the map.
Countries where addresses are allowed to be shown - specify the countries with the addresses offered by Google autofill function.
Please mind that Google Service allows to choose no more than 5 countries.
Enable distance counting - set to Yes to show the distance between stores and customer’s location.
You can specify different main settings for each store view if needed. Please switch to the appropriate store view using the Current Configuration Scope dropdown.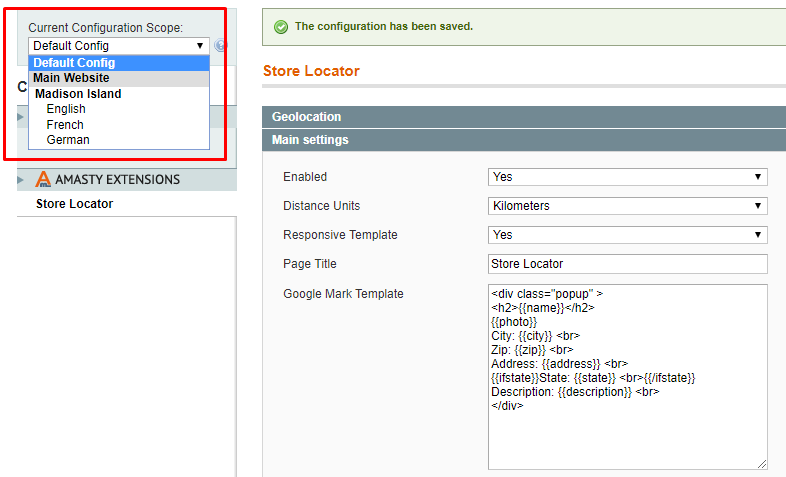
To make the extension function, please, make sure that:
* the Google API is enabled;
* the Google API Key field is filled in correctly;
* the Places API is enabled. To check it, please, follow this link.
Importing Geo IP Data
To install the Geo IP database, go to System → Configuration → Amasty Extensions → Geo IP Data.

Databases are required for the correct work of the Store Locator module. Also you need to install php bcmath or gmp extension on your server.
You can get the databases automatically or import your own data.
Hit the Download and Import button to make the extension download the updated CSV dump file and import it into your database automatically.
To import the files from your own source, use the Import option. Path to the files should look like this (the part 'var/amasty' should be replaced with your folders’ names):
var/amasty/geoip/GeoLite2-City-Blocks-IPv4.csv
var/amasty/geoip/GeoLite2-City-Blocks-IPv6.csv
var/amasty/geoip/GeoLite2-City-Locations-en.csv
In the Import section, the Import button is grayed out by default. It will be available right after you upload the CSV files. The red error notification will switch to green success notification when the import is completed.
For more information please check this article.
Importing Store Data
With the extension, you can instantly create or update numerous store locations by gathering all store info and upload it as a .CSV file.

You can follow this step by step guide to learn how to modify the CSV file:
- Connect to the server via FTP or some other connection;
- Navigate to Magento root folder and proceed to /var/amasty/amlocator/;
- Here you will see the file: Amlocator-locations.csv;
- Edit the file according to your needs and save it;
- Go to the Magento admin panel and navigate to System → Configuration → Store Locator → Import and click the Add Stores button.
Creating New Store Locations
To create a new location or edit already existing ones please go to CMS → Store Locator.
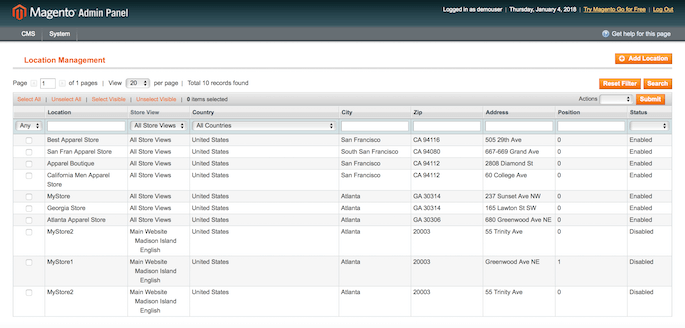
Hit the Add Location button to create a new store location.

Location Name — fill in the store location name;
Store View — define the store views for which you want to display this store location.
Specify the country, the state/province and the city.
Description - fill in the information you want your customers to know about the store.
Then, specify the required store location details that you want to provide your customers with.

Status — enable or disable this location;
Position — define the location's position in the list;
Location Photo — add location photo by choosing the appropriate photo or image on your computer.
Next, switch to the Location on Map tab and specify the latitude and longitude manually or hit the Auto fill button to detect coordinates based on the address specified above.
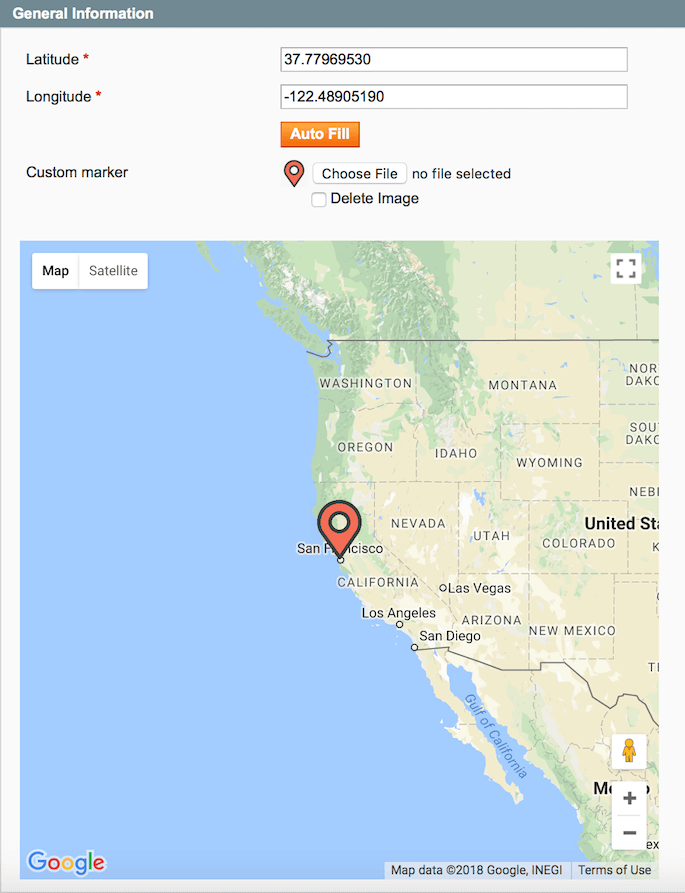
Also, you can upload custom marker that will be displayed on the map.
You can view the location marked on the map and easily zoom it in and out.
Then, switch to the Available Products tab. In case some offline stores sell only specific products you can assign these products to store location.
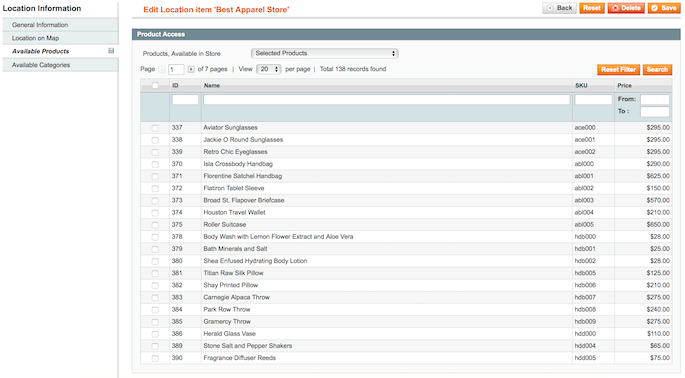
Choose the Selected Products option from the Products Available in Store dropdown to assign specific items to a particular offline store.
Offline stores selling only particular products, will not be displayed in the locations list on the Store Locator page. You can see these locations only after clicking the link on the corresponding product pages.
Switch to the Available Categories tab where you can assign a category to a particular store view. It means that this online store sells only products from this category.
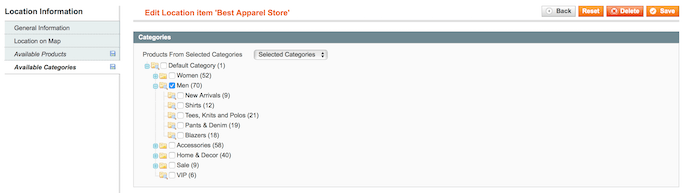
Choose the Selected Categories option from the Products from Selected Categories dropdown to assign specific categories to a particular offline store.
Offline stores selling products only from particular categories will not be displayed in the locations list on the Store Locator page. You can see these locations only after clicking the link on the corresponding product pages.
Frontend View
Store locations are added to the locations list and displayed on the map. Customers can specify the exact location to search the nearby stores and see the distance to them by clicking the Locate Nearby button. Also, it’s possible to specify exact radius if needed. You can enable customers to select search radius measurement (see this section for details).
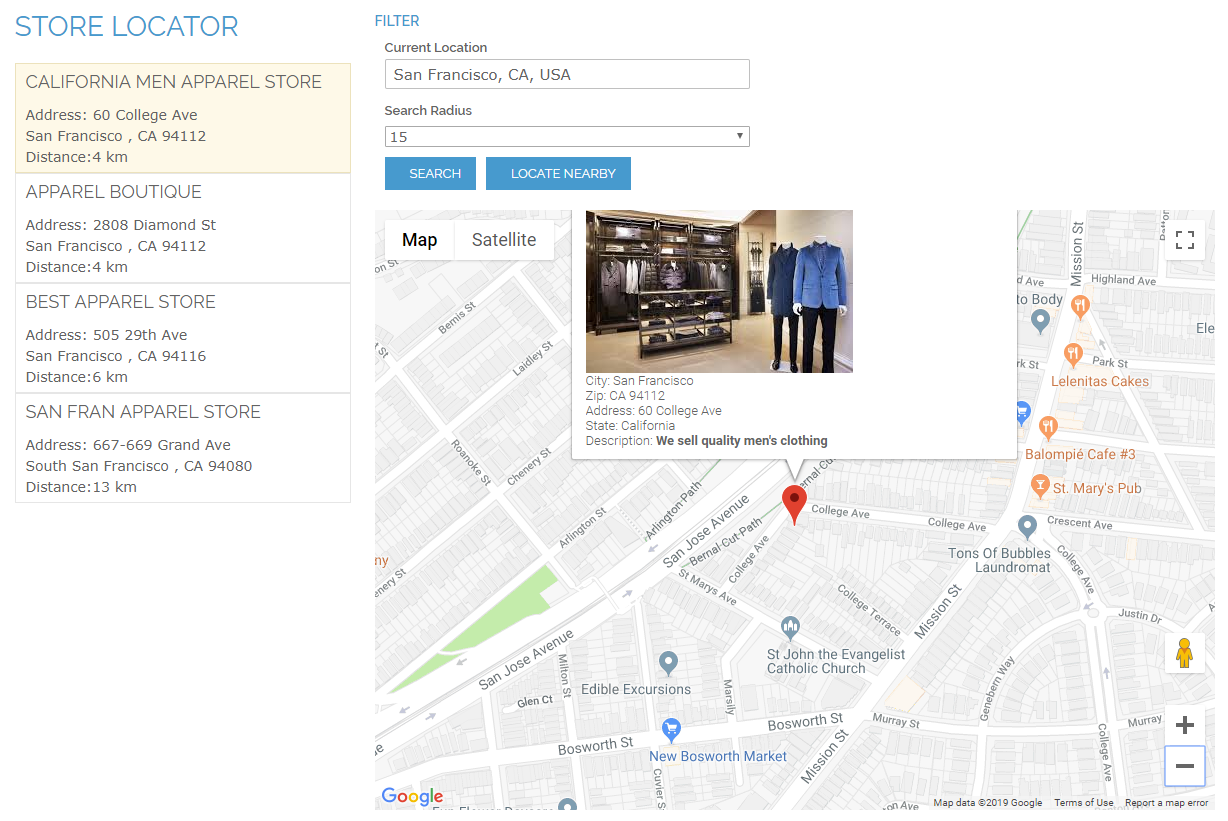
On the map you can display any additional info for each store. Store locations are added to the locations list and displayed on the map. Single stores are marked with a Google mark while the areas with multiple stores are shown in the clusters.
Notice, the more stores are there in the area, the brighter cluster mark will be.
The above link automatically appears on product pages when you assign products to particular store locations. After clicking the link, a customer will be redirected to the page with the offline stores that sell this product.
magento_1/store_locator.txt · Last modified: 2019/07/22 13:56 by skudrov