
Sidebar
magento_2:jet-theme
Table of Contents
For more details see how the Jet Theme for Magento 2 works.
Guide for Jet Theme for Magento 2
Trendy, responsive, customizable. The Jet theme brings both stable store performance and stunning visuals to your Magento 2 store.
- Adapt to the latest design trends without spending a fortune on custom development
- Provide customers with a smooth shopping experience on mobile and desktop
- Forget about compatibility problems and poor functionality
- Customize theme design in no time with Style Guide
Jet Theme supports the following Magento editions:
- Magento Community
- Magento Enterprise (Commerce)
- Magento B2B
For the correct work of all the theme features (e.g. floating shopping cart), please make sure that the Jet Theme is applied to the correct store view and consequently reflects on the frontend. Please note that out of the box features of the Jet Theme are not applicable to other themes (e.g. Luma theme).
In Jet Theme FAQ you can find answers to the most popular questions about the extension functionality.


Jet Theme Pro edition for Magento 2
As for now, the following 5 extensions below are going with the Jet Theme Pro edition out-of-the-box:
- Lite Mega Menu M2 - See user guide →
- Lite Layered Navigation M2 - See user guide →
- Product Tabs M2 - See user guide →
- Google Invisible reCaptcha M2 - See user guide →
- Thank You Page M2 - See user guide →
The original functionality of these extensions by Amasty is fully available out-of-the-box with the Jet Theme Pro. Set up Jet and start using the integrated extensions, no extra costs implied.
>> See how the extensions work together with Jet on our demo <<
Jet Theme Premium edition for Magento 2
As for now, the following 8 extensions below are going with the Jet Theme Premium edition out-of-the-box:
- Lite Mega Menu M2 - See user guide →
- Lite Layered Navigation M2 - See user guide →
- Product Tabs M2 - See user guide →
- Google Invisible reCaptcha M2 - See user guide →
- Thank You Page M2 - See user guide →
- Banner Slider M2 - See user guide →
- Shop by Brand M2 - See user guide →
- Custom Button M2 - See user guide →
The original functionality of these extensions by Amasty is fully available out-of-the-box with the Jet Theme Premium. Set up Jet and start using the integrated extensions, no extra costs implied.
>> See how the extensions work together with Jet on our demo <<
Theme Installation
The Jet theme can be installed both manually or via Composer.
Find out how to install the Jet Theme extension for Magento 2 via Composer.
We strongly recommend you to make a backup of your database before theme installation. It will keep your files secure, especially if you have lots of customizations applied.
After theme installation, we recommend you to check 5 things to ensure the stability of theme work.
- Check if the theme is assigned to all necessary websites/store views by going to Content → Design → Configuration;
- Go to the website and/or store view that doesn't have Jet Theme applied to make sure everything is as it should be;
- Go to the global theme settings and adjust them. Learn how to do this in the Configurations section of the User Guide;
- Check newly created CMS pages to ensure that they are correctly assigned to the store view. To do this, go to Content → Elements → Pages;
- It is possible, that several pages duplicates appear. It is expected behavior, as we do not delete existing pages on your instance. EXCEPTION: if you are installing the Jet theme's sample data, products and categories will be deleted and replaced with newly created sample data
Sample Data
We limited access to the sample data to prevent accidents like deleting all products in the store database. To get access to Jet Theme sample data, please write us a ticket. Alternatively, you can create a ticket in your Customer Account by going to My Account → Support Tickets.
The Jet theme goes with sample data, for example, products, images, texts, CMS pages, etc. You can use Jet's sample data to replace the default one by Magento.
The sample data deploy is not a necessary step. You can skip it if you want to test the theme with default Luma sample data.
Please note that the sample data deploy deletes all existing products, orders, customers, etc, to replace them with custom data. If you are installing the sample data over the existing store data, we strongly advise you to make a backup of all data.
How to install sample data?
Before installing the specified Jet sample data, please install the Luma sample data first. To do so, please follow the step-by-step instructions below.
Luma Sample Data
1. Navigate to the root directory of your Magento 2 store.
2. Run the following CLI command to install Magento 2 sample data:
php bin/magento sampledata:deploy
3. To authenticate from repo.magento.com, enter your username, and password.
4. After successfully installing Magento 2 sample data, run the following commands one by one.
php bin/magento setup:upgrade
php bin/magento setup:di:compile
php bin/magento setup:static-content:deploy -f
Jet Sample Data
To install the Jet theme sample data, the first step is to upload the files of the Jet Sample data and then run the following commands one by one:
php bin/magento setup:upgrade
php bin/magento jettheme:sampledata:deploy --clean
The php bin/magento jettheme:sampledata:deploy –clean command permanently deletes all existing products and categories on this Magento instance and installs the sample data of Jet theme.
This an important step that ensures the sample data is correctly installed, without mixing with previously created items.
After that, run the following strings:
php bin/magento indexer:reindex
php bin/magento cache:flush
php bin/magento setup:static-content:deploy -f
That's it — the sample data is installed to your Magento instance.
Jet Theme Configurations
To configure the Jet Theme, please go to the Stores → Configuration → Jet Theme.
Style Switcher

Choose Style - choose one of the styles available in the dropdown and hit the 'Apply' button below to see how the settings below are changed according to the style configurations.
Then click 'Save' and run the following command in the console to apply style to the frontend:
'bin/magento setup:upgrade && bin/magento setup:static-content:deploy'
Please check this part of the guide if you want to know how to apply different styles per the different store views.
Enable Custom Colors - Set this setting to 'Yes' to enable color scheme preset configurations section.
Please note that
'bin/magento setup:upgrade && bin/magento setup:static-content:deploy'
command must be run in the console when any of the settings in the fields below have been changed.
Color Scheme Presets - In order to apply a color scheme preset on a storefront, please follow the steps below:
- 1. Make sure the value of the setting 'Enable Custom Colors' is set to 'Yes';
- 2. Make sure this is the store view you need for changing the color scheme. If it's not, then change to the store view you need and empty all checkboxes 'Use Default' for the section 'Color Scheme';
If you haven't prepared any child themes on a backend yet, please consult this part of the user guide first in order to apply color scheme presets to the store views correctly.
- 3. Choose the preset you want from the 'Color Scheme Presets' dropdown (e.g. 'Bright');
- 4. Click on the 'Apply' button below the dropdown. Now you can see the available color options included into the preset in the section 'Color Scheme';
- 5. Click on the 'Save' button to apply a preset to the store view you've selected;
- 6. Run the
'bin/magento setup:upgrade && bin/magento setup:static-content:deploy'
command.
General Settings
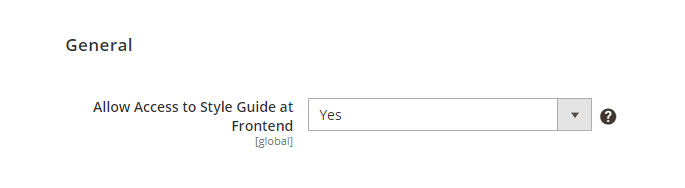
Allow Access to Style Guide at Frontend - set to Yes to enable access to the Style Guide via frontend link. We advise you to restrict access to Style Guide in the Production environment.
To access the Style Guide, use the following link format:
http://example.com/amasty_jettheme/styleguide
For example, on the demo instance, the link looks as follows: https://jet-theme-m2.magento-demo.amasty.com/amasty_jettheme/styleguide
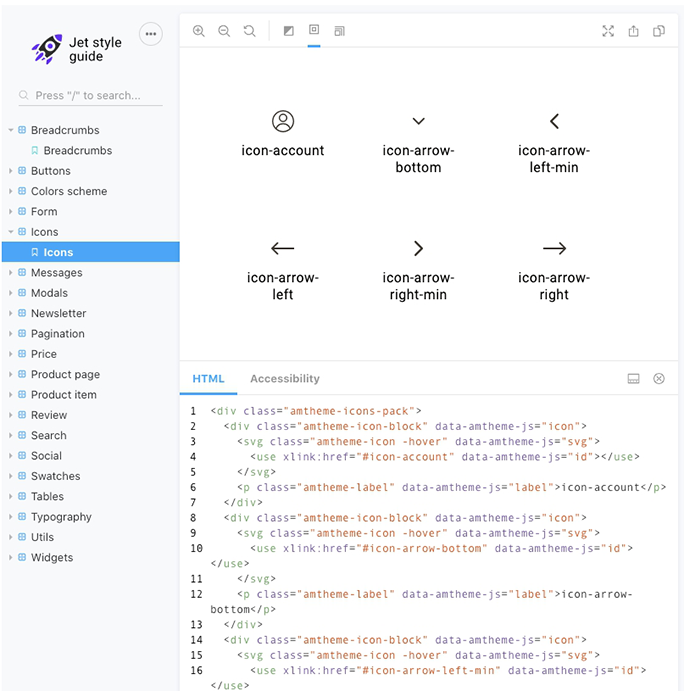
The Style Guide is a comprehensive documentation Storybook-based tool that consists of font, layouts, elements settings. They are used to give a standardized look to the stores' frontend.
An example of a style guide page is shown in the screenshot below.
Additional Elements
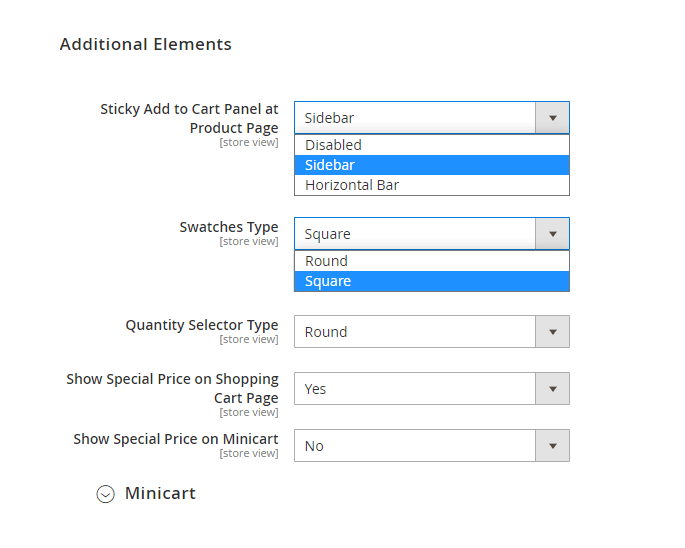
Sticky Add to Cart Panel at Product Page - choose from two types of display for your sticky Add to Cart panel or just Disable it:
- Horizontal Bar;
- Sidebar.
Please note that if the Sticky Add to Cart (Horizontal Bar) is also enabled, then only the Sticky Add to Cart (Horizontal Bar) will be displayed and the Sticky header won't be visible.
Please note that the Sticky Add to Cart (Horizontal Bar) won't be visible for the out-of-stock products.
Horizontal Bar
Sidebar
Swatches Type - Choose the preferable type for the product swatches display, round or square.
Round swatches:

Square swatches:
Quantity Selector Type - Choose the preferable type for the quantity selector display, round or square.
Round quantity selector type example:
Square quantity selector type example:

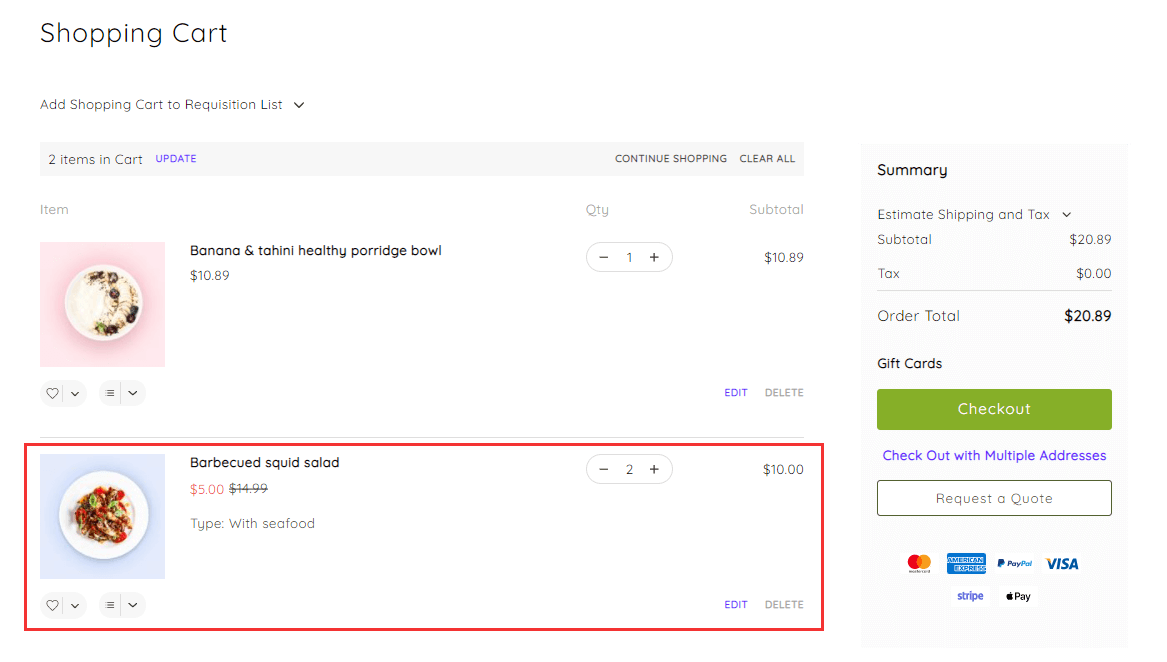
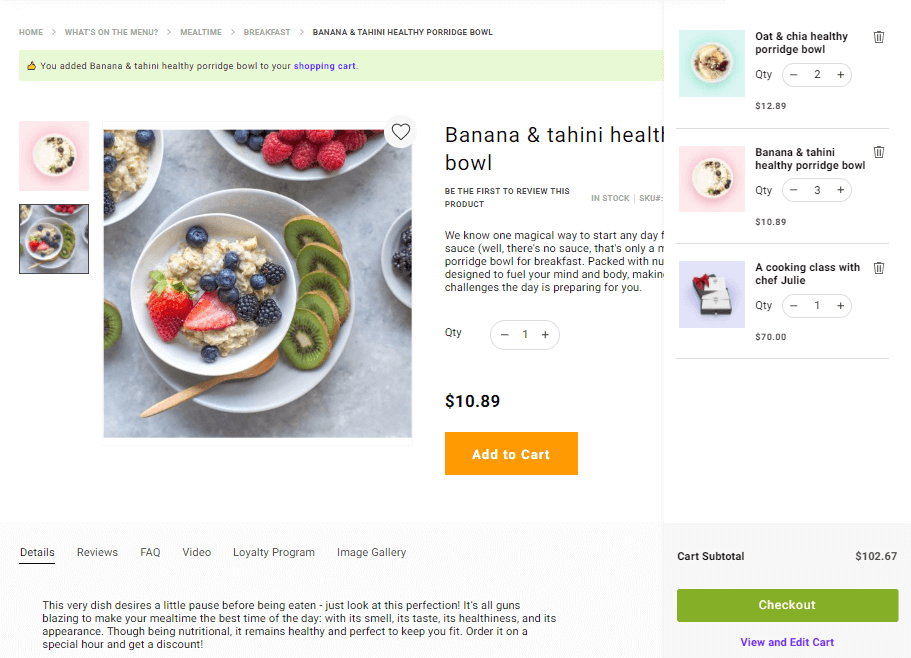
Show Special Price on Shopping Cart Page - Use this setting to enable the special price display on the Shopping Cart Page.
Show Special Price on Minicart - Use this setting to enable the special price display on the Minicart. Use two more settings below in the 'Minicart' section for making further Minicart configurations.
Special price display example:
Minicart
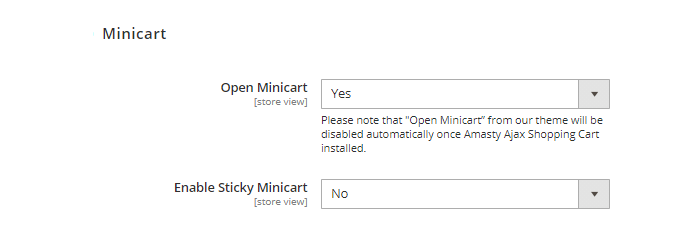
Open Minicart - Set 'Yes' to enable 'Open Minicart'.
Please note that “Open Minicart” from our theme will be disabled automatically once Amasty Ajax Shopping Cart installed.
Enable Sticky Minicart - Set 'Yes' to enable Sticky Minicart.
This is an example of how the Sticky Minicart looks on the frontend:
Newsletter Subscription
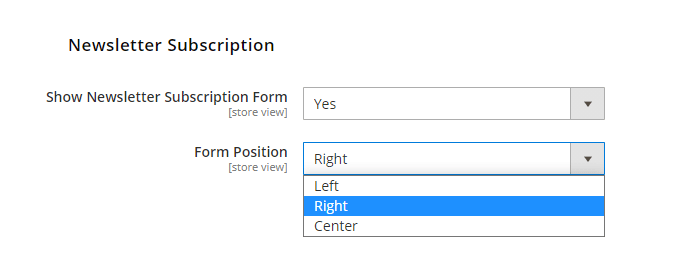
Show Newsletter Subscription Form - set to 'Yes' to display 'Subscribe to Newsletter' block on the frontend.
Form Position - Specify the position of the input (email) field on the block: center, right or left.
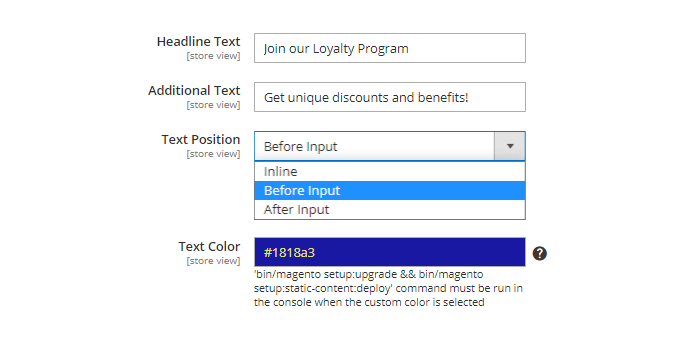
Headline Text - enter the text you'd like to see as a headline.
Additional Text - enter the text that adds extra info about the value of a subscription to your newsletter.
Text Position - Specify text position towards to the input field (email field): before, after or inline.
Text Color - Pick up color for the text on your newsletter block, don't forget to save settings.
Please run the following command below to see the result on the frontend.
'bin/magento setup:upgrade && bin/magento setup:static-content:deploy'
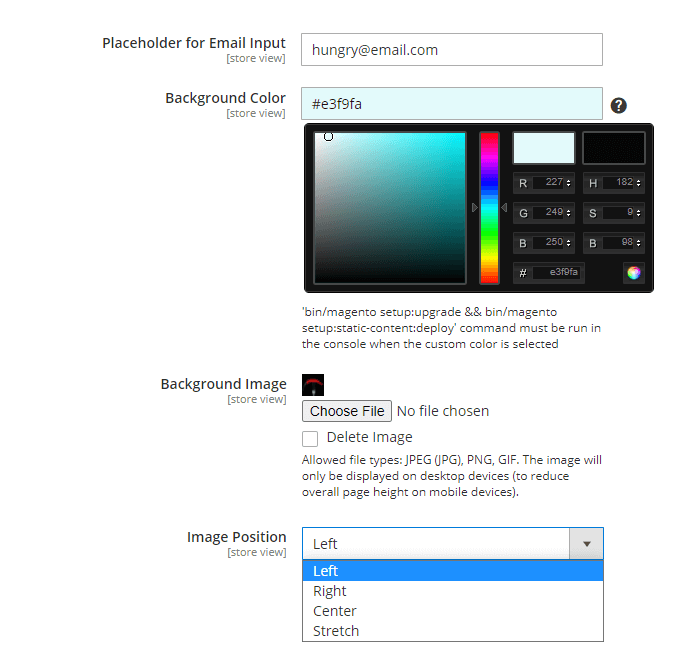
Placeholder for Email Input - set the text that will be displayed as a placeholder.
Background color - Use color picker to specify any color for the block background.
Please note that
'bin/magento setup:upgrade && bin/magento setup:static-content:deploy'
command must be run in the console when the custom color is selected
Please make sure that the setting 'Enable Custom Colors' from the Color Scheme section is set to 'Yes', if you need to customize the background color of the newsletter block.
If you want to apply the different Color Scheme per store views, please check this part of our guide.
Background Image - Use this setting to upload image for the block background.
Please note that the allowed file types are the following: JPEG (JPG), PNG, GIF. The image will only be displayed on desktop devices (to reduce overall page height on mobile devices).
Image Position - Use this option to specify how the image you've uploaded will be applied to the block (stick to the right/left/center or stretch to the full size of the block).
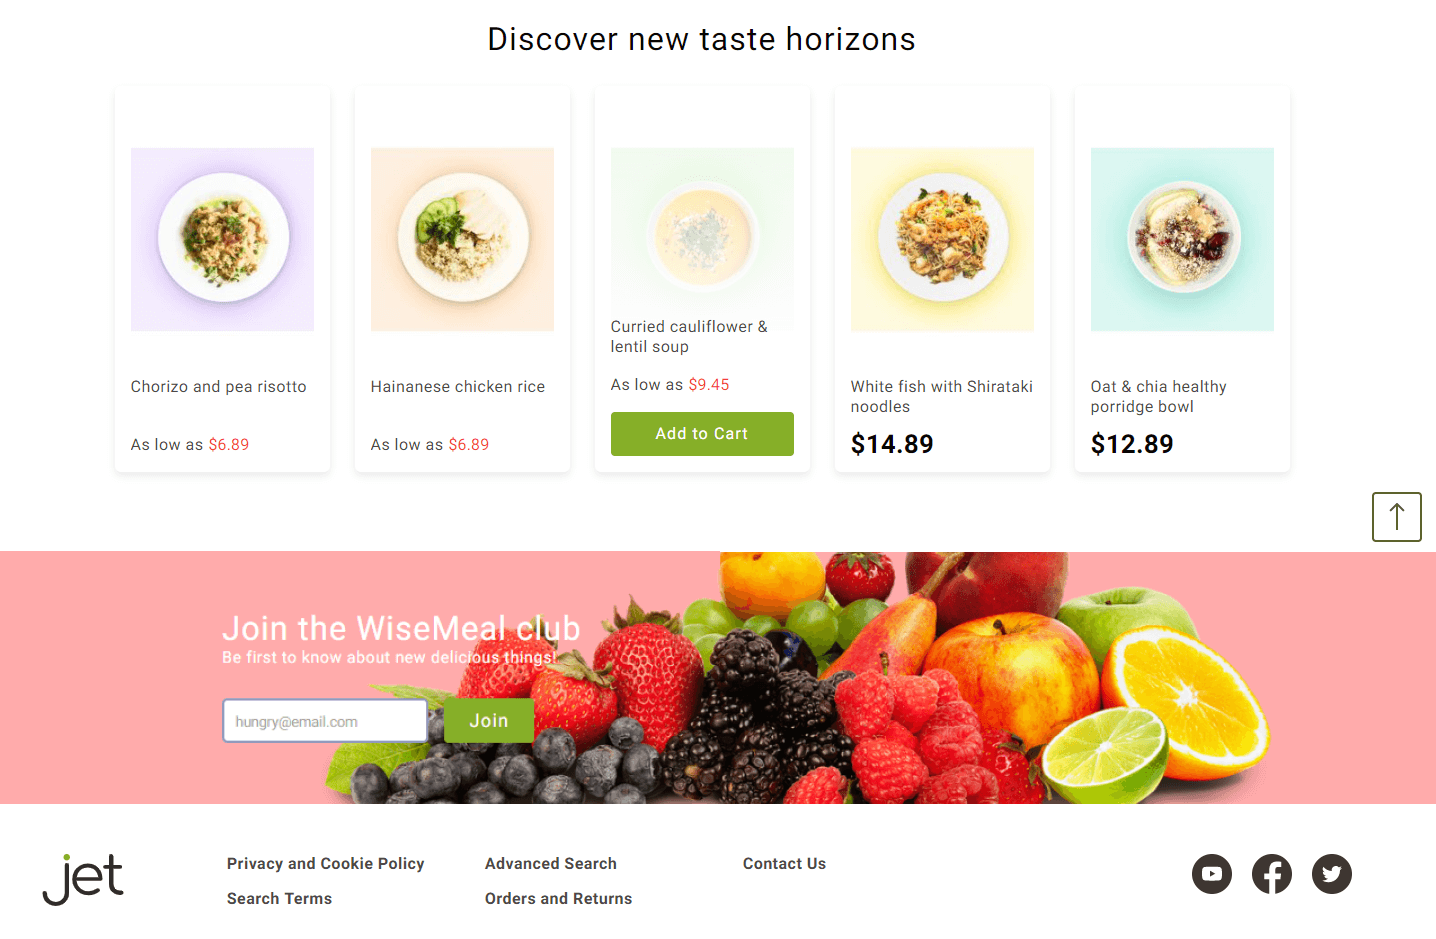
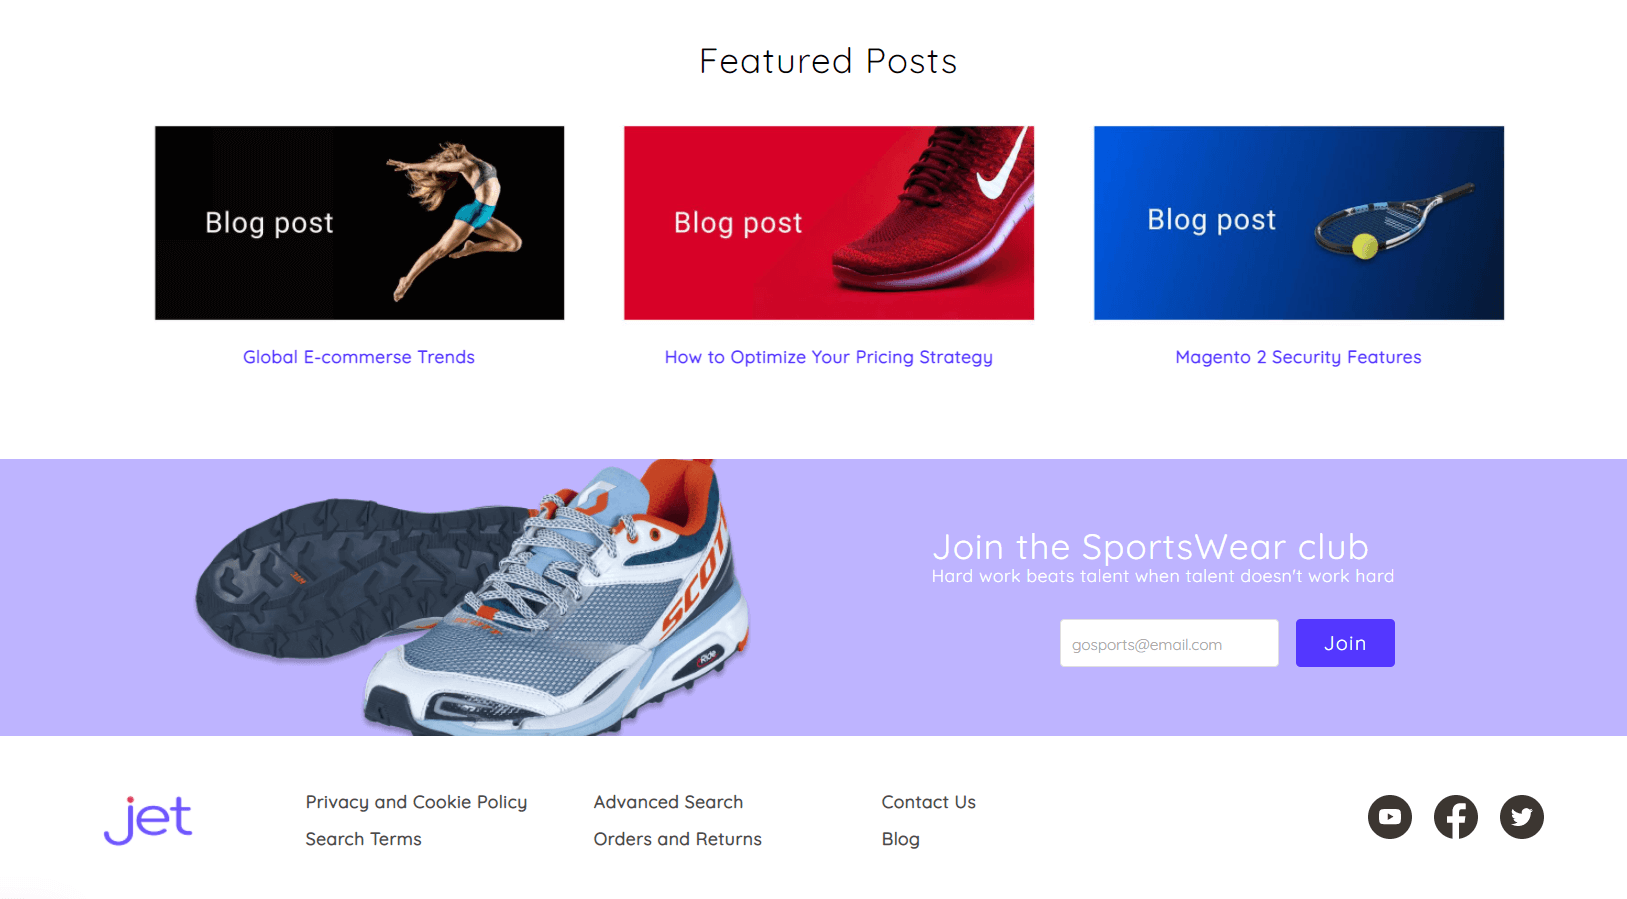
This is an example of how the Newsletter Subscription block looks on the frontend:

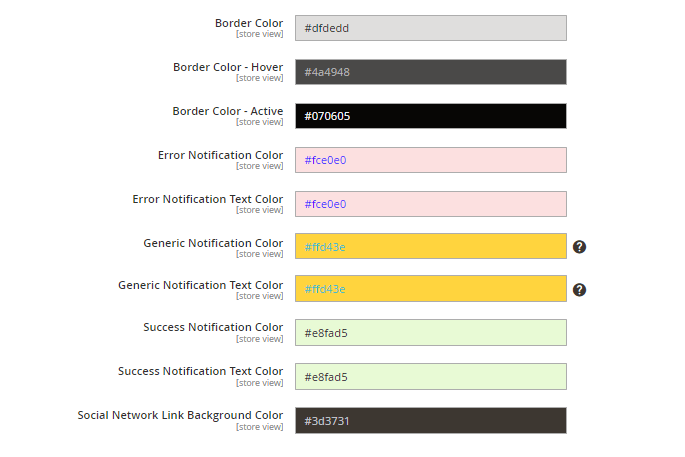
Color Scheme
The Jet theme allows you to quickly customize the colors of your store. To do that, simply choose the colors you'd like to see for a variety of elements.
Please note that the command below must be run in the console when any of the settings in the fields of the 'Color Scheme' section have been changed.
'bin/magento setup:upgrade && bin/magento setup:static-content:deploy'
Feel free to customize colors within the ready-made presets, but make sure not to reapply the same preset again over the color scheme customizations unless you want to reset these customizations.
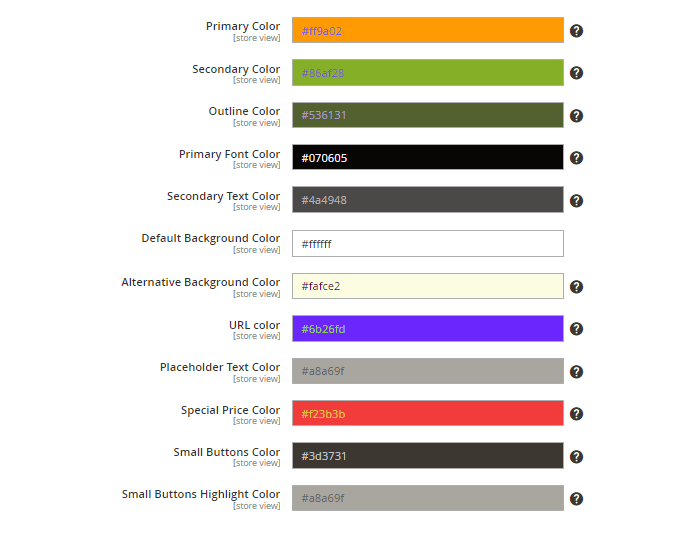
See the preset examples on our demos below.
Default preset:
Bright preset:
Dark preset:
Light preset
Pastel preset:
Fonts
Choose one of three available font types:
- Default (Roboto);
- Google;
- or Non-latin.
Default
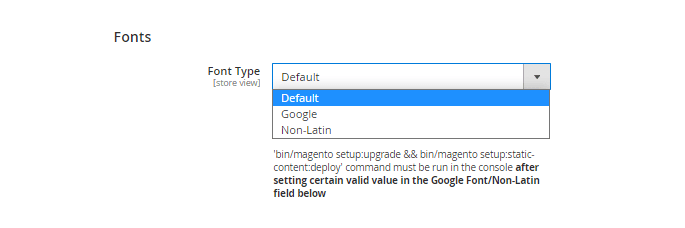
The default font is Roboto.
Please note that
'bin/magento setup:upgrade && bin/magento setup:static-content:deploy'
command must be run in the console after setting certain valid value in the Google Font/Non-Latin field below
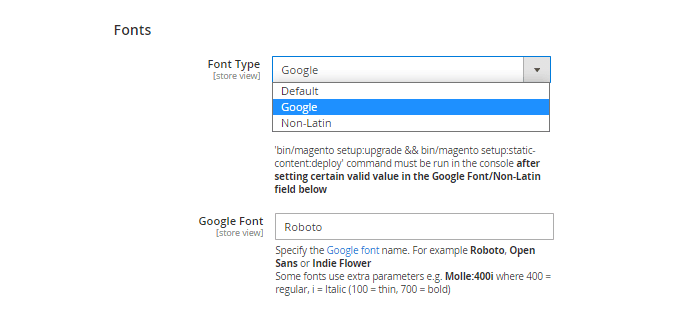
Google Font - Type in the font name you'd like to apply on the frontend, like 'Roboto', 'Open Sans' or 'Oswald'.
Please note that some fonts use extra parameters e.g. Molle:400i where 400 = regular, i = Italic (100 = thin, 700 = bold).
You can find the full list of the available Google Fonts with examples here.
Non-latin
Please install the 'JetNonLatinFonts' module first to properly configure this theme functionality.
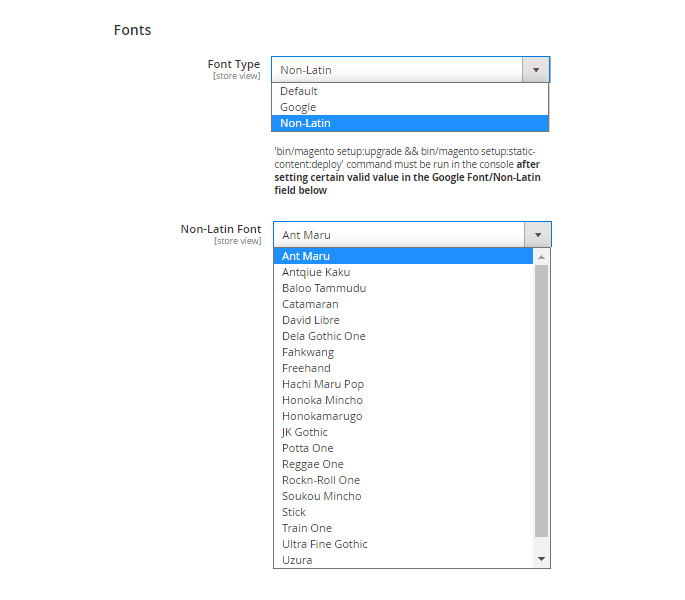
Specify the Non-Latin font name. For example Hachi Maru Pop.
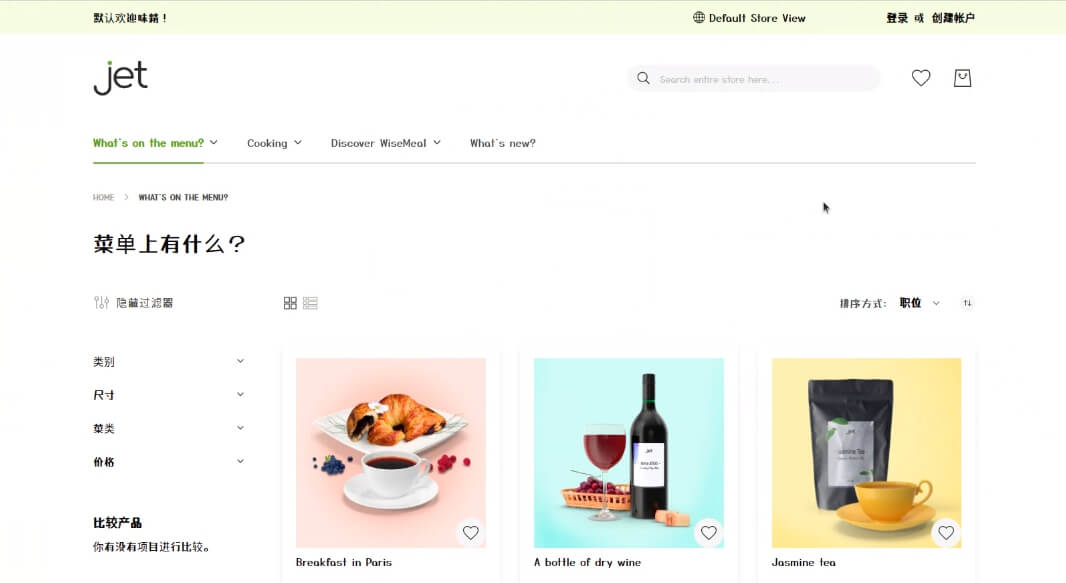
Example on the frontend:
How to apply Color Schemes, Google Fonts and Styles from the Style Switcher to different Store Views?
With Jet Theme, you can apply different Color Schemes and Google Fonts for different Store Views. It allows for more customization options so that your storefront will get a unique design.
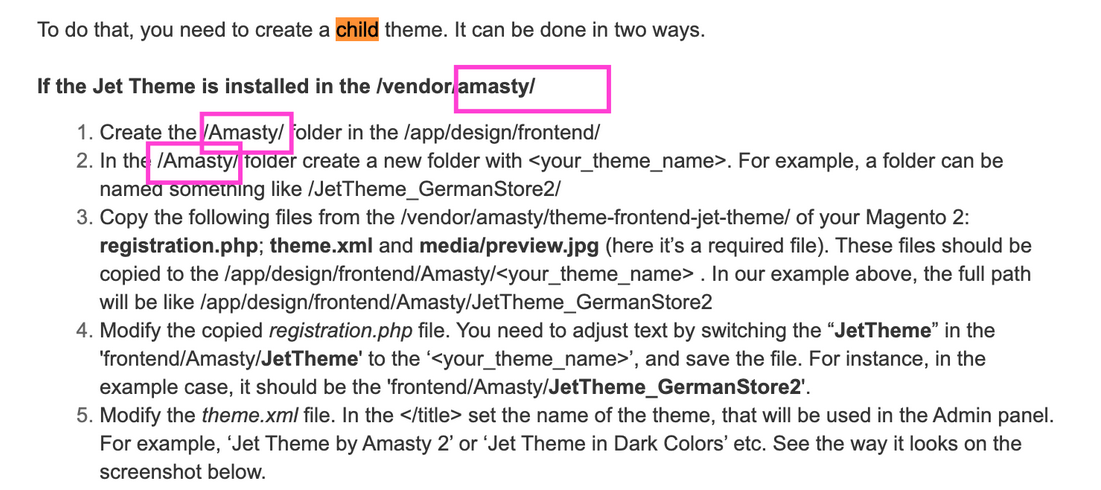
To do that, you need to create a child theme. It can be done in two ways.
If the Jet Theme is installed in the /vendor/amasty/
- Create the /Amasty/ folder in the /app/design/frontend/
- In the /Amasty/ folder create a new folder with <your_theme_name>. For example, a folder can be named something like /JetTheme_GermanStore2/
- Copy the following files from the /vendor/amasty/theme-frontend-jet-theme/ of your Magento 2: registration.php; theme.xml and media/preview.jpg (here it’s a required file). These files should be copied to the /app/design/frontend/Amasty/<your_theme_name> . In our example above, the full path will be like /app/design/frontend/Amasty/JetTheme_GermanStore2
- Modify the copied registration.php file. You need to adjust text by switching the “JetTheme” in the 'frontend/Amasty/JetTheme' to the ‘<your_theme_name>’, and save the file. For instance, in the example case, it should be the 'frontend/Amasty/JetTheme_GermanStore2'.
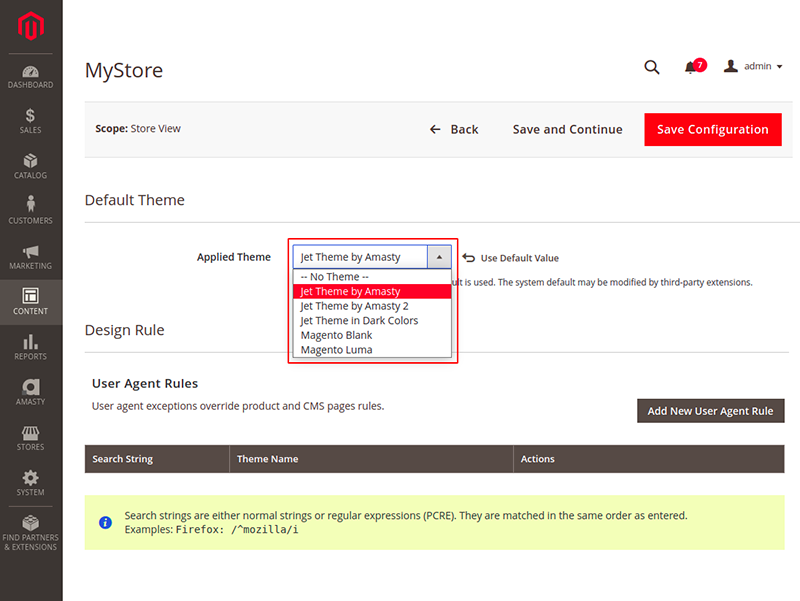
- Modify the theme.xml file. In the </title> set the name of the theme, that will be used in the Admin panel. For example, ‘Jet Theme by Amasty 2’ or ‘Jet Theme in Dark Colors’ etc. See the way it looks on the screenshot below.
- Also, in the <parent> tag set ‘Amasty/JetTheme’ instead of the ‘Magento/blank’ and save the file.
- If you are working in the Developer Mode, you need to run the
'bin/magento setup:upgrade' command from your Magento 2 root. - In case you are working in Production Mode, you need to run the
'bin/magento setup:upgrade && bin/magento setup:di:compile && bin/magento setup:static-content:deploy’ command from the Magento 2 root folder.
If the Jet Theme is installed in the /app/design/frontend/Amasty/
- In the /app/design/frontend/Amasty/ folder create a new folder with <your_theme_name>. For example, a folder can be named something like /JetTheme_GermanStore2/
- Copy the registration.php, theme.xml files and /media/ folder from the /app/design/frontend/Amasty/JetTheme of your Magento 2 to the /app/design/frontend/Amasty/<your_theme_name>. For example, the destination folder can be something like /app/design/frontend/Amasty/JetTheme_GermanStore2/
- Modify the copied registration.php file. You need to adjust text by switching the “JetTheme” in the 'frontend/Amasty/JetTheme' to the ‘<your_theme_name>’, and save the file. For instance, in the example case above it should be the 'frontend/Amasty/JetTheme_GermanStore2'.
- Modify the theme.xml file. In the </title> set the name of the theme, that will be used in the Admin panel. For example, ‘Jet Theme by Amasty 2’ or ‘Jet Theme in Dark Colors’ etc. Then, in the <parent> tag set ‘Amasty/JetTheme’ instead of the ‘Magento/blank’ and hit the Save button.
- If you are working in the Developer Mode, you need to run the
'bin/magento setup:upgrade' command from your Magento 2 root. - In case you are working in Production Mode, you need to run the
'bin/magento setup:upgrade && bin/magento setup:di:compile && bin/magento setup:static-content:deploy’ command from the Magento 2 root folder.
After creation of a Child Theme
After you created a child theme, you need to apply it to the required Store View. To do that, please do the following steps:
- In the Admin panel, go to Content → Design → Configuration
- Press the Edit button near the required Store View
- In the Applied Theme select the newly created theme name (in the creation process examples above, it was ‘Jet Theme by Amasty 2’ and ‘Jet Theme in Dark Colors’)
- Hit the Save button
To apply various Color Schemes and Google fonts for various Store Views, you need to do the following steps.
- First, please proceed to the Admin panel and go to Amasty → JET Theme → Configuration
- In the Scope, select the required Store View and install all necessary Color Scheme and Google Fonts


- Press the Save button.
Run the 'bin/magento setup:upgrade’ command for Developer Mode. If you are working in Production Mode, please run the ‘bin/magento setup:upgrade && bin/magento setup:di:compile && bin/magento setup:static-content:deploy' command.
You can download the archive with sample files to reproduce steps that are described earlier in the guide.
AJAX Usage Configuration
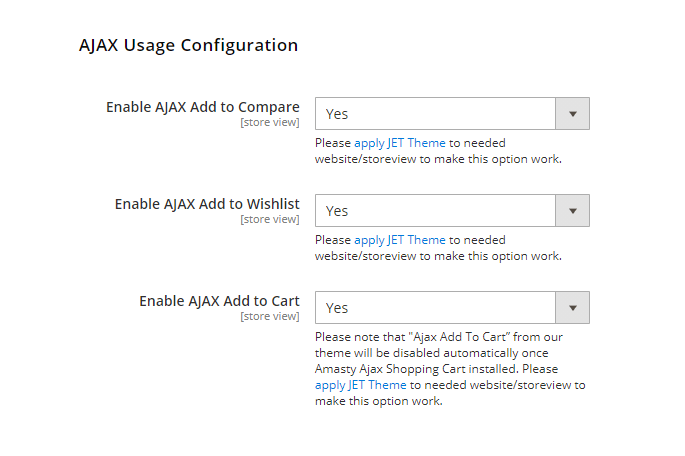
Please apply the JET Theme to the needed website or store view to make these options work.
Enable AJAX Add to Compare - Set 'Yes' if you want the AJAX to work for the 'Compare products' feature.
Enable AJAX Add to Wishlist - Set 'Yes' if you want the AJAX to work for the 'Wishlist' functionality of the theme.
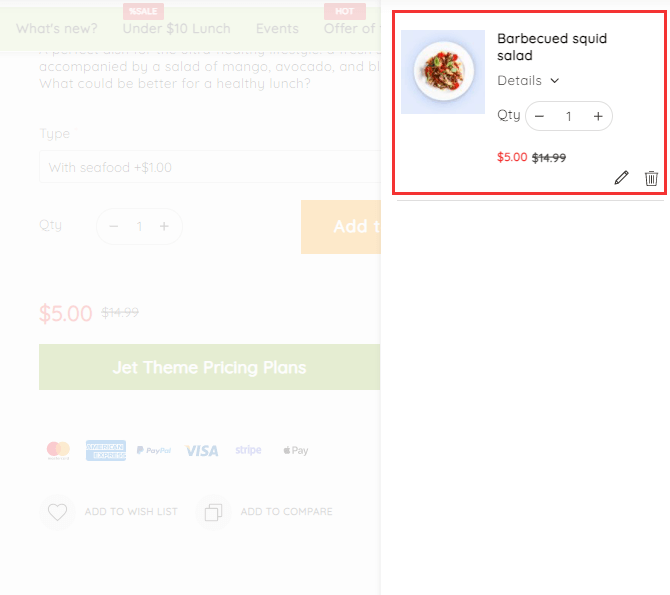
Enable AJAX Add to Cart - Set 'Yes' if you want the AJAX to work for the 'Add to Cart' functionality.
Please note that 'Ajax Add To Cart' from our theme will be disabled automatically once Amasty Ajax Shopping Cart installed.
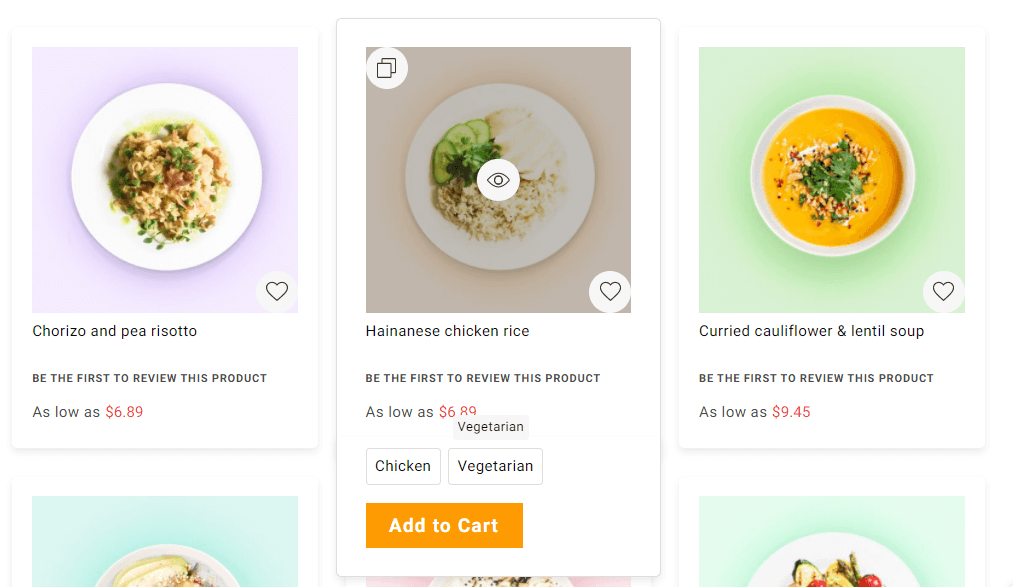
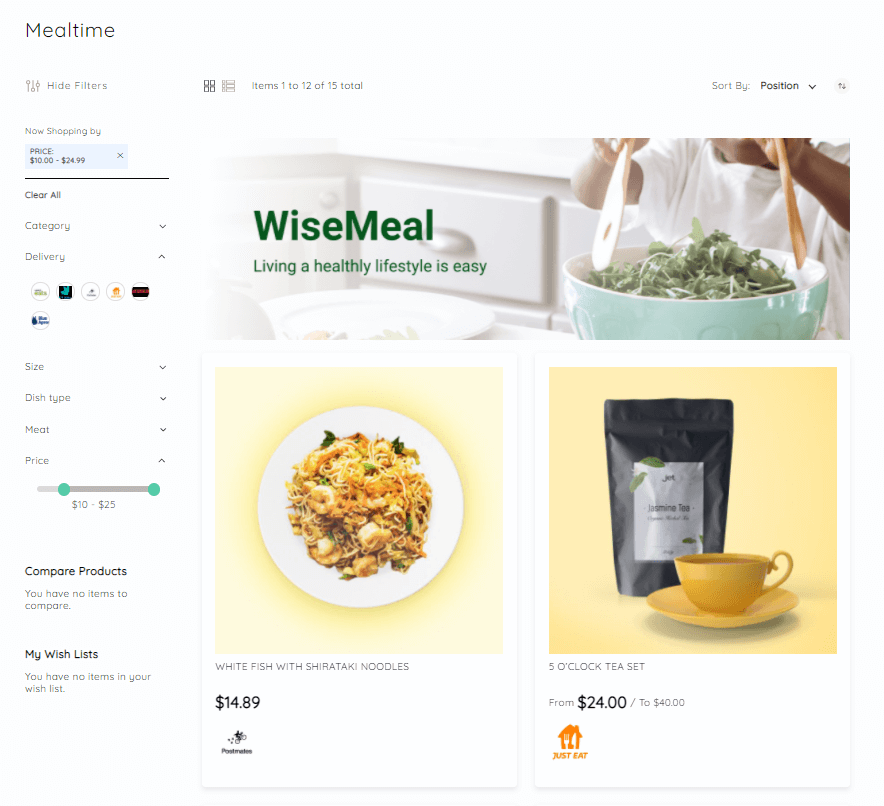
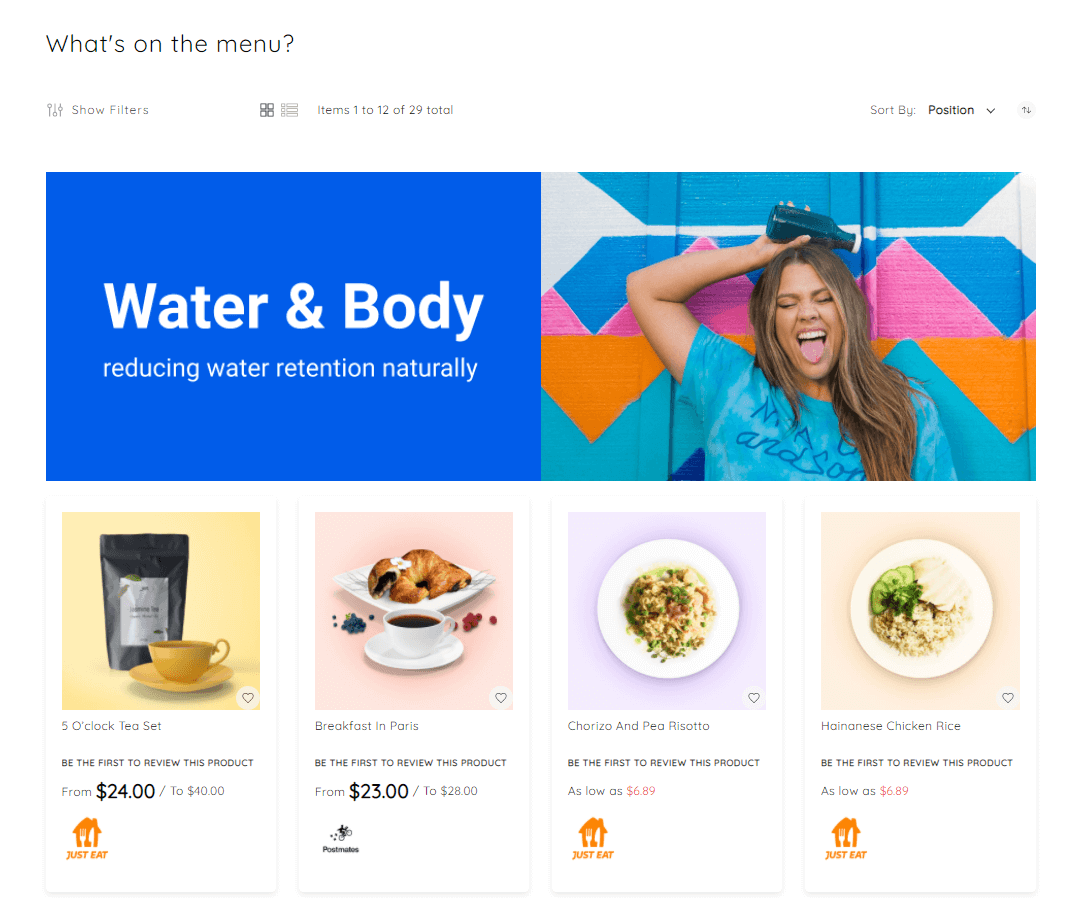
Category Page
See 4 basic examples of how the configurations described below can be applied:

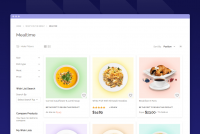
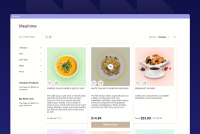


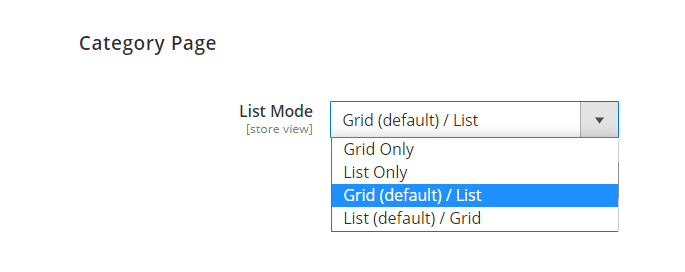
List Mode - please choose one list mode from the dropdown to configure the way you want products to be displayed on category pages.
As for now, four list modes are available:
- Grid only
- List only
- Grid (default)/List
- List (default)/Grid
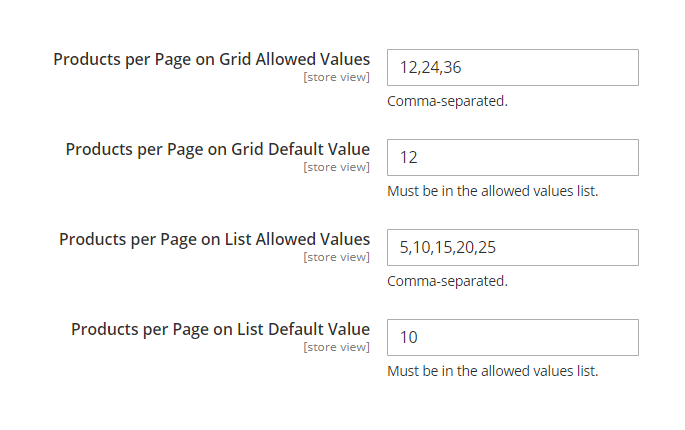
Products per Page on Grid Allowed Values - Here you can specify one or several values of products to be displayed per page on the category page. Please separate several values by commas for the correct work of this feature.
Products per Page on Grid Default Value - Here you can specify the number of products to be displayed per one page on a category if the Grid mode is selected as default.
Products per Page on List Allowed Values - Here you can specify one or several values of products to be displayed per page on the category page. Please separate several values by commas for the correct work of this feature.
Products per Page on List Default Value - Here you can specify the number of products to be displayed per one page on a category if the List mode is selected as default.
Please note that the number you specify in this field must be in the list of allowed values.
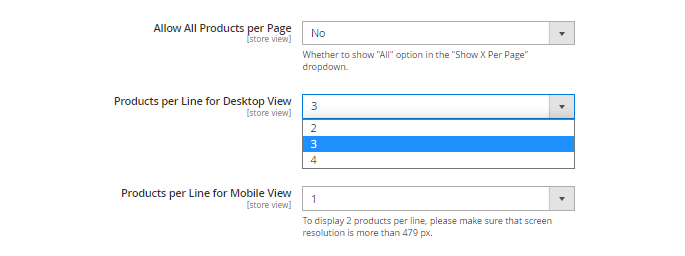
Allow All Products per Page - Allow showing all the relevant products per one page without any limitations.
Whether to show “All” option in the “Show X Per Page” dropdown.
Products per Line for Desktop View - Choose how many products to display per line on the category pages.
See examples of various category layout configurations on the frontend:


Products per Line for Mobile View - Choose how many products to display per line on the category pages on mobile. To display 2 products per line, please make sure that screen resolution is up to 480 px.

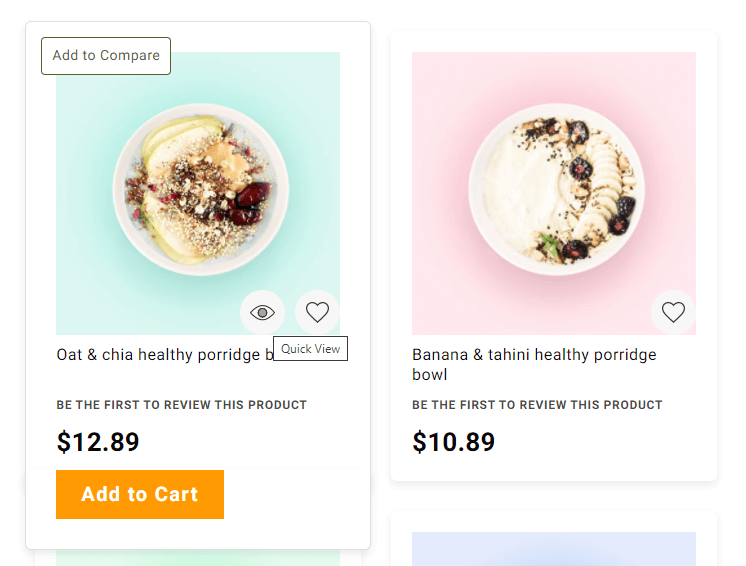
Enable Quick View - Use this setting to switch on/off the Quick View feature for the product cards on the frontend.
Please apply JET Theme to needed website/storeview to make this option work.
See how the Quick View feature looks on the frontend:

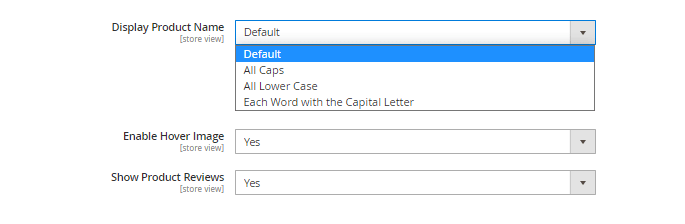
Display Product Name - Choose how do you want to display product names on the frontend:
- 'Default' - the standard Magento product names display;
- 'All Caps' - with all letters capitalized;
- 'All Lower case' - with no capital letters at all;
- 'Each Word with the Capital Letter' - each word will start with the capital letter.
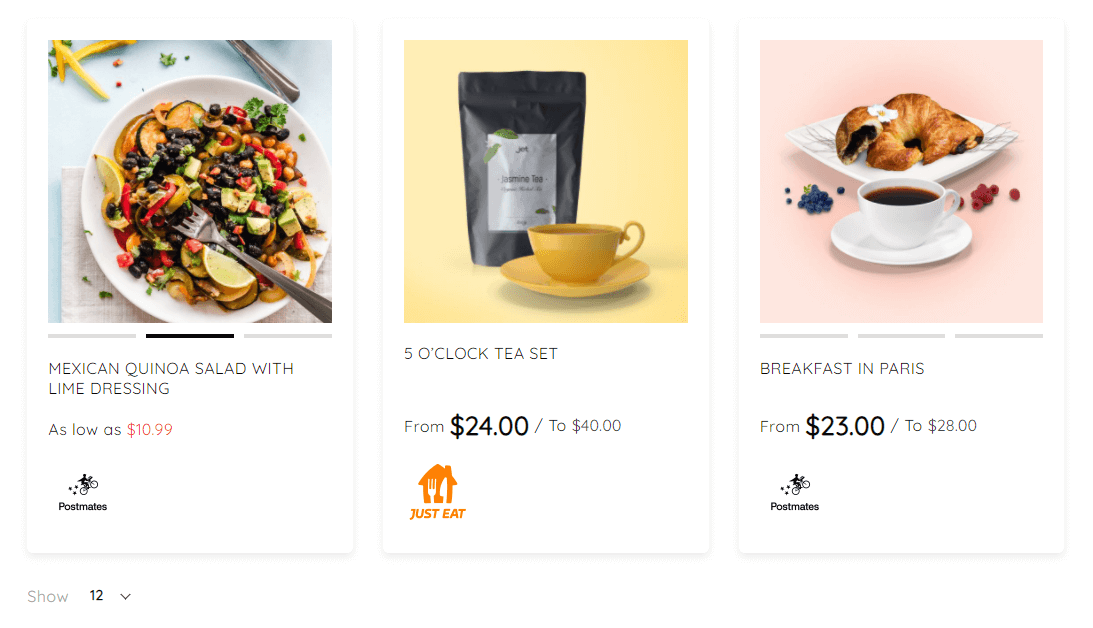
Enable Hover Image - Set 'Yes' to enable hover image animation for the product cards. Mouse hover will activate the slideshow, on the product listing pages and search.
See the example of the product listing page when the 'Enable Hover Image' setting is set to 'Yes'.
Show Product Reviews - Enable/disable the display of the product reviews.
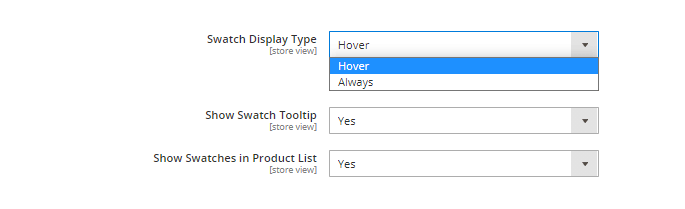
Swatch Display Type - Choose whether to show the swatches all the time or just on hover.
Show Swatch Tooltip - Use this setting to enable the display of tooltips for the swatches configured.
Show Swatches in Product List - Enable/disable showing swatches in the product list.
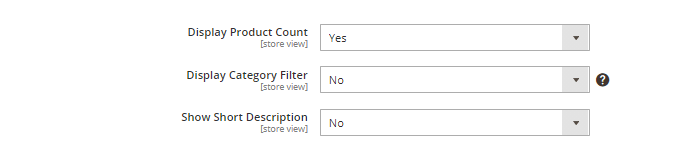
Display Product Count - Enable/disable the display of the product count on the frontend.
Display Category Filter - Enable/disable the display of the category filter on the frontend.
Please kindly note that this feature was introduced in Magento 2.4.0 and may not be available in older versions.
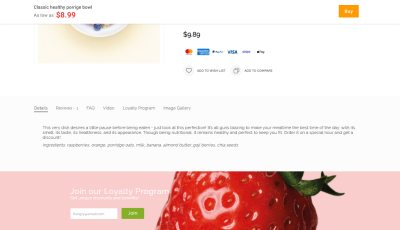
Show Short Description - Enable/disable display of the short description.

Display Add to Cart Button - Choose when to display your 'Add to Cart' buttons:
- 'No' - do not display the 'Add to Cart' buttons on category pages at all;
- 'Always' - always show the 'Add to Cart' buttons on category pages;
- 'On hover' - show the 'Add to Cart' buttons on category pages on hover only.

Align Add to Cart - Choose the style for your 'Add to Cart' buttons display:
- Center;
- Left;
- Full Width.
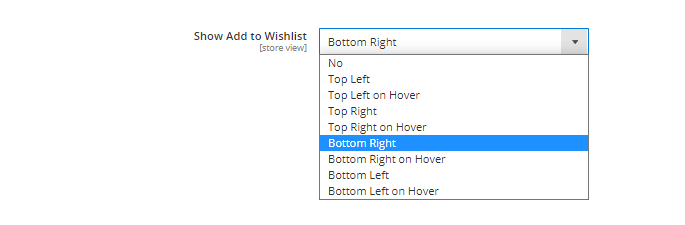
Show Add to Wishlist - Choose where and how to display the 'Add to Wishlist' buttons.
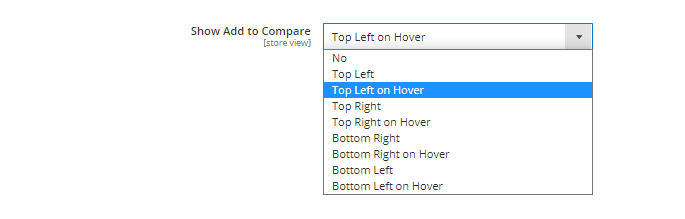
Show Add to Сompare - Choose where and how to display the 'Add to Сompare' buttons.
Gallery
Thumbnails Gallery
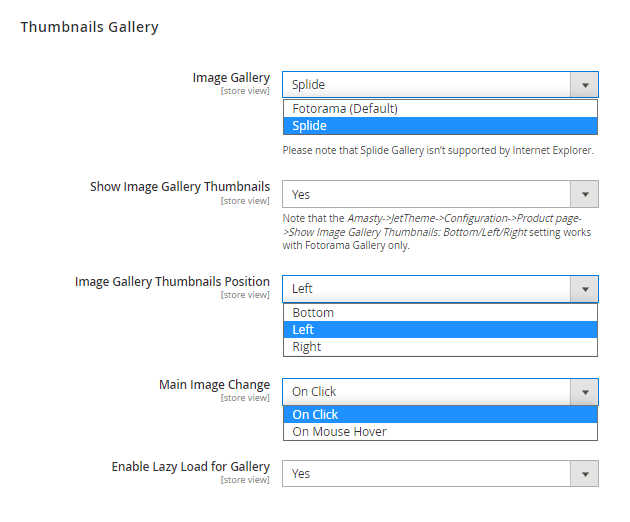
Image Gallery - Select gallery type from the dropdown for further configurations.
Please note that Splide Gallery isn’t supported by Internet Explorer.
Show Image Gallery Thumbnails - Set to 'Yes' to enable image gallery thumbnails.
Note that the 'Amasty → JetTheme → Configuration → Product page → Show Image Gallery Thumbnails' : Bottom/Left/Right setting works with Fotorama Gallery only.
Image Gallery Thumbnails Position - Choose the image gallery position from the dropdown:
- Left
- Bottom
- Right
Main Image Change - Choose the way the main image of the gallery will be changed to the next or previous one:
- On click
- On Mouse Hover
Enable Lazy Load for Gallery - Set 'Yes' to use Lazy Load for the Splide type Gallery images.
Magnifier
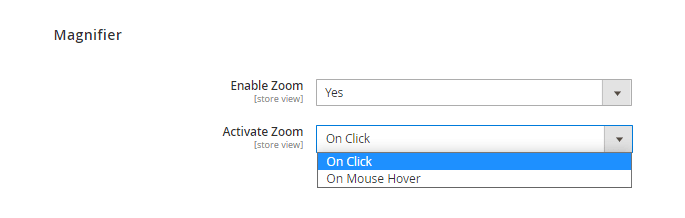
Enable Zoom - Use this setting to enable Zoom for your gallery.
Activate Zoom - Choose the way of activating Zoom:
- On click
- On (mouse) hover
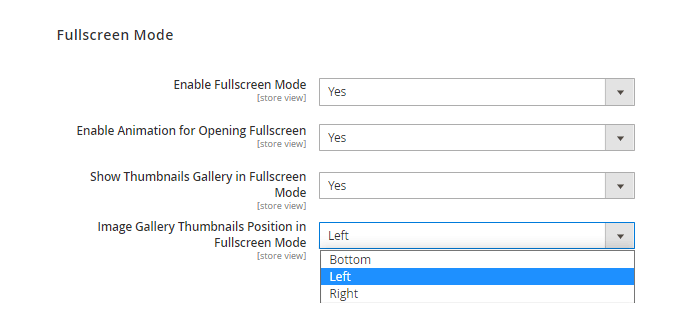
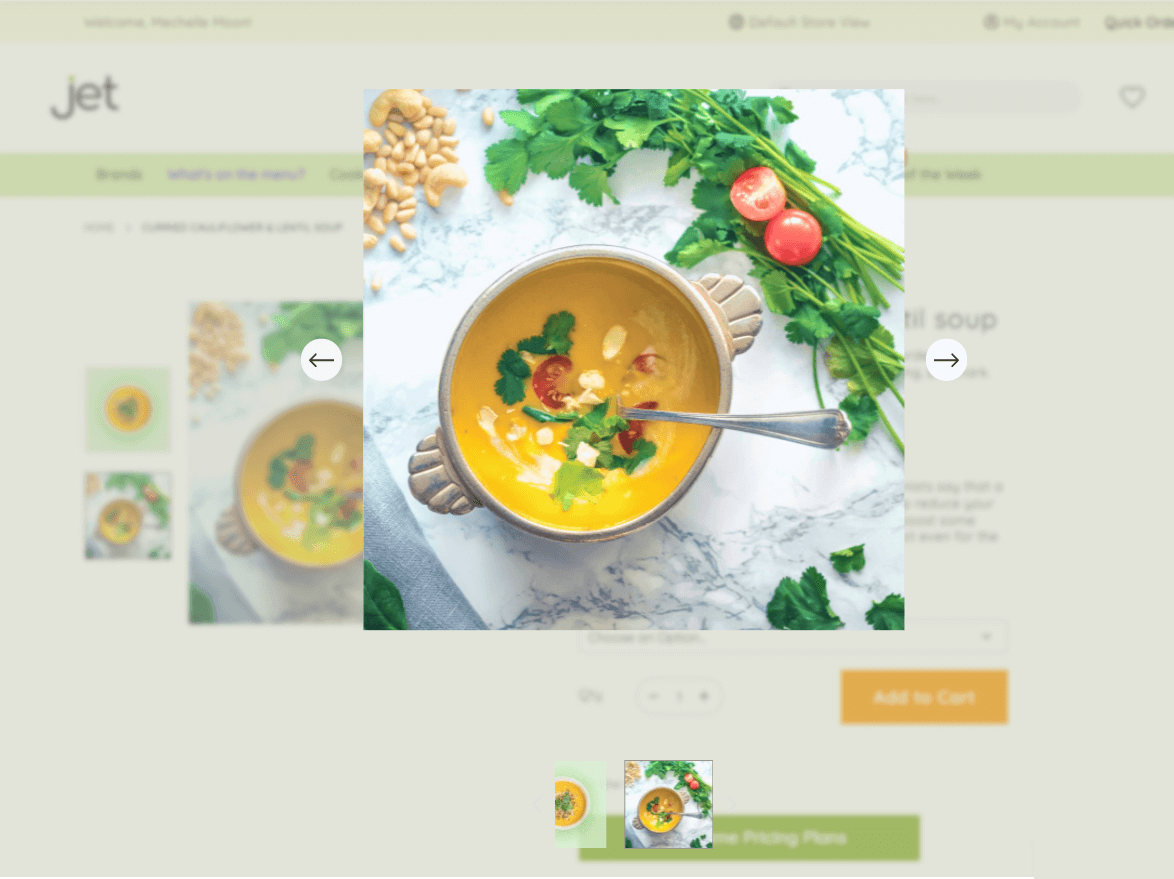
Fullscreen Mode
Enable Fullscreen Mode - Use this setting to enable the fullscreen mode for the Splide image gallery.
Enable Animation for Opening Fullscreen - Set 'Yes' to enable specific animation for opening a fullscreen mode.
Show Thumbnails Gallery in Fullscreen Mode - Use this setting to enable fullscreen mode for the thumbnails gallery.
Image Gallery Thumbnails Position in Fullscreen Mode - Choose one from three positions from the dropdown for the main image display type:
- Left
- Bottom
- Right
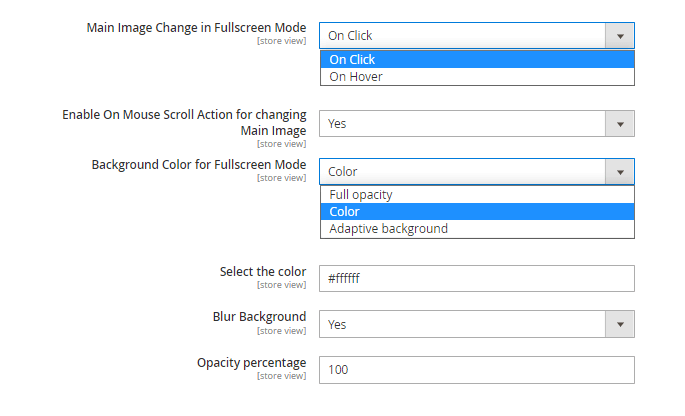
Main Image Change in Fullscreen Mode - Choose the way of how the main image will change in the fullscreen mode:
- On click
- On hover
Enable On Mouse Scroll Action for changing Main Image - Set 'Yes' to enable changing images on mouse scroll.
Background Color for Fullscreen Mode - Use this setting to choose one of the ways how the background will be displayed:
- Full opacity - choose this option for 100% background opacity;
- Adaptive background - This option enables two more configurations: Blur background and Opacity percentage.
- Color - This option enables three more configurations: Select the color, Blur background and Opacity percentage.
Select the color - Use a color picker to choose color for the background color.
Blur Background - Enable background blur here.
Opacity percentage - Specify the opacity of the background blur here.

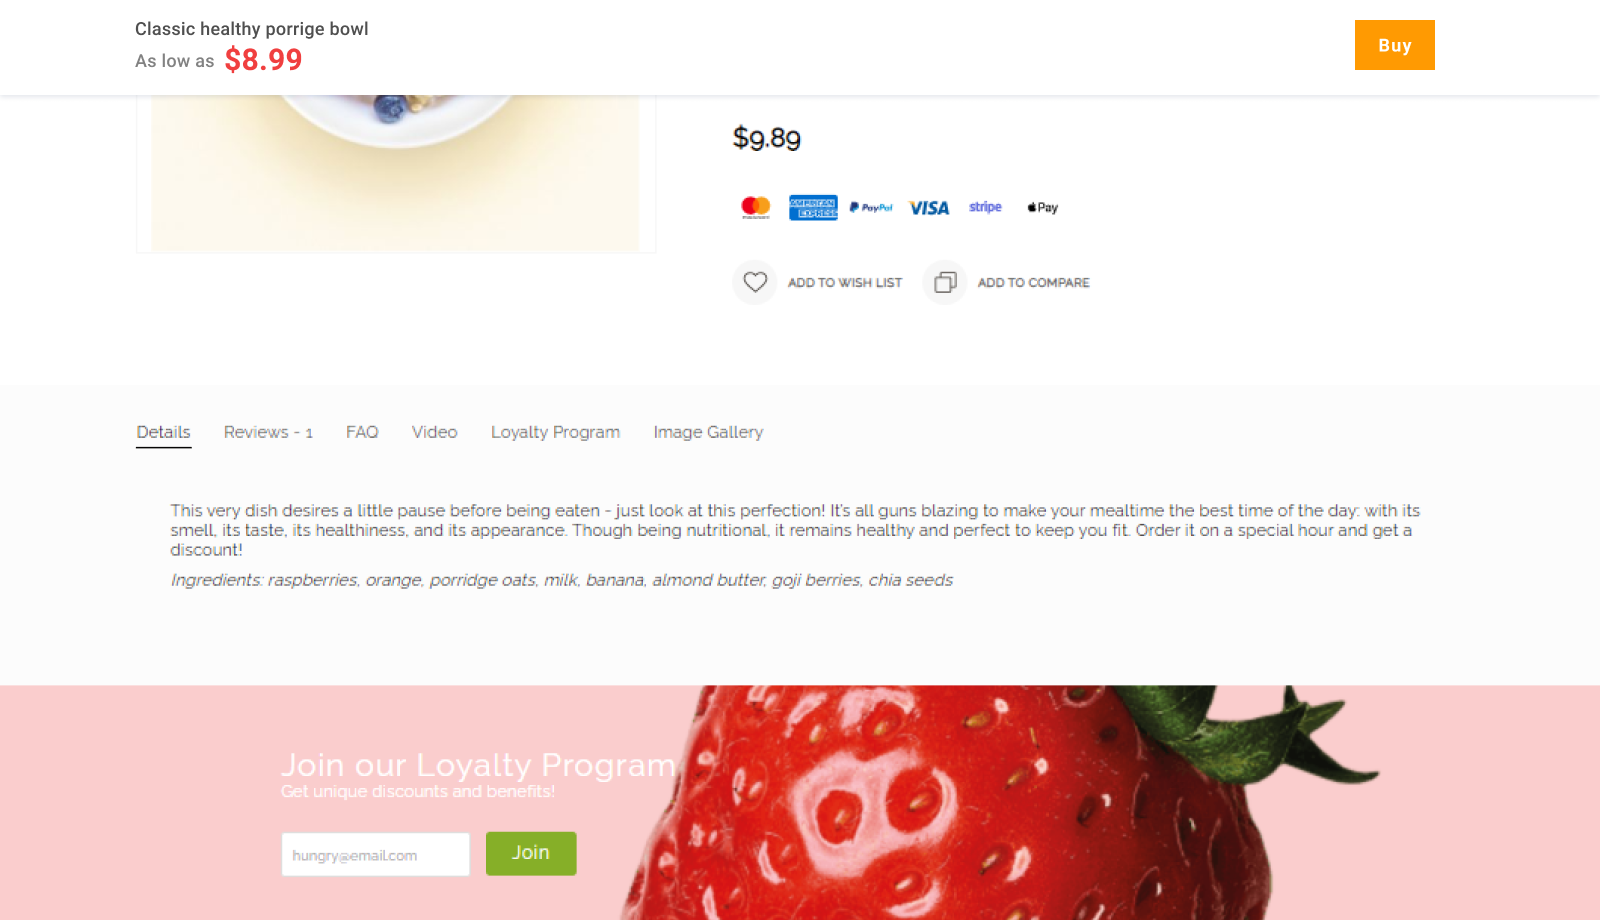
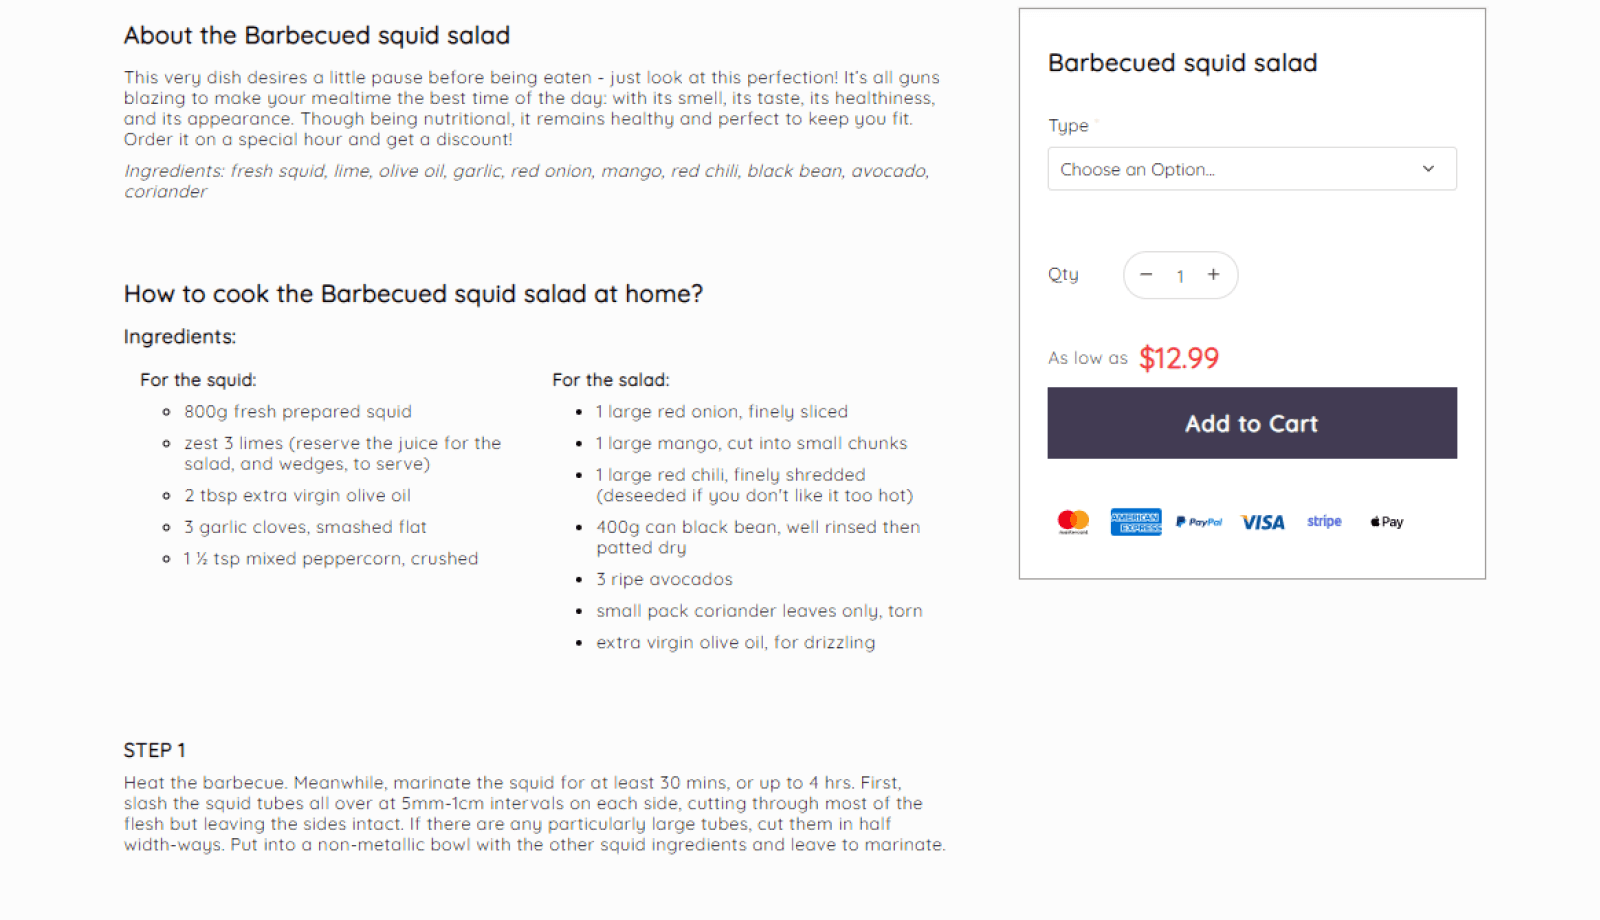
Product Page
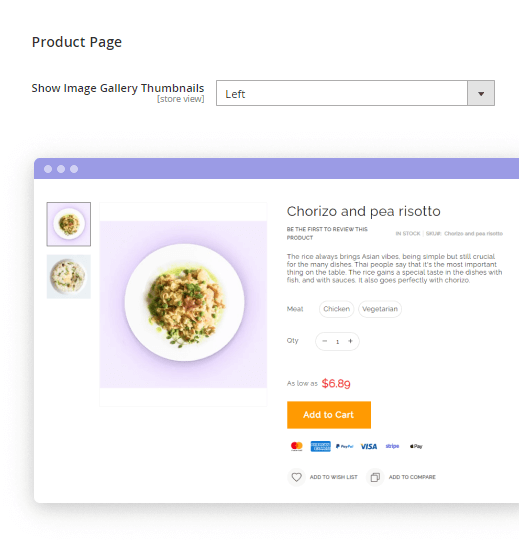
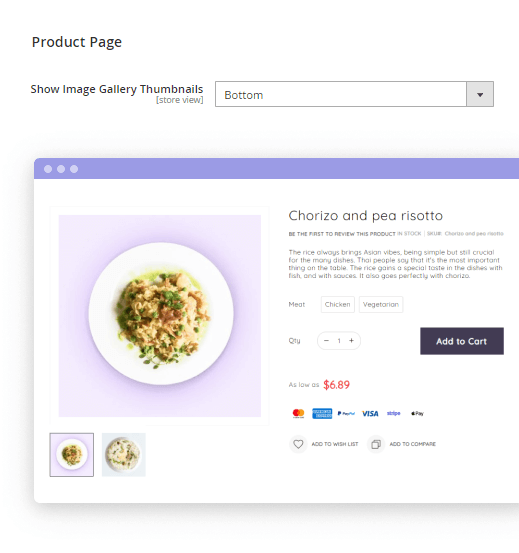
See 3 basic examples of how the configurations described below can be applied:


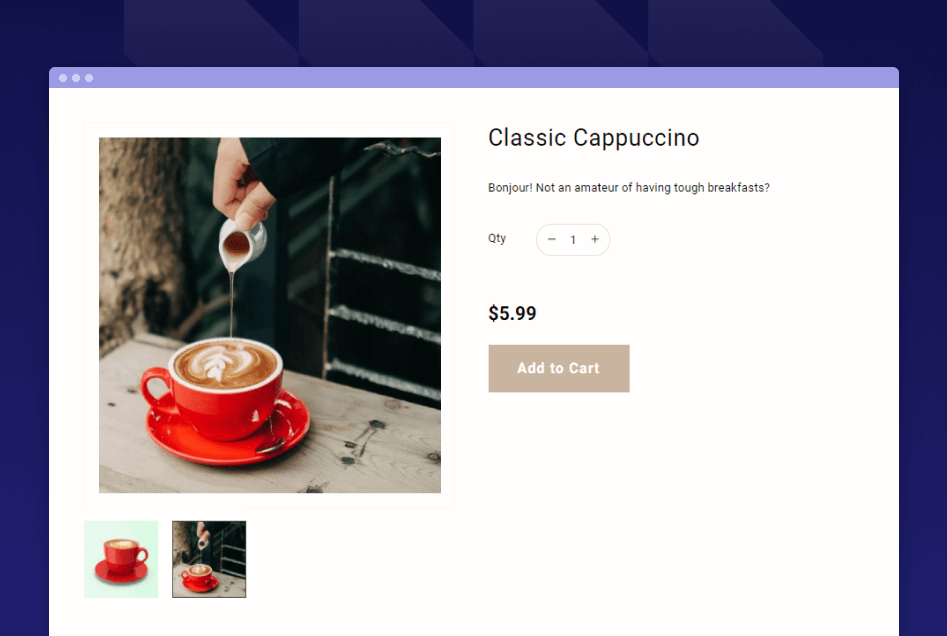
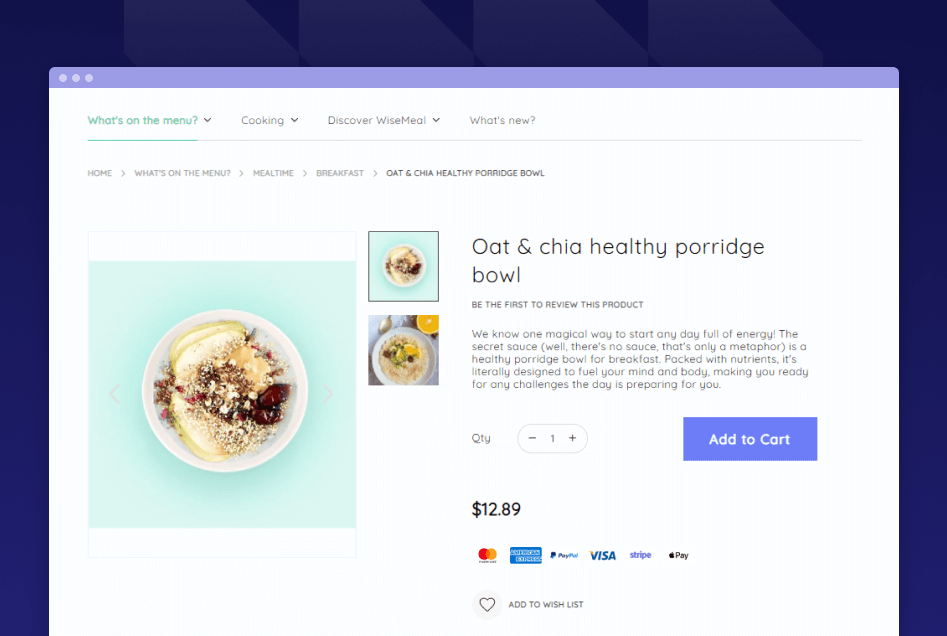
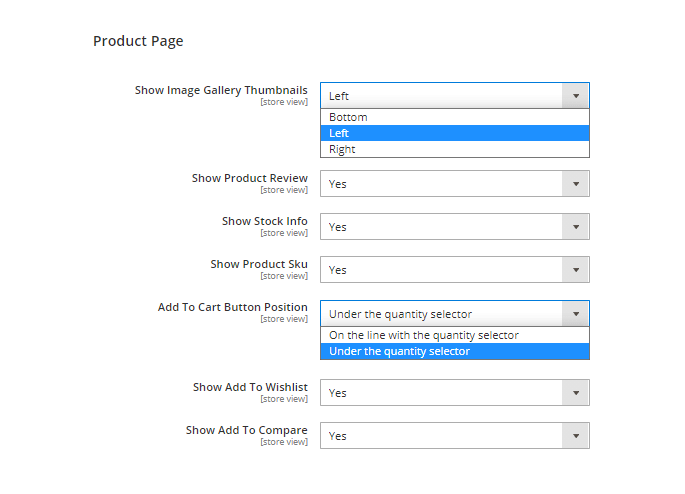
Show Image Gallery Thumbnails - Choose how to display the image gallery thumbnails:
- 'Bottom' - bottom (below the main image),
- 'Left' - on the left from the main image,
- 'Right' - on the right from the main image.

Show Product Review - Enable/disable the display of product reviews on the frontend.
Show Stock Info - Enable/disable display of the product stock info.
Show Product Sku - Enable/disable display of the product SKU.
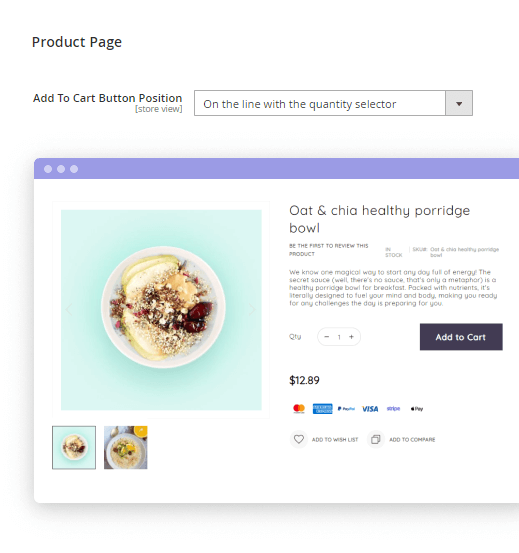
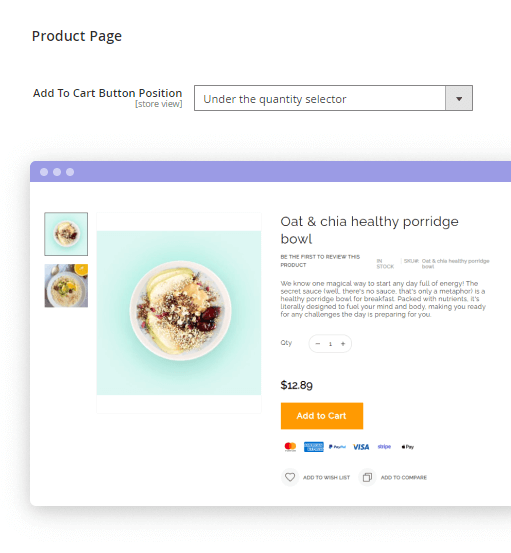
Add To Cart Button Position - Choose the 'Add to Cart' button's position from the dropdown:
- Under the quantity selector;
- On the line with the quantity selector.
Show Add To Wishlist - Enable/disable display of the 'Add to Wishlist' button for the product.
Show Add To Compare - Enable/disable display of the 'Add to Compare' button for the product.
Custom Header
Enable Custom Header - Set 'Yes' to enable custom header and make further configurations.
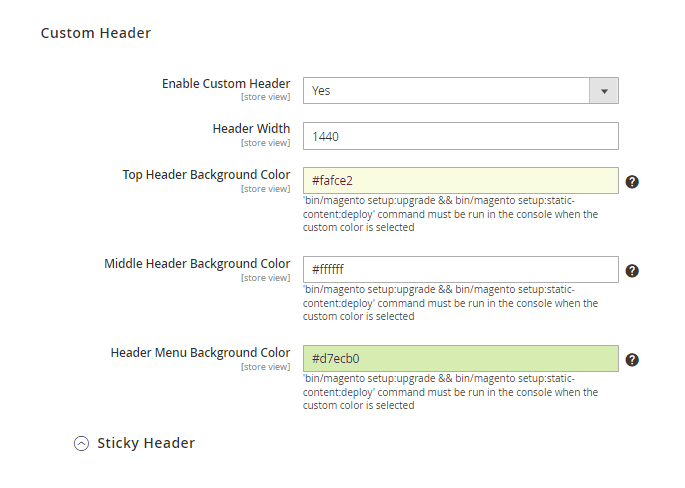
Header Width - use this setting to specify header width, in pixels.
Please note that the
'bin/magento setup:upgrade && bin/magento setup:static-content:deploy'
command must be run in the console when the custom color is selected.
Top Header Background Color - use this setting to customize the top header background color.
Middle Header Background Color - use this setting to customize the middle header background color.
Header Menu Background Color - use this setting to customize the header menu background color.
To customize other colors of the color scheme, please consult the Color Scheme section of the user guide.
Sticky Header
Please note that if the Sticky Add to Cart (Horizontal Bar) is also enabled, then only the Sticky Add to Cart (Horizontal Bar) will be displayed and the Sticky header won't be visible.
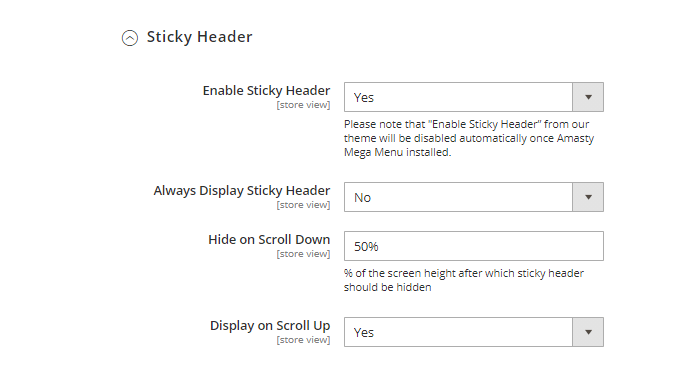
Enable Sticky Header - Set 'Yes' to enable Sticky Header.
Please note that “Enable Sticky Header” from our theme will be disabled automatically once Amasty Mega Menu installed.
Always Display Sticky Header - Choose whether to always display Sticky Header or only if a certain condition is met. Choose 'No' to see extra configuration options.
Hide on Scroll Down - This option becomes visible only if you've chosen 'No' in the option 'Always Display Sticky Header'. Specify here % of the screen height after which sticky header should be hidden, e.g. 50%.
Display on Scroll Up - his option becomes visible only if you've chosen 'No' in the option 'Always Display Sticky Header'. Set 'Yes' to display Sticky Header on a scroll up.
This is an example of how the Sticky Header looks on the frontend:
Custom Footer
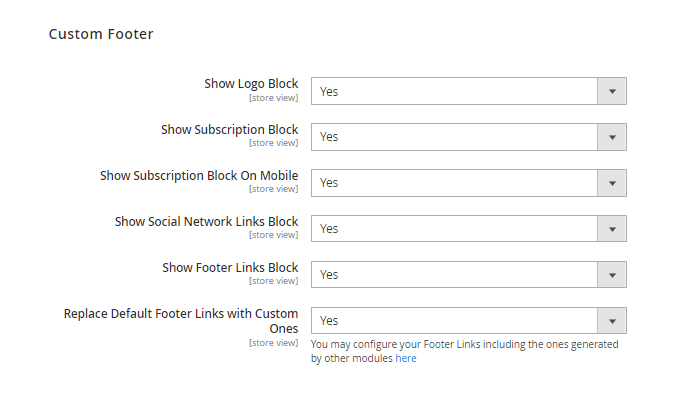
Show Logo Block - Set 'Yes' to show logo on your custom footer. If this setting is set to 'No' then the default footer will be displayed.
Show Subscription Block - Set 'Yes' to show the subscription field on your custom footer.
Show Subscription Block on Mobile - Set 'Yes' to show the subscription field on your custom footer on mobile devices as well.
Show Social Network Links Block - set to 'Yes' if you want to display the block with clickable icons of chosen social networks in your custom footer.
Show Footer Links Block - set to 'Yes' display your custom links in the footer.
Replace Default Footer Links with Custom Ones - To configure your Footer Links including the ones generated by other modules, please navigate to 'Content → Amasty Jet Theme → Manage Footer Links'.
Learn more about how to configure Social Links here.
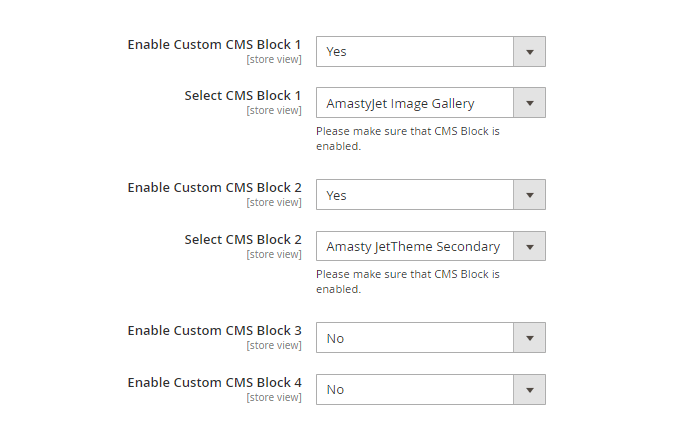
Enable Custom CMS Block X - set 'Yes' to enable custom CMS block in footer. There are 4 slots available for adding custom CMS blocks.
To create and configure CMS Blocks please navigate to Content → Elements → Blocks (default Magento functionality).
Select CMS Block X - choose the necessary CMS block from the dropdown so it can be displayed in your footer.
- Please note that this setting is only visible when the setting 'Enable Custom CMS Block' is set to 'Yes'.
- Please make sure that CMS Block is enabled.

Show Payment Methods Block - set 'Yes' to display available payment methods in your footer.
Align Payment Methods Block - use this setting to choose the alignment of the payment methods block: right, center, or right.
Learn how to configure Payment Methods Block here.
See the frontend example of payment methods in footer:


Enable Custom Mini Footer - set 'Yes' to enable custom mini footer. For the correct work of this option please create the relevant CMS block first.
Mini Footer CMS Block - Choose the relevant CMS block from the dropdown.
- Please note that this option can be visible only if you've set 'Yes' for the option 'Enable Custom Mini Footer'.
- Please make sure that CMS Block is enabled.
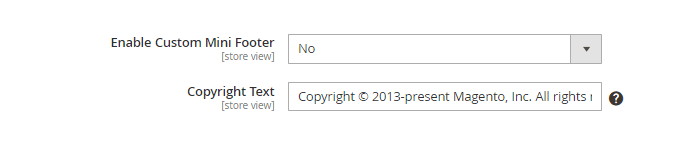
Copyright Text - Please note that this option won't be visible if you've selected 'Yes' for the option 'Enable Custom Mini Footer'. Specify the copyright text to be displayed on your footer.
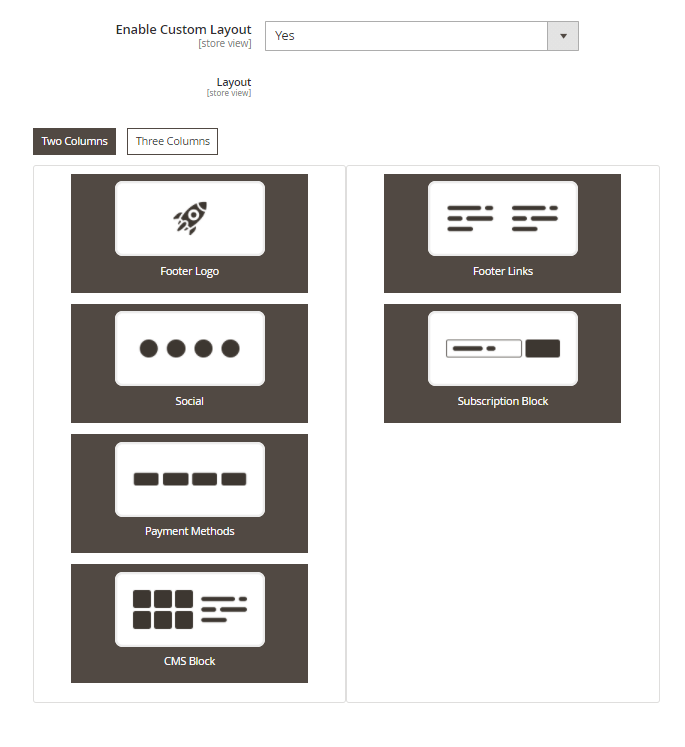
Enable Custom Layout - set 'Yes' to choose from the 2- or 3-columns footer layout and customize its content. Just drag-n-drop cards to configure it.
Social Links in Footer
This is an example of how the Social Network Links block looks on the frontend:

In order to configure content of the block, please navigate to Content → Amasty Jet Theme → Manage Social Links.
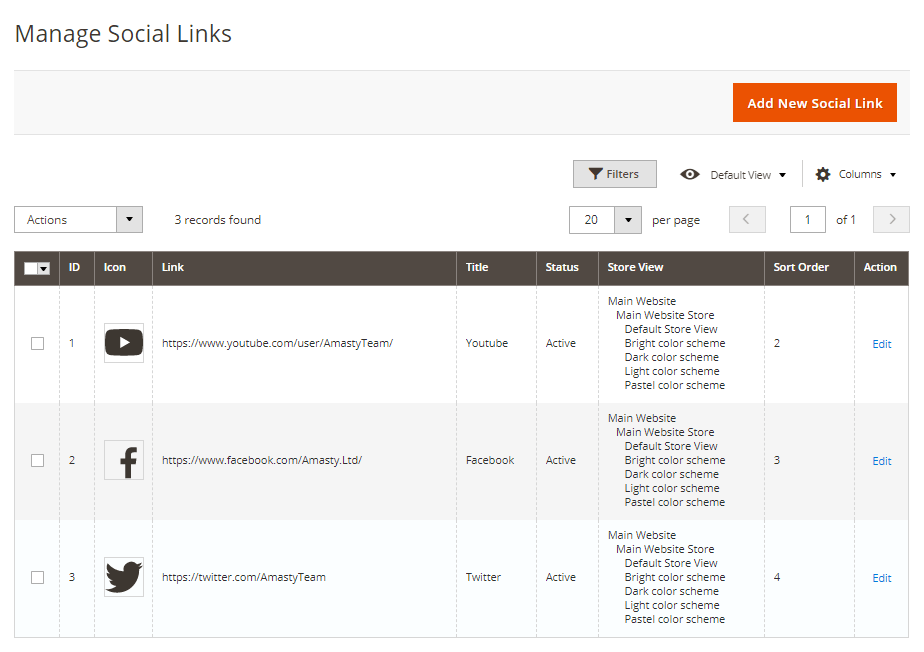
There you'll find a grid to manage all social links you create. Click no the 'Add New Social Link' button to create the new one.
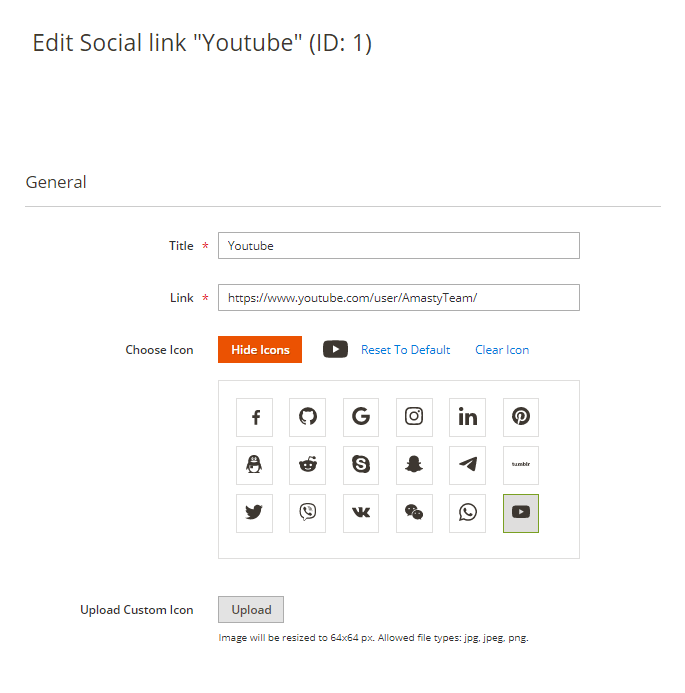
Title - Specify the social link's title, e.g. 'YouTube'.
Link - Specify the URL leading to your profile on a social network.
Choose Icon - Choose a social icon from the gallery. Reset icon to default if you changed your mind or just clear icon.
Upload Custom Icon - Upload custom icon here.
Image will be resized to 64×64 px. Allowed file types: jpg, jpeg, png.
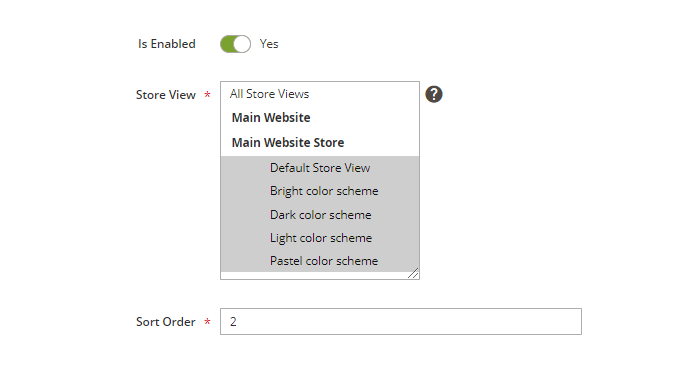
Is enabled - Enable/disable the social link with this toggle.
Store View - Choose the store views where your icon will be displayed.
Sort Order - Specify sort order for the icon to set up a certain order (priority) of its display among the other icons.
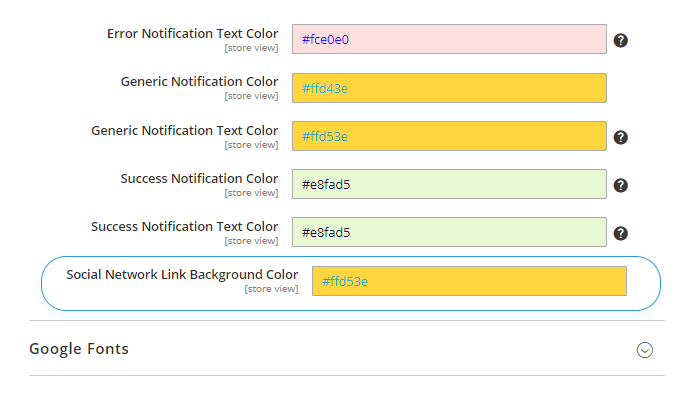
How to change the color of the social network icons?
Please note that you can also change the color of the social link icons. To do so, please navigate to Stores → Configuration → Amasty Extensions → Jet Theme → Color Scheme and use the last setting from the list, named 'Social Link Background Color'.
Mobile Logo
![]()
Use Other Logo for Mobile - Set this setting to 'Yes' to configure the mobile logo of your store separately from the desktop logo.
Mobile Logo Image - Use this setting to upload a separate logo for the mobile version. Maximum file size: 2 MB. Allowed file types: JPG, GIF, PNG.
To configure logo for the Desktop please navigate to 'Content → Design → Configuration'. From the grid, select the required scope, go to the detailed settings and move to Header section → Logo Image.
Mobile Logo Attribute Width, Height - Use this setting for width and height configuration.
Payment Methods Block
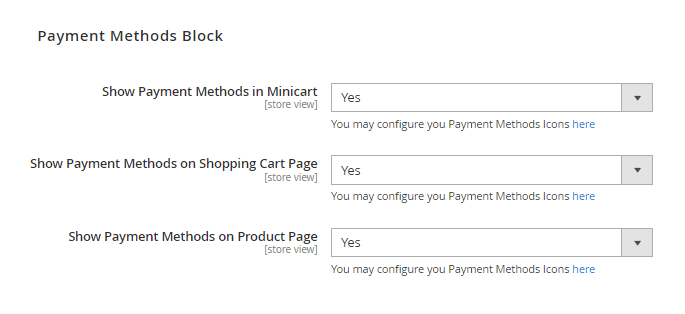
Show Payment Methods in Minicart - Set 'Yes' to show payment methods block in mini cart;
Show Payment Methods on Shopping Cart Page - Set 'Yes' to show payment methods block on Shopping Cart Page;
Show Payment Methods on Product Page - Set 'Yes' to show payment methods block on Product Page.
See frontend examples:


Manage Payment Method Icons
Please navigate to Content → Amasty Jet Theme → Manage Payment Method Icons to manage Payment Method Icons.
![]()
Use the default payment method icons or click on the 'Add New Payment Method Icon' button to create new.
![]()
Title - Here you can specify the title of the icon.
Choose icon - Choose from the library of the ready-made icons or upload your own image using the setting below.
Upload Custom Icon - Upload an image to create a custom icon not listed in the library from the setting above.
Is Enabled - Enable and disable the icon.
Store View - Choose the store views where the icon will be displayed.
Sort order - specify a sort order for the icon.
See these settings on our demo.
Image Optimization
To start using the Image Optimization and Lazy Load functionality of Jet please make sure that you have installed the 'JetOptimizer' module. Installation of this module is required if you have 1.12.0 version of the Jet Theme and higher.
The correct functioning of the theme requires some special software to be installed: JPEG optimization tool / PNG optimization tool / GIF optimization tool / WEBp tool.
You can install the Webp tool package to your server using the command
sudo apt-get install webp
. For a specific setup with versioning, use this guide.
If you are not sure how to install the necessary software on the server correctly, please contact your administrator or Amasty support team.
Please note, that if you have already installed or just going to install our Magento 2 Google Page Speed Optimizer extension, then the functionality of this extension will prevail under the Image Optimization and Lazy Load functionality pre-integrated into the theme.
General Settings
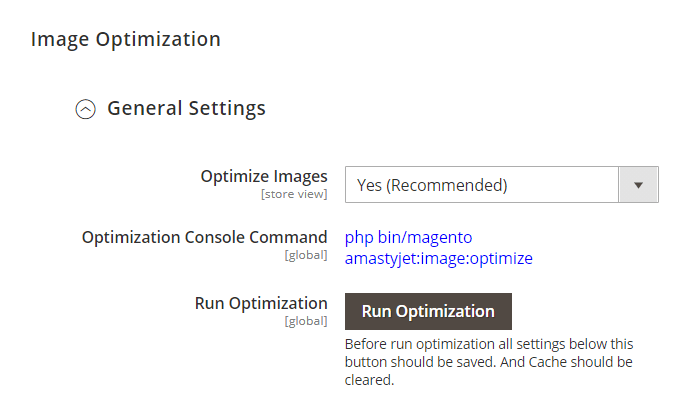
Optimize Images - Set 'Yes (Recommended)' to enable advanced image optimization settings for your store.
Optimization Console Command - to run optimization manually, execute the following command:
php bin/magento amastyjet:image:optimize
Run Optimization - press the 'Run Optimization' button after all the optimization settings below are properly configured.
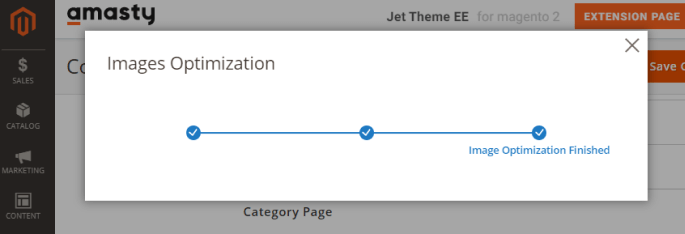
Before you press the 'Run optimization' button all settings below this button should be properly configured, saved and the Cache is cleared.
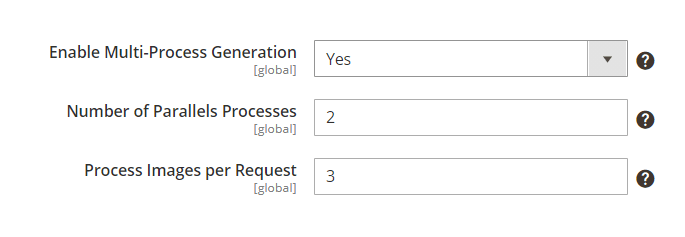
Enable Multi-Process Generation - select 'Yes' to speed up image optimization.
'Multi-Process Optimization' significantly boosts the image optimization speed. But it generates extra load to the server as well. We recommend first to run the test image optimization process with the 'multi-process' ON and monitor your server performance.
The 'Multi-Process Generation' feature needs the php extension 'pcntl' to be installed on the server. If you enable the feature and no performance boost happens, please ask your hoster/system administrator to check if the 'pcntl' extension installed.
Number of Parallels Processes - Specify the number of the parallel processes here.
The more parallel processes are set, the faster is the image optimization process, as well as the higher is the server load.
Process Images per Request - Enter the number of images you want to be shown instantly, per one request.
You may also optimize images in bulk using a console command (here 4 is the number of threads):
bin/magento amasty:optimizer:optimize -j 4</cpde>

Moreover, you can specify the particular pattern ( i is the id of the pattern):

<code>bin/magento amasty:optimizer:optimize -j 4 -i 2
The more images are processed per request, the faster the optimization process is. But keep in mind that your server load is higher as well.
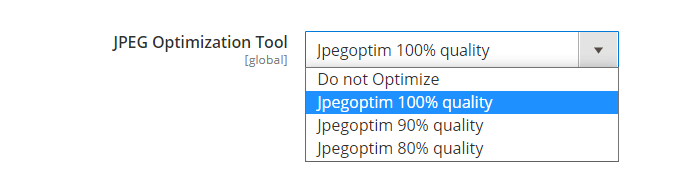
JPEG optimization tool - set the way to optimize JPEG images:
- Do not Optimize - select this option to forbid optimization;
- jpegoptim 100% quality / jpegoptim 90% quality / jpegoptim 80% quality - choose the quality level you want to get after compression. See the examples of optimized images right below the setting.

PNG optimization tool - select optipng to optimize PNG images.

GIF optimization tool - choose gifscale to compress GIF files.

Create Webp Copy - choose Cwebp to create a copy for every image in the WebP format.
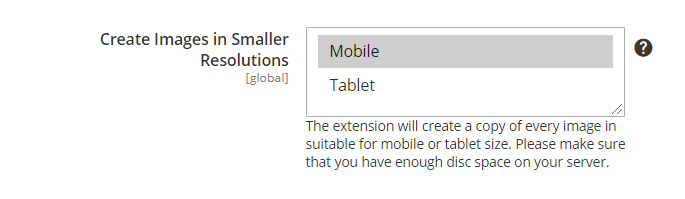
Create Images in Smaller Resolutions - choose the type of copies to be created:
- Mobile - the extension will create copies suitable for mobile devices. All copies will be placed in the automatically created folder - pub/media/amasty/amoptmobile.
- Tablet - all the copies will be created specially for tablets and placed in pub/media/amasty/amopttablet folder.
The extension will create a copy of every image in suitable for mobile or tablet size. Please make sure that you have enough disc space on your server.
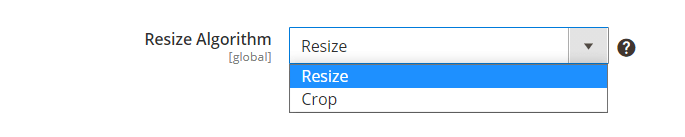
Resize Algorithm - select the algorithm according to which the images will be compressed:
- Crop - cuts pictures by size according to the device used, but not proportional to the size of the picture itself. While the height of the image would be the same, in the result the cropped image will look like the part of the original picture.
- Resize - compresses the images in proportion to the picture itself according to the size of the field viewed. Simply it will be the same picture, but smaller in pixels.

Dump Original Images - set this option to 'Yes' to store original images in the pub/media/amasty/amoptimizer_dump folder. It lets to collect all the original files in one place and easily update them in case the settings are changed.
Automatically Optimize Newly Uploaded Images in Catalog and Wysiwyg folders - set to 'Yes' to optimize all images uploaded to the catalog or Wysiwyg folder automatically.
All images uploaded to the catalog or Wysiwyg folder will be optimized automatically.
User Agent
Expand the User Agent tab to adjust settings for image loading according to the customer's browser user agent.
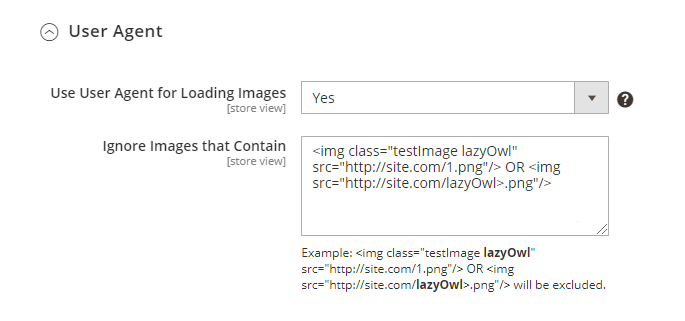
User Agent for Loading Images - Set this setting to 'Yes' to enable fetching appropriate image sizes based on the user agent data, obtained from the browser.
Ignore Images that Contain - In this setting, you can specify certain images to be excluded from the loading based on the user agent info. Such images will be delivered on the users' devices in the original size.
Lazy Load
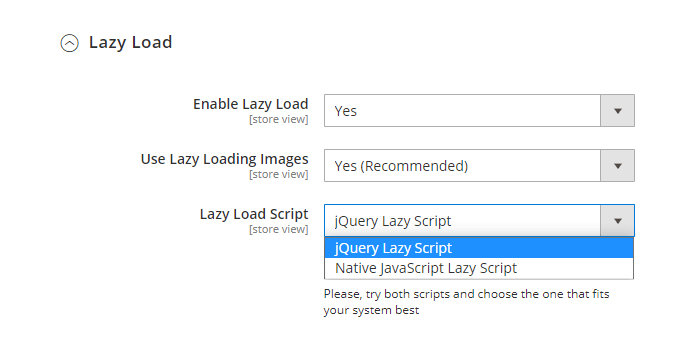
Enable Lazy Load - Set this setting to 'Yes' enable the Lazy Load functionality.
Use Lazy Loading Images - set to Yes to make off-screen images load only when a customer scrolls to them. It prevents pages full of images from lagging.
Lazy Load Script - you can choose between 2 lazy load scripts: jQuery Lazy Script or Native JS Lazy Script. We recommend trying both of them to choose one that fits your system best.
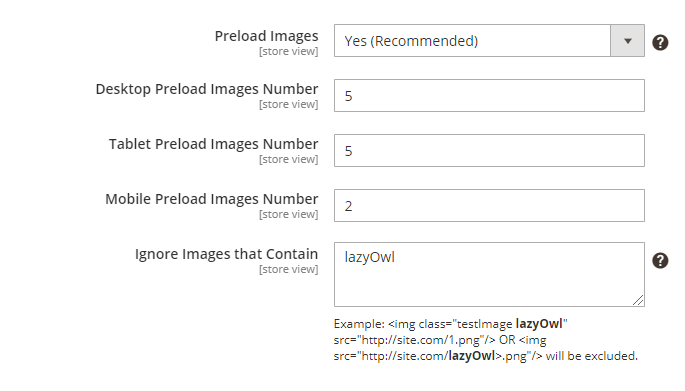
Preload Images - You can decide whether to 'Preload Images' or load them from scratch when they happen on screen. Decide how many images to load by setting Preload Images Number.
Desktop Preload Images Number - set the number of images to be pre-loaded on the page from the start. You can also assign a specific number of images for tablet devices with the Tablet Preload Images Number and for phones with the Mobile Preload Images Number fields.
Ignore Images That Contain - specify the images that should not be optimized.
For better compatibility with other extensions, the img tag which includes empty src will be ignored.
Delete Previously Generated WebP & Resized Images
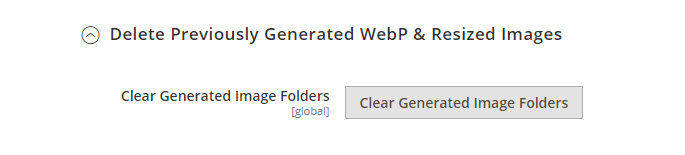
Clear Generated Image Folders - the Clear Generated Image Folders button deletes the optimized files from the pub / media / amasty / folder_name folder.
It is used if the previously selected optimization settings were inconvenient to use and there is a need to re-generate the queue and re-optimize the images.
Width
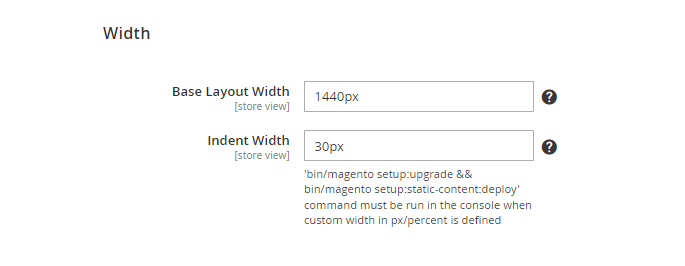
Please note that 'bin/magento setup:upgrade && bin/magento setup:static-content:deploy' command must be run in the console when custom width in px/percent is defined.
Base Layout Width - Specify the base layout width here, px.
Please note that it's highly recommended to enter a value that's higher than 980px.
Indent Width - Specify the indent width here, px.
Please note that the recommended value is ranging from 10px to 50px. If the customer uses bigger screen resolutions than set in Base Layout Width, the value will dynamically change.
Troubleshooting
In this section, you'll find answers to the most frequently asked questions.
How to work with Child Theme?
In case your Child Theme is not from Amasty and you have trouble with the changes to colors or fonts, then please:
A) make sure you saved the Child Theme in an Amasty folder, according to the instructions
B) if your Child Theme is some custom template other than the Jet Theme, you can change the name of the Child Theme to contain the word “Amasty”. That way the settings of the Jet Theme module for the color scheme/ fonts will affect all your themes.
How to modify contents of the footer?
In order to modify the contents of the footer, please refer to the file
vendor/amasty/theme-frontend-jet-theme/Magento_Theme/layout/default.xml
How to add more content into the Menu?
You can enhance the default Magento Menu functionality with features like image upload, different layouts for the menu display, eye-catching labels, and a hamburger menu.
For this purpose, we recommend you consider the Mega Menu for Magento 2 extension, fully compatible with the Jet Theme.
CMS Blocks after installation
By default, if you are installing the Jet theme without sample data, all custom CMS blocks by Jet theme will be disabled.
It is made to ensure that no unnecessary blocks will be visible on the frontend.
To enable custom Jet theme blocks, you have to do it manually by enabling each particular block one-by-one.
Varnish compatibility
To ensure the correct extension work, please check the following configurations.
Magento is running with Magento_CSP, no Varnish
Please increase the buffer size in nginx configurations:
fastcgi_buffers 16 16k;
fastcgi_buffer_size 32k;
Magento is running with Varnish or any other proxy
Please, add to Proxy section the following:
proxy_buffers 16 16k;
proxy_buffer_size 32k;
The Mixin-Rewrite-Patch & how to install it
The Mixin-Rewrite-Patch was created as a suggested sub-component of the Jet Theme module. That's why whenever the Jet Theme is installed through the Composer, the Mixin Patch automatically appears on the bash Terminal screen as a suggestion:

- To install the patch through the Composer, please use the following command:
composer require amasty/module-mixin-rewrite-patch
- Afterward please make sure to run:
php bin/magento setup:upgrade
For more instructions on installing modules/patches through Composer, please refer to this guide.
How to enable our stylized 'Maintenance Mode' page?
1. If you want to enable stylized for the Jet Theme 'Mainatance Mode' pages, please do the following:
- if the theme is installed to the 'app/code' folder, please navigate to 'app/code/Amasty/JetTheme/Setup/Files/errors' and copy the folder 'amasty_jettheme' to the folder 'errors' ('pub/errors') in the Magento root folder.
- in case you've installed Jet Theme via composer, please copy the folder navigate to 'vendor/amasty/jet-theme/Setup/Files/errors' and copy the folder 'amasty_jettheme' to the folder 'errors' ('pub/errors') in the Magento root folder.

2. Please follow the instructions below in case you have the local.xml or local.xml.sample file before the installation of the Jet Theme on your store.
Please navigate to the local.xml file and add the amasty_jettheme into the <skin> parameter. In case your file is named local.xml.sample, then please rename it into local.xml and follow the instructions above.
3. Please follow the instructions below in case you DON'T have the local.xml nor local.xml.sample file before the installation of the Jet Theme on your store.
If you want to use our stylized 'Maintanance Mode' page for your store, please create file named local.xml first, containing the following data:
<?xml version="1.0"?>
<config>
    <skin>amasty_jettheme</skin>
    <report>
        <action>print</action>
        <subject>Store Debug Information</subject>
        <email_address></email_address>
        <trash>leave</trash>
        <dir_nesting_level>0</dir_nesting_level>
    </report>
</config>
Move the file you've just created [local.xml] to the root of the folder 'pub/errors'.
Then please follow the instructions from the first section of this notice for the case when you already have the local.xml file (see it above).
How to configure the ready-made banner slider widget for the CMS pages?
To create a new banner slider widget, please navigate to Content → Widgets → Add Widget.
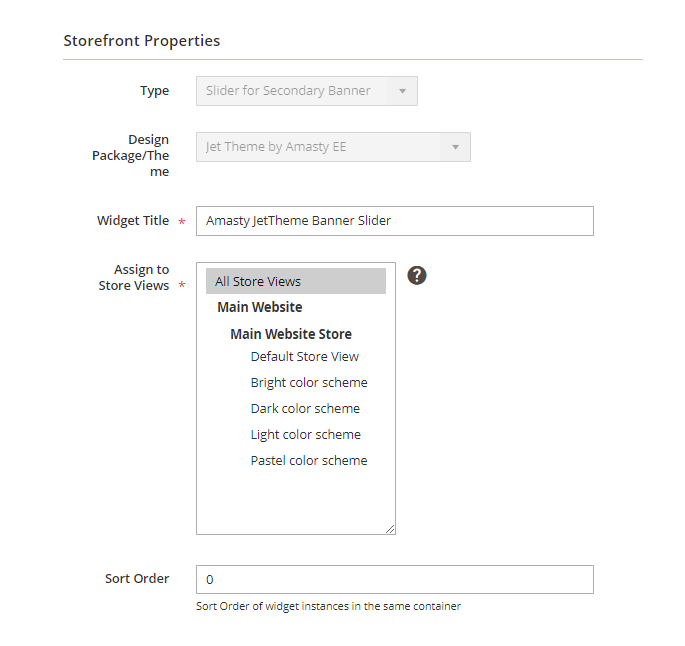
Select the widget type 'Slider for Secondary Banner' and choose the Jet Theme for the option 'Design Theme'.
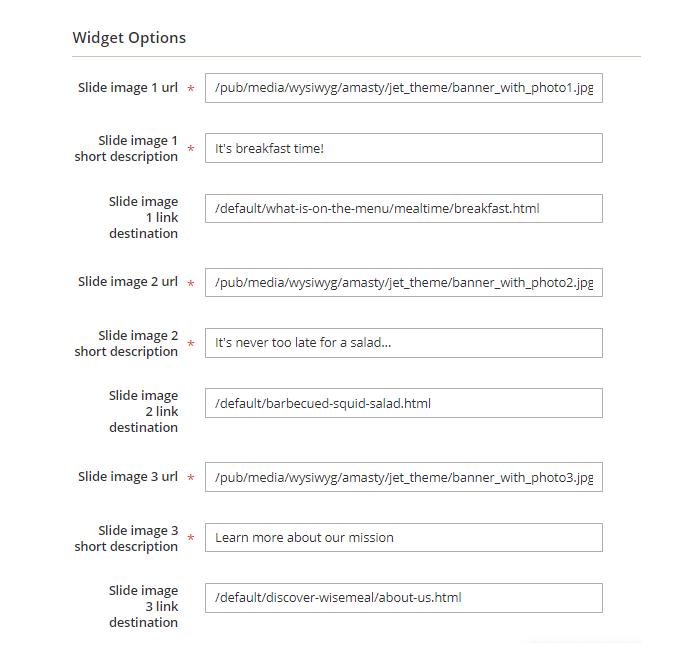
Then navigate to the 'Widget options' to specify image sources for the slides, image descriptions, and URLs per each image if it's necessary.
Frontend Examples
See the examples of Jet theme's frontend looks. Please note, that all screenshots are made on the Magento 2 instance with custom sample data installed.
Use case #1
- Color Scheme Preset = ‘Bright’
- Google Font = ‘Indie Flower’
- Show Add To Wishlist = ‘Top Right’
- Show Add To Compare = ‘Top Right’
- Show Short Description = ‘Yes’
- Show Product Reviews = ‘No’
- Swatches Type = ‘Square’

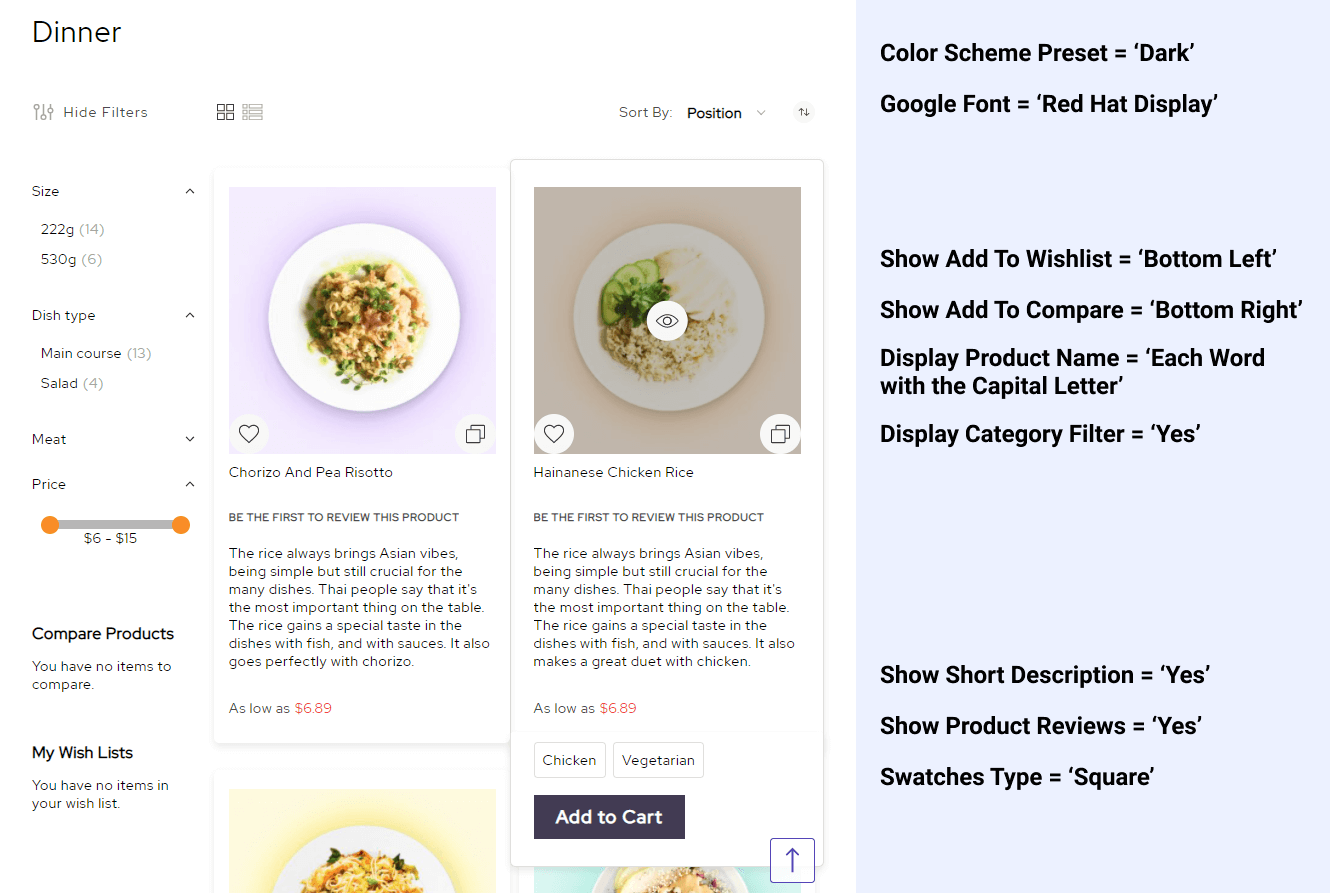
Use case #2
- Color Scheme Preset = ‘Dark’
- Google Font = ‘Red Hat Display’
- Show Add To Wishlist = ‘Bottom Left’
- Show Add To Compare = ‘Bottom Right’
- Display Product Name = ‘Each Word with the Capital Letter’
- Show Short Description = ‘Yes’
- Show Product Reviews = ‘Yes’
- Swatches Type = ‘Square’
Use case #3
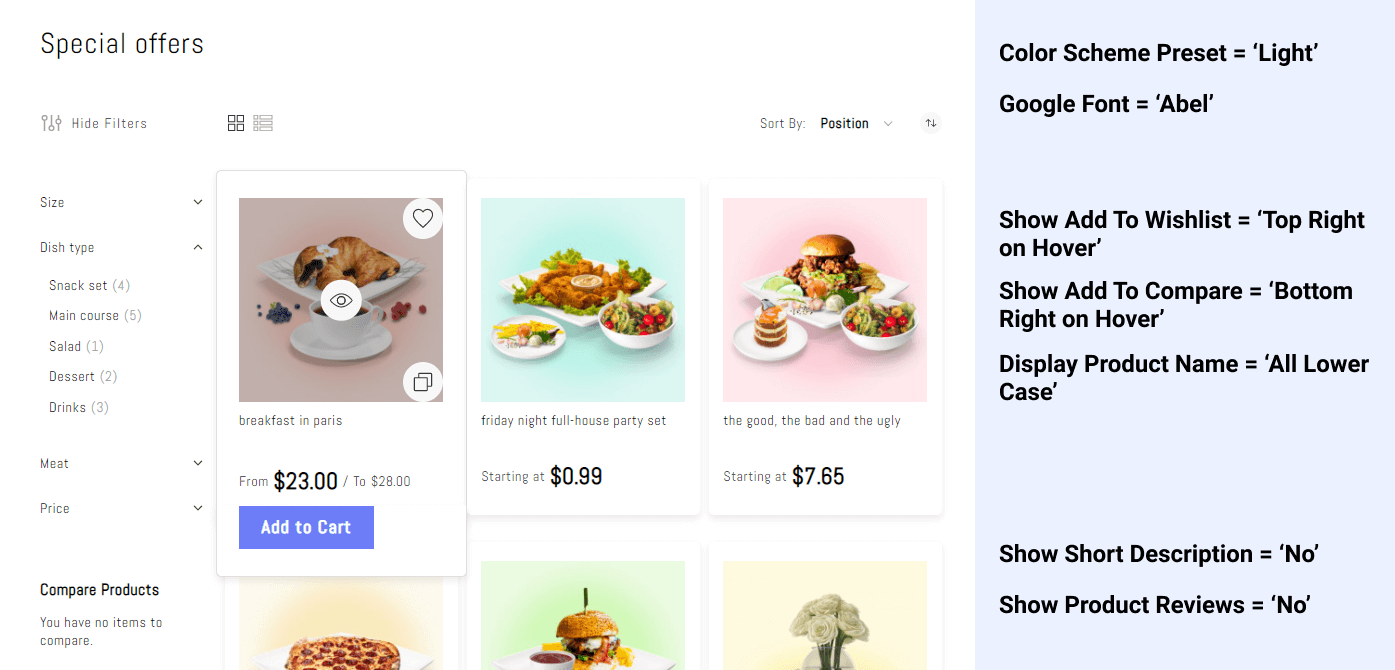
- Color Scheme Preset = ‘Light’
- Google Font = ‘Abel’
- Show Add To Wishlist = ‘Top Right on Hover’
- Show Add To Compare = ‘Bottom Right on Hover’
- Display Product Name = ‘All Lower Case’
- Show Short Description = ‘No’
Use case #4
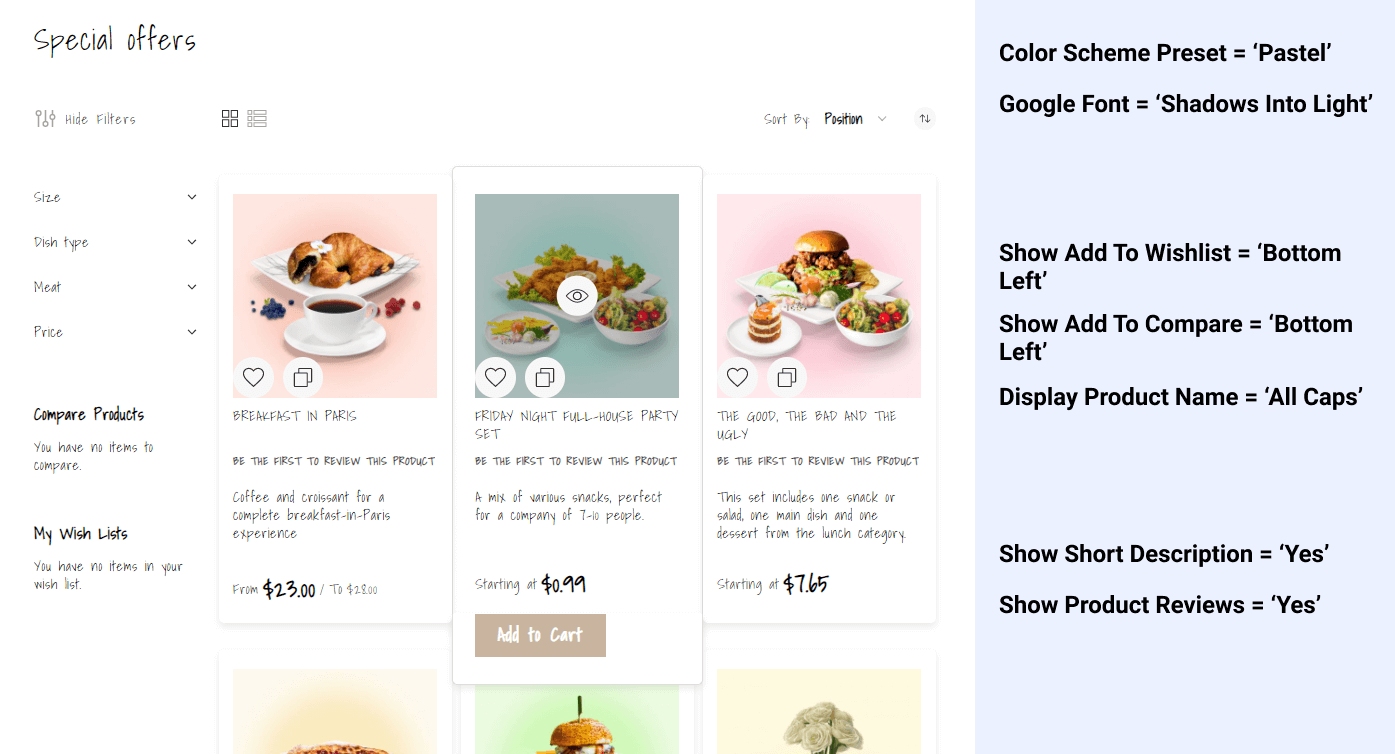
- Color Scheme Preset = ‘Pastel’
- Google Font = ‘Shadows Into Light’
- Show Add To Wishlist = ‘Bottom Left’
- Show Add To Compare = ‘Bottom Left’
- Display Product Name = ‘All Caps’
- Show Short Description = ‘Yes’
- Show Product Reviews = ‘Yes’
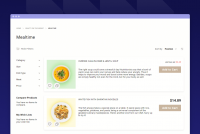
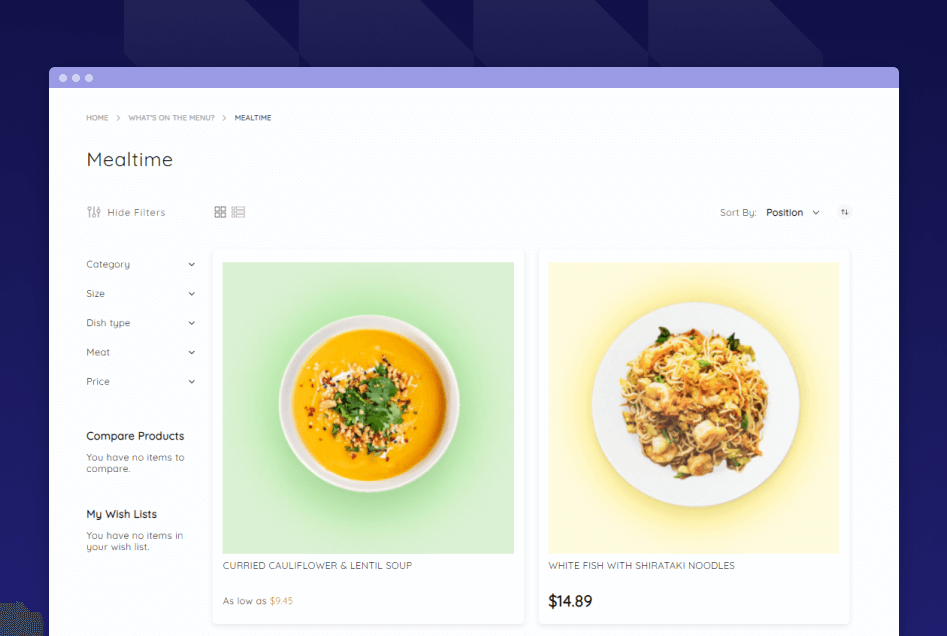
Catalog Pages
The Catalog Pages on a Jet Theme are equipped with extra options to simplify product browsing.
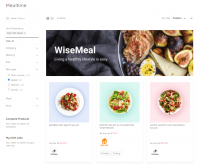
Hide Filters - by click, it hides all product filtering options and frees screen space to enlarge product cards.
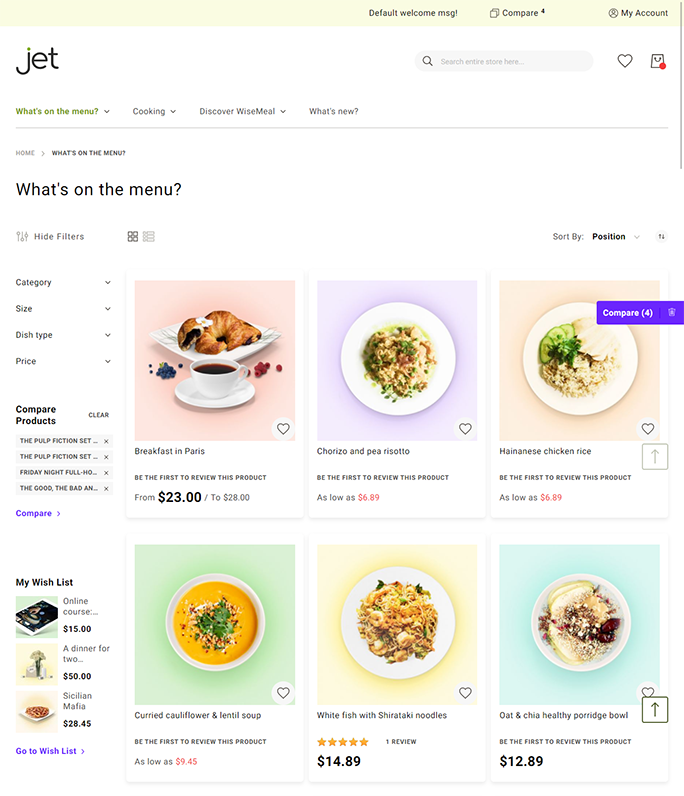
Compare - bright floating 'Compare Products' button always visible and reminds users of products they'd like to compare and buy further.
Back to Top Button - a green button with an arrow is visible at all times and enables shoppers to get back to page top in one click.
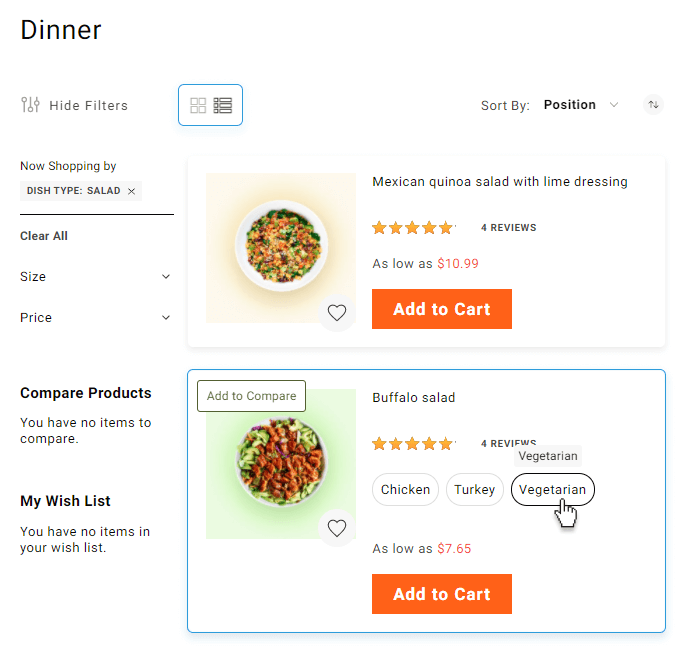
Table mode - Switch to the 'Table mode' on any page of the catalog to see more info about the product right from the category and configure product attributes.
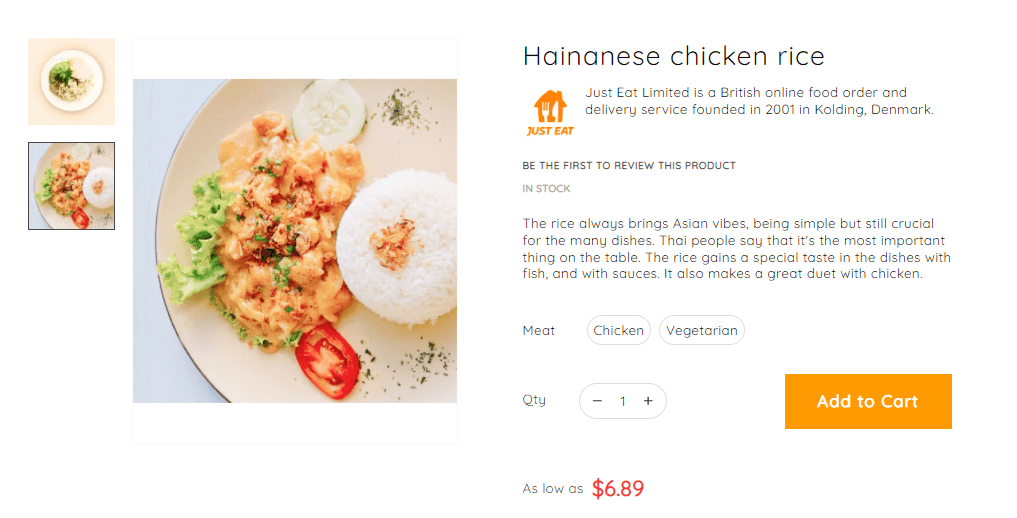
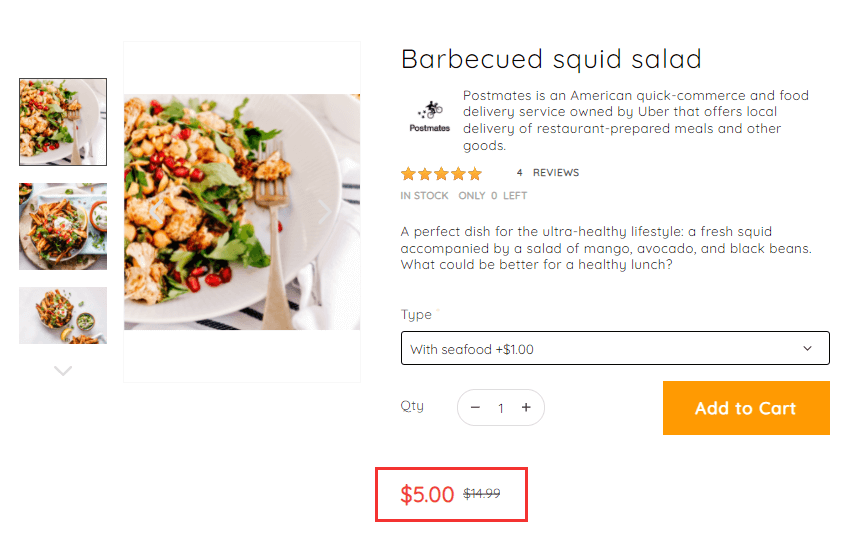
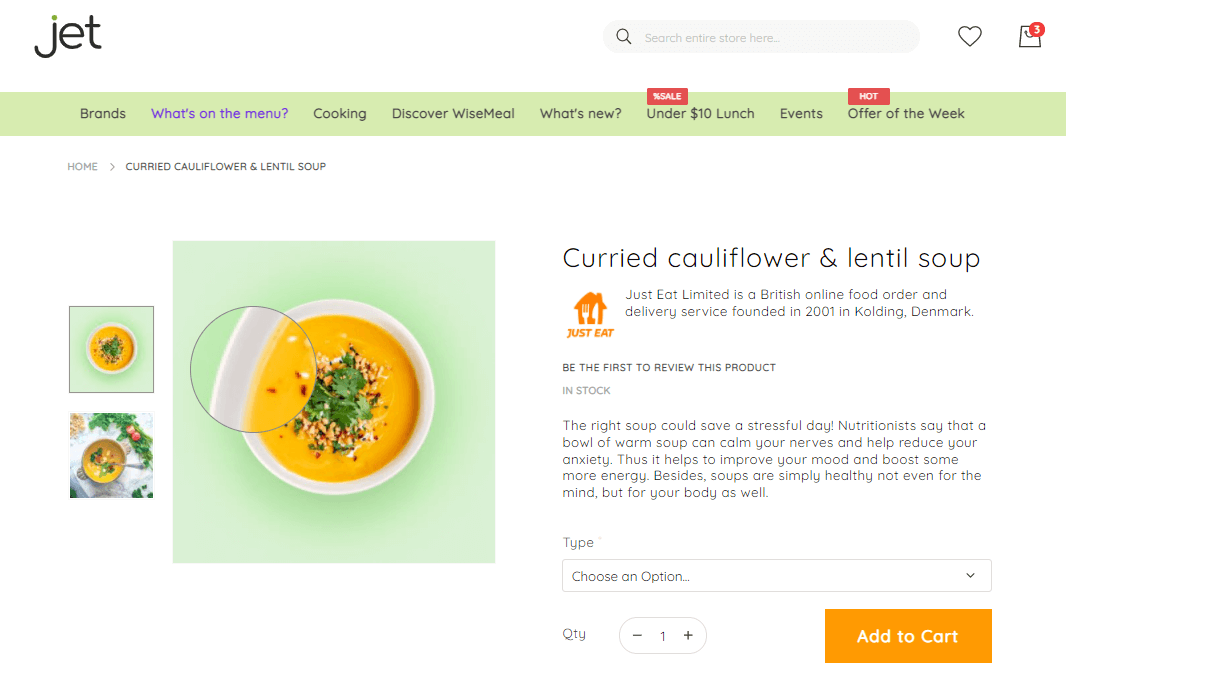
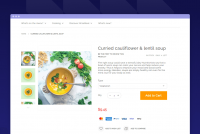
Product Pages
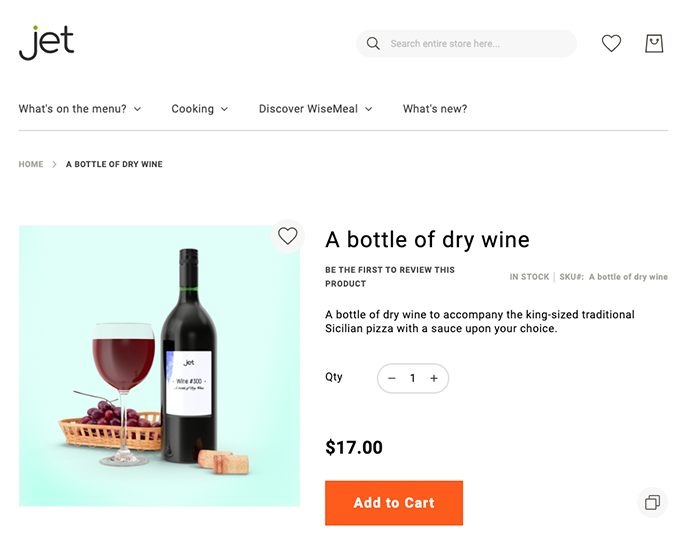
Simple Product
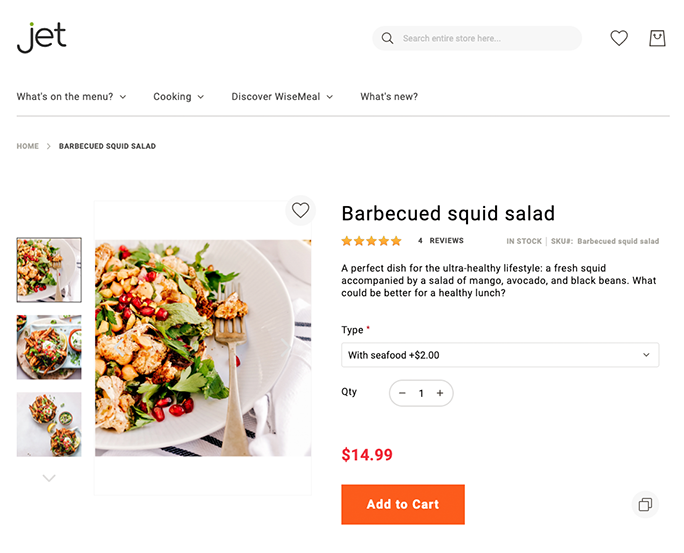
Configurable Product
Bundle Product

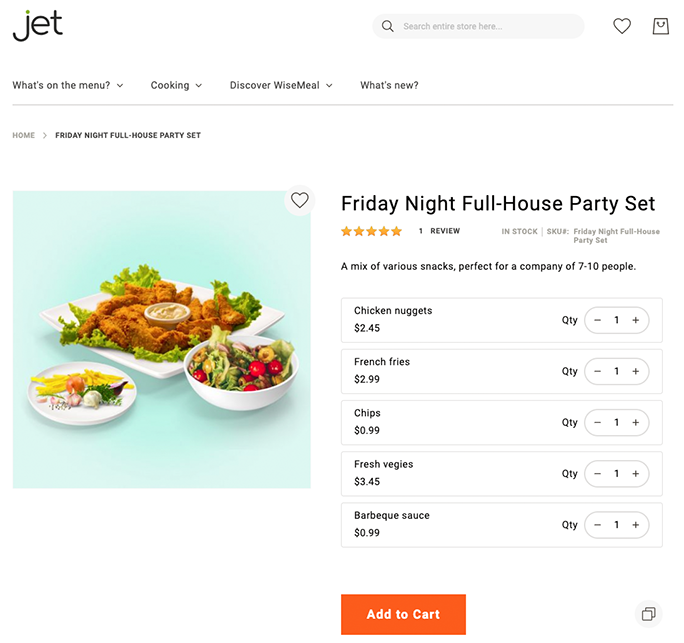
Grouped Product
Virtual Product

Downloadable Product

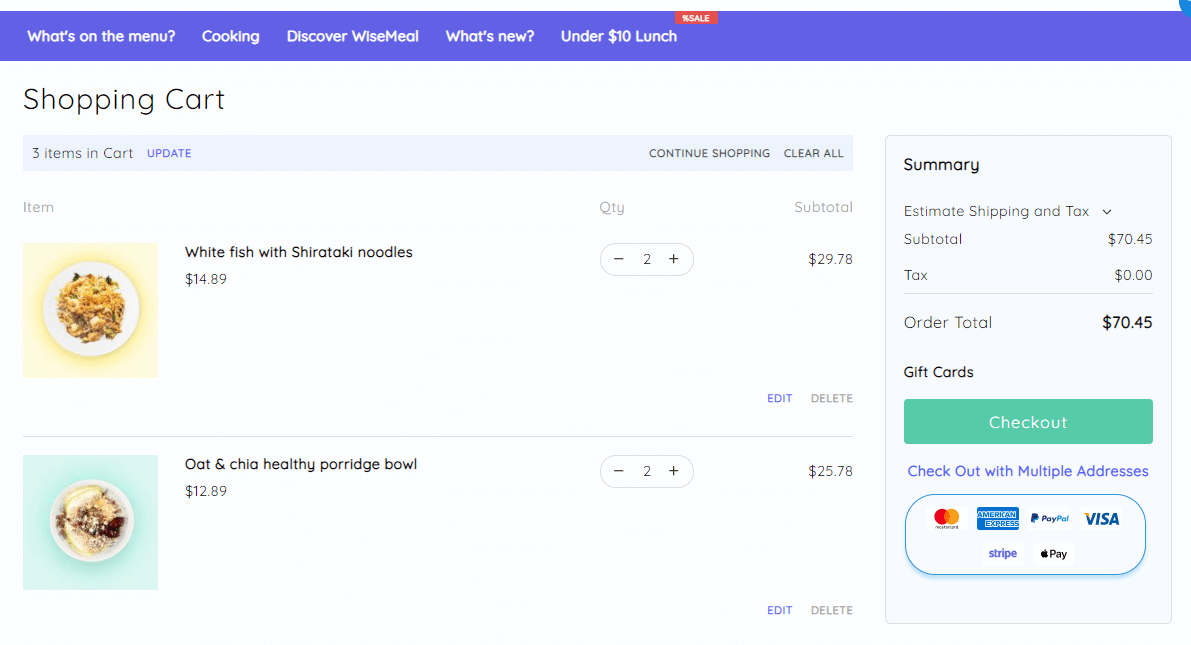
Checkout
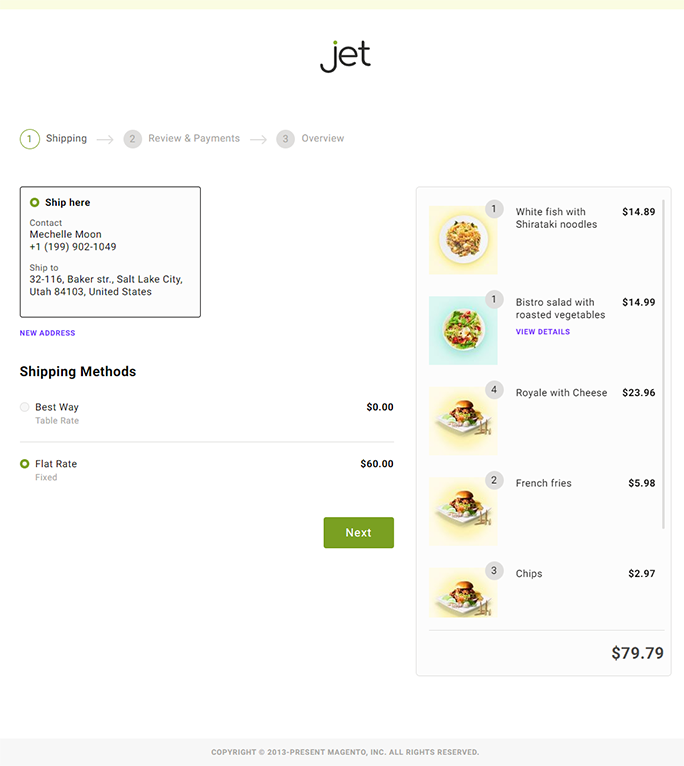
First step of the checkout — Shipping
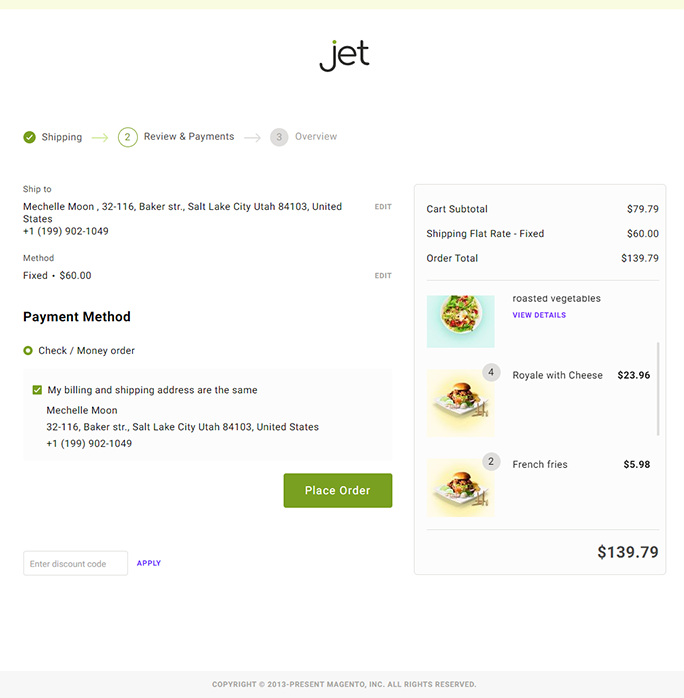
Second step of the checkout — Payment
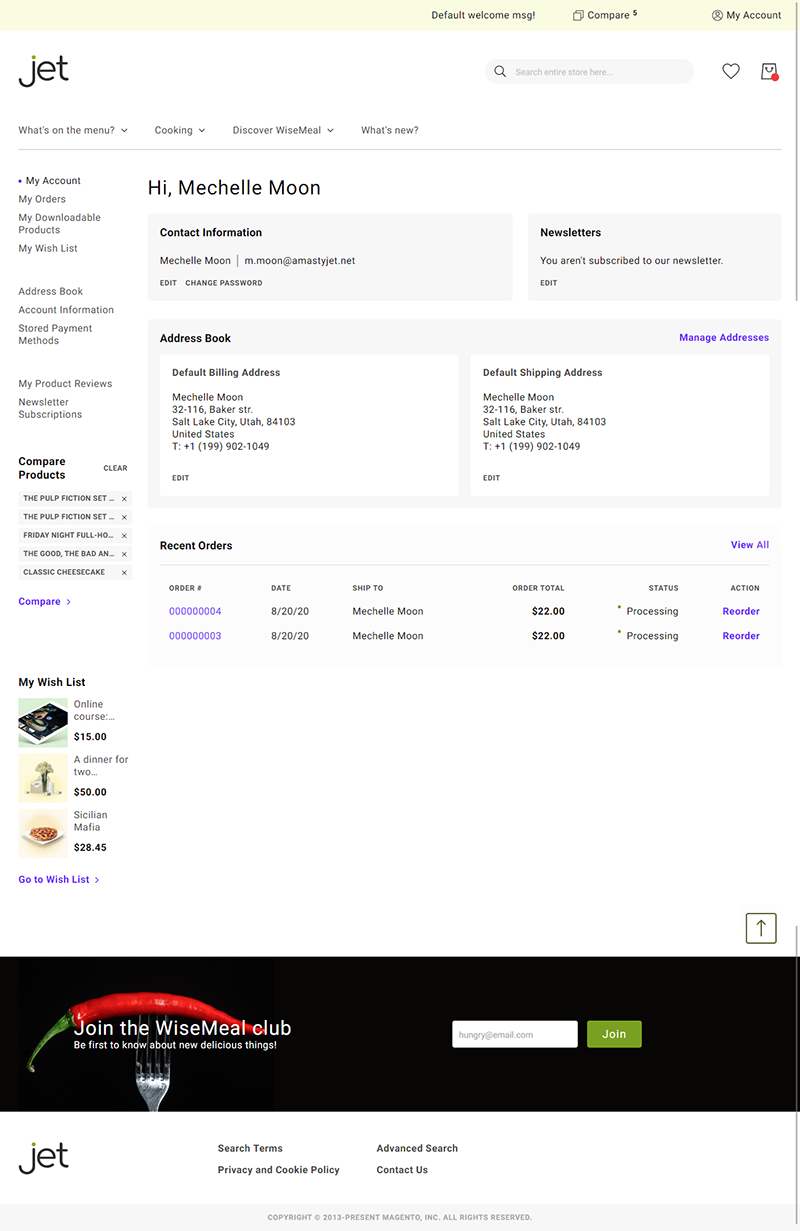
Customer Account
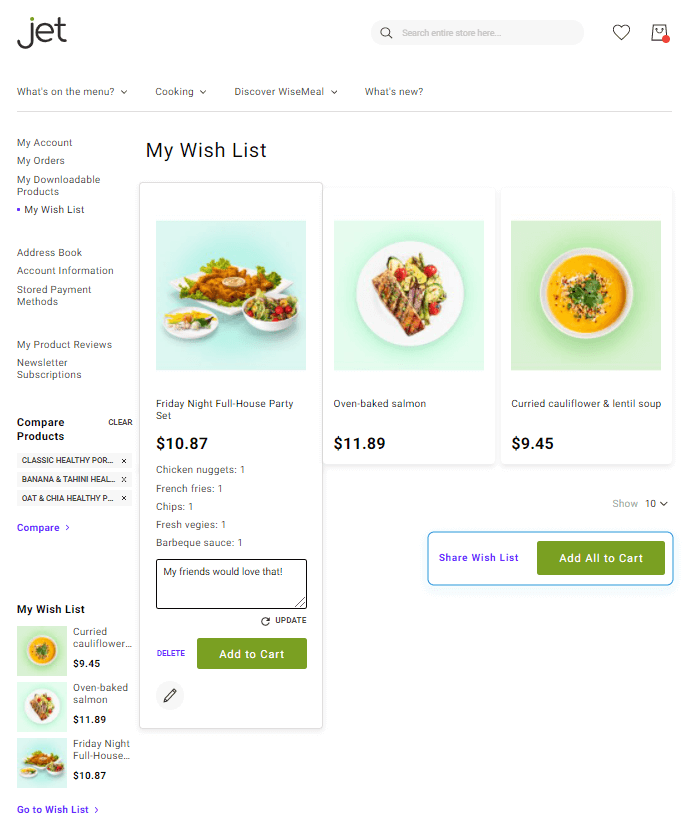
Wishlist
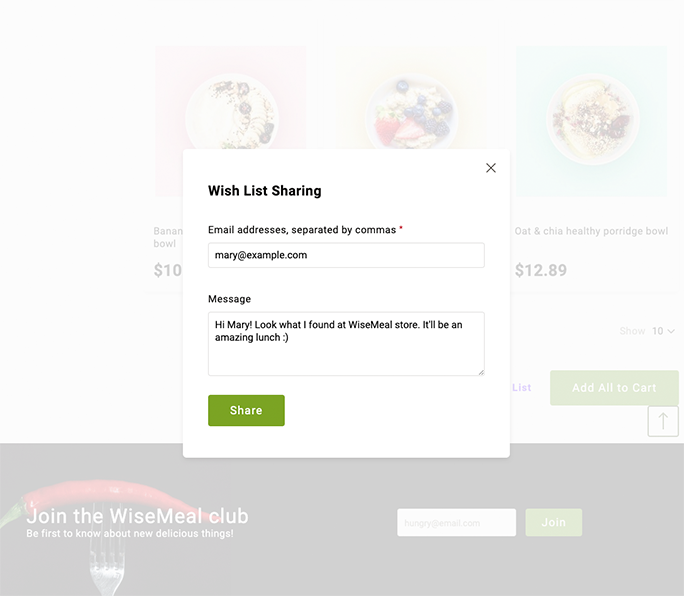
We also redesigned the 'Share Wishlist' action. By click, now a pop-up appears and allows users to share wishlists by email.
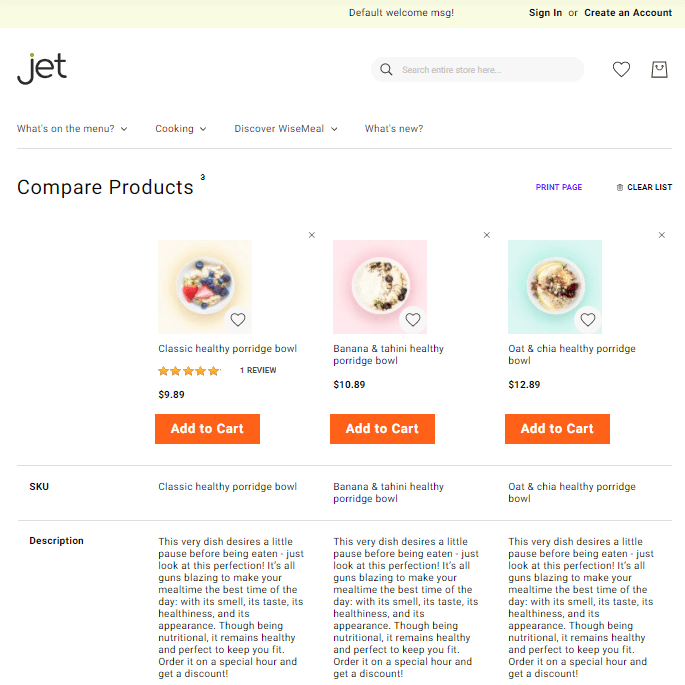
Compare Products Page

FAQ
magento_2/jet-theme.txt · Last modified: 2023/05/18 14:30 by kkondrateva