User Tools
Site Tools
Trace: • Guide for Cross Linking for Magento 2 (auto interlinking) • Guide for ChatGPT AI Content Generator for Magento 2 • Guide for Affiliate for Magento 2 • Guide for Jet Theme for Magento 2 • Guide for Worldline Online Payments for Magento 2 • Guide for Quickbooks Payments for Magento 2 • Guide for Improved Layered Navigation for Magento 2 (settings) • Guide for Customer Attributes for Magento 2
Sidebar
magento_2:customer_attributes
Table of Contents
For more details, see the way the Customer Attributes for Magento 2 extension works.
Guide for Customer Attributes for Magento 2
Display additional attribute fields on the registration page to collect important customer data. Create customer attributes of various types to effectively gather as much information as you need.
- Show extra attributes of different input types
- Manage customer attributes from the admin panel
- Effectively process collected customer data
- Use additional attributes in email templates
- Generate handy attribute usage reports
- WCAG compliance (for Hyvä Theme)
- Hyvä Checkout ready
Magento 2 Customer Attributes and Customer Attributes Pro extensions are compatible with Hyvä themes. You can find the packages: amasty/module-customer-attributes-hyva-compatibility (for Lite and Pro versions) and additionally amasty/module-customer-login-attributes-hyva-compatibility (for Pro version) for installing in composer suggest (Note: the compatibility is available as part of an active Product Subscription or Support Subscription).
The extension is compatible with Hyvä Checkout. You can find the 'amasty/module-customer-attributes-hyva-checkout' package for installing in composer suggest. The compatibility is available as a part of an active product subscription or support subscription.
Explore our internal Knowledge Base to gain even more valuable insights and uncover answers to popular questions about the configuration and features of the Magento 2 Customer Attributes extension.
General Settings
To configure general extension settings please go to Stores → Configuration → Customer Attributes.
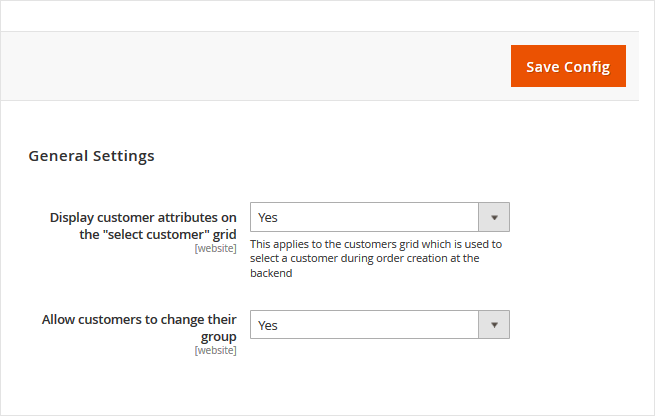
Display Customer Attributes on the 'selected customer' grid' - Please set this option to ‘Yes’ to see the attributes when you select a customer during order creation from the backend.
Allow customers to change their group - This option lets customers choose and change their customer group. To make the option work please create customer attribute of ‘Customer Group Selector’ input type.
Attribute Creation
To create a new attribute please go to Customers → Customer Attributes → Manage Attributes. On this grid, you can add the new attributes and edit the already created ones. To add an attribute, please click the Add New Attribute button.
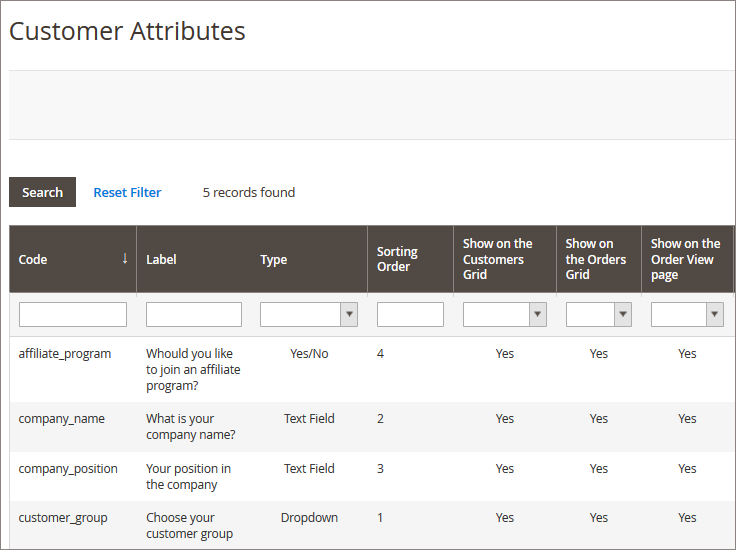
Attribute Configuration
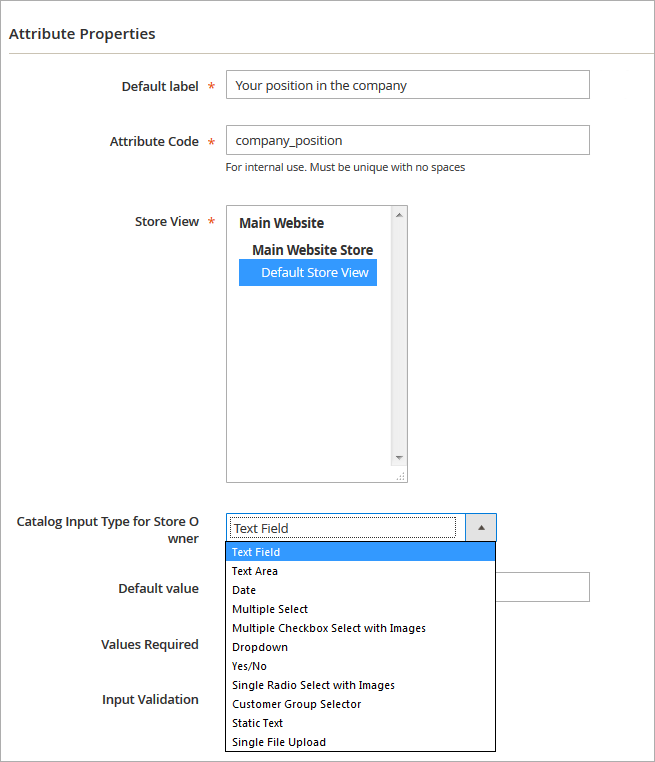
Default Label/ Attribute Code - Specify an attribute label and a code. The code will be used only for internal needs.
Store View - Select the store view for which the attribute will be available.
Catalog Input Type for Store Owner - choose among various input types depending on your specific needs. Please note that the following fields depend on the selected input type.
NOTE: after the attribute code and the catalog input type are specified and saved they can’t be changed.
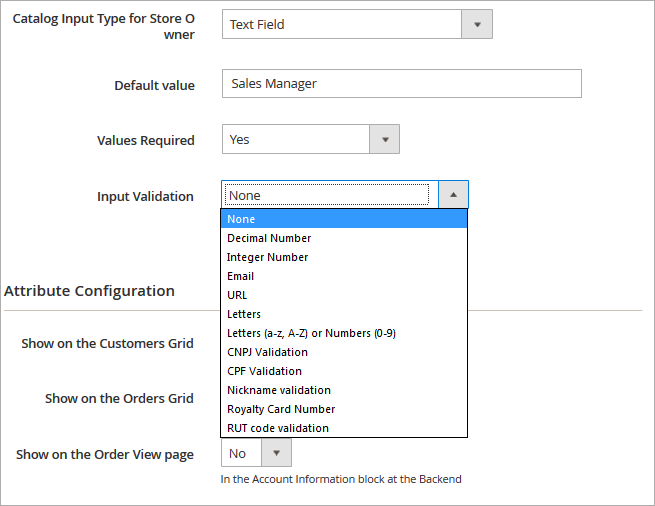
Default Value - Specify the value which will be preselected by default if necessary.
Values Required - If the option is set to ‘yes’ customers won’t be able to leave this attribute field blank while getting registered.
To make the value required in Hyvä Checkout, the “Required” checkbox must be selected for the attribute in Stores > Configuration > Hyvä Themes > Checkout > Shipping Address Form.
Input Validation - Specify the type of input validation.
CNPJ Validation - a taxpayer identification number for Brazilian companies. CPF Validation - an individual number in Brazil. RUT code validation - a taxpayer identification number in Chile.
Select pages on which the attribute will be displayed. Specify attribute display order.
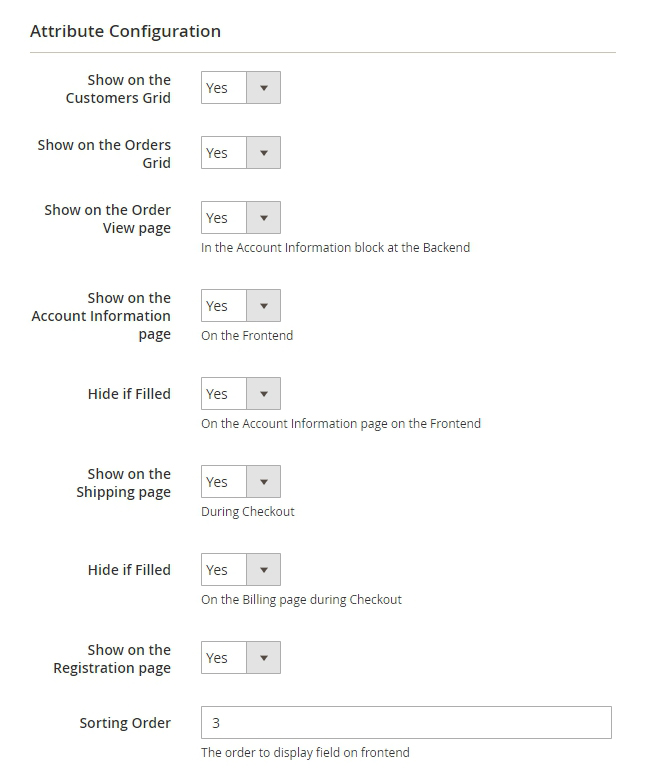
To change the sorting order in Hyvä Checkout, adjust it using the drag-and-drop feature in Stores > Configuration > Hyvä Themes > Checkout > Shipping Address Form.


Please note that for the Single File Upload input type you can set the maximal file size value. However, this value should not exceed the limit set on your server. Make sure that you increased the limit on your web server before modifying the maximal file size in the extension settings.
Attribute Options Management
You can specify values only for selectable attributes.
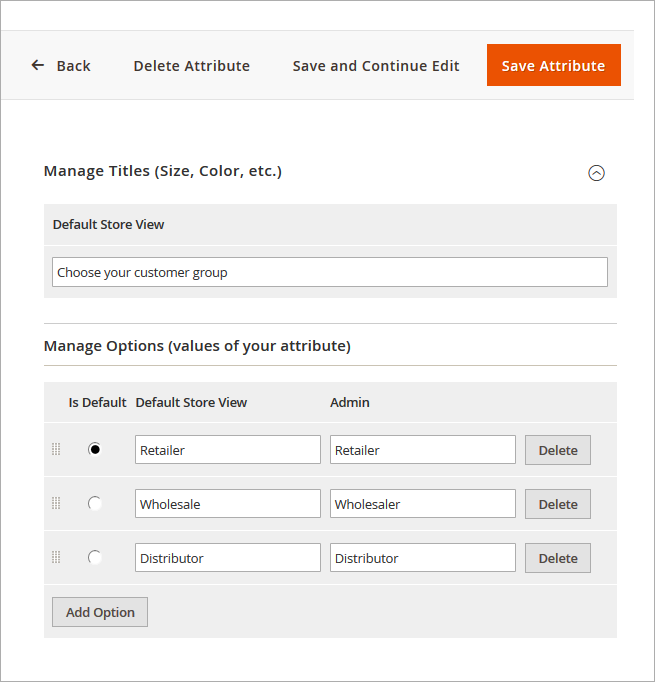
Default Store View - Specify attribute title that will be visible on the frontend.
Manage Options - Create as many attribute values as you need, specify the value that will be preselected by default.
Choose input types with images (Multiple checkbox select with images, Single radio buttons select with images) to upload pictures for attribute values.
![]()
Attribute Relations Management
To manage attribute relations please go to Customers → Customer Attributes → Manage Attribute Relations.
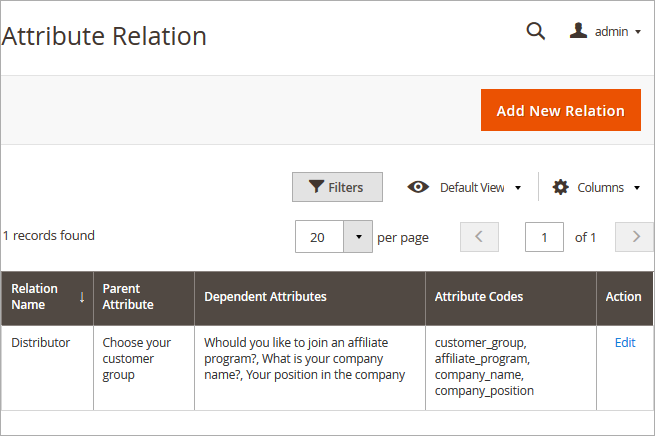
Attribute Relation - On the 'Attribute Relation' grid you'll see all created relations. It's possible to add an unlimited number of new relations and manage already created once.
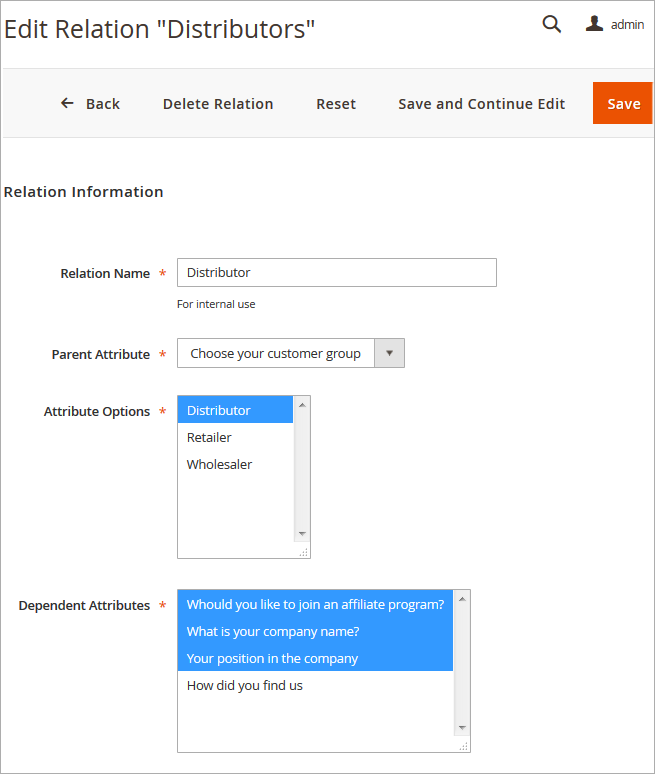
Relation Name - Specify a relation name that will be used for internal needs only.
Parent Attribute - Choose the attribute that will be parent.
Please, consider, that only these types of attributes can be used as the parent attributes.
- Multiple Select
- Dropdown
- Multiple Checkbox Select with Images
- Single Radio Select with Images
Attribute Options - Select attribute values that will trigger the display of dependent attributes.
Dependent Attributes - Specify which attributes will be dependent. These attributes will be displayed only if a customer selects one of the specified values of a parent attribute.
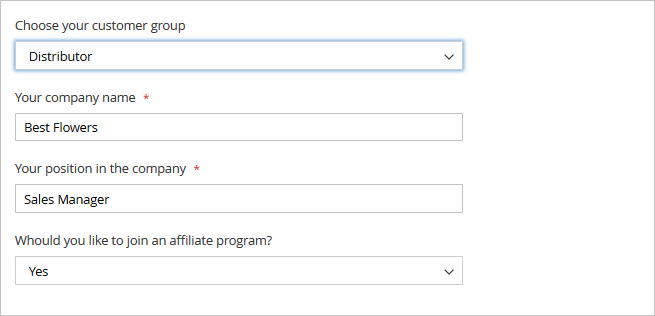
Dependent attributes are shown because the 'Distributor' option is chosen. According to our settings 'Distributor' is the value of a parent attribute which triggers the display of dependent attributes.
Attribute Display on the Backend
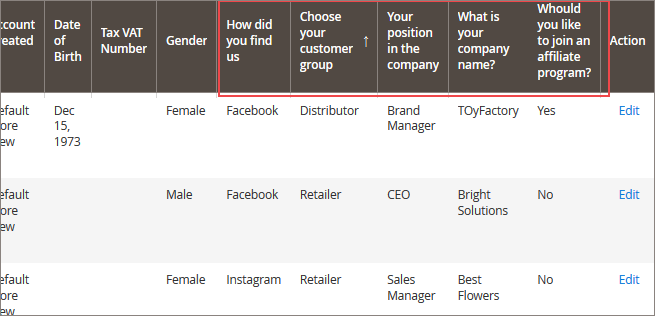
Show additional attributes on the Customers grid. Filter the list of shoppers using custom attributes. E.g. you can find out where customers see information about your store and fine tune your marketing strategy accordingly.
NOTE: Custom attributes will be also displayed on the 'Select Customer' grid when a store admin generates orders from the backend. Apart from that, you can display custom attributes on the order grid as well as on the order info page.
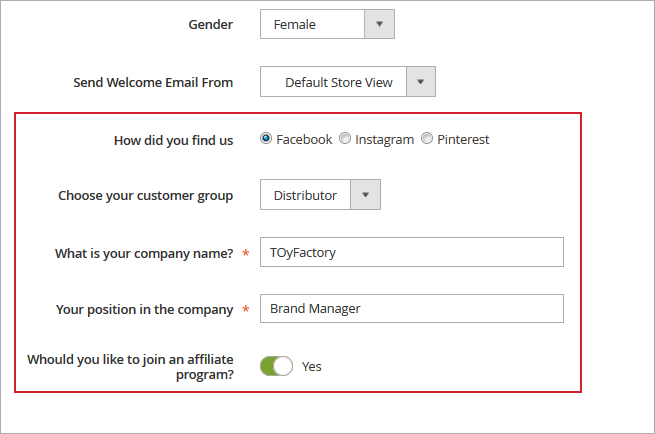
Show custom attributes on the customer info page. You can edit attributes for already existing customers
and specify attribute values for new customers which you create from the admin panel.
Attribute Usage Reports
To see an attribute usage report please go to Customers → Customer Attributes → Manage Attributes → open the necessary attribute and click on the Reports tab in the Attribute Information menu.
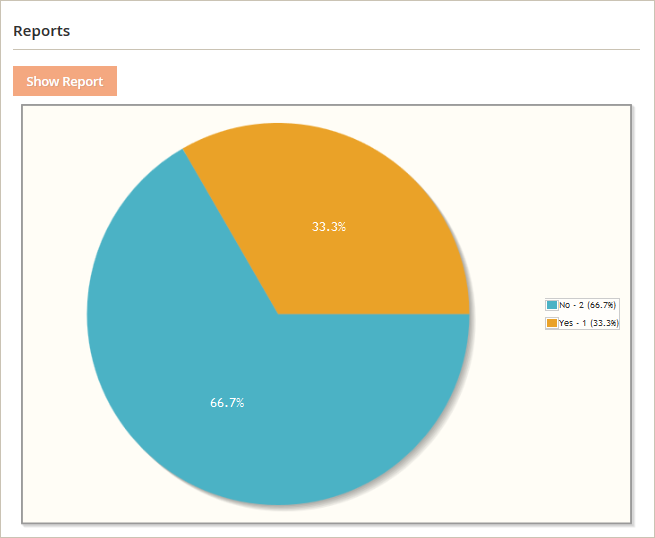
NOTE: reports are created only for selectable attributes such as checkboxes, multiple selects, dropdowns, yes/no and radio buttons.
Attribute Display on the Frontend
Show Extra Attributes on the Checkout page.
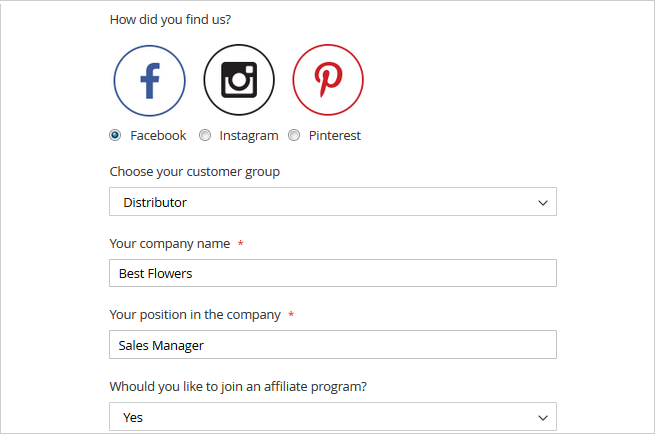
Display custom attributes on the Registration page.
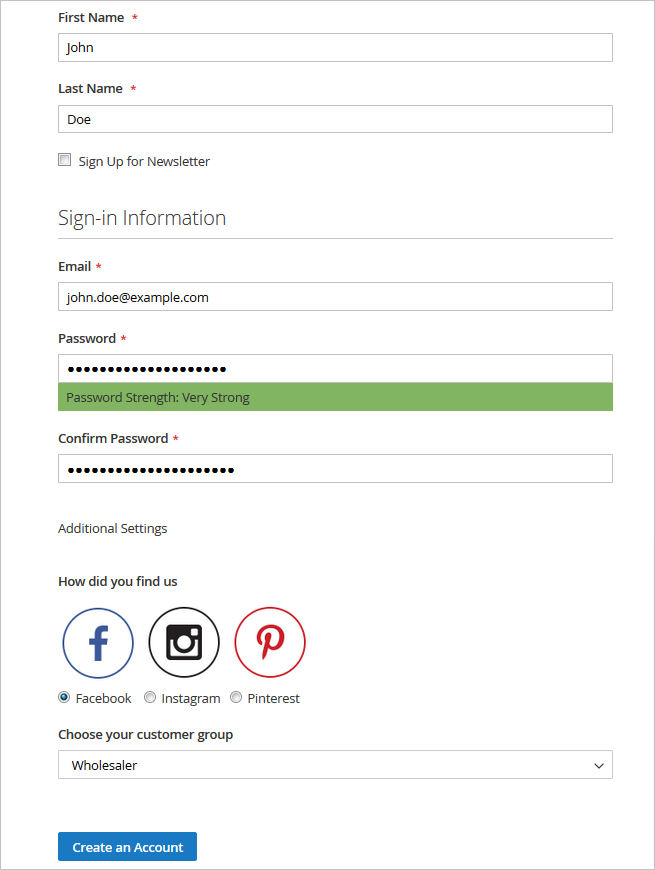
Also, the attributes can be viewed and edited from the customer's account. Take a look at the Account Information section to see the existing attributes.
Include Customer Attributes in E-mail
The extension is compatible with Order Status extension for Magento 2.
You can include customer attributes in your business e-mails, by inserting the special variable in your messages. Insert a customer attribute into the code:
If customer attribute is profession, for instance, insert the following in your letter:
{{var order.customer.getData('profession')}}`
or
{{var order.customer.getProfession()}}
You can include any custom attributes into any email template.
The extension is fully compatible with Magento 2 PDF Customizer. Use more customer attributes in your templates!
Attributes Import and Export
With the extension, you can include the created customer attributes into the default Magento import/export procedures.
Please, go to System → Export and switch the Entity Type option to the Customers Main File. Below, in the Entity Attributes section you will see the created attributes that will exported together with the customers' data. Hit the Continue button.
Proceed to the System → Import and choose the Customers Main File option from the Entity Type dropdown menu. Then, adjust the Import Behavior and choose the file to import customers with the custom attributes. Hit the Check Data button to proceed.
Find out how to install the Customer Attributes extension for Magento 2 via Composer.
Customer Attributes Pro
All features below are available only in the Pro version of the extension.
General Settings
To configure general extension settings please go to Stores → Configuration → Customer Attributes.
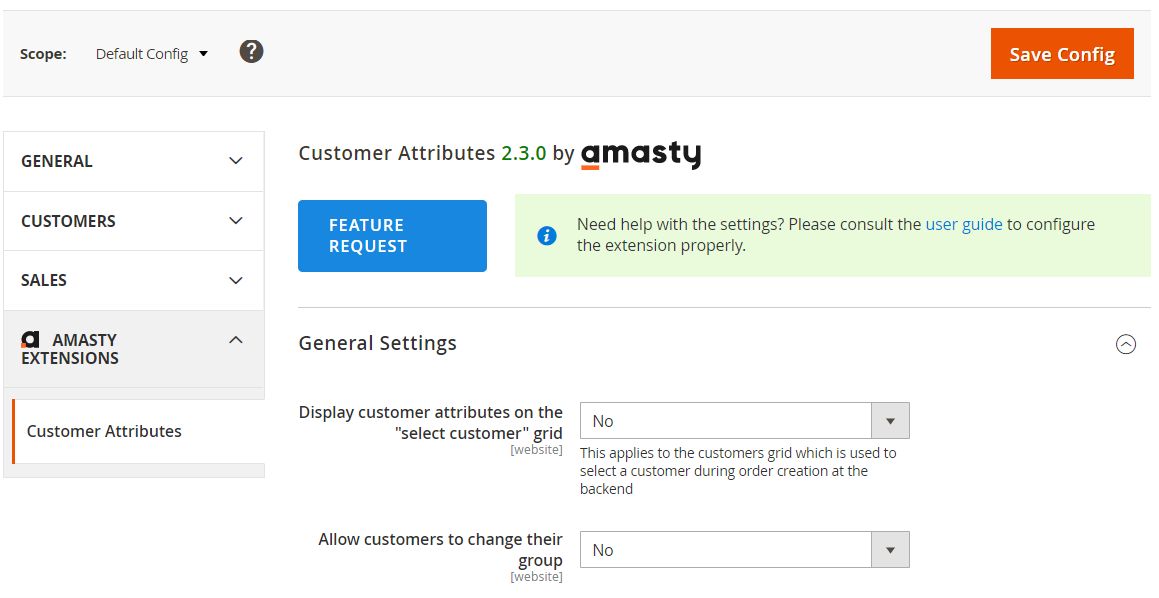
Display customer attributes on the “select customer” grid - Please set this option to ‘Yes’ to see the attributes when you select a customer during order creation from the backend.
Allow customers to change their group - This option lets customers choose and change their customer group. To make the option work please create a customer attribute of ‘Customer Group Selector’ input type.
Login Settings
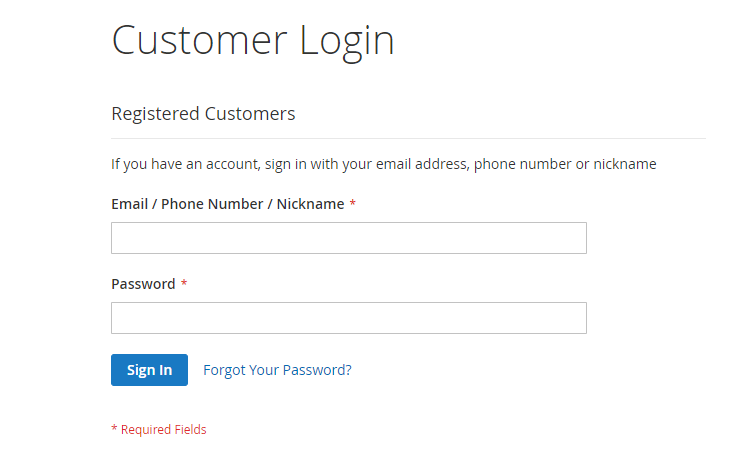
Login Attribute Selector - Selected attributes will be used by customers to login. Only Login Attributes and Email may apply. Note that it is a good practice to make Login Attributes visible and editable at “Create New Customer Account” and “Edit Account Information” forms.
Modify Field Title on the Login Page - This option allows you to modify the field title. Please, set ‘Yes’ or ‘No’ option upon your needs.
Modify Notice on the Login Page - If the option is set to ‘Yes’ modify the notice on the Login Page
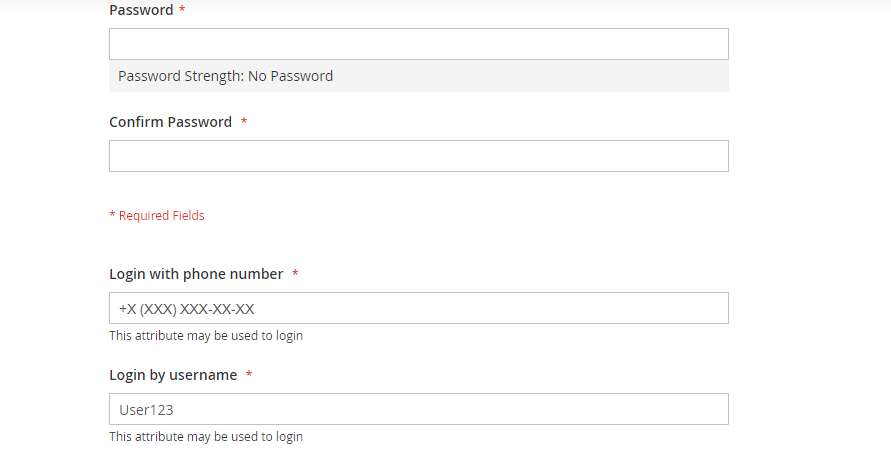
Add Notice to Login Attributes - Adds notices to attributes that are set to use as login to notify customers. Notices are displayed at “Create New Customer Account” and “Edit Account Information” forms.
Default Region for Phone Number - This setting is used to process a phone number correctly. You can choose a needed country from the drop-down list.
Use Geo IP to Process Phone Numbers - This option allows you to use Geo Ip feature to process a phone number correctly.
Login Attribute Creation
To create a new attribute please go to Customers → Customer Attributes → Manage Login Attributes. On this grid, you can add new attributes and edit already created ones. To add an attribute, please click the Add New Attribute button.
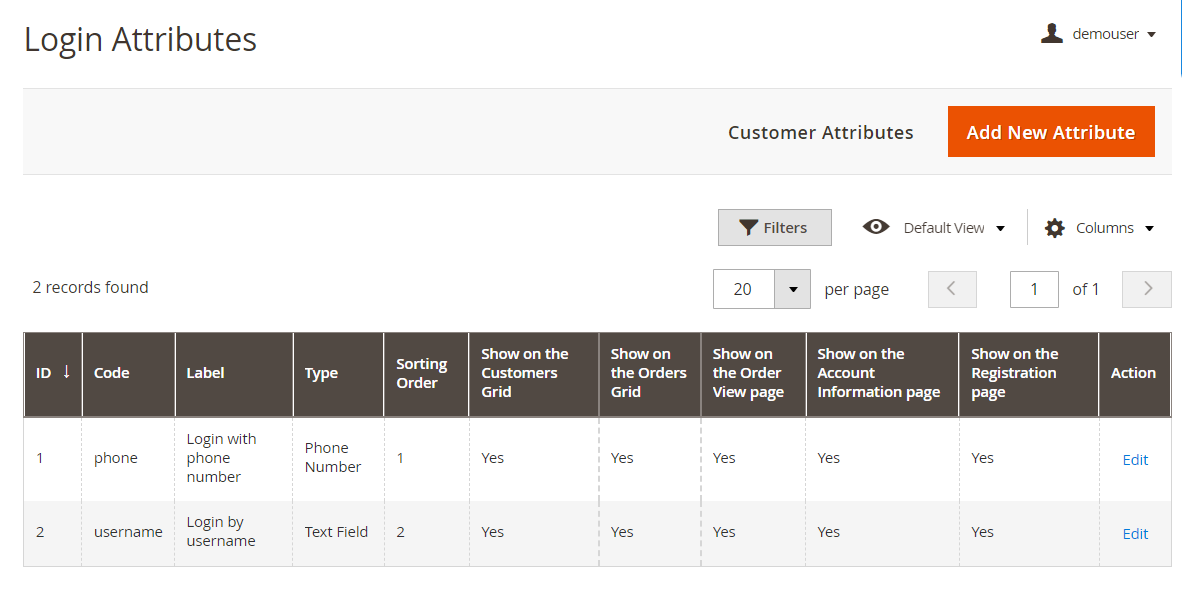
Login Attribute Configuration
 Default Label/Attribute Code - Specify an attribute label and a code. The code will be used only for internal needs.
Store View - Select the store view for which the attribute will be available.
Type - choose between two input types of login option depending on your specific needs:
- Text Field option is suitable for username, Id or any other text login;
- Phone Number option provides customers with login by the phone.
Values Required - If the option is set to ‘Yes’ customers won’t be able to leave this attribute field blank while getting registered.
Input Validation - Specify the type of input validation.
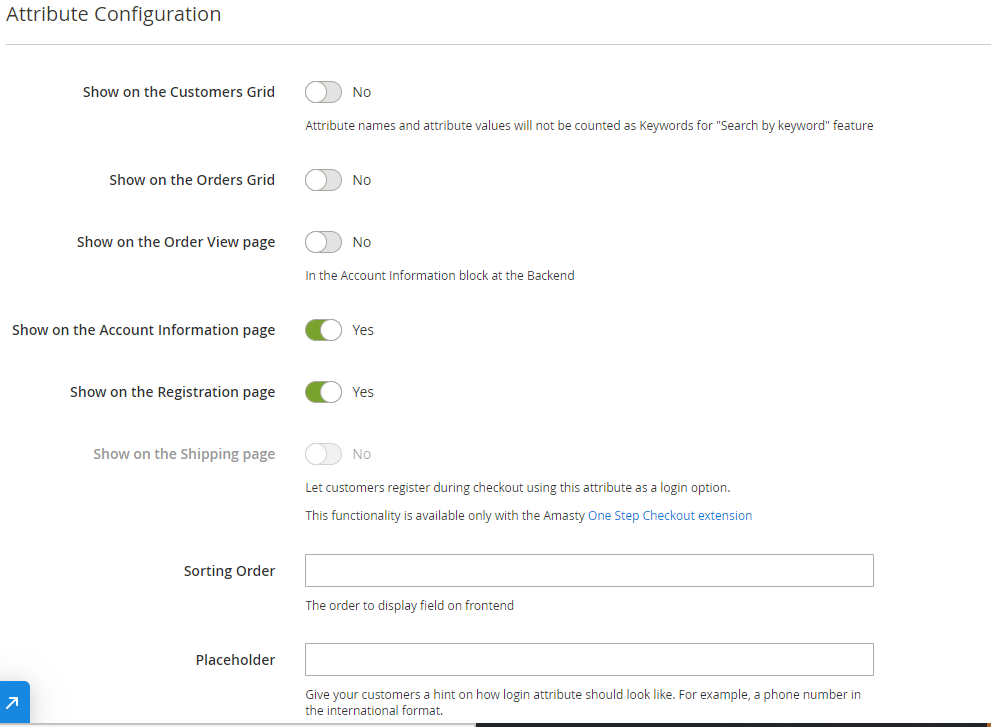
Attribute Configuration
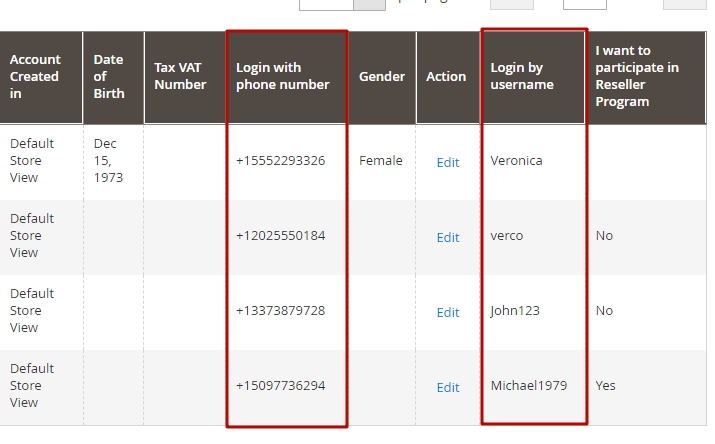
Login Attributes on the Backend
Show login attributes on the Customers grid. Apart from that, you can display login attributes on the order grid as well as on the order info page.
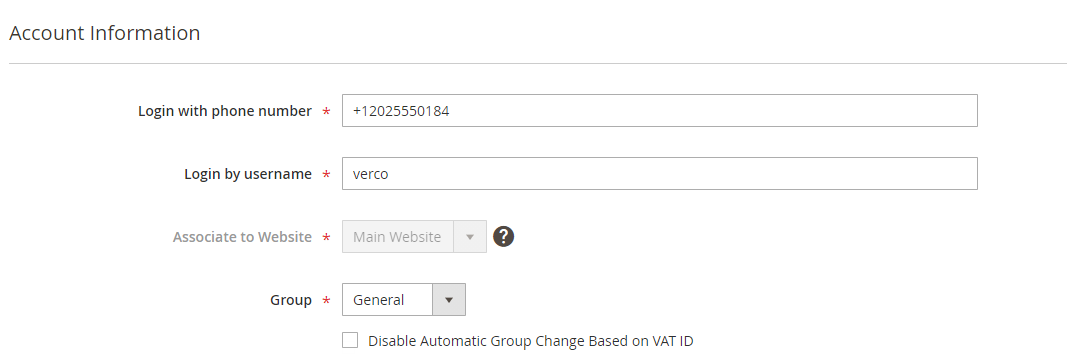
Show custom attributes on the customer info page. You can edit login attributes for already existing customers and specify attribute values for new customers which you create from the admin panel.
Login Attributes on the Frontend
Geo IP Data Configuration
This product includes GeoLite2 Data created by MaxMind, available from 24.10.2023 (last update date).
The extension uses Geo IP Database to detect site visitors' location. Please, go to Stores → Configuration → Amasty Extensions → Geo IP Data.
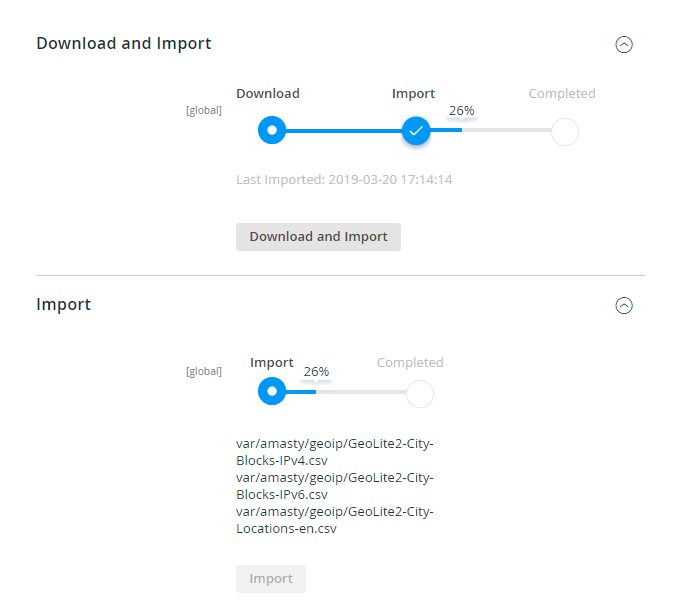
Databases are required for the correct work of the GDPR module. Also you need to install php bcmath or gmp extension on your server.
You can get the databases automatically or import your own data.
Hit the Download and Import button to make the extension download the updated CSV dump file and import it into your database automatically.
To import the files from your own source, use the Import option. Path to the files should look like this (the part 'var/amasty' should be replaced with your folders’ names):
var/amasty/geoip/GeoLite2-City-Blocks-IPv4.csv
var/amasty/geoip/GeoLite2-City-Blocks-IPv6.csv
var/amasty/geoip/GeoLite2-City-Locations-en.csv
In the Import section, the Import button is grayed out by default. It will be available right after you upload the CSV files. The red error notification will switch to green success notification when the import is completed.
IP Database Update Settings
The database included in the extension was last updated on October 24, 2023. To keep the IP database current, you can update it using one of two methods.
Please note that regardless of the updating method chosen, you need to import the IP database first.

Refresh IP Database - select the appropriate method for refreshing the IP database:
- Manually - to manually upload the updated database files;
- Update via Amasty Service - to update the database automatically and regularly via Amasty Service, which is complimentary for you until August 2024.
Debug Mode
You can enable IP forcing, which makes it possible to set a specific IP address that will be used instead of the visitor's real IP address when determining geolocation. The feature is useful while configuring or testing the extension.

Enable Force IP - set to Yes to replace the real IP address.
Force IP Address - specify the address to use instead of a real one.
FAQ
* My Customer Attribute relations don't work, how can I check if anything is not configured correctly?
* How to create a promotion based on the Customer Attributes values?
* Why don't the Customer Attributes relations work while placing an order in the Backend?
* Is it possible to allow customers to upload files using the Customer Attributes M2 extension?
magento_2/customer_attributes.txt · Last modified: 2025/07/01 08:41 by avronskaya


