
Sidebar
magento_2:facebook_pixel
Table of Contents
For more details see how the Facebook Pixel for Magento 2 works.
Guide for Facebook Pixel for Magento 2
Connect your Magento store to Facebook in a split second. Gather more relevant data for the customer behavior analysis during your promo campaigns where Facebook or Instagram are involved.
- Choose the events to track
- Set up remarketing audiences
- Optimize your ads configurations
- Create lookalike audiences
- Configure custom events
Magento 2 Facebook Pixel extension is compatible with Hyvä Theme and Hyvä Checkout. You can find the 'amasty/module-facebook-pixel-hyva' package for installing in composer suggest. The compatibility is available as a part of an active product subscription or support subscription.
When you end up will all the configurations, for the correct work of the extension, please check if it's necessary to flush the Magento cache.
See an overview of how Apple's iOS 14 changes may affect advertising with Facebook.
Learn more about the Facebook Pixel configurations on the Facebook side and Events Manager in the detailed guide by Facebook.
In Facebook Pixel FAQ you can find answers to the most popular questions about the extension functionality.
Facebook Pixel Lite
General Settings
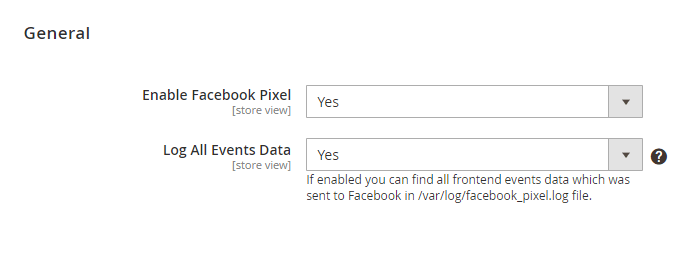
Enable Facebook Pixel - Select 'Yes' to enable the extension and make all the other settings below visible.
Log All Events Data - If enabled you can find all frontend events data which was sent to Facebook in /var/log/facebook_pixel.log file.
Please enable this setting only if you need to check the event data and disable after debugging, as it can affect site performance. We recommend not to keep the 'Log All Events Data' setting enabled all the time in order to optimize the load on your disk space.
Please note that all the info that is sent to Facebook through the Facebook Pixel is logged and stored on the Magento side. If the setting 'Log All Events Data' is enabled, you can find all events data which was sent to Facebook in this file:
/var/log/facebook_pixel.log
.
Manage Pixel IDs
Manage all pixel IDs that you create via the Manage Pixel IDs grid. Please navigate to Marketing → Amasty Facebook Pixel → Manage Pixel IDs to explore the grid and add new pixel IDs. Click 'Add New Pixel ID' to link a new pixel with the Facebook account from Magento backend or click 'Edit' on the grid to edit the existing one.

Edit Pixel / Create a new Pixel
General

Pixel ID - fill in this field with the pixel ID that you can get from your Facebook account. After pasting it here, save the configuration and flush Magento Cache.
To get your Facebook Pixel ID, please follow this link and copy the ID from here:

Is Enabled - Set this setting to 'Yes' to enable this very pixel.
The Product Identifier, Parent or Child Identifier, and Enable Advanced Matching features are available only in the Pro version of the extension and require an active product or support subscription. Upgrade to Pro and subscribe to gain access to these features for more precise tracking.
Store View - Specify the store view or multiple store views to where the pixel will be applied.
Events
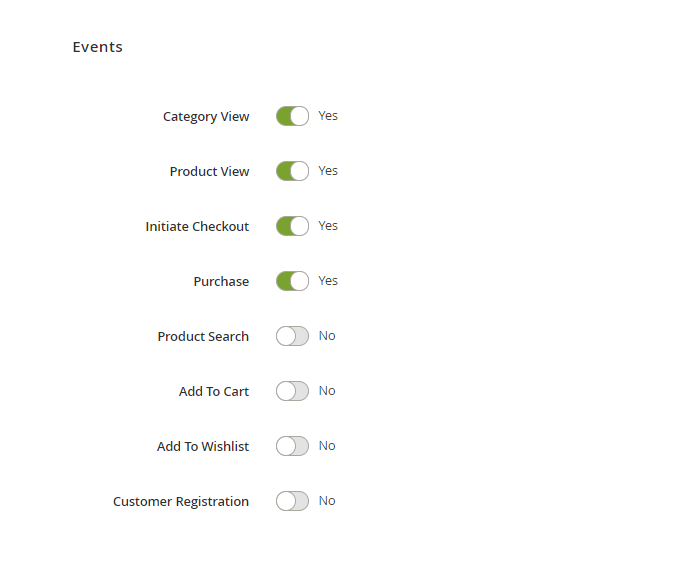
In this section, you can choose for which parts of your store you'd like to track using the events. Enable the events that you need by selecting 'Yes' from the dropdown where needed.
Here's the list of the events you can track using the extension:
- Category View (Magento event name) = ViewCategory (Facebook event name)
- Product View (Magento event name) = View Content (Facebook event name)
- Initiate Checkout (Magento event name) = Initiate Checkout (Facebook event name)
- Purchase (Magento event name) = Purchase (Facebook event name)
- Product Search (Magento event name) = Search (Facebook event name)
- Add To Cart (Magento event name) = Add to Cart (Facebook event name)
- Add To Wishlist (Magento event name) = Add to Wishlist (Facebook event name)
- Customer Registration (Magento event name) = Complete Registration (Facebook event name)
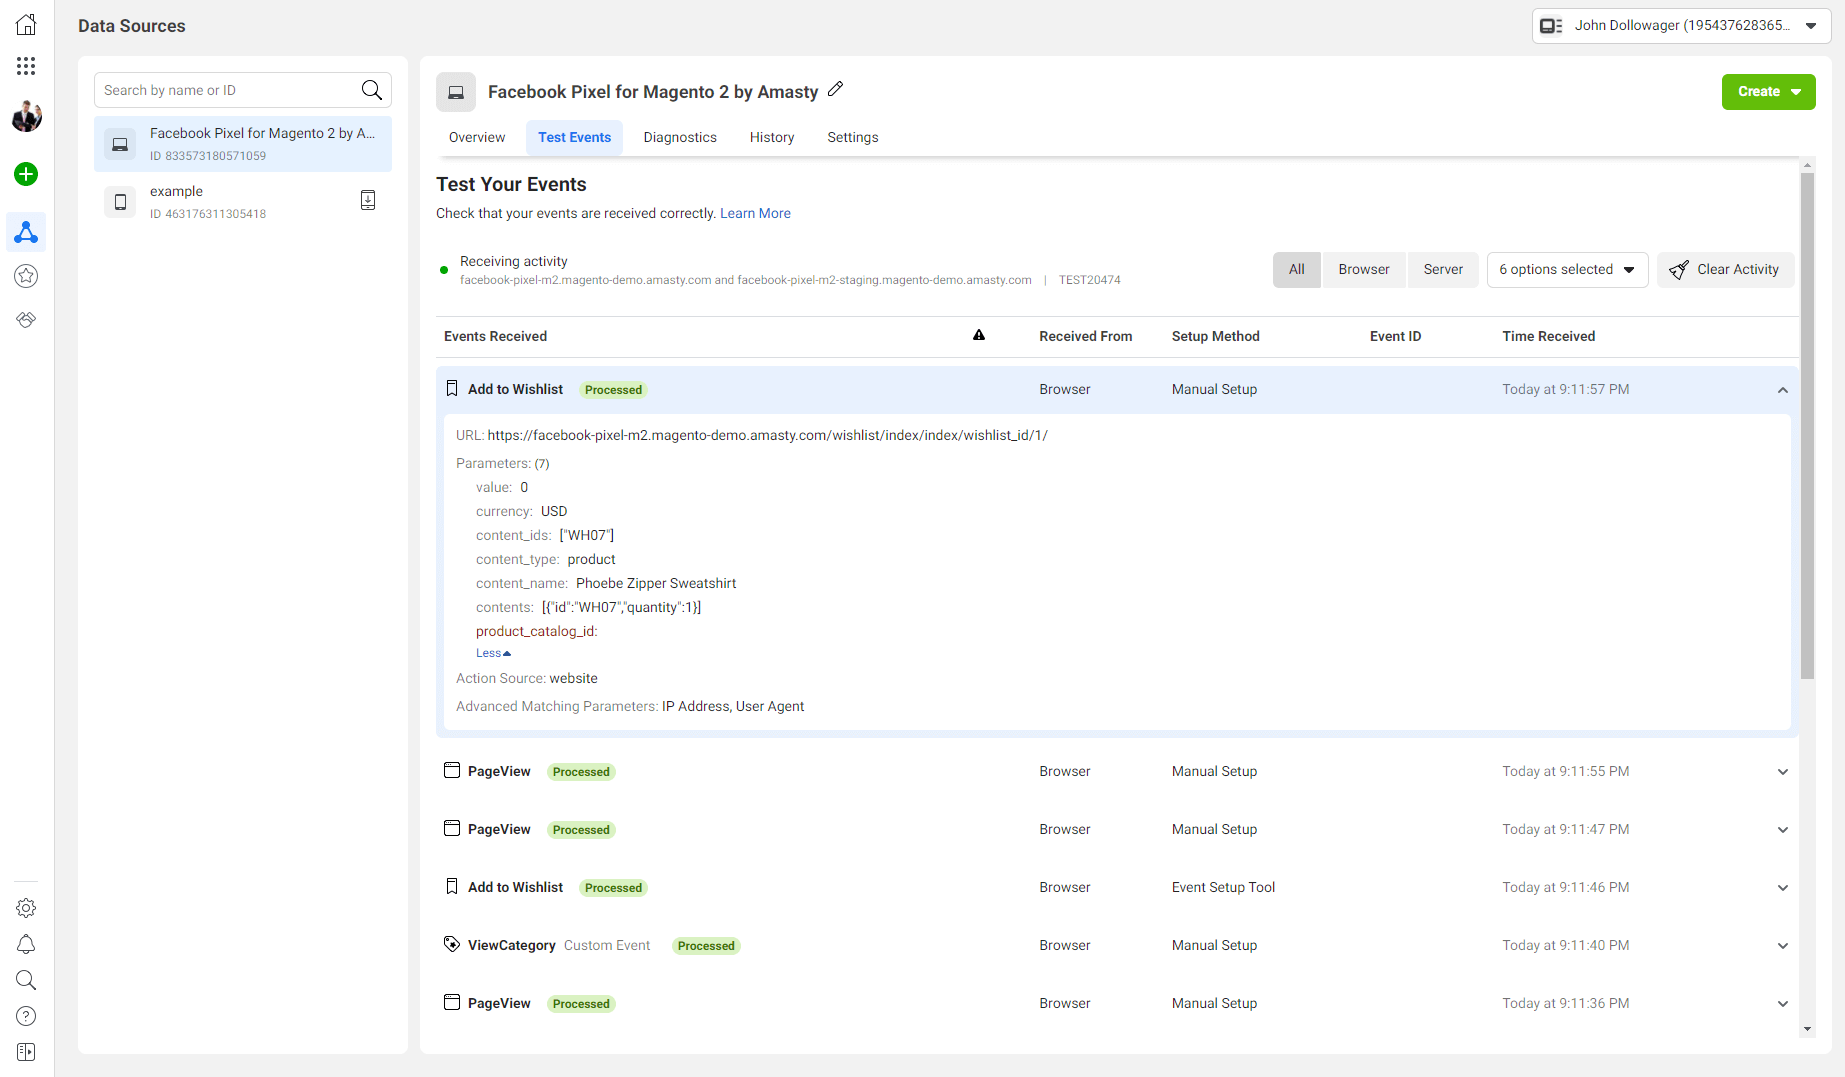
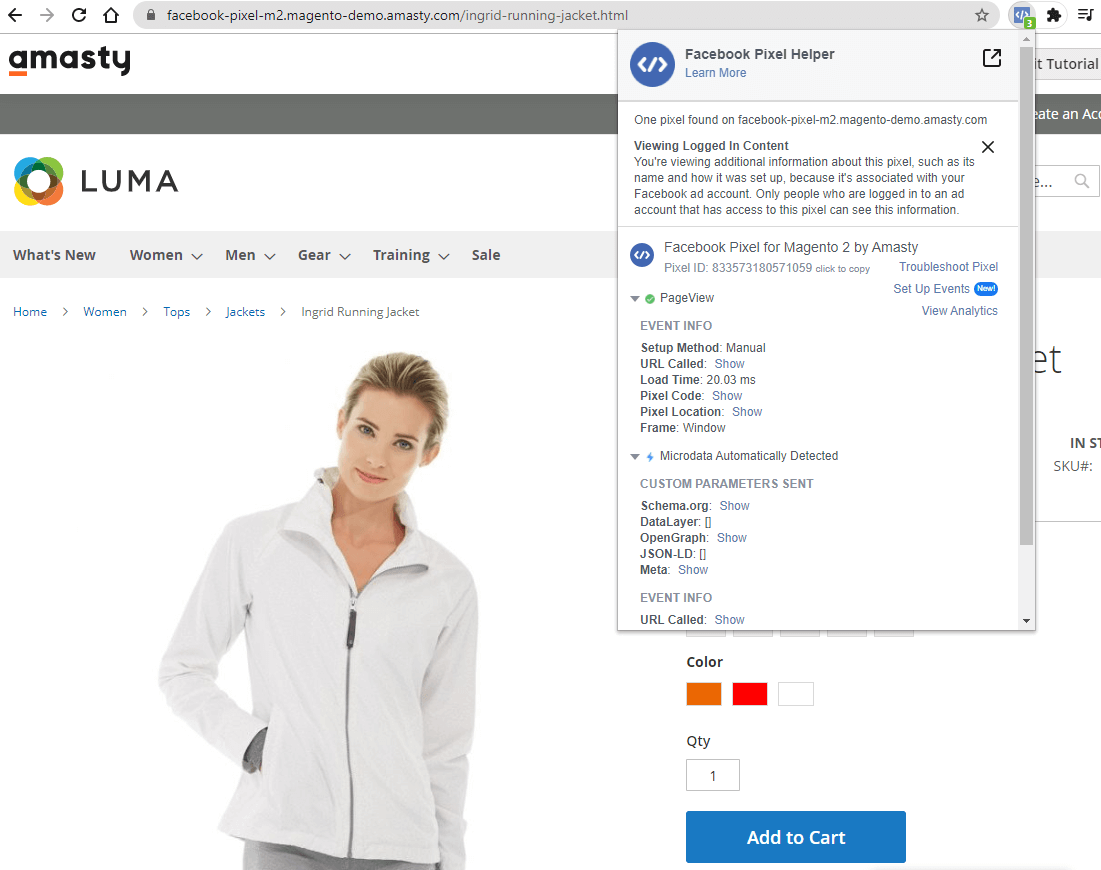
This is how the tracked events will look like on the side of the Facebook:
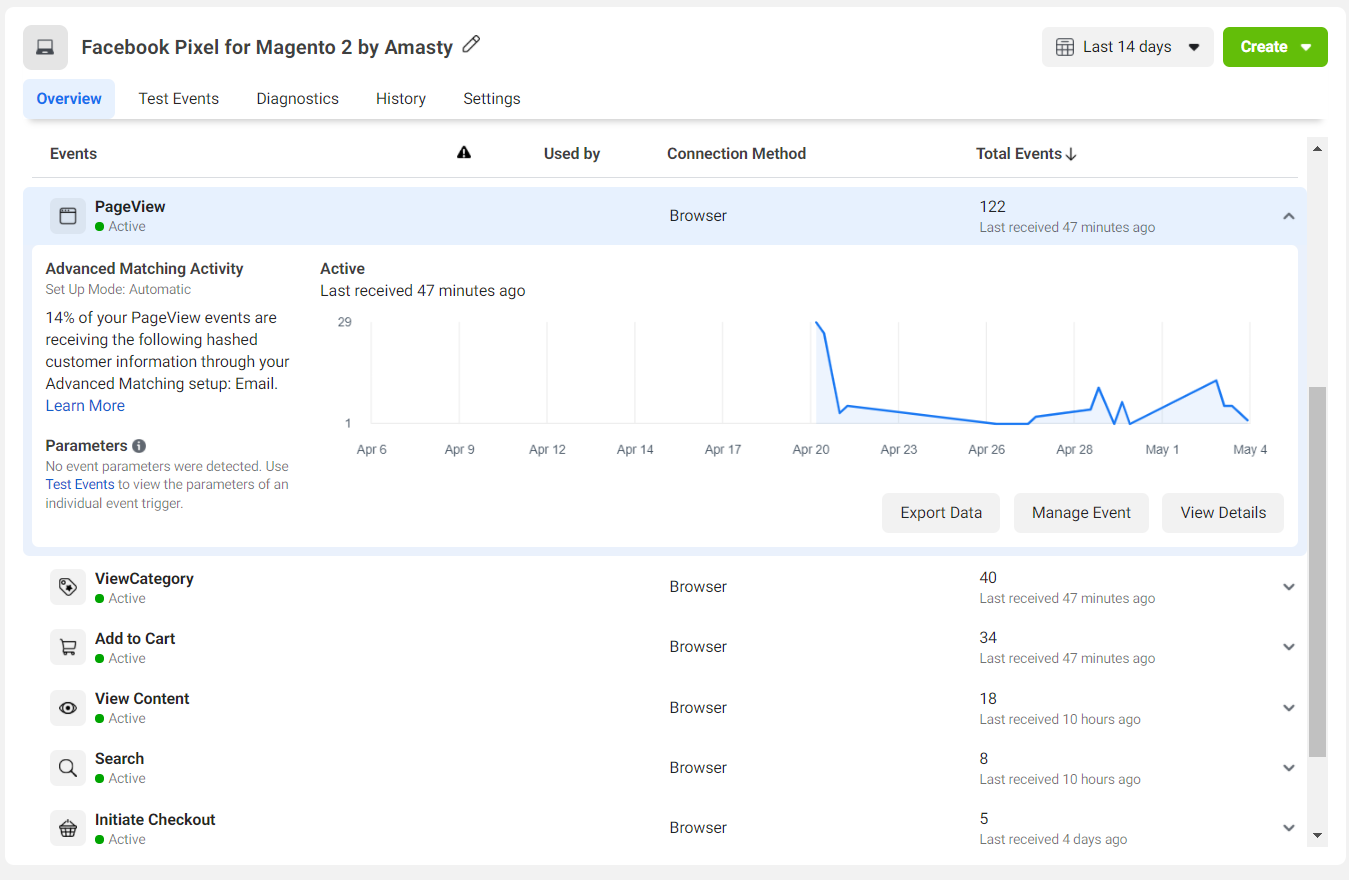
A hint: you can use the Meta Pixel Helper browser extension for easier configuration.
How to connect Magento catalog to Facebook?
Having all the catalog data imported to Facebook will help you to get more precise results from the analytics and more correct work of the Facebook Pixel events related to products. Just for that purpose, we can suggest you to use our Product Feed for Magento 2 extension to export products from Magento and then import this data into Facebook.
Facebook Pixel Pro
General Settings (Pro)
The Facebook Pixel Pro edition adds two more settings to the main configuration area.
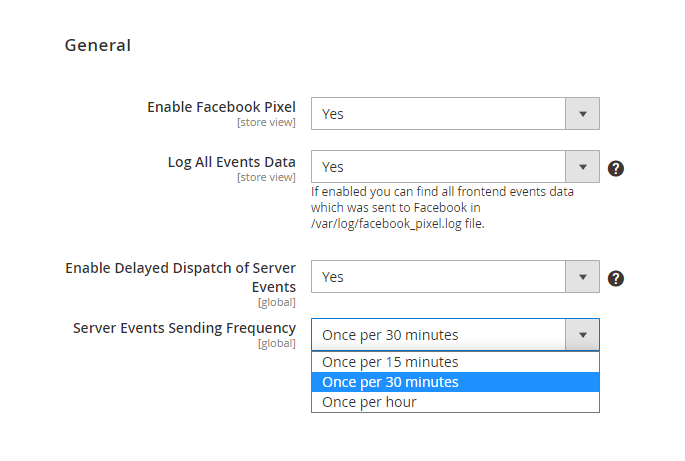
Enable Delayed Dispatch of Server Events - Set this setting to 'Yes' to allow the delayed dispatch of server events and to enable one more setting ('Server Events Sending Frequency') below.
Server Events Sending Frequency - choose the server events sending frequency from three available options:
- Once per 15 minutes;
- Once per 30 minutes;
- Once per hour.
Edit Pixel / Create a New Pixel (Pro)
Additional settings for more detailed and flexible tracking are exclusively available on the pixel creation/editing pages in the Pro version of the Facebook Pixel extension.

Product Identifier - Choose how to identify products in the pixel: either by SKU or by Product ID from your Magento catalog.
- If the SKU option is selected, product SKUs will be displayed in the content_ids parameter of the events as the product identifiers;
- If the Product ID option is selected, the Magento Product IDs will be displayed instead.
Parent or Child Identifier - Select whether the identifiers of child or parent products should be tracked in the events.
- The option selected in the Product Identifier setting will determine whether SKUs or Product IDs are tracked for the products of the selected type (parent/child);
- For grouped products, only childs' SKUs or Product IDs will be tracked.
Enable Advanced Matching - set to Yes to send hashed information about registered customers along with the enabled Facebook (Meta) Pixel events. The following registered customer details will be forwarded: Email, Phone Number, First and Last Name, City, State, and ZIP Code.
- This feature does not support sending such information about guests.
Customer ID - set to Yes to forward Customer ID information along with the enabled Facebook (Meta) Pixel events.
- For guest customers, the external_id parameter included the client session IDs will be forwarded with the enabled events;
- For registered customers, Magento customer IDs will be forwarded.
All features described in this user guide section are available only as part of an active product subscription or support subscription. You can find the amasty/module-facebook-pixel-advanced-matching package for installation in composer suggest.
These features work similarly for the Conversion API method.
Conversion API
Please note that you need to have a Facebook Business account to setup the Conversion API functionality. You can create it here, by following this link: https://business.facebook.com/overview/
The Facebook Pixel Pro edition adds extra section to the Pixel ID configuration area. In order to use use it, please navigate to Marketing → Amasty Facebook Pixel → Manage Pixel IDs → Add New Pixel ID / Edit → Conversion API.
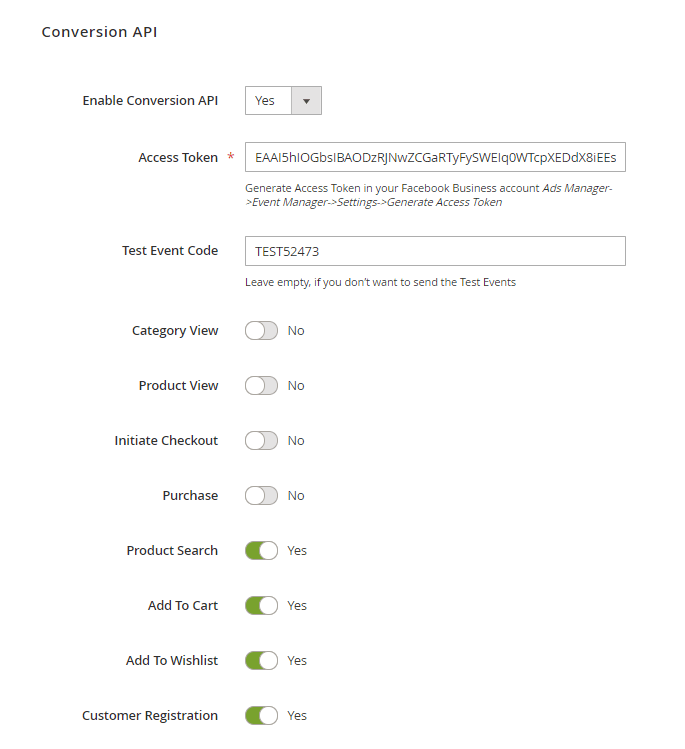
Enable Conversion API - Set this setting to 'Yes' for further configurations of the Conversion API functionality.
Access Token - Generate Access Token in your Facebook Business account Ads Manager → Event Manager → Settings→Generate Access Token.
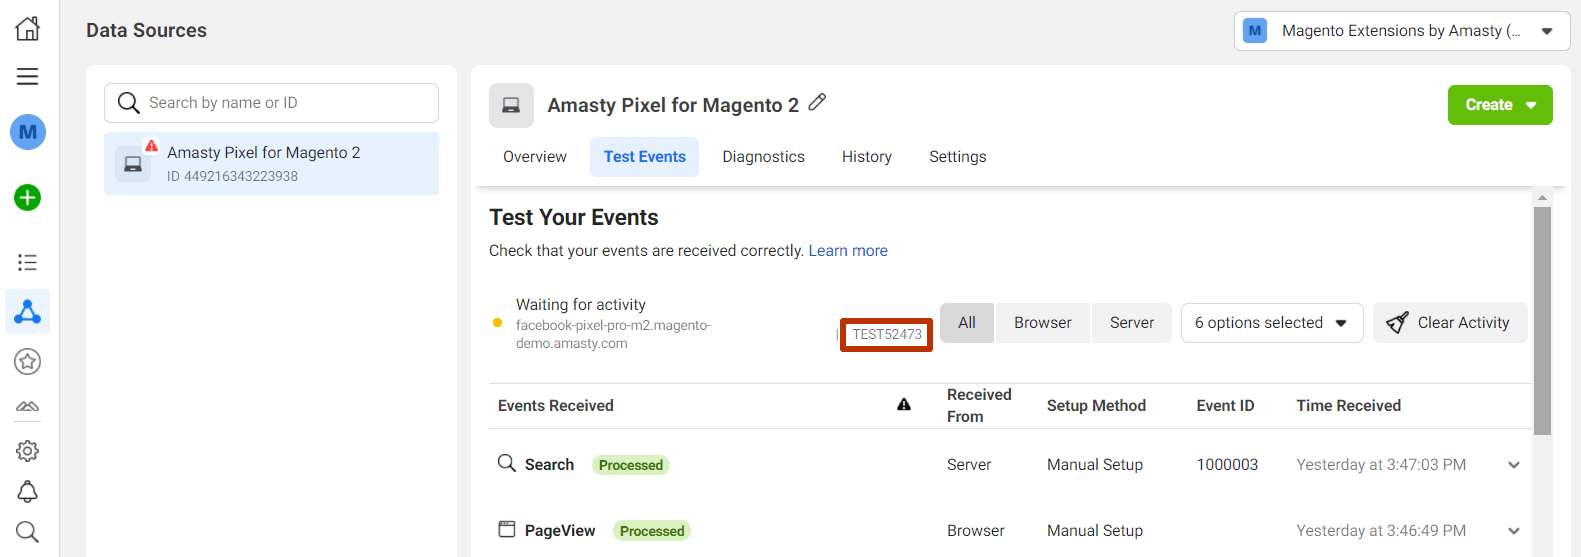
Test Event Code - In order to get the test code, please navigate to the 'Test Events' tab of your Facebook account. Leave empty, if you don’t want to send the Test Events.
Please note that the any test information will remain in the Test Events tab for 24 hours or until you clear it.
Find out how to install the Facebook Pixel extension for Magento 2 via Composer.
magento_2/facebook_pixel.txt · Last modified: 2025/04/01 10:52 by kkondrateva