
Sidebar
magento_1:product-feed
Table of Contents
For more details see the Product Feed extension page.
Guide for Product Feed
Product Feed extension is designed to generate files containing data from the store catalog and then share them. For example, using this extension you can generate a feed file with your products and upload it to Google to make your products available for advertisement campaigns.
How to set up a feed profile for Google Merchant and Facebook
Since Facebook is using the same feed format and tags as Google, the feed profile we're going to create here will work for both Google and Facebook.
Go to Feeds and click the Setup Google Feed button.

Step 1. Categories mapping
To map your category to category in Google taxonomy simply click on category name and insert suitable category path from Google taxonomy:

When you're done mapping categories this is how the result might look like:

Hit Save button to continue.
Step 2. Basic product information setup
Wizard will have all fields already filled for you so you can skip to the next step if you don't want to make any changes.
But in case you want, for example, to use short description instead of the description in your feed, then you can do it like this:

The same can be applied to all other attributes.
Also check the Options section. There you can select which storeview to take attribute values from. It's very useful when you have a multilingual store for example, so you can create feeds using the names or descriptions in specific languages. Same works for currencies. If you have a multistore configuration with different currencies set for each store then this setting will make the Feed fetch product prices in the currency assigned to the specific store.
Notice! Condition tag
By default, Wizard will have a static text New put in the condition tag. This is alright if you don't sell used or refurbished items. But in case you do, you should create a product attribute which will indicate if the product is new or not, and assign values to this attribute for each product in your store.
As you may have already noticed, the static text New is shown for the condition tag. This is okay when you sell only new items. And if you sell used or refurbished items, don’t forget to change this setting.
This is how this attribute configuration may look like:


While creating the option for this attribute please note that Google will accept only the following values: new, refurbished or used.
After the attribute is created (you can assign attribute values to products later) reload Wizard page to be able to select this newly created attribute in the dropdown:

Save and go on to the next step!
Step 3. Fine-tuning
Just as in previous step here we see a list of attributes. But this time which attributes to use greatly depends on what you are selling. Google has different requirements for data that should be included in the feed. The requirements depend on your store location and the type of products you export.
For example, if you sell apparel and the Condition tag is set to New in your products, you will need to have attributes gtin, mpn and brand in the feed.
Brand should be set manually. Here’s the example: in my test store I have the brand info saved in the Manufacturer attribute, so I choose it in the dropdown.

Gtin (A Global Trade Item Number) and mpn (Manufacturer Part Number) are very important so it's worth looking at them in a bit more detail.
If you don’t have these attributes, you have to create them, just the same way as we did for the condition attribute before. But this time the attribute type will be Text field.


After creating these attributes, you have to set them for each product. You may want to check this help article from Google if you don’t feel very confident regarding these terms.
If any of the listed attributes are not required for your country or a product type, just choose the None option, and the tag won’t be added to the feed profile.
Here’s how the fully configured step 3 may look like:

Step 4. Automatic generation and uploading options
In the following example we're going to set up a feed to be uploaded to the Google servers daily, once a day, using SFTP in fully-automatic mode.
We should start from the Google Merchant account setup. Add a new feed:

A test feed will do for now, but please keep in mind that test feeds can't be used in AdWords campaigns:

Since we're going to upload our feed files to Google server, Upload is what we need here:

The next one is important because the name of the feed file you set here should match the actual name of the file you're going to upload to Google. The same name we're going to use in Wizard a bit later:

In the Google Merchant dashboard, go to Settings (near your profile avatar) > SFTP / FTP / GCS:

Click Reset password and save the password. Now, on the SFTP settings page we can get the server address and login:

Return to the Product Feed extension, step 4, choose SFTP as the upload method and enter the data you have received from the Google Merchant dashboard. Here also goes the filename you've set in the Google Marchant feed settings. Switch the Generate feed setting to Daily, and you’re done!
Here’s how the configured step 4 may look like:

As you click Save and Continue, the feed profile will open and the feed generation will start, and because we configured the SFTP upload, the feed will go to the Google server, too:

After the file is uploaded to the Google server, it will be automatically processed.
Step 5. Getting rid of errors
As I've already mentioned Google has very specific and quite strict requirements for the data in the feed. For example, if we’re trying to import apparel items, we must specify some required attributes, such as color, size, age group, and more. You can get details about these requirements here.
You can see the list of errors with details in your Google Merchant account after the feed file was uploaded and processed:

You can add attributes to your feed profile using the feed editor. For instance, if you need a Color attribute and you have it as an attribute in your Magento store, add it as well.

Act accordingly until all the errors are gone, and your file will be submitted successfully, and the products will appear in search.
Of course, each shop and product type have peculiarities that can’t be covered in a single guide. Therefore, please carefully read error messages, they offer all the necessary information for their correction.

General settings
Extension menus are located in Catalog > Product Feeds
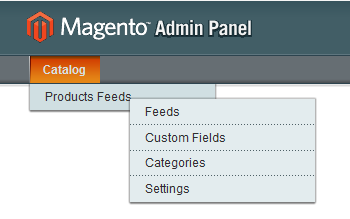
- Feeds menu contains product feed profiles. This is where most of the extension action takes place.
- In Custom Fields menu you can set up fields for special cases. Please check below for instructions and some examples.
- In Categories you set category mapping. Why this is important and what you should do about this is described here.
- Settings menu is where extension settings are. Here you can find more about extension settings.
Settings menu

- Max Memory Used (Mb) limits the amount of memory feed generation will use. This setting is overridden by server configuration in most cases.
- Batch Size controls how many products will be processed in a single batch. Feed generation may take some time in cases when there are many attributes are exported or if the product catalog is large.
Setting this option high will speed up feed generation as there will be fewer if not no timeouts between batches, but if there is a lot of data to export then generation script may exceed timeout delay and stop.
Feed profile settings
General
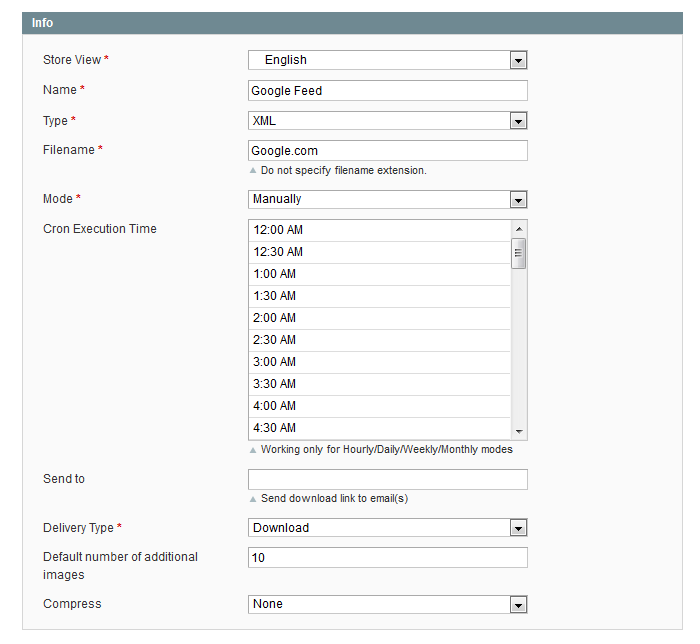
- Store View setting controls from which store view products and attributes will be exported. For example, if you have set English and Dutch store views with different product names and descriptions, then you can set up separate feed profiles to fetch data from English in English and from Netherlands store in Dutch.
- Name - name of feed profile.
- Type - file type. Should be set according to requirements of the site where you want to upload feeds. For example, Google accepts feeds in XML and text (TSV) formats. XML format is more flexible when CSV (or TSV) is more straightforward to configure.
- Filename - name of the resulting feed file. Please note: feed files are stored with different names due to security reasons. Files which are uploaded to the server using the FTP\SFTP method or by Download button will have the correct name set.
- Mode - generation mode, can be Manual or automatic (hourly, daily, weekly, monthly).
- Cron Execution Time - if automatic generation mode is set up, then generation will start at the time set in this setting.
- Send to - put an email address here and each time generation finishes download link will be sent to this address.
- Delivery Type - can be set to upload feed file to the external server using FTP or SFTP protocol.
- Default number of additional images - controls the maximum number of image links which can be exported from a single product.
- Compress - feed files can be compressed to save disk space and download\upload time. In this setting you can select the compressed file format.
Content
XML format
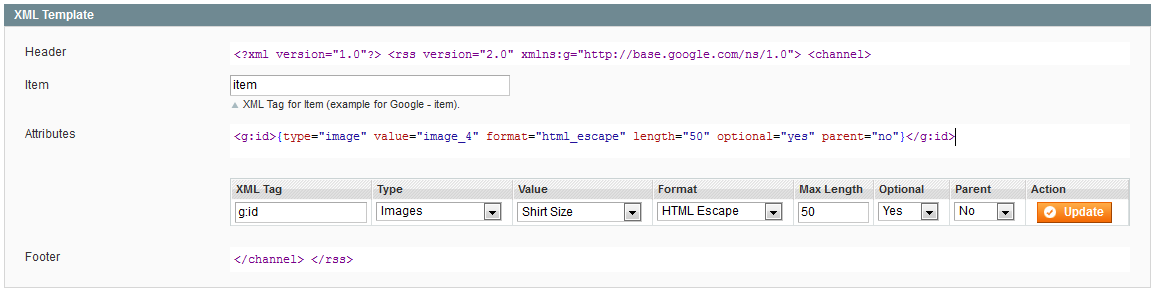
- Header - used to place some info into the XML header
- Item - tag which will wrap each product in the feed
- Attributes - XML editor where XML tags and attribute codes are inserted
- Footer - used to place some info into XML footer
- XML Tag - XML tag for the entity set up below.
- Type - type of the following Value entity.
- Value - Depending on the Type setting there can be a list of attributes, images, Custom fields and other entities which can be exported into the feed.
- Format - format of the Value field. Can be set to “As Is” to export data as it is in the attribute, or it can be set to “HTML Escape” to escape special symbols for example, which is important for XML format as special symbols can be treated as part of XML markup and break feed file.
- Max Length - maximum length the Value output in characters.
- Parent - when enabled, simple products which are associated with configurable products will output attribute value from the parent configurable product.
- Action - removes the column.
CSV format

- Column Names controls whether column names will be put in the first line of the feed files or not.
- Header - there you can set some test to be displayed at the very start of feed file
- Fields enclosed by - there you set which delimiter will be used to enclose data in columns.
- Fields separated by - this setting controls which column delimiter will be used.
- Fields - Header - name of the field, will be displayed in feed file if Column Names setting is enabled.
- Fields - Before - text from this setting will be put before output of the field below.
- Fields - Type - type of the Value entity below.
- Fields - Value - Depending on Type setting there can be a list of attributes, images, Custom fields and other entities which can be exported into feed.
- Fields - After - text from this setting will be put after the output of the Value field.
- Fields - Format - format of the Value field. Can be set to “As Is” to export data as it is in the attribute, or it can be set to “HTML Escape” to escape special symbols for example.
- Fields - Max Length - maximum length the Value output in characters.
- Fields - Parent - when enabled, simple products which are associated with configurable products will output attribute value from the parent configurable product.
- Fields - Action - removes the column.
Formats settings
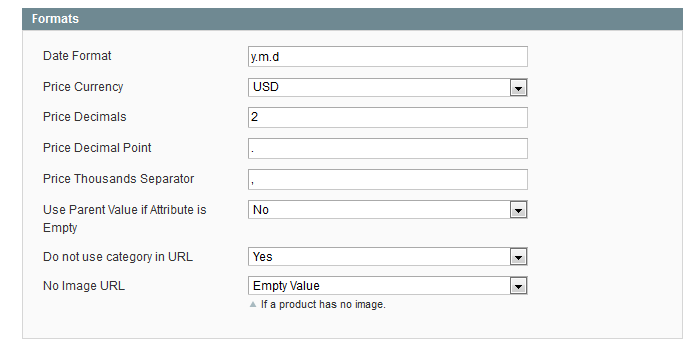
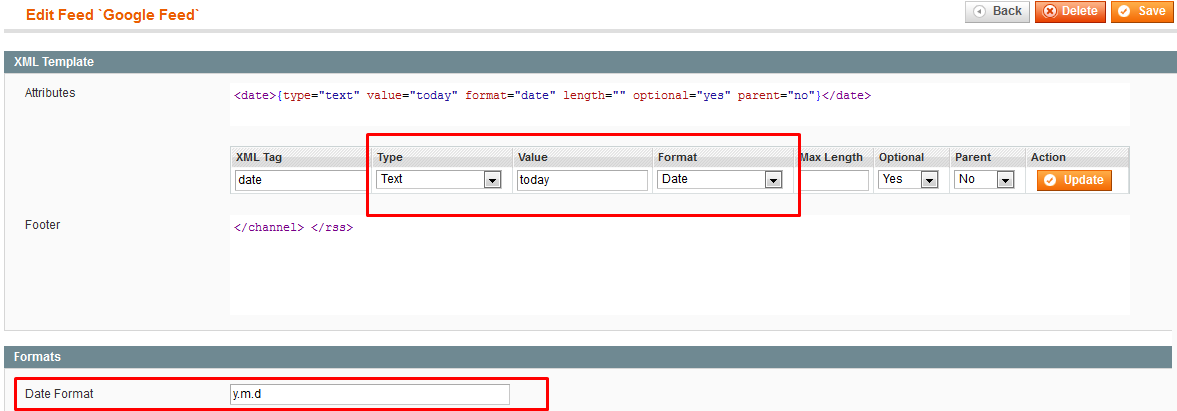
- Date Format - output format for the Format Date. More information and examples can be found here.
- Price Currency - if a store has multiple currencies set up, this setting will convert the base currency to selected currency by exchange rates set in Magento settings.
- Price Decimals - controls decimal precision of prices. Can be set in a range from 0 to 4.
- Price Decimal Point - decimal point delimiter for price values.
- Price Thousands Separator - thousands delimiter for price values.
- Use Parent Value if Attribute is Empty - same as Parent option, but engages only if there is no data in the attribute of the associated simple product.
- Do not use category in URL - when enabled, product links will have categories stripped from URLs.
- No Image URL - can be set to Default Image to output link of Default Image set in Magento settings if there is no picture available in product configuration.
Conditions

- Exclude Disabled Products - when enabled, Disabled products won't be exported.
- Exclude Out of Stock Products - when enabled, Out of Stock products won't be exported
- Product Types - types of products to export.
- Attribute Sets - when set, only products with matching Attribute Set will be exported.
- Products Filter Configuration - there you can set advanced filter options. For example, you can export only products from certain category or exclude products under certain price from the feed.
Delivery
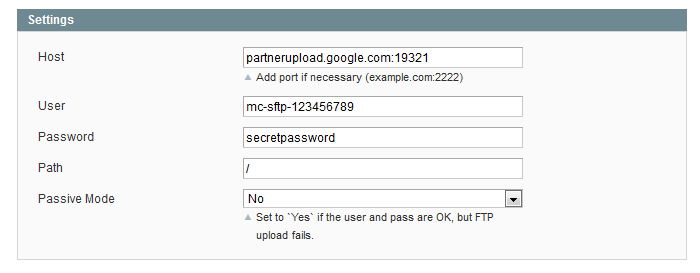
- Host - FTP\SFTP server hostname or IP address.
- User - FTP\SFTP username.
- Password - FTP\SFTP password.
- Path - path to directory on FTP\SFTP server. Please note: this path is set relative to FTP\SFTP user home directory. If home directory is already set to desired feed destination then you don't need to set Path.
- Passive Mode - can enable Passive mode for FTP connections. More on FTP modes here.
How to's
How to add current date to the feed
How to add or replace text in the attributes (How to use Custom Fields)
Open Catalog > Product Feeds > Custom Fields menu and hit Add New button. Give a new field a name and a code, then check the Transform tab.
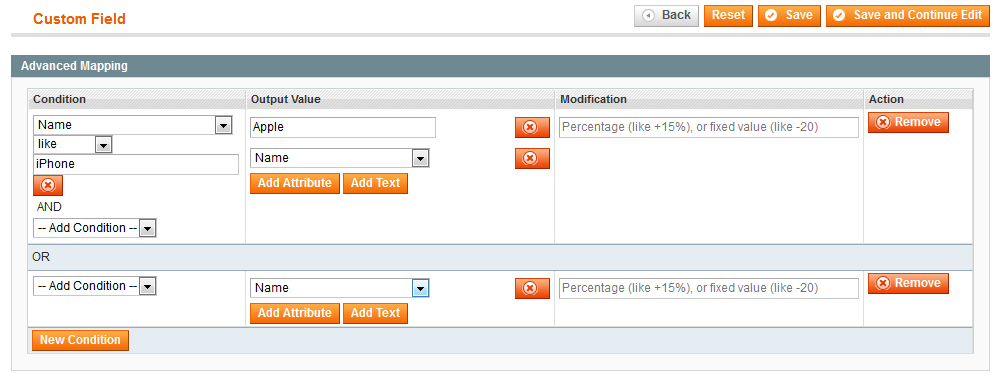 On the left you'll see Condition. Here you can control for which products our custom field should apply.
In the center there is Output Value. Here you define how the custom field's output will look like, what will be actually put into the feed.
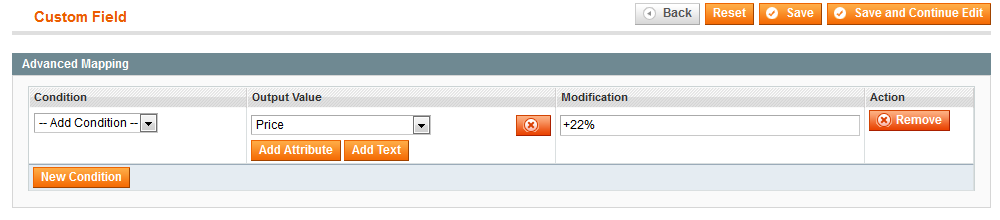
Modification can apply arithmetical operations on attributes selected in Output Value column. Of course, this will only work on numbers.
On the left you'll see Condition. Here you can control for which products our custom field should apply.
In the center there is Output Value. Here you define how the custom field's output will look like, what will be actually put into the feed.
Modification can apply arithmetical operations on attributes selected in Output Value column. Of course, this will only work on numbers.
After you have you Custom Field set up you should add it to the feed profile you're using

Example 1. Add tax to prices
Example 2. Add text "Apple" before product name for iPhones
The logic here is simple: if a product has “iPhone” text somewhere in the name, text “Apple” will be added before the product name.
Please note the transform set up in the second line. Most likely this new field will be used as a replacement for the default Name attribute. Since we want to output names of non-iPhone products unchanged we need to add the transform you see in the second line.
Since transformations work from top to bottom, then Custom Field will check if the product has “iPhone” text in the name, and if not it will check the condition on the second line. Since there is no special condition set, it will just output the Name attribute value as we've set it.
How to use configurable product attribute data instead of associated simple product's data
Often store catalogs are configured in the way when only parent configurable product is visible on the store when it's child simple products set to Not Visible Individually, but they store important attributes which you want in your feed. In this case you have to include Simple Products in the feed, but you also don't want feed to, for example, output URLs for these products. Best solution for this would be using URL of parent Configurable Product and this is what you can do with our extension.
To achieve this, simply enable Parent option:

You can do the same for any attribute.
When Parent option is enabled, attribute value will be taken from Parent Configurable Product if one exists.
How to submit configurable products to Google Merchant
Related help article on Google support site.
To make the Google know that the simple and configurable products you submit in the feed are related you should use g:item_group_id tag. Add this tag like any other to your feed profile, set it to output SKU attribute and enable Parent option.

With this setup Feed extension will export products with same g:item_group_id if they happen to be related, i.e. if they are associated products of the same Configurable Product. Then Google will check g:item_group_id value and treat these products as a variant of the same product.
Known issues
XML formatting error
In the most cases this error appears when your feed has special characters inside tags. Please note the line number in the error message, then open your XML feed file and check the aforementioned line. Note the tag used in this line, then open feed profile, find the tag and set Format to “HTML Escape”
 Hit Update, then save and generate the feed.
MySQL "JOIN" error at the start of generation
Open the feed profile and find the link tag. Change the Attribute value to URL
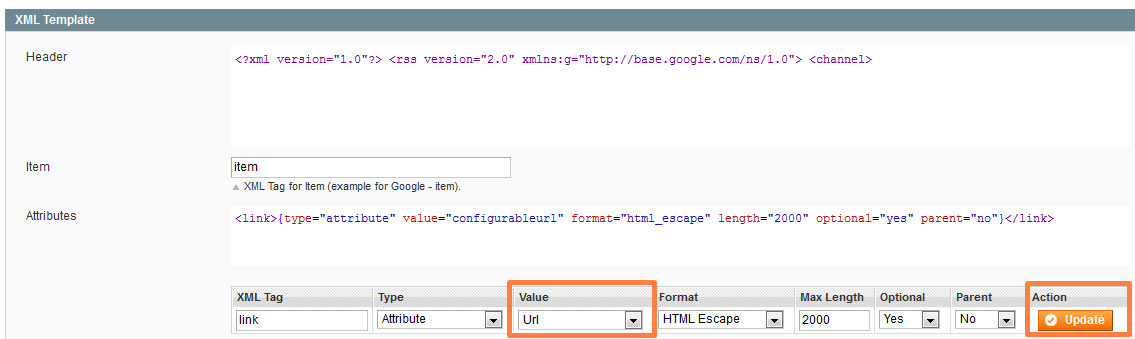 Hit Update, then save and generate the feed.
"Daily" generation doesn't work
There are two possible causes:
- Magento cron is not running. Please check this article to learn how the Magento cron is configured.
- Feed was generated manually. In this case it may take Feed up to 48 hours to run next Daily generation routine.
Image URLs are HTTP on HTTPS site
Open the following file: /app/code/local/Amasty/Feed/Model/Profile.php
Find this line of code:

Comment it, save the changes, flush Magento cache and generate feed again.
magento_1/product-feed.txt · Last modified: 2019/07/22 13:53 by skudrov