
Sidebar
magento_2:improved_layered_navigation
Table of Contents
For more details see how the Improved Layered Navigation extension works.
Guide for Improved Layered Navigation for Magento 2 (settings)
With a feature-rich navigation module, you will easily enhance customer shopping experience by adding a handy vertical and horizontal navigation menu to your website. Filter store catalog by any product attribute, display price sliders and ‘from-to widgets’. Generate custom brand pages and optimize your website for search engines.
- Configure multiple store filters to meet your specific need;
- Auto generate SEO-friendly page URLs;
- Display a 'Brand' filter;
- Use AJAX technology to streamline product filtering;
- Customize the color for selected filters;
- Import navigation attributes and brand options;
- Compatibility with AI Content Generator Pro (Shop by Brand part);
- WCAG compliance.

The extension is read compatible with GraphQL. Now you can expose the datasets in Improved Layered Navigation for Magento 2 via GraphQL queries.
Magento 2 Improved Layered Navigation extension is compatible with Hyvä themes. The compatibility is available as part of an active product subscription or Support Subscription.
For the correct Hyvä compatibility work, please install the following packages from the composer suggest:
- amasty/module-shop-by-brand-graphql
- amasty/module-shopby-hyva-compatibility
- amasty/module-shop-by-brand-hyva-compatibility
- amasty/module-shop-by-base-hyva-compatibility
- amasty/module-shopby-grouped-options-hyva
General Settings
Magento highly recommends to deploy static content after the extension installation.
The Enterprise and Cloud editions of the extension are compatible with Live Search.
To get access to Magento 2 layered navigation settings, please go to Stores → Configuration → Improved Layered Navigation


How to apply filters on Desktop/Mobile with Varnish
If you need different types of cache for mobile and desktop devices, please, insert this code (line 2-8) into the section vcl_hash in the varnish configuration file (vcl).
sub vcl_hash {
    if (req.http.X-UA-Device ~ "^mobile"
        || req.http.X-UA-device ~ "^tablet"
    ) {
        hash_data("mobile");
    } else {
        hash_data("desktop");
    }
}
For the correct work of this code, please make sure that you have this library installed.
Enable AJAX - Enable AJAX to avoid page reloads. Enabling AJAX allows your store to update filter results dynamically, so when a customer uses filtering on the frontend, selecting filters will not cause a page reload.
Customers can continue selecting multiple filter options while it's loading with AJAX. This way the whole shopping process becomes seamless and fast.

Scroll to Top after AJAX Load - With this setting, you can enable an option of scrolling to the top after filter applying by AJAX. You can choose one of the three options:
- Yes (to Listing Top)
- Yes (to Page Top)
- No
Add Vertical Scrolling to Filter Block After - Specify maximal filter size (in pixels) that will be displayed without vertical scrolling. In case a filter is higher than the indicated size, the scrolling will appear. To disable set 0.
See a Vertical Scroll example 
Enable Sticky Sidebar for Desktop - set to ‘Yes’ to pin the sidebar with filters and keep it in the user's line of sight.
Submit filters on desktop (on mobile) - Select Instantly mode to apply filters one by one, on the fly. With the By Button Click mode, customers will be able to apply multiple filters in bulk after clicking an Apply button.
By Button Click mode sample 
Highlight Selected Filter Options - Here you can specify whether you want to use the default settings or custom color to highlight the selected filters in Category Tree on the frontend. If you choose the Custom Highlight option, an additional setting will appear, allowing you to specify a particular color. Note: this functionality is available as a part of an active product subscription or support subscription. It is temporarily unavailable for Hyvä Theme.
- Default settings frontend example:

- Custom Highlight settings frontend example:

Leave the Single-Select Filter Visible after Selection - Disable the setting to hide the filter with just one option when the value is selected.
How it works:
If the setting is set to No, the option with the only one choice will become hidden after the selection:

If you enable the option, it will remain visible:

Hide Filters with One Available Option - Set to 'Yes' to hide filters with one available option. Applies only to category filters and filters based on EAV attributes.
Number of Unfolded Options in State - Specify the number of unfolded options. To see other options, a customer should click the 'More' button.
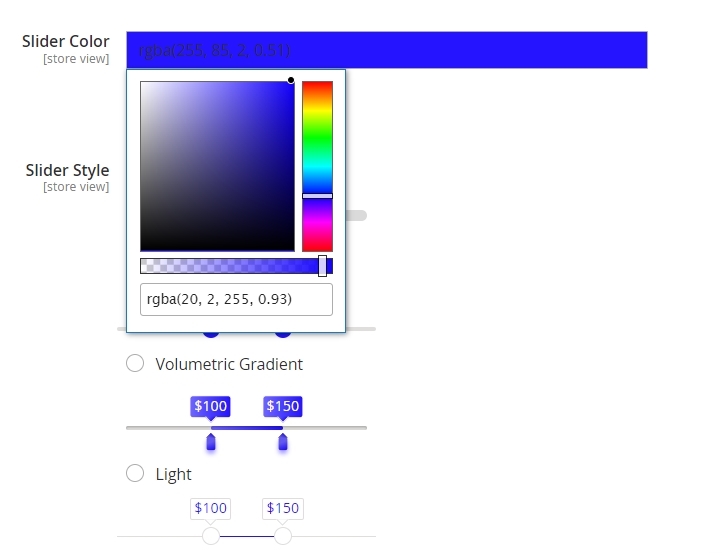
Slider Settings - Here you can choose the style and color for a Price Slider. There are 5 options available for now: Default, Improved, Volumetric Gradient, Light, Dark.
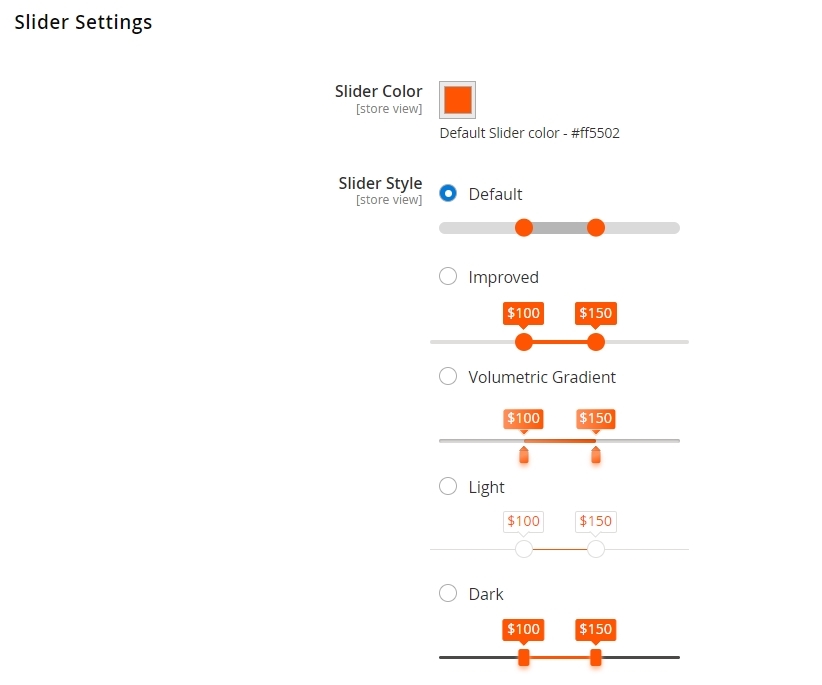
You can customize the slider color and transparency level to match your website’s design.
Exclude 'Out of Stock' Configurable Options from Navigation - Set to 'Yes' to hide out-of-stock configurable products options and parent configurable products from the search results if the configurable products don't have an option by which the filtering went.
Please mind, that to make the Exclude 'Out of Stock' Configurable Options from Navigation option visible, you should go to Stores → Configuration → Catalog → Inventory → Stock Options and make sure that the option Display Out of Stock Products is set to 'Yes'.

Add Title, Description and CMS Blocks of the Selected Filters
Here you can customize and add Magento 2 category attributes like title and description.

Add the title & description of the selected filters - specify any filters to which you want to apply custom title and description.
Check the frontend sample of a customized title:

Add filter title - Select the place where filter title will be displayed:
- Before Category Name
- After Category Name
- Replace Category Name
- Don't Add
Separate Category name and title with Specify the separator for a category name and a title
Add filter description - Specify where to display a custom filter description:
- Before Category Description
- After Category Description
- Replace Category Description
- Don't Add
Replace Category Image - When enabled, a category image will be replaced if a filter option has a custom image uploaded.
Replace Category CMS Block - When enabled, a category CMS block will be replaced if a filter option has a custom Top CMS Block defined.
Please open Stores → Attributes → Product → [open attribute] → Properties → [open attribute option settings] in order to define Title, Description, Image and CMS block for a chosen filter.
Children Categories Block
These settings activate the block with subcategories on top of the selected category pages.

Display Mode - Choose the display mode for a Children Categories Block. Two options are available: either to show subcategories' names with their icons or without the ones.
Category's Thumbnail Image Size (the field is available when the display mode “Category Thumbnail Images” is chosen) - Specify the size of thumbnails, which will be displayed in the block on the category page.
Show Image Labels (the field is available when the display mode “Category Thumbnail Images” is chosen) - Select Yes to display the titles of the subcategories.
Enable Slider - Set Yes to display block as a slider, otherwise it will be displayed as a static block.
Items per Slide - Specify how many items will be displayed in the slide on the page. Other thumbnails will be available with the scroll.
Enable Infinity Loop - Set to 'Yes' to enable continuous loop mode for the сhildren сategories slider. Because of the nature of how the loop mode works (it will rearrange slides), the total number of slides must be >= slidesPerView*2; otherwise, this mode will not function properly.
Categories - Choose whether to show children categories block for all categories or enable/disable children categories block per chosen categories.
Category Meta Tags

Add the Meta-data of the selected filters - Select the filters and the meta-data category attributes of the applied filters Magento 2 will add to the category and brand pages.
Add filter title to meta title - Choose whether to add and additional filter title to meta title.
Title tag separator - specify the title tag separator.
Add filter description - Select the place where filter description will be displayed:
- Before Meta-Description
- After Meta-Description
- Replace Meta-Description
- Do Not Add
Description tag separator - Specify the description tag separator.
Add filter Title to meta-keywords - Enable the option to automatically add a filter title to meta-keywords.
Filters Settings
To configure general settings for different filter types go to Stores → Configuration → Improved Layered Navigation →
Category Filter

Enabled - Set to 'Yes' to enable category filter.
Position - Specify the filter sorting order in the sidebar navigation block.
Search Engine Bucket Size - Indicate how many category values the search engine can return for layered navigation. The actual number of displayed categories may be lower due to additional internal filtering. This setting takes priority over the default search engine settings used on the instance.
Hit the Category Filter Settings button to adjust other settings of the category filter.

See how to configure Category Tree in this section of the guide.
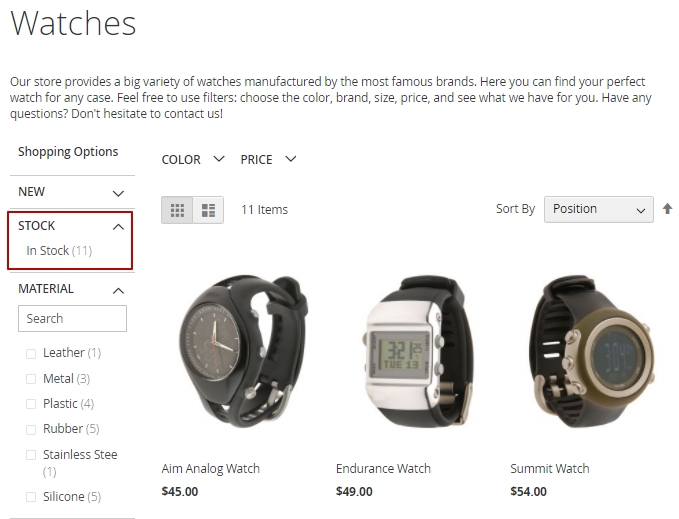
Stock Filter

Enabled - Enable In Stock/Out of Stock filter. You can preselect a label, position and the display mode.
Consider Product Salable Quantity in the Filter - If enabled, the Salable Quantity will be taken into account and displayed on the front-end in the “In Stock” filter. This setting is only compatible with simple products.
Show in the block - Choose where to display the filter:
- Sidebar;
- Top;
- Both.
Tooltip - Specify tooltip text that will be displayed on a mouse hover for the Stock filter.
Expand - Allows to expand filter automatically right after a page is loaded. Set 'Expand for desktop only' to keep filter minimized on mobile. Keep 'Auto' to work based on the custom theme functionality.
Rating Filter
Configure settings for the Rating filter. Choose whether to show it in the left sidebar, in the top menu, or in both positions.

Also, you can specify the Label, Tooltip, and adjust the Expand settings for the filter.

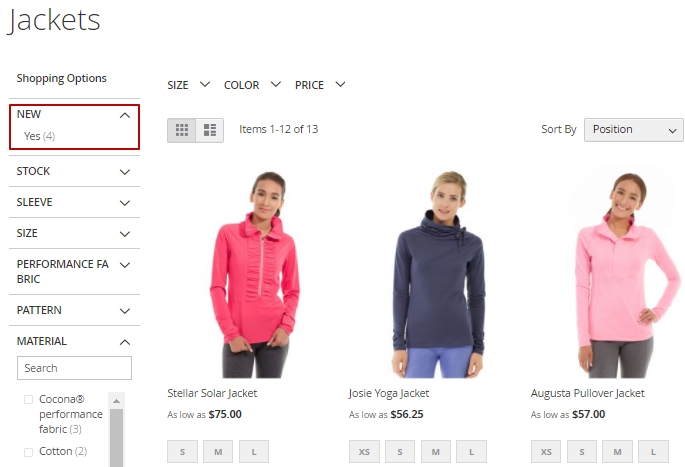
New Filter
Configure settings for the 'New' filter. Choose whether to show it in the left sidebar, in the top menu or in both positions.

Note that to set up products for this filter, you should go Catalog → Products, select a product, specify the interval when the product is new.
 Note that attribute New does not co-relate with a filter work.

Note that attribute New does not co-relate with a filter work.
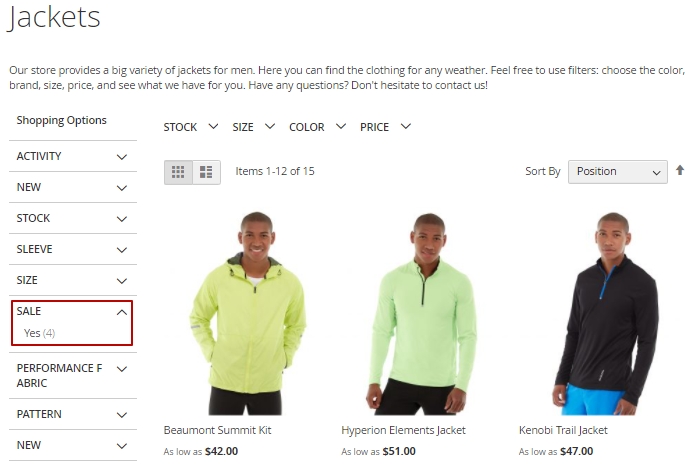
On Sale Filter
You can add category filters based on Magento 2 attributes. For example,'On Sale' filter takes into account two parameters: Special Price and Catalog Price Rules. In case a product meets at least one of these parameters it's automatically added to the 'On Sale' filter results.

Configure settings for the 'On Sale' filter. Choose whether to show it in the left sidebar, in the top menu or in both positions.
Tooltips
Enable the Tooltip option and upload a tooltip image.

To specify the text for a tooltip of a particular attribute, go to Stores → Attributes → Product, select an attribute, go to Attribute Information → Improved Layered Navigation → Tooltip field. Input text for different store views.

Enable/Disable Filters
To enable/disable a particular filter please go to Stores → Attributes → Product and select the attribute you need.

Use in Layered Navigation - If you want an attribute to become filter in the navigation, select one of the options:
1. Filterable (with results) - a filter will be displayed only if there are products with such options in a category.
2. Filterable (no results) - a filter will be displayed even if there are no products with such options in a category.
Use in search results Layered Navigation - Enable this feature if you want the options above to be applied to the search results page.
Vertical & Horizontal Navigation
With Magento 2 Layered Navigation extension, you can display each particular filter block either in vertical or horizontal navigation. You can also select both options if needed. To adjust filter position, please go to Stores → Attributes → Product, pick up the needed attribute (filter), proceed to the Improved Layered Navigation tab, and then choose one of the three modes in a Show in the Block field.

See the example of vertical and horizontal navigation blocks on the storefront.

Filter Display Modes
To fine-tune filter display modes please go to Stores → Attributes → Products and choose the necessary attribute, then click on the Improved Layered Navigation tab.
Ranges Display Mode

Use 'Ranges' display mode for prices and other numeric attributes (like dimensions, weight, etc.).
Range Algorithm - Set ranges algorythm. You can choose the Default system algorithm or Custom algorithm. When selecting Custom algorithm, a related option, Range Step, becomes available, allowing you to define the intervals at which this attribute will appear in frontend filtering.

Slider Display Mode

Use ‘Slider’ display mode for price attribute.
Minimum Slider Value - Specify the minimal price (e.g.<10$) to limit the slider.
Maximum Slider Value - Specify the maximal price (e.g.<999$) to limit the slider.
Slider Step - Here you can configure the slider step size for the filter.

Some nuances of interacting with the price slider on the storefront:
- Products outside the selected price range in the slider will be hidden.
- If all products on the page are outside the lower or upper limits, the price filter will not be displayed.
You can adjust the price slider style in the extension general settings (Stores → Configuration → Improved Layered Navigation → General).

'From-To' Widget

Use the ‘From-to-widget’ filter for numeric attributes either separately or together with other filter display modes. To use it separately, choose the 'From-to only' display mode.

To use the filter together with other display modes, open the needed attribute (filter), and choose 'Yes' in the Add From-To Widget field.

In this example, the From-To Widget is used together with Price Slider:

Filter Display Settings
Please avoid using the same names for attribute codes and attribute options to prevent potential errors during filtering.
To fine-tune filter display settings please go to Stores → Attributes → Products and choose the necessary attribute, then click on the Improved Layered Navigation tab.

Display Mode - Specify how to display filters - as Labels, Images, Images & Labels, Text Swatches.
Show in the Block - Specify whether to show the filter in a vertical or horizontal navigation. It's also possible to show filters in both blocks.
Sort Options By - Specify which way you would like to sort the options: by Name, by Position or by Product Quantities. If you choose Product Quantities, the options within the attribute will be sorted by the number of products in the options, from the highest quantity to the lowest.
Show Product Quantities - Set whether to display or not the product quantities with the filter options.
Show Search Box - Set to 'Yes' to show a search box in a filter. It is very convenient for filters with many options.
Show the search box if the number of options more than - Indicate the number of options required to display the search box in a filter.
Number of Unfolded Options - Specify the number of unfolded filter values that will be shown to customers when they click on a specific filter.
Expand - The option allows to expand filter automatically right after a page is loaded. Set 'Expand for desktop only' to keep filter minimized on mobile. Keep 'Auto' to work based on the custom theme functionality.
Example: if we specify 2 unfolded values for display, other values will be shown after a customer clicks the Show More link. 
Tooltip - Specify the tooltip text that will be displayed for a specific filter on mouse hover. You can set different tooltips text for particular store views.
An example of a tooltip icon and a text.
If you want to display only particular options in the filters, you should make them Featured.
- Go to Stores → Product
- Select a particular attribute
- In the Properties tab, go to Manage Swatch (Values of Your Attribute)
- Select a needed option, that you want to make featured
- Click on settings' gear icon in the option's section.

- Enable Is Featured option. Note, that not featured options will be hidden under ‘show more’ element if at least one attribute's option is marked as ‘Is Featured’.

- Adjust other featured option settings you need:

Visible in categories - Choose for which categories the filter will be available.
Show only when one of the attributes below is selected - choose filter attributes that will trigger the display of a dependent filter. You can select as many attributes as you need.
Show only when one of the options below is selected - choose the options that will trigger the display of the dependent filter.
Show icon on the product page - upload a special image that will be displayed on the product pages which meet filter requirements. This option is especially useful for a Brand filter to show a brand logo on the corresponding product pages.

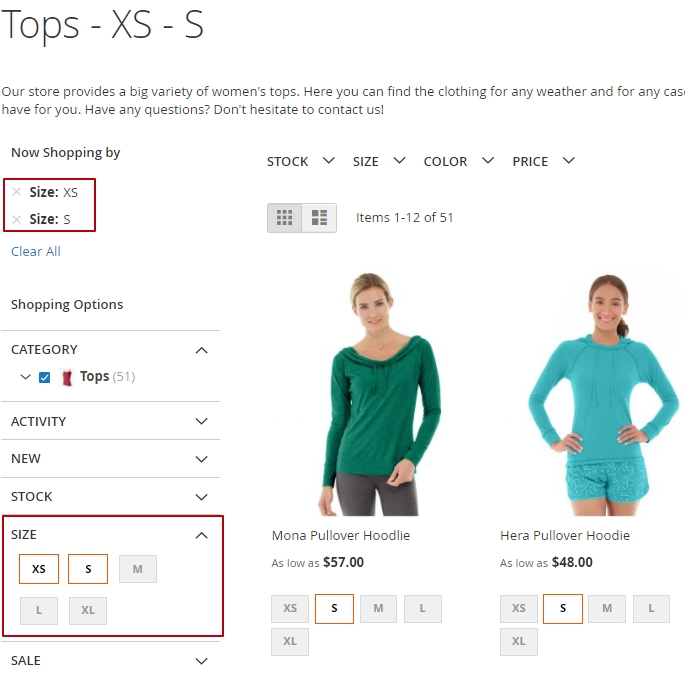
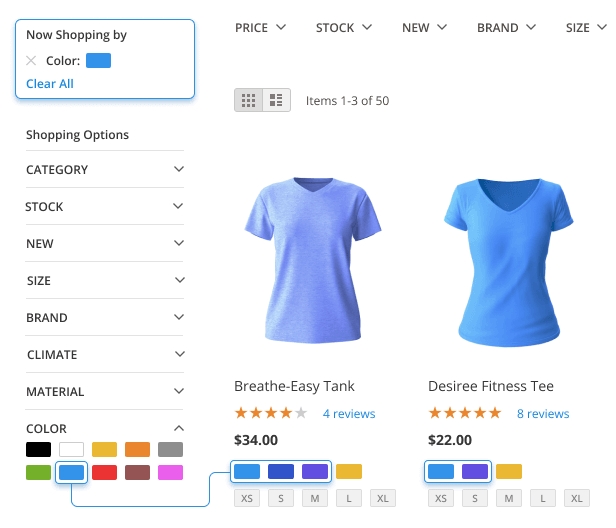
Allow Multiselect - Enable the option to let customers choose several values of the filter at a time.
Multiple Values Logic - There two options available:
- Show products with ANY value - all products containing at least one value from the selected ones will be displayed);
- Show products with ALL values - products that contain all select values will be displayed.
Filter Mapping Settings
Please note, that to use this funсtionality, you should additionally install the Grouped Options module via composer with the following command: composer require amasty/module-grouped-options.
To configure the option please go to Stores → Layered Navigation → Manage Group Attribute Options → click Add New Group button

Configure mapping settings.

Group Title - Specify different titles for attributes' group for each view store individually.
Group Code - Specify a group code that will be used in the URL of the filter results page by default.
Status - Enable filter group on the frontend.
Swatch - Select the main thumbnail swatch for the whole group.
Alias - Specify a custom alias if necessary that will be used in the URL of the filter results page.
Position - Set the display position for your frontend filters block. This setting defines the position only among the Group Attribute Options (created within the same attribute). It doesn't affect the positioning of common attribute options in the filter.
Attribute - Select an attribute type for which you want to create a group.
Attribute options - Once the attribute is selected you'll see corresponding attribute options. Select the ones that you want to gather in a group.
See the option in action. When a customer selects the icon of an attribute group ('Blue' for example), the module will display all products with the attributes from the 'Blue' group.
Fine-Tuning Filters
Simple attribute filters are presented in Magento by design. They are derived from the attributes of Catalog Input Type for Store Owner=Multiple Select. An attribute becomes a filter, if there is a Use in Layered Navigation setting.
Attribute Filters
Available settings in the Display Properties section are the following:
(the specific for simple attribute-filters are highlighted)
- Display Mode (Labels / Images / Images & Labels)
- Show in the Block (Sidebar / Top / Both)
- Sort Options By (Position / Name)
- Show Product Quantities
- Show Search Box (only in the Labels mode)
- Number of unfolded options (only in the Labels mode)
- Expand
- Tooltip
- Visible In Categories
- Show only when any option of attributes below is selected
- Show only if the following option is selected
- Show icon on the product page
Show Search Box adds a text field for the quick search under the options. It hides the options that don't correspond to the request.

Number of unfolded options indicates options that will be displayed right after the page is loaded. The other options are hidden with the Show more button. This is useful, when there are many options.
NOTE: While filtering with Search Box, the Number of unfolded options option becomes timely unavailable and all the filter options become visible.
Expand - Expand filter right after a page is loaded. The setting may be helpful for the themes, where filters are hidden by default.
If a filter is applied, it will be expanded in any case, independently from this setting.
Tooltip - Add a pictogram to a filter. When you hover over a pictogram, a pop-up hint appears.

You can upload any pictogram to Improved Layered Navigation - Tooltip.
Visible in Categories - It defines what categories includes a filter.
Show only when any option of attributes below is selected - It allows to manage a correlation between one filter visibility and the several others. Thus, if you specify a few other attributes here, the filter will be visible only if one of the specified filters is used by a visitor.
Show only if the following option is selected - It allows to manage a correlation with other filters in more detail. Specify individual options of another filter, rather than a filter all-in-all.
Available settings in the Filtering section:
- Allow Multiselect
- Multiple Values Logic
Multiple Values Logic - Show products with any values. A product is selected, if at least one of the filter's options match with its attributes' values.
Multiple Values Logic - Show products with ALL values only. A product is selected, if all the filter's options match with its attributes' values.
Filter SEO settings
For each filter, including Yes/No filters and Category filters with Multiselect, you can find the following settings in the SEO section:
- Generate SEO URL
- Allow Google to INDEX the Category Page with the Filter Applied
- Allow Google to FOLLOW Links on the Category Page with the Filter Applied
- Add rel=“nofollow” to filter links (Auto / No)
- Attribute URL Alias

To enable SEO setting for Yes/No filters please go to Stores → Configuration → Improved Layered Navigation: SEO → Include Attribute Code → set to ‘Yes’
Generate SEO URL. When you filter by this attribute, it removes the parameter from the GET-request and embeds it in the main part of the URL with alias, optimized for the search engines. For instance, category/cotton.html instead of category.html?material=46. It is active, if SEO URL generator is enabled in the general SEO settings.
category/cotton.html instead of category.html?material=46
Allow Google to INDEX/FOLLOW the Category Page with the Filter Applied - the option allows to block the indexing and prevent the search crawlers from going through links on the pages, where the filter is applied. It is implemented with the meta-tag robots. Active, when the option Allow the Module to Modify Robots Meta Tag is enabled in the SEO general settings.
The exception: the brand page is always INDEX, independently from the brand SEO settings. The other applied filters - if there are active - continue to affect robots. There are also some differences in performance with the Robots tag on the Custom Page.
Add rel=“nofollow” to filter links allows to block the path to links that are unavailable by design. Thus it decreases the stress on a search robot. It is active, when the option Automatically add rel=“nofollow” to filter links when required is enabled in the SEO general settings. You can disable this parameter, when the attribute takes part in the Custom Page formation. This will help the search robot reach the necessary page.
Attribute URL Alias - the option allows a store admin to set a custom URL alias for an attribute. If the field is left empty, the attribute code value will be used as an URL alias.
Swatch Filters

The attributes from Catalog Input Type for Store Owner = Visual Swatch / Text Swatch in Magento are displayed in a particular way: as images or pictograms with texts. That is why, the kit of settings in Improved Navigation is different.
Available settings in the Display Properties section:
- Display Mode (Labels / Images / Images & Labels / Text Swatches)
- Show in the Block
- Sort Options By (Position / Name)
- Show Product Quantities (only for Labels, Dropdown, Images & Labels mode)
- Show Search Box (only for Labels and Images & Labels)
- Number of unfolded options (except Dropdown mode)
- Expand
- Tooltip
- Visible In Categories
- Show only when any option of attributes below is selected
- Show only if the following option is selected
- Show icon on the product page
The settings in the Filtering and SEO sections are identical to the settings for simple attributes.
Manage Options
To manage filter options, go to Admin panel → Stores → Attributes → Product → Attribute Information → Properties → Manage Options (Values of Your Attribute)→ Select an option → Click Settings button.
Here you can make the option Featured if needed. It is useful if you want to display only particular options in the filter. It is also possible to specify particular filter options to improve SEO. The following option settings are available:
- Meta Data (Meta Title, Meta Description, Meta Keywords)
- Page Content (Page Title, Description, Image, Top CMS Block)
- SEO (URL Alias)
- Other (Small Image, Small Image Alt)

Meta Data and Page Content are added to the page according to the settings specified in the sections Improved Layered Navigation > Category Title and Description Improved Layered Navigation > Category Meta Tags. It is added, when you filter products by particular option. Also these settings are applied on the page of the appropriate brand, replacing data set by default.
Improved Layered Navigation automatically generates URL Alias for the filter options. To enable this, leave an empty field.
Please, consider: if you change this setting, the prior urls will become unavailable.
Price & Decimal
Price & Decimal are filters that are featured in Magento by design.
Decimal is any attribute of the price type, except the price itself. Decimal attributes are often used to store the values, that don't relate to the price (e.g., size, length, weight, etc). This is convenient, as far as you can specify any arbitrary values in decimals, rather than selecting them from variants.

The multiselect is not available for price and decimal filters.
To hide zero decimal for the price filter, navigate to Stores → Product → Select ‘Price’ attribute → go to Improved Layered Navigation tab

Hide Zero Decimal - set to ‘Yes’ to display price without the zero decimal.
Available SEO Settings
SEO URL is not available, as Price and Decimal attributes are added to the URL as a GET parameter: category.html?price=100-200
If the filter is applied, then the robots tag takes the value “noindex, nofollow” (if Allow the Module to Modify Robots Meta Tag is enabled in the SEO settings). Accordingly, direct links to filtering should have the attribute rel=“nofollow” (if Automatically add rel=“nofollow” to filter links when required is enabled in the SEO settings)
Magento forms price intervals, including the lower limit and excluding the upper one, for one product does not fall into several intervals at the same time. For example, the interval in the filter is specified as 40.00-49.99, the same interval is also specified in the block Currently Shopping By. Although, in the URL, the upper limit is extended by 0.01 (price = 40-50). If the filtering is done using a slider, or from-to widget, then the products must include products that match the end points as well. For this purpose, in case the visitor filters using a slider or from-to widget, the extension adds 0.01 to the top border (into the URL) to neutralize the Magento's correction by default.

Multiple Currencies
If a store's currency differs from the base currency, the values are recalculated according to the rates only for the Price filter, but not for Decimal.
Available settings in the Display Properties section:
(the specific ones for Price and Decimal filters are highlighted)
- Display Mode (Ranges / Dropdown (Deprecated) / Slider / From-To Only)
- Add From-To Widget (except From-To Only)
- Minimum Slider Value (only for Slider mode)
- Maximum Slider Value (only for Slider mode)
- Slider Step (only for Slider mode)
- Measure Units (Store Currency / Custom Label)
- Unit Label (if Custom Label is selected)
- Show in Block
- Show Product Quantities
- Expand
- Tooltip
- Visible In Categories
- Show only when any option of attributes below is selected
- Show only if the following option is selected
Add From-To Widget adds a widget to the filter and offers an alternative filtering method in addition to the selected Display Mode.

Minimum Slider Value and Maximum Slider Value narrow the limit of the slider for the convenient filtering.
For instance, there are products in the category within the price range from 20 to 200$. But there are also several products with the price above 1000$. Admin can specify the Maximum Slider Value to 200$, and the products with the price above 1000$ will not be included in a sample. However, if customers leave the slider untouched while filtering, these expensive products will be displayed in the search results.
Slider Step allows you to specify the step of the slider. It can be either an integer or a fractional number.
Measure Units and Unit Label determine the unit of measurement. By default, this is the currency of the current store. It is used on the frontend: in the filter block and in the Currently Shopping By section.
'All Products' Page Settings

Enable All Products Page - Set the option to 'yes' to enable the All Products page, containing all store items and layered navigation filters.
All Product Page URL - Specify an appealing URL for the page, e.g. all-products.html.
You can set the name for
the default category in Products – > Categories, e.g. All products

Brand Settings
General Settings
To configure greneral Brands Settings please go to Stores → Configuration → Improved Layered Navigation: Brands

Brand Attribute - Here you can set an attribute that will be used as a brand. You can use different attributes as a brand for different store views. It is also possible to setup nice short URLs for pages of a brand attribute (or any other one you prefer), e.g.:
- example.com/canon.html
- example.com/nike.html
To generate such URLs for an attribute, please specify the code of the attribute in the Brand Attribute field. This feature works only for one attribute at a time.
URL Key - Specify the key that will be added to the URL before the brand name. E.g. your-site/brand/brand-name.html
Choose CMS page - Select a CMS page where the All Brands List will be shown. Please make sure the CMS page is enabled (Content → Elements → Pages).
Search Engine Bucket Size - Indicate how many brands will be handled by the search engine for the display on the All Brands page on the frontend. Please note, that increasing the bucket size might influence the website’s performance. The Search Engine Bucket Size setting takes priority over the default settings of the search engine used on the instance.
Brands Item Label - Specify a name, which will be displayed in a menu bar and account top links.
Brand Label specified as Teams
Display Tooltip - Multi-select the directories, where you would like to display a tooltip with a brand info. Possible variants to display:
- all-brands page
- product pages
- catalog pages (listing)
A tooltip

Tooltip Content - automate the tooltip creation and update. Enter the variables that should be used for a tooltip. Possible variables: {title}, {small_image}, {image}, {description}, {short_description}.

Exclude Brands without Products from Sitemap - set to ‘Yes’ to exclude brand pages without products from the sitemap.
Add Brands to Account Top Links - Display a Brands link in a customer account.
Add Brands Link to Top Menu- choose whether to display a Brands link leading to the All Brand Page on the top menu bar. To configure the link position, select one of three modes:
- No
- Display First
- Display Last
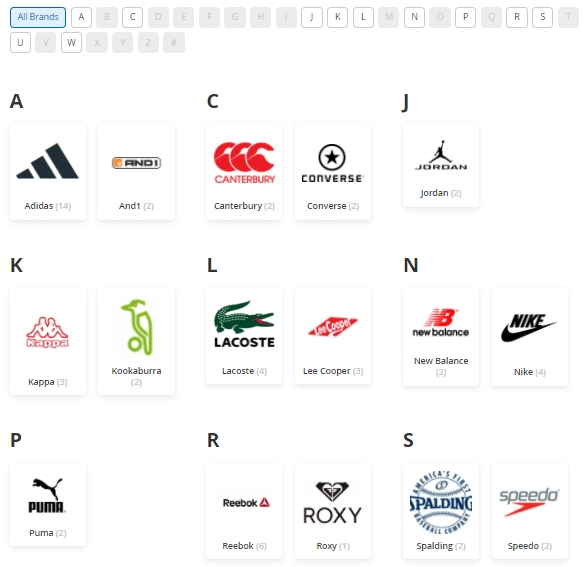
Show Brands List Popup - display brands list and filter them by a character right in the top menu Brands dropdown.
Brands List Popup Configuration

Show Brand Logo - Enable to display brand logos in the Brands List Popup.
Image Max Width (Height) - Specify the size of logos in the listing popup.
Enable Search - Enable a search box on the all-brands listing page.
An example of a searchbox. 
Enable Filter by Character - When activated, displays all the alphabet letters and allows filtering by them.
Show Characters without Brands - Enable to display only characters.
Show Products Quantity - Enable to display a marker with a number of items assigned to a particular brand.
Show Brands Without Products - Set to 'No' to display only the brands that have products assigned to them. Please note that this setting may affect the performance.
This is a frontend example of a page with an alphabetical list of all brands. Each name leads to the appropriate brand page.
More from this brand

Enable - Display a block of products of a current product's brand. A block will be displayed at the bottom of a current product page.
Title - Specify a title of a block, using a Brand variable.
Max Product Count - Specify the number of random products to display in a block.
3 more products from Nike brand, sample

Product Page Brand Settings

Display Brand Title on Product Page - set to ‘Yes’ to enable a clickable brand title on product pages.
Display Brand Logo on Product Page - Enable a brand logo display on the products pages.
To make sure the images are displayed correctly, and to avoid issues with poor image quality during resizing - you can install the PHP Imagick. Additionally, to prevent any loss in image quality, it's important to maintain the aspect ratio.
Brand Logo Width & Height, px - Specify the size of a brand in pixels.
Display Short Description on Product Page - Set to ‘Yes’ to enable a label short description on the products pages.
To prevent errors when accessing a brand page with a configured Shared Catalog (applicable to Magento EE), ensure that permissions are properly set for the Root Category, as the brand category inherits from the Default Category.
A brand logo and short description on a sample product page.

Product Listing Brand Settings

Display Brand Logo on Product Listing - Set to ‘Yes’ to show brand logos on category pages.
Please enable “Used in Product Listing” setting for brand attribute.
Brand Logo Width and Height - adjust logo resolutions. Specify the value in pixels (e.g. 10) or percent (e.g. 10%). Leave empty to use default image size.
NOTE: Brands block on a category page is based on the current category. It means that the block contains only brands from the opened category. 
Brand Attribute Settings
To add new brands and to manage brand attribute settings please go to Stores → Products → Attributes → Product → Brand.

Catalog Input type for store owner - select an input type for the catalog. Choose on of 3 available variants:
- Dropdown;
- Visual Swatch;
- Text Swatch.
Add brand names and adjust settings for different store views, upload brand logos and specify a brand that will be preselected by default.
![]()
Click on the Settings icon beside a brand name to detailed brand information, and make all needed changes.

Brand Options - Here you can enable the display in a Brand List Widget, in Brand Slider Widget, and specify the brand Position in a slider. Also, you can make the option Featured if necessary.

URL alias - Specify a custom URL alias if necessary that will be used in the URL of the filter results page.
Meta Data - In this tab, you can specify meta title, description and keywords for each particular brand.
Specify content for the brand page. Add a title, description, image, and a CMS block using WYSIWYG editor.

In the Page Content section you can also specify the Additional Brand Information. We added the ability to display information about the manufacturer, importer and responsible person of the Brand in accordance with the requirements of the EU Product Safety Regulation (Note: the functionality is available as a part of an active product subscription or support subscription).

You can specify the Brand Info Block Position: After Brand Title, After Brand Description, Above Page Footer, or in the Product Page More Information Tab. You can select either a single position for the Brand Information Block or multiple positions.
If you select Product Page More Information Tab as the placement for the Brand Info Block, the additional brand information will also be displayed on the product pages of items assigned to this brand.
Manufacturer or Importer Postal Address - Specify the manufacturer or importer postal address to be displayed in the Brand Info block.
Manufacturer or Importer Electronic Address - Specify the manufacturer or importer e-mail address to be displayed in the Brand Info block.
Responsible Person’s Contact Information - Add the manufacturer or importer responsible person’s contact info to be displayed in the Brand Info block.
The input settings support the following tags: <u>, <b>, <a>, <i>, <br>.
Here is an example of how the Brand Info Block may look on the frontend:

In the Design section, you can adjust сustom Brand Pages layout, by specifying the page display type:
- Default Category Layout
- Empty
- 1 Column
- 2 Columns with Left Bar
- 2 Columns with Right Bar
- 3 Columns

Add a brand image and specify a small image Alt.

Below you'll see a brand page with a short SEO-friendly URL and custom content.

All Brands CMS Page Settings
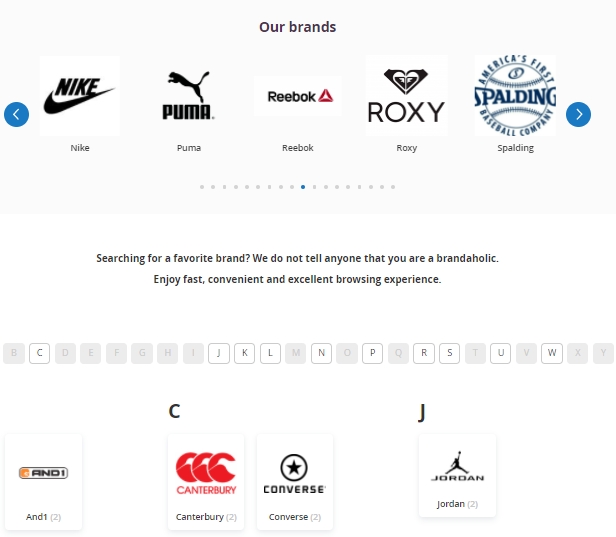
To add an All Brands page Content → Elements → Pages. Here you can Add a page with a list of all brands in alphabetical order.

Please click on the Add New Page button to create a page with all brands.

When creating an All Brands page, you can add various text elements and images to the page and also you can:
- Insert Brand Slider widget;
- Insert Brand List widget.

You can create and insert Brand Widgets either while editing any CMS page using the WYSIWYG editor, or by navigating to Content → Elements → Widgets. From there, you can create a widget, set the display on specific pages, and adjust its position.
Brand List Widget Settings

Number of Columns - Set the number of columns for your brand list widget.
Show Brand Logo - Enable to display brand logos in the all-brands listing.
Image Max Width (Height) - Specify the size of logos in the listing.
An example of 100 px logo in the listing.

Enable Search - Enable a search box on the all-brands listing page.
An example of a searchbox.
Enable Filter by Character - Enable to display all the alphabet characters and possibility to click them.
An example of a filter by character.

Show Characters without Brands - Enable to display only characters.
Show Products Quantity - Enable to display a marker with a number of items assigned to a particular brand.
Show Brands Without Products - Set to 'No' to display only the brands that have products assigned to them.
This is a frontend example of a page with an alphabetical list of all brands. Each name leads to the appropriate brand page.
Brand Slider Widget Settings

Hide Brands - Here are all the existing brands displayed for which the “Brand Slider Widget” option is set to Yes (in the brand attribute settings). If you select any brands here, they will not be displayed in the brand slider widget on the frontend. The functionality is available as a part of an active product subscription or support subscription.
Brands Display - Adjust brands display in the Brand Slider Widget (Note: this functionality is available as part of an active product subscription or support subscription):
- Show Brands without Products - Disable to display only the brands that have products assigned to them.
- Show Brands Related to Category - This option regulates display only on category pages, showing only the brands that have products in this category.
Visible Items Quantity - Specify how many brands will be displayed in a slider at a time.
Sort By - Select a sorting type for slider items – either by name or by position.
Slider Max Width, px - Set the slider maximum with in px.
Header Title - Specify a header title for the slider.
Specify the Header Background Color and Header Text Color.
Adjust Image Max Width and Image Max Height.

Show Brand Label - Choose whether to display text labels together with brand logos.
Show Buttons - Enable previous/next buttons display.
Infinity Loop - Enable continuous loop mode for slider images.
Simulate Touch - Let customers click and drag slider images.
Show Pagination - Enable pagination display below the slider.
Clickable Pagination - Set to 'Yes' to enable pagination per click.
Autoplay - Switch on/off the autoplay option.
Autoplay Delay - Specify the time interval (ms) for autoplay delay.
Brand Slider Examples - See the example of a brand slider added to the All Brands page.
Brand Info Widget Settings

The Storefront Properties of the Brand Info Widget are configured in the standard way. However, there are some nuances in the Layout Updates section. Currently, only the following containers are available for widget placement:
- Main Content Area
- Main Content Aside
- Main Content Bottom
- Main Content Container
- Main Content Top
- Product Extra Info
- After Page Header
- After Page Header Top
- Before Main Content
- Before Page Footer
- Before Page Footer Container
- Page Header Container
In the Widget Options tab you can selected brand fields will be displayed in the widget:
- Short Description
- Additional Brand Information
Select both options or leave empty to display all fields.

Note: this functionality is available as a part of an active product subscription or support subscription.
Brand Management
To manage brands, please navigate to Content → Amasty Layered Navigation → Brand Management.
In this section, you can conveniently manage all the brands from the grid. For each brand, you can add custom descriptions and logos, adjust position in a slider, insert various CMS blocks and banners, add metadata, and etc. Also, here you can view what attribute is used for brand for a particular store view. You can set different attributes as a brand for different stores in the Brands General Settings Section (Stores → Configuration → Improved Layered Navigation: Brands → General).

Access any brand to make changes. The way of configuration for each brand is the same as it was described in the brand attribute settings section.
Custom Product Sorting on Brand Pages (Add-On)
The additional functionality allows admins to customize product sorting on brand pages.
The feature can be enabled only after purchasing a Custom Product Sorting for Shop by Brand Add-On.
To manage products order on a brand page, go to Content → Layered Navigation → Brand Management.
Open the necessary brand page and scroll to the Products tab.

Here you can:
- Reorder items using drag-and-drop
- Place particular products at the top of the listing
- Adjust sorting options
- Move products through the pages
- Pin particular ones
With the add-on, you can manage product sorting for particular store views separately.
First, set the necessary sort order, according to which all products will be displayed.

Sort Order - select from the dropdown the preferable way of the automatic ordering of the product listing.
Available options:
- Move out of stock to the bottom
- Newest products first
- Name: Ascending
- Name: Descending
- Price: Ascending
- Price: Descending
Search Products - find products within one current brand product listing by SKU or name.

In the Visible Items field the number of all the products that fall under the specified conditions is displayed.
Keep in mind that only Enabled products with the Visible Individually option can be displayed.
Drag-and-drop brand products according to your current marketing needs.

Move to Top - hit this button to send a particular item to the first position in the list.

Once you drag a particular product, the Manual mode is set automatically and it is “pinned” to a particular location. The feature helps to fixate a product in the same position even after the automatic sorting is activated too.
Moreover, the number of products per page in the admin panel equals the number of products customers see on the frontend. Thus, you will see how the products will be displayed to customers on each page.
With the move products through the pages feature it is possible to adjust the of products per each page by moving particular products to another page. As the page number is changed, the product becomes last on this page.

As the result, we set the follwing products order:

And on the frontend it will be displayed in the following way:

SEO Settings
Migration from Magento 1
If you've been using Improved Layered Navigation extension by Amasty for Magento 1 and now are going to migrate to M2, please pay a careful attention to your URL settings.
If you have URLs working based on 'Long with URL key' setting in Magento 1, then, please, configure the following options to migrate to Magento 2 and keep the existing URLs:
Include Attribute Name = Yes
Filter Key = shopby
See more information on this options below.
SEO URLs & Robots Tag Control
Check some useful tips and tricks on best SEO practices in our recent article Magento 2 Layered Navigation: Best Settings For SEO
To manage SEO URLs, go to Stores → Configuration → Amasty extensions → Improved Layered Navigation:SEO

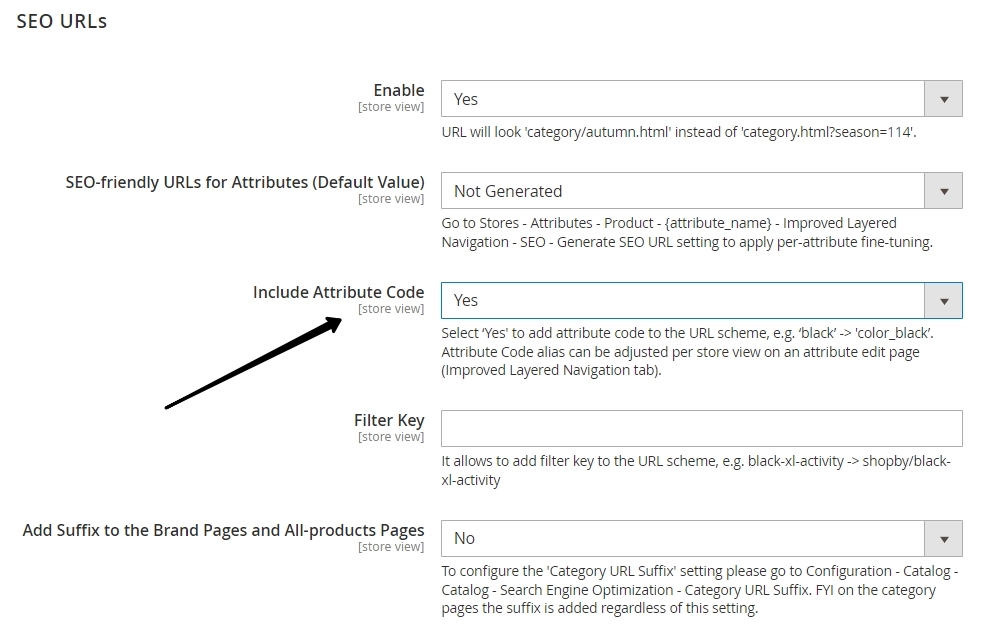
Enable - Set the option to 'yes' to optimize store URLs for search engines. The URLs will become short and clear. When enabled, store URLs are optimized for search engines, e.g. URL will be 'category/autumn.html' instead of 'category.html?season=114'.
SEO-friendly URLs for Attributes (Default Value) - with this setting you can generate SEO-friendly URLs for attributes in bulk. Go to Stores - Attributes - Product - {attribute_name} - Improved Layered Navigation - SEO - Generate SEO URL setting to apply per-attribute fine-tuning.
Include Attribute Code - Select 'Yes' to add attribute code to the URL scheme, e.g. ‘black’ → 'color_black’. Attribute Code alias can be adjusted per store view on an attribute edit page (Improved Layered Navigation tab). Also, if this setting is set to Yes the URLs will not contain -1 -2 -3.
Use 301 Redirect for SEO-optimized URLs - If enabled, it redirects from former URLs to SEO-friendly once these URLs are optimized by our module. Note: the compatibility is available as a part of an active product subscription or support subscription.
Filter Key - The option allows to add a filter key to the URL scheme, e.g. example.com/black-xl-activity → example.com/shopby/black-xl-activity.
Add Suffix to the Brand Pages and Filtered All-products Pages - Set to Yes to add a particular SEO suffix to brand pages.
Replace Special Characters With - Specify how to replace special characters.
Separate Attribute Options With - Select the URL separator for the selected attribute options. For example, if a customer selects 3 options for the attribute `color`, the URL may look like http://example.com/red-green-blue.html.
You can use the dash symbol in the Replace Special Characters With and Separate Attribute Options With fields simultaneously. But this method has a significant drawback. Let's compare the methods of using the same and different separators:
1. The same separator.
When building SEO URLs, the system may mistakenly regard one option as another. As a consequence, the results will be irrelevant.
E.g.: 3 different attributes have different options: “red”, “cotton” and “new”. This is how they will be displayed together in the link: “red-cotton-new” (when you apply a filter containing these 3 options). And there exists the 4-th attribute: its option displays on the frontend as “red+cotton=new”. According to the setting, all these symbols will be replaced to the dash separator. As a result: the system may take the filter of three options as a filter of one option (we'll receive 2 identical filters: “red-cotton-new”).
2. Different separators.
The situation described in the previous paragraph is impossible. When you replace special characters with the “_” symbol and separate attribute options with the dash symbol, you'll get 2 different filters: “red-cotton-new” and “red_cotton_new”. In addition, this method provides higher productivity with a large amount of data and filters.
To specify the suffix, go to Configuration → Catalog → Catalog → Search Engine Optimization → Category URL Suffix.

Allow the Module to Modify Robots Meta Tag - Enable robots tag control to let the module manage indexation according to SEO settings for each attribute. If you disable the option, search engines will index all the store content. Use “No” for compatibility with other SEO extensions.
Noindex when Multiple Attribute Filters Applied - Enable this option to set the robots to the noindex values for multiple filters.
Automatically Add rel=“nofollow” to Filter Links when Required - Enable this option to automatically add rel=“nofollow” to the filter links and set the “nofollow” robot tag. This setting helps to exclude filter links from search engine indexation if necessary. Please refer to filter-specific settings to exclude filters.
Noindex for paginated pages - Set to Yes to set the robots to noindex for paginated pages.
Canonical URL Settings

You can set structure of canonical URLs for ‘key’-related (‘Canonical URL’ setting) and category (‘Category Canonical URL’ setting) pages:
1. If you choose a “Keep current URL” option for category page, the canonical URL will have all information and will look like:
http://www.your_store.com/category/URL_Key.html?all_get_parameters_displayed_in_state
For “all product” page it will look like on the example below:
http://www.your_store.com/URL_Key.html?all_get_parameters_displayed_in_state
Please keep in mind, that all toolbar parameters (list mode, order, dir, limit), except pagination, won’t be added to canonical URL.
You can customize the All Products Page URL in Stores→Configuration→Improved Layered Navigation→All Products.
2. If you select the “First attribute value” for category page, the canonical URL will look like this:
http://www.your_store.com/category/URL_Key.html?first_attribute_displayed_in_state
Brand Pages - set canonical URLs for Brand pages.
Available options:
- Keep Current URL - default
- URL Without Filters
- First Attribute Value
- Current URL without Get Parameters
For “all product” it will be generated like this:
http://www.your_store.com/URL_Key.html?first_attribute_displayed_in_state
Please, note that attribute's position in URL depends on specified attribute priority.
3. With the “Current URL without get parameters” for both “all product” pages and categories, canonical URL will have SEO-friendly attributes and a filter key:
http://www.your_store.com/category/URL_Key/seo_friendly_attribute_displayed_in_state.html
For the 'Current URL without Get parameters' option, the extension uses the recommended pagination parameter suggested by Google.
4. If you choose the “Without filters” option for category page, canonical URL will miss all filters and toolbar attributes (except pagination). As an example:
http://www.your_store.com/category/URL_Key.html?p=x
5. With “Brand Filter only” option for category page, the canonical URL will have brand attribute value:
http://www.your_store.com/category/URL_Key.html?brand_attribute_displayed_in_state
6. If you select the URL Key Only For “all product” page, the canonical URL will look like specified in the example below:
http://www.your_store.com/URL_Key.html
Add Canonical URL for Noindex Pages - If enabled, canonical URLs will be added to the NOINDEX pages. This setting applies to canonicals on Category Pages, Custom Pages, All Products Page, and Brand pages but does not affect canonicals on Product Pages. (Note: the functionality is available as a part of an active product subscription or support subscription).
SEO URLs Examples
Generate SEO URL’ option is enabled. The URL is clear and includes the selected attributes.

Generate SEO URL’ option is disabled.

Pagination Settings
 To bring your web store SEO to a top tier, you may as well want to check out new Amasty SEO Toolkit for Magento 2.

Use Prev/Next Tags for Improved Navigation Pages - Enable this option to help Google properly index your paginated content.
Add Page Number to Meta Title - Enable the option to add page numbers to meta titles, for example, 'Gear | Page 5'. This will fasten the work of search crawlers and the index building process.
Add Page Number to Meta Description - Set the option to Yes to add page numbers to meta descriptions. For instance, 'Gear Description | Page 3'.
Custom URL Alias
To customize URL Alias for pages with filtered options make sure you set the 'Generate SEO URL' option to ‘Yes’ (Stores → Attributes → Product → choose necessary attribute and open Improved Navigation tab).

Then open the 'Properties' tab, select the necessary filter value, click on the Settings icon and specify a custom URL alias.

See a custom URL Alias for the ‘Hoodie’ attribute.

Category Tree
Tree Settings
To create a category tree please go to Stores → Product and select the ‘Categories’ attribute.

In the Attribute, Information menu open the Improved Layered Navigation tab and adjust the main Display Properties: position un the block, product quantities and search box display, number of unfolded options, and etc.

IMPORTANT: To add a particular category to a category tree make the category Anchor.

Render All Categories Tree - Specify to what extend the tree should be expanded.
- Yes (Render Full Categories Tree);
- No (For category filter tree customization);
Category Tree Depth - Specify the maximal level number for a category tree.
Render Categories Level - Indicate the level from which categories will be shown. There are 3 levels available:
- Root Category
- Current Category Level
- Current Category Children
See how the 'Render category level' feature works when, for example, you're opening the Tops subcategory page:

To get the Render Categories Level configuration available, you need to set the Category Tree Depth at 2 minimum, then press Enter button on the keyboard.
Subcategories View - For the Labels display type you can specify the subcategories view mode: Folding/Fly-Out.
Please, make sure all parent categories have set is_anchor flag
Category Tree Display Mode - Specify the mode for category tree presentation. You can display only text, only images, or both.

- A sample of Show Labels & Images mode

Specify whether to allow or disallow the Multiselect option for the category tree.

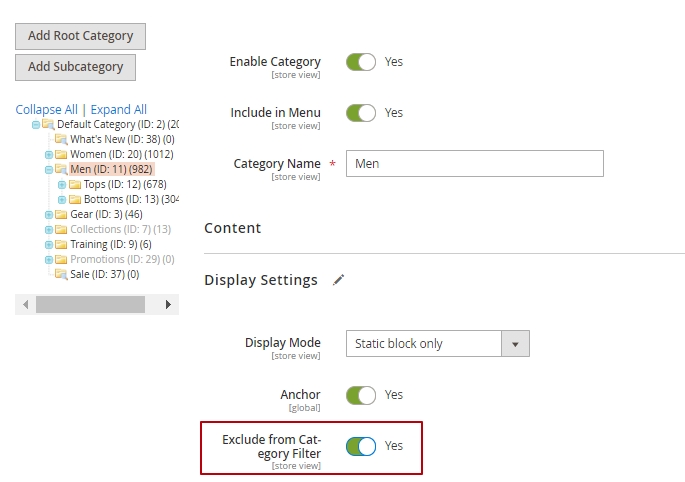
Also, you can exclude any category from the filter if it is not required for filtering. To do this, please navigate to Catalog → Categories, choose the needed category, and expand its Display Settings tab. Then set the Exclude from Category Filter toggle to 'Yes'.
Some nuances of filtering when navigating to a category page:
- When navigating to a category, it is NOT selected in the filter tree, and only products from that category are displayed.
- When selecting any other category, only products from the selected category are displayed.
- When filtering by the current category option + any other option, the resulting selection will display products from both the current category and the category that was additionally filtered.
Frontend Examples
Here is the example of the ‘Labels’ category tree with the Folding view type and enabled Multiselect.

Here is the example of the ‘Labels’ category tree with the Fly-Out view type and enabled Multiselect

Custom Pages
To create custom pages for specific filter results please go to Content → Layered Navigation → Custom Pages.

Add Title & Description - Choose whether to replace category page metadata with your own info, or show it before/after category data.
Title - Specify the custom page title.
Description - Add the page description using the WYSIWYG editor.
Image - Choose and upload an image.
Please, keep in mind that for proper functioning image size should be less than the maximum size allowed by a server.
Top CMS Block -Select the CMS block on the base of which the page should be created.
NOTE: You can either select one of already existing CMS blocks or create a new one. To create a new CMS block please go to Content → Elements → Blocks.

Meta Tags Tab - Specify Meta Title, Description, Meta Keywords and Canonical URL for each Custom Page you create. In this section you can also adjust Robots Tag Control. Choose the option you need:
- Index, follow - allows robots to index the page and follow links.
- Noindex, follow - the page will not be indexed by search engines, but robots can follow links from this page to others.
- Index, nofollow - permits indexing of the page, but robots will not follow the links within it.
- Noindex, nofollow - prevents indexing of content on the respective page and also prevents robots from following links.
IMPORTANT: Specify the Canonical Url when you're adding your custom navigation page to the sitemap with the XML Google Sitemap extension.

Categories & Store Views Tab - Select store views for which the page will be available. Choose categories products from which will be displayed on a custom page.

Filter & Filter Value - Select an attribute with its value. You can specify as many combinations (filter+value) as you need for a custom page. For instance, specify selection#1 with color-red and selection#2 with brand-puma to display only red puma items on a custom page.
See an example of a custom page with specific filter results.

Need a navigation tree on CMS pages?
Add Magento 2 Landing Pages module and gain the ability to effortlessly add products to any CMS page and utilize our convenient navigation tree, allowing your website visitors to quickly find the products they need.
Compatibility with Live Search
The Enterprise and Cloud editions of the extension are compatible with Live Search. Compatibility encompasses the extension's core functionalities, allowing navigation on the All Products Page and Brands Page, as well as the use of custom filters. However, there are some current limitations (which we are actively addressing for upcoming releases):
- The Multi Select feature is currently not performing as expected when used with Live Search, so we recommend avoiding its use for now.
- Although all navigation features on the All Products Page and Brand Page are accessible, the category filter is currently supported only on category pages, and can render 1st-level current category children in the category tree.
- The Price filter does not operate in Slider and From-to Only display modes.
Import and Export
Within the Pro and Premium versions of the extension you can import and export navigation attributes, brand options data and custom pages. This functionality is available as a part of an active product subscription or support subscription.
To import navigation data, please go to System → Amasty Import → Import → Select Entity → choose the needed entity and subentity:

Then adjust other settings for the import according to your needs.
To export navigation data, please go to System → Amasty Export → Eхport → Select Entity → choose the needed entity and subentity:

Then adjust other settings for the export according to your needs.
AJAX Technology
How AJAX works in Improved Layered Navigation for Magento 2
If AJAX is enabled, visitors can continuously select multiple filter options without page reloads. This feature provides a smooth and fast shopping experience. To make it possible, we use AJAX call to controller method within Magento. AJAX allows your store web pages to be updated separately by exchanging data with a web server behind the scenes.
In Magento 2, we call controller using AJAX to promptly fetch data from backend to frontend without reloading the web page. When a user applies a new filter in the navigation block in Magento 2, AJAX makes a request in the controller to the server, interprets the results, and updates the current screen. That is how you create an enjoyable shopping experience for your customers.
Compatibility with Fastly
When using Fastly and the AJAX functionality of Improved Layered Navigation, you need to add a custom VCL snippet in Fastly settings:
1. In the admin panel, navigate to: Stores > Configuration > Advanced > System > Full Page Cache > Fastly Configuration > Custom VCL Snippets
2. Click the Create button and fill in the snippet as follows:

- Name – Any name (words should be separated by _)
- Type – hash
- Priority – Default value
- VCL -
if (req.url ~ "[?&]shopbyAjax") {
    if (req.http.cookie ~ "X-Magento-Vary=") {
        set req.hash += regsub(req.http.cookie, "^.*?X-Magento-Vary=([^;]+);*.*$", "\1");
    }
}
3. Save the changes.
4. Then, click the Upload VCL to Fastly button on the configuration page.

5. Flush the Fastly cache.
API Methods
You can use Magento web API integrators to communicate with the Shop By Page functionality.
The following methods are available:

POST request - to create or update a resource;
GET request - to retrieve data from a server;
PUT request - to create or update a particular page;
DELETE request - to delete a particular page.
PWA for Improved Layered Navigation (Add-On)
Implement a PWA-ready solution to offer handy navigation on mobiles and tablets. With the Improved Layered Navigation PWA add-on, customers can easily find needed products in the catalog using various filters on any device.
Please keep in mind, the PWA add-on will work properly only if the original Improved Layered Navigation extension for Magento 2 and a PWA theme are installed. Learn more on how to install PWA Studio here.
In order to correctly install a PWA add-on, please install the corresponding GraphQL system package first. For the correct name of it, please check the composer.json file of the main module. For example, the GraphQL system package name of the PWA add-on for the Blog Pro extension would be the following: amasty/blog-graphql

If the add-on is installed, the Venia theme will display filters on mobile in the following way:
You can additionally implement PWA add-on for Shop by Brand to use brand management functionality.

How it looks on tablet:

For more information about Magento PWA integration, check out here.
Additional packages (provided in composer suggestions)
To make additional functionality available, please install the suggested packages you may need.
Available for all tariff plans with no additional fees:
amasty/shopby-graphql- Install this module to activate the integration with GraphQl.
Available as a part of an active product subscription or support subscription:
For Layered Navigation (Lite) version:
amasty/module-iln-lite-hyva- Install this package to ensure Layered Navigation (Lite) works with Hyvä Theme.
For Improved and Premium versions:
amasty/module-shopby-hyva-compatibility- Install this module to activate the integration with Hyvä Theme.
amasty/module-shop-by-brand-hyva-compatibility- Install the module to activate the integration of the Shop by Brand module with Hyvä Theme.
amasty/module-shopby-grouped-options-hyva- Install this module to activate the integration of the Grouped Options functionality with Hyvä Theme.
amasty/module-shop-by-filter-highlight- Install this package in order to use custom filter highlight color functionality.
amasty/shop-by-redirect- Install this package to enable 301 redirect for SEO-optimized Urls functionality.
amasty/module-shopby-setting-export-entity- Install this package to activate export functionality.
amasty/module-shopby-setting-import-entity- Install this package to activate import functionality.
amasty/shop-by-brand-widget- Install this package in order to manage Brand Slider Widget.
amasty/module-improved-layered-navigation-page-import-entity- Install this package for Import Custom Pages compatibility.
amasty/module-improved-layered-navigation-page-export-entity- Install this package for Export Custom Pages compatibility.
amasty/module-shop-by-brand-subscription-functionality- Install this package in order to use custom Brand Pages Layout functionality and to display information about the manufacturer, importer and responsible person of the Brand in accordance with the requirements of the EU Product Safety Regulation. For Luma Theme.
amasty/module-shop-by-brand-subscription-functionality-hyva- Install this package in order to display information about the manufacturer, importer and responsible person of the Brand in accordance with the requirements of the EU Product Safety Regulation. For Hyvä Theme.
amasty/module-shopby-subscription-functionality- Install this package in order to use slash as a separator for SEO URLs attribute options.
amasty/module-ai-shop-by-brand-content-generator- Install this package to ensure compatibility of Shop by Brand extension with Amasty ChatGPT AI Content Generator Pro.
amasty/module-shop-by-canonical-management- Install this package for the ability to add canonical URLs for noindex pages.
For Enterprise and Cloud editions of all tariff plans:
amasty/module-shop-by-live-search- Install this package to ensure the compatibility with Live Search.
amasty/module-shopby-livesearch-root-category- Install this package to activate LiveSearch and Shop By Brand integration.
amasty/module-shop-by-enterprise-subscription-functionality- Install this package to activate advanced enterprise functionality.
amasty/module-shopby-hyva-enterprise- Install this package to enhance compatibility and resolve minor issues for the EE Hyvä Theme.
For Premium tariff plan only:
amasty/module-scroll-hyva- Install this module to integrate the Infinite Scroll extension with the Hyvä Theme.amasty/module-shopby-premium-subscription-functionality- Install this package to use additional layouts for category pages.amasty/module-shopby-filter-analytics-hyva- Install this package to enable the compatibility of Built-in filters analytics with Hyva Theme.amasty/module-shop-by-multiselect-price-ranges- Install this package to enable multiselect option for price range filter.
In Improved Layered Navigation FAQ you can find answers to the most popular questions about the extension functionality.
Find out how to install the Improved Layered Navigation extension for Magento 2 via Composer.
![]() Any concerns about module configuration and implementation?
Any concerns about module configuration and implementation?
Book an individual training session to explore how the extension works and what practices to implement to achieve the desired result. Save time spent searching for the right settings - discuss configuration cases suitable for your business with the experts and work out the flow that your team needs.
magento_2/improved_layered_navigation.txt · Last modified: 2025/06/24 12:16 by asemenova