
Sidebar
magento_2:gift_card
Table of Contents
For more details see how the Gift Card for Magento 2 extension works.
Guide for Gift Card for Magento 2
Enable customers to buy gift cards and send them to friends via email or by post. Create an unlimited number of gift cards with different pricing models and easily keep track of all purchased certificates.
- Create gift cards with fixed or open amount price types
- Easily generate and upload gift codes
- Send gift certificates via email or post office
- Keep track of all purchased gift cards
- Offer stunning gift card templates
- API support
- GraphQL compatibility
- Compatibility with AWS Remote Storage
- NEW | GraphQL Application Server compatible
- NEW | Сompliance with WCAG 2.1 level AA requirements (for Luma Theme)
The module easily solves the gifting dilemma by offering specially designed gift certificates which can be sent to recipients via email or by post. Once the certificate is purchased, a unique code with a custom greeting message will be sent to the addressee. The module lets admin users create gift card products with different pricing types, use predefined card images or upload their own ones and helps them to keep track of all purchased gift certificates.
Visit our FAQ section to get even more valuable information and find out answers to popular questions about the configuration and features of the Magento 2 Gift Card extension.
Magento 2 Gift Card Pro and Premium extensions are compatible with Hyvä theme. You can find the amasty/module-giftcard-hyva-compatibility package for installing in composer suggest (Note: the compatibility is available as part of an active product subscription or support subscription). For the correct Hyvä compatibility work, the GraphQL module should also be installed. You can find it in the composer suggest amasty/module-gift-card-graph-ql).
The extension is compatible with Hyvä Checkout. You can find the amasty/module-gift-card-hyva-checkout and amasty/module-gift-card-account-hyva-checkout packages for installing in composer suggest. The compatibility is available as a part of an active product subscription or support subscription.
The Gift Card Enterprise and Cloud editions are compatible with Live Search. Please note that this compatibility is available as a part of an active product subscription or support subscription.
The module is compatible with Adobe Payment Services. You can find the amasty/module-giftcard-account-adobe-payments package for installation in composer suggest. Note: the compatibility is available as a part of an active product subscription or support subscription. The Hyvä Checkout is currently unsupported.
How do gift cards work?
- Gift card is an alphanumeric code, consisting of letters and numbers, like BIRTHDAY_DF627. It can be applied at the cart/checkout to cover the order total
- These codes are groped in code pools: Birthday cards, Christmas cards, etc. You can name them as you want. Before selling gift cards, you need to create a code pool for your campaign
- In the catalog, gift card is represented as a custom product type. A customer can buy this product and get the code. You can allow customers to use gift cards they bought for themselves
- Gift card is always linked to the code pool. Code pool should be generated first, then a product is linked to the pool
- A gift card code becomes activated after the order invoiced only. If the order is not paid, a customer will not be able to apply a gift card
- To track the balance of a particular voucher, Gift Code Accounts are issued. The store manager can adjust the balance manually
How do I ship my gift cards?
- Gift Card as a product in your catalog may be virtual, printed, or combined
- A virtual gift card is just an email-sent code like virtual and downloadable products, it has no weight, there is no physical inventory and it cannot be shipped
- When gift card is printed or combined, it means the code is being printed on a sheet of paper and delivered. The delivery flow is standard like for simple products
- Amasty Gift Card does not cover printing issues, we offer only tracking tools
Please note that the gift card amount is displayed in the website's base currency, regardless of whether multiple currencies are allowed for store views. This is because all calculations are conducted at the website level, which operates with only one currency. This approach ensures consistency in all transactions, preventing fluctuations in gift card amounts due to possible changes in exchange rates between the date of gift card purchase and application.
How to configure Gift Card in Magento 2? General Settings
To configure general extension settings please go to Stores → Configuration → Gift Card.
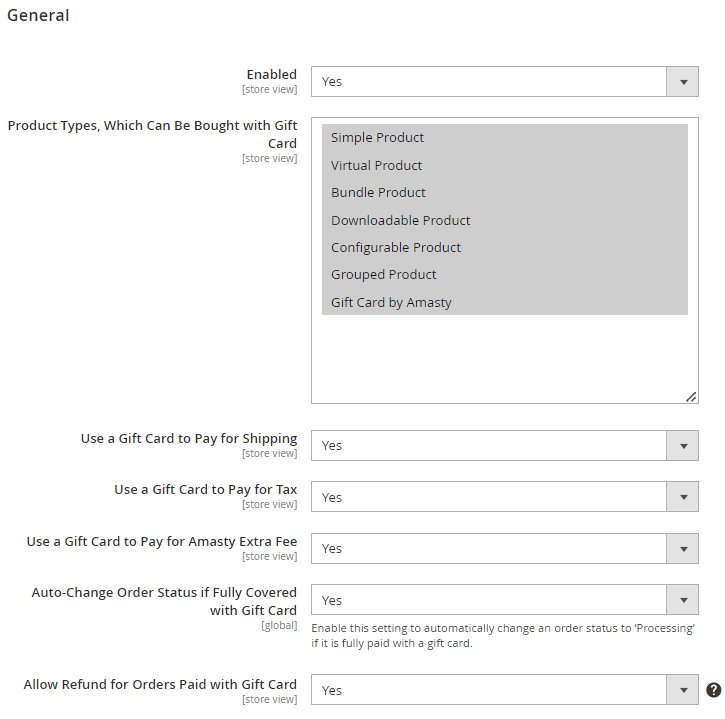
Enabled - set the option to Yes to run the extension.
Product Types, Which Can Be Bought with Gift Card - specify product types which customers will be able to purchase using a gift card.
Use a Gift Card to Pay for Shipping - select Yes, to pay for a shipment with your giftcard. I.e. a gift card can cover both a purchase and a shipping.
Use a Gift Card to Pay for Tax - enable the setting to allow customers to pay for tax with a gift card. This means, that a customer will be able to pay both for products and taxes with a gift card.
Use a Gift Card to Pay for Amasty Extra Fee - set to Yes to let customers cover extra fees added by Amasty Extra Fee extension with gift cards.
Auto-Change Order Status if Fully Covered with Gift Card - activate this setting to automatically update the order status to Processing when the payment is fully completed using a gift card (including Tax, Shipping, and Extra Fees configured and allowed to be covered with a gift card in the general settings).
Allow Refund for Orders Paid with Gift Card - if you enable this option, the sum paid with gift cards will be refunded to gift card amounts.
How it works:
Customers can pay for orders with gift cards. If they want to refund orders later, they may also want to get the wasted gift card balance back. In such cases, the extension does the following:
- the amount will be refunded to the gift card balance
- if the gift card is already in a “used” or “inactive” status, it will become “active” again
- if the gift card account was deleted, a new account will be created instead after the credit memo creation
- if the order was paid with several gift cards, the amount will be refunded to each of the account according to the spent sum
- if the gift card has the “expired” status, admin won't be able to refund to this card: in this case, you can turn off the 'Allow Refund for Orders Paid with Gift Card' option and refund as usual
- admin can specify the required refund details in the credit memo email to notify customers
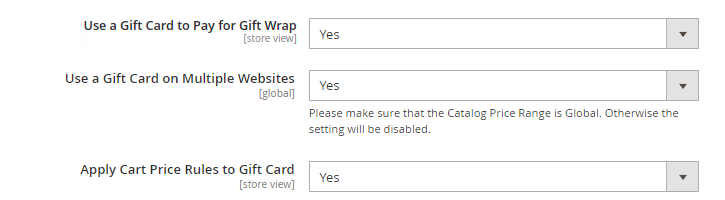
Use a Gift Card to Pay for Gift Wrap - choose Yes if you want to allow shoppers pay for gift wrap with their gift cards.
This setting appears only after the Amasty Gift Wrap extension installation.
Use a Gift Card on Multiple Websites - select Yes to allow customers to apply one gift card code on different websites of your store (in case you manage multiple websites). Set to No if you want to forbid using the same gift card code on multiple websites.
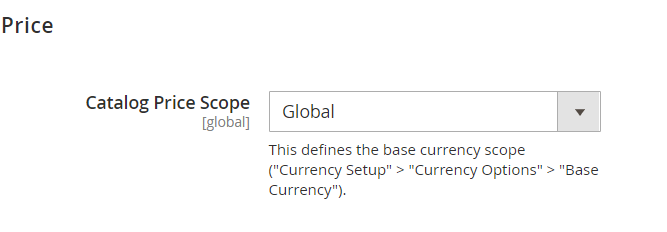
Please make sure that the Catalog Price Range is Global. Otherwise, the Use a Gift Card on Multiple Websites setting won’t work even if it is set to Yes.
To check the Catalog Price Range configuration, go to Stores→Configuration→Catalog→Price:
Apply Cart Price Rules to Gift Card - enable this option to make Cart Price Rules available for gift cards.
Use Amasty Gift Cards as Free Gifts
The Pro and Premium versions of the Gift Card extension are compatible with Amasty Free Gift. This means that when both modules are installed, you can set up various free gift rules and offer Amasty gift cards to customers as free gifts.

To make this work, ensure the following in the Gift Card extension configuration:
- The Apply Cart Price Rules to Gift Card setting is enabled;
- The gift card(s) you intend to offer as free gift(s) are properly created and set up with the fixed price option(s).
Please note:
- Admins cannot add gift cards as free gifts to customer orders from the admin panel;
- Compatibility with Amasty Free Gift is available only as part of an active support or product subscription. You can find the amasty/module-promo-gift-card package for installation in composer suggest;
- For more information on setting up free gift rules and gift card compatibility, please refer to the Free Gift user guide (Gift Card Compatibility section).
Gift Card Code Request Limitation
The configuration of settings in this tab allows you to limit the number of validation attempts for gift card codes (made through the Check Gift Card Code Status or Apply Gift Card Code fields on the frontend).
Please note that the Gift Card Code Request Limitation functionality is available as a part of an active product subscription or support subscription. You can find the amasty/module-gift-card-rate-limiter package for installation in composer suggest.

Block Requests from One IP Address - set to Yes if you want to block a user's IP address when the number of requests to validate a gift card exceeds the limit (specified in the Requests Number setting) within the particular period of time (set in the Period in Minutes setting).

Display options
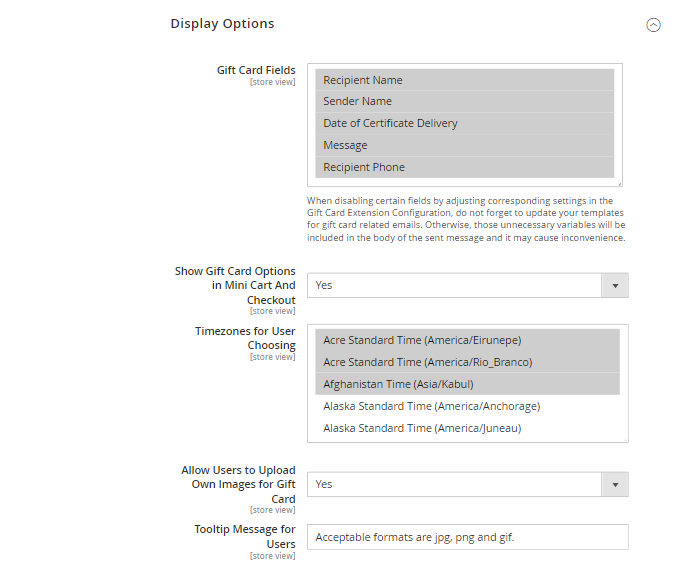
Gift Card Fields - Specify the fields a customer should fill in when purchasing a gift card.
When disabling certain fields by adjusting corresponding settings in the Gift Card Extension Configuration, do not forget to update your templates for gift card related emails. Otherwise, those unnecessary variables will be included in the body of the sent message and it may cause inconvenience.
Show Gift Card Options in Mini Cart And Checkout - Enable the option to show the gift card options on the cart page.
Timezones for User Choosing - Define the timezones a user can choose on the frontend. The option is connected with the delivery date setting. A user can define the date a gift card should be sent and, also, choose the timezone of a recipient.
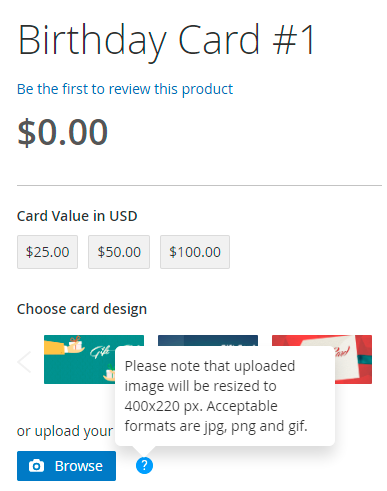
Allow Users to Upload Own Images for Gift Card - Set to Yes to enable users to upload their own images for gift cards (in png, jpg, gif formats).
Tooltip Message for Users - Specify the message to inform customers upon certain restrictions when uploading their own images for gift cards.
Here's how customers will see the tooltip:
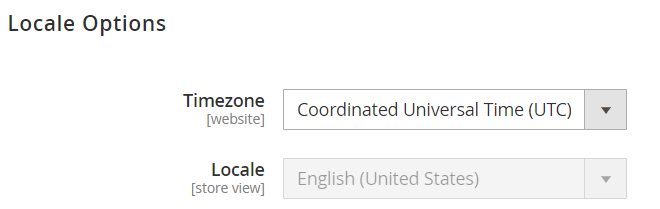
Please note that the display (format) of delivery date on product page (“send later” option), mini cart, shopping cart, and checkout depends on the locale which is chosen in general configuration. To check it, navigate to Stores → Configuration → General → General → Locale Options → Locale.
Gift Card Options
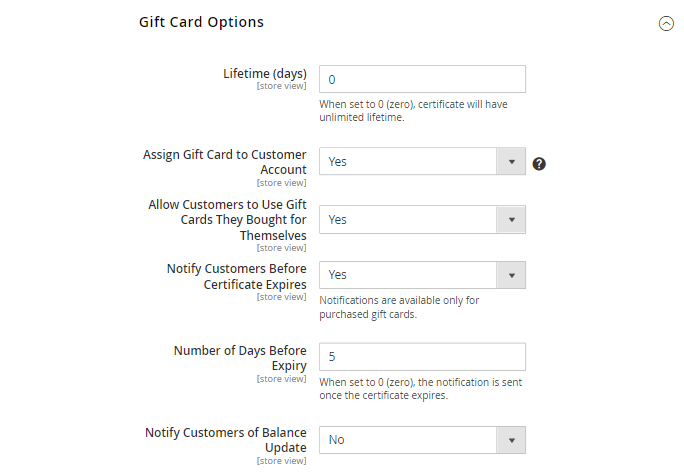
Lifetime (days) - Specify the number of days during which the gift card will be valid. When set to 0 (zero), certificate will have unlimited lifetime.
Assign Gift Card to Customer Account — enable the option to assign gift cards to customer accounts to improve fraud protection. If enabled, customers need to bind Gift Card Codes with their accounts to use them on checkout or in the cart. Otherwise, they will get the notification ‘Please add this Gift Card Code to your customer account to proceed’ and won’t be able to apply the gift code.
Allow Customers to Use Gift Cards They Bought for Themselves - Enable the option to let customers buy gift card without sending them to other recipient.
Notify Customers Before Certificate Expires - Set the option to ‘yes’ to enable notifications dispatch when the certificate lifetime expires. Notifications are available only for purchased gift cards.
Number of Days Before Expiry - specify when email reminders should be sent. When set to 0 (zero), the notification is sent once the certificate expires.
Email Options
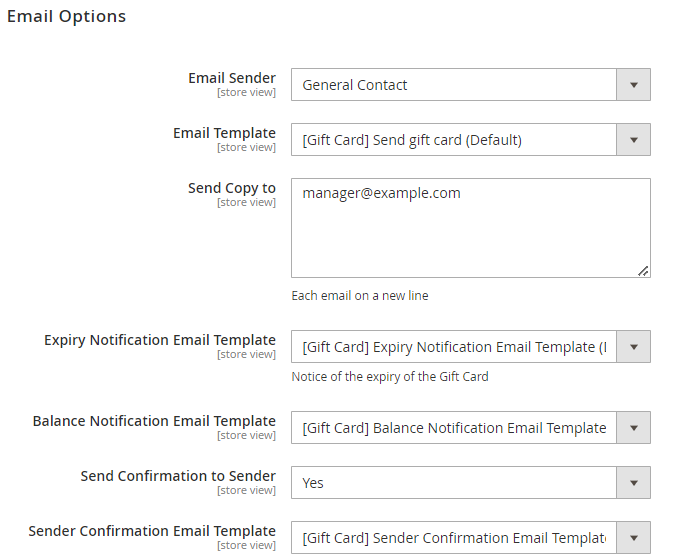
Email sender - select an email sender.
Email Template - choose a template according to which an email will be generated.
Send Copy to - in this field you may specify particular email addresses to which notifications will be sent as well. Each email should be placed on a new line.
Expiry Notification Email Template - set the template for the expiry notifications.
Balance Notification Email Template - set the template for balance notifications.
Send Confirmation to Sender - enable this option to notify a gift card sender once the certificate is sent to the recipient.
Sender Confirmation Email Template - select the corresponding sender confirmation email template from the templates list.
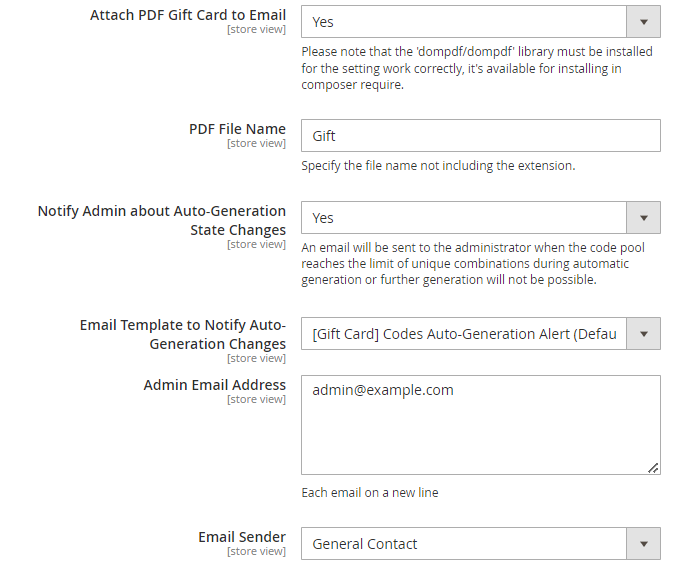
Attach PDF Gift Card to Email - you can add a PDF gift card to the email.
PDF File Name - specify the file name without the file extension (e.g., .png, .jpg, etc.).
Send Gift Card Code Email When Order Item is - choose the order status that will trigger gift card code account creation and email sending.
- Select the Invoiced status to trigger both actions only after the invoice is created.
- Select the Created status to trigger these actions immediately after the order is created.
Please note that the emails are processed via the consumer queue, so it's important to ensure the cron job is running on the instance for successful delivery. Alternatively, you can trigger the email sending manually by running the command:
php bin/magento queue:consumers:start amasty_gift_card_account.send_notification
Deactivate Gift Code Account if Order is Cancelled - set to Yes to deactivate the gift card code account if the order is cancelled, preventing its further use.
The Send Gift Card Code Email When Order Item is and Deactivate Gift Code Account if Order is Cancelled settings are available as a part of an active product or support subscription. You can find the 'amasty/module-gift-card-subscription-functionality' package for installation in composer suggest.
Notify Admin about Auto-Generation State Changes - enable this setting to send a notification to the admin when the code pool reaches the limit of unique combinations during automatic generation, or when further generation is not possible.
Please note that the Notify Admin about Auto-Generation State Changes feature is available only as a part of an active product subscription or support subscription for Gift Card Pro and Gift Card Premium extension versions.
If the feature is set to Yes, the following depending features will appear:
Email Template to Notify Auto-Generation Changes - set the template for notifications about auto-generation issues.
Admin Email Address - specify the admin’s email to send alerts about auto-generation issues.
Email Sender - select an email sender.
Gift Card Account
In this tab you can configure how and where the field for adding a card will be displayed.
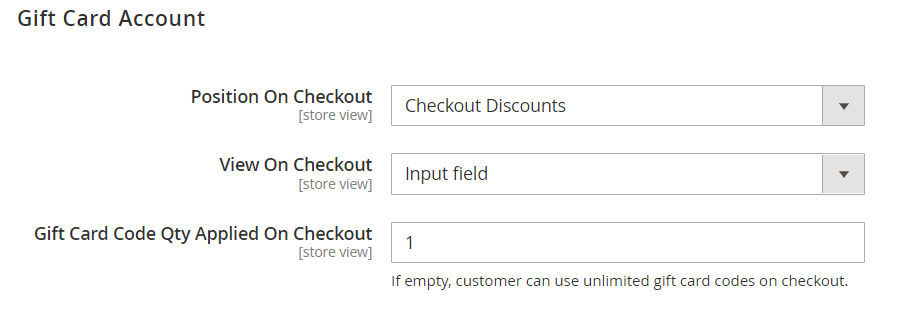
Position On Checkout - choose the position to add the filed for gift cards application (by now, only 'Checkout Discount' position is available).
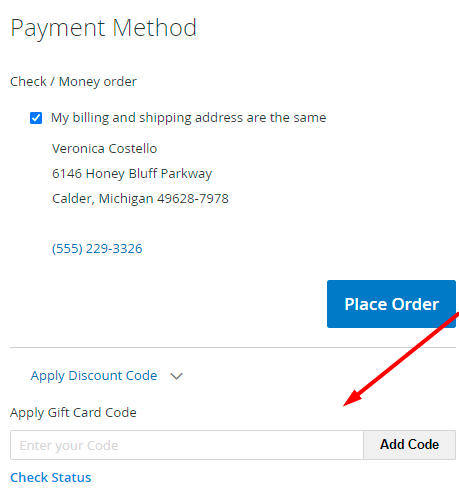
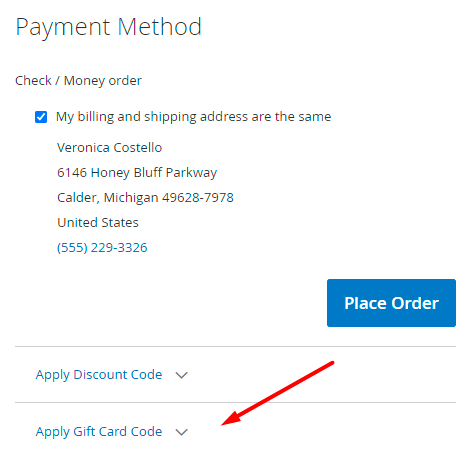
View On Checkout - select the 'Input Field' value to show the gift card after the discount block or choose the 'Dropdown' to hide the option.
Input field:
Dropdown:
Gift Card Code Qty Applied On Checkout - specify the quantity of gift card codes that customers can apply on the checkout page at once. Leave the field empty to let customers use unlimited gift card codes on the checkout.
If customers apply more gift card codes than specified, the error message will occur:

Email Addresses
To specify store email addresses from which you want to send gift card emails and expiration notifications please go to Stores → Configuration → Store Email Addresses.

Product Creation
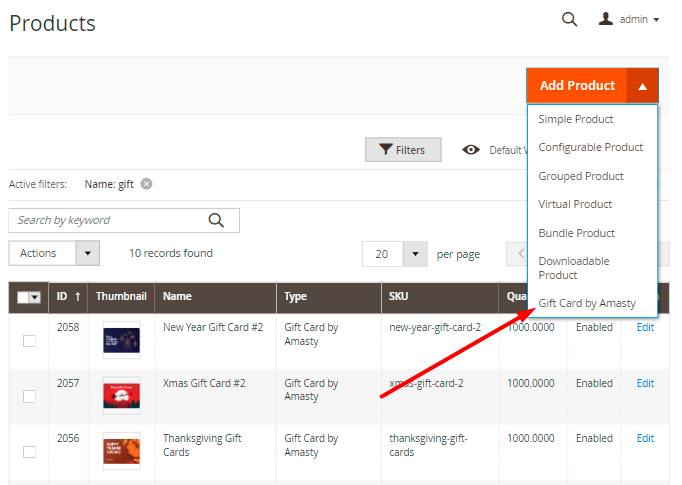
To create a gift card product please go to Products → Catalog → click on the Add Product button and select the Gift Card by Amasty product type in the dropdown.
Gift Card Information Settings
Gift Card product settings include the same options as other product types except for Prices and Gift Card Information settings.
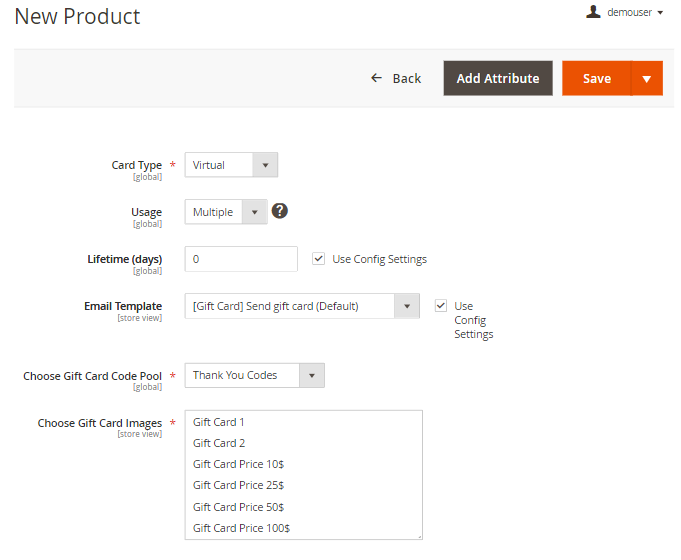
Card Type - Select one of the card types:
- Virtual;
- Printed;
- Combined:
Usage - Set the ‘Multiple’ value for a Gift Card that can be used an unlimited number of times till the balance is over. The ‘Single’ value should be used to allow a single application only. In this case, the remaining balance will be reset.
Lifetime in days - It's possible to set individual lifetime for each particular gift card or use default settings.
Email Template - It's also possible to set an individual template per gift card product or use general configuration settings.
Choose gift card code pool - Select one of the available gift card code sets.
Choose gift card images - Choose a gift card image/images from the list of predefined images or upload your own ones.
Gift Card Price Settings
To set gift card price and possible pricing options, expand the Amasty Gift Card Prices tab.
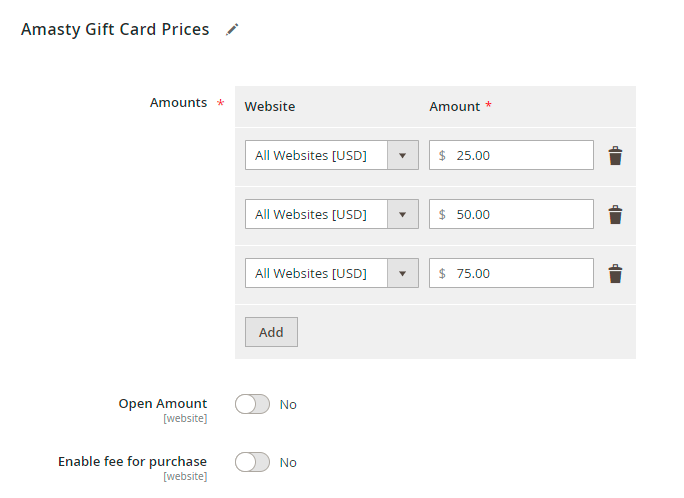
Amounts - You can set fixed price for a gift card product.
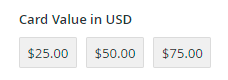
The specified prices will be displayed on the frontend product page.
To add even more flexible pricing options, you may enable Open Amount and a Fee for purchase.
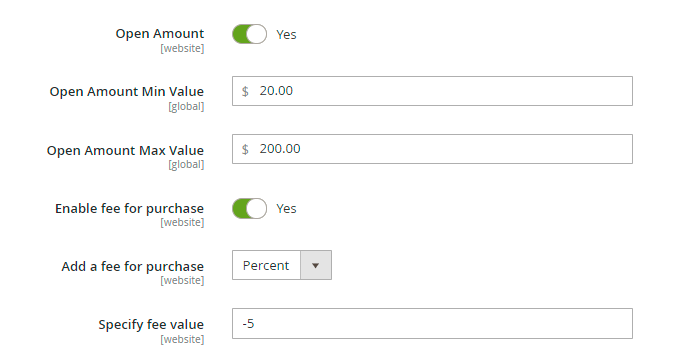
Open Amount - Enable the option to let customers specify a custom gift card amount.
Open Amount Min/Max Value - Limit an open amount with min/max values.
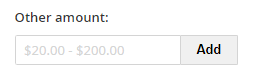
On the frontend the feature will be displayed in the following way:
Enable fee for purchase - Set the option to 'yes' to add an extra fee for a gift card product or vice versa - make the gift card product price lower than the certificate value.
Add a fee for purchase - Select a fee type either fixed or percent.
Specify fee value - in case you specify a negative amount, the price of a gift card product will be decreased accordingly. If you want to add an extra fee, either percent or fixed, please specify a positive value. E.g. -10 or 10.
Gift Card Codes Generation
To create gift card code pools please go to Marketing → Gift Cards → Code Pools.
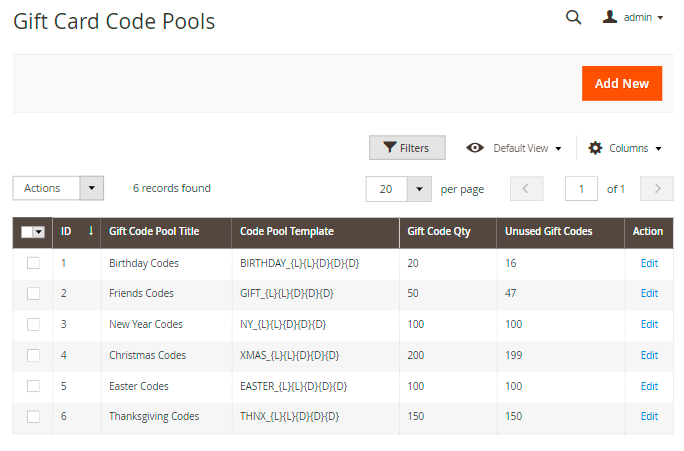
On the Gift Card Code Pools grid you'll see all previously generated gift code sets. You can easily delete or edit them if needed.
Create additional code pools with the Add New button. Configure the General Settings.
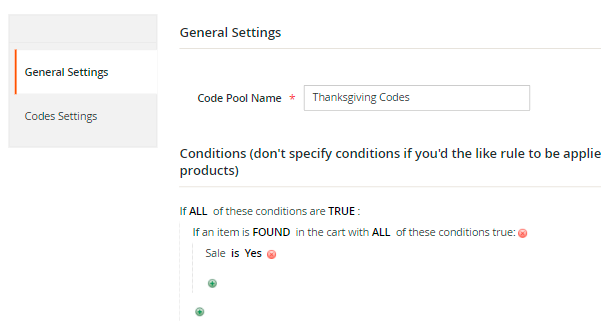
Code Pool Name - Specify the name for each code pool you create.
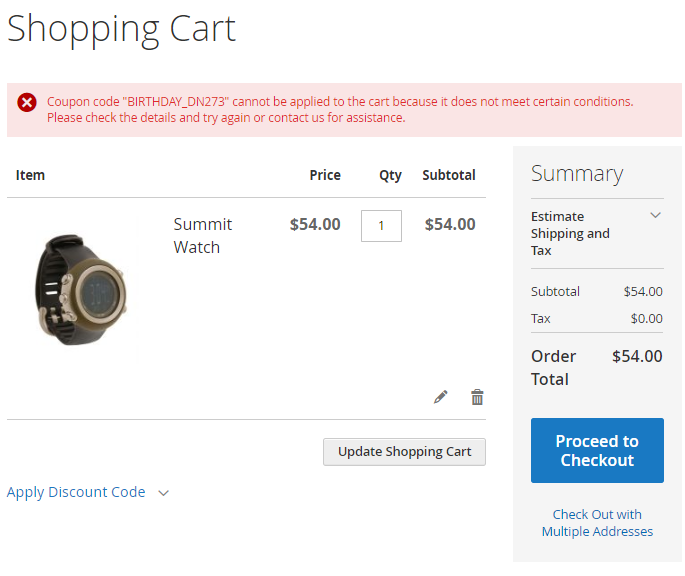
Conditions - set the necessary conditions that will limit the cases of a gift card application.
When a customer tries to apply a gift card code, that doesn't match the conditions set by the admin, he will see a notification:
Proceed to the Code Settings section.
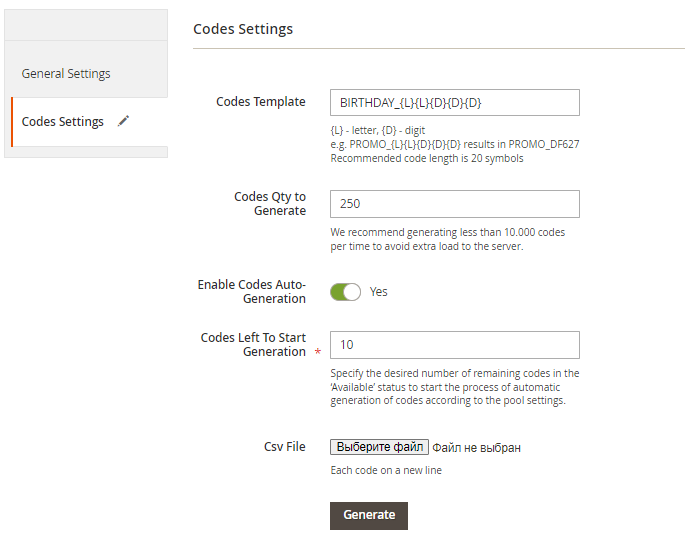
Code Templates - Specify the template for codes generation, where {L} - letter, {D} - digit, e.g. PROMO_{L}{L}{D}{D}{D} results in PROMO_DF627. Recommended code length is 20 symbols (15 symbols if using barcodes).
Codes Qty to Generate - Set the codes quantity that should be created.
Enable Codes Auto-Generation - activate this feature if you’d like to automatically generate coupon codes as they are about to run out.
Please note that the Enable Codes Auto-Generation option is available only as a part of an active product subscription or support subscription for Gift Card Pro and Gift Card Premium extension versions.
Codes Left to Start Generation - specify the desired number of remaining codes in the Available status to trigger automatic code generation according to the pool settings.
You can also import gift card codes using a CSV file.
Hit the Generate button. Open the Codes List tab, where you'll find all generated or imported codes.
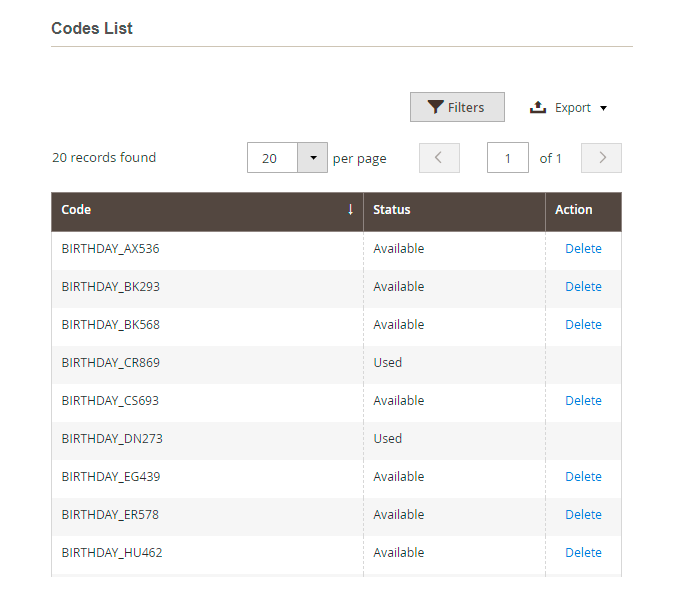
When a coupon is used, you will see the updated status in the codes list.
Gift Card Images
To upload gift card images please go to Marketing → Gift Cards → Images.
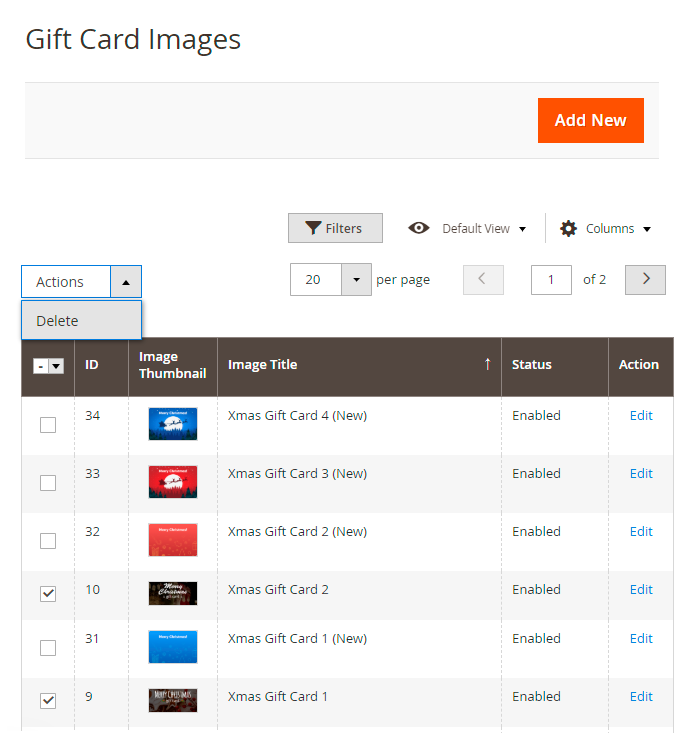
See uploaded images on the grid. Click on the Add New button to upload a new image.
From the start, a set of 15+ ready-to-use gift card images prepared by designers for different occasions will be available on the grid.
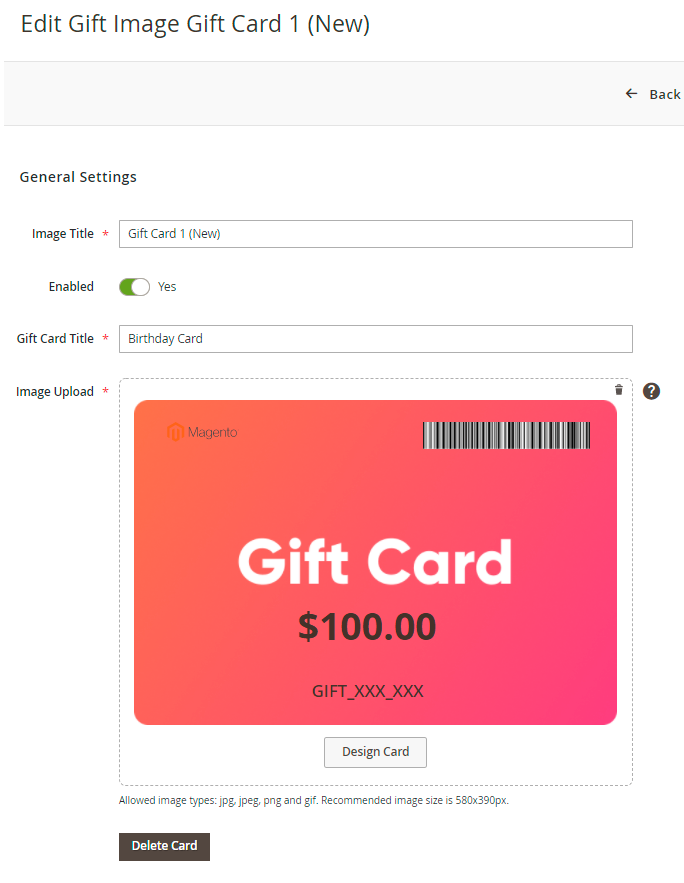
Image Title - specify the suitable title for internal use.
Enabled - switch to Yes to activate the image.
Gift Card Title - provide the title of a gift card which can be placed on the image using drag-and-drop.
Hit the Upload Image button.
Also, you can customize the design of a card by adding different types of information. Hit the Design Card button.

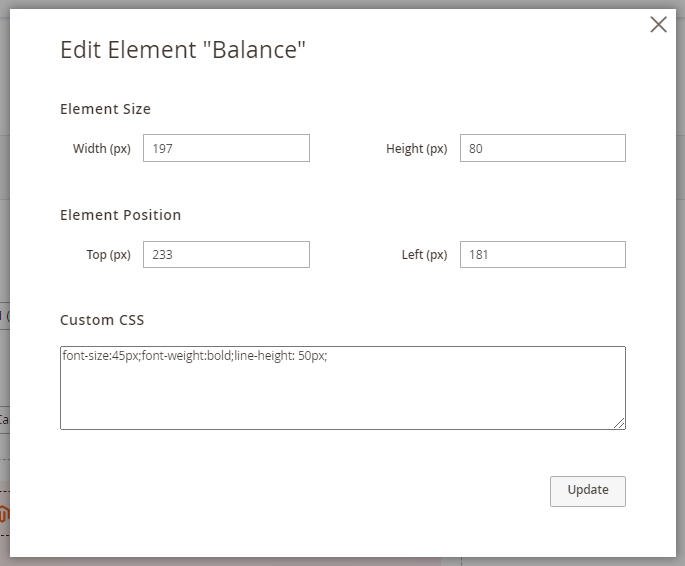
Drag and drop the elements you need to place on a card. It is possible to edit each element manually if needed. Delete elements by double-clicking or by clicking on the trash icon directly on the item.
The Pro and Premium versions of this extension include a built-in barcode generator. After you place the ‘barcode’ element on the gift card image via drag-and-drop, the individual barcode will be automatically generated for each gift card code (account) with this image.
Please note the following when using barcodes:
- The recommended maximum gift card code length when using barcodes is 15 symbols. For other uses, the optimal length is 20 symbols;
- Longer gift card codes require wider barcodes to ensure readability. Before sending emails to customers, test the barcode by creating a gift code account in Marketing → Gift Cards → Accounts using your email address. Then, click Save & Send Email to send a test email.
- You can adjust the width and height of the ‘barcode’ element. Due to image display limitations, the element frame is 580x390px, assuming no top or left padding. The recommended maximum width for the ‘barcode’ element is 540px.
Now, it is possible to download gift card images that are stored in AWS Remote Storage.
Gift Code Accounts
To manage gift code accounts please go to Marketing → Gift Cards → Accounts.
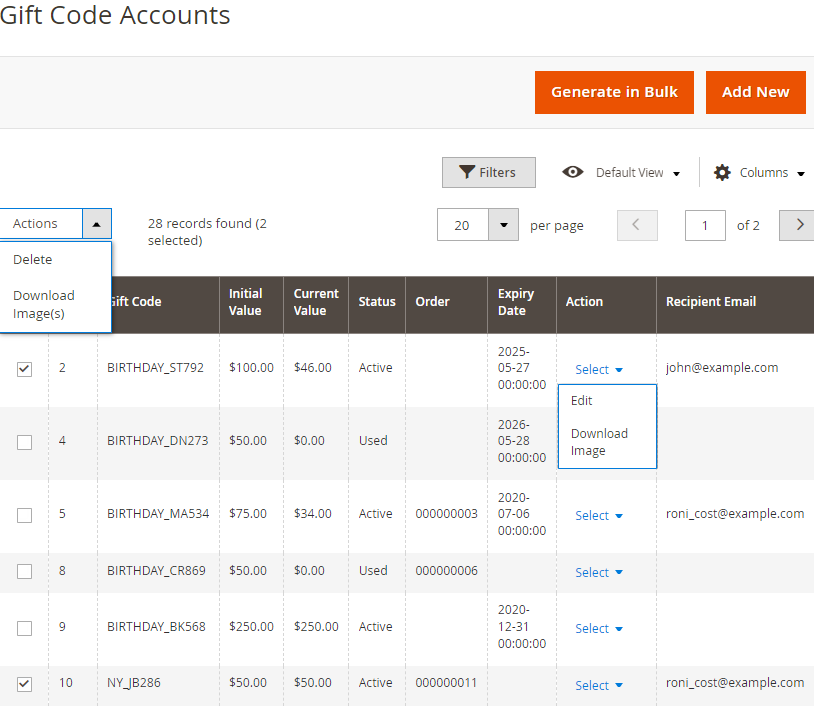
On the gift card code accounts grid you can view and edit the accounts of all purchased gift cards. Generate in Bulk to create several accounts at once.
You can also view and filter all accounts by the recipient and the sender email addresses. Also, you can filter gift codes by their order numbers.
Click Select → Edit in the Action column to check the info of a particular account.
It is possible to download images of the purchased and paid gift cards right from the accounts grid for further printing.
To download a single image of a particular account, сlick Select in the Action column on the grid and choose the Download Image option from the dropdown.
To download the several images in a bulk, select the needed accounts and click on the Download Image(s) option in the mass actions dropdown. The images will be downloaded as a .zip archive.
For the download features to work, the following must be installed on your instance:
- php extension Zip;
The extension is needed for downloading via mass actions only. You can run this command to check:
php -m | grep -i zip
- php extension ImageMagic;
You can run this command to check:
php -m | grep -i imagick
- dompdf/dompdf (via Composer);

Order ID - Click on the order ID to get redirected to the corresponding order page.
Edit gift card codes data:
- Status;
- Usage;
- Website;
- Initial code value;
- Current balance;
- The date of expiration;
Comment - Admin users can write a comment for each gift card code for their internal needs.
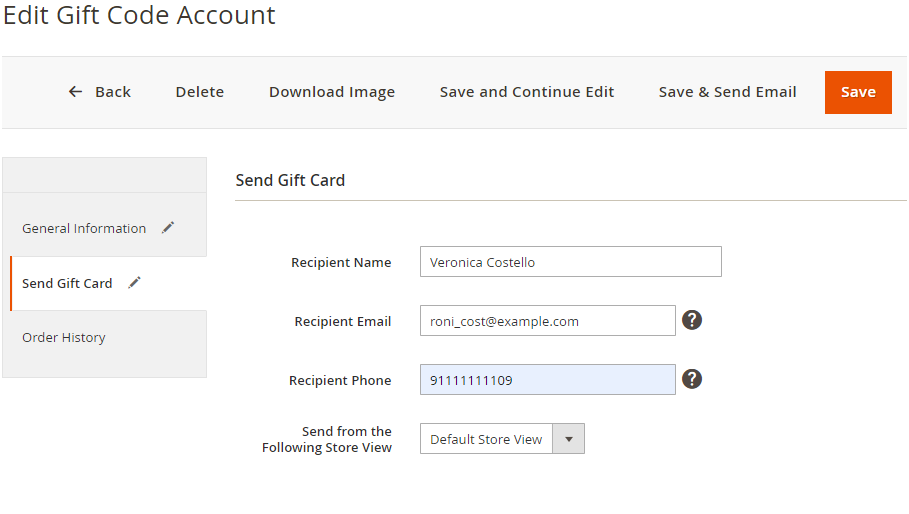
Send Gift Card - Specify recipient's data to resend a gift card code if needed.
In the Order History tab you'll find all orders for which the gift card was used.
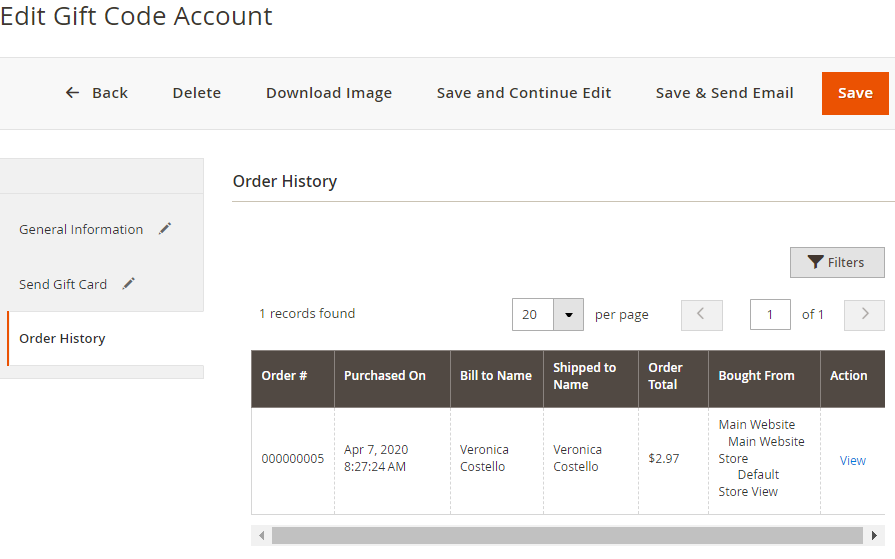
You can download gift card image right from the Edit Gift Code Account page by tapping the Download Image button in the top of the page.
Please note that clicking Save & Send Email adds emails to the consumer queue. For their successful delivery, ensure the cron job is running on the instance. You can also use the following command to manually trigger the sending process:
php bin/magento queue:consumers:start amasty_gift_card_account.send_notification
Gift Card Email Templates Settings
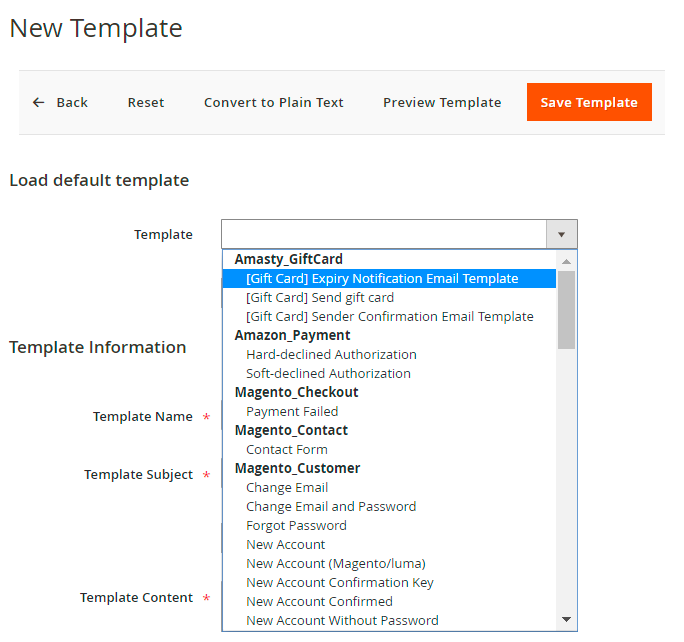
To create or edit an email template please go to Marketing → Communications → Email Templates. Choose the template you need and click on the Load Template button.
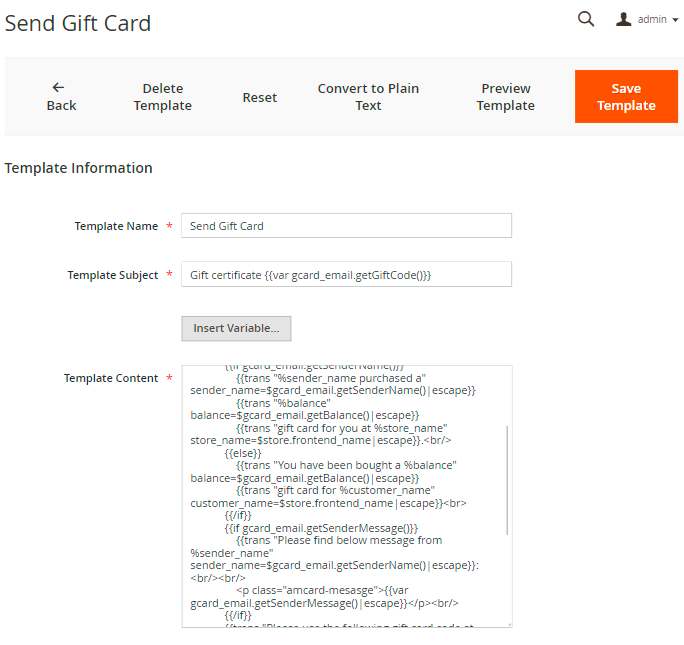
Template Content - In this field you can edit the template content according to your needs.
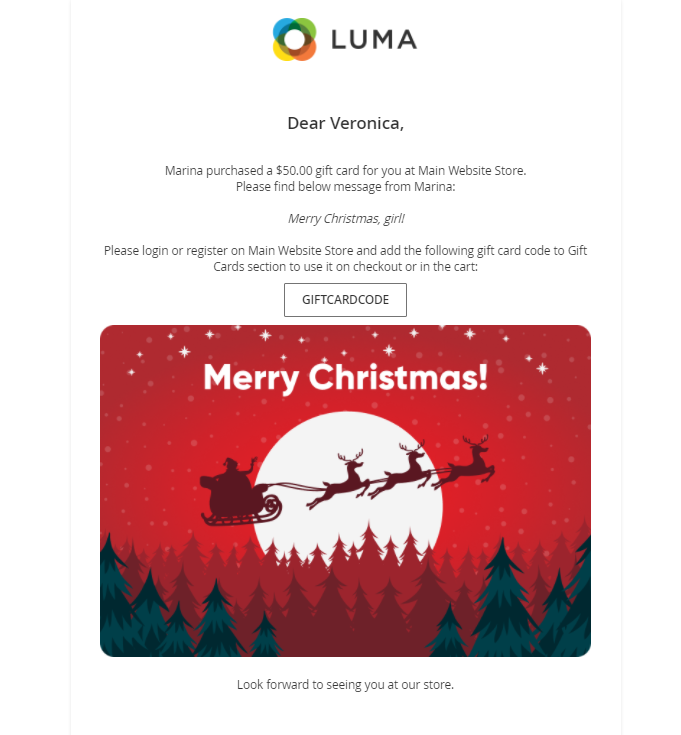
Gift Card Email Template Example
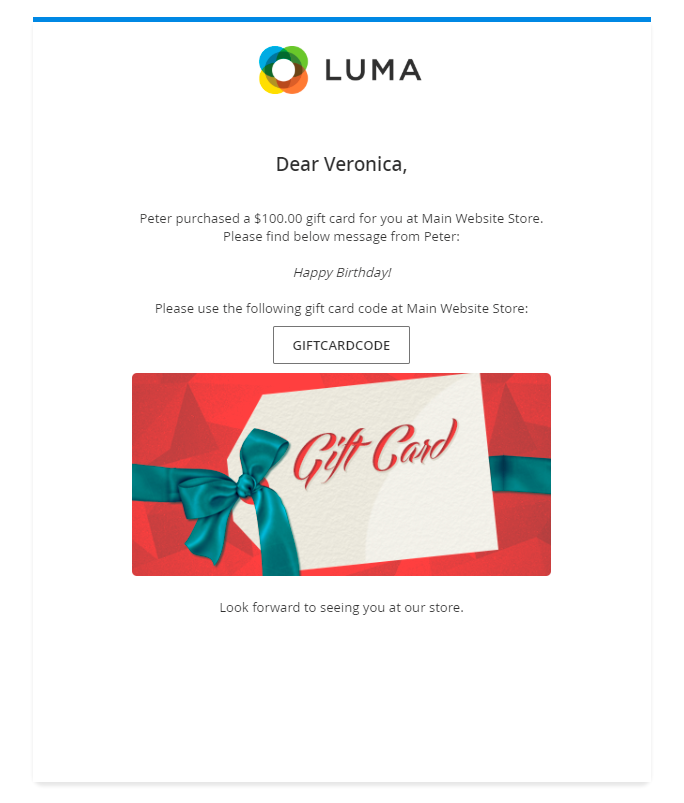
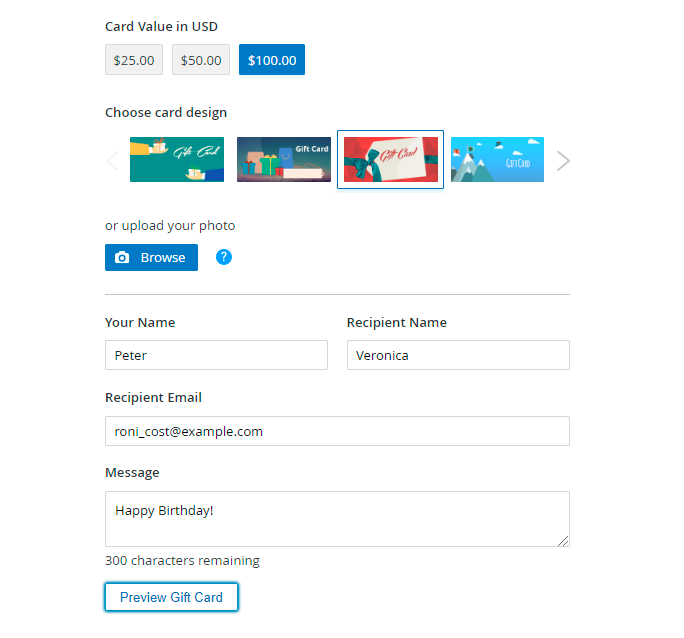
Also, the customers have the ability to preview the email with a gift card before they make a purchase.
If you enabled Assign Gift Card to Customer Account option then the email template will be as follows:
Please mind that if you use a custom email template, it needs to be adjusted to convey the proper message under the setting enabled.
Gift Card Frontend Examples
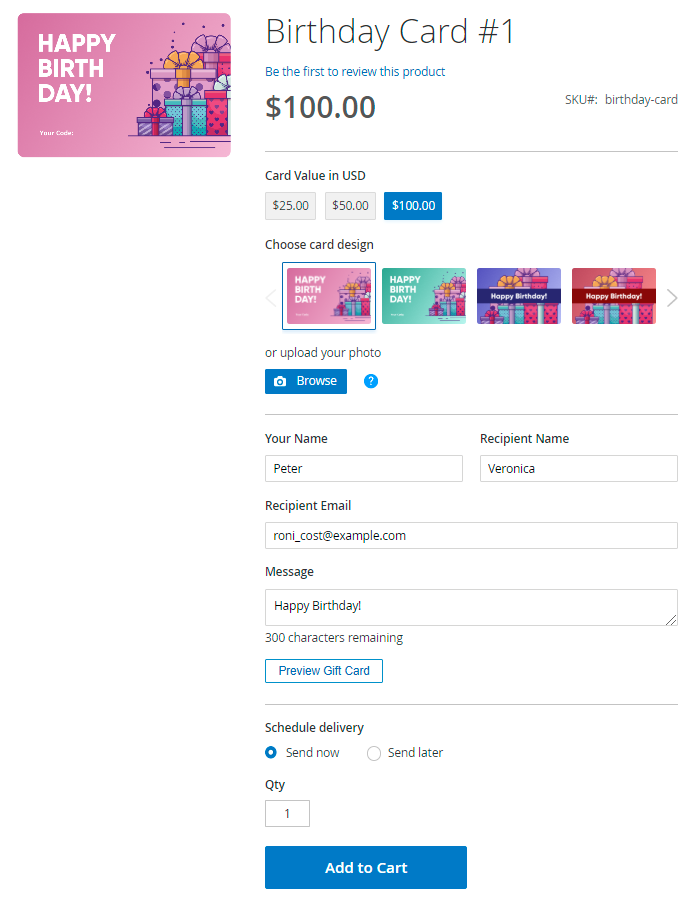
See the example of gift card products added to a separate category.

Here is the example of a gift card product page where a customer can select the gift card value (if there are any), upload a custom image, specify recipient's information and write a greeting message.
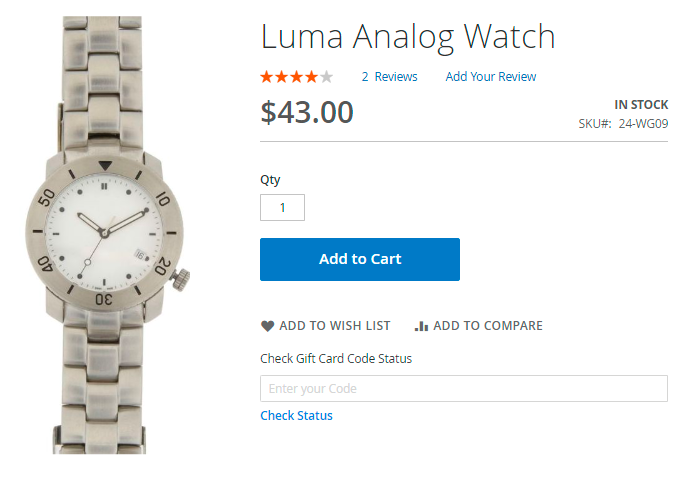
Amasty Gift Card Code Status Check Widget
You can also add a widget so that customers could check their balance on any page. See the frontend sample on a product page:
To create a widget, go to Content → Elements → Widgets and hit the Add Widget button.
Select the Amasty Gift Card Code Status Check widget type.
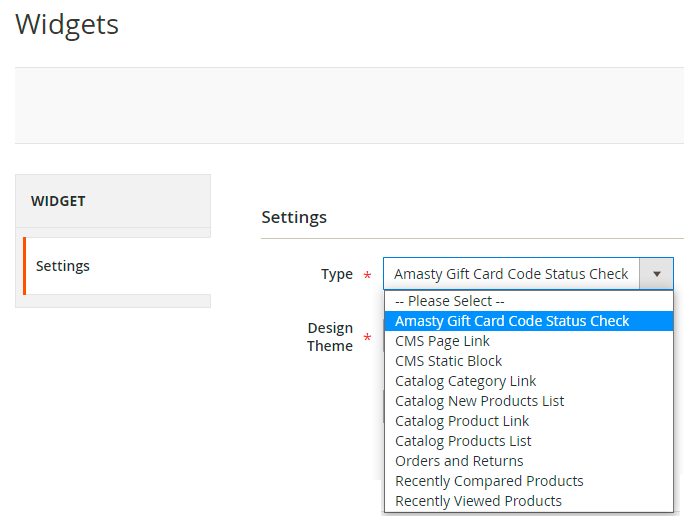
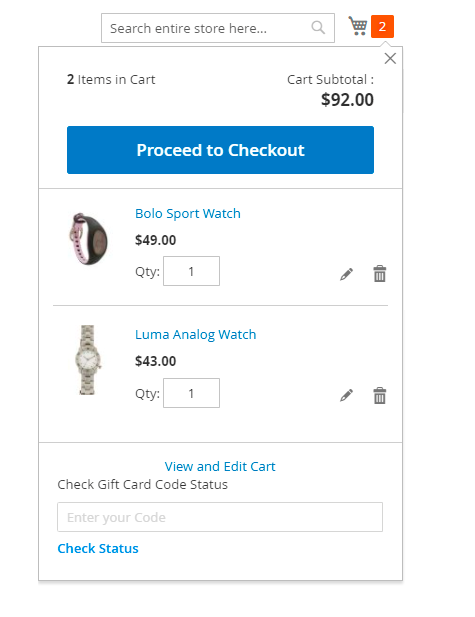
Choose the theme, set the required pages and postion for you widget and click Save. For example, you can also add status check to the mini cart by choosing the appropriate position.
Gift Card Application
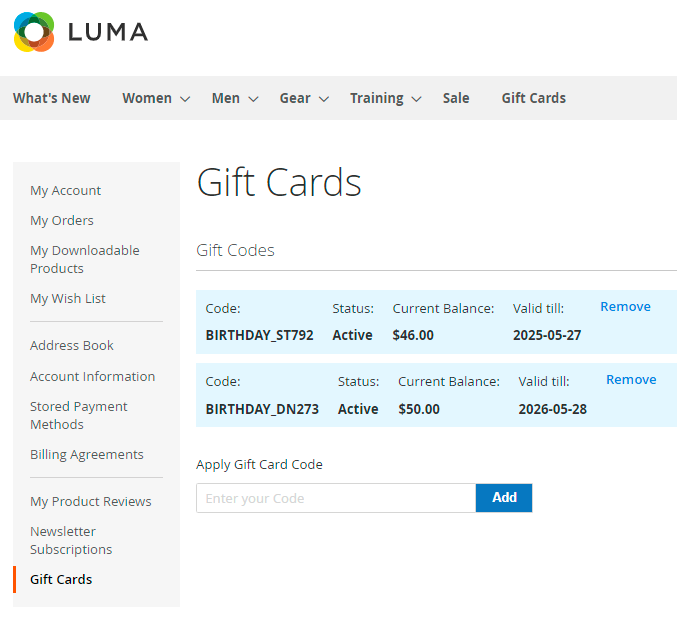
Customers can check the balance of each gift card in their accounts. To see the balance, the recipient should open the corresponding tab in a customer account, enter the code and click on the 'Submit' button. Information about activated codes will be displayed below.
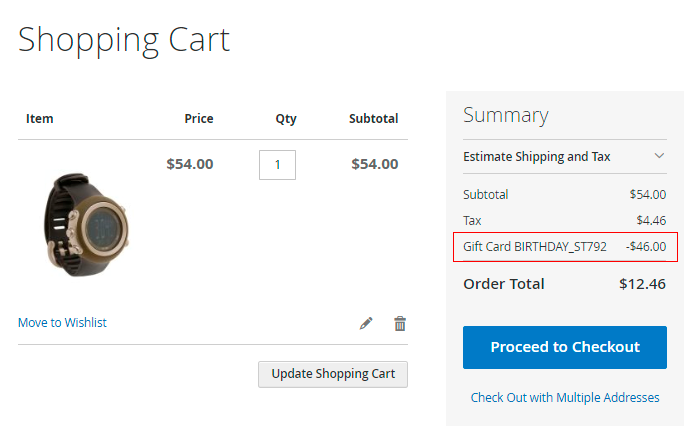
Customers can check a gift card status as well as apply the gift card on a shopping cart page. All active codes are displayed in the dropdown, so customers can simply choose the necessary one.
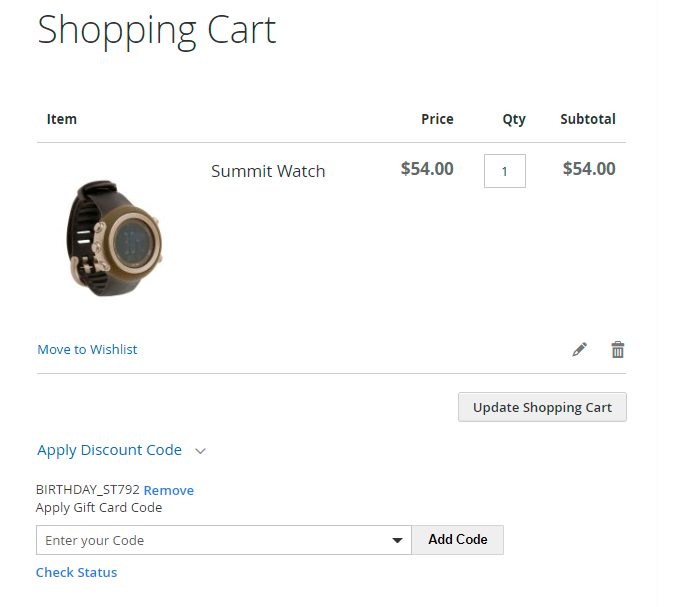
Once a gift card code is applied, the order total will be automatically recalculated.
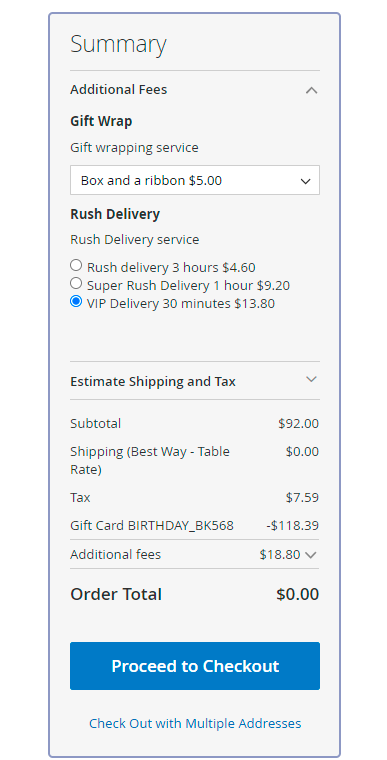
Now the extension is compatible with Amasty Extra Fee extension. Thus, shoppers can cover ANY costs with their gift cards.
API Integration
The extension includes API support. Store admins may use the following APIs:
GiftCard
Amasty\GiftCard\Api\ImageRepositoryInterface - API for images processing
Available methods:
save(account)
getById(id)
getList()
deleteById(id)
Amasty\GiftCard\Api\CodePoolRepositoryInterface - API for codes pool processing
Available methods:
save(codePool)
getById(id)
getList()
deleteById(id)
Amasty\GiftCard\Api\CodeGeneratorManagementInterface - API for codes generation
generateCodesForCodePool(codePoolId, qty) - generation of codes qty for codePoolId
generateCodesByTemplate(codePoolId, template, qty) - generation of codes according to template for codePoolId
GiftCardAccount
Amasty\GiftCardAccount\Api\GiftCardAccountRepositoryInterface - API for gift account processing
Available methods:
save(account)
getById(id)
getByOrderId(id)
getByCode(code)
deleteById(id)
getList()
Amasty\GiftCardAccount\Api\GiftCardAccountManagementInterface - API for cards application to customers
Available methods:
saveByQuoteId(cartId, giftCardCode) - application //cartId// of gift account with //giftCardCode//
deleteByQuoteId(cartId, giftCardCode) - deletion //cartId// of gift account with //giftCardCode//
Amasty\GiftCardAccount\Api\GuestGiftCardAccountManagementInterface - API for card apllication to guests
Available methods:
saveByQuoteId(cartId, giftCardCode)
deleteByQuoteId(cartId, giftCardCode)
Amasty\GiftCardAccount\Api\GiftCardEmailSenderInterface - API for email dispatch when a new account is created
Available method:
send(accountId, storeId, recipientEmail, recipientName)
GraphQL compatibility
The extension is compatible with GraphQL (read + write).
Here is an example of the implementation via Graphql. Follow the steps below:
1. Create the cart
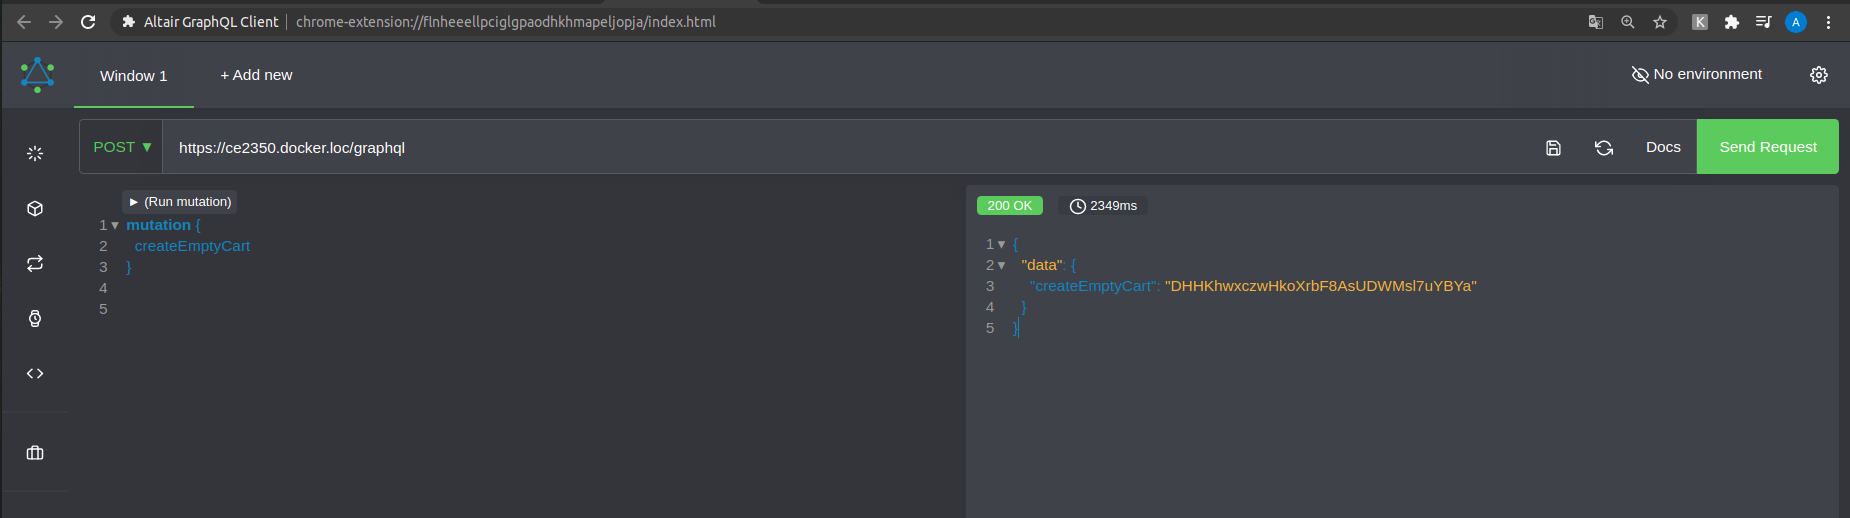
mutation
{createEmptyCart}
2. Add the product
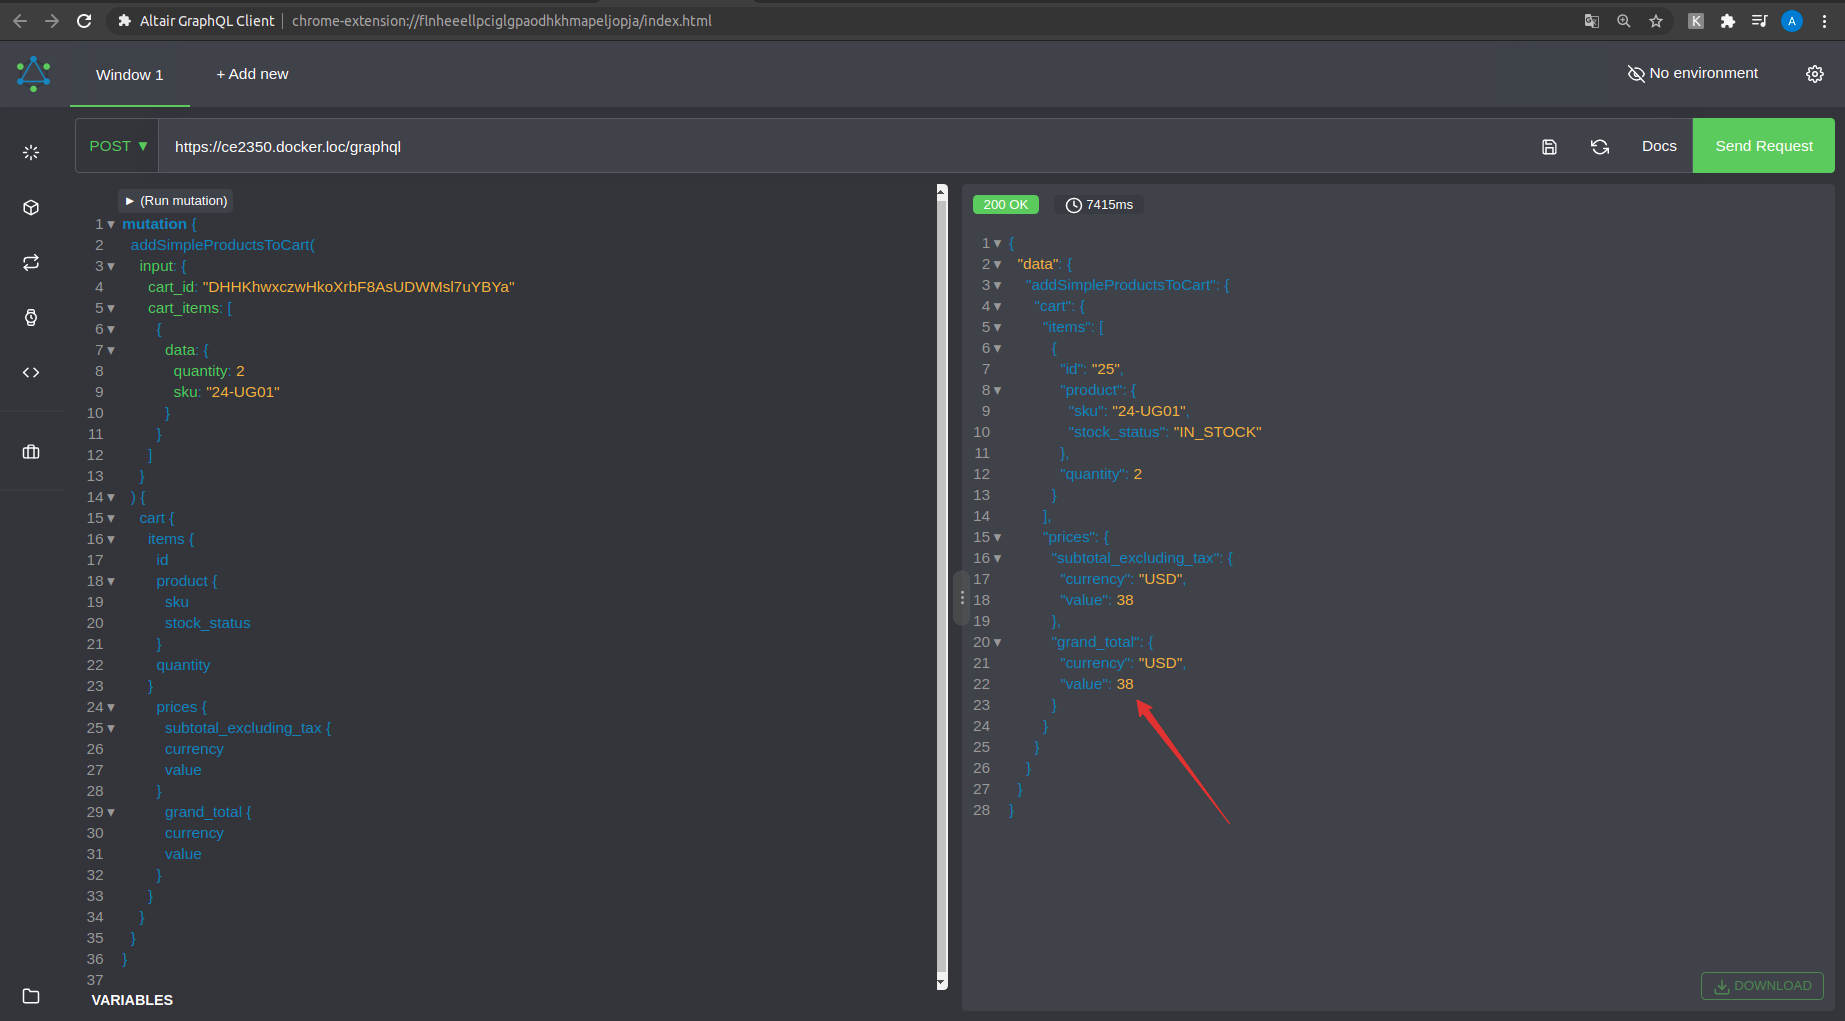
mutation
{addSimpleProductsToCart(
input: {
cart_id: "YOUR CART ID"
cart_items: [
{
data: {
quantity: 2
sku: "YOUR PRODUCT SKU"
}
}
]
}
) {
cart {
items {
idproduct {
sku
stock_status
}
quantity
}
prices {
subtotal_excluding_tax {
currency
value
}
grand_total {
currencyvalue
}
}
}
}
}
3. Apply the gift card
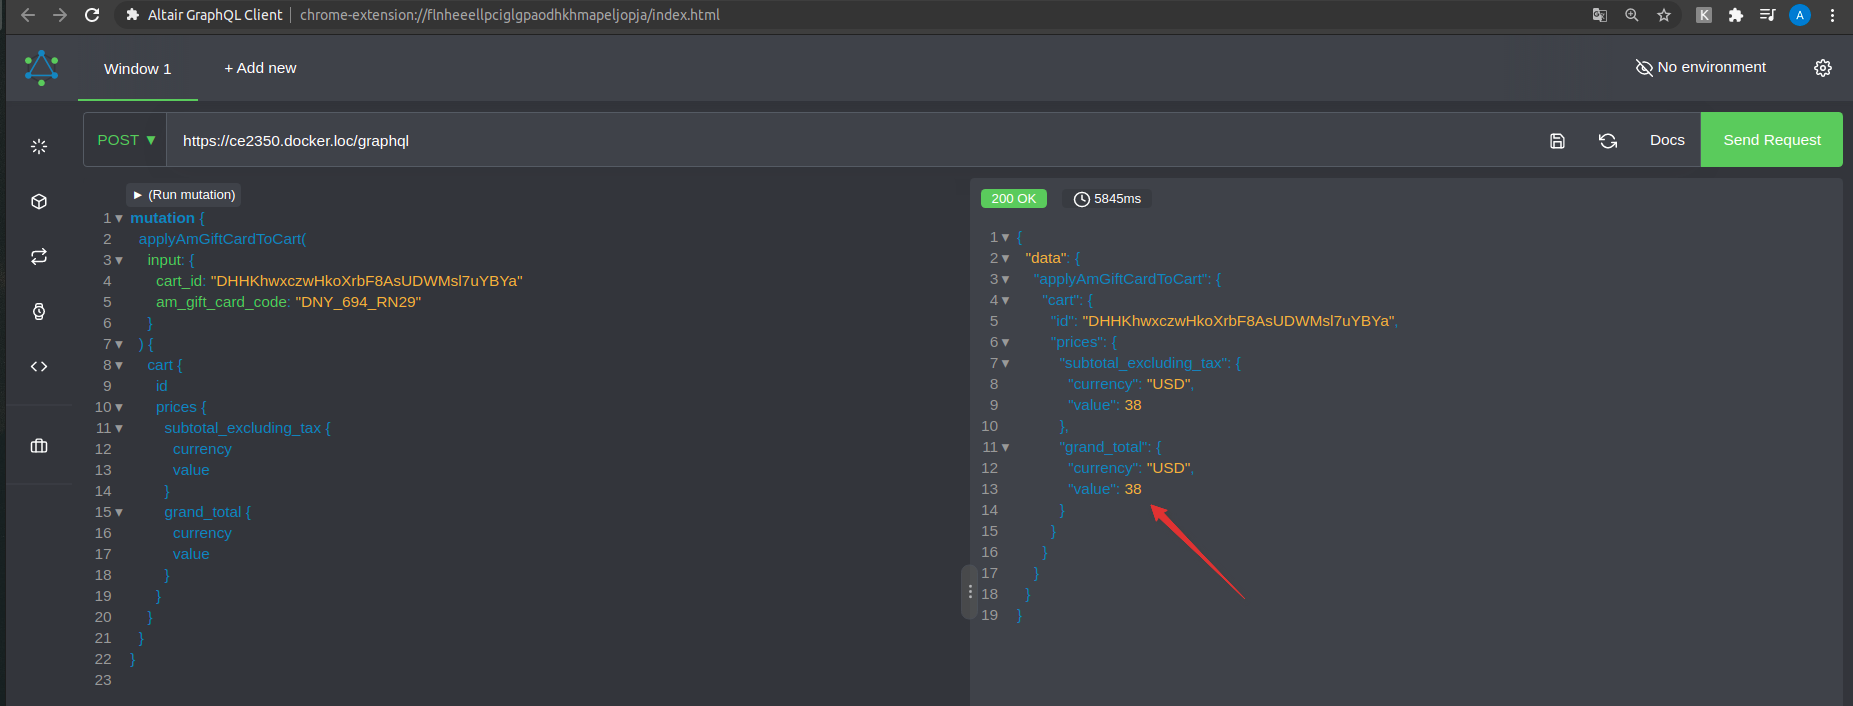
mutation {
applyAmGiftCardToCart(
input: {
cart_id: "YOUR CART ID"
am_gift_card_code: "YOUR GIFT CODE"
}
) {
cart {
id
prices {
subtotal_excluding_tax {
currency
value
}
grand_total {
currency
value
}
}
}
}
}
Gift Card Pro: Export
The extension includes a part of Export Orders solution. It means that you can export any gift card information using the simplified export UI.
Navigate to System → Amasty Export → Export.
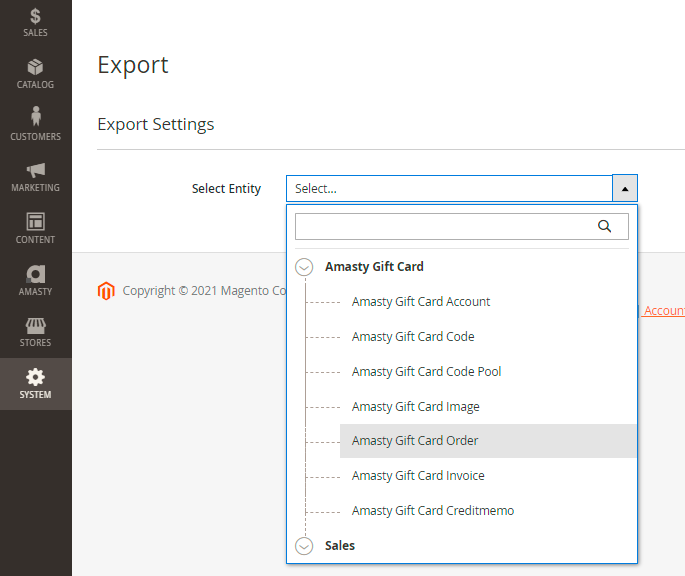
Choose the required entity and configure export settings.
Main features you can use:
- Choose 1 of 6 available file types (CSV, XML, ODS, XLSX, JSON, Template)
- Specify output option (Store Exported File On Server, Upload Exported File By FTP / SFTP, Send Exported File to E-mail, Send to Rest Api Endpoint)
- Configure export fields and their namings
- Filter data by any parameter
Check the details of each tab configuration in this guide.
Gift Card Pro: Import
The same UI as described above is now available for the import tasks.
Navigate to System → Amasty Import → Import.
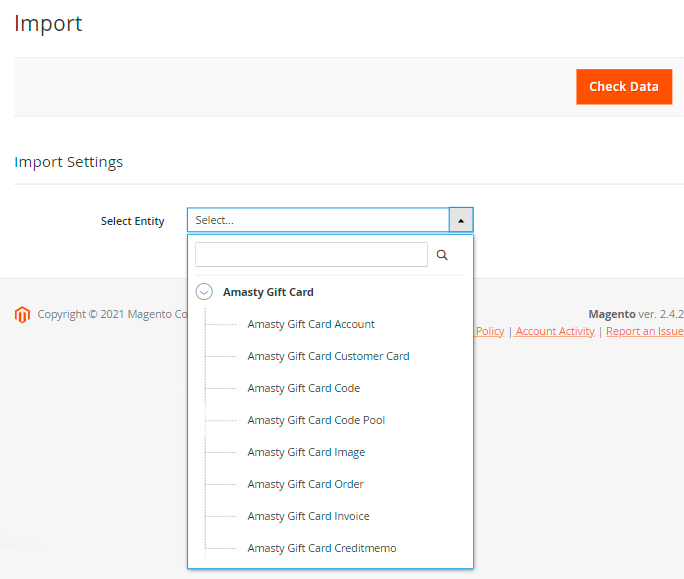
Choose the required entity and configure import settings.
Main features you can use:
- Select file format (CSV, XML, ODS, XLSX)
- Specify output option (Local Directory, File Upload, FTP, SFTP, URL, Google Sheets, REST API Endpoint)
- Add import fields and map the namings
- Validate import file to avoid errors
See the details in this guide.
Gift Card Premium: Store Credit
Now the product enjoys features of the Amasty Store Credit & Refund extension to allow your customers to redeem Gift Cards balances for store credit.
Configuration
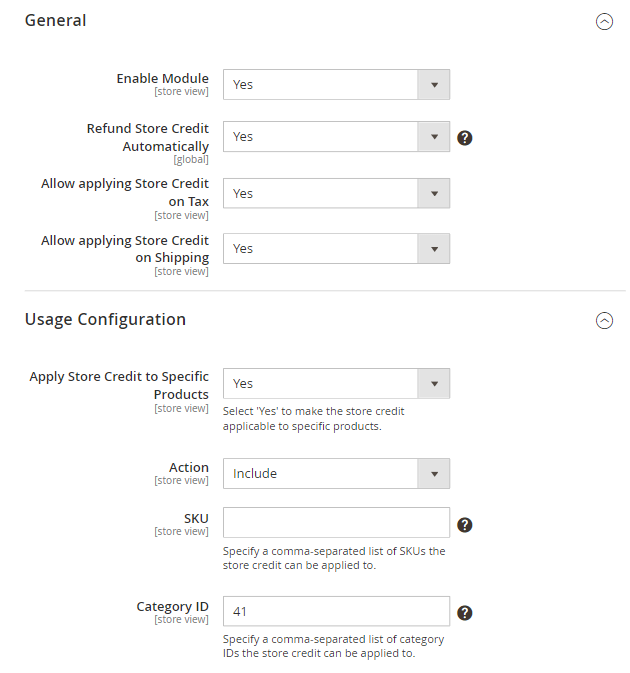
Enable Module - set to Yes to enable refunding to Magento 2 store credit balance.
Refund Store Credit Automatically - select Yes if you want the Refund to Store Credit option to be set on the credit memo page by default.
Allow applying Store Credit on Tax - enable this option if you want to allow customers to apply store credit currency on taxes.
Allow applying Store Credit on Shipping - set to Yes to enable your customers to apply store credit balance on shipping.
You can also apply Store Credit to certain products by including/excluding lists of SKUs and categories. In the example above, we enabled the functionality for category 41, which is the category id for Gift Cards in the demo. You can also enable email notifications about the store credit balance updates. To learn about all the settings, please, refer to the Store Credit and Refund User Guide.
PWA for Gift Card Add-On
To get the most of the Gift Card Pro extension, install the PWA add-on. The software provides a faster, enhanced experience for the clients shopping from phones and tablets.
Before purchasing the PWA for Gift Card Add-On, please, acknowledge, that it requires
- the Gift Card Pro Extension;
- PWA theme and PWA Studio installed.
In order to correctly install a PWA add-on, please install the corresponding GraphQL system package first. For the correct name of it, please check the composer.json file of the main module. For example, the GraphQL system package name of the PWA add-on for the Blog Pro extension would be the following: amasty/blog-graphql

The add-on adapts interaction with the website to various screen resolutions to improve responsiveness and the overall client experience.
Once the software is added, the Gift Card page will be displayed as follows:
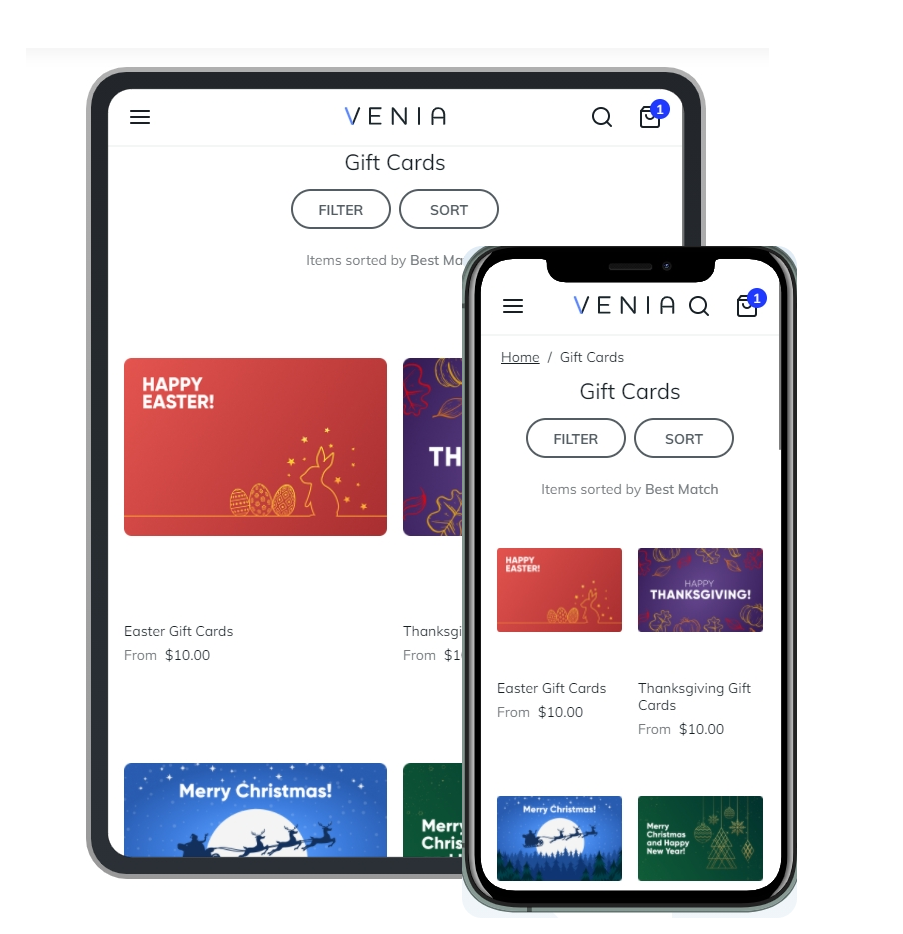
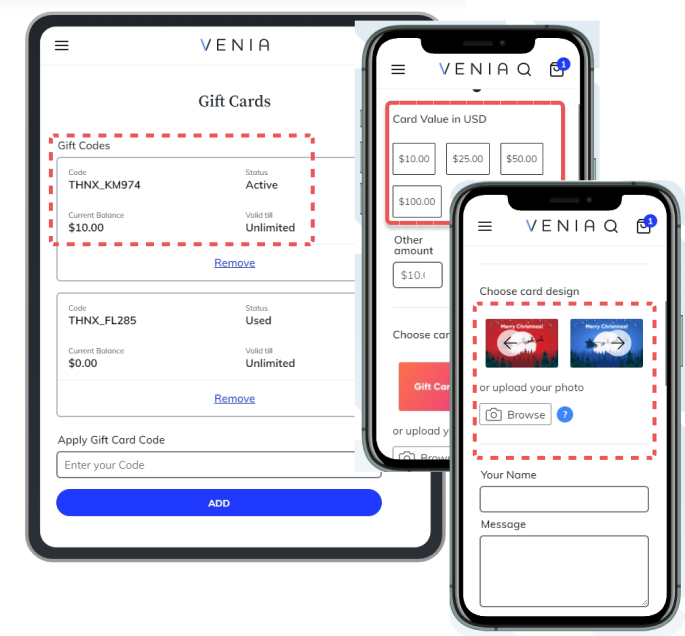
Choosing the card value, its design, checking gift cards balance, and other features will be available with the enhanced mobile usability.
Please, note a few limitations when purchasing PWA for Gift Card Add-On:
- The add-on doesn’t include a widget that helps clients see their gift card balance on any page of the store. To check the information one needs to proceed to their account.
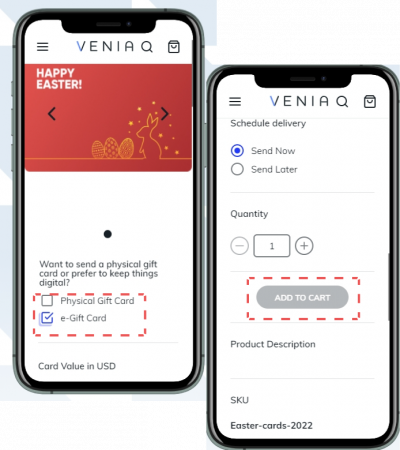
- Customizable options, like wrapping the gift card, adding ribbons, are not compatible with the add-on.
- The software doesn’t support the virtual gift card type. When setting up the Gift Card product page, make sure the related options are disabled. Otherwise, the e-Gift Card type will be displayed on the page, but not available for adding to the cart.
Troubleshooting
Problem: images are not displayed in emails.
Solution: install the Imagick extension to display images for different email clients properly. If you are not sure how to install the necessary extension on the server correctly, please contact your administrator.
Find out more about the Imagick PHP extension here.
Additional packages (provided in composer suggestions)
To make additional functionality available, please install the suggested packages you may need.
Available for all tariff plans with no additional fees:
ext-imagick- Install this package to improve image processing for different email clients.
amasty/module-gift-card-graph-ql- We recommend installing this GraphQL module if you use Magento 2.4.2+.
Available as a part of an active product subscription or support subscription:
For Basic, Pro, and Premium versions:
amasty/module-giftcard-account-adobe-payments- Install this package for compatibility with Adobe Payment Services (Note: The Hyvä Checkout is currently unsupported).
amasty/module-gift-card-rate-limiter- Install this package to enable the gift card code request limitation functionality.
amasty/module-gift-card-subscription-functionality- Install this package to use the 'Send Gift Card Code Email When Order Item is' and 'Deactivate Gift Code Account if Order is Cancelled' settings.
For Pro and Premium versions:
amasty/module-giftcard-hyva-compatibility- Install this package to ensure the Gift Card extension works with the Hyva Theme.
amasty/module-gift-card-hyva-checkout- Install this package to ensure the Gift Card extension works with Hyva Checkout.
amasty/module-gift-card-account-hyva-checkout- Install this package to ensure the Gift Card extension works with Hyva Checkout.
amasty/module-gift-card-codes-auto-generation- Install this package to enable the gift card codes autogeneration functionality.
amasty/module-promo-gift-card- Install this package to enable compatibility with Amasty Free Gift extension (Note: Compatibility is only supported when both the Gift Card Pro/Premium and Free Gift extensions are installed).
For Enterprise and Cloud editions of all tariff plans:
amasty/module-gift-card-live-search- Install this package for compatibility with Live Search and to display Amasty gift cards in the Live search results.
FAQ
I'd like to apply discounts to gift cards. How can I do that?
How to activate the gift card account?
Is it possible to create a gift code account using a specific code from the pool?
Is it possible to use a gift card for several orders?
Find out how to install the Gift Card extension for Magento 2 via Composer.
magento_2/gift_card.txt · Last modified: 2025/06/11 10:30 by kkondrateva