
Sidebar
magento_2:worldline_payments
Table of Contents
Guide for Worldline Online Payments for Magento 2
Deliver an outstanding shopping experience with an end-to-end Magento payments solution. Accept online payments faster and more securely to unlock your business growth potential with Worldline Online Payments.
- Provide customers with three extra payment methods
- Protect buyers and your business from fraud with 3-D secure
- Ensure a seamless payment experience at the checkout
- Accept recurring payments for your subscription services
- Go worldwide with 28 supported languages for the payment page
- Use 6 languages for backend configuration
Configuring extension
To process transactions, you need an account on Ingenico platform.
Before you process live transactions, feel free to use test environment to learn the solution without costs or any commitments involved. Magento will also work with the test environment.
Configuration takes place on both sides: Worldline backoffice & Magento backoffice
Generate API Credentials
After the installation you need to set up your Ingenico account and the Magento plugin. To do so, follow these steps:
- Login in to the Worldline Back Office.
- Go to: Configuration > Technical information > API settings.
- Click “generate” under the section “Direct API Key”
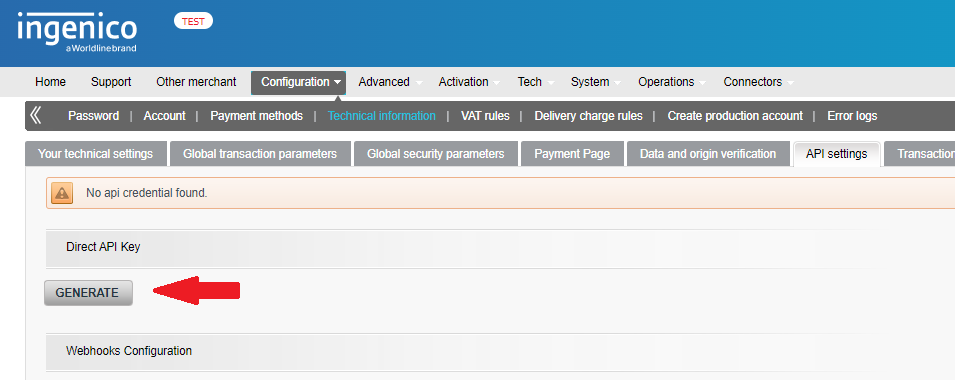

Save 'Secret' somewhere as you will not be able to see this here again. But you can
renew the credentials any time you want.
Generate Webhooks keys
The extension integrates webhooks received from Worldline in order to create and update orders based on the transaction status. Hence, it is also important to configure those correctly in order to successfully create orders.
- Login in to the Worldline Back Office.
- Go to: Configuration > Technical information > API settings.
- Click 'Generate Webhooks API key' under the section 'Webhooks Configuration'
Save your 'WebhooksSecret' somewhere as you will not be able to see this here again.
But you can renew the credentials any time you want.
Configure Magento Backoffice
Configure API Credentials
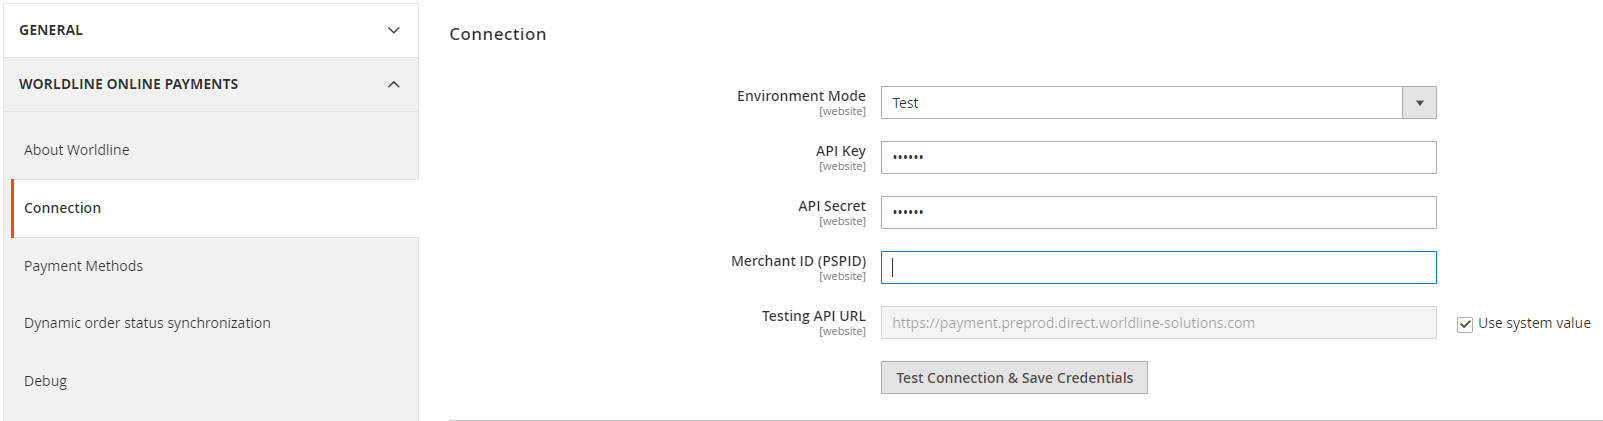
- Log in into your Adobe commerce / Magento backoffice and go to: 'Stores > Settings > Configuration > WORLDLINE ONLINE PAYMENTS > Connection'
- Copy from the 'API settings' values 'key' and “secret” and paste them into corresponding fields in Magento
- Specify your 'Merchant ID (PSPID)'
Configure Webhooks credentials
- Log in into your Adobe commerce / Magento back-office and go to: Stores > Settings > Configuration > WORLDLINE ONLINE PAYMENTS > Connection
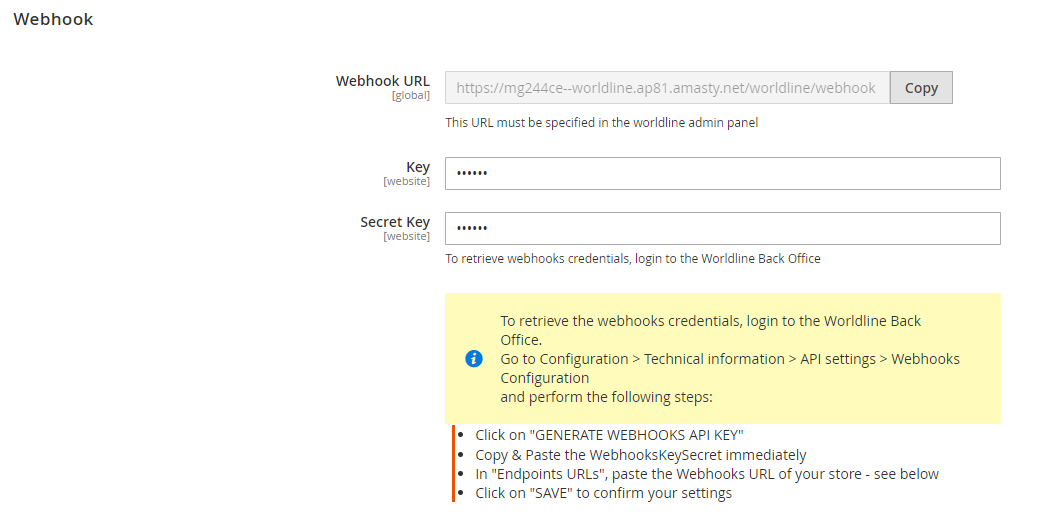
- Copy from the 'Webhooks configuration' values 'WebhooksKey' and 'WebhooksSecret'and paste them into corresponding fields in Magento – respectively Key and Secret Key
- Click on the 'Copy' button next to the Webhook URL in Magento

- Paste the URL in the Worldline back-office under the tab Configuration > Technical Information > API Settings in the Endpoint Urls box and click on 'Save'

Don’t forget to click on Save! Otherwise, your webhooks credentials won’t be saved.
Test Connection
Once the connection details have been configured in Magento, you can easily check whether those have been successfully input:
- Click the 'Test Connection' button to make sure that your connection is set correctly:

If it says:
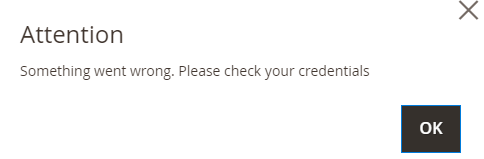 Something went wrong with the credentials. Please make sure that you copied everything correctly
After you have completed the configuration, save settings & clean the cache.
Select Payment Method
Finally, you need to add the payment methods you want to offer to your customers. To do so, log in to the Adobe commerce / Magento admin panel. Go to Stores > Settings > Configuration > WORLDLINE > Payment Methods:

The extension propose three different checkout modes to your customers:
- Credit Cards (iFrame): Directly integrate an iFrame within your Magento checkout in order to let them pay using their favorite credit card without leaving your store environment!
- Hosted Checkout (Redirect to Worldline): A single payment button will redirect your customer to the Worldline payment page. All the available payment methods configured in your account will then be proposed to your customer in order to pay with the preferred payment mean.
- Redirect Payment: After having chosen directly on your checkout page which payment method your customer wishes to use, a redirection will happen to a dedicated payment page on Worldline side.
Each of those payment methods can be individually configured.
Credit Cards (iFrame)
In 'Credit Card', configure the following settings for transactions processed via our iFrame:
Enable Module - Select one of the options to for processing credit card payments.
Yes: The module processes card payments via Hosted Tokenization Page integration mode. Any non-card payments go via Hosted Checkout Page as configured in “Hosted Checkout”.
No: Instead of using Hosted Tokenization Page for card payments, all payment methods are offered via Hosted Checkout Page as configured in “Hosted Checkout” or “Redirect Payment”
Title - Customize the payment button text in the iFrame on the Magento checkout page.
HTML Template ID - Enter the file name of your template to adapt our payment page to the look and feel of your shop. If you don’t use any template, our default design will be used.
Payment Action - Define whether to process the transactions in authorization mode or as direct sale. Select one of the following options:
- “Authorize & Capture”: The amount has been ordered to be paid out in one go. Use this mode to receive the money before shipping the order There are no further actions required to capture the transaction. Successful transactions will have status=“CAPTURED” / statusOutput.statusCategory=“COMPLETED” / statusOutput.statusCode=9
- “Authorized (Authorization Only)”: The amount is only blocked on your customer's card. Successful transactions will have status=“PENDING_CAPTURE” / statusOutput.statusCategory=“PENDING_MERCHANT” / statusOutput.statusCode=5 (Use this mode when you wish to capture a transaction only after shipping the order)
If transaction type is set to “Authorized (Authorization Only)”, beware of the following:
- Make sure that you capture authorised transaction later. Only then will the transaction have status=“CAPTURED” / statusOutput.statusCategory=“COMPLETED” / statusOutput.statusCode=9, for which you receive the actual payment for the transaction
- Capture transaction in the Magento Back Office via the “Order” module
Skip 3DSecure - Authent ication Select “Yes” or “No” to deactivate the 3-D Secure authentication process for payments.
We strongly recommend selecting “Yes” if your customers are based in Europe, as 3-D Secure has become mandatory with the introduction of the PSD2 guideline. Deactivate this option only if your customers are located elsewhere.
Trigger an authentication for every payment - Select “Yes” if you want the issuer to request a SCA (strong customer authentication) for every payment. Request 3DS exemption - Select “Yes” if you would like your customers to be potentially exempted from a 3-D Secure authentication during their transaction process if the total amount of their basket is below 30 EUR.
Sort - Define the sort order of the iFrame. This will allow you to decide in which order the different payment means will be displayed on your checkout page.
Filtering - You can also implement various filters to define when to propose this way of processing payment to your customers : countries, currencies, amounts.
Hosted Checkout (Redirect to Worldline)
Enable Module - Select one of the options to for processing all payments.
Yes: The module processes both card and non-card payment methods via Hosted Checkout Page mode No: The module processes only card payments via Hosted Tokenization.
Page integration mode - If you select “No”, make sure “Enable Module” in the “Credit Card” module is set to “Yes” to ensure at least card payment methods are possible. Title- Customize the heading on the Hosted Checkout Page.
HTML Template ID - Enter the file name of your template to adapt our payment page to the look and feel of your shop.
Payment Action - Define whether to process the transactions as authorisation mode or as direct sale. Select one of the following options:
- “Authorize & Capture”: The amount has been ordered to be paid out in one go. Use this mode to receive the money before shipping the order. There are no further actions required to capture the
transaction. Successful transactions will have status=“CAPTURED” / statusOutput.statusCategory=“COMPLET ED” / statusOutput.statusCode=9
- “Authorized (Authorization Only)”: The amount is only blocked on your customer's card. Successful transactions will have status=“PENDING_CAPTURE” / statusOutput.statusCategory=“PENDING_MERCHANT” / statusOutput.statusCode=5 (Use this mode when you wish to capture a transaction only after shipping the order).
If transaction type is set to “Authorized (Authorization Only)”, beware of the following:
- Make sure that you capture authorized transaction later. Only then will the transaction have status=“CAPTURED” / statusOutput.statusCategory=“COMPLETED” / statusOutput.statusCode=9, for which you receive the actual payment for the transaction
- Capture transaction in the Magento Back Office via the “Order” module.
Skip 3DSecure Authentication - Select “Yes” or “No” to deactivate the 3-D Secure authentication process for payments. We strongly recommend selecting “Yes” if your customers are based in Europe, as 3-D Secure has become mandatory with the introduction of the PSD2 guideline. Deactivate this option only if your customers are located elsewhere.
Trigger an authentication for every payment - Select “Yes” if you want the issuer to request a SCA (strong customer authentication) for every payment.
Request 3DS exemption - Select “Yes” if you would like your customers to be potentially exempted from a 3-D Secure authentication during their transaction process if the total amount of their basket is below 30 EUR.
Sort - Define the sort order of the iFrame. This will allow you to decide in which order the different payment means will be displayed on your checkout page.
Group Cards - Group all cards payment methods under one single button on the Hosted Checkout page.
Submit Customer Cart Items Data to Worldline - Defines whether you wish to submit your customer cart details to Worldline. Doing so will improve customer experience but might generate errors in case you use custom tax rules.
Process Mealvouchers - Select “Yes” to be able to process Mealvouchers payment method and configure the different product types you need: 1. Food and Drink 2. Gift and Flowers 3. Home and Garden
Filtering - You can also implement various filters to define when to propose this way of processing payment to your customers: countries, currencies, amounts.
Redirect Payment
Enable Module - Select one of the options to for processing all payments.
- 'Yes': The module processes both card and non-card payment methods via Hosted Checkout Page mode
- 'No': The module processes only card payments via Hosted Tokenization Page integration mode
If you select 'No', make sure 'Enable Module' in the 'Credit Card' module is set to “Yes” to ensure at least card payment methods are possible.
Title - Customize the heading on the Hosted Checkout Page
HTML Template ID - Enter the file name of your template to adapt our payment page to the look and feel of your shop.
Payment Action - Define whether to process the transactions as authorisation mode or as direct sale. Select one of the following options:
- Authorize & Capture: The amount has been ordered to be paid out in one go. Use this mode to receive the money before shipping the order There are no further actions required to capture the transaction. Successful transactions will have status=“CAPTURED” / statusOutput.statusCategory=“COMPLETED” / statusOutput.statusCode=9
Authorized (Authorization Only): The amount is only blocked on your customer's card. Successful transactions will have status=“PENDING_CAPTURE” / statusOutput.statusCategory =“PENDING_MERCHANT” / statusOutput.statusCode=5 (Use this mode when you wish to capture a transaction only after shipping the order)
If transaction type is set to “Authorized (Authorization Only)”, beware of the following:
- Make sure that you capture authorised transaction later. Only then will the transaction have status=“CAPTURED” / statusOutput.statusCategory=“COMPLETED” / statusOutput.statusCode=9, for which you receive the actual payment for the transaction
- Capture transaction in the Magento Back Office via the “Order” module
Skip 3DSecure Authentication - Select 'Yes' or 'No' to deactivate the 3-D Secure authentication process for payments.
We strongly recommend selecting 'Yes' if your customers are based in Europe, as 3-D Secure has become mandatory with the introduction of the PSD2 guideline. Deactivate this option only if your customers are located elsewhere.
Trigger an authentication for every payment - Select “Yes” if you want the issuer to request a SCA (strong customer authentication) for every payment.
Request 3DS exemption - Select 'Yes' if you would like your customers to be potentially exempted from a 3-D Secure authentication during their transaction process if the total amount of their basket is below 30 EUR. Sort - Define the sort order of the iFrame. This will allow you to decide in which order the different payment means will be displayed on your checkout page.
SubmitCustomer Cart Items Data to Worldline - Defines whether you wish to submit your customer cart details to Worldline. Doing so will improve customer experience but might generate errors in case you use custom tax rules.
You will then be able to enable each payment method separately by configuring for each of them the following settings:
Enable Module - Select one of the options to for processing all payments
- 'Yes': The module processes both card and non-card payment methods via Hosted Checkout Page mode
- 'No': The module processes only card payments via Hosted Tokenization Page integration mode
If you select “No”, make sure “Enable Module” in the “Credit Card” module is set to “Yes” to ensure at least card payment methods are possible.
Sort - Define the sort order of the iFrame. This will allow you to decide in which order the different payment means will be displayed on your checkout page.
Title - Customize the heading on the Hosted Checkout Page.
Some of those payment method may have additional settings to be configured, please refer to their dedicated documentation.
Additional features
Dynamic order status synchronization
The plugin guarantees that the orders are always up to date and hence has implemented several safeguards in order to ensure that updates still occur even if webhooks don’t reach your environment for one or another reason.
Concretely, once a customer has placed an order, a webhook is being triggered from the Worldline platform:
- If the webhook arrives immediately, the order is immediately created and the customer is redirected to an “Order confirmation” page
- If the webhook is not immediately integrated on Magento, the customer is redirected to a “Waiting” page, where we will still listen to webhooks for 15 seconds. As soon as the webhook arrives, the customer is redirected to an “Order confirmation” page.
- If the webhook doesn’t arrive within 15 seconds, two process take over:
- A first get call is triggered in order to fetch the transaction status directly from Worldline
- If this get call doesn’t result into a final result, a cronjob takes over and will trigger get calls at regular intervals in order to update the order accordingly.
The configuration available in this menu will allow you to define the different timings of the above process. Login to the Adobe commerce/Magento Back Office. Go to Stores > WORLDLINE ONLINE PAYMENTS > Dynamic order status synchronization
In General, configure the following settings:
Fallback Timeout - Defines the period (in minutes) after the module sends GET calls if webhooks fail. After this period, the module will send calls once every minute
Fallback Timeout Limit - Defines the period (in hours) during which the module sends GET calls. The default period (3 hours) corresponds to the session validity of a CreateHostedCheckout / CreateHostedTokenizationSession
Schedule (Cron Syntax) - Synthax to use to run the process
Debug
Requests logs
Each payment method allows you to enable a debug mode, which is by default deactivated:

When activated, additional logs of all the request performed by Worldline Magento plugin to the Worldline platform will be logged and can be retrieved.
By scrolling to the debug section, you will be able to perform some actions:
- Define for how long those logs needs to be kept
- Download the log file or delete it
- Access a grid that will allow you to filter the logs you wish to see
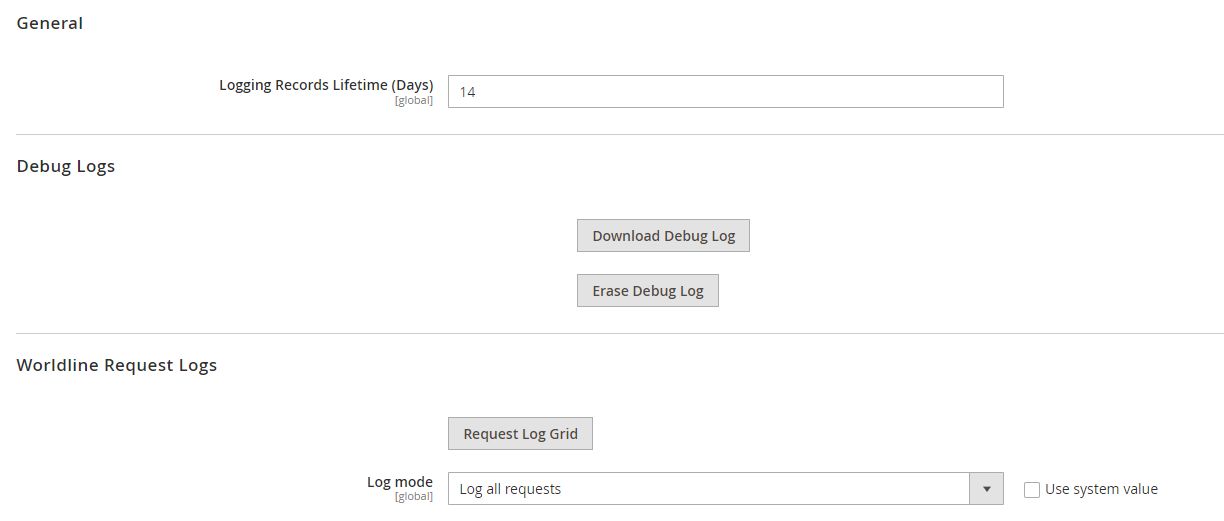
You can for instance filter on HTTP status codes, on the API’s used, on specific dates or on the content of the request/response
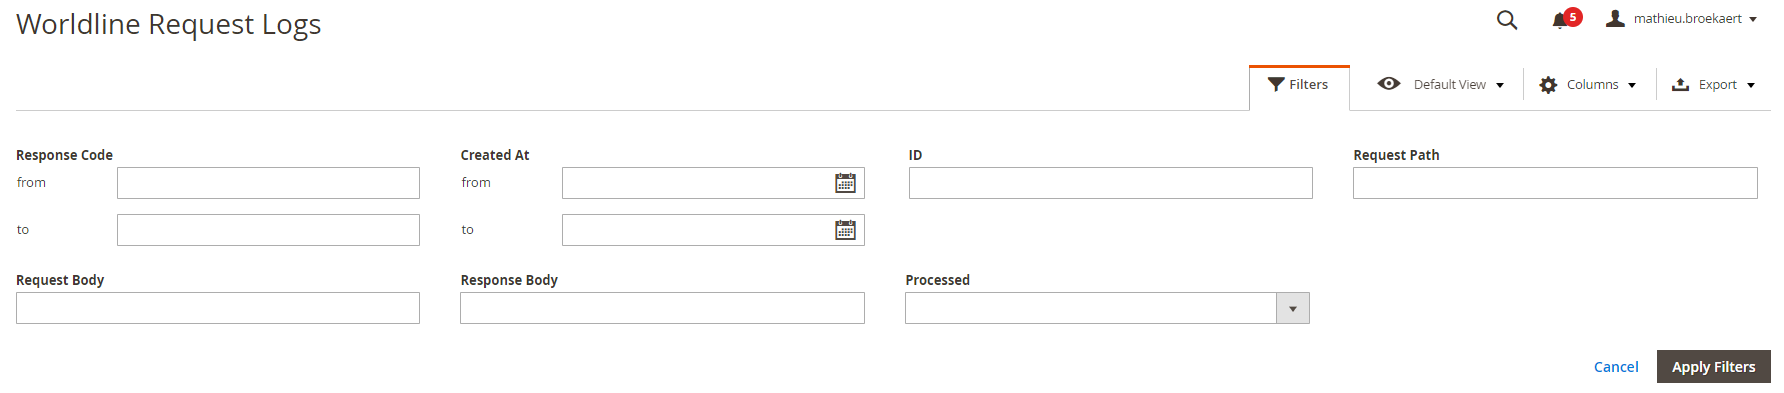
Webhooks logs
You will also be able to request your systems to log all incoming webhooks and display them into a similar grid as for the requests.
Please note that:
- You need to set the “Log webhooks” on “Yes” to log webhooks
- The time we will keep the logs of the webhooks is configured as the same as the time we log the requests.
Subscriptions and Recurring Payments
This Magento extension also features the possibility to process recurring payments and subscriptions by making full use of Subscriptions & Recurring Payments module specifically tailored your needs. It will include a lot of features needed when you process subscriptions:
- Pre-defined or customizable subscriptions
- Free trials, discounts and free delivery
- Mixed baskets
- Make products available through subscription only
- Notifications emails to manage failed payments
————————————————–
Find out how to install the Worldline Online Payments extension for Magento 2 via Composer.
magento_2/worldline_payments.txt · Last modified: 2023/06/06 10:27 by tihomirova